Introduction — What You Need in a Security Gun Safe
If you own firearms, you need a gun safe. In some states, such as California, if you don’t own a safe, you face potential liability if your firearms are stolen. Purchasing a safe is no easy decision however. There are dozens of safe manufacturers and countless design options. Sorting out the facts from the marketing claims can be difficult.
Today’s seven Saturday Showcase videos explain the most important qualities you should look for in a safe, and help you with the tough decisions, such as “Should I get a digital lock or a dial lock?”, “What kind of fire-proofing is most effective?”, “How big a safe do I really need?”, and “What interior works best with long-barreled scoped rifles?” You’ll find reviews of full-size safes, modular safes, and smaller handgun safes. Plus you’ll find expert advice on how to install your safe in your home and how to keep the contents free from rust.
Budget $1200-1500 for a safe from a major maker, with external hinges, and an interior at least 58″ high. That gives you room for 30″-barreled rifles with a top shelf for handguns and other valuables. A rotary rack and slide-out drawers are great additions.
Keypad or Dial? We favor rotary dial locks. With minimal maintenance they will function flawlessly for decades. But the digital locks offer quick-access and convenience. If you go digital, get a commercial-grade unit.
Fire-lining is worth getting, but a thin layer of sheet-rock doesn’t make a safe truly “fire-proof”.
Interior at least 58″ High and 30″ wide Overall Weight 750+ Pounds 8 Gauge or Heavier Wall Thickness Double-Wall, Composite Door with Relockers Minimum UL RSC Rated. TL-15 or TL-30 Rating is Desirable External Hinges
Mechanical UL Group II (or better) Lock with Standard Dial Or UL Type 1 Commercial-Grade Electronic Lock
Custom Interior Suitable for Scoped Guns with Long Barrels On-Door Storage System for Non-scoped Long Guns OR Rotary Gun Rack for Scoped Rifles and ARs
Internal (sandwiched) Insulator, Reinforced if Sheet-rock Palusol? Heat-Activated Expanding Door Seals
Slide-out Drawers for Handguns Fire-lined Inner Safe for Paper and Media
Low Gloss, Rust-resistant External Finish Pre-Drilled holes for Lag Bolts and in Rear for Electric Cord Overhead Fluorescent Lamp and/or LED Mini-lights on Strings
Advice for Gun Safe Buyers — Seven Key Things to Consider
This video covers key gun safe features — Seven Things to Consider Before Buying a Gun Safe. Not all gun safes are created equal. There are many variables — fire ratings, burglar ratings, colors, lock choices, internal capacity, door storage, and more. And with the recent controversy involving Liberty Safes, you should check the safe-maker’s policies regarding digital passcodes — you don’t want your passcode revealed without a warrant and/or without your consent.
DOs and DON’Ts of Safe Buying
DO purchase a safe that is bigger than you think you need.
Your gun collection is bound to grow over time. A good safe is more than just a gun locker–it becomes a secure storage device for your family’s other valuables as well. You’ll find you quickly fill up even a large safe. Spend the money for the size, protection, and features you want. Your gun collection may be worth many tens of thousands of dollars. Some people who visit this site wouldn’t hesitate to spend $1300 for a custom action or $1800+ for a competition scope, yet they don’t want to spend more than a few hundred dollars on a safe. That’s not common sense. If you’re on a tight budget, consider a used safe. Unlike many other products, safes don’t really wear out over time. When businesses change locations, you can get a very high quality commercial safe for little more than the cost of removing it.
DO spend more for a safe that offers fire-resistance.
But you have to do your homework–you can spend a lot of money for “fire-proofing” that actually is not very effective. Make sure if sheet-rock is used that it is properly installed. If you have valuable documents and media files, it’s not a bad idea to purchase a smaller, commercial-grade fire safe to put inside the gun safe. This gives you double protection.
DO look at many different brands of safes before you buy.
There ARE significant differences among brands. For example, Browning offers a unique (patent-pending) door-mounted rifle rack. Zanotti offers slide-out drawers and a modular design that is much easier for an owner to move. Ft. Knox uses an advanced method to secure and stabilize its fire-proofing layers within the safe. Brown offers custom exotic wood interior shelving and safes with commercial-grade burglary protection (much thicker steel with heavy composite doors and walls). Amsec offers a proprietary “DryLight” poured concrete-type fire insulation with greater structural strength than typical sheet-rock panels.
DO investigate the safe’s specifications.
Just because a safe is big and heavy doesn’t mean it’s particularly secure. Heavy-gauge steel is much more resistant to cutting and drilling than light 12- or 14-gauge steel. Some safes on the market have walls so thin they can be penetrated with a fire ax. We recommend 10-gauge steel at a minimum, and 8 gauge is much better. The safe should carry a UL RSC (Underwriters Laboratories “Residential Security Container”) or better rating.
DO ask about the safe’s safeguards against tampering.
A quality safe will feature extra armor or devices to defeat drilling. Low-grade safes can be opened in a few minutes with simple, battery-powered hand tools. All safes should have relockers to help ensure the safe remains locked in the case of a burglary. Relockers are hardened pins that are triggered during an attack, and cannot be retracted without hours of drilling. The number of relockers on a safe ranges from 2-10+ depending on the safe’s size and burglary grade.
DON’T store powder in your safe. A tightly-sealed metal box with a large quantity of powder inside is a bomb. Store powder in a separate, lightly-constructed cabinet or plastic box. The main thing for powder is to keep it dry and away from moisture and light.
Don’t Make the Mistake of Buying an Undersized Safe
The most common mistake people make when buying a gun safe is getting a safe that’s too small. This video explains why you should probably invest in a bigger safe. First, the rated gun capacity is exaggerated — rifles with mounted optics, long barrels, wide forearms and/or pistol grips take up considerably more space than a small rimfire rifle or a lever gun with iron sights. Second, your gun collection will likely grow in years to come. Third, you may want to store other valuables in the safe — such as vital documents, jewelry, watches, and pricey electronics. In this video the host notes: “Get a much larger safe than you think you’ll need at first. This will guarantee that you will have enough room for future purchases and all the guns and equipment you currently have.”
What Happens in a Fire and Deluxe Features
This video shows what can happen INSIDE a gun safe during a fire. This Winchester safe did not fare well during a major hourse. That’s why you want to buy a safe with a good fire rating.
This video shows the features of a large Superior Safe Co. gunsafe with internal organizers and door storage for handguns and accessories.
Modular Safes — Smart Option for Easier Moving
This article features a great video showing how to assemble a modular safe in under 30 minutes. This article also explains the benefits of modular gunsafes — primarily easier transport and installation. “Modular safes have been around for a few years now and are becoming more popular. Here’s why: The safe comes delivered to you in panels, so you can bring them into your home one at a time and put it together anywhere you like. This makes it easy to carry up and down stairs, onto elevators or anywhere! Security — Is it as secure as one that comes pre-assembled? The answer is, absolutely.” READ FULL ARTICLE on NRAWomen.com.
Five Good Gun Safes Under $500
We know some readers have a tight budget. This video looks at some recommended lower-cost safes under $500.00 list price. Note, however, that this video was produced in 2022. Now in 2023, with Bidenflation, the actual gun safe prices may be higher. For a full-size safe, we do recommend you spend quite a bit more — the investment in a higher quality safe, with better fire rating, is worth it.
Locking Device–Mechanical Dial vs. Digital Locks Recommendation: UL Group II mechanical dial lock or commercial-grade electronic.
For gun safes, we prefer rotary-combination dial locks, although commercial-grade electronic locks are now very good. While less convenient, and slower to open than electronic locks, combination locks are still more durable and trouble-free than the digital locks found on many low- to medium-cost gun safes. Among the combination locks, the Sargent & Greenleaf model 6730 (UL Group II) remains an industry standard. The director of Sturdy Safes noted: “An S&G 6730 will be working fine when your grandchildren have grandchildren.” For home use, we also recommend the standard, high-visibility “front-read” white on black dial.
Avoid the cheap, imported electronic locks. These are known for failing relatively quickly–the keypad internals just wear out. With some of these designs, if the lock fails while the door is closed, you’ll have to employ a professional gunsmith to drill your safe and replace the locking assembly and keypad. With any electronic lock, re-program your combination now and then so that keypad wear patterns don’t reveal the numbers you push to open the safe. But when you change the combination, be sure to record the new setting.
With a dial lock, choose a design that meets UL Group II (or better) certification. If you choose a digital lock, we strongly recommend that you select a UL Type I, Commercial Grade lock from LaGard, Sargent & Greenleaf, or Kaba Mas. Commercial-grade locks, such as the S&G Comptronic” 6120 or LaGard “SafeGard” are much more robust and are designed to be used 20 times a day or more in retail and banking environments. A good commercial digital keypad lock should give 10 years or more of continuous use before replacement is required. With any digital lock, however, you should replace the battery at least once a year. Normally this can be done without professional assistance.
A rapid-access bedside safe is a great way to keep your pistol secure, but also readily available, close at hand. Not all rapid-access pistol safes are created equal, however. In this video, John of Pew Pew Tactical explains what to look for in a small pistol safe, and points out the pros and cons of the four safes tested:
Fort Knox FTK-PB Simplex Pistol Box
Strong case, reliable no-battery locking system. Very good safe, but expensive ($299.00 on Amazon).
Vaultek Electronic Pistol Safes Vaultek offers multiple styles and sizes, many with advanced biometric capabilities. Vaultek rapid access safes are offered in sizes to hold a single handgun or multiple pistols along with other valuables.
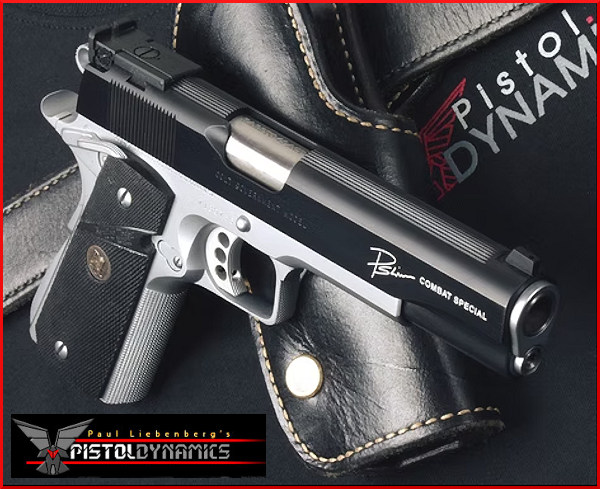
Paul Liebenberg of Pistol Dynamics is widely considered to be one of the finest pistol-smiths on the planet. When you ask other well-known handgun smiths whom they would rank among the very best, Liebenberg is a consensus pick. And Paul’s work is in high demand. There is a multi-year-long waiting list for his custom pistols, mostly built on 1911-platforms.
Some years back, Liebenberg shared his pistol building/tuning knowledge in a professional DVD from Panteao Productions. In that DVD, Liebenberg demonstrated the procedures he employs when crafting a custom 1911 pistol. The DVD’s topics covered included: fitting barrel and barrel bushing, installing grip safety and thumb safety, installing and tuning the trigger, installing and tuning extractor and ejector, relieving the mag well, undercutting the trigger guard, lowering the ejection port, and much more. Below are two YouTube videos that cover highlights from the DVD.
40+ Years Expertise
A trained industrial designer from South Africa, Paul Liebenberg was a member of the World Champion South African Practical Pistol Shooting Team. An NRA High Master and four-gun firearms instructor, Paul has competed successfully in many shooting disciplines.
In 1983 Liebenberg immigrated to the USA and joined Pachmayr Gun Works in Los Angeles where he rose to manage the Custom Gun Shop. In 1985 he opened Pistol Dynamics to build high-end 1911 competition handguns and Pachmayr pistols on contract to that company. Today Pistol Dynamics is in Florida where Paul continues to build high-end 1911 pistols. You can see his products at PistolDynamics.com
Are you curious about bullet stabilization? Do you understand why bullets can tumble or become unstable if the velocity gets too low or if the twist rate is inadequate. Here is an excellent video from Gunwerks that explains Bullet Stabilization.
This animated video starts by showing the design/shape differences between an older-style rifle bullet and a newer VLD-style bullet with higher BCs (Ballistic Coefficients). Generally speaking, the longer a bullet gets relative to diameter, the more RPM is required for stability. And to achieve that higher RPM you need more barrel twist and/or more RPM. The video illustrates where the Center of Gravity and the Center of Pressure are located. These are farther apart (in relative terms) for a VLD or Hybrid-style, long-nose bullet.
When the bullet is in flight there is an angle of attack. This is exaggerated in the animation for illustration purposes, but it is important to understand the the attack angle affect stability. The rotation rate (Revolutions Per Minute) is a function of bullet velocity as it leaves the muzzle and the twist rate of the barrel. Since long VLD-style bullets need more stability, the barrel twist rate needs to be higher than with shorter, fatter bullets. This is pretty much try for all calibers.
The importance of adequate barrel twist rates for bullet stabilization is further discussed in this next video featuring Bryan Litz of Applied Ballistics:
Bullet Stability and Twist Rates
In this video, Bryan Litz talks about bullet in-flight stability and how to calculate barrel twist-rate requirements for long-range bullets. Bryan explains that bullet stability (for conventional projectiles) is basically provided by the spinning of the bullet. But this spin rate is a function of BOTH the nominal twist rate of the barrel AND the velocity of the projectile. Thus, when shooting the same bullet, a very high-speed cartridge may work with a slower barrel twist rate than is required for a lower-speed (less powerful) cartridge. For match bullets, shot at ranges to 1000 yards and beyond, Bryan recommends a twist rate that offers good stability.
Forster Co-Ax® presses are very popular with owners because they are smooth-running, they produce very consistent ammo, and they allow quick and easy die changes. If you would like to add a Co-Ax to your loading room, now is a good time to buy — Grafs.com has Co-Ax presses in stock, at just $339.29 — that’s ten percent (10%) off the regular $376.99 price. This sale price includes a set of jaws, and includes ground shipping (in the lower 48), after a single $12.95 (per order) handling fee. If you’ve been hankering for a Co-Ax press, now is definitely a good time to buy.
If you are not yet familiar with the many unique features of the Forster Co-Ax, we recommend you watch the video embedded below. This shows how the press operates and highlights the design elements which set the Co-Ax apart from every other reloading press on the market.
Video Shows Special Features of Forster Co-Ax Reloading Press
Forster Co-Ax Press Video Review
This is a very thorough review of the Forster Co-Ax done by Rex Roach. This 14-minute video shows the key Co-Ax features, explaining how the floating case-holder jaws work (3:30 time-mark), how the dies are held in place (4:40 time-mark), how spent primers are captured (6:10 time-mark), and how to set the primer seating depth (10:00 time-mark). We’ve used a Co-Ax for years and we still learned a few new things by watching this detailed video. If you are considering purchasing a Co-Ax, definitely watch this video start to finish.
The Co-Ax case-holder features spring-loaded, floating jaws. These jaws have two sets of openings, small and large. This allows the system to adapt to various rim diameters. The jaw plates can simply be reversed to switch from small jaw to large jaw. In the photo above, the Co-Ax is configured with the large jaw openings in the center.
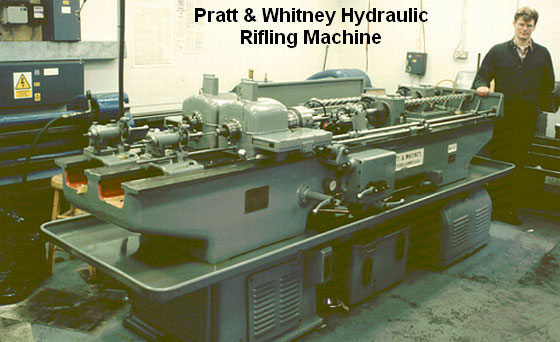
This video shows the process of cut-rifled barrel-making by Krieger Barrels, one of the world’s best barrel manufacturers. Krieger cut-rifled barrels have set numerous world records and are favored by many top shooters. The video show the huge, complex machines used — bore-drilling equipment and hydraulic riflers. You can also see how barrels are contoured, polished, and inspected.
For anyone interested in accurate rifles, this is absolutely a “must-watch” video. Watch blanks being cryogenically treated, then drilled and lathe-turned. Next comes the big stuff — the massive rifling machines that single-point-cut the rifling in a precise, time-consuming process. Following that you can see barrels being contoured, polished, and inspected (with air gauge and bore-scope). There is even a sequence showing chambers being cut.
Click Arrow to Watch Krieger Barrels Video:
Here is a time-line of the important barrel-making processes shown in the video. You may want to use the “Pause” button, or repeat some segments to get a better look at particular operations. The numbers on the left represent playback minutes and seconds.
Krieger Barrel-Making Processes Shown in Video:
00:24 – Cryogenic treatment of steel blanks
00:38 – Pre-contour Barrels on CNC lathe
01:14 – Drilling Barrels
01:28 – Finish Turning on CNC lathe
01:40 – Reaming
01:50 – Cut Rifling
02:12 – Hand Lapping
02:25 – Cut Rifling
“At the start of World War Two, Pratt & Whitney developed a new, ‘B’ series of hydraulically-powered rifling machines, which were in fact two machines on the same bed. They weighed in at three tons and required the concrete floors now generally seen in workshops by this time. Very few of these hydraulic machines subsequently became available on the surplus market and now it is these machines which are sought after and used by barrel makers like John Krieger and ‘Boots’ Obermeyer. In fact, there are probably less of the ‘B’ series hydraulic riflers around today than of the older ‘Sine Bar’ universal riflers.” — Geoffrey Kolbe, Border Barrels.
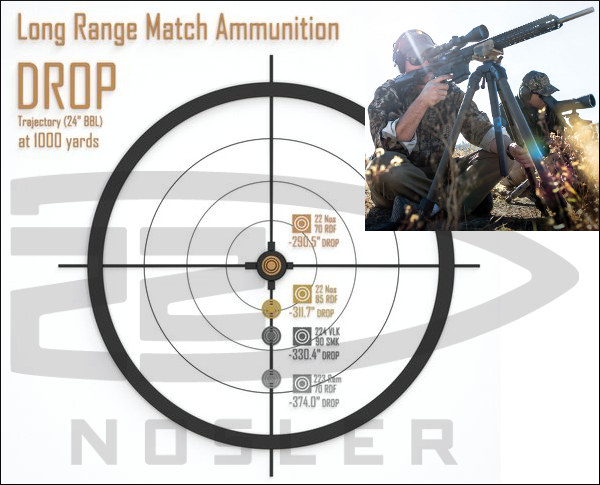
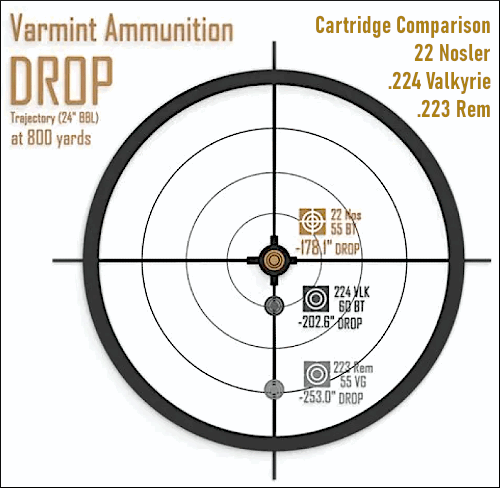
Nosler created the 22 Nosler cartridge to get the highest possible ballistic performance from a .22-caliber, AR-compatible cartridge that also provides decent barrel life and ease of conversion. The 22 Nosler achieved these objectives and much more — it delivers far better performance than the .223 Remington and even out-runs the 224 Valkyrie.
14% More Speed than .223 Remington
Approaching 22-250 velocities in a much smaller package the 22 Nosler yields 25% more case capacity than the .223 Rem/5.56 NATO, resulting in 14% more velocity and 30% more energy at the muzzle.
In ballistics, there’s no free lunch. Larger powder capacity at similar operating pressures equates to higher velocity potential. In the case of the 22 Nosler, this is evidenced by a 4-5 grain capacity increase over the tried and true .223 Remington, and a 2-3 grain capacity advantage over the newly-introduced 224 Valkyrie. This larger “engine room” allows the 22 Nosler to deliver higher velocities. That translates to less drop (flatter trajectory) at long range.
Faster than .223 Rem and 224 Valkyrie
When loaded with 80gr low-drag match bullets and fired from the same 24″ barrel (bolt actions, not gas guns) the 22 Nosler outruns the 224 Valkyrie by about 150 fps. Compared to the .223 Remington, the difference is even greater — the 22 Nosler runs over 300 fps faster than a .223 Rem! These velocity gains give the 22 Nosler an advantage in long-range trajectory and downrange energy retention.
This video compares the specifications of the 22 Nosler and .223 Remington.
NOTE: Bolt face dimensions are identical for the 22 Nosler and the 223 Rem / 5.56 NATO at 0.378″, so no bolt swap is required.
How to Run the 22 Nosler in Your AR-Platform Rifle
Converting your AR to 22 Nosler is as simple as a barrel and magazine change, and there are countless AR-platform MSRs in circulation with the proper 0.378” (.223 Rem) sized bolt face. By comparison, to make the swap to 224 Valkyrie, you must purchase a dedicated .224-Valkyrie upper (not cheap!), or at the minimum add a new barrel, modified bolt with proper bolt face, and 6.8 SPC-compliant mags.
This video explains how to adapt an AR-15 type rifle to shoot the 22 Nosler
Many Factory Ammo Options — from 55 to 85 grains
Nosler offers a variety of factory loads in 22 Nosler with bullet options from 55 grains to 85 grains, with various tip choices, and both lead core and lead-free projectile choices.
Do you have .20-Cal fever? Do you yearn to see what a 4200+ fps projectile can do to an unsuspecting prairie dog? Well you could go out and purchase a 204 Ruger rifle, fork over the money for a new, complete die set, and hope that the brass is in stock. Warren B (aka “Fireball”) has a more cost-effective solution. If you have .223 Rem dies and brass, all you need to shoot the 20 Practical is a new barrel and a .230″ bushing to neck down your .223 Rem cases. Warren’s wildcat is simple, easy, and economical. And the 20 Practical matches the performance of the highly-publicized 20 Tactical with less money invested and no need to buy forming dies or fire-form cases. Warren’s cartridge was aptly named. Practical it is.
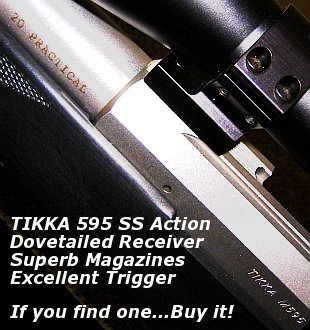
20 Practical Tikka 595 Bolt Action for Varminting
by Warren B (aka “Fireball”) and Kevin Weaver
After building my 20 PPC, I wanted to do another .20 caliber, this time a repeater for predator hunting that could also serve as a gopher/prairie dog rifle. I wanted to use a Tikka M595 stainless sporter I had. This rifle is the ultimate repeater with an extremely smooth-feeding cycle from its single-column magazine. Since the Tikka was a .223 Remington from the factory, I first looked at possible case designs that would fit the magazine. The 204 Ruger was a very new round at the time and brass was scarce. I also didn’t care for the overly long case design or the standard throat dimensions of the cartridge. I then looked at the 20 Tactical. It was a nice cartridge but I didn’t like the fact that (at the time) an ordinary two-die Tac 20 set with just a plain full-length die and standard seater were $150. Not only did the costs bother me, but I was accustomed to using a Redding die set featuring a body die, a Type-S bushing neck die, and a Competition seater. To be honest, I also didn’t care for the 20 Tactical’s name–there is absolutely nothing tactical about the cartridge. I didn’t want to adopt a new cartridge based on what I perceived to be a marketing gimmick (that “tactical” title).
Warren B, aka “Fireball”, with his Tikka 595. With its smooth action and phenolic single-column mag, it cycles perfectly in rapid fire.
Simply Neck Down .223 Rem to Make a 20-223 Wildcat
I decided the best thing to do for my purposes was to simply neck down the .223 Rem case and make a 20-223. I already had the dies, the brass, and a rifle that would feed it perfectly. I decided to call the cartridge the 20 Practical because as you will see in this article, it truly is a very practical cartridge. In addition to the generous and inexpensive availability of brass and dies, the 20 Practical is an easy case to create, requiring no fire forming as a final step. Simply neck your .223 Rem cases down, load and shoot.
[Editor’s Note: Over the years, other shooters have experimented with .223 Remington cases necked down to .20 caliber, some with longer necks, some with different shoulder angles. Warren doesn’t claim to be the first fellow to fit a .20-caliber bullet in the .223 case. He gives credit to others who did pioneering work years ago. But he has come up with a modern 20-223 wildcat that involves no special case-forming, and minimal investment in dies and tooling. He commissioned the original PTG 20 Practical reamer design, and he and Kevin did the field testing to demonstrate the performance of this particular version.]
I chose Kevin Weaver at Weaver Rifles to fit and chamber the barrel to my rifle. Kevin does excellent work and is great to work with. Kevin liked the idea of the 20 Practical so much he agreed to purchase the project reamer. (BTW Kevin didn’t even need to purchase a Go/No-Go gauge, he just used an existing .223 Rem gauge.)
Before Kevin ordered the reamer, I talked over the reamer specs with him. My priorities were tolerances on the tight end of the .223 Rem SAAMI specification, a semi-fitted neck with no need for neck-turning, and a short throat so that we could have plenty of the 32gr V-Max in the case and still touch the lands. I also wanted this short throat in case [anyone] wanted to chamber an AR-15 for the 20 Practical. A loaded 20 Practical round will easily touch the lands on an AR-15 while fitting into the magazine with no problem. With its standard 23-degree shoulder, the 20 Practical case also feeds flawlessly through an AR-15.
As for the barrel, I only use Liljas on my rifles. I have had great luck with them. They have always shot well and they clean up the easiest of any barrels that I have tried. I had previously sent my Tikka barreled action to Dan Lilja so that he could program a custom contour into his equipment and turn out a barrel that would perfectly fit the factory M595 sporter stock. There isn’t much material on an M595 sporter stock so the contour had to match perfectly and it did. Dan Lilja now has this custom contour available to anyone who would like to rebarrel their M595 sporter with one of his barrels.
There Are Plenty of Good .204-Caliber Varmint Bullet Options
How to Form 20 Practical Cases — Simple and Easy
Forming 20 Practical cases is very easy. No fire-forming is required. Start with any quality .223 Rem brass. Then simply run the case into your bushing die with the appropriate bushing and call it done.
Project Componentry
My 20 Practical rifle started out as a Tikka Model 595 Stainless Sporter in .223 Remington. Though the M595 is no longer imported, if you shop around you can find M595 Sporters for bargain prices. Mine cost under $500. I think the action alone is worth that! The receiver has a milled dovetail for scope rings plus a side bolt release like expensive BR actions. The bolt cycles very smoothly. Ammo is handled with super-reliable 3- or 5-round detachable single-column magazines (FYI, Tikka’s M595 22-250 mags will feed a 6BR case flawlessly.) We kept the standard Tikka trigger but fitted it with a light-weight spring. Now the trigger pull is a crisp 1.8 pounds–about as good as it gets in a factory rifle. We replaced the factory tube with a custom, 24″, 3-groove Lilja 12-twist barrel. Dan Lilja created a special M595 sporter contour to allow a perfect “drop-in” fit with the factory stock. For optics, I’ve fitted a Leupold 4.5-14x40mm zoom in low Talley light-weight aluminum mounts. All up, including optics and sling, my 20 Practical weighs just under 8.5 pounds.
Test Report–How’s It Shoot?
I sent the barrel and barreled action to Kevin and in a very short time it was returned. Kevin did a perfect job on the rifle. I had asked him to try to match the bead blasted finish of the Tikka when he finished the new barrel. It came out perfect and the only way one can tell it is a custom is the extra two inches of length and the “20 Practical” cartridge designation.
So, no doubt you’re asking “how does she shoot?” Is my “prototype”, first-ever 20 Practical an accurate rig? In a word, yes. Even with the standard factory stock, and light contour barrel, it can shoot 3/8″ groups. Take a look at the typical target from this rifle. This is from an 8.5-pound sporter with a very skinny fore-end and a factory trigger.
Gunsmith’s Report from Kevin Weaver The 20 Practical: Origins and Development
Editor’s NOTE: We can’t say for sure who first necked down the .223 Rem to .20 caliber and chambered a rifle for that wildcat (as opposed to the .20 Tactical). But here is an account from way back in 2006 when the Warren B first came up with the idea of a .20 Practical cartridge, complete with reamer specs.
A year ago I received a call from Warren with a great idea. Warren asked “Why couldn’t we simply neck down the .223 Remington case to 20 caliber and get basically the same performance as the 20 Tactical? This way you can forgo the expensive forming dies that are needed for the 20 Tactical.” The idea made perfect sense to me, and I saw no major technical issues, so we got started on the project. I ordered a reamer from Dave Kiff at Pacific Tool & Gauge (PTG) with a .233″ neck. The .233″ neck should allow for a simple necking-down of the 223 Remington case to produce the 20 Practical in just one step. No fire-forming necessary! Furthermore, the PTG 20 Practical reamer Dave created should work with any available .223 Rem brass, commercial or military.
The first 20 Practical round was launched down range (through Warren’s Tikka) just a few months later. The brass formed as easily as expected. All one needs is a Redding type “S” bushing die with a .230 bushing and with just one step I had a .20 caliber case ready to shoot. Warren is brilliant. [Editor’s Note: We concur. For more details on Warren’s case-forming methods and his tips for adapting .223 Rem dies, read the technical sections further down the page.]
It would be almost six months later until I got around to building a dedicated test rifle chambered for the 20 Practical. I used a Remington 722 action, Remington synthetic semi-varmint stock, and a 24″ Douglas stainless steel XX 12-twist barrel. I formed and loaded about 30 cases using Remington brass in about 20 minutes. I used a .223 Rem seating die to seat the 20 Practical bullets. The .223 seating stem seated the small 20-Cal bullets just fine. The first loads sent the 40gr Hornady V-Max bullets down range at a modest 3500 FPS. I did not shoot for groups. I just wanted to use this load to sight in the rifle and break in the barrel. Load development was painless–I used reduced .223 Rem loads for 40gr bullets and worked up from there. In the table below are some of my preferred loads as well as Warren’s favorite recipes for his 20 Practical.
Bullet Wt.
Powder
Charge Wt.
Velocity FPS
Comments
32GR
H4198
24.1
4025
Warren’s lighter gopher load
32GR
AA2460
27.8
4154
Warren’s coyote/prairie dog load
32GR
N133
26.0
4183
Coyote/PD load, clean burn
33GR
H4198
26.0
4322
Hot Load. Use with Caution!
33GR
N133
27.0
4255
Kevin: 0.388” 5 shot group
40GR
H335
25.0
3583
Kevin’s barrel break-in load
40GR
H4198
24.0
3907
Hodgdon “Extreme” Powder
40GR
IMR4895
26.0
3883
Kevin: 0.288″ 5-shot group
40GR
N133
25.0
3959
Kevin: 0.227″ 5-shot group
Warren’s Load Notes: My pet loads are all with IMI cases, 32gr Hornady V-Maxs, and Fed 205 primers (not match). These are the most accurate loads in my rifle so far. I haven’t even bothered with the 40s as I have the 20 PPC and 20 BR for those heavier bullets. I prefer the lighter bullets in the 20 Practical because I wanted to keep speed up and recoil down in this sporter-weight predator rifle. Also, the 32gr V-Max is exceptionally accurate and explosive. I like N133 the best as it burns so clean. IMI cases are tough and well-made.
Kevin’s Load Notes: I used Remington 223 cases, Hornady V-Max bullets, and Remington 6 1/2 primers to develop the above loads. CAUTION: all loads, both Warren’s and mine, should be reduced 20% when starting load development in your rifle. All load data should be used with caution. Always start with reduced loads first and make sure they are safe in each of your guns before proceeding to the high test loads listed. Since Weaver Rifles has no control over your choice of components, guns, or actual loadings, neither Weaver Rifles nor the various firearms and components manufacturers assume any responsibility for the use of this data.
Comparing the 20 Practical and 20 Tactical
Kevin tells us: “The 20 Practical and the 20 Tactical are almost identical cartridges. There are only slight differences in case Outside Diameter, shoulder angle, and case body length. The neck length on the 20 Tactical is a bit longer, but there is still plenty of neck on the 20 Practical to grip the popular bullets, such as the 32gr V-Max. Here are some specs:
Cartridge
Bolt face to shoulder
Shoulder O.D.
Shoulder Angle
Total length
20 Tactical
1.5232″
.360
30°
1.755″
20 Practical
1.5778″
.3553
23°
1.760″
Both the 20 Tactical and the 20 Practical are fine .20 caliber cartridges. Early on, the 20 Tactical was the more popular of the two because it had more publicity. However, my favorite would be the 20 Practical. Warren’s 20 Practical gives the SAME performance as the 20 Tactical without fire-forming, or having to buy expensive forming dies. So with the 20 Practical you do less work, you shell out a lot less money, yet you give up nothing in performance. What’s not to like? To create 20 Practical cases, just buy a .223 Rem Redding Type “S” Bushing Die set with a .230 or .228 bushing and have fun with this great little cartridge.”
Looking to improve your competition skills? The Shooting Sports USA website has scores of informative articles that can help your score higher at your next shooting tournament. You’ll find articles on wind reading, position shooting, match strategies, and much more.
One great Shooting Sports USA article, Shooting is 90% Mental, was penned by Chip Lohman (SSUSA’s former Editor). With the help of two very smart Ph.D types, Judy Tant and Mike Keyes, Lohman examines the mental processes involved in the shooting sports. Chip’s co-authors have impressive credentials. Dr. Judy Tant is a Clinical Psychologist and National Bullseye Pistol Champion. Dr. Michael J. Keyes, is a licensed Psychiatrist and former physician for the U.S. Shooting Team.
If you shoot competitively, this is definitely a “must-read” article. The authors examine how the brain functions under stress, how “visualization” can be used to improved performance, how “brain speed” can be enhanced through proper training, and how the brain stores learned routines into “muscle memory.” And that’s just for starters — the article gives many concrete examples of techniques top shooters have employed to improve their “mental game” and shoot higher scores.
Brain Speed and Trigger Control: Research: Scientists believe that the newer frontal lobe may not be able to keep up with “deep” brain signals that transmit at nearly 300 mph. This is explained when athletes talk about “letting go”, rather than over-thinking the shot.
This conscious signal can take up to 0.3 seconds from recognizing the desired sight picture to moving the trigger finger — too long to capture the opportunity for a perfect shot. However, if the signal is initiated spontaneously in the cerebellum where such procedures are thought to be stored through repetition, the reaction speed is much quicker. Signals are processed by the “deep brain” almost twice as fast as the problem-solving frontal lobes.
Mental Preparation for Shooting Matches
Below are tips from Emil Praslick III, former USAMU coach. Considered one of the best wind readers on the planet, Praslick also was known for his ability to help his shooters master the “mental game”.
Thinking Your Way to Success by Emil Praslick III
Why does it seem that the same small group of shooters wins the majority of the matches? What is the difference among shooters who are technically equal? Confidence. A confident shooter is free to execute his shots without the fear of failure, i.e. shooting a poor shot.
Negative thoughts (can’t, won’t be able to, etc.) will destroy a skilled performance. The mind’s focus will not be on executing the task, but on projecting fear and self-doubt. Fear is the enemy, confidence is the cure. How does a shooter on the eve of an important match … attain the confidence needed to perform up to his potential? A pre-competition mental plan can assist in acquiring that positive mental state. The plan can be broken down into a few phases.
Build a feeling of preparedness. Developing and executing a plan to organize your equipment and pre-match routine will aid you in feeling prepared on match day.
Avoid negative and stressful thoughts. Focusing on “winning” the match or shooting for a specific score (like making the “cut” or making the President’s 100) can cause undue stress. Good shooters focus on aspects that are within their control: their sight picture, their sight alignment, their position. Each shot should be treated as an individual event.
Train stage-specific tasks during your practice sessions. Instead of shooting matches or practice matches only, include some drills that focus on your problem areas. Training in this manner will assist your level of confidence.
As part of your pre-match routine, imagine yourself shooting perfect shots. Visualize getting into the perfect position, acquiring a perfect sight picture, and perfect trigger control.
Mental Training in Shooting
Mental training in Shooting” is a practical book packed with good, straightforward advice about techniques and mental preparation. Click for a link to a FREE PDF version of this excellent treatise.
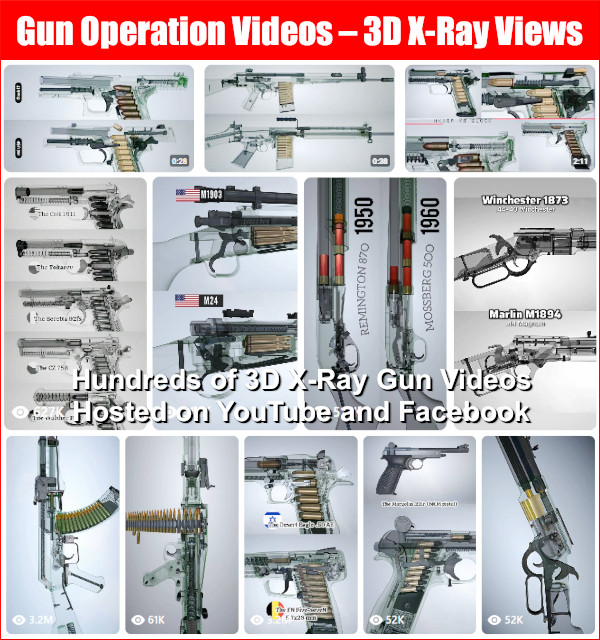
Ever wanted to see how firearms operate — viewing INSIDE the actions, barrels, and magazines? Well today we feature some great “see-through” animations for rifles, shotguns, and pistols. Using modern 3D graphics technologies, these cutaway videos show the movement of cartridges during firing, plus the operation of the bolt, trigger, and extraction systems.
These videos are found on two locations. First, there is the MasongGun YouTube site, which has 636 videos and an astonishing 3.45 MILLION subscribers. In addition, on Facebook, the GunMechanism Page has over 200 animated “Reels”, some of which have been viewed over 500,000 times. Obviously gun afficianados like these 3D X-Ray effect see-though videos. Here are 10 very good videos featuring notable lever-action, bolt-action, and semi-auto rifles, plus semi-auto pistols, a revolver, and a pair of modern shotguns.
A new Vortex video series, Cartridge Talks Comparisons, looks at multiple variables along with ballistics gel tests to determine the comparative performance of popular cartridge types. Each Month, Cartridge Talks will examine and test two popular cartridges, comparing their head to head performance. In Episode 1, Vortex Nation™ hosts Mark Boardman and Ryan Muckenhirn pit the 6.5 Creedmoor and .308 Winchester cartridges against each other, examining projectile performance. Mark and Ryan then make conclusions about the applications best suited to each cartridge type.
Cartridge Comparison 14-minute video, Highlighting Ballistic Gel Testing
This first Cartridge Talks Episode pits the 6.5 Creedmoor against the .308 Winchester in a head-to-head, ballistics gel-induced bullet battle. Ballistics (drop/drift), penetration ability, terminal performance and other variables are tested with a variety of tools and tests. Viewers are invited to check out Episode 1, and suggest future cartridge battles in the comments section.
Here is the full 67-minute 6.5 Creedmoor vs. .308 Win Cartridge comparison video:
““With the myriad of cartridges available to the big game hunter, picking which chambering is best for you and your application can be a daunting task”, says Muckenhirn. “In Cartridges Talks, we put our biases on the shelf and put as much scientific process to this as possible. From ‘shootability’ and accessibility, to terminal performance as observed in ballistics gel, Cartridge Talks wades through the numbers and figures with you, loads you up with the pertinent information, and helps you select the ideal cartridge for your next hunt!”


 For gun safes, we prefer rotary-combination dial locks, although commercial-grade electronic locks are now very good. While less convenient, and slower to open than electronic locks, combination locks are still more durable and trouble-free than the digital locks found on many low- to medium-cost gun safes. Among the combination locks, the Sargent & Greenleaf model 6730 (UL Group II) remains an industry standard. The director of Sturdy Safes noted: “An S&G 6730 will be working fine when your grandchildren have grandchildren.” For home use, we also recommend the standard, high-visibility “front-read” white on black dial.

 40+ Years Expertise


 After building my 20 PPC, I wanted to do another .20 caliber, this time a repeater for predator hunting that could also serve as a gopher/prairie dog rifle. I wanted to use a Tikka M595 stainless sporter I had. This rifle is the ultimate repeater with an extremely smooth-feeding cycle from its single-column magazine. Since the Tikka was a .223 Remington from the factory, I first looked at possible case designs that would fit the magazine. The 204 Ruger was a very new round at the time and brass was scarce. I also didn’t care for the overly long case design or the standard throat dimensions of the cartridge. I then looked at the 20 Tactical. It was a nice cartridge but I didn’t like the fact that (at the time) an ordinary two-die Tac 20 set with just a plain full-length die and standard seater were $150. Not only did the costs bother me, but I was accustomed to using a Redding die set featuring a body die, a Type-S bushing neck die, and a Competition seater. To be honest, I also didn’t care for the 20 Tactical’s name–there is absolutely nothing tactical about the cartridge. I didn’t want to adopt a new cartridge based on what I perceived to be a marketing gimmick (that “tactical” title).
 Simply Neck Down .223 Rem to Make a 20-223 Wildcat
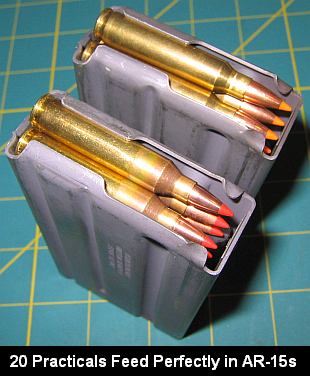 I chose Kevin Weaver at
 Project Componentry
 Test Report–How’s It Shoot?
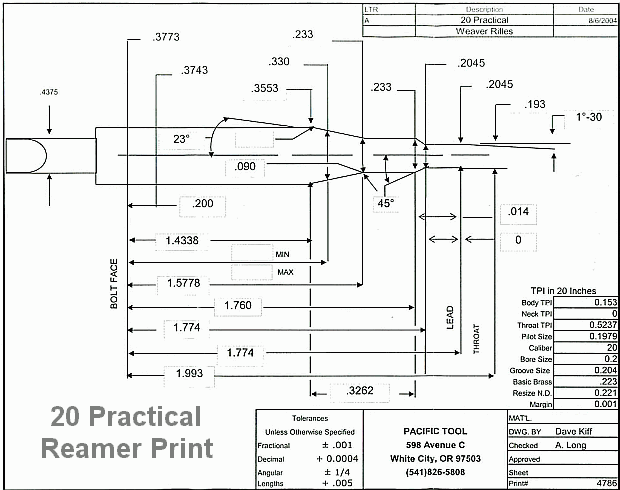
 Comparing the 20 Practical and 20 Tactical
 Research: Scientists believe that the newer frontal lobe may not be able to keep up with “deep” brain signals that transmit at nearly 300 mph. This is explained when athletes talk about “letting go”, rather than over-thinking the shot.