Keith Glasscock is an outstanding competitive shooter, who has finished second at the F-Class National Championships (F-Open) multiple times. Keith is also a skilled wind coach who runs the popular Winning in the Wind YouTube Channel. Along with his interest in mid-range and long-range F-Class competition, Keith also enjoys game hunting and varmint adventures.
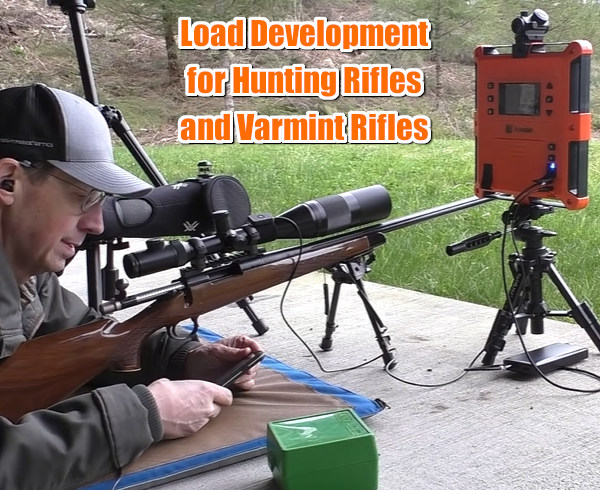
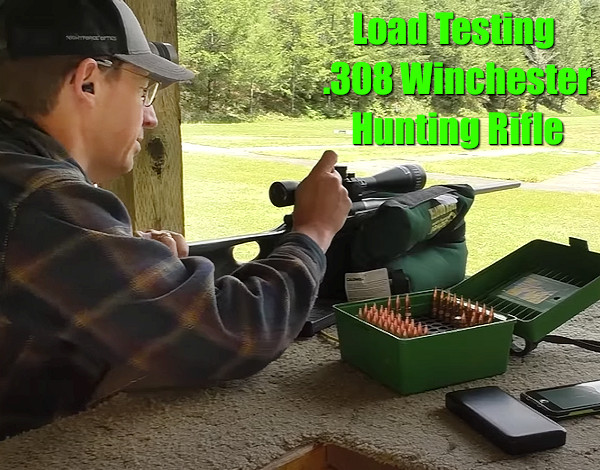
Developing accurate hand-loaded ammo for hunting and varmint rifles involves procedures that may be a bit different than load testing for a match rifle. You want to be efficient, and use the types of brass and bullets you’ll be using on the hunts. In two recent videos, Keith shows how he developed good, accurate loads for a .223 Rem varmint rifle and a .308 Win hunting rifle.
.223 Rem Load Development — Powder Charge and Seating Depth
In the first video, Keith covers the load development process for a Remington 700 bolt-action varmint rifle chambered in .223 Remington. Keith starts by full-length sizing the brass. Then he experimented with powder charge weights, and came up with a promising load of 24.7 grains of Alliant AR Comp with Hornady 50gr A-Max bullets.
Next Keith experimented with seating depths (see 5:30-6:100) and found that accuracy improved as he changed OAL length in .005 increments. Keith ended up with 2.270″ with a 3-shot group in the twos! This video shows the importance of testing your bullet choice at various seating depths. Keith shoots this rig prone off bipod, which is similar to the bipod shooting he does in the varmint fields. Keith explains key factors to consider when optimizing the .223 Rem cartridge in a varmint rig. Velocity readings are made with a LabRadar unit.
Load Development for .308 Win Hunting Rifle
In a second video, Keith shows the process for load development with a .308 Winchester hunting rifle. Here Keith uses a large X-type sandbag for a front support. Again, he was shooting a Remington 700 bolt-action rifle, this time with Barnes TSX solid copper bullets, PPU Brass, Federal 210m primers, and AR Comp powder. Keith said the Barnes bullets were excellent — he commented that these bullets were “match quality in terms of precision”. Keith achieved some very small three-shot groups with AR Comp and the TSX projectiles. Keith did note that point-of-impact shifted up significantly with increases in charge weight (see 6:20-7:10). With thinner-contour hunting barrels, this is not unexpected. But POI change should be observed carefully during load development, as you may need to adjust your zero after completing testing.
Precision Rifle Series (PRS) 22 Finale on Shooting USA
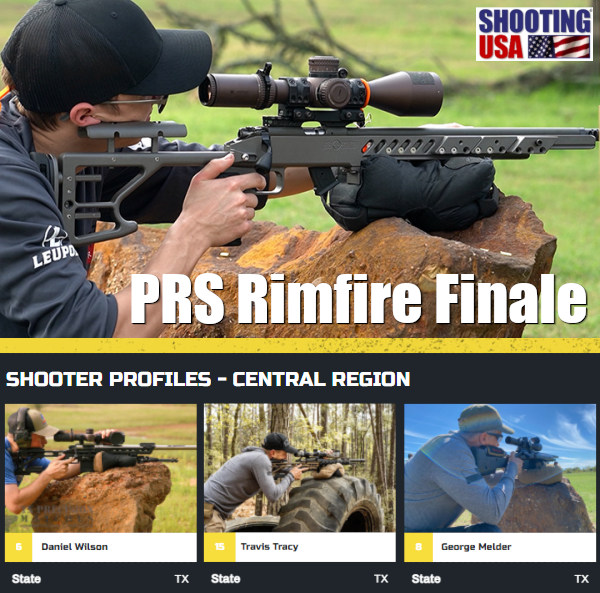
This week Shooting USA showcases the first-ever PRS Rimfire Finale. This new rimfire discipline is akin to Precision Rifle Series (PRS) centerfire tactical competition, but shot with .22 LR rimfire rifles. The inaugural PRS Rimfire Finale drew nearly 150 competitors to Texas, where shooters could compete without the cost of expensive centerfire ammo and without the need for a 1000-yard range. SEE: PRS Rimfire Series Info.
Shooting USA SHOW TIMES: This Shooting USA Episode airs Wednesday, June 15, 2022 at 9:00 PM Eastern and Pacific; 8:00 PM Central. If you miss the regular broadcast, you can stream the show online at any time on Vimeo for $0.99 per episode.
PRS Rimfire Finale — Nearly 150 Shooters in Texas
PRS and NRL tactical matches are among the fastest-growing competitive shooting disciplines. And rimfire tactical disciplines are actually growing even faster (than centerfire PRS/NRL) because .22 LR ammo is much cheaper than centerfire ammo, and there are many more ranges where rimfire matches can be held. PRS Rimfire offers the same kind of fun without the high cost of centerfire ammo and/or countless hours spent hand-loading. Rimfire PRS also offers generally less expensive rifles, and a whole lot less recoil. That’s why PRS Rimfire (as well as NRL22) has become so popular. And in the first year of the PRS Rimfire series, the Finale drew close to 150 competitors. The Finale Match was held at the Triple C Shooting Facility in College Station, Texas.
The Triple C Shooting Facility hosted the First Annual PRS Rimfire Finale. At this excellent Texas venue, match directors set out 20 unique courses of fire. There were the standard props you’d expect to see at any Precision Rifle match — tractor tires, wire spools, concrete culverts, and even cross tie bunkers. And the target placements were certainly challenging. Many of the stages had cross-course target lay-outs. This makes wind-reading much more challenging, especially with the relatively slow, low-BC .22 LR cartridges used in PRS rimfire competition.
Tune in to Shooting USA TV tonight. You’ll enjoy the coverage of this popular PRS rimfire sport, which we expect to grow significantly in 2022 and beyond. Notably, the National Rifle League (NRL) now conducts many more NRL22 matches than NRL centerfire matches. And competitors of course are drawn by the fun/challenge of a tactical match with much lower ammo costs — $0.15-$0.25/rd vs. $1.00/rd or more (counting brass, primer, bullets, powder, and barrel wear). And there are many more viable venues, because you only need a 300-yard (max) range to conduct a rimfire tactical match.
Want to see a bullet hit a target in ultra-ultra-slow motion? Watch this video to witness some amazing things — such as a bullet jacket peeling back like a banana-skin (at time-mark 7:30). Some years ago, Werner Mehl of Kurzzeit.com produced a 10-minute video for the SHOT Show. This video has has been watched over 15 million times on YouTube, making it one of the most popular shooting-related videos in history. Employing cameras recording at up to 1,000,000 (one million) frames per second, Mehl’s bullet flight video has been called “astounding” and “mesmerizing”. If you haven’t seen it yet, sit back and enjoy!
Watch This Video! It’s Really Something Special…
LINK: Kurzzeit.com Video System
Click the link above to learn more about Werner Mehl and his super-sophisticated camera systems that can record at 1,000,000 frames per second. On the same linked page you can learn about the advanced chronographs designed by Werner. Werner has now retired from business, but he was a brilliant engineer and his high-speed cameras were truly amazing. CLICK HERE to see more high-speed bullet videos.
Ever wondered how factory ammunition is produced, from start to finish? How are brass cases made, how are bullets created, and how are finished cartridges produced on automated assembly lines? Today’s video showcase features six major factories that, collectively, produce bullets, powder, and finished ammo. We start with the Berger Bullet plant, follow by Vihtavuori powder production in Europe. Then we show the Remington (now Vista Outdoor) ammo plant in Utah, along with a Federal plant that produces rimfire ammunition. Last but not least, there’s an excellent, very informative video from the Norma ammo factory, plus a Hornady ammo plant video.
Bullets being seating at Hornady ammo factory.
Berger Bullets Factory Tour — Made in USA
In this video, Recoil TV takes a behind-the-scenes look at Berger Bullets, and how the outstanding, match-winning Berger bullets are created. The video covers the entire process — from raw materials, to the placement of bullet cores inside jackets, to the final ultra-consistent and uniform projectiles. To see the complete line of Berger Bullets, with full Ballistic data, visit BergerBullets.com
Vihtavuori Powder Production in Europe
Vihtavuori produces some of the most consistent, high-quality powder on the planet. Vihtavuori powders have been used to set world records and win countless championships in multiple disciplines. This excellent video goes inside Vihtavuori’s European production centers. It is really fascinating — you see how extruded powder starts with long spaghetti-like strings, before being finalized into the tiny sticks that we load.
Along with the powder production process, this video includes the entire VV production line, so you see how powder bottles are filled with powder and the tops of the bottles are secured by automated machines.
Remington Ammo Factory (Now Operated by Vista Outdoor)
This SHWATteam video visits the Remington ammunition plant in Arkansas. Vista Outdoor, the company that produces Federal, Speer and CCI ammo, purchased Remington’s ammunition business in Lonoke, Arkansas. Including the new high-tech plant in the back, this facility has the equivalent of 13+ football fields (1200 acres) under roof at its ammo plant, with over 1100 employees. Production capacity is impressive. When running at maximum output, this Remington ammo plant can crank out a staggering 7,000,000+ rounds every day. To produce that volume of ammunition, the facility needs a huge amount of resources: one million pounds of copper per month and 124,000 pounds of lead per day. Remington started manufacturing ammunition at this Lonoke facility in 1970, but some of the machines have been churning out ammo since long before.
Norma Factory Tour
Guys — honestly, if you do anything today on this site, watch this video. You won’t be disappointed. Guaranteed. This is a very informative (and surprisingly entertaining) video. Every serious hand-loader should watch this video to see how cartridge cases are made. The camera work and editing are excellent — there are many close-ups revealing key processes such as annealing and head-stamping.
VERY Informative Video Show Cartridge Brass and Ammunition Production:
Norma has released a fascinating video showing how bullets, brass, and ammunition are produced at the Norma Precision AB factory which opened in 1902. You can see how cartridges are made starting with brass disks, then formed into shape through a series of processes, including “hitting [the cup] with a 30-ton hammer”. After annealing (shown at 0:08″), samples from every batch of brass are analyzed to check metal grain structure and hardness. Before packing, each case is visually inspected by a human being (3:27″ time-mark).
Federal Rimfire Ammunition Production
Field & Stream Tours Federal Ammo Plant in Minnesota
A reporter for Field & Stream recently got a chance to tour the Federal ammunition production facility in Anoka, Minnesota. This large plant produces both rimfire and centerfire ammunition. While touring the plant, the reporter was allowed to capture video showing the creation of .22 LR rounds from start to finish. This is a fascinating video, well worth watching. Watch and learn how rimfire ammo is made.
Note to Viewers — After Starting Video, Click Speaker Icon to HEAR audio!
This revealing video shows all phases of .22 LR ammo production including cupping, drawing, annealing, washing, drying, head-stamping, priming, powder charging, bullet seating, crimping, waxing, inspection, and final packaging. We recommend you watch the video from start to finish. You’ll definitely learn some new things about rimfire ammo.
Hornady Ammunition Factory
If you wonder how ammo is made, starting with raw metal, check out this video from Hornady. It shows how bullet jackets are formed from copper, followed by insertion of a lead core. The jacket is then closed up over the core with the bullet taking its final shape in a die (a cannelure is applied on some bullet types). Next the video shows how cartridge brass is formed, starting with small cups of brass. The last part of the video shows how cases are primed and filled with powder, and how bullets are seated into the cases, using an automated process on a giant assembly-line.
With all the anti-gun rhetoric coming out of Washington these days, it’s great to know that some organizations are helping Americans celebrate their liberties and their Constitutional rights. U.S. LawShield is organizing a nationwide series of Summer Freedom Celebrations to be held in cities across America from early June through the end of August 2022. This weekend, Freedom Celebrations take place June 11th in three locations: Springfield, MO; Tulsa, OK; and Selma, TX. Other events are listed below.
“We are excited to connect with folks from all over the U.S. as we join in celebrating our unique heritage and honor our forefathers’ vision of freedom for future generations. Encouraging our members, their families, and friends to enjoy togetherness is especially important this summer. As the Summer Freedom Celebrations travel around our great nation, we’re proud to present education on local self-defense and gun laws in conjunction with the family-friendly festivities”, stated U.S. LawShield CEO P.J. Hermosa.
At these celebrations, U.S. LawShield Independent Program Attorneys (IPAs), officials, VIPs, and guest speakers with talk about gun laws and answer questions. Because regulations differ regionally, every Summer Freedom Celebration features local IPAs and authorities who can answer questions and educate folks about local requirements. Attendees will have the chance to get answers directly from experienced attorneys and local officials.
These Summer Freedom Celebrations feature fun attractions for people of all ages, including refreshments (food trucks and/or concessions), music/entertainment, and games with prizes. These will be family-friendly events, so parents are encouraged to bring their kids.
U.S. LawShield Summer Freedom Celebration Dates and Locations
Event activities, daily schedules, and speakers are subject to change. Visit this link to register and/or check for updates on times and venues. CLICK HERE for a full, updated schedule of events nationwide.
· June 11, Springfield, MO
· June 11, Tulsa, OK
· June 11, Selma, TX
· June 18, Springdale, AR
· June 18, Cleveland, OH
· June 18, Lubbock, TX
· June 25, Morton, IL
· June 25, Fort Wayne, IN
· June 25, Jacksonville, NC
· June 25, El Paso, TX
· June 25, Midland, TX
· June 25, Ashland, VA
· June 26, Littleton, CO
More Summer Freedom Celebration events are planned for July and August in states including: Alabama, Arizona, California, Colorado, Connecticut, Delaware, Florida, Georgia, Idaho, Illinois, Indiana, Kansas, Kentucky, Louisiana, Massachusetts, Michigan, Minnesota, Mississippi, Missouri, North Carolina, Nebraska, Nevada, New Jersey, Ohio, Pennsylvania, South Carolina, Tennessee, Texas, Utah, Virginia, Washington, and Wisconsin.
Today Shooting USA features the Palmetto State Armory (PSA) Gathering, the largest industry Range Day on the East Coast. The PSA Gathering allowed industry representatives and the general public to try out a huge collection of new products. Attendees got to shoot new pistols, rifles, and shotguns. View this Shooting USA episode on the Outdoor Channel Wednesdays at 9:00 PM (Eastern/Pacific), 8:00 PM Central.
The PSA Gathering is a Firearms Range Day and Expo presented by Palmetto State Armory. The Gathering brings together the firearms community, gun media, and public to showcase new and existing products. The 2022 Gathering took place March 18-20 in Clinton, SC at the Clinton House Plantation, a 2000-acre facility with 17 shooting bays, 2 clay courses, a 1000-yard range, and a one-mile range.
One major shooting industry impact of the COVID Pandemic was the cancellation of the 2021 SHOT Show and range day. That inspired Palmetto State Armory to launch its own Industry Range Day called the Gathering. The first Gathering was a big success in 2021. So for 2022, PSA had its second-ever Gathering, which was even bigger and better.
SHOOTING USA TV Air Times
View Shooting USA on the Outdoor Channel Wednesdays 9:00 PM (Eastern and Pacific) + 8:00 PM Central.
NOTE: If you miss today’s 6/8/22 broadcast, you can still view the show on Vimeo for a small 99-cent fee, or just $1.99 per month unlimited. LINK HERE: Shooting USA on Vimeo.
Shooting USA is available On Demand via Vimeo.com. Watch a single episode for $0.99, or get a full-month subscription for $1.99 and watch as many shows as you like with limited commercial interruptions.
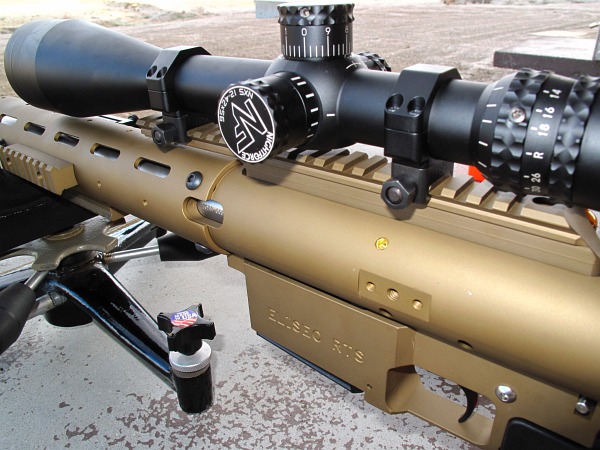
This article features an impressive .308 Winchester tubegun, crafted with an Eliseo (Competition Machine) RTS chassis, Borden action, and 30″ Krieger medium Palma Contour barrel. Owner Mark LaFevers chambered and fitted the barrel and assembled the rifle himself. What’s more, Mark even crafted his own muzzle brake, front/rear bag-riders, and his own, innovative “big-foot” bipod! Mark’s Do-It-Yourself (DIY) tubegun has proven as accurate as it is multi-faceted. Optimized to shoot the 155-grain-class match projectiles, this gun is a tack-driver. This Editor has witnessed the gun repeatedly put 3-round groups into one ragged hole at 100 yards. At 600 yards, the gun has held under 1″ of vertical in competition.
When it comes to versatility, it’s hard to beat a tubegun chambered in .308 Winchester. This rifle system can be used in High Power (Palma) competition, F-TR matches, Long Range Steel Matches, and Tactical Competitions. With the addition of a front sled, a modern tubegun can even be competitive in 600-yard benchrest matches, as demonstrated by Jerry Tierney, who, some years back, won the NBRSA 600-yard Nationals with an Eliseo (Competition Machine) tubegun.
Do-It-All Multi-Discipline .308 Win Tubegun for F-TR, Benchrest, Varmint Matches, Palma, and Tactical Competitions
by Mark LaFevers
The Concept — a ‘Do-It-All .308 Win’
This project began with a wish list developed after shooting in a precision tactical match in 2009. From that experience I knew I wanted a magazine-fed precision bolt gun sporting a high-quality, variable-power scope. I wanted a rifle that could be competitive in a broad range of gun games including tac comps and long-range prone events. If the gun could also double as a medium-range benchrest rig, that would satisfy the needs of the monthly club matches I shoot — a varmint steel silhouette match (shot from the bench), and an F-Class style prone event. I also wanted a gun that could shoot Palma matches someday (when I get around to learning to shoot with iron sights).
Because I like to build things, I’m always looking for projects that offer opportunities to customize and innovate to suit my needs. And because I’m interested in trying different shooting disciplines, I hoped to craft a rifle that could be reconfigured fairly easily to fit various needs. To maximize the gun’s potential, I chose to use only the highest-quality components for every aspect of this project. I planned on building as much of this rifle as I possibly could myself — and that would include chambering and fitting a barrel for the first time. Having much to learn, I would be relying heavily on the expert advice and goodwill of others for the gun’s success.
The Do-It-Yourself Approach — The Appeal of Building Your Own Rifle
Not everyone understands the DIY (do-it-yourself) approach to life. Why would anyone try to smith his own rifle, when he could have it done by competent professionals? There is the imagined prospect of cost savings. However, a home gunsmith may find that, at least initially, it costs more money to do it yourself when all the costs of tooling etc. are calculated. But doing it yourself is not just about saving money. There is a special satisfaction derived from building something with your own hands. For me the relationship between practiced hands, tools, materials, and knowledge of craft is important. The DIY approach surely means different things to different people. For me it’s about the quest for improvement, and an appreciation of the importance of craftmanship in history, and trying to do my part.
Whatever our craft, the fit and function of the things we care about ultimately define us. In this project I felt a responsibility to uphold certain standards. I also was motivated by the desire to give ‘homage’ to my distant relative Daniel M. LeFever, a gun-maker who left his mark on the firearms industry in the 1870s. “Uncle Dan” LeFever crafted high-grade double guns that rivaled the finest European doubles.*
Choosing Components for the .308 Win Tubegun
Looking over the range of suitable equipment, it did not take long to come across Gary Eliseo’s Competition Machine tubegun chassis kit. Initially intrigued by the beauty of the machine work in this aluminum stock, the more I looked the better this platform seemed. Gary’s RTS kit for Remington 700 and Rem clones accepts the proven AICS magazines and offers great stock adjustment flexibility. For more on that subject read German Salazar’s excellent article on Configuring the Eliseo Tubegun Stock.
When I learned that Jim Borden, BordenRifles.com, was building an action designed specifically for the Eliseo tubegun stock, the decision to go this route was made even easier. I had previously had the opportunity to admire close up the Borden action used by our top Club benchrest record holder, and I knew I couldn’t go wrong there. In selecting a trigger group, I knew I wanted a fully adjustable two-stage trigger that could be set for different pull weights for various shooting disciplines. At first glance Jewell seemed to be the obvious choices, but I asked if there were any products that might be better than the Jewell for my purposes. It was suggested that an American-made trigger by CG Jackson might do the trick, so I talked with Tom Myers of X-Treme Shooting Products. Tom’s company offered a fully-adjustable, 2-stage Mod 22 Tactical trigger that fits Remington 700 actions and their clones. It is offered with a fixed or moveable shoe, with or without a safety. I chose the fixed trigger shoe with no safety.
Choosing a Scope
Given my prior positive experiences with Nightforce products, a Nightforce scope was my first choice in optics. But I needed to select between the NXS (side-focus) and BR (front focus) models, and chose a magnification range. Because I wanted to play a variety of gun games from Tactical to Benchrest, it seemed to me that the NXS, with its faster side focus parallax adjustment, would be the more versatile choice. I went with the 12-42x56mm version so that I had plenty of magnification on tap for long-range precision work. I can still dial it back to 12 power for a wider field of view, as needed.
Mark bench-testing the gun during Load Development. The front rest is the superb SEB Neo Co-Axial.
Caliber Choice and Load Development
Choice of Caliber — .308 Win Offers Accuracy, Versatility, Long Barrel Life
Rather than agonize over the many caliber choices, I chose to step back and consider what I thought, in my experience, made winning shooters. Was it the caliber they were shooting or their training, skill and intelligence, that made them winners? While it is true that various calibers do have their specific merits, it is also true that an individual with five times as much training as you is likely to beat you with whatever caliber he or she is using. Case in point being the tactical match that got me started on this project, won by a young Marine shooting a .308 Win. While many other competitors had rifles with “faster, flatter, superior ballistics”, the Marine topped the field through his superior training, natural ability, and the keen edge of youth. With the right trigger puller, .308 Win was clearly still good enough to win this kind of match.
Among the arguments in favor of the .308 Win caliber for this project were:
I had positive previous experience with the .308 and was already set up to reload for it.
Very wide selection of performance-proven bullets.
Some popular disciplines, such as F-TR and International Fullbore, specify .308 Win (7.62×51) as one of the “permitted” chamberings.
Top shooters could provide guidance on .308 load development, and effective shooting techniques.
.308 Win offers long barrel life.
Weighing against the .308 Win were higher component costs and heavier recoil compared to many popular, smaller, mid-distance calibers, such as the 6mmBR, 6 Dasher, 6XC, and 6.5×47 Lapua.
Selecting the Optimal Barrel Configuration for my Bullet Selection
One way of narrowing the field of .308 bullet options is to choose a specific bullet that has performed well for winning shooters, and design the gun around the bullet. The weight of the bullet and its preference for a specific seating depth dictate the twist rate of the barrel and the depth of the chamber, which is also dependent upon whether you choose to single feed or magazine feed. Because I have had very positive experiences with Berger bullets, and becasue Berger Ballistician Bryan Litz was very positive about Berger’s 155.5gr Palma bullet, that was my starting bullet choice for this gun. Because Bryan had great 1000-yard success with a 1:13 twist barrel with the 155.5 bullet, but thought he might go with a 1:12 twist next time, I felt it would be interesting to try a 1:12.5″ twist. Krieger Barrels was able to privde this specific twist rate, and we hoped Krieger’s 5R rifling with a 30″ length would yield a fast barrel. Some extra velocity would help offset the velocity loss I might suffer by being limited to a mag-length COAL. (If I could load longer than mag length I could stuff in more powder and get more velocity.) The Krieger 5R proved a very good choice. From the start the barrel has cleaned up easily, it has delivered awesome accuracy, and it holds very tight elevation at long range. I’ve also been able to achieve very low ES/SD with this Krieger.
Gun Set-Up and Initial Testing
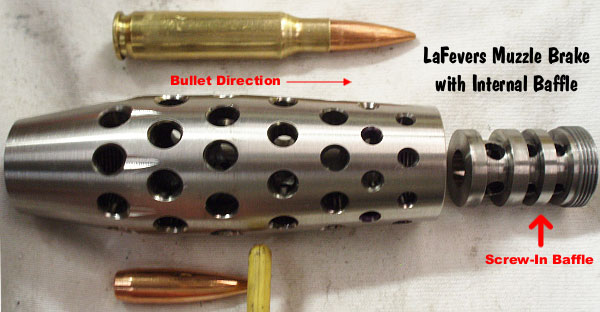
The first break-in of the rifle was done at 100 yards on home turf at the Ojai Valley Gun Club in California. Your Editor and I put 40 rounds through it using Krieger’s recommended break-in procedure. Our impression was that in less than 10 rounds the barrel was ready for competition. I shot the second 10 rounds looking at the performance of the variable muzzle brake I had built. Firing initially with only the one built-in baffle in place, a tremendous amount of gas was still blowing forward, made visually more pronounced by the frosty 29° air. Maximum recoil reduction was achieved adding the front baffle spool, so this is how the brake will be used. On disassembly after firing the forward faces of the baffle spool show descending amounts of powder residue from the gas entry to exit end, with almost no residue at the final baffle wall, showing most of the gas has exited to the side by that point. Attention to precision alignment shows the brake having no adverse effect on accuracy, as the last 20 rounds seated to various depths yielded a couple three-shot, one-hole groups at 100. At the end of the session I was pleased to find that the Krieger barrel cleaned extremely easily. Two wet patches cleared the powder residue and just a little copper showed up at the muzzle end by visual inspection.
The Jim Borden action has a really nice feel when single round loading, and good consistency feeding from the magazine with an authoritative hand. The ejector is very aggressive and will pitch the brass off the bench if it isn’t blocked from escaping. This action cycles very smoothly, and the beautiful workmanship shows even with the tubegun chassis mostly surrounding it.
Mark crafted two front sleds for the gun, one from metal, another from wood (which worked a bit better). Mark notes: “With the wood bag-rider in place the gun became quite stable, and you didn’t notice the high center of gravity so much.” Mark also made his own rear Bag-Rider.
Tubegun Wins First Fun Match
Shortly after breaking in the barrel, I took the gun down to a nearby range to compete in an informal 300- and 400-yard paper competition. I thought it would be fun to test loads while shooting in a club-level fun match. I was getting the best grouping at 44.5 grains of Varget, hotter loads were not doing so well, leading me to believe I needed to work up loads from 44.0 to 44.5 by tenths to find the sweet spot. In the 10-competitor match I squeaked out a win by 1 point. Still, a win is a win!
Load Development
I took the rifle up to the Ojai range at daybreak to run some load variations at 600 yards in still 26° air. I printed targets (sourced from AccurateShooter.com’s FREE Target Page) that had a 1″ red dot within a 5″ grid box. The dot made an excellent aim point at 600 yards. Here the capabilities of the Nightforce 12-42 NXS optic really became apparent. In the exceptionally clear, early morning conditions, I could see the dot AND the bullet holes — all at 600 yards downrange! I had set up my 72-power Meade spotting scope but didn’t use it as the Nightforce scope had more clarity and sharpness. There was no need to go downrange to check the targets, as bullet holes were clearly visible on the targets. This is great because I can make better use of the narrow window of perfect air in the morning, before the sun stirs thermals and mirage.
In this rifle, the Berger 155.5gr Fullbore bullet likes to be seated .010″ off what I’m calling “Max Jam”, using a Hornady OAL length gauge pressing the bullet softly into the lands, so the bullet just barely sticks there when the tool is removed. [Editor’s Note: At his optimal seating depth, Mark’s bullets are still in the lands, just .010″ shy of the max length he can load them without set-back.] The rounds are loaded to 2.850″ OAL to magazine feed. Even though I cut a “no-turn” chamber, I do lightly turn the outside of the case necks to uniform them. I like to look at bullet bearing surface length variations, using a Sinclair comparator body and two .30-cal inserts, one on the nose and the other on the tail of the bullet. With very uniform bullets like the Bergers this method is really only attempting to spot that random outlier bullet that varies in length enough to separate from the group. This is no knock on Berger, just a nod to the challenges of maintaining incredibly tight manufacturing tolerances.
Today’s five shot groups of Varget, jumping by tenths of a grain from 44.0 to 44.5 grains, showed the best grouping to be at 44.1 grains. The hotter loads were breaking the 2900 fps level, but the groups were not as tight as they were at the lower end. At 44.1 grains of Varget the five-shot group had a vertical dispersion of 1.9″ and a horizontal dispersion of 1.25″ at 600 yards, making that a keeper load.
Competition Load Selection and Performance
With a NBRSA 600-yard match fast approaching, I realized that with all the focus on testing I didn’t have enough Lapua brass to shoot the entire match. My solution was to fall back on once-fired Hornady Match brass, with which I have also had excellent luck. So, the day before the NBRSA match, I loaded up the best combinations of the Berger 155.5s with Hornady/Varget, Lapua/Varget, and Hornady/8208 for a final trial, and headed out to a 1000-yard range that’s a two-hour drive from home. Expecting to see the faster IMR 8208 edge out the Varget at this range, I was surprised to see the performance basically identical. With this last minute perspective I decided to shoot the six target NBRSA match using Berger/Hornady/Varget for the first three matches, then Berger/Hornady/8208 for the last three matches when the extra speed might help in a rising afternoon wind.
Match Results
Best results were in Match 1 using 44.0 grains of Varget to push the Berger 155.5 from the Hornady Match brass. Fortunately four bullets flew to a 1.44” group in the blue, unfortunately it was a five-shot match and one bullet flew high left. Excellent promise also showed in Match 6 with the IMR 8208 XBR powder yielding less than an inch of vertical at 600 yards. The lesson I learned from the event was that operator consistency was a much bigger factor than the technical limitations of the hardware or the ammunition. The gun can definitely shoot better than I can hold. I had the opportunity to shoot off a beautiful SEB NEO front rest in this competition. Although I am not a fan yet of joystick controls, this rest performed flawlessly and definitely had a positive effect on performance.
My Overall Impressions of the Project
For use as a benchrest rig, the tubegun provides an interesting challenge, because the pistol grip seems to make the gun much more sensitive to steering errors than a typical low-profile benchrest stock. You have to focus on consistency of grip. A light grip and firm cheek weld combination seems to work well at the bench, but the gun also responds well to a very firm grip and heavy shoulder pressure when fired in the prone position. Building an Eliseo tubegun is a great project and the finished product is a very versatile, fun-to-shoot gun! To encourage others with similar interests, let me just say that the products and components used in this project all get my five-star endorsement, without exception or hesitation.
The biggest challenge with this rifle lies in my own skill development — particularly for tactical matches. If you only have experience with known-distance shooting matches, you’ll need a whole new set of skills to be successful in unknown-distance (UKD) tactical competitions. These UKD matches require high levels of shooting intelligence and training. However, now that I have a rifle that instills confidence, I can work to improve my skills. Overall, I am very happy with the results of this project — the gun has certainly lived up to my expectations. It is rugged, accurate and very adept at “multi-tasking.”
DIY Machining — Chambering My First Barrel
One of my main objectives with this project was to do my own barrel chamber reaming and fit-up work. I had been studying and working from John Hinnants’s excellent book on Precision Rifle Barrel Making, building tools and working with the concepts, and felt myself to be ready to tackle the machining aspects of the project. Having local ace gunsmith Mac Tilton to talk to really helped me understand what would be needed. Greg Tannel’s excellent GreTan DVDs on how to set up a high pressure thru-the-barrel reamer flushing system and align the lathe tailstock properly for precision chamber reaming were invaluable. Greg’s off-the-shelf, hardware-store flow control layout makes the flushing system easy to regulate for other purposes as well. I built the reamer holder Greg describes in his DVD, and it too works well.
I began at everyone’s recommended starting point, which was to recheck the level of my lathe, a Jet 1340 gearhead belt-driven model. To accomplish this I used a precision 12” machinist level from Grizzly Tools. I can’t say the tool was easy to use because the leveling process is tedious as hell, but the level worked very well.
Dave Manson Shares His Reamer Knowledge
In researching which reamer maker to use to create the custom reamer for the Berger 155.5 fullbore bullet, which seems to like about .015″ jump to the lands, I was drawn by name recognition to Dave Manson’s products. In my years of thumbing through Brownells catalogs I was impressed with the thought Dave had put into the development of so many of his tools. During several phone conversations, I greatly benefited from Dave’s experience with chamber tolerances, cutting fluids and reamer modifications specific to thru-the-barrel flushing. To help spec the reamer, I sent Dave a couple dummy rounds built to magazine length so he could make a custom reamer to yield .015” jump and a no-turn neck. In no time I was using the Dave Manson reamer to practice with the flushing system on pieces cut from a take-off barrel, then checking dimensions using Cerrosafe castings. The dimensions were exactly as we had discussed, and I do mean EXACTLY! From the way Dave’s reamer worked in practice chambers, I knew this tool would produce a superior chamber.
Chambering Process with Tailstock DRO
For this project I set up a lathe tailstock digital readout from Grizzly, part # T10118, to help keep track of boring depth. Unlike relying on counting revolutions of the tailstock handwheel, with the DRO you are looking at the total travel measurement on a digital display, which is equally precise to the alternate dial indicator method. The chamber was cut in the stainless Krieger barrel at 60 RPM, using Mobilmet 744 heavy cutting oil diluted with mineral spirits, flushing chips from the reamer flutes at 100 PSI. For the last few thousandths of cut, lathe power was shut off and the cut completed by turning the reamer holder by hand while in-feeding with the lathe tailstock handwheel for precise depth and chamber dimension control.
To shorten this article up a bit and keep it on point for those interested in the rifle and not the process, let me just mention that details of some of the additional parts I made can be seen at my website: LaFeversFabricating.wordpress.com. Those parts include a muzzle brake of my design, my fast attach bipod design, a drop-leg level, wood grip, and wooden as well as metal front and rear bag riders for benchrest work.
Acknowledgements
For their participation and patience in supporting this project, and their tolerance of my myriad questions about parts and processes, I would like to thank, in alphabetical order:
Berger Bullets — Bergerbullets.com — Berger 155.5gr Fullbore Match bullets.
Jim Borden — BordenRifles.com — Stainless Rem. Clone action for Eliseo tubegun.
Gary Eliseo — CompetitionShootingStuff.com — RTS tubegun stock kit.
Grizzly Industrial — Grizzly.com
Krieger Barrels — KriegerBarrels.com — 30″ Medium Palma, 1:12.5″ twist 5R rifling, tight bore.
Dave Manson — MansonReamers.com — Custom .308 Win finish reamer for Berger 155.5 fullbore bullet.
Tom Myers — X-tremeShooting XTSP — CG Jackson Mod 22 Tactical 2-Stage Trigger.
Nightforce Optics — NightforceOptics.com — 12-42×56 NXS Scope with NP-R1 ranging reticle.
Greg Tannel — GreTanRifles.com — Lathe set-up and chambering DVDs.
*According to Chuck Hawks: “‘Uncle’ Dan Lefever was one of the greatest gun designers of his, or any, time. He founded several companies….The largest and best known of these, Lefever Arms Co., was eventually acquired by the Ithaca Gun Company around the time of the First World War. In the hey day of the classic American double there were guns galore and many different grades and price points, from plain field grade guns to masterpieces rivaling the best European guns. The Lefever Arms guns, for example, won medals at an International Arms Exhibition for ‘Best American’ and ‘World’s Best’ shotgun.”
Keith Glasscock is one of America’s greatest F-Class shooters, as well as a highly respected wind coach. A High Master, Keith finished second overall at the 2021 NRA F-Class Long Range Championship in F-Open division. He also finished second at the 2020 Nationals, tied with F-Open winner Pat Scully on points, but with fewer Xs. And he took second also at the 2019 Nationals. His consistency is unrivaled, which means he definitely knows the secrets of long range wind calling and loading ultra-accurate ammo.
Keith has a popular YouTube Channel with new content every week. On Keith’s Winning in the Wind channel, Keith offers 60+ informative videos on a wide range of topics including wind reading, reloading, component selection, load development, and training. For today’s Video Showcase, we offer four of our favorite Keith Glasscock videos. Each video has important points that can benefit any competitive rifle shooter, whether you shoot in local 100-yard fun matches or compete at the National Level in F-Class, LR Benchrest, Palma, or High Power.
How to Prepare for a Match
In this informative video, Keith explains how to prepare for a major medium- or long-range rifle competition, with a particular focus on F-Class. Keith explains how to prepare for weather conditions and “get the lay of the land” before the match. Even the day of the match, your can look and learn. As one viewer noted: “I’ve noticed some guys playing on their phones during matches. This is an important time to get in sync with wind patterns and fine tune your wind strategy.”
How to Find (and Fine-Tune) Seating Depth
This is Keith’s most popular video. Keith definitely knows how to maximize accuracy by finding the optimal seating depth for each particular barrel. He is achieving groups in the high Ones for three shots. That would be good for a short-range benchrest cartridge, but Keith is achieving that with a .284 Winchester which has much more recoil. If you shoot F-TR or F-Open or even PRS, you should watch this video.
How to Lower your ES/SD and Reduce Vertical at Long Range
This is Keith’s first video in a series on how to improve long range groups, precision, and accuracy by reducing velocity Extreme Spread (ES) and Standard Deviation (SD). To achieve the lowest ES you need to look at multiple processes, including precision powder weighing, careful seating, brass annealing, and primer selection. Another factor is bullet selection. Not all bullets of the same nominal caliber and weight class have exactly the same bullet diameter or shape. Sometimes you can get better accuracy AND lower ES by trying a different brand of bullet. We have found bullet diameters, of the same stated caliber, can vary by up to .0008″ (eight ten-thousandths). Some barrels like the fatter bullets, while other barrels may favor the skinny bullets.
How to Find Bullet-to-Rifling Touch Point
Before you even start to load for a new rifle you need to know the point at which the bullet in a loaded round will first touch the rifling. (This will be a base to ogive measurement on your round). Beyond that point you are “in the lands”. If you load shorter than that base-to-ogive length you are “jumping” your bullets. Some cartridge/bullet combos typically shoot best in the lands, while with other bullets and cartridges, jumping is the way to go. Additionally, with some disciplines it is wise to jump your bullets since you may have to unload a chambered round while on the firing line. In this video Keith shows a number of methods to determine “length to lands” with repeatable precision.
Field Test and Review of SEB Mini-X Coaxial Front Rest
While gear reviews are not the primary focus of Keith’s YouTube Channel, Keith does talk about products he likes and uses. In this video. Keith reviews the SEB Mini-X, the newest coaxial tripod rest from SEB Rests. The Mini-X offers fast, precise windage and elevation adjustment with the joystick control. The unit is much easier to pack and transport than a large, heavy front rest such as a SEB NEO or Farley. The latest Mini-X also has upgraded foot controls that make it easier to level the rest on uneven ground. For more info, see our SEB Mini-X Report.
I absolutely love using this press stand. I use it with my Forster Co-Ax as well as my Dillon 550. The stand mounts those presses at the right height to minimize fatigue and maximize torque. Some products I merely review and return but this one is a keeper and won’t be leaving my bench anytime soon. — F-Class John
Lyman Universal Press Stand REVIEW
Product Review by F-Class John
Positioning your press at the optimal height is one of the oldest problems in reloading. Most presses sit low off the edge leading to uncomfortable arm strain or inconsistent pressure being applied while using. Lyman has set out to fix that problem with a reasonably-priced ($69.46 at Midsouth) press riser that works with the vast majority of reloading presses. This unit will raise just about any press up off your bench securely, allowing you to working more comfortably from a standing position. This also frees up vital bench space UNDER the press. Unfortunately this press stand is so popular it is back-ordered at most vendors.
I have used a variety of presses over the years. At times I’ve run into issues mounting a press at a level that doesn’t promote arm or hand strain during normal operations. In the past I’ve used blocks of wood or even tried other brands’ proprietary stands. But I had very limited success with those options. Accordingly, I was very excited to give the Lyman Universal Press Stand a chance.
Lyman’s Universal Press Stand comes complete with side plates, two different top plates, and a large collection of mounting hardware. The two top plates are pre-drilled for numerous popular Single Stage or Progressive presses. Helpful diagrams and instructions show which side of the top plate you need to use. The pre-drilled holes accommodate a variety of presses from RCBS, Dillon, Lyman, Redding, and Hornady. But surprisingly, the plates are not pre-configured for the Forster Co-Ax Press.
CLICK to WATCH VIDEO Showing Lyman Universal Press Stand
Setting up the stand was very simple. The two sides bolt to the lower shelf unit at which point you attach the top plate. All the supplied bolts made this a breeze and once everything was snugged down, I was able to place it on my bench where I wanted it and mark the drill holes to mount it. After securing the stand to my bench it was time to mount my press.
Lyman Universal Press Stand with Dillon 550 Press
Adapting Lyman Universal Press Stand for Forster Co-Ax
At the time of testing I was primarily using a Forster Co-Ax press. With no pre-drilled Co-Ax configuration for either Lyman top plate, I decided to customize the blank side of one of the top plates. I opted to position the mounting holes so that the press could sit 100% on top of the mounting plate and not just off one edge. I found this process simple to execute. Mark your drill holes, then drill the plate. This can easily be done with regular drill bits although using a step-bit worked faster and cleaner to help enlarge the holes just a little when I needed some extra clearance.
Lyman Universal Press Stand Is Stable and Strong
Once set-up, I found the stand to be incredibly stable. The design allows for full force to be applied to the press no matter what the operation. Having used this Lyman Press stand regularly over the past few months with both my Co-Ax and a Dillon 550c, I still find myself loving it. The height is perfect and allows me to load as much as I like without straining my arm or getting fatigued. With an attractive price point (under $55.00 street price) and a simple design, I feel this is a great system for those looking for a secure and raised platform for their reloading presses.
The Universal Press Stand comes with two plates. If you have different presses that fit each plate you could easily swap presses just by changing plates while leaving the presses attached. It’s less functional if you have two presses that share one plate and would require removing one press before installing the next one.
Lyman Press Stand Unboxing and Set-Up (KFW Video Review):
Gunsite Academy, the oldest and largest civilian firearms training academy in the USA, now offers 96 videos cover the full spectrum of the Gunsite Academy curriculum. In most of these videos, instruction/demontrations are provided by respected Gunsite instructors with commentary by gun writer Richard Mann.
There are a wide range of videos covering pistol, rifle, and shotgun shooting. In addition, there are videos covering gun maintenance, optics, and accessories. Nearly 100 videos are currently available on the Gunsite Academy Video Page. Most of the videos are also available the Gunsite YouTube channel.
Here are Five of our Favorite GunSite Academy videos:
Proper Bipod Use with Rifles
Dry-Fire Training — Save Your Ammo
MIL vs MOA in Riflescopes
Drawing a Handgun from Concealment
AR Platform Rifle Take-Down and Maintenance
In this video, Gunsite Academy instructor/gunsmith Cory Trapp demonstrates the proper way to field-strip, clean and lubricate an AR-15 carbine. Trapp also offers important technical tips for maintaining your modern sporting rifle, including lube points. This video has nearly 2.5 million views on YouTube.
Gunsite Academy — 45-Year Heritage of Excellence
Founded in 1976 by Lt. Col. Jeff Cooper (WW II and Korean War combat veteran, author, and professor), Gunsite Academy has been providing elite firearm instruction for more than 40 years. It enjoys a reputation for serious, no-nonsense training. Cooper built the facility just west of Paulden, Arizona. Originally it was called the American Pistol Institute (API).






 Norma has released a fascinating video showing how bullets, brass, and ammunition are produced at the
  If you wonder how ammo is made, starting with raw metal, check out this video from
 At these celebrations, U.S. LawShield Independent Program Attorneys (IPAs), officials, VIPs, and guest speakers with talk about gun laws and answer questions. Because regulations differ regionally, every Summer Freedom Celebration features local IPAs and authorities who can answer questions and educate folks about local requirements. Attendees will have the chance to get answers directly from experienced attorneys and local officials.


 The Concept — a ‘Do-It-All .308 Win’