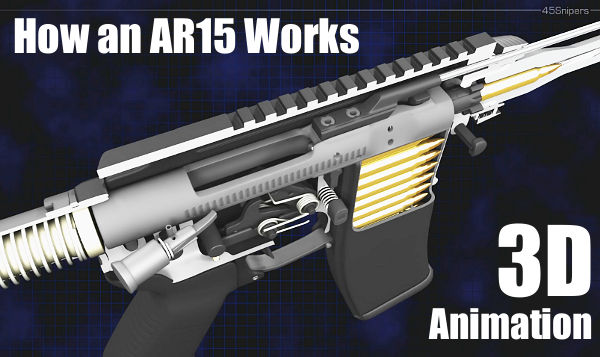
Ever wondered how the parts inside an AR15 work together? Just exactly how does the reciprocating bolt carrier feed rounds from the magazine? How do the elements in the trigger group work and reset after each shot? How does the gas system bleed gas from the barrel and operate the bolt carrier? These and other questions are answered in this eye-opening video from 45Snipers. Using “cutaway” 3D computer animation, this 5-minute video shows all features of an AR15 inside and out. This fascinating firearms animation allows the viewer to look inside the upper and lower receivers, into the bolt carrier, chamber, barrel, and magazine.
This video starts off slow and has annoying background music, but it is well worth watching if you own or shoot any AR-platform rifle. It illustrates all the key operations during the charging, loading, firing, and ejection processes. The cutaway animation shows how rounds are stripped from the magazine and then chambered. It then shows how every part of the trigger group works, and how the firing pin strikes the primer. You can even watch the bullet move down the barrel before the empty shell casing is removed from the chamber and tossed out the ejection port. Here are sample frames from the video:
Video find by Grant Ubl. We welcome reader submissions.
How fast can you shoot a bolt-action rifle? We doubt you can out-pace the ace “Stangskyting” shooters from Scandinavia. Some of these guys can run more than two rounds per second, including mag changes! That’s impressive. Bulletin reader C. Lemmermann from Denmark told us: “In Scandinavia we have this competition called ‘Stangskyting’. It’s similar to the ‘Mad Minute’ but we only have 25 seconds to hit the target [at] 200-300m distance with a 6.5×55 [target rifle].” In the Stangskyting video below a shooter named Børklop puts 16 rounds on target in just 25 seconds. (He starts with a round in the chamber and cycles through three, 5-round magazines).
Børklop’s performance, with just a sling and iron sights, is impressive. He’s shooting a Sauer 200 STR target rifle with 5-round magazine. Note that Børklop manipulates the Sauer’s bolt with his thumb and index finger, while pulling the trigger with his middle finger. As good as Børklop is, some Stangskyting competitors are even better. Roy Arne Syversrud from Oslo, Norway tells us: “The best shooters in Norway can do 21 shots in 25 seconds, changing the mag three times.”
Here’s another Stangskyting video. Check out the speed with which John Olav Ågotnes works that action — simply amazing!
This Guy Could Break the “Mad Minute” Record
Børklop’s rate of fire, 16 rounds in 25 seconds, is the equivalent of 38.4 rounds in 60 seconds. That’s a notable number because the record for the “Mad Minute”, a British Army marksmanship drill, is 38 rounds in one minute. That record was set in 1914 by Sergeant Instructor Alfred Snoxall, and still stands. So as you watch Børklop, keep in mind that Snoxall shot that fast for a full minute with a Lee-Enfield nearly 100 years ago!
Børklop has an average cycling time of 1.56 seconds per shot, starting with a round in the chamber. To beat the record of 38 rounds, he would need to make seven mag changes in sixty seconds. All those mag swaps could reduce his average time per shot, making it difficult to achieve 38 hits in a minute. But, if Børklop could use 10-round mags with his Sauer STR, this guy has the skills to break the record.
To emphasize the capabilities of the WWI-era British shooter who set the record, Snoxall shot as fast as Børklop does, but Snoxall reloaded with stripper clips. Snoxall’s SMLE (Lee-Enfield) rifle also had relatively crude open sights and the stock was far less ergonomic than Børklop’s Sauer STR stock.
Here’s another Stangskyting video showing John Ågotnes shooting rapidfire with his Sauer 200 STR (Scandinavian Target Rifle) chambered in 6.5×55. By our count, Ågotnes manages 17 shots within the 25-second time period. That rate of fire (17 in 25 seconds) equates to 40.8 rounds in one minute!
This video shows the process of cut-rifled barrel-making by Krieger Barrels, one of the world’s best barrel manufacturers. Krieger cut-rifled barrels have set numerous world records and are favored by many top shooters. The video show the huge, complex machines used — bore-drilling equipment and hydraulic riflers. You can also see how barrels are contoured, polished, and inspected.
For anyone interested in accurate rifles, this is absolutely a “must-watch” video. Watch blanks being cryogenically treated, then drilled and lathe-turned. Next comes the big stuff — the massive rifling machines that single-point-cut the rifling in a precise, time-consuming process. Following that you can see barrels being contoured, polished, and inspected (with air gauge and bore-scope). There is even a sequence showing chambers being cut.
Click Arrow to Watch Krieger Barrels Video:
Here is a time-line of the important barrel-making processes shown in the video. You may want to use the “Pause” button, or repeat some segments to get a better look at particular operations. The numbers on the left represent playback minutes and seconds.
Krieger Barrel-Making Processes Shown in Video:
00:24 – Cryogenic treatment of steel blanks
00:38 – Pre-contour Barrels on CNC lathe
01:14 – Drilling Barrels
01:28 – Finish Turning on CNC lathe
01:40 – Reaming
01:50 – Cut Rifling
02:12 – Hand Lapping
02:25 – Cut Rifling
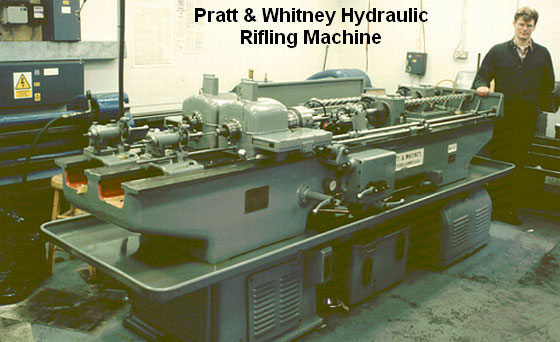
“At the start of World War Two, Pratt & Whitney developed a new, ‘B’ series of hydraulically-powered rifling machines, which were in fact two machines on the same bed. They weighed in at three tons and required the concrete floors now generally seen in workshops by this time. Very few of these hydraulic machines subsequently became available on the surplus market and now it is these machines which are sought after and used by barrel makers like John Krieger and ‘Boots’ Obermeyer. In fact, there are probably less of the ‘B’ series hydraulic riflers around today than of the older ‘Sine Bar’ universal riflers.” — Geoffrey Kolbe, Border Barrels.
Gavin Gear of UltimateReloader.com has been testing the AutoTrickler V3, a microprocessor-controlled powder-dispensing system that works with super-precise force restoration scales. Combining an automated powder measure with a motorized trickler, the AutoTrickler can deliver a full powder charge, with single-kernel precision, in a few seconds.
AutoTrickler inventor Adam MacDonald has developed numerous enhancements to his powder-dispensing system, which will be incorporated into the latest AutoTrickler V3 production version. Gavin Gear reviews all these important new features in a new video released on October 6, 2019. Check it out:
Key Enhancements for AutoTrickler V3 Production Version:
1. Improved, Larger-Capacity Clear Powder Hopper
The new clear plastic powder hopper is much larger than the old Lee red-colored hopper it replaces. That’s good news for folks loading large magnum cartridges.
2. Taller Glass Powder Cup and Improved Diffuser
When the main powder charge comes down from the hopper, it passes through a plastic “diffuser” into a glass cup. Both these products have been enhanced.
3. New Simple V-Shaped Stop for Powder Cup
With the V3, it is easier to center the powder cup on the scale unit. Gavin explains: “Instead of a ramp and ‘landing pad’, the cup stop is now a super-simple angled back stop. If you push the cup back towards the center of the pan, it will guide itself into the centered position every time.”
Here is the original AutoTrickler V3 Video Report from UltimateReloader.com:
Every year at SHOT Show in January, bullet-makers showcase their latest and greatest projectiles for hunters and paper-punchers. we plan to get the “inside scoop” on new bullet designs from Berger, Hornady, Lapua, Nosler and Sierra.
A while back, at SHOT Show 2012 we chatted with Berger Ballistician Bryan Litz about Berger’s popular line of Hybrid bullets. Berger now offers a wide range of Hybrids in multiple calibers and weights. In fact, for .30-Caliber shooters, Berger now offers many seven (7) Hybrid match bullets, with weights from 155 grains up to 230 grains. Two .338-caliber OTM Tactical Hybrids were introduced in 2012 (a 250-grainer and a 300-grainer).
Bryan tells us: “The hybrid design is Berger’s solution to the age old problem of precision vs. ease of use. This design is making life easier for handloaders as well as providing opportunities for commercial ammo loaders who need to offer a high performance round that also shoots precisely in many rifles with various chamber/throat configurations.”
For those not familiar with Hybrid bullets, the Hybrid design blends two common bullet nose shapes on the front section of the bullet (from the tip to the start of the bearing surface). Most of the curved section of the bullet has a Secant (VLD-style) ogive for low drag. This then blends in a Tangent-style ogive curve further back, where the bullet first contacts the rifling. The Tangent section makes seating depth less critical to accuracy, so the Hybrid bullet can shoot well through a range of seating depths, even though it has a very high Ballistic Coefficient (BC).
In the video we asked Bryan for recommended seating depths for 7mm and .30-Caliber Hybrid bullets. Bryan advises that, as a starting point, Hybrid bullets be seated .015″ (fifteen thousandths) off the lands in most barrels. Watch the video for more tips how to optimize your loads with Hybrid bullets.
Doug Koenig’s Championship Season returns to Pursuit Channel celebrating its 9th season. The latest show features long range precision rifle competition. Doug travels to the 2019 Masterpiece Arms (MPA) Spring Shootout in Georgia, campaigning his 6mm Creedmoor bolt-action Ruger Precision Rifle. Doug has been a top competitor in Production Division (factory class), having posted multiple first-place Factory Class finishes in recent months.
Each week, Doug Koenig’s Championship Season airs on the Pursuit Channel three times: Wednesday at 5:30 pm (EST), Friday at 9:00 pm (Eastern Primetime), and Saturday at 1:00 am (EST). View past seasons and previously-aired episodes at PursuitTV.com. You can also see previews and get competition news on Doug Koenig’s Facebook Page.
Koenig said, “I’m relatively new to long range precision rifle competitions, but it’s the combination of shooting from fixed or uneven barricades, to the variety of shooting positions and distances that has captured my excitement for this sport.”
Koenig secured a Production Division win at the 2019 MPA Spring Shootout held at the Arena Training Facility in Blakely, GA with a final score of 173.00 and a time of 58.89. “The MPA match had some long shots out to 800-1356 yards, but my factory rifle got the job done and helped me win my third production class title in a row. That proves you don’t need to spend a fortune to get started in PRS competition.”
Precision Rifle matches offer a variety of challenges not found in benchrest or High Power matches. Over the course of multiple stages, competitors must shoot a wide variety of positions, standing, prone, and from barricade, while the clock is ticking. Some PRS/NRL matches even have moving targets. These matches test shooting fundamentals, while demanding good wind reading skills, and the ability to shoot at multiple distances in a stage. That demands good “dope” and the ability to hold-over and hold-off.
Koening Goes Hunting for Argentine Stag
Doug Koenig is also an avid hunter. In this Championship Season episode from 2016, Doug takes viewers into the field on an Argentine Stage Hunt. There is also some shotgun shooting footage:
How is a modern, metal-chassis rifle built? This very cool video from Masterpiece Arms answers that question. The nicely-edited video shows the creation of a Masterpiece Arms tactical rifle from start to finish. All aspects of the manufacturing process are illustrated: 3D CAD modeling, CNC milling of the chassis, barrel threading/contouring, chamber-reaming, barrel lapping, laser engraving, and stock coating. If you love to see machines at work, you will enjoy this video…
Lapua offers a sophisticated FREE Ballistics App for iOS and Android smartphones and mobile devices. This state-of-the-art App has many great features — much more than you’d expect for a free App. If you do much shooting past 300 yards, or use a wide variety of bullets and/or cartridge types, we recommend you download the App and give it a try. This article, written by a Lapua technician, explains how to use the App. This article is definitely worth reading — there are many important concepts and procedures discussed here that apply to all Ballistics calculators, not just the Lapua App. For more details, read the Lapua Ballistics App User Manual.
Watch Video for Explanation of Lapua Ballistics App Features
Lapua Ballistics App Basics — How to Get Started
Article by Matti Paananen
As smartphones and tablets are constantly developed, ballistic software and Apps are also improving, and with their help our ability to hit targets can improve significantly. This is a short introduction on why and how to use a ballistic calculator, namely the Lapua Ballistics App, and a few pointers that will help you use the App effectively.
Ballistics software and Apps are designed to help shooters and hunters make calculations to hit distant targets or take down game in the field by offering ballistic solutions. Lapua Ballistics is the first App utilizing the 6DOF calculation model.
Toying around with ballistics apps is always fun, but effective use of ballistic software requires general understanding of how they work. The App gets information from the user and by using mathematical formulas it provides the solution that will give the user a solid starting point to hit the target.
However, it is also important to remember that the App can’t think — it only calculates a solution based on your parameters. You will not know the error until you have already fired the shot.
1. SET UP YOUR SCOPE RETICLE AND RIFLE
Scope manufactures use different units per click, so it’s important that you use the correct unit in the App. For example, in your scope, one click can be 0.1 mil, 1/4 MOA, [or 1/8 MOA depending on the model]. You can find this information in your scope manual and also usually from the scope turrets. Setting your scope reticle is very important, partly because if you use the wrong unit in the App, the ballistic solution will not match your scope. To set up your scope reticle in Lapua Ballistics, go to Manage Rifle / Cartridge Data –> Add Rifle Cartridge Data (or choose to edit a Rifle/Cartridge combo you’ve already set up) –> Reticle –>.
Another thing to setup in Lapua Ballistics is your scope height, i.e. Line of Sight to Bore in the Manage Rifle / Cartridge Data window. This is the distance between the center of the scope and the center of the bore. The default height is 45mm but with tactical rifles, the height can be even 70mm. So check! The height is easy to measure with a ruler. Then there’s also the twist rate of your rifle to set up — look it up in the rifle manual, it can also be stamped on the rifle barrel. The rifle twist rate is needed to calculate spin drift and bullet stability. Spin drift should be taken into account with longer distances, and it can be enabled or disabled in Lapua Ballistics.
2. SET UP YOUR BULLET CHOICE
You can add your bullet of choice from the bullet library, where you find all Lapua bullets. It is also possible to add information manually. In this case, you will need bullet weight, the ballistic coefficient BC and muzzle velocity. The Ballistic coefficient can be given in G1 or G7 values. G7 is designed for low-drag bullets with a boat tail and G1 is used for more traditional flat base bullets. Lapua on the other hand uses Doppler radar-based data to calculate a more accurate ballistic trajectory for Lapua bullets by 6DOF model. Anyway, it is good to remember that the ballistic coefficient changes with velocity, so all changes in a flight path cannot be predicted.
The following thing you will need to set up is the bullet’s actual muzzle velocity. You can reverse engineer the number based on your drop or by using a chronograph. It is good to remember that more rounds you shoot, the better average velocity you will get.
Because temperature affects muzzle velocity, it would be good to shoot velocities in different temperatures and write them down. Those notes can be used with Lapua Ballistics as it is possible to set up the powder temperature variation in the App.
3. SET UP WEATHER CONDITIONS
Lapua Ballistics has settings for temperature, air pressure, and humidity. All these affect the ballistic solution and the chance to hit the target. In a nutshell, temperature affects the powder’s burn speed and in that way the bullet velocity. Air pressure and humidity also affect bullet drag.
If you are shooting approximately on sea level, you do not need to change air pressure values, but if you are shooting or hunting in mountain areas or where there is lot of elevation difference, you might want to check the air pressure. On sea level, the atmospheric pressure is 1013 hPa. The higher you go, the less air pressure you will have and thus less bullet drag. Some like to use handheld weather and wind meters that have a function to get actual air pressure and humidity, however the Get Current Weather function in Lapua Ballistics will give you the air pressure reading from your local and most close weather station, provided that your app is allowed to use your location data.
Temperature is an important variable. To understand how velocity change in different temperatures, only way is to shoot and keep notes. Some ballistic software and apps have values for muzzle velocity in different temperatures. The user needs to input muzzle velocity in different temperatures in order to software to calculate the effect. More velocities in different temperatures the user adds, the more accurate the calculation will be.
4. SET UP A BALLISTIC SOLUTION
After we have set up our own rifle / cartridge data, there are few things that need to be taken into account when shooting: the distance to the target, the wind and our shooting skills. Distance can be measured for example with a laser rangefinder and then put in. Wind can also be measured with a wind gauge but it is important to remember that the wind in the target area can be very different from that in the shooting position. Lapua Ballistics gives a ballistic solution based on stationary wind, so in the end, the shooter’s task is to estimate how much the wind factor will be.
It’s good to remember that Lapua Ballistics is a starting point and designed to assist the shooter. Software and apps have ways of helping us adjust the sight and predict the ballistic solution but they will not replace the shooter. We still have to pull the trigger and record our range data. By keeping good range notes and with the support of good ballistic software like Lapua Ballistics, we should be able hit in all environments.
Article Find by EdLongrange. We welcome reader submissions
The 2-day Precision Rifle EXPO wraps up today at the Arena Training Facility in Blakely, Georgia. Over 700 visitors have attended the two-day event. This year, manufacturers will be showing off actions, optics, ammo, reloading equipment, stocks, chassis, electronics, supporting equipment (bags and tripods), rifles, triggers, suppressors, and much more. There will be training sessions on precision handloading, wind reading, marksmanship, ballistic devices, and introduction to competition.
There was so much to see and do at the EXPO, with over 50 companies displaying their wares, including some exciting new products. As a teaser, here are three highlights from Sunday in Georgia.
1. Shooting .22 LR Rimfire Ammo at 625 and 850 Yards
David Lott was shooting his .22 LR Vudoo Gun Works Rifle at what can be called “Extreme Long Rang” — at least for a .22 LR rimfire cartridge. David achieved multiple hits on 18″ square targets at 650 yards and 850 yards. Note the TACOM HQ Charlie TARAC Prism on the front of the scope. This $1700 optical device allows David to see the target even with the rifle aimed at an extreme up-angle to compensate for huge bullet drop.
2. AMP Annealing Team — All the Way from New Zealand
Alex Findlay and son Matt, creators of the impressive Annealing Made Perfect (AMP) Annealing Machines, traveled all the way from New Zealand to attend the EXPO. There the AMP team displayed the AMP Mark 2 Machine, plus a new servo-motor bullet seating machine.
Alex reports: “The bullet seater has been putting in some work today. Having some fun playing around with a few variables and how they effect neck tension. So far the results are pretty fascinating!” Yes, that silver gadget is a new, prototype high-tech Load Cell Bullet Seating Press. This uses an electric servo motor to move a ram downwards on the Wilson seating die. A wealth of precise data is collected during the bullet seating process. Alex noted: “Thanks for Berger Bullets for supplying the bullets and the Lapua brass!”
Watch “Smart” Load Cell Seating Press in Action
This interesting video shows how the new, prototype Load Cell Bullet Seating Press with Auto-Drive works. (AMP plans a production version for 2020 or sooner). There’s never been a press like this before! Everything else is old technology.
3. Applied Ballistics Mobile Ballistics Lab
Applied Ballistics brought its Mobile Ballistics Lab down to Georgia. To demonstrate its capabilities, the AB crew set up the big gray Doppler Radar unit for testing. LabRadars were set on ground level as well (see below). Applied Ballistics Guru Bryan Litz lamented that he was spending more time looking at computer screens than having fun shooting rifles on the impressive ranges at the Arena Training Facility.
The Mobile Lab carries both hardware and electronics. Bryan reports: “The Mobile Lab will transport most everything that’s in the main lab including the Doppler radar. This rig is new, so the load-outs will be somewhat flexible depending on the venue we are supporting.”
Arena Training Facility — 2300 Acres with Ranges out to 2100m
The 2300-acre Arena Training Facility is a premier shooting facility with multiple shooting ranges from 50m to 2100m. Arena’s 1000-yard covered Known Distance range offers multiple benches, steel and paper targets out to 1000 yards. On Arena’s UKD (unknown distance) range shooters can engage steel out to 2300 yards. This 2100m UKD range boasts a 3-Story Shooting Tower, Air-Conditioned Shoot House, and multiple Positional Challenges.
At last year’s EXPO, Long-Range Clinics were held on the 1000-yard Range:
The National Rifle League (NRL) started off sponsoring major centerfire tactical matches, similar to PRS competitions. That proved successful and the NRL added a .22 LR Rimfire series, called NRL22. The NRL22 rimfire discipline has been a success, as rimfire guns are fun to shoot and ammo is very affordable. The most popular NRL22 matches have drawn up to 150 rimfire competitors. Get more info at NRL22.org.
NRL22 is a great way to get into competition shooting with minimal expense. There are Five (5) classes: Open, Base, Ladies, Young Guns (8-16), and Air Rifle. Base Class is for the budget-minded shooter — the combined MSRP of Rifle and Optic may not exceed $1050.00 (so you could spend $550 on a rifle and $500 on a scope for example). That keeps the sport affordable. Open, Youth, and Ladies Classes have no price limits on Rifle and Optic. Visit NRL22.org to find an NRL22 match near you.
The two videos above from Long Range Shooters of Utah feature footage from the January 2019 course of fire from the NRL22 Rimfire Competition Series. Note the snow-capped hills in the lower video. Useful commentary explains how competitors establish their shooting positions.
NRL22 Publishes Monthly Courses of Fire
This video from a Utah NRL22 Match features shooters from each of the four rimfire classes. With the NRL22 program, scores from from local matches like this are ranked against scores from other matches nationwide. In advance of match dates, NRL22.org publishes 5 courses of fire to be used in that month. Each course of fire will always include 2 prone stages, 1 positional, 1 barricade, and a fifth that can be any of those. Details of the course of fire, including target distances, target sizes, time limits, and barricade profiles, are listed at NRL22.org.
Official NRL22 Rimfire Steel Target Package
This video reviews the official NRL22 Rimfire Steel Target Kit. Crafted by JC Steel Targets from AR500 steel, this kit from JC Steel Targets includes 8 hanging targets, 4 KYL (Know Your Limits) targets, plus all needed Hangers. That’s lot of steel and hardware for $329.99.
About NRL22 Tactical/Practical Competition The goal of NRL 22 is to make Precision Rifle competitions more available to every community. However, nearly all localities have access to 100-yard ranges and most shooters own a .22 LR rifle. The NRL22 program is designed so any facility with a 100-yard range can host matches. Participants at local NRL22 events can then attend a National Championship. NRL22 started with four classifications: Open, Base, Ladies, and Young Guns (8-18 age). Air Rifle is the new fifth class. For the 2018/2019 Competition Season, over 700 shooters attended NRL22 matches. In the 2019/2020 Competition Season, the NRL22 expects significant growth and is excited to welcome new members and clubs.






 Applied Ballistics brought its Mobile Ballistics Lab down to Georgia. To demonstrate its capabilities, the AB crew set up the big gray Doppler Radar unit for testing. LabRadars were set on ground level as well (see below). Applied Ballistics Guru Bryan Litz lamented that he was spending more time looking at computer screens than having fun shooting rifles on the impressive ranges at the Arena Training Facility.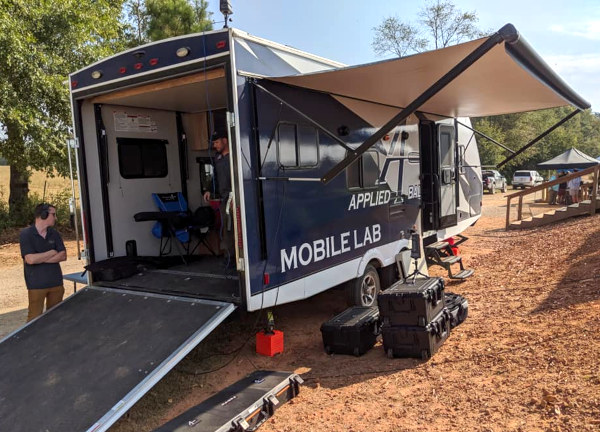


 The goal of NRL 22 is to make Precision Rifle competitions more available to every community. However, nearly all localities have access to 100-yard ranges and most shooters own a .22 LR rifle. The NRL22 program is designed so any facility with a 100-yard range can host matches. Participants at local NRL22 events can then attend a National Championship. NRL22 started with four classifications: Open, Base, Ladies, and Young Guns (8-18 age). Air Rifle is the new fifth class. For the 2018/2019 Competition Season, over 700 shooters attended NRL22 matches. In the 2019/2020 Competition Season, the NRL22 expects significant growth and is excited to welcome new members and clubs.


