Sturm, Ruger & Co. has created a series of 11 short videos that trace the history of firearms, from matchlocks to modern semi-autos. Ruger’s “History of the Gun” video series provides a fascinating look at firearms technology throughout the years. The host is Garry James, Senior Editor of Guns & Ammo magazine. Featured here is Segment 7 on Rifling. Other installments in the series are linked below.
Many guys getting started in long range shooting are confused about what kind of scope they should buy — specifically whether it should have MIL-based clicks or MOA-based clicks. Before you can make that decision, you need to understand the terminology. This article, with a video by Bryan Litz, explains MILS and MOA so you can choose the right type of scope for your intended application.
You probably know that MOA stands for “Minute of Angle” (or more precisely “minute of arc”), but could you define the terms “Milrad” or “MIL”? In his latest video, Bryan Litz of Applied Ballitics explains MOA and MILs (short for “milliradians”). Bryan defines those terms and explains how they are used. One MOA is an angular measurement (1/60th of one degree) that subtends 1.047″ at 100 yards. One MIL (i.e. one milliradian) subtends 1/10th meter at 100 meters; that means that 0.1 Mil is one centimeter (1 cm) at 100 meters. Is one angular measurement system better than another? Not necessarily… Bryan explains that Mildot scopes may be handy for ranging, but scopes with MOA-based clicks work just fine for precision work at known distances. Also because one MOA is almost exactly one inch at 100 yards, the MOA system is convenient for expressing a rifle’s accuracy. By common parlance, a “half-MOA” rifle can shoot groups that are 1/2-inch (or smaller) at 100 yards.
What is a “Minute” of Angle?
When talking about angular degrees, a “minute” is simply 1/60th. So a “Minute of Angle” is simply 1/60th of one degree of a central angle, measured either up and down (for elevation) or side to side (for windage). At 100 yards, 1 MOA equals 1.047″ on the target. This is often rounded to one inch for simplicity. Say, for example, you click up 1 MOA (four clicks on a 1/4-MOA scope). That is roughly 1 inch at 100 yards, or roughly 4 inches at 400 yards, since the target area measured by an MOA subtension increases with the distance.
MIL vs. MOA for Target Ranging
MIL or MOA — which angular measuring system is better for target ranging (and hold-offs)? In a recent article on his PrecisionRifleBlog.com website, Cal Zant tackles that question. Analyzing the pros and cons of each, Zant concludes that both systems work well, provided you have compatible click values on your scope. Zant does note that a 1/4 MOA division is “slightly more precise” than 1/10th mil, but that’s really not a big deal: “Technically, 1/4 MOA clicks provide a little finer adjustments than 1/10 MIL. This difference is very slight… it only equates to 0.1″ difference in adjustments at 100 yards or 1″ at 1,000 yards[.]” Zant adds that, in practical terms, both 1/4-MOA clicks and 1/10th-MIL clicks work well in the field: “Most shooters agree that 1/4 MOA or 1/10 MIL are both right around that sweet spot.”
You can never be too safe when hand-loading your own ammunition. This helpful Brownells video outlines the Seven Fundamental Reloading Safety Tips. This is important information for novice hand-loaders and a good refresher for those with reloading experience!
Summary of the Seven Safety Tips:
1. Store your reloading supplies in a safe and dry location, away from children and away from any possible source of ignition. It is also smart to keep your powder and primers separate.
2. Get and use respected reloading manuals, especially for new cartridges. Start low and work up slowly while watching for warning signs of pressure and/or case fatigue.
3. Locate your reloading activity where you will not be distracted. If you get interrupted, stop. (Distractions will eventually lead to mistakes.)
4. Do NOT mix powders. Keep your powders clearly marked and dated. You can use masking tape to write the date on the container.
5. If you load the same cartridge type for different firearms, make sure your ammo headspaces properly in each gun.
6. Check cases frequently. Look for split necks, case head separation or other signs of fatigue and excessive pressure.
7. If reloading military brass, be aware that case capacity is usually reduced, and initial loads should be at least 10-15% lower than published data.
Here are some other tips that will help your avoid making costly mistakes (such as using the wrong powder, or undercharging a case):
Powder Type — Always double-check the label on your powder containers. After placing powder in the powder measure, put a piece of tape on the measure with the powder type written on it. Some guys write the powder type on a card and place that right in the hopper.
Scale Drift — Electronic balances can drift. If you are using a digital powder scale, calibrate the scale with a test weight every 50 rounds or so.
Case Fill — If you throw more than one charge at a time, look INSIDE every case before seating a bullet. Squib charges can be dangerous if you don’t notice them before firing the next round.
Progressive Presses — When using a progressive press, consider using an RCBS Lock-Out Die. This will detect a low charge and stop the machine. These dies will work with RCBS, Hornady, and Dillon progressives.
Here at AccurateShooter.com, we’re more about rifles than pistols. But we know that the majority of our regular readers own handguns, and many also have concealed carry (CCW) permits. Our editors also enjoy shooting pistols, both rimfire and centerfire. Accordingly, we try to provide helpful insights for the pistoleros out there. We found a great article on the Shooting Illustrated website that showcases a huge variety of holsters — 30 in fact. Each holster is illustrated, with pros and cons explained. These are all EDC holsters, meaning those designed for “Every Day Carry”.
Shooting Illustrated calls this article “HolsterPallooza” and it really does provide a ton of helpful information. Most other holster reviews on the web may feature a half-dozen holsters at the most. In this Holsterpallooza article you can see 30 holsters, with a wide variety of materials, designs, and applications. There are small molded IWB holsters for CCW, conventional on the belt holsters, leather shoulder holster rigs, and even ankle holsters. This is a great place to start if you are in the market for a holster.
Here’s sample of the many holster options reviewed, an innovative hybrid IWB holster constructed with leather over Kydex. That gives you the “best of both worlds” — the secure fit/retention of a molded Kydex shell, with an attractive leather exterior.
Shooting Illustrated explains: “As the interface between your gun and your body, the holster is a vital component of your carry rig. In many cases, the circumstances of your daily life will determine the method of carry you choose. This, in turn, will determine what type of holster you need, which may end up determining the handgun you carry. Therefore, choosing the method and type of holster may be as, or even more important than, choosing a firearm.”
Hickok 45 Reviews CCW Holsters:
If you want to see even MORE holsters for “Every Day Carry” (EDC), check out this video from Hickok 45. This popular YouTube host looks at 15 different IWB holsters from a number of manufacturers. Hickok 45 examines many hybrid holsters that combine Kydex or plastic with leather for increased comfort. He has his favorites… and they might not be what you’d expect. NOTE: As this video has been watched over 810,000 times, you may also want to read the viewer comments. There are many helpful suggestions from CCW holders who carry daily.
Today is October 31st, Halloween (originally “All Hallows Eve”). That means it’s pumpkin time. Just how much fun can you have with pumpkins? Watch these two videos and find out. In the first video, the RatedRR team sends a few orange gourds to pumpkin heaven using Det Cord, C4, and binary explosives. The sequence starting at the 2:00 minute mark in the first video is truly amazing. WARNING: DO NOT TRY THIS AT HOME!
Watch Pumpkin Blasting with Explosives
In the next video, a pumpkin carved as a Death Star serves as the target for a .50 caliber rifle (looks like a Barrett M82 .50 BMG). As you may guess, the pumpkin Death Star suffers the same fate as the Hollywood version in Star Wars. NOTE: At the 0:42 mark in the video, a graphic displays “30,000 FPS”. That’s the high-speed camera’s frame-per-second rate, NOT the projectile velocity in feet-per-second.
Watch .50 BMG Rifle vs. Death Star Pumpkin
Warning: These demonstrations were carried out on closed ranges by experienced professionals certified to use explosives. Possession of C4 and Det Cord may be a violation of various Federal, State, and local laws. Detonating cord and C4 are classified as high explosives and are regulated by the BATFE. Don’t even think about trying to repeat these stunts on your own.
Tomorrow is October 31st, Halloween (originally called “All Hallows’ Evening”). That means kids in costumes will be ringing doorbells as soon as it gets dark. No doubt some of you proscrastinators will wait ’til the last minute to set out your Halloween decorations and Jack-O-Lanterns. Don’t worry, in the video below, our friend, 3-Gun ace Taran Butler, shows how to carve a pumpkin in just about 5.5 seconds, give or take a tenth. Taran performed this feat of speed-carving with his trusty Infinity handgun, chambered in 9mm Major.
What Are the Origins of Halloween?
Halloween or Hallowe’en (a contraction of “All Hallows’ Evening”), also known as All Hallows’ Eve, is a yearly celebration observed on October 31, the eve of the Western Christian feast of All Hallows (or All Saints). According to many scholars, it was originally influenced by western European harvest festivals and festivals of the dead with possible pagan roots, particularly the Celtic Samhain. Others maintain that it originated independently of Samhain and has Christian roots.
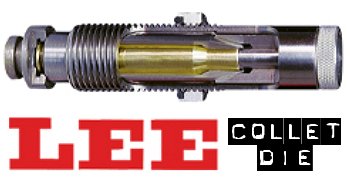
For those who prefer to neck-size their brass (rather than full-length-size), the LEE Collet Die is a popular, inexpensive option. It works by having collet tangs or “fingers” press the neck against a central mandrel. The benefit is that you get a very straight neck, which is sized consistently from top to bottom. Canadian shooter Jerry Teo explains: “LEE Collet Dies produce sized cases with very low runout (measured runout is under .001″ using a Sinclair concentricity gauge). You also don’t get the build-up of brass at the base of the neck, as can happen with bushing neck dies. The neck-shoulder junction stays nice and crisp.”
TIP ONE — Adjusting Tension
LEE Collet dies don’t have a specific mechanical adjustment for neck tension. But you CAN easily modify the die to provide more or less tension. If you want to adjust the neck tension using a Lee Collet die, you can simply chuck the mandrel in a drill and reduce the diameter with some sand-paper (to increase neck tension) or you can order a mandrel the next caliber larger and turn it to whatever diameter you want (the larger the mandrel diameter, the less the neck tension). You can also order custom mandrels from Lee sized to any diameter you want.
Regarding neck tension, Boyd Allen makes an important point: “The only way to properly get more neck tension with collet dies is to either reduce the diameter of the mandrel, or order a smaller-diameter mandrel from Lee. I remind folks that adjusting the die position to have more toggle at the top of the ram stroke (not the factory recommended method), or leaning on the press handle with more force than recommended will NOT increase neck tension.”
Lee also offers Custom Collet Dies, made from two fired cases. Lee offers custom standard collet dies for $70.00 (plus S/H) and custom large collet dies for $160.00 (plus S/H). CLICK HERE to ORDER.
TIP TWO — Polish and Tune for Easy Case Removal
Some users have complained that their Collet Dies grab the case-neck too firmly, making the case hard to remove. There are solutions to this problem. First inspect the collet fingers and smooth the inner surface up a bit with polishing compound or an extra-fine sanding pad. Second, you can open up the fingers a little bit. LEE recommends that if your Collet Die is sticking, take a steel punch and tap the fingers apart a little bit so that the natural “unloaded” position is wider. Lastly, you should lightly lubricate the outside of the collet fingers (see arrows) before you re-assemble the die. This will ensure they slide smoothly. Also, to prevent the collet fingers from closing too tight, never load up the die with your press without putting a case in place first. Without a case neck between the collet fingers and the mandrel, the collet can clamp itself too tight as you raise the ram.
TIP THREE — Always Have a Case Inside When Operating Collet Die
Our friend Boyd Allen tells us that you need to follow directions and NEVER operate the die without a case inside. Boyd explains: “This is because doing so will spring the quadrents of the collet inward so that they interfere with the insertion of a case, and the user will have to figure out how to undo the damage if the die is to operate properly. This advice would not be needed if everyone read the instructions before using the die…. but many times, they don’t. Another thing that I tell new users is to take the die apart so that they will have a better chance of understanding how it works.”
TIP FOUR — Size Twice and Spin Your Case 1/8th Turn
After reaching fully “down” on your press handle, withdraw the case about an inch and manually rotate it about 1/8th (NOT 1/4 or 1/2) turn while still in the shell-holder, then size again. This will place the die’s collet petals on the four “high spots” of the case neck and will result in a rounder, more evenly-sized neck with slightly more bullet tension. This takes only about one second more per case and is well worth the slight extra effort. (We thank reader Stonecreek for this smart tip).
Here’s a good video that explains how to use a Lee Collet Die to Neck-Size .243 Win brass:
Here’s a cool contest courtesy of Pyramyd Air. Win a pick-your-own prize package worth up to $3000.00. The winner selects any combination of products from Pyramyd Air’s entire inventory — air rifles, scopes, pellets, targets — you name it. You can even choose a set of products that cost more than $3000 — you just pay the difference. Act soon — the entry deadline is November 10, 2018.
This Backyard Brawl contest is a bit unusual. To enter you need to shoot a set of mini silhouettes and then make a video. The silhouette targets are free with code BRAWLER (shipping extra). Once you receive the targets, knock ‘em down with your airgun, and upload a video to YouTube or Vimeo.
How to Enter Backyard Brawlin’ Contest
Order Air Venturi Airgun Slynger Metal Silhouette Targets, FREE with promo code BRAWLER (shipping extra). Then upload a video of you shooting the targets with an air rifle or air pistol. Contest ends November 10, 2018. Limit one entry per person. All entrants will receive $5 in Bullseye Bucks at Pyramyd Air. Winner will be announced the week of November 12, 2018.
Backyard Brawl Contestant Videos
Here are two videos recently uploaded by Backyard Brawl contest entrants. You’ll see some pretty good shooting with interesting airguns. Can you make a more entertaining video?
Here Matt Coulter shoots a .22 Caliber Royale with JSP Express Jumbo pellets at about 580 fps.
In this video, UpNorthAirGunner shoots a Benjamin Marauder .177 Field & Target, a Broom-Handle Mauser clone full-auto BB Pistol, and a Seneca “Dragon Claw” .50 caliber air rifle.
The Rimfire Challenge is just about the most fun you can have with .22 LR pistols and rifles. This week Shooting USA TV features the 2017 Rimfire Challenge World Championship hosted at the Cavern Cove Rimfire Range in Woodville, Alabama. This major match attracts hundreds of competitors from around the nation. It’s fast and fun with instant feedback from ringing plates indicating hits. The Rimfire Challenge Championship is family-friendly event that’s great for all skill and experience levels.
Shooting USA TV Airs Wednesday Night on the Outdoor Channel:
9:00 PM Eastern and Pacific; 8:00 PM Central
The 2017 Rimfire Challenge World Championship brought 350 competitors to Alabama from as far as California and Washington State to shoot .22 LR rimfire pistols and rifles on 14 challenging stages, all with steel plate targets. The Challenge is designed to attract first-time competitors. “Our mission is to promote, protect and preserve hunting and the shooting sports. And to see all these young kids out here with their parents and their families all shooting together and enjoying the shooting sports. That’s what it’s all about, ” says Tisma Juett with the NSSF.
The Challenge offers plenty of action, with fourteen (14) stages of fire — each with a wide variety of steel plates. There is no set pattern or design, so each stage is different. You need to be fast AND accurate — you get penalty points for missing any plates. Scores are based on time for each stage, with add-ons for penalties. As with most action shooting games — it’s always best to shoot “clean” (no misses), even if you slow down a little bit.
At the 2016 NSSF Rimfire Challenge Championship Smith & Wesson was on hand with demo rifles and pistols. See the action in the S&W-produced video above. Competitive shooting is one activity in which entire families, both oldsters and youngsters, can come together in a supervised setting to enjoy the spirit and camaraderie of competition.
NSSF Rimfire Challenge Basics
The Rimfire Challenge is a two-gun event so you need a rifle and a handgun (which can be either a semi-auto pistol, or revolver). There are two divisions: 1) Open — Any firearm (pistol or revolver in handgun class) with scopes, optical sights, light gathering scopes, battery powered optics or lasers; and 2) Limited — Pistols and rifles with iron sights, adjustable metallic sights, and/or fiber optic. Bolt-action rifles and lever-action rifles are allowed, but self-loading (semi-auto) rifles are most popular because they can shoot quickly.
Many different stage designs can be employed at Rimfire Challenge matches. Here are two examples from the Rimfire Challenge Suggested Courses of Fire:
Rimfire Rifle of Choice: S&W M&P 15-22
If you want to shoot both Limited and Open class, a very good rifle choice rifle is the Smith & Wesson M&P 15-22. The feel, weight, and controls will be familiar to any AR owner. These 15-22s have been refined over the years and now are very reliable. Shoot it in Limited Class with the standard iron sights. Then fold down the sights and attach a 1-4X optic to shoot Open Class.
Rimfire Challenge Organizational Change for 2018
The National Shooting Sports Foundation (NSSF) announced that, starting in January, 2018, the NSSF Rimfire Challenge will be transitioned to a new organization: the Rimfire Challenge Shooting Association. Originally developed by Ruger’s Ken Jorgenson, TV host Michael Bane and the late Nelson Dymond, the program was first known as the Ruger Rimfire Challenge. NSSF took over the the program in 2014, changing its name to the NSSF Rimfire Challenge. The new organization will be led once again by Ken Jorgensen and Michael Bane.
Probably the most popular centerfire rifle round in the Western Hemisphere is the .223 Remington and its metric match, the 5.56x45mm. Though many folks use “.223 Rem” and “5.56×45″ interchangeably, there are some meaningful differences in specifications for the original .223 Rem and the 5.56x45mm cartridge, as adopted by the U.S. military and NATO armies. The default chamber throats are slightly different and the .223 Rem is rated at 55,000 PSI vs. 62,366 PSI for the 5.56x45mm.*
.223 Rem vs 5.56x45mm — Key Differences
There is a truly outstanding, very thorough article on the subject, published by LuckyGunner.com.** This involved extensive testing, with pressure monitors, of 5.56x45mm ammo in .223 Rem chambers. Those tests revealed the peak pressures. Here is one of the ammo test charts:
NOTE: “The observed chamber pressure for Federal XM855 5.56mm ammunition in a .223 Rem chamber exceeded .223 maximum pressures, but not by a massive amount. The ninth shot (the red line) was an underpowered cartridge which exhibited significantly lower velocity and pressure than the other rounds, so it was excluded from the average velocity and pressure numbers for this chamber.”
And if you’re curious, LuckyGunner also fired .223 Rem ammo in a 5.56x45mm NATO-chambered AR15 rifle. As you would expect, the peak pressures were significantly lower, but the .223 Rem ammo still cycled the semi-auto AR-platform rifle perfectly well:
UltimateReloader.com Explains .223 Rem vs. 5.56x45mm
To explain the key differences between the .223 Rem and 5.56x45mm cartridges our friend Gavin Gear of UltimateReloader.com has created a very thorough 12-minute video. This covers the cartridge specifications and explains key considerations for hand-loaders. Gavin also addresses the oft-asked question “Can I shoot 5.56x45mm ammo in my .223 Rem chamber?” Gavin’s video is definitely worth watching. In fact, this is one of the most popular videos Gavin has ever created — it has been watched over 300,000 times on YouTube.
What Exactly Is the 5.56x45mm NATO Cartridge?
The 5.56×45mm NATO is a rimless bottle-necked intermediate cartridge family standardized by NATO with development work by FN Herstal. It consists of the SS109, SS110, and SS111 cartridges. Under STANAG 4172, it is a standard cartridge for NATO forces as well as many non-NATO countries.
Bullet diameter: 5.70 mm (0.224 in)
Maximum pressure (EPVAT): 430.00 MPa (62,366 psi)
Maximum pressure (SCATP 5.56): 380.00 MPa (55,114 psi)
Case length: 44.70 mm (1.760 in)
Rifling twist: 178 mm or 229 mm (1 in 7 in)
Parent case: .223 Remington (M193)
Ammo-Maker Federal Premium Compares .223 Rem and 5.56x45mm
Here is a video from ammo-maker Federal Premium explaining the difference between .223 Remington and 5.56x45mm NATO. Federal states that you may experience excessive pressures when firing a 5.56x45mm in a standard .223 Remington chamber:
One leading gunwriter has addressed the question of shooting 5.56x45mm ammo in .223 Rem chambers. He advocates caution (for more info, SEE pressure tests by LuckyGunner.com):
“I have received a slew of questions — many from first time AR-type rifle buyers — about the .223 Rem and the 5.56×45 mm NATO cartridges. Can I shoot 5.56×45 mm NATO in my .223 and vice-versa? Are these the same cartridge?
Externally, the two cartridge cases are identical. The main differences are that 5.56×45 mm NATO operates at a higher chamber pressure (about 60,000 PSI versus 55,000 PSI on the .223 Rem.) and the 5.56’s chamber is slightly larger than that of the .223 Rem. Also, the throat or leade is longer in the 5.56×45 mm chamber. What does this mean? You should not shoot 5.56×45 mm NATO out of a rifle that is chambered in .223 Rem. And be aware that some .223 Rem. ammunition will not reliably cycle through some AR-style .223 Rem. rifles, but it usually does. As a matter of fact, I have not encountered any difficulty with current .223 Rem. loads cycling through a 5.56 mm AR-style rifle.” – Mark Keefe, Editor, American Rifleman
* According to the official NATO proofing guidelines, the 5.56×45mm NATO case can handle up to 430.0 MPa (62,366 psi) piezo service pressure. The U.S. SAAMI lists Maximum Average Pressure (MAP) for the .223 Remington cartridge as 55,000 psi (379.2 MPa) piezo pressure with deviation of up to 58,000 psi (399.9 MPa). The chamber for military 5.56×45mm NATO has a longer throat prior to the bullet contacting the rifling which results in lower pressures when firing 5.56×45mm NATO ammunition. If 5.56×45mm NATO is used in rifles chambered for .223 Remington the bullet will be engraving the rifling when chambered. which can increase pressures past SAAMI Max levels. NOTE: The C.I.P. standards for the C.I.P. civilian .223 Remington chamber are much closer to the military 5.56×45mm NATO chamber.
** The full-length LuckyGunner article is well worth reading. It even provides specifications for a number of .223 Rem reamer types, and compares the original .223 Rem, the 5.56x45mm NATO, and the modern .223 Wylde chamberings.


 Tomorrow is October 31st, Halloween (originally called “All Hallows’ Evening”). That means kids in costumes will be ringing doorbells as soon as it gets dark. No doubt some of you proscrastinators will wait ’til the last minute to set out your Halloween decorations and Jack-O-Lanterns. Don’t worry, in the video below, our friend, 3-Gun ace
 TIP ONE — Adjusting Tension
 TIP TWO — Polish and Tune for Easy Case Removal


