What can happen when the bottom-most primer in a primer feed tube goes off? A big bang, that’s what. Some or all of the primers in the vertical feeding tube can go off in a chain detonation. That’s exactly what happened to Dustin Ellermann, Top Shot Season 3 Champion. Scary experience, but thankfully Dustin was not injured. He writes: “Super thankful that I was wearing my Wiley X eye protection this weekend when I was reloading some .223 rounds. My press detonated nearly 100 small rifle primers. Shown here is the magazine feed tube. Not fun but it could have been much worse. Stay safe!”
When working with progressive reloading presses, you should definitely wear eye protection. Dustin’s chain detonation experience proves that — without a doubt. Remember you only have one set of eyes!
RCBS APS Strips — Alternative to Primer Tubes When you stack a column of primers in a single metal tube, you’re asking for trouble. As Dustin Ellermann learned, when one primer fires, the entire column can follow suit in a chain detonation. Thankfully, you do have options when it comes to primer feeding on a progressive press. RCBS developed an innovative primer system for its Pro-2000 progressive press. Instead of being stored in a vertical tube, primers are placed in flat, plastic “APS” strips, with a ring of plastic separating each primer. Moving horizontally, primers are never stacked, so the chance of a chain detonation is reduced dramatically. The re-usable APS strips are color-coded for different primer types. You can buy CCI “pre-loaded” primer strips, or you can insert any brand of primers into strips using an RCBS strip-loader tool.
RCBS Pro-2000 with APS Strip Priming System
AccurateShooter.com Editor Uses Strip Primers
This Editor owns an RCBS Pro-2000 progressive press. The RCBS strip-priming system was one key reason I selected the RCBS Pro-2000 over similar-priced progressives from Dillon and Hornady. I believe the strip primer system is safer, more positive, and easier to use. Before I purchased my RCBS progressive, I “road-tested” the competition. I loaded hundreds of rounds on each of four different progressives: Dillon 550B, Dillon 650, Hornady Lock-N-Load, and RCBS 2000. I was concerned about the primer feed tubes on the Dillons, and I found the RCBS rotary powder measure was much more precise (and easier to adjust) than the sliding bar system on the Dillon machines. The RCBS priming system was definitely more fool-proof than the system on the Hornady press (a first-generation L-N-L that had issues with primer feeding). After “test-driving” blue, red, and green brand progressives extensively, I settled on the RCBS Pro-2000. A decade later, I still think I made the right choice. I like the APS strips for big jobs, and I can also use them in the RCBS hand-priming tool (shown below). With the strips, it’s easy to prime 20 or 40 cases at a time, and then switch to another type of primer for comparison testing.
The APS priming system also works with press-mounted priming tool, bench-mounted tool, and APS hand-tool. EdLongRange uses the press-mounted tool: “I also like the APS approach but use the press-mounted unit (saves your hands/wrists — and I haven’t had a need for a progressive press in over 20 years). Loading the primers in the strips is a bit of a PITA but very manageable. As with all tools there is a learning curve.” CLICK HERE for video showing strip-loading tool and press-mounted APS tool. The press-mounted tool is no longer in production, but you can still BUY IT HERE.
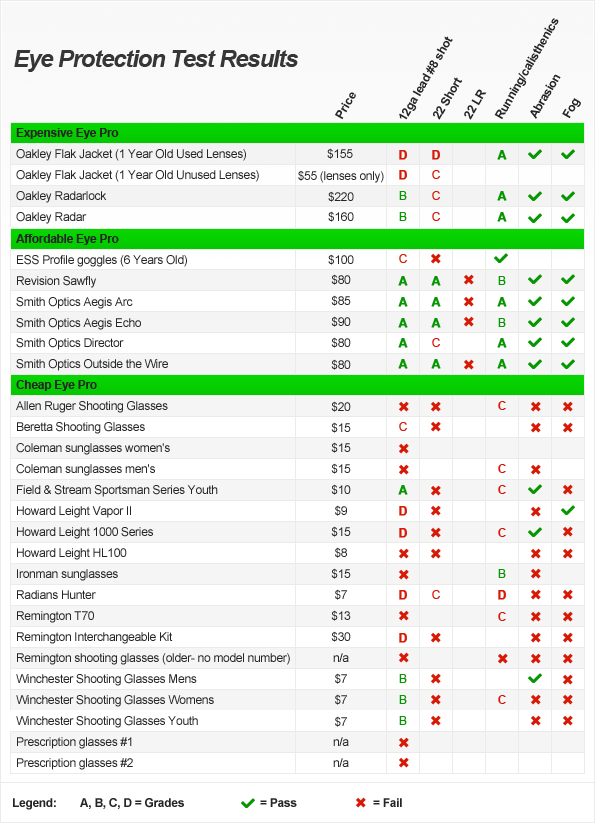
If you’re one of those folks who doesn’t wear eye protection, you need to check out the LuckyGunner Labs Eye Protection Test. For those who DO wear safety glasses — don’t assume that everything is OK. Just because you purchased name-brand “safety glasses” doesn’t mean that you are getting truly effective protection. In fact, many forms of protective eyewear sold today are flimsy, or poorly made. Consequently, they won’t stop even low-energy, slow-velocity fragments.
Two years ago, LuckyGunner Labs conducted very extensive field tests of 28 types of eyewear, ranging in price from $7 to $220. Remarkably, some of the most expensive safety eyewear performed no better than $10 items. Many of the products failed shockingly — with the lenses coming right out of the frames when hit with pellets. LuckyGunner recorded these kind of failures even with ANSI Z87-“approved” eyewear. The reason is that the Z87 test is not tough enough: “The basic ANSI standard is referred to as Z87, and you’ll see this marked in a number of locations on most eye protection marketed to shooters. However, the Z87 impact standard involves a .25″ steel ball traveling at 150 fps — this is fine for protecting eyes from debris that might fall or be thrown, but is not extremely relevant to shooters, who are dealing with objects traveling at much higher velocities.”
Standard
Impact speed
Caliber/Size
ANSI Z87.1-2003
High Velocity
150 feet/second
45 meters/second
0.25″ diameter steel ball
(25 caliber)
Mil-PRF-31013
Vo ballistic test
640-660 feet/second
195 meters/second
0.15 inch diameter steel projectile (15 caliber)
The testers recommend you select eyewear that meets military specification (above and beyond ANSI Z87). The MIL-PRF-31013 Standard covers projectiles up to 650 feet per second. This is much more stringent. Additionally, you want to replace often-used protective eyewear every year or so. Long-term exposure to UV radiation can weaken polycarbonate and lessen its ability to withstand impacts.
SUMMARY — What to Look for in Protective Eyewear
THE GOOD — Eyewear Protects Against Direct Hit with .22 Short Bullet
APEL Revision Sawfly eyewear was shot with a .22 Short, pushing a 29 grain bullet at 710 fps. That’s not powerful by modern firearm standards, but this might be fairly representative of a ricochet bullet fragment. The Sawfly lens stopped this 29gr bullet with minimal damage to the cheek area.
THE BAD — Remington Eyewear Lenses Separate. Right Lens Enters Eye Socket
The most gruesome example was the cheap Remington eyewear which shed both lenses back towards the eyes, one of which embedded itself into the eye socket. The real-world implications of this action are disturbing to say the least.
THE UGLY — Prescription Glasses Failed Miserably
Many ranges don’t see any need for protective eyewear beyond prescription glasses. However, most prescription lenses offer little if any protection. If the prescription lenses are glass, this can create more problems. As shown below, these prescription glasses offered no ballistic protection, and, in fact, proved more dangerous to the eyes due to the flying glass shards.
Results Chart, Video Clips, and Photos copyrightLuckygunner.com.
Summary and Conclusions:
For faster-moving projectiles such as ricochet fragments, you need high quality, tested eye protection. LuckyGunner recommends eyewear with a single (one-piece) lens for any activity where your face might be struck by small, fast-moving objects. Individual lenses detach from the frames once a certain level of force is reached, and they are driven back into the eye sockets, where considerable damage may be done. There are good examples of protective eyewear with two separate lenses, but a broad, one-piece lens distributes force much better.
A wide, comfortable, and preferably soft rubber nosepiece is critical. Along with good “arms”, this will serve to keep the eye protection in place and will also reduce the chances of the lens being driven down or back into the face with enough force to damage the orbital bones.
A frame that connects across the top of the lens, not individual arms which attach to the outside corners of the lens, is recommended. This will reduce the chances of the lens detaching from the frame under impact (it’s still possible, just less likely). Some types of eye protection actually use the frame to absorb impact and distribute force.
NOTE: Andrew, the author of the LuckyGunner Eyewear report, was a former Navy Corpsman. Accordingly, he is familiar with health and safety matters.
What anti-corrosion products really fight rust effectively? You’ll hear many opinions, but what do actual field tests reveal? One rifle shooter, who posts on YouTube as BlueonGoldZ, wanted to separate myth (and marketing claims) from reality, so he completed his own long-term rust test using metal samples. First he used ordinary tap water spray, and then he did a second, longer-duration test with a salt-spray solution. Nine different products were tested: Break Free CLP, Corrosion-X, Frog Lube, M-Pro 7, Outers, Pro-Shot Zero Friction, Rem Oil, Slip 2000, and Tetra Gun Triple Action CLP.
BlueonGoldZ initially examined each product for its “beading” properties with a normal tap water spray. But the main test involved many multiple weeks of exposure after a “dense” salt-water spray. (No rust formed after two weeks tap water exposure, so the test was accelerated with salt-water exposure).
The clear winners in the test, as shown by the screen shot above, were Corrosion-X (Best), and Frog-Lube (Second Best). The photo shows the test samples two weeks after being sprayed with salt water. The results are pretty dramatic — you can see with your own eyes what happened. We think this is a very useful bit of real-world research.
Results from Similar Long-Term Salt Exposure Test
Unfortunately, BlueonGoldZ’s test did NOT include Eezox, which we have found to be extremely effective (on a par with Corrosion-X). In another long-term test of corrosion preventatives, the two best rust fighters were Eezox and Corrosion-X in that order. Since that test was completed, Corrosion-X, already an excellent product, has been enhanced. CLICK HERE for Long-Term Salt Exposure Test Report.
Schmidt & Bender 5-25×56mm PM II SFP Review Test conducted by RifleShooter.com
For police and military use, the Schmidt & Bender PM II (Police Marksman) is the gold standard of extreme use rifle optics. Other high end scopes aspire to the PM II’s level of durability, optical clarity, repeatability, and performance. With our assistance, RifleShooter.com recently conducted an in-depth test of Schmidt & Bender’s 5-25×56 PM II, Second Focal Plane (SFP) version. Here are the results…
The test scope is a 5-25×56 PM II (SKU: 677-911-995-A8-A2) with a Second Focal Plane (SFP) P4FL2-MOA reticle; double-turn elevation with rotation indicator; single turn windage; 1/4-MOA click values; illuminated reticle; and side adjustable parallax from 10 meters to infinity. This is an impressive beast — a big, sturdy, well-made optic.
Schmidt & Bender scopes have sophisticated features and a wide array of available options. The many options and features of the 5-26x56mm PM II are explained in this Schmidt & Bender video:
Second Focal Plane (SFP) Reticles
The Second Focal Plane (SFP) reticle design works well for long-range target shooters, benchrest shooters, hunters, and law enforcement. Often, SFP reticles are associated with Minute of Angle/MOA-based reticles. For target shooters who like to dial-in the elevation corrections, frequently SFP is the preferred reticle type. Also, these reticles are offered with thinner lines and markings to aid in target shooting, by not covering up as much of the target area, which is absolutely necessary in such cases as F-Class and Benchrest shooting. With a SFP reticle the size/width of the reticle lines stay constant at all magnifications.
Tall Target and Box Tests
Commentary by Rifleshooter.com Editor
To get an idea of how the PM II tracked I wanted to conduct a tall target and box test. I set up a couple of ISPC targets at 100 yards (below).
The target on the left is for the tall ladder test, the target at the right is for the box test.
With the scope zeroed* I set up a tall target test at 100 yards. I placed a 1″ orange dot on a pair of targets (above, left). We then used a four foot level to draw a plum line moving up from the dot and fired the three shot group below.
I dialed 30 MOA of elevation on the scope and fired another group. Measuring the distance between the two groups, would indicate how well the scope is tracking.
Since 1 MOA is 1.047″ at 100 yards, 30 MOA would be 31.41″ (30 x 1.047″ = 31.41″), looking at my tape measure, everything checked out (above).
Next I conducted a quick box test and set up an IPSC target with a orange paster at 100 yards. To do this I first Fired one round with the scope zeroed, then…
Dialed 6 MOA left, fired one round
Dialed 15 MOA up, fired one round
Dialed 6 MOA right, fired one round
Dialed 6 MOA right, fired one round
Dialed 15 MOA down, fired one round
Dialed 6 MOA left and fired one round
After this, you want to see two holes close to each other on the first target, as well as the correct spacing dialed in between each hole, so how did the PM II do?
Well, it worked like a champ! The rest of my time with the PM II has been equally impressive.
— It’s a lot of scope. The PM II is pretty much the best scope you’ll be able to buy anywhere in the world. There is a reason they are in such widespread Military and Law Enforcement use, it has earned its reputation.
— Great zero stop. The PM II has the easiest-to-adjust turret and zero stop system I have ever used. On the PM II, Schmidt & Bender’s exclusive “Sub Zero Stop” system allows movement below zero. On the test scope it was 1.75 MOA. This is a great feature if you switch ammunition or elevation and need to bump your zero down.
— Tracks well. This was to be expected with its widespread use by military units throughout the world.
— Crisp, precise adjustments. The tactile feel of the knobs is exceptional.
— Crystal clear glass. Great light transmission and reticle.
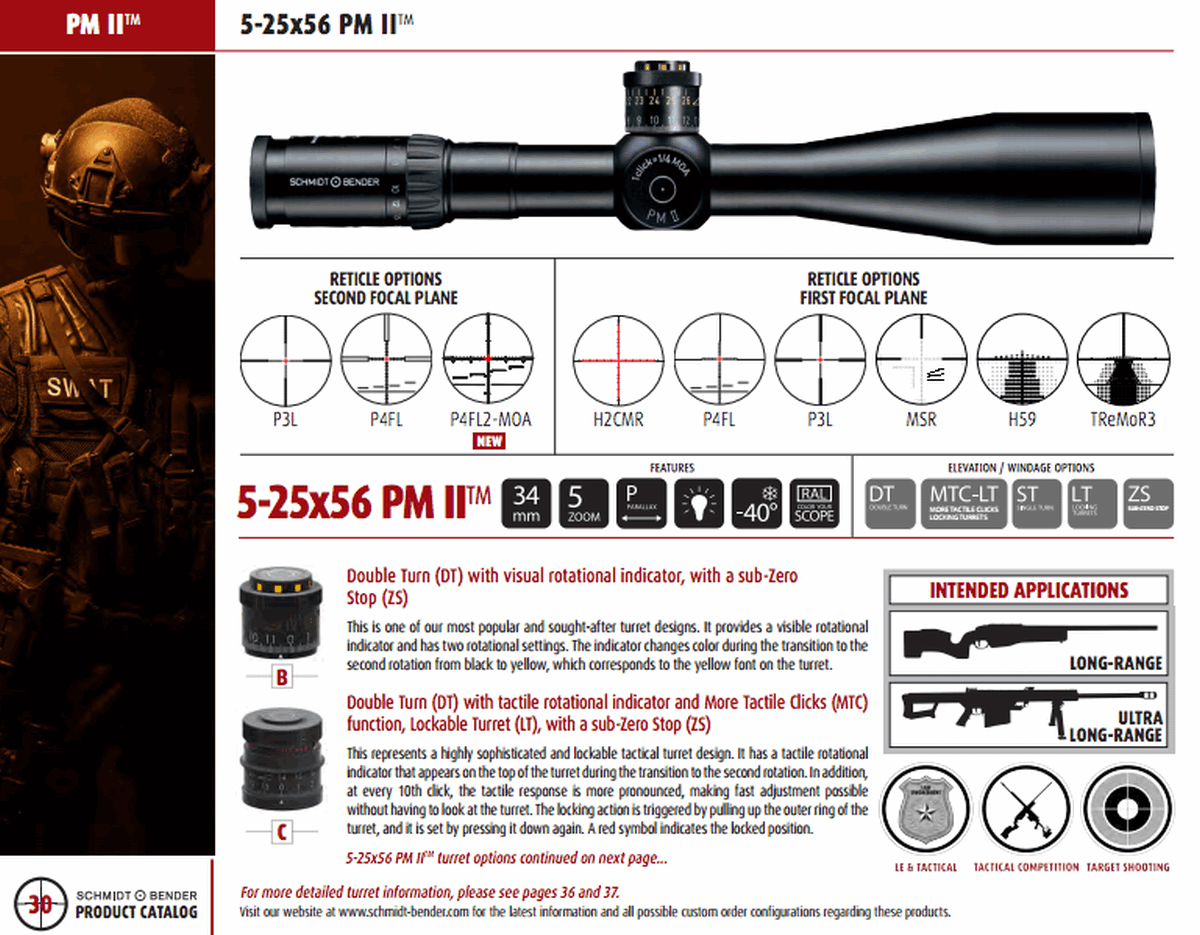
This Schmidt & Bender catalog page shows reticle options for the 5-25×56 PM II:
Click image to zoom
Turrets and Controls — How They Work
On the right side of the optic, you’ll notice a .250 MOA single-turn windage adjustment knob. On the top you’ll note the .250 MOA elevation adjustments. The tactile feel of each “click” is impressive — crisp and precise. A large parallax knob is located on the left side of the turret. The smaller knob located closer to the eyepiece is the adjustment knob for the illuminated reticle.
Here the view from behind the scope. Note the DT (double turn) elevation turret. At its current setting in the photo above, it is still on the first revolution (.250 MOA below 0) and as adjustments within the first revolution are made, you’d read the white numbers. During the second revolution, the windows in the top of the turret turn yellow, as shown below.
Test Rifle — .300 Win Mag in Accuracy International AICS AX Chassis
For testing and evaluation purposes I mounted the PM II in Spuhr ISMS mount on a custom made .300 Winchester Magnum rifle. Testing was done with handloaded ammo: Sierra’s 195-grain Tipped MatchKings over Norma brass and Hodgdon H4831SC powder.
This is the test rifle I used. It was built primarily with parts from Brownells.
Here is the Schmidt & Bender 5-25x56mm PM II SFP (foreground) alongside three other S&B products: 5-25×56 PM II FFP (Desert Tan), 12-50×56 PM II, 3-20×50 PM II
Better Pricing, Better Warranty, Better Availabilty
In addition to increased production and availability, Schmidt and Bender has reduced retail pricing on PMII models 14-19% depending on the model. S&B Marketing Director Kyle Brown commented, “S&B improved its warranty in the USA for 2017, and now offers a USA 20-Year Transferable Limited Warranty. We have reduced our pricing to be competitive; and have greatly increased our on-hand inventory levels to supply our customers with complete and on-time deliveries.”
Schmidt & Bender has made an effort to support the Precision Rifle Series (PRS). Brown said “for 2017 we have made a very hard push to become more active in PRS with our brand and with our products.”.
To learn more about Schmidt & Bender optics, CLICK HERE.
* Zeroing Process for PM II: The zero stop and turret settings are controlled by set screws. Zeroing is a breeze. You don’t have to move caps, insert shims, move clutch mechanisms, and so on. Simply loosen the screws, swing the turret back to “0” and you are all set. To establish a 100-yard zero, I hung a target at 50 yards, fired one round, dialed a correction, fired a confirmation shot and moved back to 100 yards. I fired one round at 100, made a correction and was zeroed. That’s it, three rounds, done.
In recent years, Forster Co-Ax® presses have been somewhat hard to find, as demand has out-stripped supply. However, right now Grafs.com has Co-Ax presses in stock, at just $299.99 — that’s six percent off the regular price. This sale price includes a set of jaws, and includes ground shipping (in the lower 48), after a single $7.95 (per order) handling fee. If you’ve been hankering for a Co-Ax press, now is definitely a good time to buy.
If you are not yet familiar with the many unique features of the Forster Co-Ax, we recommend you watch the video embedded below. This shows how the press operates and highlights the design elements which set the Co-Ax apart from every other reloading press on the market.
Video Shows Special Features of Forster Co-Ax Reloading Press
Forster Co-Ax Press Video Review
This is a very thorough review of the Forster Co-Ax done by Rex Roach. This 14-minute video shows the key Co-Ax features, explaining how the floating case-holder jaws work (3:30 time-mark), how the dies are held in place (4:40 time-mark), how spent primers are captured (6:10 time-mark), and how to set the primer seating depth (10:00 time-mark). We’ve used a Co-Ax for years and we still learned a few new things by watching this detailed video. If you are considering purchasing a Co-Ax, definitely watch this video start to finish.
The Co-Ax case-holder features spring-loaded, floating jaws. These jaws have two sets of openings, small and large. This allows the system to adapt to various rim diameters. The jaw plates can simply be reversed to switch from small jaw to large jaw. In the photo above, the Co-Ax is configured with the large jaw openings in the center.
Some custom barrel makers are now honing barrels (after drilling) to improve bore diameter uniformity, smooth the interior finish, and reduce barrel lapping times. For years, large-scale manufacturers of hammer-forged barrels have employed honing. Now the process is being used by smaller, “boutique” barrel-makers. This article explains how and why barrel honing is done. Take the time to watch the video. For anyone with an interest in barrel-making, this video is an eye-opener…
Barrel Honing Process Demonstrated (Worth Watching!):
For custom barrel makers, honing is a time-saver and cost cutter. A few minutes on a honing machine can cut lapping times in half, leaving a cross-hatched surface finish in single or low double-digit Ra. Honing is the same process used to make diesel fuel injectors with bore roundness and straightness controlled to fractions of a micron (<0.000040″), with surface finish Ra ≤0.15 µm (6 µin).
A key manufacturing process used for hammer-forged barrels is now getting attention from the makers of custom button-rifled barrels. This process is precision bore-honing. Honing produces a high-quality bore surface fast, which is critical to hammer forging. (Why is honing so important with hammer forging? Surface finish is the one feature of the barrel that cannot be controlled in hammer forging. Surface imperfections in a barrel blank tend to be amplified as the blank is formed on the rifling mandrel. And if the bore is chromed afterwards, imperfections in the surface finish become even more obvious.)
Honing dramatically improves bore diameter size uniformity and accuracy, surface finish and roundness throughout the length of the barrel. It can certainly be used in place of a pre-rifling lap. The chief difference between a lapped and honed bore is the direction of the finish lines in the bore. Honing leaves fine spiraling crosshatch lines, while a lap leaves lines going longitudinally in the bore. After rifling the manufacturer can remove the crosshatch finish with a quick lap if desired. Honing is fast, accurate, and can be automated. Its surface quality and geometry can duplicate lapping, except for the longitudinal lines of the lapped finish.
Frank Green of Bartlein Barrels told us: “We worked with Sunnen and we did all the initial testing on the prototype machine for them. The machine works great! We ordered and received last year a new manufactured machine with the changes we wanted on it and we just ordered a second one a month or so ago. Should be here next month.”
Many of our readers have been interested in learning how modern bullets are made. While a “boutique” bullet-maker, supplied with appropriate cores and jackets, can craft bullets using relatively simple hand dies and manual presses, factory production is different. The major bullet-makers, such as Barnes, employ huge, complex machines to craft their projectiles on an assembly line.
Modern hunting bullets are made with a variety of sophisticated (and expensive) machines, such as Computer Numerical Control (CNC) lathes, giant multi-stage presses, and hydraulic extruding machines that draw lead ingots into lead wire. Barnes offers an “inside look” at the bullet production process in a series of videos filmed at its Mona, UT factory. We’ve embedded four videos from the series here. These videos can also be viewed on the Barnes Bullets YouTube Channel.
Milling Slots in TSX All-Copper Bullet
This video shows how the slots (between the drive bands) in the TSX all-copper bullet are cut. The slots reduce the bearing surface that contacts the rifling. This helps reduce friction and heat, extending the life of barrels used with all-metal, drive-band bullets:
Varminator Bullets Produced in Jumbo Transfer Press
Here is the transfer press used in the production of Varminator and MPG Bullets. The process begins with a giant spool of flat copper material. The copper is stamped into jackets and eventually the formed Varminator bullets are ejected one by one into a bucket.
CNC Lathe Turns Bullets Automatically
In the video below, a Bar-Feed CNC crafts mono-bloc bullets from metal bar stock. Barnes uses a small CNC lathe to turn .50-caliber bullets from brass bar stock. We’re not sure which bullet is being made in this video. The material looks to be sintered metal. In the close-ups you can gold-colored shavings from when the machine was previously used for CNC-turned brass bullets.
Accuracy Testing in 100-yard Tunnel
Barnes regularly tests bullet samples for accuracy. In the video below, a Barnes technician loads sample rounds and tests them for accuracy in a 100-yard tunnel. The rounds are shot through a special fixture — basically a barreled action connected to parallel rods on either side. This allows the testing fixture to slide straight back on recoil (see it move back at 1:07-08 minute mark). Note how the tester actuates the trigger, which is oriented upwards, just the opposite of a normal rifle. The technician taps the upward-pointing trigger shoe lightly with a metal rod. Could this upside-down trigger orientation be useful in benchrest shooting — perhaps with railguns? It could make for an interesting experiment.
Story suggestion by EdLongrange. We welcome reader submissions.
Remington Arms Company celebrated its 200th year in business in 2016. The Remington enterprise was founded in 1816 by Eliphalet Remington in Ilion, New York, as E. Remington and Sons. Remington is America’s oldest gun maker and is still the largest U.S. producer of shotguns and rifles.
This week, Shooting USA TV spotlights Remington, exploring the company’s 200 years of continuous production. The show covers the rich history of Remington Arms Company, and focuses on many of the company’s most noted firearms.
The Shooting USA Hour Airs Tuesdays and Wednesdays on the Outdoor Channel:
Eastern Time:
Tuesday 3:00 PM
Wednesday 9:30 PM, 1:00 AM
Central Time:
Tuesday 2:00 PM
Wednesday 8:30 PM, Midnight
The Founding of a Great Enterprise
Eliphalet Remington II grew up in the countryside of Herkimer County, New York, learning the blacksmith trade. Eliphalet told his father he wanted a gun, so his father told him to build one himself. And, so he did in 1816 with the help of a hired gunsmith to bore and rifle his barrel. Eliphalet then took the finished flintlock to a local shooting match.
“And apparently it was a very successful barrel. His gun shot well,” says Remington Historian Richard Shepler. “So, neighbors, friends said, ‘ could you make me a barrel?’ Over time there was more and more demand.”
By 1828, Eliphalet moved into a factory in Illion, New York. In 1845, he jumped at the opportunity to buy the first of many government contracts. When the Civil War broke out, Remington stayed busy producing firearms. While later in the 1890s during peacetime, Remington manufactured cash registers, sewing machines, knives and even the first successful typewriter. The storied history continues, from the Remington Double Derringer to the Remington Model 700, unquestionably the most successful American sporting rifle.
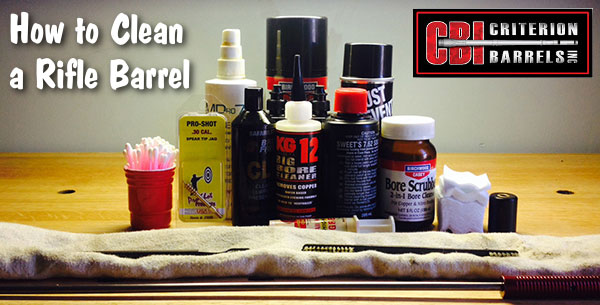
This article comes from the Criterion Barrels website. It provides good, conservative advice about barrel cleaning. Understand that cleaning methods may need to be adapted to fit the amount and type of fouling (and the particular barrel). In general, we do try to minimize brushing, and we follow the procedures Criterion recommends respecting the crown/muzzle. We have also had very good success using wet patches followed by Wipe-Out bore foam. Along with the practices outlined by Criterion below, you may want to try Wipe-Out foam. Just be sure to use a fitted cleaning rod bore guide, to keep foam out of the action recesses and trigger assembly.
The above video shows how to apply Wipe-Out or other bore-cleaning foam. We use a slightly different method. First, we use 3-4 wet patches to remove loose carbon fouling. Then we apply the foam as shown, but usually from the muzzle end (with bore guide in chamber). Here’s the important point — after 20-30 minutes, once the bubbles have dissipated, we apply the foam a second time, getting more of the active ingredients into the barrel. We then patch out, as shown, after 3-4 hours.
What is the Best Way to Clean a Rifle Barrel?
We are asked this question quite frequently alongside requests for recommended break-in procedures. Improper barrel cleaning methods can damage or destroy a barrel, leading to diminished accuracy or even cause a catastrophic failure. When it comes to barrel maintenance, there are a number of useful techniques that we have not listed. Some techniques may work better with different barrel types. This series of recommendations is designed to incorporate a number of methods that the Criterion Barrels staff has used successfully both in the shop and on their personal rifles. Please feel free to to list your own recommendations in the below comments section.
We recommend the use of the following components during rifle cleaning:
• Cloth patches (sized for the appropriate caliber)
• Brass jag sized properly for your bore
• One-piece coated cleaning rod
• General bore cleaner/solvent (Example: Hoppes #9)
• Copper solvent of your choosing (Example: Sweets/KG 12)
• Fitted cleaning rod bore guide
• Plastic AP brush or toothbrush
• Q-Tips
• Plastic dental picks
• CLP or rust preventative type cleaner
There are a number of schools of thought relating to the frequency in which a barrel should be cleaned. At minimum we recommend cleaning a barrel after each shooting session to remove condensation, copper, and carbon build-up. Condensation is the greatest immediate threat, as it can cause the barrel to rust while the rifle sits in storage. Copper and carbon build-up may negatively impact future barrel performance, increasing the possibility of a failure in feed or function. Fouling should be removed whenever possible.
The below tips will help limit the wear of different parts of your barrel during routine maintenance, helping extend the life of the barrel and improving its performance.
The Crown
The crown is the portion of the barrel where the bullet loses contact with the lands and grooves and proceeds to exit the firearm. The area most critical to accuracy potential is the angle where the bullet last touches the bore of the barrel.
Avoid damage to this area by using a plastic toothbrush and CLP type cleaner to scrub the crown from the exterior of the barrel. Even the most minimal variation in wear to the crown will negatively impact barrel performance, so be careful to avoid nicking or wearing away this part of the barrel.
Reducing Cleaning Rod Wear to the Crown
When running a patch through the barrel, place the muzzle about a ¼” from a hard surface that runs flat at a perpendicular angle to the cleaning rod’s direction of travel, like a wall or the edge of a work bench (pictured). When the jag impacts the hard surface, retract the cleaning rod and remove the patch.
By withdrawing the jag prior to its exit from the barrel, you are limiting the possibility of the brass dragging upon the crown if the rod is at all bent or misaligned. The soft cloth patch will continue to serve as the point of contact between the jag and the barrel, minimizing potential wear.
If possible, insert the rod through the chamber, pushing it forward toward the muzzle. Some rifles, such as the M1 Garand or M14, will require you to insert the cleaning rod through the muzzle. In these situations the use of a cleaning rod guide is recommended to limit the friction placed upon the crown.
Avoid using cleaning rod segments for scraping carbon from the recessed muzzle of an AR-15 barrel. We used this trick in the Marine Corps to impress the armorers and NCO’s with the cleanliness of our muzzles, but it likely played a significant role in reducing the service life of the rifle barrel in question.
Use a Q-Tip soaked in solvent to remove any copper or carbon residue from the recessed muzzle of an AR-15 barrel. A little bit of remaining carbon on the face of the muzzle will not negatively affect bullet travel so long as the crown edge remains consistent around the circumference of the bore.
The Lands and Grooves
This portion of the barrel may experience reduced efficiency due to copper fouling and cleaning rod damage. If copper fouling takes place during the initial break-in of the rifle, make sure to check our barrel break-in article.
For regular maintenance we suggest using a single piece coated cleaning rod rather than the traditional segmented rod or bore snake. While segmented rods and bore snakes may be convenient for field use, the corners between the segments may bow out and catch on the lands, scraping along the length of the rifling. Residual grit and particles from expended cartridges may also get caught between segments, resulting in an abrasive surface working its way down the length of the barrel. Most bore snakes will remove significant amounts of carbon fouling, but may fall short in the removal residual carbon buildup and copper fouling during deep cleaning. Good rods can be sourced from multiple manufacturers, but we have found good results using both Pro-Shot and Dewey brand products.
General cleaning requires the use of patches rather than nylon or brass bore brushes. Brass brushes may be required when aggressive cleaning is required, but can lead to unnecessary wear on the barrel if used frequently. This is not due to the nature of the soft brushes themselves, but from the abrasive particles of grit that become embedded in the material that is being run repeatedly through the bore. We recommend the use of bore guides when cleaning from both the muzzle and breech. These bore guides will help serve to protect the crown and throat from cleaning rod damage.
If significant resistance develops while running the cleaning rod through the bore, no attempt should be made to force it in further. Back the rod out and inspect the barrel to determine the cause of the resistance. The jag may be pushing between a bore obstruction and the rifling, digging a divot into the barrel before pushing the obstruction back through the muzzle. One way to minimize the risk of a stuck rod is by utilizing a slightly smaller patch during the initial push.
The process of cleaning the length of the rifling is relatively straightforward:
1. Check to make sure the rifle is safely unloaded.
2. Carry out any necessary disassembly procedures prior to cleaning.
3. Remove bolt (if possible) and insert fitted cleaning rod bore guide in action.
4. Soak a patch in bore solvent (similar to Hoppes #9).
5. Center and affix the patch on the brass jag, inserting it into the chamber end of the barrel. A misaligned patch may cause the jag to damage the lands of the rifling, so make sure the patch is centered on the jag.
6. Run the patch the full length of the barrel, retracting it upon reaching the end of the muzzle.
7. Let the solvent sit for a minute.
8. Continue to run patches through the bore until carbon residue is minimized.
9. Run a dry patch through the bore to ensure carbon residue has been removed.
10. Soak a patch in copper solvent (Sweet’s or KG-12).
11. Run the patch through the bore, leaving it to sit for 3-5 minutes (do not let solvent sit for more than 15 minutes.*)
12. Repeat this process until no blue residue remains on the patches.
13. Run a patch of Hoppes #9 and a dry patch through the bore to neutralize the copper solvent.
14. Inspect the barrel prior to reassembling the rifle, verifying that no bore obstructions remain.
*Please note that some ammonia-based copper solvents may prove to be corrosive if left sitting in the barrel for an extended period of time. It is essential that these solvents be removed within 15 minutes to avoid ruining the bore.
The Chamber
Proper cleaning of the chamber is a critical component of a general cleaning procedure. Carbon rings can build up near the neck and throat of the chamber wall, leading to feeding malfunctions and pressure spikes inside the chamber.
The chamber can be the trickiest part of the barrel to effectively clean, due to its fluctuation in size and the awkward ergonomics often required to remove carbon residue. Numerous chamber specific devices have been created to address this problem, and while some should be avoided (steel chamber brushes), others can be used to great effect (cleaning stars and plastic dental picks). The simplest approach to cleaning a chamber is to apply solvent to a couple patches, and use the cleaning rod to spin the wadded up patches inside the confines of the chamber. This should aid in removing any excess carbon. A Q-Tip can be used to reach portions of the chamber unreached by patches.
The Barrel Exterior
While the condition of the crown, rifling, and chamber are essential to firearm performance, the finish of the exterior should also be cleaned after handling. Condensation, humidity, direct water contact, and salt residue from skin contact can cause rust or corrosion. An application of anti-corrosion products is recommended when placing a firearm into deep storage for an extended period of time. [Editor: AccurateShooter.com recommends Corrosion-X or Eezox, but other products work well too.]
Finding Cleaning Components
While most cleaning components can be found at your local gun shop, some specialty items may need to be sourced through online retailers such as Brownell’s. Criterion utilizes both Dewey and Pro-Shot brand cleaning components during our day-to-day operations.
Do you have any rifle cleaning tips or tricks not mentioned in the above article? We’d love to hear about them. You can post your comments below.
Thunder Beast Arms suppressors are popular with tactical competitors and hunters.
Hopefully, in the near future, it will be much easier to purchase a suppressor for your firearm. Legislative efforts to reform the laws governing suppressors are moving forward in the U.S. Congress.
On January 9, 2017, Congressman Jeff Duncan (R-SC), co-chair of the Congressional Sportsmen’s Caucus (CSC), introduced H.R. 367 to remove suppressors from National Firearms Act control and treat them the same as long guns, replacing the outdated federal transfer process with a NICS background check. The measure picked up 42 Republican co-sponsors and one Democrat co-sponsor. Sen. Mike Crapo (R-Idaho) introducted the similar Hearing Protection Act of 2017 (S. 59) in the U.S. Senate.
The new silencer reform legislation has a key backer — Donald Trump, Jr., the President’s son. “It’s about safety. It’s a health issue, frankly.” Trump Jr. explains in a video interview with Joshua Waldron, the founder of SilencerCo.
Donald Trump Jr. Talks about Suppressors and Shooting Safety
Donald Trump Jr. Talks about Suppressors
“I’ve had the privilege of being able to hunt in Europe, where some of the strictest gun laws in the world exist. Guess what… virtually every hunting gun there is suppressed. It’s about safety. If you had that kind of noise levels in any other industry as you would in shooting sports, OSHA would be all over the place. It’s about safety.” Trump Jr. said the current U.S. suppressor laws are “arbitrary policies by people who don’t know what they’re talking about.” He says it’s time the U.S. follow the lead of European nations, and adopt sensible suppressor policies, “because if Europe can do it, American better well be able to do it.”
NSSF Supports Hearing Safety Act
The National Shooting Sports Foundation (NSSF) supports efforts to make silencers/suppressors easier to purchase. “This legislation will enable gun owners to have better access to hearing protection products and improve safety for the shooting sports by removing extensive wait times for burdensome paperwork processing that does not advance public safety,” said Lawrence Keane, NSSF senior VP and general counsel.
“Anyone who has ever worried about hearing loss from shooting might want to lend their ears to this cause” said Emily Taylor, an attorney at the Houston law firm of Walker & Byington.
Current law imposes signficant barriers to suppressor ownership, Taylor explained: “Currently, the manufacture, purchase, and possession of firearm silencers are regulated by the ATF and must comply with the requirements laid out in the National Firearms Act (NFA). Anyone who wants a firearm suppressor must first get approval from the ATF and pay the required tax. An extended waiting period comes along with the time it takes the ATF to process these requests.”
“The Hearing Protection Act seeks to amend the law so that firearm silencers are treated the same way as long guns,” Taylor added. “The bill would make it so that there is no longer a tax associated with the transfer of a firearm silencer, and anyone who pays a tax on a silencer after October 22, 2015 could receive a refund of such tax. Lastly, the bill would preempt certain state laws that tried to impose taxes or registration requirements on firearm silencers.”


 When you stack a column of primers in a single metal tube, you’re asking for trouble. As Dustin Ellermann learned, when one primer fires, the entire column can follow suit in a chain detonation. Thankfully, you do have options when it comes to primer feeding on a progressive press. RCBS developed an innovative primer system for its Pro-2000 progressive press. Instead of being stored in a vertical tube, primers are placed in flat, plastic “APS” strips, with a ring of plastic separating each primer. Moving horizontally, primers are never stacked, so the chance of a chain detonation is reduced dramatically. The re-usable APS strips are color-coded for different primer types. You can buy CCI “pre-loaded” primer strips, or you can insert any brand of primers into strips using an RCBS strip-loader tool.
 The APS priming system also works with press-mounted priming tool, bench-mounted tool, and APS hand-tool. EdLongRange uses the press-mounted tool: “I also like the APS approach but use the press-mounted unit (saves your hands/wrists — and I haven’t had a need for a progressive press in over 20 years). Loading the primers in the strips is a bit of a PITA but very manageable. As with all tools there is a learning curve.” CLICK HERE for video showing strip-loading tool and press-mounted APS tool. The press-mounted tool is no longer in production, but you can still BUY IT HERE.






 Many of our readers have been interested in learning how modern bullets are made. While a “boutique” bullet-maker, supplied with appropriate cores and jackets, can craft bullets using relatively simple hand dies and manual presses, factory production is different. The major bullet-makers, such as
 The Founding of a Great Enterprise