Setting optimal bullet seating depth is very important for maximum accuracy. While some cartridges and barrels may deliver good accuracy with a wide range of bullet seating depths, other barrels may be more fussy, and may strongly prefer a specific seating depth, such as .006″ in the lands or .020″ off. To get this kind of precision, you need to know the exact position of the lands in your barrel. In addition, because barrel throats tend to move as the round count goes up, you should check the position of the lands regularly on a competition rifle.
Today’s Saturday Videos demonstrate a number of methods for finding Length to Lands in your rifle barrel. We start with the most common method — using the Hornady O.A.L. Gauge with a threaded modified case. With some practice, and a refined touch, this is actually very accurate. After this, we offer videos that have alternative methods, each with its pros and cons. You should find a method that works for you, that can achieve results within a couple thousandths for multiple measurements.
Finding Cartridge Length to Lands with O.A.L. Gauge
Probably the most common method to find length to lands is using a Hornady O.A.L. Gauge Tool with a comparator on a set of calipers. We regularly use this method with a custom modified case for our 6mmBR rifle. Using the technique described below, we can get results within .0015″ or so three out of four times. We do recommend taking multiple measurements. As explained below, be consistent and do NOT push the gray plastic rod too fast or with too much force.
During this measurement process, the modified case, with a bullet in its neck, is inserted in the chamber. Go slow, take your time. Here are FIVE TIPS that will help you get repeatable and reliable length-to-lands measurements with the Hornady O.A.L. Gauge:
1. Start with a clean chamber and clean barrel throat.
2. Make sure the modified case is fully screwed down and seated on the O.A.L. Gauge. It can sometimes unscrew a bit during repeated measurements.
3. Insert the modified case slowly and gently, but ensure the shoulder of the modified case is fully seated on the end of the chamber.
4. Push the gray plastic rod GENTLY. It is common for the bullet to be tilted a bit. You want to allow the bullet to self-center in the throat BEFORE you apply much pressure. Then tap a couple times and push until you feel resistance. Do NOT push too hard — that will jam the bullet in the lands.
5. Repeat the measurement at least 3 more times. If you follow our instructions, you should, typically, get a repeatable measurement, within 0.0015″ or so, 3 out of 4 times.
NOTE: We’ve seen some folks struggle to get repeatable measurements with this tool. In most cases, they were going too fast and pushing too hard on the gray rod, creating a hard jam.
Brownells — Using Hornady O.A.L. Gauge with Modified Case
This Brownells video shows how to use the modified (threaded) case for the cartridge your rifle shoots. Attach it to the O.A.L. Gauge, then insert a bullet into the case neck and slide the tool into the chamber. It takes a little practice to get consistent results. After getting the measurement in the barrel, you ascertain the length to lands using a Hornady Bullet Comparator attached to your calipers.
Making Your Own Modified Case — Threading the Case End
This helpful video from our friend Gavin Gear of UltimateReloader.com shows how to create a custom modified case to use with a Hornady O.A.L. Gauge. You need to drill out the primer pocket area, then tap and thread the bottom of the case.
Ultimate Reloader Shows 3 Ways to Find the Lands
This video shows three different ways to measure distance to lands. First Gavin Gear shows how to use a Hornady O.A.L. Gauge with Modified Case. The second methods shows how to use a bit of Loctite INSIDE the neck to secure a bullet. Be sure there is NO Loctite on the outside of the neck — you don’t want that in your chamber! You place the case with bullet into the chamber, then close bolt to seat the bullet. After waiting 5-10 minutes for the Loctite to set, you remove the cartridge gently. The third method (time-mark 16:50) is a Jam method using a bolt with the firing pin assembly and ejector removed (so there is no extra pressure on the case). Gavin notes: “The bullet ogive can be colored with a permanent marker if you want to indicate lands contact.”
About this third Jam method, ace F-Class shooter Erik Cortina posted: “My method is actually the last one that Travis showed. The one where you let the lands push bullet in. But it is neck tension dependent. I also put die wax in bullet ogive to prevent it from sticking in the lands. The method of seating bullet deeper and deeper until bolt closes is the Alex Wheeler method. As you said, there are a tons of ways to measure this.”
Finding Length to Lands the Speedy Way
Here is another method to find length to lands that can work with an unmounted barrel. This method is explained by Thomas “Speedy” Gonzales, a top gunsmith and ace benchrest shooter. Speedy drops a case with bullet seated into the chamber and then adjusts the seating depth with an inline seating die until there is no sticking or resistance felt. He can then adjust the true length to lands easily with his micrometer seating die. If you don’t have a modified case and do not want to partially disassemble your bolt to take measurement, you might want to use Speedy’s method.
Finding Length to Lands Using Bolt Movement — Primal Rights
This video shows how to remove the firing pin assembly in your bolt. This way the bolt can be used to advance a case with bullet smoothly into the chamber. Then the bullet seated in the case neck will move back to “first touch” contact position. Then extract the case slowly and measure.
The video host states: “Overall length gauges and modified cases tend to be close, but never as precise as we would like them to be. Here we describe how to measure the length to your lands in your rifle as precisely as possible, using a caliper and bullet comparator.” NOTE: The host says a store-bought Modified Case may not deliver that exact same length from case base to lands as your own fired case. That is true, but as long as the commercial Modified Case gives you repeatable results, you have a functional reference point which you can then use to test seating depths relative to that measurement.
Finding Length to Lands Using Bullet in Case With Split-Cut Neck
Here is a common method that requires no special tools. Simply take a fired (no primer), neck-sized case and split the necks down vertically with a Dremel. Done right, this will hold the bullet in place when you chamber the unloaded round. As the bullet touches the rifling it will move back. As the cartridge chambers, the bullet slides back into the case to give you length to lands. This is not super-accurate but it is probably good enough for finding the length to lands for a hunting rifle. The video maker explains: “No need to purchase gauges for this if you are willing to sacrifice one case. With a little time and patience you can get good results with this method.” Further Explanation.
How to Adjust Tension — Length and Number of Neck Cuts
Forum member Andris Silins, who uses this method, explains: “I made the neck cuts using a Dremel with a cut-off wheel. You can adjust tension two ways. First, you can make the cuts longer or shorter. Longer cuts = less tension. If you used only three cuts instead of four you would get more tension. The trick is to be gentle when you open and close the bolt. If you ram the bolt closed you may wedge the bullet into the lands. When you open the bolt it helps to keep a finger or two near by to guide the case out straight because the ejector wants to push it sideways.” READ MORE.
Finding the Lands with HK Rifleworks
This is another video that demonstrates how to disassemble the bolt so that the firing pin assembly and spring does not apply pressure on the empty case which would affect the bullet as it touches the lands. The video maker shows how to use a Brownells bolt disassembly tool to quickly take the bolt apart (3:20 time-mark). Once you have a repeatable measurement, you know exactly where is “first touch”. Then you can adjust your seating depth to be into the lands, or jumping the bullets. Many benchrest shooters like to load “into the lands”. PRS/NRL shooters and hunters will generally prefer to jump their bullets .0020″ or more.
For some applications, we prefer a non-bushing FL die over a bushing die. Shown here are three Forster full-length sizing dies, with necks honed to three different dimensions: 0.265″, 0.266″, and 0.267″.
The Honed Full-Length Sizing Die Option
There are many good options in full-length (FL) sizing dies. Most precision hand-loaders prefer FL dies with neck bushings. These let you adjust the “grip” on your bullet by using larger or smaller bushings. FL bushing dies are available from Whidden Gunworks, Forster, Redding and other makers.
Conventional, non-bushing full-length sizing dies can create ultra-accurate ammo with very low run-out. But many conventional non-bushing FL dies have an undersized neck diameter so you end up with excess neck tension, and you work the brass excessively.
There is another effective option, one that promises extremely low run-out. The honed FL die is a full-length sizing die that has the necked honed to provide a precise fit to the case-neck. When done right, honed FL dies produce extremely straight ammo — as there are no issues with bushing alignment (or bushings that are not perfectly concentric). This Editor owns honed dies from Forster, Redding, and Whidden Gunworks. They all perform extremely well, delivering match ammunition with extremely low run-out measured with a 21st Century Concentricity Gauge.
In one of the most popular articles we’ve ever published, Bugholes from Bipod, California shooter “Froggy” explained why he prefers honed dies for his tactical ammo.
Q: Do you FL size every time? Do you use custom dies?
Absolutely, I full length resize all of my brass every time I reload. And guess what? I’ve never had a feeding problem.
I do use a modified sizing die, without bushings. My FL resizing die has been custom-honed in the neck area to give .0015″ press fit on the bullet. I also put a slightly larger radius at the neck shoulder junction. I feel that this helps to seal the chamber. With this die, I get consistent neck tension every time–without bushings. Bushings are useful when you’re fishing around for a good load. But once you find the right amount of sizing for ideal neck tension, you can do this better with a customized FL die.
6.5 Guys Review Forster Honed Full-length Dies
The 6.5 Guys have reviewed honed FL sizing dies from Forster, explaining the pros and cons of this type of reloading die. They explained that, if you load a wide variety of bullets from different manufacturers, you many want to stick with a Bushing FL die. However, if you have settled on a particular bullet and found the “ideal” neck tension, then a honed die may make sense.
In this Gear Update, the 6.5 Guys discuss a service offered by Forster Products to custom hone the neck diameter of its full-length sizing dies to the customer’s specifications (to the thousandth). Whidden Gunworks has also crafted custom-honed FL dies for many customers, including this Editor.
Here’s inspiration for rimfire shooters out there. The video below shows some mighty impressive .22 LR iron sights lever gun shooting by a very talented young lady. In this video, Kirsten performs a classic Annie Oakley trick shot, cutting a playing card in half with a bullet. We hope this display of marksmanship brings a smile to our readers.
Kirsten Joy Weiss is a phenomenal off-hand rifle shooter. Splitting a playing card would be hard enough with a scoped rifle shot from the bench. But Kirsten makes this amazing shot from standing position, shooting over iron sights, with an inexpensive rimfire lever gun. Trust us, that’s not easy. It did take Kirsten three tries, but we’re still impressed.
To accomplish this trick shot, Kirsten’s horizontal aim had to be ultra-precise. A playing card is only 0.25mm thick (about 1/100th of an inch). That leaves almost no room for error.
GIF Animation Shows Bullet Slicing Card in Half:
We know top benchresters can put five shots in one ragged hole at 100 yards, used a scoped rifle sitting on a stable rest. But make those folks stand on their hind legs, hold the rifle, and aim over primitive iron sights, and some of those benchrest aces would be lucky to hit a dinner plate at 100 yards. Kudos to Kirsten for making this great shot.
Today’s showcase shows how CCI, Federal, and Remington .22 LR rimfire ammunition types are produced in large American factories. CCI and Federal, until very recently, were part of the Vista Outdoor Kinetic Group. In December 2024 CCI and Federal along with other Vista ammo brands were sold to a Czech company, CSG.* Most CCI rimfire is produced in Idaho, while most Federal rimfire ammo is produced in Anoka, Minnesota. Here we feature videos from CCI, Federal, and Remington ammo plants. Watch and learn how rimfire ammo is made.
The Manufacturing Process for .22 LR Rimfire Ammunition Shooting Sports USA explains: “Rimfire cartridge cases are the oldest self-contained cartridge in existence, having been in continuous production since the mid-1850s. Rimfire cases are drawn from a thin piece of brass and formed with a hollow rim. A priming compound is then forced into the case using centrifugal force, where it is charged with powder and a bullet is seated in the mouth of the case. The case is then crimped around the bullet to ensure sufficient push and pull when the round is fired. When the firing pin strikes the thin brass rim of the case, the hollow rim is crushed and the primer is ignited.” Source: SSUSA.org 9/2/2017.
.22 LR Ammo Production at Federal Ammo Plant in Minnesota
Note to Viewers — After Starting Video, Click Speaker Icon to HEAR audio!
A while back a Field & Stream writer toured the Federal ammunition production facility in Anoka, Minnesota. This large plant produces both rimfire and centerfire ammunition. While touring the plant, the reporter was allowed to capture video showing the creation of .22 LR rounds from start to finish. This is a fascinating video, well worth watching. Click speaker icon for sound.
22Plinkster Tours CCI/Speer Idaho Factory
Trickshot artist and YouTube host 22Plinkster was able to tour the CCI/Speer production facility in Lewiston, Idaho. This large plant produces both rimfire and centerfire ammunition. While touring the plant, 22Plinkster was allowed to capture video showing the creation of .22 LR rounds from start to finish.
This revealing video shows all phases of .22 LR ammo production including cupping, drawing, annealing, washing, drying, head-stamping, priming, powder charging, bullet seating, crimping, waxing, inspection, and final packaging. We really recommend you watch the video from start to finish. Well worth watching, this excellent video has logged 3.2 million views on YouTube.
Remington Factory Produces Millions of Rounds of Rimfire Ammo
Billions of .22 Long Rifle rounds are produced every year, and Remington Ammunition in Lonoke, Arkansas produces a significant share of the rimfire ammunition used worldwide. This “American Rifleman Television” feature shows the full ammo production process. At the start, brass cups are stamped out of large sheets of brass, and the cups then move on to have the headstamps applied and rims formed. Next, the rounds move on to be annealed and rinsed. Then the cases move onto priming. A wet priming pellet is then pressed into each empty .22 case, and the case is spun rapidly, spreading the pellet mix into the inner cartridge rim. The primed cartridges are then sent to a drying house, where they’ll sit for several days to allow the priming mixture to dry. The Remington factory is very efficient, with “some of the fastest rimfire-making equipment on the planet”.
*In December 2024, Vista Outdoor completed the $2.23 billion sale of the company’s “Sporting Products” division — which is known as the Kinetic Group and includes American ammunition brands CCI, Federal Premium, Hevi-Shot, Remington, and Speer — to the Czechoslovak Group (CSG), a Czech conglomerate. READ Full Story of Vista Outdoor Kinetic Group ammo brands sale.
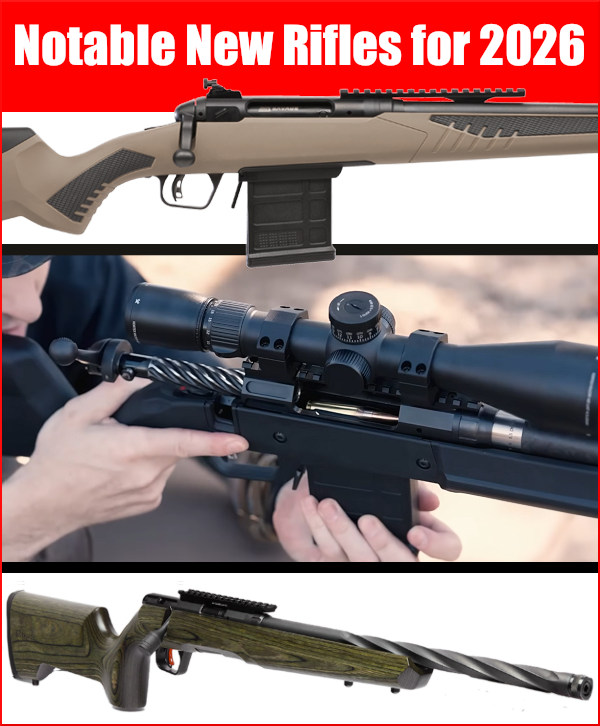
SHOT Show 2026 kicks off 16 days from now in Las Vegas. The biggest gun industry trade show on the planet, SHOT Show will showcase a huge variety of new products including firearms, optics, electronics, reloading hardware, ammunition and more. For today’s Sunday GunDay article we feature seven new (or nearly new) rifles that will be on display at SHOT Show 2026. You’ll see a wide variety of long guns here, at all price levels — from $300 to $7999. This Sunday showcase features bolt guns, semi-autos, and lever-action guns offered with a huge selection of chamberings, rimfire and centerfire.
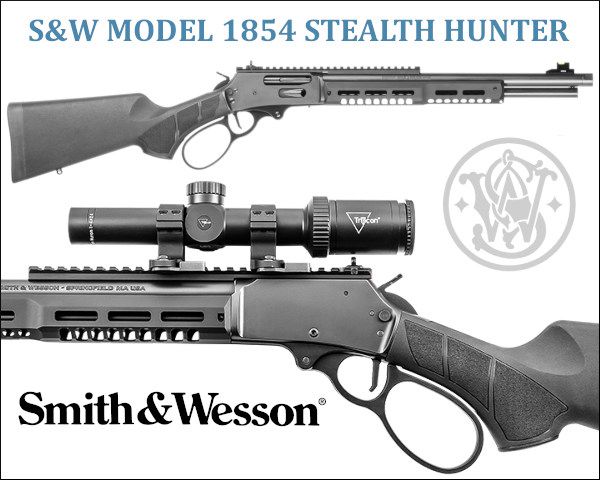
The Smith & Wesson (S&W) Model 1854 Stealth hunter is modernized lever-action rifle featuring a black finish, optics rail, and threaded barrel. This combines the slimness and easy cycling of a classic lever-action with the ability to mount modern optics and fit brakes and suppressors. The Stealth Hunter is currently offered in four chamberings: .30-30 Win, .357 Magnum, .44 Magnum, .45 Colt, .45-70 Govt. The 45-70 delivers significant stopping power for big game hunting.
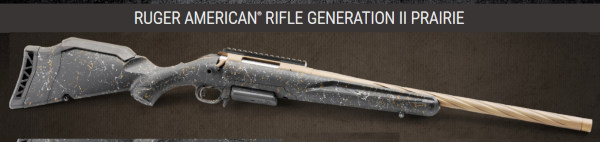
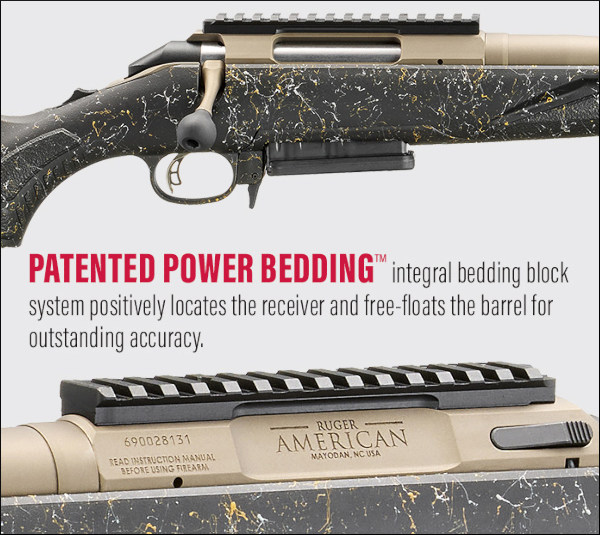
The updated Ruger American Rifle Gen II “Prairie” is a modern hunting rifle with nice features including a Cerakote coating on the receiver, bolt handle, and barrel. This rifle also includes a patented bedding block system with free-floating barrel and a Ruger Marksman adjustable trigger. This is a good value with a $729.00 MSRP.
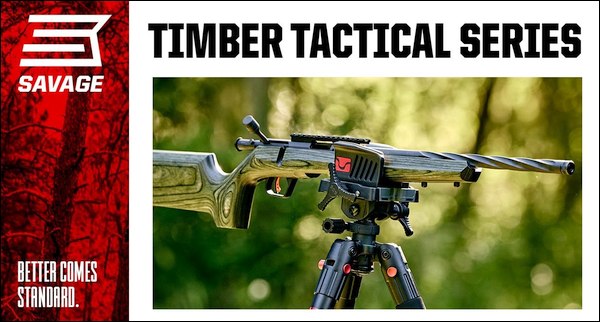
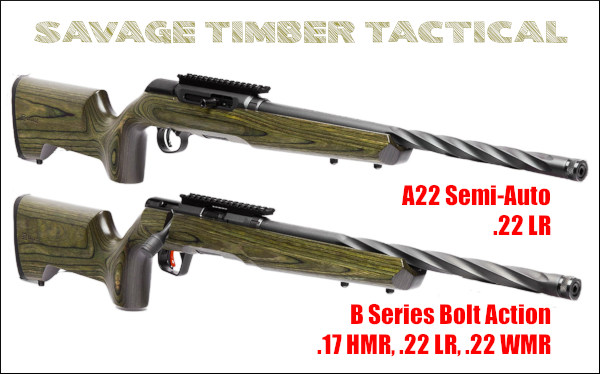
Savage has released a pair of “Timber Tactical” rifles in matching green laminated stocks. The A22 is a semi-auto available in .22 LR only. The B Series Timber Tactical rifles are offered in three rimfire chamberings: .17 HMR, .22 LR, .22 WMR. These look like a good option for a plinking rifle or for someone looking for a small varmint rifle. We might get the A22 for rapid-fire steel target rimfire matches, while for shooting ground squirrels we’d opt for the B-Series in .17 HMR. CLICK HERE for detailed American Hunter review of both Timber Tactical variants.
The .17 Hornady Magnum Rimfire (HMR) The .17 Hornady Magnum Rimfire (HMR) was introduced in 2002 by Hornady as a high-velocity, rimfire cartridge derived from the .22 Magnum case necked down to .17-caliber. The .17 HMR gained popularity among varmint hunters and target shooters for its good accuracy and hitting power out to 200 yards or more — all with low recoil and relatively low cost (compared to centerfire ammo).
Most .17 HMR ammo runs 17-grain or 20-grain hollow-point or plastic-tipped bullets at speeds around 2375-2550 FPS (lower for 20-grainers). Though lightweight, these small projectiles do deliver a powerful impact on small game while maintaining low recoil. Compared to the .22 LR, the .17 HMR offers superior ballistic performance, with flatter trajectories and higher energy at extended distances. It’s good for shooting prairie dogs, ground squirrels, sage rats, and other small critters.
The Savage 110 Magpul Scout is a new, versatile rifle with interesting features. With a modern Magpul Hunter stock and a 16.5″ barrel it is relatively compact and fairly light. It boasts a long rail on top of the action plus AR-style sights. It ships with a factory muzzle brake which can be removed for placement of a suppressor. Both black and FDE (flat dark earth) stock colors are offered. NOTE: MSRP is $1099.00 but dealers are selling Savage Magpul Scout 110s for under $820. (See Bud’s Gun Shop.)
The Proof Research Tundra TI-X is a high-end ultra-lightweight hunting rifle, with a 1/2-MOA accuracy guarantee. Priced at $7999.00, this is one of the most expensive hunting rifles on the market. But you do get a titanium action, a carbon fiber stock, and high-tech carbon-wrapped barrel. The Tundra Ti X sports an adjustable TriggerTech Special Trigger and BDL-style magazine. A wide variety of chamberings is offered with barrels ranging from 20 to 26 inches. Listed starting weight (with shorter barrels) is 6 pounds, 5 ounces. Five different stock appearance types are offered: Green Granite, Green Jungle Camo, TFDE, Black, Black Jungle Camo.
The new Model 307 Alpine ST is light-weight, carbon-stock “backcountry bolt gun” built on Weatherby’s newest bolt-action rifle platform, the Model 307. Meant to complement the historic Mark V and Vanguard lineups, the Model 307 action is a 2-lug, fully cylindrical action compatible with aftermarket accessories. Model 307 is designed to accommodate a wide variety of stocks, triggers, rails, and mounts. Weatherby teamed up with PEAK 44 to produce an ultra-light rifle that can own the range and dominate in the field. The PEAK 44 Bastion stock weighs in at just 24 ounces and uses a proprietary 3D-Hex recoil pad to reduce the effects of recoil. The lightweight, spiral fluted barrel delivers good accuracy and comes with Weatherby’s recoil-reducing Accubrake ST.
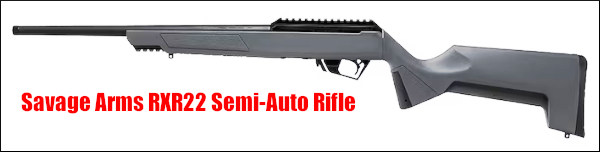
Savage RXR22 Semi-Auto Rimfire
Chamberings: .22 LR Rimfire | MSRP: $299.99
The Savage RXR22 is a new budget-priced semi-auto rimfire rifle. This is a good choice for plinking and small varmint work. It features an optics rail on top, a short rail on the forearm (for bipod mounting) and a detachable 10/22 compatible rotary magazine. This is designed to compete with the Ruger 10/22 with better bolt/chamber access and a better stock trigger. The RXR22 has a 16.25″ barrel and weighs just 4.6 pounds without optic.
With today’s Saturday video showcase we feature eight videos from the Popular Backfire YouTube Channel. The host of the BackFire channel, Jim Harmer, also has a good website, Backfire.tv with written reviews. If you’re shopping for a hunting rifle we recommend you read the recent (12/1/2025) Best Hunting Rifles article. Without further ado, here are eight noteworthy videos from the BackFire Channel.
Five Powder Dispenser Comparison Test (All Units Purchased)
If you are in the market for a sub-$500 electronic powder dispenser, definitely watch this review. This Backfire comparison test is notable because the tester spent his own money to purchase all five powder dispensers being reviewed. That means Backfire could tell the full truth, both good and bad, about the machines. In fact, Backfire bought TWO ChargeMaster Lites because one failed (See 14:12 time-mark). The reviewer liked the RCBS ChargeMaster Supreme, but his top choice overall was the Hornady Auto Charge Pro. He favored the overall design, and really liked the way the dispensing speeds could be easily set faster or slower. Here are highlights from the video review:
00:08 Speed Test
03:09 Accuracy Test
07:57 Frankford Arsenal Intellidropper
09:08 Lyman Gen 6
10:44 RCBS Chargemaster Supreme
12:03 Hornady Auto Charge Pro
14:12 RCBS Chargemaster Lite
14:41 Conclusions
Best Rifle Scope Under $500 (2.2 Million Views)
This is a very comprehensive test of ten scopes under $500 MSRP. Unlike many reviews, the tester actually purchased all the tested scopes with his own money to provide a fair, unbiased review. The ten scopes all have approximately 4-14X magnification, common for a hunting/general purpose field scope. The reviewer ranked the $349 Vortex Diamondback Tactical FFP as the Best Overall scope. The reviewer’s first choice for a Target/Competition scope was the $299 Arken 4-16×50 model. The $175 Burris Fullfield E1 Hunting model was named the best “Lightweight, Capped Scope”.
The Backfire team purchased eight rangefinders and tested them in the field. Most of the products are under $500. This is a good review if you are looking for a compact LRF at a moderate price. Looking at performance for the price, for the hunting market, the reviewers favored the Leupold RX-1600 and the waterproof Vortex Ranger 1800. COMMENTARY: If you can afford it, we recommend that serious hunters consider top-end laser rangefinder-equipped binoculars such as the ZEISS Victory RF and Leica Geovid.
Affordable Hunting Rifles under $750.00 (1.3 million views)
Here’s another good Backfire Channel video for hunters looking for a new rig. With hunting season starting soon, this video can save you time and help you get the most bang for your buck. The Backfire team review eight affordable under-$750 rifles: Bergara B-14, Howa 1500 Hogue, Kimber Hunter, Remington 700, Ruger American, Savage 110 Switchback, Tikka T3X Superlite, and Weatherby Vanguard. The Backfire reviewers tested all 8 rifles for function and accuracy (4-shot groups). These 8 rifles were chose for review based on input from Backfire channel viewers.
Accuracy Secrets of a Champion — Interview with Erik Cortina
Our friend Erik Cortina is one of America’s top F-Class marksmen, and he has also achieved notable results in some long-range tactical matches. In this video Erik explains some of the factors that help in load development, wind reading, and achieving long range accuracy. If you shoot F-Class or even just compete in local matches, this video is worth watching. Erik’s Cortina Precision company produces high-quality tuners, tuner brakes, dies and other high quality products.
How to Set Up a Rifle for 1000 Yards
Here’s good video for novice ELR and Long range shooters. The video covers initial zeroing and then working with ballistics at 600-1000 yards. The tester explains the importance of a very stable platform and optics with adequate vertical adjustment and proper parallax control. The featured rifle is a 6.5 Creedmoor Bergara Premier Competition in a dark, gray PMA chassis (this is not the tan rifle in cover shot). Note: Bergara also offers a barreled action that you can put into a different chassis of your choice. The scope is an Athlon Helos BTR Gen2 4-20x50mm. A Garmin Xero C1 radar chrono was used to confirm velocity.
Low-Cost vs. High-Cost Rifles — How They Compare (2 Videos)
Here are two interesting videos that compare the features and performance of rifles at various cost points. The first video compares two rifles with a 10X (1000%) price difference — $350 vs. $3500. Some quite inexpensive rifles can perform very well, if you get lucky with the factory barrel. At the high end of the spectrum you can (hopefully) expect a smoother action, better trigger, more sophisticated stock, and (hopefully) more shot-to-shot consistency. Still a big investment doesn’t always guarantee vastly improved performance. For a deer hunter, a $500 rifle with a modestly-priced scope can probably do the job. If you want to hit prairie dogs at 500 yards and beyond, you’ll need an accurate cartridge and a very good (preferably custom) barrel for consistent hits.
We like Lyman’s Electronic Digital Trigger Pull Gauge, which is faster and more precise than the previous model. The latest Lyman Pull Gauge measures trigger pull weights from 1 ounce to 12 pounds with resolution of 0.1 ounces (2.8 grams). It features an adjustable, 4-position rod which retracts into the gauge body. We think that anyone running match triggers below 2.5 pounds pull weight should have a gauge like this. Among the pull gauges on the market, we think the Lyman unit offers great performance for the price.
Features: More Precise Strain Gauge | Improved Grip Shape | Adjustable Rod Lengths
Lyman’s Electronic Digital Trigger Pull Gauge is designed to be the fastest and most accurate trigger pull gauge available. State-of-the-art strain gauge technology allows for repeatable accuracy of 1/10 ounce (2.8 grams). The gauge features a large, easy-to-read LCD display and you can switch from ounces to grams with the push of a button. The gauge can also deliver a pull weight average of the last 10 readings. That’s very helpful when working with factory triggers that may not be very consistent.
The Lyman Trigger Pull Gauge features a solid, collapsible rod with four locking positions. Being able to adjust length makes it easier to use the gauge with a wide variety of firearms — pistols, rifles, and shotguns. The locking feature prevents the rod from flexing when applying pressure to the trigger. When not in use, the rod conveniently collapses into the gauge body, making the whole unit more compact. The new Trigger Pull Gauge comes in an internally-padded plastic case that can be easily stored in a drawer or on your work bench.
Happy New Year to all our readers and site visitors, and especially the 81,030+ members of our AccurateShooter Forum. We hope 2026 brings you good times, fulfilment in your lives, and success in your endeavors. We also wish for high match scores, tight groups on target, and successful hunts in the New Year.
Forum Members — Upgrade Your Membership to Get Unlimited Classifieds for 12 Months.
Looking Forward to 2026 Every year we work to improve AccurateShooter.com. We have continued to upgrade the Forum, adding enhanced security measures, with background checks on all sign-ups and enhanced scammer detection. On the content side we have expanded our popular Deals of the Week and Sunday GunDay features. And we’ve added a Video Showcase every Saturday. We also now offer more product reviews in our Daily Bulletin. We hope you’ll continue to enjoy our feature articles, our Deals of the Week, our match reports, and our Forum Classifieds. The formula seems to be working — our audience is bigger than ever, with Forum membership growing substantially year after year.
Forum Membership Increased 6% in 2025
Our Shooters’ Forum grew significantly over the past 12 months. Total registered membership grew by about 6% as Forum ranks swelled to 81,030+ members! More people are successfully buying and selling through our Forum Classifieds services than ever before. Silver and Gold members get unlimited Classifieds for 12 months. Gold members also get custom Avatars and other privileges.
We need your support. For 21+ years the site has relied largely on volunteer efforts. But as the site grows, we need the assistance of Forum moderators, product testers, web gurus, and computer software experts. Those guys don’t work for glory alone.
Consider this — you could pay $30 for a couple medium pizzas. For the same thirty dollars you can become a Silver Forum member for an entire YEAR and help this site provide info, tests, tech tips, bargains, and shooting news.
And consider the benefits — Silver or Gold Members get unlimited classifieds for 12 months. If you were to sell just ONE $600 item through Gunbroker.com, you would pay $32.00 in fees! That’s more than our 12-month Silver Membership fee — just to sell one single $600.00 rifle or pistol.
In 2025 about 2650 site users have donated or upgraded their Forum membership. That’s less than 3.3% of the current membership. We thank all those who have generously contributed. But that still leaves tens of thousands of users who access the site every week without contributing. With more donations and more Forum upgrades, we can deliver more premium content and offer more services to our members.
How to Contribute
If you ARE a Forum member, you can help the site by UPGRADING your membership. CLICK HERE to UPGRADE.
If you are NOT a Forum member, you can still help by making a donation. Donating is simple and easy. Just click on the orange “Donate” button at right. If you have a credit card, you don’t need a PayPal account to contribute. Just choose the “Donate with Debit or Credit Card” Option.
IMPORTANT: After you click on the orange button a PayPal screen will load. You’ll see a field that says “$0″. Fill in the amount you want to give. For example, to give $30, type 30.00 in the amount field. You choose the amount.
Help Support this Site by Making a Secure Donation.
If You Don’t Like PayPal, You Can Send a Check.
Make the check payable to: Jeff Williams. Please list your Shooters’ Forum Log-In Name (if any), and mail the check to:
Jeff Williams
P.O. Box 240
Solon Springs, WI 54873
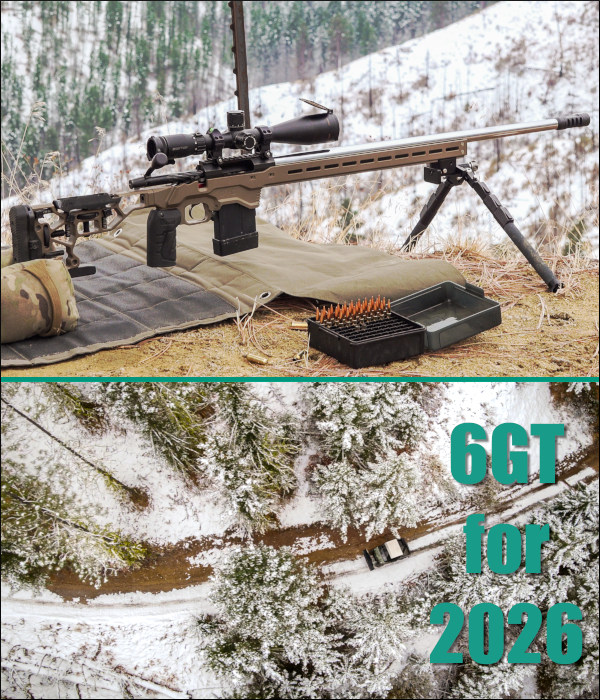
For the very first day of 2026 we present a precision rifle built with a modern 6mm cartridge — the 6GT. Developed by George Gardner of G.A. Precision and Tom Jacobs of Vapor Trail Bullets, the 6GT was designed to have the efficiency of a 6mm Dasher without the need for case forming. It was also designed with a longer case body so it feeds better from magazines. Even with the added capacity, the 6GT is still very efficient, and can achieve good velocities with less powder than a 6mm Creedmoor.
Today’s feature rifle was smithed and tested by Gavin Gear of UltimateReloader.com. Gavin did all the gunsmithing — chambering the barrel, fitting the muzzle brake, and even laser engraving the barrel. In building this 6GT rifle, Gavin used top-tier components: BAT TR action, Krieger 28″ 1:7.5″-twist 4-groove 6mm barrel, TriggerTech Diamond Rem 700-compatible trigger, and Area 419 Hellfire Muzzle Brake. The barreled action was then fitted in a handsome and rugged MDT ACC Chassis. On top is a Zero Tech 4.5-27×50mm FFP Trace Advanced scope in 30mm Hawkins Precision high rings.
We recommend you watch the video above — it covers the rifle build, load development, and then features some remarkable shooting sequences across snowy hills in the Pacific Northwest. Gavin’s team actually used a drone to capture overhead footage of the location.
After developing a promising load with Berger 109gr LRHT bullets, Varget powder, and Alpha brass, Gavin literally headed for the hills to test his new rifle at longer ranges, shooting from bipod. His load had shot well under half-MOA at 100 yards in testing so he was hoping he could hit multiple steel targets positioned at 340 yards, 760 yards, and 1000 yards. Indeed he did, proving the rifle’s great accuracy and Gavin’s fine trigger-pulling skills. You can see the hits at these time points in the above video:
340 Yards — 18:15 time | 760 Yards — 19:00 time | 1000 Yards — 19:54 Time
Gavin’s 6GT Hit Highlights on Steel out to 1000 Yards
Building Gavin’s 6GT Precision Rifle
Gavin Gear did all the gunsmithing on this project, using his own Precision Matthews TL-1660 lathe for the chambering with an Alpha carbide 6GT reamer. The barrel work took about four hours total. Shown below is the reamer cutting the chamber, which was finished with a 0.170″ freebore and 0.270″ neck diameter. For other brands of brass you might want the chamber to have a larger 0.272″ neck diameter.
Chambering the Krieger barrel with Alpha carbide 6GT reamer, 0.170” freebore, .270″ neck diameter.
This project when smoothly, with Gavin able to install the barreled action in the MDT Chassis and fit the buttstock in an hour or so. So total build time was about five hours. One nice “finishing touch” on the project was laser engraving the 28″ Krieger barrel — a process you can see in the video below.
Laser engraving of Krieger 28″ barrel.
About the 6GT — Sort of a 6 Dasher on Steroids
6GT Cartridge Design Features
The 6GT was designed to have an optimal length and capacity for mag-fed PRS/NRL tactical rifles. The 6GT is longer than a 6mmBR and 6 Dasher, but shorter than a 6mm Creedmoor and 6.5×47 Lapua. That gives the 6GT ample case body length to feed reliably from a magazine, while the case capacity is sufficient to run popular powders at reasonable pressures. It has a 35-degree shoulder angle.
On paper the 6GT seemed like the perfect cartridge for PRS- and NRL-style centerfire competition. It has the low recoil of a 6 Dasher, with good feeding and mag compatibility. With the 6GT, a competitor can push 6mm 105gr bullets at 3000+ FPS or run heavier bullets at ~2950 FPS. With this 28″ Krieger barrel, Gavin actually achieved 3004 FPS running 109gr Bergers.
Gavin started with quality Alpha Munitions brass. The cases were then annealed with an AMP Annealer and trimmed to length with a Henderson powered trimmer (see video below). After sizing with a Forster Co-Ax press, Federal SR Primers were seated using a Primal Rights competition seater. Next the powder was measured with an A&D FX120i force restoration scale. Finally, the Berger 109gr LR Hybrid Target bullets were seated with a Forster Micrometer die, again using the smooth Forster Co-Ax press.
Initial Load Testing with Berger and Hornady Projectiles
Before it got cold and snowy, Gavin did load development, shooting from a bench with a Sinclair front rest. The Krieger cut-rifled barrel was accurate right from the start and Hodgdon Varget powder proved to be a very good choice for the 6GT.
Gavin’s 6GT boasts a MDT ACC short action chassis with SRS-X Elite buttstock, vertical grip, and MDT CKYE-POD Bipod.
Gavin did initial load testing with both Hornady 110gr A-Tip Match and Berger 109gr Long Range Hybrid Target bullets. The Berger 109gr LRHT bullets were the most promising. A variety of charge weights were tested, with Gavin settling on 34.6 grains of Varget. This delivered fine accuracy with a 3004 FPS muzzle velocity. Group size measurements with this load are shown in the chart. At 100 yards, four three-shot groups averaged 0.361 MOA, and the rifle produced a nice 0.387 MOA (0.405″) five-shot group.
———————————————— Winter Wonderland for Shooters ———————————————–
As we release this story, the New Year — January 1, 2026 — is just 22 hours away (East Coast Time). Perhaps you’ve been eagerly awaiting for the big event, getting champagne (and sparklers) to celebrate the New Year. With the election of Donald J. Trump in November 2024, America has seen big changes in 2025 — we’re pleased to see that the current President has restored border security and is protecting Second Amendment rights. To mark the dawning of 2026, with hope for a good year, we expect many folks will open a bottle of champagne. You could pop the cork the traditional way, or read on and learn how to release the celebratory champagne with a rifle shot, as demonstrated by the talented Kirsten Joy Weiss. Click on the above video to see Kirsten release champagne with a rimfire rifle.
A while back at Thorton Winery in Temecula, California, a champagne vintner, we were shown the best way to open a champagne bottle. We were told you should hold the bottle nose up at an angle then rotate the BOTTLE slowly while holding the cork. That works great… but it’s not as stunning as the way sharpshooter Kirsten Joy Weiss opens a bottle of bubbly.
A former competitive smallbore rifle shooter, ace trigger-puller Kirsten Joy Weiss tried a special New Year’s trick shot a few seasons back. In keeping with the festive New Year’s spirit, Kirsten attempted to shoot the cork off a champagne bottle. After a few unsuccessful tries, she managed to hit the cork with at least two shots. But alas the cork did not fly. She actually hit the cork, but it did not release. That was surprising…
Undaunted, Kirsten changed her strategy, aiming for the neck of the bottle. This duplicates the process of “sabering” a champagne bottle — a method of liberating the bubbly by slashing off the end of the neck with a blade. Aiming for the neck of the bottle, Kirsten successfully blew off the top of the bottle. (Apparently, when “sabering” it is actually the pressure within the champagne bottle which does most of the work).


 The .17 Hornady Magnum Rimfire (HMR) was introduced in 2002 by Hornady as a high-velocity, rimfire cartridge derived from the .22 Magnum case necked down to .17-caliber. The .17 HMR gained popularity among varmint hunters and target shooters for its good accuracy and hitting power out to 200 yards or more — all with low recoil and relatively low cost (compared to centerfire ammo).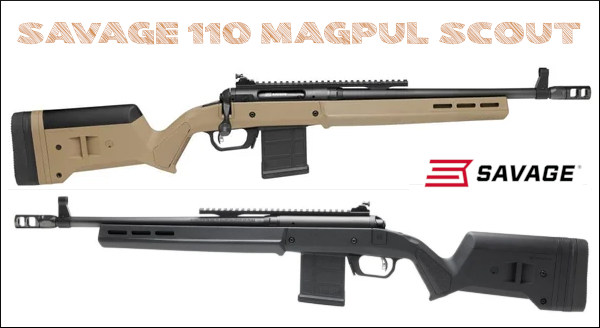











 A former competitive smallbore rifle shooter, ace trigger-puller Kirsten Joy Weiss tried a special New Year’s trick shot a few seasons back. In keeping with the festive New Year’s spirit, Kirsten attempted to shoot the cork off a champagne bottle. After a few unsuccessful tries, she managed to hit the cork with at least two shots. But alas the cork did not fly. She actually hit the cork, but it did not release. That was surprising…


