Hunting season is right around the corner. That means its time to inspect all your hunting gear, including your scope set-up. If you have a new optic, you’ll want to get it mounted correctly on your current rig. And if you have a new hunting rifle, you’ll need to mount the properly rings and install the riflescope so that you have the correct eye relief.
A proper scope installation involves more than just tensioning a set of rings — you need to consider the proper eye relief and head position, and it should be leveled correctly. This video shows a simple, quick method to mount a scope. The method assumes that the reticle (cross-hairs) are square without the turret. You’ll want to confirm that with a plumb line hanging straight down, a procedure you can do indoors.
In this NSSF video, Ryan Cleckner shows how to set up a scope on a hunting or tactical rifle. Ryan, a former U.S. Army Sniper Instructor, notes that many hunters spend a small fortune on equipment, but fail to set up their rifle to use the optics optimally. Cleckner likens this to someone who owns an expensive sports car, but never adjusts the seat or the mirrors.
Ryan notes that you want your head and neck to be able to rest naturally on the stock, without straining. You head should rest comfortably on the stock. If you have to consciously lift your head off the stock to see through the scope, then your set-up isn’t correct. Likewise, You shouldn’t have to push your head forward or pull it back to see a clear image through the scope. If you need to strain forward or pull back to get correct eye relief, then the scope’s fore/aft position in the rings needs to be altered. Watch the full video for more tips.
Tips on Mounting Your Scope and Adjusting Your Comb Height:
1. Normally, you want your scope mounted as low as possible, while allowing sufficient clearance for the front objective. (NOTE: Benchrest shooters may prefer a high mount for a variety of reasons.)
2. Once the scope height is set, you need to get your head to the correct level. This may require adding an accessory cheekpad, or raising the comb height if your rifle has an adjustable cheekpiece.
3. Start with the rifle in the position you use most often (standing, kneeling, or prone). If you shoot mostly prone, you need to get down on the ground. Close your eyes, and let you head rest naturally on the stock. Then open your eyes, and see if you are too low or too high. You may need to use a cheekpad to get your head higher on the stock.
4. If your scope has a flat on the bottom of the turret housing, this will help you level your scope. Just find a flat piece of metal that slides easily between the bottom of the scope and the rail. Slide that metal piece under the scope and then tilt it up so the flat on the bottom of the scope aligns parallel with the flats on the rail. Watch the video at 8:40 to see how this is done.
Video find by EdLongrange. We welcome reader submissions.
Video Reviews Selected by Brandon Green
For this week’s Saturday Showcase, we present seven videos featuring modern Electronic Target Systems. These videos were selected by Brandon Green, one of America’s greatest marksmen. Recent winner of the legendary King’s Prize in the UK, Brandon is a three-time National High Power Champion, and a National Long-Range Champion. Brandon has chosen these videos to illustrate how electronic target systems work, and so viewers can optimize their performance when working with e-Targets, both for live fire and dry-fire training. The first four videos cover electronic live-fire systems for rifles. The second three videos cover dry-fire systems for pistols that can be used indoors.
Electronic Targets for Rifles
Shotmarker Target Unboxing, Overview and Set-Up
The convenience of electronic targets offers the competitive marksman or enthusiast the ability to train and gather data without having to enlist help. These systems allow the shooter to set up a target at any distance where the projectile is supersonic and collect vital data. This system allows you to see impacts on target, get retained velocities, and measure group sizes with remarkable accuracy provided the target frame is square, rigid, and calibrated properly. This 14-minute Ultimate Reloader video will cover the unboxing of the system as well as discussing the capabilities, setup, and calibration for proper use. This ShotMarker unit retails at $799.00 USD. LINK: ShotMarker Product Page.
Long Shot LR-3 Long Range Target Camera
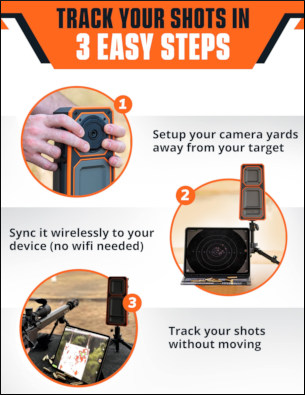
With the versatility of shooting steel or paper targets at distance, the camera style target systems can bring undeniable convenience to your range sessions. These systems can give you both the visual indication of shot placement on target and group sizes right on your phone or tablet.
This video covers unboxing, compatibility, and functionality of the Long Shot LR-3 target camera system with a live fire demo that shows image quality and speed. This impressive system can work out to 2 miles and syncs directly to your device. No range WiFi is required. This Longshot LR-3 Target Camera System is on sale for $899.99 USD.
If you typically shoot inside 1000 yards there are less expensive Long Shot devices. The Ranger+ 1K system is $404.00, The Marksman 300-yard UHD (ultra-high definition) is $449.00, and the Range 100-yard unit is just $224.00. LINK: LongShot Camera Options.
Caldwell Ballistic Precision LR Target Camera System
The Caldwell camera system appears to work similarly to the Long Shot system while coming in at a bit of a reduced cost. This video will cover unboxing, setup, and capabilities as well as a live fire demo that shows video quality and speed. This unit retails at $604.99 USD. LINK: Caldwell Camera System.
Kongsberg Electronic Targets for CMP
The CMP’s outdoor electronic targets at Camp Perry employ Kongsberg Target System (KTS) technology. The system includes monitors at each firing point that instantly display shot scores. The mobile version of the KTS system, which has been featured at CMP Travel Games events and the National Matches highpower series for many years, was used at the 2025 National Matches this summer. The advanced Kongsberg eTarget system at the National Matches will includes the KTS Shooter’s Journal, which keeps a log of each individual’s shots/scores on the firing line. LINK: Kongsberg Target System Products.
Pistol Dry-Fire Training Systems
Strikeman Laser Firearm Training System
The Strikeman Laser Training System is another dryfire training aid that allows the user to choose calibrated targets and get instant feedback with the training App on their smartphone. This video covers the unboxing, setup, and demonstration of the system. This unit is sold for $124.98 on the Strikeman website. LINK: Strikeman Pistol Training System.
Mantis Laser Academy Training System
The Mantis Laser Academy is a complete dryfire training system that allows the user to train indoors with the added benefit of getting feedback of shot placement, score on target and split times between shots. This system allows you train on numerous calibrated targets and offers several training drills with the app. You can also adjust your offset if you’re running an optic such as an RMR on your pistol. This kit is sold for $159.00 USD on the Mantis website. LINK: Mantis Laser Academy Kit.
Laser Ammo i-MTTS Target Training System
Laser Ammo’s i-MTTS training system is an interactive training system that allows the shooter to set up a complete indoor training range with various target sizes and shapes. This system allows the user to program drills, group targets together, and track splits with elapsed time. This video will cover the target system, setup, programming and drill demonstrations. This unit starts at $99.95 for a single target or $395.00 for the 5-in-1 combo pack on the Laser Ammo website. LINK: Laser Ammo i-MTTS Target System.
Proper eye protection is ‘must-have’ gear for shooting sports. In addition to providing reliable impact protection, good shooting glasses should be comfortable, fog-free, and not interfere with your preferred hearing protection. Those who require corrective lenses also need to consider the various options available. In a past episode of their Weekly Gear Review, the 6.5 Guys discuss a variety of shooting glasses they have tried, including examples from DeCot, Oakley, and Wiley-X. Ed and Steve outline the key considerations when choosing eye protection, and then review practical aspects of eyewear design and construction that enhance comfort and functionality in the field.
The 6.5 Guys (Ed and Steve) offer a number of smart tips consider safety eyewear, helping you select the most effective safety glasses at an affordable price. Here are the 6.5 Guys’ KEY Take-aways when choosing shooting glasses, including prescription eyewear:
Key Things To Consider When Choosing Eye Protection
1. Avoid polarized lenses or lenses that reduce light transmission significantly (except for action shooting in very bright conditions with large, close targets).
2. Avoid frame designs that interfere with prone shooting.
3. Avoid designs that easily fog.
4. Avoid frame designs with thicker temples that are uncomfortable to wear underneath hearing protection.
5. Select lenses with an appropriate degree of ballistic protection. CLICK HERE to learn more about eyewear safety standards.
6. When you get your prescription, be sure your ophthalmologist includes the interpupillary distance. This is a critical measurement particularly for heavier prescriptions.
7. If you have a complicated prescription select a vendor who will actually spend time with you to address any concerns.
Horrific .50 BMG Kaboom — Eye Saved by Protective Eyewear
Think you don’t need eye protection? Watch this video starting at 4:10. The screw-on barrel “cap” (chamber closure) of the .50 BMG action flies into the shooter’s face. Without eye protection the shooter would have definitely lost his right eye. (See video at 5:20 for analysis).
Safety First — Your Eyes Are Irreplaceable Accurate shooting begins and ends with the human eye. Your career as a marksman could be cut short if you don’t use good eye protection every time you go to the range and/or handle a firearm.
Every year, over 1,000,000 people suffer serious eye injuries. Shooting is hazardous; it is estimated that there are 30,000 firearms-related eye injuries each year (if you include paintball sports.) After paintball, general hunting accidents comprise most firearms-related eye injuries.
Quality eye protection need not be expensive. You can find comfortable, ANSI Z87.1-certified shooting glasses for under $10.00.
If you select shooting glasses carefully, and ensure that your eyewear is safety-certified, inexpensive shooting glasses can perform very well. But you need to avoid cheap, soft-plastic lenses that claim “impact resistance” without satisfying a testing standard.
Hunting season is coming soon in most parts of the country. As part of NRA Women TV, hunting guide Kristy Titus hosts a series of videos that explain important strategies and shooting skills for hunters. These videos can help you prepare for a fall hunt. Titus is a certified instructor who has hunted around the globe. She grew up in the outdoors, running pack mules in Oregon with her father. In these videos, Kristy discusses demonstrates field positions that can be employed during a hunt. She also explains preparation for a hunt, including fitness training.
Click each link below to watch other Kristy Titus Hunting Videos.
Kristy says: “When it comes to bolt-action rifle fit, there is no ‘one size fits all’. When picking out your rifle [consider options] after the purchase to ensure you are as comfortable as possible.”
Have you ever wondered how Olympic-class position shooters hold their aim so steady? Those bulky shooting coats help, but there is a lot of bio-mechanics involved also. Top shooters employ their body structure to help support the weight of their rifles, and to steady their aim. This interesting video, produced by GOnra Media, demonstrates rifle hold and body alignment for prone, standing, sitting, and kneeling positions. Olympic Gold Medalist Jamie Corkish (formerly Jamie Gray) demonstrates the proper stance and position of arms and legs for each of the positions.
Ideally, in all of the shooting positions, the shooter takes advantage of skeletal support. The shooter should align the bones of his/her arms and legs to provide a solid foundation. A shooter’s legs and arms form vertical planes helping the body remain stable in the shooting position.
Jamie Corkish, London 2012 Gold Medalist in Women’s 3 X 20, has retired from top-level competitive shooting. However, Jamie remains involved in the shooting sports as a Public Relations/Marketing representative for ELEY, a leading maker of rimfire ammunition. Jamie also works with shooting clubs and educational institutions to promote smallbore target shooting.
Images are stills from GOnraMedia video linked above.
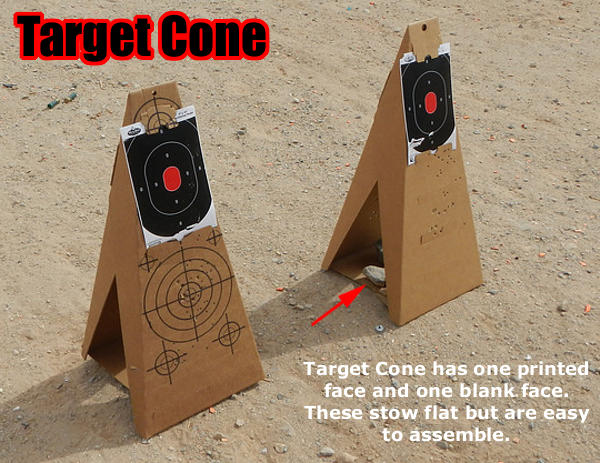
Sometimes you have an opportunity to go shooting but you’re a long way from home and don’t have your regular tall target frame(s). Here’s a handy product — a 28″ tall foldable cardboard cone — you can easily carry in your vehicle and deploy any time.
With this innovative Target Cone you can easily carry a target-holder wherever you go. The Target Cone from Re-Nine Safety transports flat so it can be easily stowed in the trunk of your car (or even under a seat). When you’re ready to use it, simply fold the flaps to create a self-supporting cone with pre-printed targets on one side. Place a rock on the base to hold it steady. The Target Cone can be used by itself or, as shown below, you can attach other targets, such as Re-Nine’s Silhouette Target (below right).
We think this is a great innovation. Keep a couple Target Cone flats in the back of your car or truck and you’ll always have a target support. For spur-of-the-moment range sessions, this is much easier than toting around a big target frame. The Re-Nine Safety Target Cones come flat, fold together and interlock forming a sturdy 28″ tall stand-alone target. These are sold as a 5-pack for $25.00.
If you shoot high quantities of ammunition in pistol or rifle competition, you should consider acquiring a good progressive press. Because multiple operations (sizing, powder dropping, bullet seating etc.) take place with a single pull of a lever, a progressive press can produce way more ammo in a given period of time than any single stage press. With a progressive, on the ram up-stroke, the multiple stations can simultaneously remove spent primer, full-length size case, drop powder, seat bullet, and crimp (if desired). Most progressives are also set up to prime cases with the ram in the lower position — though some guys prefer to prime manually.
Progressive presses aren’t just for high-output pistol ammo or bulk rifle ammunition. Good progressives can be adapted to do certain reloading tasks for top-on-the line match ammo. You might use a progressive for decapping, priming, and sizing, then throw powder and/or seat bullets separately. Some Champion shooters do use progressives to load their match ammo! For example 5-Time National Long Range Champion John Whidden and 2020 Berger SWN F-Open Champion Jay Christopherson both use progessive presses for some (but not all) operations.
To help you get started with progressive presses, here are six videos from UltimateReloader.com that cover seven popular machines, from the elite Mark 7 Evolution to the affordable Lee Loadmaster. With many of these machines you can add separate vertical bullet feeder systems that further increase loading efficiency. Machines Covered: Lyman Mark 7, Dillon XL-650, Dillon XL-750, Dillon RL-550c, RCBS Pro Chucker 7, Hornady Lock-N-Load AP, and Lee Load Master.
Mark 7 Evolution Press — Distributed by Lyman
Dillon XL-650 vs. Dillon XL-750
RCBS Pro Chucker 7 with Bullet Feeder
Dillon 550C with 6mm Creedmoor and 9x19mm
Hornady Lock-N-Load AP Progressive
Lee Load-Master Features and Loading 9mm
SAFETY BONUS — Why You Need a Lock-Out Die
The RCBS Lock-Out Die can also be used with some Dillon and Hornady progressive presses.
If you load pistol or rifle ammo with a progressive press, we strongly recommend you get a Lock-Out Die from RCBS. This unique reloading die will prevent your progressive press from advancing if the dispensed powder charge is more or less than about 0.3 grains too high or too low. The Lock-Out Die really works.
The Lock-Out Die works by using a central die detection rod that sets its vertical position based on the height of the powder column in the case. Through an ingenious design, if the powder column height is too low or too high, the rod locks in place as you start to pull the press handle. This halts the press before the ram can lift and the cartridge plate can advance. Unlike a beeping alarm system (which can be ignored or defeated), the Lock-Out Die physically stops the movement of the press ram and prevents a bullet being seated in the “problem” case.
It takes a bit of tweaking to get the Lock-Out Die detection rod setting just right, but once it is correctly positioned, the Lock-Out Die works smoothly in the background. The Lock-Out Die won’t interfere with the loading process unless it detects a high or low charge — and then it positively stops the progressive loading cycle.
While crafted for use in RCBS progressive presses, the RCBS Lock-Out Die can also be used on a Dillon XL Progressive or Hornady Lock-N-Load progressive — though it does take up one station which could otherwise be used for a final crimp die (after the seating die). This Editor has used the RCBS Lock-out die very successfully on an RCBS 2000 progressive press for many years.
Looking for a very affordable first rifle for a young family member? Here’s one of the best low-cost options you can find among .22 LR rimfire rigs. The Rossi RS22 is a reliable, semi-auto rifle that comes equipped with barrel-mounted iron/fiber optic sights. There are also dovetails on the receiver for mounting scope rings. The RS22 also takes most Mossberg 702 magazines.
The Rossi RS22 features an 18″ free-floating barrel, adjustable fiber optic sights and a synthetic Monte Carlo stock. For added accuracy, 3/8″ dovetail mounts allow the mounting of a scope or other optic (and there is a model with a Picatinny rail).
There are multiple RS22 models. The basic RS22 with black stock and iron sights is $149.99 at Sportsman’s Warehouse. If you prefer a different stock color, Sportsman’s Warehouse also has the iron sights RS22 with Brown stock or Green stock for $149.99. Or get a Flat Dark Earth RS22 for $161.99 at Palmetto State Armory. If you will always be using a scope, consider the RS22 model with Picatinny scope rail and threaded barrel (but no iron sights) — it is on sale now for just $149.97 at Sportsman’s Warehouse.
Rossi RS22 Specifications:
Model: RS22 Semi-Auto, .22 LR
Barrel: 18″ Free-floating
Stock: Black Monte Carlo Synthetic Stock
Overall Length: 36.25″
Weight: 4.1 lbs.
NOTE: The Rossi RS22 on sale has a matte black stock.
Two Video Reviews of Rossi RS22
The above video review of the Rossi RS22 confirms its reliability and build quality. The reviewer praised the fiber-optic iron sights and liked the magazines. After fitting a scope to the rifle’s built-in dove-tail, the tester got excellent accuracy with CCI ammo at 25 yards. Ten shots basically formed one half-inch hole. (See video 8:24 – 8:50 and target at right.) That’s good enough for an NRL22 match. Pretty impressive for a $134 rifle!
Gunblast.com also tested the Rossi RS22. This “dandy little rifle” performed great, with flawless semi-auto feeding and cycling for hundreds of rounds. Accuracy was quite good. The tester praised the fit and feel of the stock and noted it has sling swivel studs and well-protected sights. The RS22 can also use 25-round Mossberg magazines.
Our friend Gavin Gear has just released an excellent video showing how to make a threaded Modified Case for use with the Hornady Lock-N-Load Overall Length Gauge. You can watch Gavin make a Modified Case start to finish in the video below:
Video Shows How to Drill and Tap Modified Case
Gavin has some clever tricks. First he uses a sizing die to hold the cartridge case during the threading process. Second he uses two drill bits in sequence — a smaller bit to ream out the primer pocket, and then a larger “M” bit to increase the hole diameter before threading the brass. Finally he leaves the threading tap IN the brass, locks the tailstock, and then “gently pulls on the quill” to remove the brass from the die held in his lathe (See 5:46 timemark).
Get the Correct 5/16″-36 RH Tap
Unfortunately, Hornady has selected an uncommon thread type for OAL Gauges. You probably won’t be able to buy the correct 5/16″ – 36 RH HSS Tap at your local hardware store. However you CAN order this special tap from Amazon for $9.99.
Modified Case Q & A — TECH TIPS
Why do I need a Modified Case?
Every serious reloader should have a Modified Case for each cartridge type they shoot. The reason is that this allows you to get very precise measurements of the length-to-lands in your chamber. When used with the Hornady OAL Gauge, with some practice, you should be able to get repeatable length-to-lands measurements within about 0.0015″. We generally do 4-5 measurements with the OAL Gauge and usually 3 or 4 will be “on the money”. NOTE: We recommend a gentle, easy pressure on the plastic pusher rod. Don’t push too hard or you will jam the bullet hard into the lands, which produces inconsistent results.
Can’t I Just Buy a Modified Case?
Hornady makes a variety of Modified Cases sold on Amazon and through retailers such as Midsouth. While Hornady makes modified cases for many standard cartridges, if you shoot a wildcat such as the 6mm Dasher or .284 Shehane, you’ll need to create a custom modified case. And even if you shoot a standard cartridge such as the .308 Win, you can get more consistent measurements with a custom Modified Case.
If you do decide to make your own modified case, you’ll want to start with a case that’s been fired in your rifle. That way you get the best fit to YOUR chamber. Also, you won’t need to expand the neck to provide bullet clearance. Then you need to drill out the primer pocket and tap the base of the case to match the threads on the Hornady OAL Gauge tool. Make at least two modified cases, as you’ll probably misplace one at some point.
MORE INFORMATION: Want to learn more? We published a much longer story in which Erik Cortina explains in greater detail how to made the Modified Case. That article illustrates the 5/16″ – 36 RH HSS Tap required and shows how to set up the lathe to drill and tap your case. If you are serious about making your own Modified Cases, you should Read the Full Article.
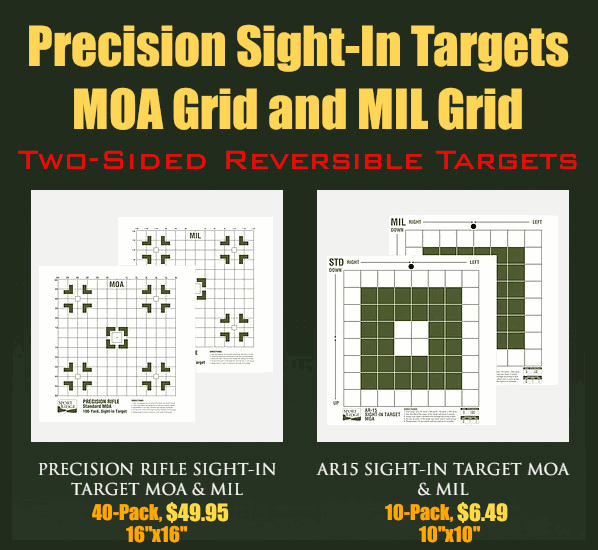
One side has MOA (Minute of Angle) grid for MOA-based scopes. Flip target over for MIL adjustment grid.
Here’s a clever product that can speed up the process of sighting-in your rifles, whether you have a scope with MOA-based clicks or an optic with MIL-based clicks. Sport Ridge offers a pair targets that are printed on BOTH sides with precise grids based on your scope’s click values. One side has an MOA-based grid while the other side of the target has 1/10th Milliradian (MIL) grid.
Choose between two, double-sided printed targets: the 16″x16″ 100-yard Precision Rifle Target and the 10″x10″ 25/50-yard AR15 Sight-In Target. For both target types, side one has an MOA-based grid for scopes with 1/4-MOA or 1/8-MOA click values. Flip the target over to use the grid for MIL scopes with 1/10th Milliradian click values.
Sport Ridge’s Premium Precision Sight-In Targets allow you to adjust the point of impact quickly because the target’s grid boxes precisely match the click values of MOA and MIL measurement systems. Sport Ridge states: “No more guesswork at matching your optic’s adjustment value, saving your ammunition and time spent sighting-in firearms.” Get the 16″x16″ Precision Target 40-pack for $49.95, or the 10″x10″ AR Target 10-pack for $6.49.
Manufacturer Video Explains How to Sight-In with MOA/MIL Grid Target:
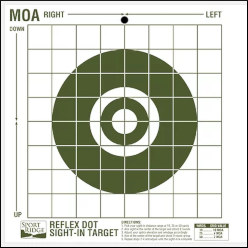
For MOA-type scopes, Sport Ridge also offers a single-sided Reflex Sight-In target with an MOA-based adjustment grid. This has a large center sighting bullseye so it can be used to confirm MOA-based click values at longer ranges (300+ yards) with rifles. Or use it at close range (for 10, 25, or 50 yards) for red-dot equipped pistols or shotguns. A 10-pack of these targets is $6.49.
REFLEX DOT SIGHT-IN TARGET
• Large Central Bull with MOA Grid
• Table of distance MOA optic click values
• Grid adjustment in direction Up/Down, Left/Right
This video explains general principles of sighting-in rifles, including dialing to Point of Impact:


 In this NSSF video, Ryan Cleckner shows how to set up a scope on a hunting or tactical rifle. Ryan, a former U.S. Army Sniper Instructor, notes that many hunters spend a small fortune on equipment, but fail to set up their rifle to use the optics optimally. Cleckner likens this to someone who owns an expensive sports car, but never adjusts the seat or the mirrors.
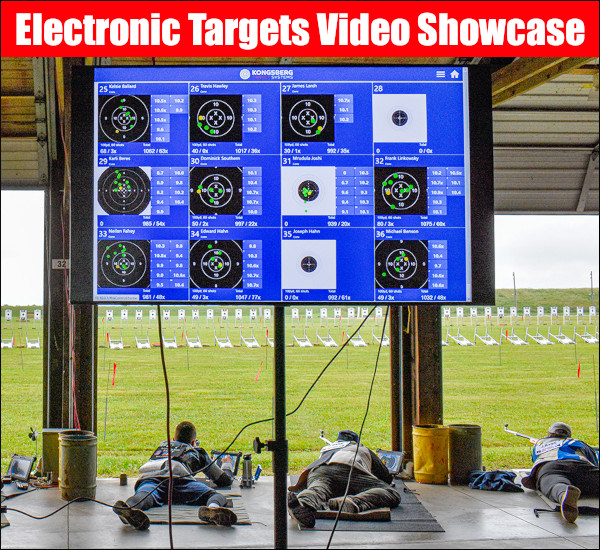

 With the versatility of shooting steel or paper targets at distance, the camera style target systems can bring undeniable convenience to your range sessions. These systems can give you both the visual indication of shot placement on target and group sizes right on your phone or tablet.
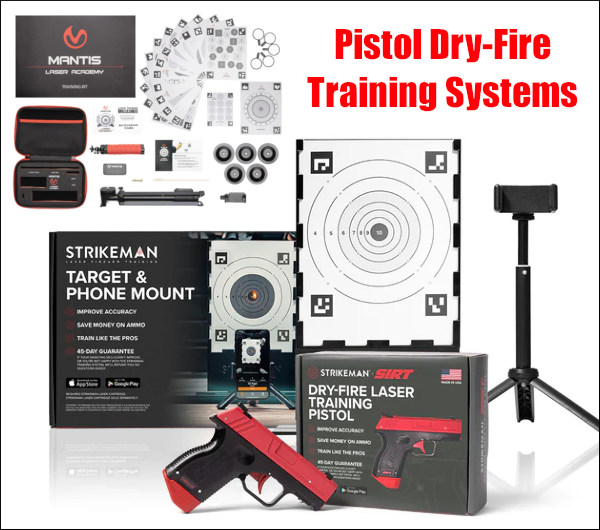

 Accurate shooting begins and ends with the human eye. Your career as a marksman could be cut short if you don’t use good eye protection every time you go to the range and/or handle a firearm.


 For MOA-type scopes, Sport Ridge also offers a single-sided


