Forum member Erik Cortina has produced a series of YouTube videos about reloading hardware and precision hand-loading. Here we feature Erik’s video review of the Forster Co-Ax® reloading press. The red-framed Co-Ax is unique in both design and operation. It boasts dual guide rods and a central handle. You don’t screw in dies — you slide the die lock ring into a slot. This allows dies to float during operation.
Erik does a good job of demonstrating the Co-Ax’s unique features. At 1:00 he shows how to slide the dies into the press. It’s slick and easy. At the two-minute mark, Erik shows how sliding jaws clasp the case rim (rather than a conventional shell-holder). The jaws close as the ram is raised, then open as it is lowered. This makes it easy to place and remove your cases.
At the 5:20 mark, Erik shows how spent primers run straight down into a capture cup. This smart system helps keep your press and bench area clean of primer debris and residues.
While many Co-Ax users prime their cases by hand, the Co-Ax can prime cases very reliably. The priming station is on top of the press. Erik demonstrates the priming operation starting at 4:20.
Smart Accessories for the Co-Ax from Inline Fabrications
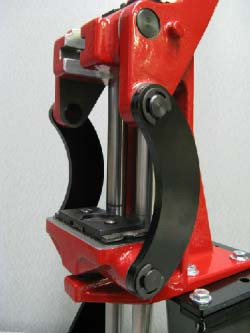
Forum member Kevin Thomas also owns a Co-Ax press, which he has hot-rodded with accessories from Inline Fabrications. Kevin tells us: “Check out the add-ons available from Inline Fabrications for the Co-Ax. I recently picked up a riser mount and a set of linkages for mine and love the results. The linkages are curved. When you replace the original straight links with these, the work area opens up substantially and the the press becomes much easier to feed.” CLICK HERE for Co-Ax Accessories.
Inline Fabrications Forster Co-Ax Accessories
Forster Co-Ax Curved Side Linkage (For Better Access)
The Civilian Marksmanship Program (CMP) will offer hands-on rifle and pistol training programs in 2021 at locations around the nation. The CMP’s Marksmanship 101 Program, formerly known as the Small Arms Firing School (SAFS) On The Road, is designed to train beginners on rifle or pistol essentials and competition basics in a closely monitored setting, utilizing the talents of qualified CMP staff, trainers, and members of the U.S. Army Marksmanship Unit (USAMU).
Held at CMP Games matches and at various CMP Affiliated Clubs around the nation, the courses are led by certified CMP Master Instructors and talented members of the U.S. Army Marksmanship Unit. The course curriculum is based off of the Small Arms Firing Schools (SAFS) offered at the annual National Rifle and Pistol Matches at Camp Perry, Ohio, which have been attended by countless individuals since 1918.
Upcoming Rifle Marksmanship 101 Classes:
New England Games, September 19, 2021, Jericho, Vermont
Oklahoma Games, October 17, 2021, Oklahoma City, Oklahoma
Talladega 600, November 16, 2021, CMP Talladega Marksmanship Park, Talladega, Alabama
Upcoming Pistol Marksmanship 101 Classes:
New England Games, September 19, 2021, Jericho, Vermont
Oklahoma Games, October 17, 2021, Oklahoma City, Oklahoma
Firearms and Ammunition Are Provided by CMP
Here is one of the biggest lures of the Marksmanship 101 Program — the CMP supplies guns and ammo! Rifles (AR-15), pistols (M9) and ammunition will be provided by the CMP at each location.
Programs Combine Classroom Learning and Outdoor Shooting
The Marksmanship 101 rifle and pistol courses train both adults and juniors in a safe and comfortable environment. Courses will be held at multiple locations. CMP Training Director Steve Cooper explains: “We know there are many people across the country who simply don’t have the time or means to travel to Ohio for the Small Arms Firing Schools during the National Matches, so, we decided to take the same basic curriculum and training on the road and customized the name.”
The Marksmanship 101 courses are a mix of indoor classroom learning and outdoor experiences on the range. Areas covered during the course include firearm safety, essential firing practices and handling, positioning and other competition skills, along with live firing on the range. Each course ends with applying everything learned to a true Excellence-In-Competition match on the range. “We always start our 101 events in a classroom environment, where we explain and demonstrate everything we’re going to do, very thoroughly,” Cooper said.
Program Requirements for Marksmanship 101
Since CMP Marksmanship 101 programs are designed to fit even those new to the marksmanship world, no previous firearm experience is required to attend. Participants ARE required to bring hearing and eye protection for the live-fire activities. Individuals should also dress according to weather conditions and may also bring any other desired competitive shooting equipment they wish to use.
How to Register for CMP Marksmanship Training Programs
Visit the CMP Marksmanship 101 website for Registration Links and other information. Once on the website, click your desired date and location to be sent to the CMP Competition Tracker page to complete registration. Questions regarding Marksmanship 101 may be directed to Amy Cantu at 419-635-2141 ext. 602 or acantu@thecmp.org.
How have gun sales grown in recent years in the USA? What states have the most new gun owners? How much ammo is produced each year? You’ll find answers to these and other questions in a new infographic produced by Bear Creek Arsenal.
Here Are Some of the Key Findings:
1. Over 21 million NICS Adjusted background checks were done in 2020, a 59.7% increase over 2019 (and 34.3% higher than 2016). NSSF estimates that 40% of 2020 gun sales were to first-time gun buyers who numbered 8.4 million last year.
2. Of all U.S. States, Texas had the most NICS checks in 2020, with 1.8 million, followed by Florida with 1.6 million. Perhaps surprisingly, Democratic Party-controlled California recorded 1.23 million NICS checks.
3. Some “Blue States” have seen huge increases in gun sales, prompted by Leftist- and BLM-sponsored riots and social unrest. For example, Michigan saw a 180% increase in sales, while the District of Columbia saw a 140% increase. That is interesting because DC is definitely not a bastion of conservative Republicans. In fact, the District of Columbia is solid Democratic Party territory. This shows that concerns over personal safety/self-defense cut across party lines.
4. Over NINE BILLION rounds of ammunition were produced in 2020. This represents a total annual ammo value of $21.38 billion. Quote: “A reasonable extrapolation puts the amount of ammunition produced for the United States market [in 2020] at somewhat over 9 billion rounds, of which 5 billion are rimfire and 4 billion are centerfire rifle, pistol, and shotgun rounds.” Source: Dean Weingarten on Ammoland.com
2020 was definitely the year of the gun. Firearm sales were up 95% in the first half of 2020. And, according to the NSSF, there were nearly 8.4 million first-time-ever gun buyers in the USA in 2020. A NSSF dealer survey estimates that 40% of all gun sales were conducted to purchasers who have never previously owned a firearm. Women accounted for 40.2% of all first-time gun purchases. Notably, firearm purchases among African American men and women increased 58% over last year, the largest such increase of any demographic group.
Looking for a faster, easier, and more accurate way to measure bullet positions on your loaded rounds? Check out the Accuracy One Seating Depth Comparator. This unique tool provides a shoulder-to-ogive measurement instead of the traditional cartridge base-to-ogive measurement. The Accuracy One Comparator just might work for you. This unique tool allows a very rapid and secure measurement that provides a precise determination of the bullet seating depth in the case.
Accuracy One Seating Depth Comparator
Product Review by F-Class John
You probably check your loaded ammo by measuring cartridge base to ogive, but have you ever considered there may be a better way? Curt at Accuracy One has considered the question, and after exhaustive research and testing he created the Accuracy One Seating Depth Comparator. As opposed to looking for a base to ogive measurement, this tool measures from the shoulder to ogive, which is arguably the more repeatable number when it comes to accuracy.
Click Arrow to Watch Video Tool Review
As Curt explains, “Well, when you fire a chambered cartridge, the strike from the firing pin first pushes the cartridge forward until it bottoms against the shoulder. The primer is then ignited. What this means is that your seated bullet depth consistency can more accurately be gauged using the dimension from shoulder to ogive. Using this dimension, you effectively eliminate any small variances in your sized case length from the equation”. As a result, it made sense that when he was designing the measurement tool his goal was to create a universal insert that allowed a user a quick, easy, accurate and repeatable process that measures from mid-shoulder to ogive.
The comparator fits cartridges from .22 to .30 Caliber with 0.400″ and larger shoulder diameters. The tool fits so many bullet sizes because of the specific taper that Curt developed. This ensures that any caliber in that range makes good contact along the ogive. As I used this tool and talked to people about it, I kept getting skeptical comments with people asking how it could measure the ogive on that many calibers accurately. I had to remind them that the ogive is not a single point on the bullet but in fact the entire curve from the tip of the bullet to the point it straightens out. As a result, it’s only important that the tool you use is consistent in what point along the ogive it measures and that’s where the Accuracy One Seating Depth Comparator shines. According to Curt, he went through countless iterations on his design until he was able to accurately and repeatably measure all those calibers (.22 to .30).
How to Use the Accuracy One Seating Depth Comparator
Using the comparator is simple. There are alternative methods. The easiest way is to simply zero the indicator, insert a loaded round, note the measurement and compare any future rounds against it for variation. An alternative to this is a method I use. I insert a loaded round and then zero the indicator. This allows you to see the exact variation without mental math (and frankly it’s faster this way). I also use this method to sort loaded rounds for matches in order from shortest to longest ensuring that rounds that measure the same are fired together.
Bonus Option — Measuring Length to Lands with Tool
Another great use for this Accuracy One comparator is to take my initial depth to lands. This helps ensure my seating depth was properly set. Using a case with very light neck tension, I load a bullet, and with a stripped bolt I load and close it. Then I can remove the round and take a measurement, zero the indicator and make a note of it in my book. After that the comparator will remember the new zero until it’s zeroed again and if that happens by accident, I can always reference the number that my round measured and pull on the indicator stem until that number is found and then zero it again. I found this entire process fast, easy and repeatable as I loaded rounds and needed to check for any seating depth variance.
Tool Pricing:
Seating Depth Comparator without Indicator: $65.00
Seating Depth Comparator with Indicator: $115.00
Gauge Stand: $47.00
Purchase Options
You can buy the tool with or without an Digital Indicator. Accuracy One also makes a Primer Depth Gauge. Both Accuracy One tools employ the same digital indicator. This helps save money as you can order the comparator alone if you already have one (either from another Accuracy Tool or another tool).
The Accuracy One Seating Depth Comparator is essentially the same size as the Accuracy One Primer Depth Gauge, so you can even utilize Accuracy One’s primer gauge storage case. There is also an optional stand that I HIGHLY RECOMMEND as it can hold either the seating depth OR primer gauge, making for amazingly simple one-handed operation while you’re loading.
CONCLUSION — Tool Is Precise, Repeatable, and Fast
Overall, this tool left me feeling confident in my depth setting and I found it quick and easy compared to past methods. At the end of the day there are several ways to skin the proverbial cat when it comes to measuring seating depth. But if you’re looking for what just might be the most accurate, consistent and speediest method, give the Accuracy One Seating Depth Comparator a try.
This article was originally written by noted rimfire gunsmith Bill Myers. Sadly, Bill passed away in May 2010, but his legacy lives on. He pioneered many advancements in rimfire gunsmithing and Myers-built guns still win matches in benchrest competition.
Crafting competitive rimfire benchrest rifles is considered an art as much as a science. The smith must understand subtle, yet critical aspects of vibration control, barrel tuning, and rifle balance. In the United States, only a handful of gunsmiths consistently turn out rimfire BR rifles that consistently run at the front of the pack at major matches. Bill Myers was one of those master craftsmen. In this article Bill discussed the process of building a winning rimfire BR rig. He reveals some interesting secrets, including his procedures for testing bedding performance and his barrel indexing system. Bill’s methods obviously work, as the Suhl-actioned rifle featured here won a truckload of trophies in its very first match.
Building a Match-Winning Rimfire Benchrest Rig
by Bill Myers
In my opinion, a winning rimfire benchrest rifle is probably twice as difficult to build as a competitive centerfire rifle. The relatively slow .22 LR bullets stay in the barrel much longer than centerfire bullets. This means that vibration control is critical. Likewise bedding is critical. Bore finish and lapping are very important. The amount of bore taper or “choke” can have a huge effect on accuracy. Ignition is also very important and above all, rimfire BR rifles need a very stable stock that tracks perfectly. A rimfire that shoots great is a complete marriage of all components and of the shooter’s need to be aware of everything possible.
Click Photo to Zoom
The rifle featured in this article was built from scratch with attention to all the details that go into accuracy. The goal was to build a gun that could win from the get-go. This would be a “Spec Gun”, meaning a rifle that was personally tested and tuned by me for optimum performance before it went out to the customer.
The Suhl trigger is as good as it gets so no change was needed. It easily adjusts down to about 2 ounces.
Baer Stock in Bubinga Wood
There are many choices when you start to build a complete rifle. It has to shoot well and it has to catch ones eye, or it’s just another rifle on the line. I prefer wood stocks on rimfires for two reasons: they are very stable if the right wood is used and they have a certain traditional appeal to many shooters. I chose Bubinga wood for this particular gun because it is very stable and heavy, it has a very dense grain and a very pronounced figure with a natural red color. The Bubinga is a very forgiving wood to work with.
Gerry and Bruce Baer in Pennsylvania do all my stock blanks. I do all my own inletting and bedding. The blank weighed 4.5 pounds when it came off of Bruce Baer’s duplicator. This Bubinga wood is so hard that it did not need pillars, but I put them in anyway. I bed all my stocks with Loctite Steel Bed liquid and add filler to desired thickness. The final bedding is done with an aircraft tooling epoxy that does not deteriorate over time. The stock has an ebony butt plate and six (6) coats of automotive clear, polished to a “high buff” finish.
Suhl 150-1 Action Accurized and BN-Nickel Plated
I used a new, unfired Suhl 150-1 action. As explained in the sidebar below, the Suhl 150 actions were originally crafted in East Germany for position rifles. They have a very fast lock-time and come with an outstanding trigger. However, they need some work when adapted to a modern BR gun. The action needed to be accurized and threaded. I have a special tool that I use to accurize actions. It uses two sets of spiders for dialing-in the bolt raceway. After the bolt raceway is running true, one can thread and true up all bearing surfaces so that everything is in perfect alignment with the action raceway bore.
BN-Nitride Plating on Action
I decided to plate the action and all bolt parts with Boron Nitride nickel plating. I bough the BN Electroless Nickel Kit from Caswell Plating and did the job myself. I started by bead-blasting the action so that it would end up with a “satin” finish. The plating material is then applied in a tank. The Boron Nitride goes directly into the plating solution, but you need to use a pump to keep the solution agitated so the BN distributes evenly.
Once the action is completely ready (the metal must be perfectly prepped, with no contaminants), the process goes easily and can be completed in about half an hour. The end result is a very slick, low-friction finish, that is .0002″ (two ten-thousandths) thick and hard as glass. The Boron Nitride makes everything very smooth. After the plating job, the action was noticeably slicker than before.
The cone breech (photo below) permits the barrel to be INDEXED (rotated around bore axis) to any position on the clockface. You then test various rotation settings to find the best accuracy. The system does work. Some barrels shoot best in a particular rotational setting. E.g. with index mark at 3 O’clock vs. 12 O’clock.
Fitting and Chambering the Barrel
As for a barrel, I had two good choices: one Shilen 1:16″-twist, 4-groove ratchet and one Benchmark 1:16″-twist, 3-groove. Both barrels were very accurate and at the end, I decided to leave the Shilen on the rifle because I wanted to put the Benchmark on another Suhl I’ve set aside for myself. I chambered the barrel for Eley flat nose EPS. We’ve found the gun also shoots the new Lapua X-ACT ammo very well.
The barrel finished at 25″ long and features a tuner by the Harrell brothers of Salem, Virginia. I use a flat 90° crown–it’s the most accurate and its gives a good seal against the tuner. I also use a 45°, 12-flute cutter that leaves no burr when cutting the crown. This chamfer protects the crown when cleaning the barrel. There is no sharp edge for the brush or jag to hit on the return stroke. The barrel was headspaced at .043″ and I use a tapered reamer ground by Dave Kiff of Pacific Tool & Gauge in Oregon. The chamber leade area is lightly polished to remove reamer burrs. The breech end of the barrel is machined with a 1/2″ ball end mill to produce what I call a “Myers cone breech.” Technically, it has a sloping radius as you can see, rather than a straight-sided cone. Finishing the breech in this fashion facilitates indexing the barrel, as the barrel can be rotated to any position (on the clockface), without requiring new extractor cuts.
Barrel Indexing — Finding the “Sweet Spot”
When indexing a barrel, one rotates it to different clockface positions relative to the action. Imagine marking a barrel at TDC or 12 o’clock, and then rotating it so the mark is at 3 O’clock, 6 )’clock, 9 O’clock and so on. At each position one shoots groups to determine at which index setting best accuracy is achieved.*
I know that barrel indexing is controversial. I don’t want to get into a lengthy debate other than to say that I believe that careful and thorough testing can reveal a “preferred” index position for a good barrel. With the barrel set in that particular position relative to the action I believe the barrel can yield optimal performance.
I perform the indexing tests indoors at 50 yards. I use a rail-gun with floating action. The barrel is held in place with a clamping fixture similar to an Anschutz 2000-series action. Basically, two vertically-stacked metal blocks clamp around the barrel. I can index the barrel this way simply by unclamping the barrel blocks, rotating the barrel and then re-clamping the system. I have a special system so the action can stay in the same position, even as the barrel is rotated.
It takes time and effort to get solid indexing results. Normally I shoot at least 400 rounds of ammo in 3-4 indexing sessions. Shooting a handful of groups is not enough. You may think you’ve identified the best index position, but you need to shoot many more rounds to verify that. Also, in a very good barrel, the effects of indexing may be subtle, so it will take many groups to confirm the optimal position. In my experience, really good “hummer” barrels do not benefit as much from indexing as an “average” barrel.
Accuracy Testing with Both Barrels
I tested the rifle indoors at 50 yards at the Piney Hill Benchrest Club range. There was no finish on the stock, but it shot well in my one-piece rest with the Benchmark 16-twist, 3-groove barrel and no added weight on the tuner. I shot 30 rounds of Eley Match EPS Black Box (1064 fps) and had 25 Xs and five 10s on the IR 50/50 style target. Not too shabby for a new barrel with no special break-in.
When the Shilen barrel arrived, I installed it on the rifle. By this time the stock had been clear-coated and finished, and the action had been polished and plated. I shot the Shilen barrel outside since it was too hot in the building. The first target was a 250-19X with a new lot of Eley Match EPS Black Box (1054 fps). The gun shot well. My friend Tony Blosser asked to shoot the gun, and he drilled a 250-20X in a steady wind using the same Eley ammo. See target at right.
Advanced Procedures — Vibration Control and Tuner Position
Barrel Tuning Using 2-Way Electronic Indicators
Before competing with this rifle, I put it in a firing fixture I use to tune the barrel. I employ a pair of very expensive Swiss 2-way electronic min/max hold indicators. These measure both up movement and down movement of the barrel as the gun is fired. I can measure the actual vertical travel of the barrel at any position from the front of the receiver to the tuner. I can also tell how long the barrel vibrates, time-wise. Using this fixture I found that the Shilen barrel was very consistent in readings and seemed to work well with no additional weight on the tuner. No barrel ever stops vibrating completely — but this was close, showing less than .002″ of total movement.
Bedding and Vibration Control
I have found that measuring the actual movement of the barrel during firing tells me a lot about the quality of the bedding. I have learned that if I see very big movements (e.g. .010″ up and .005″ down), then there may be a problem with the bedding. I saw this kind of big swing on a rifle with bedding that had not cured properly.
Another pattern I watch for is uneven vertical movement. For example, if the barrel vibrates .008″ up but only .002″ down, that tells me the bedding has issues. As noted above, I look for minimal vibration travel (after the tuner is fitted and optimized), and I also want that travel to be relatively equal both up and down. Good rimfire gunsmiths agree that proper bedding has an important influence on vibration control and tuning. By measuring actual barrel movement during firing, we can, to an extent, quantify how well the bedding is working. At a minimum, we can see if there’s a serious bedding problem.
Trial by Fire — Shooting the Gun in Competition
After semi-gluing in the action, the rifle was shooting great. So, I decided to take it to the Maryland State Unlimited Championship to see if it was truly competitive — whether it could “run with the big dogs”. As it turns out, the Bubinga Suhl was more than just competitive. The rifle won three of the six cards and won the meters championship. In the photo below you can see all the trophies the gun won in its very first match. One of the other competitors in Maryland, dazzled (and perhaps a bit daunted) by the Bubinga Suhl’s stellar performance, told me: “Sell that gun Bill. Whatever you do, just get that darn rifle out of here.” Confident that this was a rifle capable of winning major matches, I packed up the rifle and shipped it to Dan Killough in Texas. Killough has shot some impressive scores with the gun.
Suhl Target Rifles — East Germany’s Legacy
Suhl 150 rifles were manufactured in former East Germany (GDR) by the Haenel firearms factory in the town of Suhl. This region has a long history in arms production. In 1751, Sauer & Sohn founded the first German arms factory in Suhl. Following WWII, Suhl 150s were produced for Communist Bloc marksmen, including East German Olympic shooters. Prior to German unification, the East German national shooting arena was located at Suhl and hosted many top-level competitions including the 1986 ISSF World Championships.
Superb Rifles with Amazing Triggers
As a product of East Germany, the “mission” of the Suhl 150 was to rival the accuracy of the Anschütz, Walther and other premium match rifles built in the West. East German shooting teams wanted to finish on top of the podium, so they needed a rifle with superb inherent accuracy. The Suhl 150s have an outstanding trigger that can be adjusted down to about two ounces. The Suhl 150 action, like the Anschütz 54, boasts an extremely fast lock-time — an important factor in a position rifle. And Suhl barrels were legendary for accuracy.
Suhl 150 Benchrest Conversions
Many of the first used Suhl 150s that made it to America were converted to Benchrest rifles because the action/trigger/barrel combination was unbeatable for the price. Some of the barrels on these “surplus” Suhls were phenomenal — as good as any custom barrels available today. It was not unknown for a Suhl 150 barreled action, transplanted into a benchrest-style stock, to win BR matches with the original barrel. Today, however, most of the Suhl benchrest conversions end up with modern, American-made barrels. While some older Suhl barrels can “shoot with the best of ‘em”, new barrel designs optimized for use with tuners have an edge, at least in benchrest circles. That’s why builders such as Bill Myers swapped out the Suhl barrel with something like a Benchmark reverse-taper two-groove.
Today Suhl 150 rifles are very hard to find in North America. In 2006, a used Suhl 150, even without sights, might fetch $1200.00 or more. Then, in 2007 through early 2008, hundreds of Suhl match rifles were imported. This drove prices down, and those “in the know” snapped up complete Suhl 150s at prices ranging from $450 to $850 (see 2007 advert at right), depending on condition.
Many of these rifles were left “as built” and used successfully in prone competition. Others were converted into benchrest and silhouette rifles, “parted out” for the actions and triggers. If you were able to grab one of those imports at a good price–consider yourself lucky.
* Bill Myers actually created his own clamping rimfire action to facilitate barrel indexing. CLICK HERE for Myers Rimfire Action. To index the barrel, Myers simply loosened three clamping-bolts and rotated the barrel in the action. Because there is no thread to pull the barrel in or out, the headspace stays the same no matter how much the barrel is rotated. With a threaded action, you might have to use shims to test different rotational positions, or otherwise re-set the shoulder with each change.
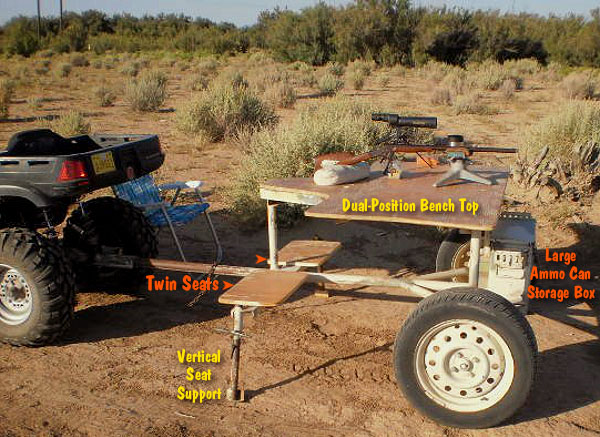
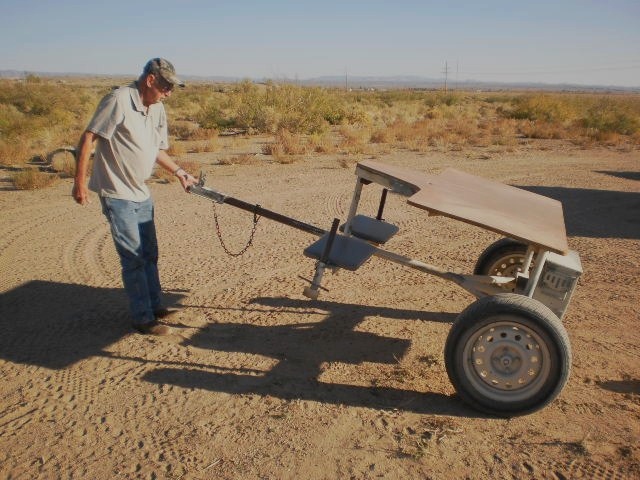
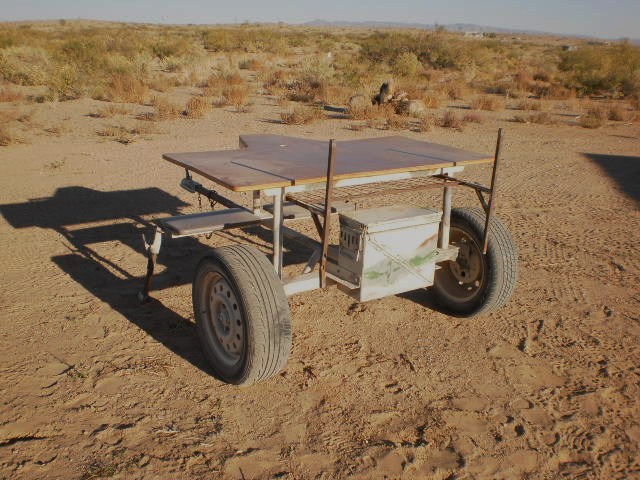
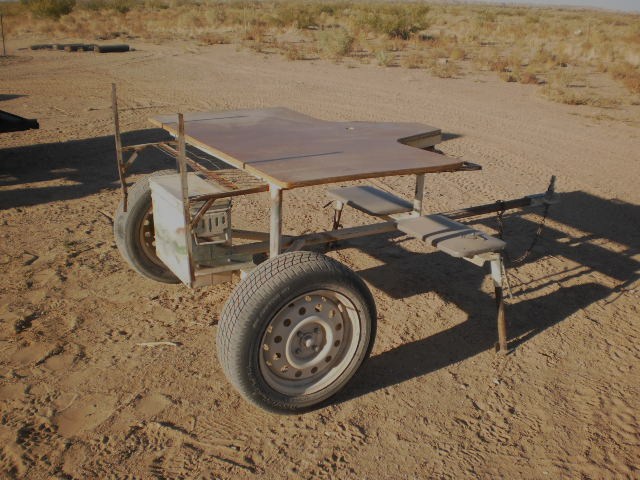
AccurateShooter Forum member John H. of New Mexico (aka “Skratch”) has created an impressive mobile shooting bench that he can haul with his ATV. This trailer-mounted, movable bench is built on a central tubular spine that also serves as the tongue for the trailer, which attaches to a standard hitch. The bench offers two (2) shooting positions so it works for both left-handed and right-handed shooters.
Up front, for storage, a surplus .50-Cal ammo can is secured to the trailer frame. The V-shaped middle section of the wood benchtop looks to be reinforced with a metal stiffener frame on the underside. The front section of the bench is supported by twin tubular uprights attached to the box-section axle housing. The two wooden bench-style seats (on left and right) ride on a cross-tube. At the ends of that cross-tube are adjustable legs for additional support.
Great Rig for New Mexico Varmint Hunting
There are plenty of great varmint hunting areas in Skratch’s home state of New Mexico — you’ll find some huge prairie dog fields there. But to get the best results on a varmint-hunting field session, you need a solid shooting station that can be easily hauled to new locations as needed. It looks like John (aka “Scratch”) has come up with an outstanding “War Wagon” for his New Mexico varmint safaris.
Click on image frames to see full-size photos
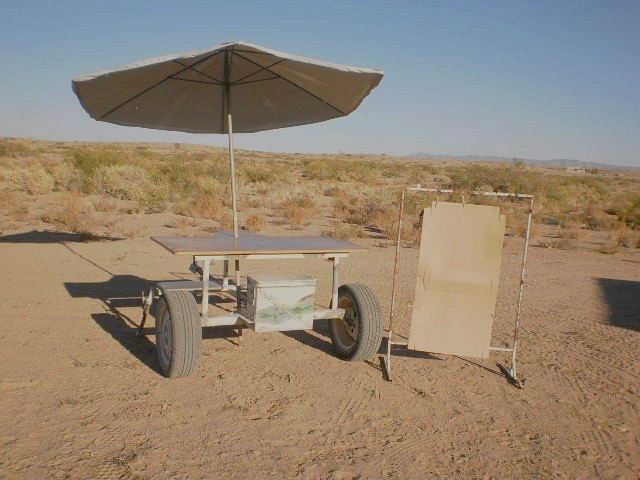
Some readers wanted to know how John’s War Wagon is positioned in the field and if it is ever detached from John’s ATV. John answers: “We do unhook the 4-wheeler for target-checking unless we have an extra along which is usually the case. That way we can level the table front to rear. We have an umbrella from a patio table to provide shade on extra warm days.”
War Wagon Construction Details
John told us: “My brother-in-law and I built this mobile bench a few years ago. The axle, wheels and tire are a tag axle from a small Chevy car, obtained from a salvage yard for about $35-$40 a decade ago. The tubular frame is drill stem, while the bench-top and seats are 3/4′” plywood. Under the plywood we fitted rails so we can slide our target stand under the benchtop for secure travel. The total cost for everything (including storage box) was about $250-$300.”
We set the bench and seat heights so that, with adults, the rifle sets straight level to the shoulder. For the smaller ‘younguns’ we just use a sofa pillow to raise them up. (Yes, adjustable seat heights would be great.) The ammo box holds our rifle rest, sand bags, spotting scope, and miscellaneous gear. Options are a couple of lawn chairs, and a cooler of brew (for after the shooting is done).
The total economic impact of the firearm and ammunition industry in the United States increased from $19.1 billion in 2008 to $63.5 billion in 2019, a 232% increase, while the total number of full-time equivalent jobs rose from approximately 166,000 to over 342,330, a 106% increase in that period, according to a report released by the National Shooting Sports Foundation, the industry’s trade association.
In just the last year, the industry’s economic impact rose from $60 billion in 2019 to $63.5 billion in 2020. Total jobs increased by 10,000+, from nearly 332,000 to over 342,330. The NSSF states: “The broader impact of the industry throughout the economy supports and generates business for firms seemingly unrelated to firearms, at a time when every job in America counts. These are real people, with real jobs, working in industries as varied as banking, retail, accounting, metalworking, and printing among others.”
The firearms/shooting industries help fund vital public services, by generating billions in Federal and state tax revenues. Since 2008 the gun industry has increased federal tax payments by 170%, state business taxes by 125% and Pittman-Robertson excise taxes that support wildlife conservation by 89%.
Bigger is Better?
Yes, size matters — at least when it comes to gun safes. Is your current safe bursting at the seams with your ever-growing firearms collection? Perhaps you need a little more vertical clearance for your Lahti L-39 or favorite Punt Gun? Well Superior Safe Co. has a solution for you — a humongous safe that stands 10-feet tall and weighs more than a pick-up truck. For reference, the young man in the picture, Greg from Pyramyd Air, is an honest 6’3″ tall.
Sized Right — For a 7-Footer
Now if you’re not an NBA center, the lock placement on this safe is not very practical. The lock’s keypad is a good foot above Greg’s head, making access somewhat difficult for the “vertically challenged” customer. We’re not sure what Superior Safe hand in mind here — unless this mega-safe was really created for the likes of Shaquille O’Neal or Joel Embiid.
Still, Americans love big stuff — big cars, big houses, and, of course, big guns. At least if you purchase one of these monsters, you’ll have the peace of mind that a smash-and-grab thief can’t roll it away on a hand dolly. Superior Safe, which displayed this yellow giant at the NRA Annual Meeting & Exhibits a while back, explains that this is a “custom model” not on the normal price list — face it, if you need to ask about the price, you can’t afford it. Joking aside, if you really need this kind of capacity for a firearms collection (with a punt gun or Lahti), you’d be wise to consider a custom walk-in vault, built into a room in your house. (Safe photo courtesy Pyramyd Air.)
What is a Punt Gun? A punt gun is an extremely large shotgun used in the 19th and early 20th centuries for shooting large numbers of waterfowl for commercial harvesting operations and private sport. Punt guns could have bore diameters exceeding 2 inches (51 mm) and fire over a pound of shot at a time. A single shot could kill over 50 waterfowl resting on the water’s surface. Punt guns were too big to hold so they were often mounted directly on the punts (boats) used for hunting, hence their name. Generally the gun was fixed to the punt, requiring the hunter to maneuver the entire boat to aim the gun. Firing the gun often propelled the punt backwards from recoil. Sometimes fleets of punt gun-boats were used together. In the United States, this practice depleted stocks of wild waterfowl and by the 1860s most states had banned the practice. In the United Kingdom, a 1995 survey showed fewer than 50 active punt guns still in use. UK law limits punt guns to a bore diameter of 1.75 inches (1 1/8 pounder). Learn more at Wikipedia.com.
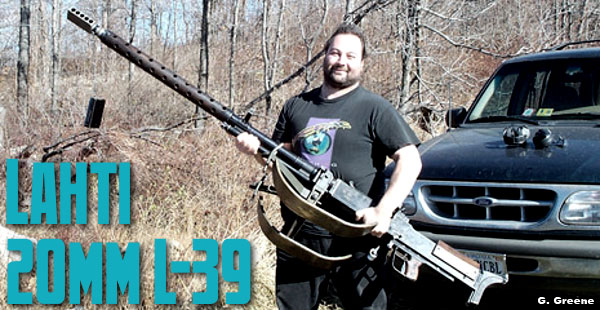
Lahti L-39 photo, courtesy Gordon Greene, originally appeared in The Gun Zone.
The 6mmBR Norma cartridge has spawned many great variants in multiple calibers: 6mm Dasher, 6BRA, 22 BR, 22 Dasher, 30 BR and others. This article is about a handsome 22 BR Rem-action varmint rig.
Richard Franklin (who operated Richard’s Custom Rifles prior to his retirement), has built scores of varmint rifles, in many different calibers. One of Richard’s all-time favorite varmint rifles is a 1:14″-twist, 22 BR built on his Model 11 stock in laminated Black Walnut and fiddleback maple. Richard says the rifle is versatile and deadly accurate out to 400 yards. Richard uses a Leupold 8.5-25x50mm LRT with varmint reticle.
Richard’s 22 BR Varmint Rifle with Lilja Barrel
Richard tells us: “[Shown above] is my light walking varminter. It’s built on a blue-printed Stainless Steel Remington 700 short action and chambered as a no-turn 22 BR for Lapua brass. The bolt handle is a Dave Kiff replacement and I’ve fitted a Jewel BR trigger with bottom safety. The barrel is a Lilja, 1:14″ #6 contour with a muzzle diameter of .750″. I shoot the 40gr V-Max bullets in the rifle at 4000 FPS. It’s tough on hogs if you don’t try them too far. 400 yards is about the max with it.
Accuracy is outstanding and with Roy, Mike, my grandson and myself shooting this rifle I don’t believe it has missed more than three hogs out of over 100 we shot at one summer. This rifle is carried in a ceiling rack in the truck where it’s handy and is used by the first person that grabs it when a hog is sighted if we are moving between setups. The Varmint reticle on the Leupold (shown below) is nice for quick hold-overs as you change distances.”
At right is a another Franklin Model 11 stock in Birdseye maple. That photo shows the details of the thumbhole stock.
Editor’s Note: We have shot a 1:8″-twist 22 BR in varmint matches and it was very accurate with 80gr bullets. It actually shot flatter out to 500 yards than our 6mmBR running 105-grainers. If we were to build a new long-range, bolt-action varmint rifle it would probably be a 22 BRA, essentially a 22 BR with 40° shoulder. That gives you a very stable cartridge with a bit more capacity. The 22 BRA retains a longer neck compare to the 22 Dasher, which is also an excellent cartridge — versatile and accurate.
22 BR Rivals 22-250 Performance
With bullets in the 40gr to 60gr weight range, the 22 BR gives up very little in velocity to a 22-250, despite burning quite a bit less powder (30-32 grains for the 22 BR vs. 35-38 grains for the 22-250). With a match-quality chamber, the 22 BR will probably have an edge in accuracy over a 22-250, and you should experience longer barrel life. Here are some recommended 22 BR loads for 40-60gr bullets:
In late 2020 Nosler released the Nosler Reloading Guide #9, the latest in a respected series of hardback Nosler load manuals. This 800-page guide covers 101 cartridge types. New in this edition you’ll find the popular 6mm Creedmoor, 6mm XC, 6.5 PRC, and 7.62×39, along with 20 Nosler, 22 Nosler, 24 Nosler, 27 Nosler and 33 Nosler. This new guide draws from thousands of hours in the Nosler Ballistic Lab, along with the experience of many respected experts.
Current Load Data for 101 Cartridge Types
The Nosler Reloading Guide 9 Reloading Manual provides load data for 101 rifle and handgun cartridges with hundreds of new powder additions. A comprehensive data set for today’s reloader, this manual is current with every bullet that Nosler offers through 2020 from 17 caliber up to 458 caliber in the rifle section and 9mm up to 45 caliber in the handgun section. Nine new cartridges were added to this manual. These include: 20 Nosler, 22 Nosler, 24 Nosler, 6mm Creedmoor, 6mm XC, 6.5 PRC, 27 Nosler, 7.62×39 and 33 Nosler. Also new for the Nosler Reloading Guide #9 are cartridge introductions written by veteran outdoor writers and industry tech experts. The 800-page book also has helpful “how-to” sections such as “Getting Ready to Reload”.
Q. Why Buy a Book when Load Data is Available Online from Powder Makers?
There are good, solid reasons to buy print-format loading guides produced by bullet-makers. If you go to the Hodgdon online Reloading Data Center you’ll only find loads with Hodgdon, IMR, and Winchester powders — the key brands they sell. In a book such as this Nosler #9 or the Sierra Reloading Manual, you will find loads with a much wider selection of powders including Vihtavuori, Alliant, Accurate, Norma, Ramshot, and other brands. You won’t find a Reloder 16 or VV N140 load on Hodgdon’s website.
In addition, it is handy to have loads in a print edition which is easy to access on your load bench. You don’t need a computer or an internet connection. And using a book is often faster than a web interface when quickly scanning through a variety of bullet choices for a cartridge.
Along with the new Nosler #9 Manual, here are four other Recommended Reloading Manuals:




 Purchase Options


 Accurized and BN-Nickel Plated
 BN-Nitride Plating on Action
 Fitting and Chambering the Barrel
 Accuracy Testing with Both Barrels


 Today Suhl 150 rifles are very hard to find in North America. In 2006, a used Suhl 150, even without sights, might fetch $1200.00 or more. Then, in 2007 through early 2008, hundreds of Suhl match rifles were imported. This drove prices down, and those “in the know” snapped up complete Suhl 150s at prices ranging from $450 to $850 (see 2007 advert at right), depending on condition.




 A punt gun is an extremely large shotgun used in the 19th and early 20th centuries for shooting large numbers of waterfowl for commercial harvesting operations and private sport. Punt guns could have bore diameters exceeding 2 inches (51 mm) and fire over a pound of shot at a time. A single shot could kill over 50 waterfowl resting on the water’s surface. Punt guns were too big to hold so they were often mounted directly on the punts (boats) used for hunting, hence their name. Generally the gun was fixed to the punt, requiring the hunter to maneuver the entire boat to aim the gun. Firing the gun often propelled the punt backwards from recoil. Sometimes fleets of punt gun-boats were used together. In the United States, this practice depleted stocks of wild waterfowl and by the 1860s most states had banned the practice. In the United Kingdom, a 1995 survey showed fewer than 50 active punt guns still in use. UK law limits punt guns to a bore diameter of 1.75 inches (1 1/8 pounder). Learn more at
 The 6mmBR Norma cartridge has spawned many great variants in multiple calibers: 6mm Dasher, 6BRA, 22 BR, 22 Dasher, 30 BR and others. This article is about a handsome 22 BR Rem-action varmint rig.
 Accuracy is outstanding and with Roy, Mike, my grandson and myself shooting this rifle I don’t believe it has missed more than three hogs out of over 100 we shot at one summer. This rifle is carried in a ceiling rack in the truck where it’s handy and is used by the first person that grabs it when a hog is sighted if we are moving between setups. The Varmint reticle on the Leupold (shown below) is nice for quick hold-overs as you change distances.”


