Registration has opened for the 2026 NRA Annual Meetings & Exhibits in April — So you may want to start your planning and register now for the event.
The 2026 NRA Annual Meetings & Exhibits will take place at the George R. Brown Convention Center on April 16-19, 2026 in Houston, Texas. The Exhibit Hall is open all three days and will showcase over 14 acres of guns and gear. There will also be numerous special events, plus entertainment. If you would like to attend, register for the event and book your hotel soon.
The 2026 NRA Annual Meetings & Exhibits has events on April 16th and the convention hall will officially open at 9:00 AM on April 17. NRA members and immediate family receive free entry. Non-members can join online or at the door for immediate access. Visit NRAam.org for more information and to purchase tickets for special events. NRA Members receive free admission, while a Weekend “All Access” Pass is offered for $35, which includes a 1-year NRA membership.
Women are arming themselves — millions of females now have carry permits and female gun ownership is up 77% since 2005. What factors should women consider when choosing a handgun for self-defense? What are good choices for a lady’s defensive handgun, suitable for concealed carry? Is a self-loading pistol better than a revolver? In this article we include two videos focusing on handgun options for females. The videos cover six key factors: function, size, weight, ergonomics, reliability, and concealability.
Classic Swiss Precision — the Sig P239
The single-stack Sig P239 is an ultra-reliable, compact pistol with a grip suitable for smaller female hands. Weighing 25 oz. in 9mm, it is slightly heavier than polymer-framed handguns, but that may be a good thing. During my handgun training days, this Editor found most women shot the Sig P239 better than Glocks, with more control over recoil. This is a hammer-fired pistol with decocker but no separate safety. There are many other good handgun options for concealed carry — some smaller, thinner and lighter, but the Sig P239 provides a good benchmark for reliability and accuracy. Shown is the .40 S&W model. We prefer the 9mm Luger version. Photo Creative Commons BY-SA 3.0.
Choosing a Self-Defense Handgun — Ladies Explain the Options
Not Just a Guy Thing — Half of New Gun Buyers Are Women
According to the Wall Street Journal, over the past few years, “Close to half of all new U.S. gun buyers since the beginning of 2019 have been women.” And the percentage of female gun owners overall has increased dramatically. Here’s an interesting statistic — according to an NSSF survey, the percentage of gun owners who are female has increased dramatically. The National Shooting Sports Foundation (NSSF) has documented a 77% rise in female gun ownership since 2005.
And now nearly one-quarter of American gun owners are female. According to statistics from the NRA, around 23% of women in the U.S. own guns presently, when just 13% did in 2005.
The vast majority of first-time female gun buyers acquire a handgun for defensive purposes. However, the statistics also show that many new female gun owners are also getting involved in sport shooting and/or competitive shooting. An interesting TWAW survey shows that 76% of female gun owners are over 45 years of age, and most are married or in a serious relationship.
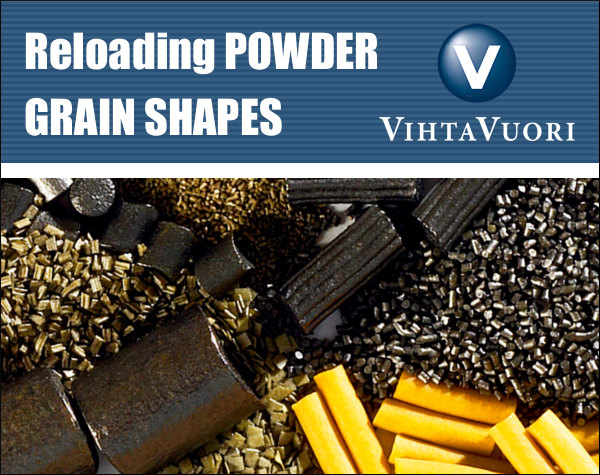
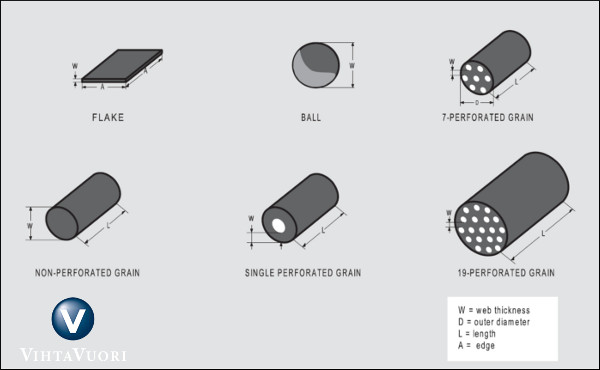
The shape of powder grains has a profound effect on the performance of the powder charge, as it concerns both pressure and velocity. There are multiple powder shapes including flake, ball, and extruded or “stick” (both solid and perforated).
So how does powder grain shape affect pressure and muzzle velocity?
In general, it can be said that powder that burns progressively achieves a desired muzzle velocity at lower maximum pressure than a powder that burns neutrally, not to mention a degressive powder. As grain size increases, the maximum pressure moves towards the muzzle, also increasing muzzle blast. Muzzle velocity and pressure can be adjusted by means of the amount of powder or loading density, i.e. the relationship between the powder mass and the volume available to it. As the loading density increases, maximum pressure grows.
All Vihtavuori reloading powders are of the cylindrical, single-perforated extruded stick type. The differences in burning rate between the powders depend on the size of the grain, the wall thickness of the cylinder, the surface coating and the composition. Cylindrical extruded powders can also have multi-perforated grains. The most common types are the 7- and 19-perforated varieties. A multi-perforated powder grain is naturally of a much larger size than one with a single perforation, and is typically used for large caliber ammunition.
Other types of powder grain shapes include sphere or ball, and flake. The ball grains are typically used in automatic firearms but also in rifles and handguns. The ball grain is less costly to produce, as it is not pressed into shape like cylindrical grains. Flake shaped grains are typically used in shotgun loadings.
Web thickness in gunpowder terminology means the minimum distance that the combustion zones can travel within the powder grain without encountering each other. In spherical powders, this distance is the diameter of the “ball”; in flake powder it is the thickness of the flake; and in multi-perforated extruded powders it is the minimum distance (i.e. wall thickness) between the perforations.
The burning rate of powder composed of grains without any perforations or surface treatment is related to the surface area of the grain available for burning at any given pressure level. The change in the surface area that is burning during combustion is described by a so-called form function. If the surface area increases, the form function does likewise and its behavior is termed progressive. If the form function decreases, its behavior is said to be degressive. If the flame area remains constant throughout the combustion process, we describe it as “neutral” behavior.
The cylindrical, perforated powders are progressive; the burning rate increases as the surface area increases, and the pressure builds up slower, increasing until it reaches its peak and then collapses. Flake and ball grains are degressive; the total powder surface area and pressure are at their peak at ignition, decreasing as the combustion progresses.
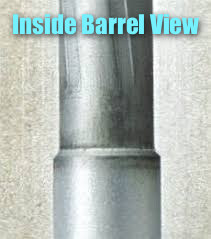
Above is a sectioned barrel showing an 80gr Sierra that was fired in a .223 bolt action with a cleaning rod in the bore. Both the bullet and the rod are still in the bore.
A Negligent Shooter Gets Lucky
“Here we have a story so filled with negligent acts that I can only marvel that the shooter survived the experience. The photo and narrative were provided by the gunsmith who took in the repair job, my comments are in italics. It’s worth reading, we can’t get enough safety warnings in our hobby.” — GS Arizona, Rifleman’s Journal
Description of Incident (with Commentary)
The shooter had a stuck case in his .223 chamber. The stuck case was actually a loaded round that didn’t fire. It wouldn’t extract because it was a .222 case that got mixed in with his .223 brass. [He had loaded the wrong brass.] I saw the loaded round with an 80gr bullet in it and a light primer strike. Negligent Act #1: Wrong brass was mixed in with the brass being reloaded.
The shooter removed the stuck case with a 3-piece aluminum rod. Negligent Act #2: Hammering out a loaded round with a cleaning rod. People have been killed doing this as the round can fire and drive the cleaning rod right into you. I remember one such incident about 5 years ago, the shooter was pounding out a stuck round, the cleaning rod went right through him, he didn’t survive.
The shooter didn’t notice only two segments of the cleaning rod came out when he removed it. Negligent Act #3: If you put anything at all down the barrel of a rifle you’d better make darn sure you got it all out before doing anything else!
He then chambered another round and fired it. Negligent act #4: If you’ve had a barrel obstruction of any kind, and if you’ve put something in the barrel, look through the barrel before proceeding! Within the past two years I know of an incident in which a benchrest shooter was killed in exactly this manner. The pressure built up and the rifle bolt came out of the receiver and into his chest.
The shooter is ‘OK’, but did not escape unscathed. He said there was a huge explosion and after regaining his senses found he was bleeding heavily from his forehead. The blood was thick enough that it ran in his eyes and he couldn’t see. In his words “I thought I was going to die”.
He has what looks like a pretty deep cut about an inch long on the side of his head, right in line with his right eye starting where the eye socket turns out to the side of the skull. And no telling what he’s got in the way of brass particles embedded in his forehead.
He was shooting on private property, and was alone when this happened. Negligent Act #5: Don’t shoot alone! Accidents happen, this is just one more example. If we could predict accidents, we wouldn’t have them. Always shoot with at least one other person.
He managed to get the bleeding stopped, or at least under control, packed his car and drove himself home without seeking immediate medical attention. Negligent Act #6: This one could have cost him his life after being lucky enough to survive the incident. There’s no way to know what’s happened just after an incident like this. He should have been at a hospital getting checked for shrapnel in the head.
The rod and slug could not be driven out. Since the barrel had a high round count there was no point in trying to salvage it. Note that the aluminum rod is expanded to a tight fit in the bore for the first couple inches. The base of the bullet is a little over 2″ from the mouth of the chamber.
What we’ve seen here is negligence and an absolute indifference to the established rules of safe reloading and gun handling, from start to finish, capped off with the shooter’s foolish avoidance of medical treatment. This shooter is lucky to be alive, but he’s surely used up all his luck. Don’t assume you’ll be so fortunate.
This article originally appeared in the Rifleman’s Journal website, which is no longer available. The Rifleman’s Journal site was created by German Salazar, who, sadly, passed in 2022. He was a great shooter who helped this website in many ways. RIP German.
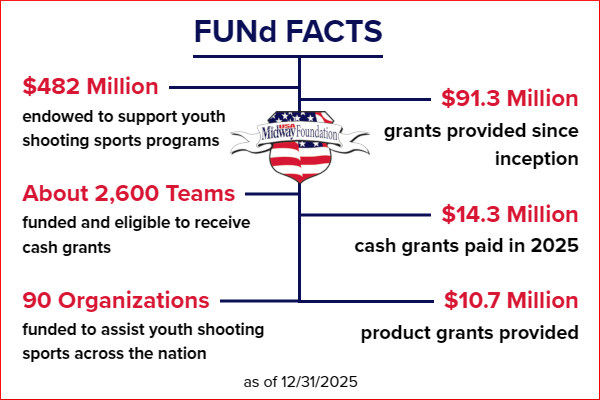
In its latest funding cycle, the MidwayUSA Foundation paid over $7.5 million to youth shooting sports teams and organizations. This record-breaking late 2025 grant cycle provided over $5.7 million to 970+ youth shooting teams and over $1.6 million to organizations that work with youth shooting programs. Since 2008, the MidwayUSA Foundation has paid nearly $80 million in cash grants to support youth shooting sports over the years. Foundation grants assist with costs for ammunition, targets, entry fees, and travel. Grants also help cover coach certification costss.
In total, this latest funding cycle provided over $7.5 million to the youth shooting sports community. This payout includes funds to youth shooting teams, organizations, and grants were provided to certain donor-advised endowments. A shout-out to the states of Minnesota, Iowa, Missouri, and Wisconsin for being at the top of the list in cash grant recipients and dollars paid to teams. In addition to youth shooting teams, the MidwayUSA Foundation provides funds to key state, regional, and national organizations that support youth shooting sports.
Rachel Augustine of Missouri 4-H Foundation stated: “The grants we receive from the MidwayUSA Foundation play a crucial role in the success of Missouri 4-H shooting sports. They help us provide essential funding for equipment, volunteer training, and state and national contests, as well as events. Through 4-H shooting sports, youth gain confidence, leadership, and responsibility, while developing a lifelong appreciation for shooting, hunting, and the outdoors.”
Donations Are Tax-Deductible
Donations made to MidwayUSA Foundation are tax-deductible and 100% of each donation goes to the endowment of the donor’s choice — nothing is removed for operations.
The MidwayUSA Foundation is a 501(c)(3) public charity working to sustain and grow youth shooting sports by providing long-term funding to youth shooting teams. For more information please visit MidwayUSAFoundation.org or call 1-877-375-4570.
For today’s Sunday GunDay story, we look at the legendary Remington 700, perhaps the most popular American bolt-action rifle of all time. After covering the history of the Rem 700 rifle, we provide an inside look at the Rem 700 through a series of cutaway animations. Then we explain how gunsmiths can enhance a Remington 700 action through “blueprinting” procedures.
Remington 700 Origins and History
After World War II, Remington Arms engineer Mike Walker began designing lower-cost alternatives to the Model 30, which resulted in the Model 721. These used a cylindrical receiver produced from cylindrical bar stock that could be turned on a lathe, rather than machined in a series of milling operations, which significantly reduced the cost of production. Further developments of the basic 721 action under the direction of Walker produced the Model 722 and Model 725, and ultimately in 1962, the Model 700.
Walker sought to increase the accuracy of the rifles, by utilizing tight tolerances in the chamber and bore, a short leade, and a very fast lock time. Like the earlier 721, the Remington 700 action was designed for mass production. Remington initially produced two variants of the Model 700, the ADL and BDL, in both long- and short-action versions. In 1969, Remington introduced upgrades for the rifle, including a longer rear bolt shroud, a jeweled bolt, and improved stock finishing. Four years later, production of left-handed Rem 700s began, to compete with the Savage Model 110, at that time the only major American-made left-bolt rifle.
Other Rem 700 versions include the titanium receiver 700ti, the 700 SPS (which replaced the ADL in 2005), and the CDL model. In addition to its development as a hunting rifle, the Model 700 also provided the basis for military and police sniper rifles, starting with the M40 rifle in 1966, which was initially ordered by the U.S. Marine Corps. The U.S. Army adopted the M24 Sniper Weapon System in 1986.
The Remington 700 is sold in both short action and long action variants. This photo is from the Big ED YouTube video comparing the two action lengths.
The Remington 700 is a manually-operated bolt action with two forward dual-opposed lugs. The bolt face is recessed, fully enclosing the base of the cartridge, The extractor is a C-clip sitting within the bolt face. The ejector is a plunger on the bolt face actuated by a coil spring. The bolt is of 3-piece construction, brazed together (head, body and bolt handle). The receiver is milled from round cross-section steel.
Chassis Systems for Remington 700s
With the popularity of the Remington 700 series rifles, and the availability of Rem 700 barreled actions by themselves, many companies have created after-market chassis systems. This Brownells Video reviews modern Accuracy Int’l chassis systems configured for Remington 700 barreled actions. Modular chassis systems have become particularly popular with PRS/NRL competitors.
Rem 700 Cutaway Video Shows Components + Operation
Ever wish you could look inside your rifle, to see how the trigger and fire-control system work? Well now that is possible with the magic of 3D computer graphics. Modern software allows detailed “cutaway” side-views (see below), as well as 3D views with 360° rotation. The software can also provide X-Ray-type views into the gun’s internals — as you can see above. And computer animation can show the complete firing process from trigger pull to chambering of the next round.
READERS — Do take the time to watch the video! This Rem 700 animation is really outstanding! EVERY bolt-action shooter should watch this video all the way through.
The Model 700 series of bolt-action rifles have been manufactured by Remington Arms since 1962. All are based on basically the same centerfire bolt action. They are typically sold with an internal magazine depending on caliber, some of which have a floor-plate for quick-unloading, and some of which are “blind” (no floor-plate). The Model 700 is a development of the Remington 721 and 722 series of rifles, which were introduced in 1948.
The Remington 700 is a manually-operated bolt action with forward, dual opposed lugs. It features “Cock On Opening”, meaning the upward rotation of the bolt when the rifle is opened cocks the firing pin. A cam mechanism pushes the firing pin’s cocking piece backward. The bolt face is recessed, fully enclosing the base of the cartridge. The extractor is a C-clip sitting within the bolt face. The ejector is a plunger on the bolt face actuated by a coil spring. The bolt is of 3-piece construction, brazed together (head, body. and bolt handle). The receiver is milled from round cross-section steel.
Blueprinting Rem 700 Action — Making a Good Action Better
You may have heard the phrase “blueprinting an action”, but do you know what that really means? Do you know what operations are done to an action during the blueprinting process? To help you understand, gunsmith Bill Marr of RifleShooter.com has created a helpful article showing a Rem 700 blueprinting job start to finish. This article spotlights how the procedures can be done with manual tools. Bill, who runs 782 Custom Gunworks Ltd., can also perform many of these operations with modern automated machinery. In fact, Bill has written a follow-up article on Truing a Rem 700 receiver with a Lathe.
Bill explains: “Blue-printing, or truing a rifle action, ensures the receiver face, threads, lugs, bolt lugs, and bolt face are square to the center line of the receiver.” In Bill’s informative article, Bill shows how he blueprints a Remington 700 short action receiver with .308 Win bolt face. He covers the following procedures step by step:
Action Disassembly
Ream Minor Diameter of Receiver Threads
Square the Receiver Lugs
Square the Face of the Receiver
Lap the Bolt Lugs
Square the Bolt Face
Bill employed a variety of tools from Brownells to complete the blueprinting job, including: Remington 700 Armorer’s Kit; Manson Receiver Accurizing Kit; Bolt Lapping Kit; Bolt Face Truing Tool; Manson Receiver Ring Facing Cutter; Multi-Vise with Jaw Pads; Silicone Carbide Abrasive; and Do-Drill Cutting Oil.
1. Truing the Receiver Face
Using the receiver facing tool, the front of the receiver is trued. The tool is placed over the tap and turned by hand. We used Do Drill to lubricate it.
2. Lapping the Lugs
The bolt lapping tool screws into the front of the action and applies rearward pressure on the bolt face. A little bit of lapping compound is placed on the front of the receiver lugs. The bolt handle is then raised and lowered repeatedly. Note — it is critical that we do not get any lapping compound on any other surfaces.
3. Truing the Bolt Face
On this bolt, the central part of the bolt face was low. After the truing operation, this Rem 700 bolt face is now completely square to the action.
IMPORTANT: Rifleshooter.com states: “This article highlights our project and is presented for information purposes only. This provides an overview of the process and should not be attempted without the guidance and supervision of an experienced gunsmith“.
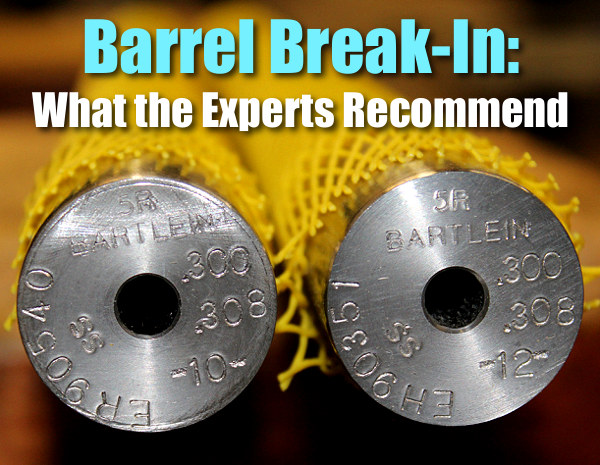
The question of barrel break-in is controversial. Some folks advocate an elaborate, lengthy cycle of shooting and brushing, repeated many times — one shot and clean, two shots and clean and so on. This, it is argued, helps barrels foul less and shoot more accurately. Others say minimal break-in, with patching and brushing after 10-15 rounds, is all you need. Still others contend that break-in procedures are a total waste of time and ammo — you should just load and shoot, and clean as you would normally.
We doubt if there will ever be real agreement among shooters concerning barrel break-in procedures. And one must remember that the appropriate break-in procedure might be quite different for a factory barrel vs. a custom hand-lapped barrel. This Editor has found that his very best custom barrels shot great right from the start, with no special break-in, other than wet patches at 5, 10, and 15 rounds. That said, I’ve seen some factory barrels that seemed to benefit from more elaborate break-in rituals.
What’s the best barrel break-in procedure? Well our friend Eric Mayer of Varminter.com decided to ask the experts. A while back Eric interviewed representatives of three leading barrel manufacturers: Krieger, Lothar-Walther, and Shilen. He recorded their responses on video. In order of appearance in the video, the three experts are:
Do I Need to Break-In a New Rifle Barrel?
Eric Mayer of Varminter.com says: “That is a simple question, [but it] does not necessarily have a simple answer. Instead of me repeating my own beliefs, and practices, on breaking-in a new rifle barrel, I decided to answer this one a bit differently. While we were at the 2016 SHOT Show, we tracked down three of the biggest, and most popular, custom barrel makers in the world, and asked them what they recommend to anyone buying their barrels, and why they recommend those procedures. We asked the question, and let the camera run!” Launch the video above to hear the answers — some of which may surprise you.
Long-Term Barrel Care — More Experts Offer Opinions
Apart from the debate about barrel break-in, there is the bigger question of how should you clean and maintain a barrel during its useful life. Some folks like aggressive brushing, other shooters have had success with less invasive methods, using bore foam and wet patches for the most part. Different strokes for different folks, as they say. In reality, there may not be one solution for every barrel. Different fouling problems demand different solutions. For example, solvents that work well for copper may not be the best for hard carbon (and vice-versa).
“Why worry about a little barrel fouling when the throat is subjected to a brutal 5,600° F volcano at 55,000 PSI? To investigate these and other questions about taking care of a match barrel, we spoke with a dozen experts and share their knowledge in this first of a series of articles.
After listening to folks who shoot, build barrels or manufacture cleaning solvents for a living, we concluded that even the experts each have their own unique recommendations on how to care for a match barrel. But they all agree on one thing — the gun will tell you what it likes best. Because the life expectancy of a match barrel is about 1,500 to 2,500 rounds, the objectives of cleaning one should include: preserve accuracy, slow the erosion, and remove fouling — all without damaging the gun. This article doesn’t claim that one cleaning method is better than the next. Rather, we set out to interject a little science into the discussion and to share some lessons learned from experts in the field.” — Chip Lohman
John Nosler lived 97 years, passing in 2010. During his long lifetime, John was an iconic figure in the shooting and hunting world. Considered a true pioneer in bullet and ammunition design, Nosler developed the famous Partition bullet in the 1940s. Born on April 4, 1913 in Brawley, California, John built his business from scratch. He founded his bullet company in 1948. He was considered to be one of the great innovators whose designs helped create the premium bullet category and influenced ammunition manufacturers worldwide.
Moose-Hunt Inspires Partition Bullet Design
While hunting in Canada, John experienced a bullet failure on the hide of a mud-caked bull moose. He then began developing a revolutionary new projectile, which he called the “Partition”, because of the barrier that separated the bullet into two sections. One year later, John and a friend traveled back to British Columbia with his new Partition bullets, which were designed to provide deep penetration and expansion. The men bagged two moose with two shots, and the rest is history.
NRA Golden Bullseye Pioneer Award
In recognition of his contribution to the shooting sports industry, John was the unanimous choice for the inaugural 2007 NRA Golden Bullseye Pioneer Award. The award was the highlight of a long and fruitful career. Even though he officially retired in 1988 when his son and daughter-in-law, Bob and Joan Nosler purchased the company, John still managed to come to the office on a daily basis until his health declined.
Today, John’s son Bob Nosler still presides over the company as president and CEO of Nosler, Inc., based in Bend, Oregon. Along with bullets, the company now produces cartridge brass, loaded ammunition, and hunting rifles.
To learn more about John Nosler and his innovative bullet designs, get your hands on Going Ballistic, a “Professional Memoir” told by John Nosler to outdoor writer Gary Lewis. CLICK HERE to find the Going Ballistic book on Amazon. It is offered in paperback for $19.99 or hard-cover for $53.76. There is also a $6.99 Kindle edition.
John Nosler remained an avid hunter and shooter even late in life. Gary Lewis recalled that, at age 92, John Nosler attended the opening of a new shooting range outside Bend, Oregon. Even in his nineties, Nosler managed to drill two shots inside nine inches at 1000 yards. John Nosler leaves a legacy that will benefit hunters and shooters’ nationwide. The John A. Nosler Endowment of The NRA Foundation, sponsors the NRA’s Basic Rifle Training Program which instructs novices in safe rifle handling.
Photo from Training Program at Bellevue Gun Club, Washington State’s “premier indoor shooting facility”.
At AccurateShooter.com, our primary focus is precision target shooting with rifles. But it’s definitely fun to shoot pistols too, and we bet most of our regular readers own handguns. Here are five tips for shooting safely and accurately with handguns. These pointers will help you advance your skills and have more fun with your pistols and revolvers.
1. Make Sure Safety Is Number One
Whether you own one gun or one hundred, gun safety must always be your main priority. In this video, Smith & Wesson Team Captain Julie Golob covers the basics of gun safety.
2. Start with a .22 LR Handgun
We strongly recommend that new pistol shooters start off with a .22 LR rimfire handgun. The .22 LR cartridge is accurate but has very low recoil, less “bark” than a centerfire, and very little smoke and muzzle flash. New shooters won’t have to fight muzzle flip, and won’t develop a flinch from the sharp recoil and muzzle blast common to larger calibers. With the .22 LR, the trainee can focus on sight alignment, breathing, and trigger pull. When he or she has mastered those skills, move on to a .38 Special or 9mm Luger (9x19mm).
What gun to use? We recommend the 10-shot Smith & Wesson Model 617. This is ideal for initial training, shooting single action, slow-fire. You want to focus on sight picture and holding steady. Shown above is the 4″-barrel Model 617 which balances well. There is also a 6″-barrel version. It has a longer sight radius, but is a little nose-heavy. Both are great choices. They are extremely accurate and they boast a very clean, precise trigger.
If you prefer a semi-auto .22 LR pistol, we recommend the Browning Buck Mark series. Buck Marks are very accurate and very reliable. There are now 58 different Buck Mark models, priced at $469.99 to $839.99 MSRP. Retail prices start at about $330 for a basic Buck Mark Camper 22 UFX model. Like the S&W Model 617, a good Buck Mark will serve you for a lifetime.
3. Use Quality Targets with Multiple Aim Points
It’s common for new pistoleros to start shooting at cans or clay birds at a public range. That can be fun, but it’s better to start with proper targets, placed at eye level, at 7-10 yards. We like to use targets with large, brightly colored circles. Focus on putting 5 shots in a circle.
We recommend targets that have multiple bullseyes or aiming points — that way you don’t have to constantly change your target. There are also special paper targets that can help you diagnose common shooting problems, such as anticipating recoil. EZ2C makes very good targets with bright, red-orange aim points. You can also use the bright orange Birchwood Casey stick-on Target Dots (right). These come in a variety of diameters. We like the 2″ dot at 10 yards.
Too many new pistol shooters try to move right to rapid fire drills. It’s better to start slow, practicing the basics, under the guidance of a good mentor. If you belong to a club, ask if there are certified instructors who will help out. This Editor learned pistol shooting from a seasoned bullseye shooter, who got me started with a .22 LR revolver and very close targets. Over the course of a few range sessions we progressed to farther targets and faster pace. But the fundamentals were never forgotten. When starting your pistol training, it’s wise to view some instructional videos. Top Shot Champion Chris Cheng hosts an excellent Handgun 101 Series produced by the NSSF. We’ve linked one of these Handgun 101 videos for Tip #6.
5. SLOW DOWN — This Is Not a Race
When you learned to ride a bicycle, you started slow — maybe even with training wheels. The same principle applies to pistol shooting. When you get started with handguns, we recommend you shoot slowly and deliberately. Start with the handgun unloaded — just work on your sight alignment and breathing. With snap caps in place, try some dry-firing drills. Then progress to live fire. But be deliberate and slow. With the target at 20 feet, see if you can get three successive shot-holes to touch. Believe it or not, many common pistols are capable of this kind of accuracy (but you won’t see many shooters at indoor ranges who pursue that kind of precision). Once you master your form and accuracy, then you can work on your speed.
The 2026 Southwest Nationals (SWN) competition concludes this afternoon, February 15, 2026, at the Ben Avery range in Arizona. With skilled shooters in Sling, F-TR, and F-Open classes, the SWN is one of the USA’s most popular multi-class, long-range rifle events held annually. We’ll have a full report on SWN individual and team final results tomorrow.
To show the type of rifle that can win a SWN title, today we feature the .308 Winchester F-TR rifle of talented F-Class shooter Peter Johns. With this impressive rig, Peter won the F-TR Division at the 2020 Berger SW Nationals (SWN), after finishing second in 2019. And Peter also won mid-range AND long-range Texas State championships in 2019. Along the way Peter set a new 600-yard NRA National F-TR Record (200-18X), and tied the 600-yard F-TR Aggregate Record with 600-47X. This Sunday GunDay story features Peter and his trophy-grabbing .308 Win F-TR rifle.
How to Campaign a Winning .308 Winchester F-TR Rifle
Report by Peter Johns
I started contemplating F-Class shooting after talking with Darrell Buell at SHOT Show a decade ago. My first F-Class match was with a Savage VLP with a 26″ Shilen 7mm SAUM barrel and a Harris bipod. After that initial match in Texas I knew I had a lot to learn. I decided that F-TR was the place to start. This story follows my development as an F-TR shooter and showcases the rifle that delivered multiple F-TR match wins in 2019 and 2020.
Watch Peter Johns Shoot his .308 Win F-TR Rig
Equipment Showcase — Key Components of Peter’s F-TR Rifle
Omar Alonzo (Alonzo Custom Rifles, (713) 283-4384, Gunbuilder284@gmail.com) does all my gunsmithing. I believe this is one of the major reasons I have been doing so well in the last couple years. He does a phenomenal job with rifle bedding. He also fixed the timing on my action. The first barrel he chambered has really helped me win matches and set records.
In this Video, Peter talks about his key rifle components and gear:
McMillan Kestros BR Stock — I switched to a Kestros BR stock when they first came out. I painted the stock myself. I am very grateful to Kelly McMillan for letting me be one of the first to try them. The Kestros BR tracks better than any stock I have tried. NOTE — the Kestros was so light that I had to add a steel bar under the forearm to get closer to the F-TR weight limit with a 30″ HV barrel. [Editor: That has the advantage of lowering the center of gravity and the bar can slide fore/aft to adjust center of balance]. I use a SEB Bigfoot rear bag with slick ears and 3/4″ spacing. When I got the Kestros I thought the rear bag spacing was too wide but it worked so well I didn’t change.
Kelbly (Stolle) Panda Action and Krieger Barrel — My rig has a Kelbly Panda F-class action with a Bix’N Andy trigger. At the Berger SWN, I used a Krieger 1:10″-twist 30″ HV 4-groove barrel. It is superbly accurate. I have been bouncing between Krieger and Bartlein for barrels for the last few years. The best barrel I have had is a 30″ Krieger 4-groove HV, however the Bartleins have been very good as well.
Duplin Bipod with Articulating Feet — I really liked the Pohlabel articulating feet that are available for the SEB JoyPod so I asked Dan Pohlabel for permission to copy his feet. I bought some aluminum and made the best copy I could. Since SWN, Duplin has coming out with a new bipod with articulating feet which are considerably better than the feet I made. I use a board and a piece of stall mat with carpet glued on it for the bipod to sit on.
Vortex Golden Eagle Scope — I use the 15-60x52mm Vortex Golden Eagle on all my F-Class rifles. I see the mirage better with the Golden Eagle than any other scope and it tracks perfectly. I also use a Vortex Razor spotting scope with long eye relief lens on the line to help watch mirage and flags. I also use the Razor spotting scope to call wind for Team Texas.
Cleaning Procedure — Less is More — No Cleaning During SWN Long Range Event
Peter has learned that he can go for long round counts without cleaning: “I have found that my .308 Win rigs, for the most part, shoot really well dirty. I can usually get 300 or more rounds before cleaning. I cleaned my barrel at the 2020 SWN after the mid-range event and fouled it before the long-range. I did not clean my barrel again until I got home from the match.”
Peter does clean thoroughly when he gets home: “After a big match I clean my rifles with Boretech Eliminator and a bronze brush followed by Iosso until the majority of carbon is removed from the barrel, as verified with a Lyman borescope. After a thorough cleaning, I find that I need to shoot a bunch of foulers. I will usually go to my practice range and shoot a 20-shot practice match and I will see the accuracy tighten up in the back half.”
600-yard practice target on left. On right is 600-yard record match target shot at 2019 TX State Championships (on ShotMarker targets). This 200-18X was a NRA National Record for F-TR division.
Peter’s Match Load and Reloading Methodology
Loading for .308 Win F-TR — Do What Matters
My loading technique has evolved almost full circle from where I started. I went from the basics to doing every step a person could conceive. Then I decided to start testing all the different steps to see what didn’t matter or made things worse. I am now back to almost no steps in my reloading process. I don’t clean brass anymore. I just wipe the case off, lube, size, prime, and load. I anneal when I feel the necks getting inconsistent when seating the bullets. I pre-load all my ammo for matches. I tried seating them at the match but I didn’t find it to matter on the score card and it takes my focus away from conditions.
Peter’s 2020 SWN-winning .308 Win load consists of Berger 200.20X bullets, Lapua Palma brass, Federal 205M primers, and Varget powder. Peter revealed: “The Berger 200-grainers are running in the mid-2600 fps range. I have tried them much faster but found the best consistency at this speed.”
Peter measures powder to the kernel and also weighs/sorts other components. He runs Berger 200.20X bullets slightly off the lands in a 0.170 freebore chamber. Notably he tests a variety of powders, ascertaining each barrel’s particular preference: “In the last few years I have tried N140, N150, H4895, and Varget. I think they are all good powders for F-TR and the 200.20X bullet. This year I was using Varget. At the 2018 SWN I placed 4th with H4895, in 2019 SWN I got 2nd with N140. I find what powder my particular barrel likes best. I also test CCI BR4 and Fed 205M to see which my rifle likes best. This year I was using Fed 205M. I have been using Lapua Palma brass and it seems to last forever.” Peter full-length sizes with a Redding bushing FL die. He seats his Berger bullets with a Wilson inline seater.
Q & A with Peter Johns, F-TR Ace
Q: What was your biggest challenge at the 2020 Berger SW Nationals?
Peter: I think the biggest challenge was staying focused on conditions. I think the hardest thing for me to do is to stop shooting when the wind conditions are out of my ability to call accurately. I focused hard on this aspect of my game this year and it has paid off. This match is super well run and staff does an excellent job which allows the shooters to maintain their focus.
Q: What gear/hardware items give you an edge over the competition?
Peter: The Kestros BR stock (below) is not used by many F-TR shooters and I think it gives me a huge advantage over the competition. This stock fits me perfectly and tracks in such a manner that I can shoot fast and accurately when conditions are right.
Q: What is your advice for newcomers in F-Class and Long Range competition?
Peter: Go to a top gunsmith building F-Class rifles and do what he says. Competition is the best way to get better. So shoot as many matches as you can. Find top shooter rivals and strive to beat them.
Q: Do you have any specific Gun Handling Tips for F-TR shooters?
Peter: I shoot better with a really light grip and cheek pressure. I can shoot well with a heavier grip and cheek pressure but when the tension of a big match is going my pressure will vary and cause poor accuracy. The most consistent I can shoot is with light gun handling. I also focus on trying to watch the bullet hit through the scope to ensure good follow through and this prevents me from jerking the trigger. There are a bunch of ways to hold a rifle that have proven to be successful. I think a shooter needs to test and find what works best for them.
Q: What do you like most about F-Class and Long Range competition?
A. I really like technical things. F-Class is right in my wheel house for technical stuff. Also, the people in the shooting world are top notch. I enjoy talking with other shooters.
Q: Do you prefer individual events or team matches?
Peter: I prefer the team matches by far because it is a social event with collaboration and there is a lot more pressure. I put a lot of effort into learning the wind for the team matches which in the long run helps me with individual matches.
Peter Johns calls wind for Team Texas at 2018 F-Class Nationals in Raton.
Overcoming Serious Injury in U.S. Navy to Become a Top-Level Marksman
Peter Johns is a U.S. Navy veteran, rank Chief (E7). In 2006, during his duty aboard the U.S.S. Nimitz, Peter sustained very serious and extensive burns in a massive electrical fire. Showing great strength of character, Peter went through a tough, 4-year program of surgeries and rehab. The photo below shows Peter doing therapy during his recovery process.
Peter tells us: “As many of you know I was badly burned on board the U.S.S. Nimitz in 2006. That has limited me in my ability to compete in physical activities that I used to enjoy but F-Class has filled the gap for my competitive nature. I medically retired from the Navy as a Chief (E7) in 2010 after four years of surgeries and physical therapy. I was very surprised to find how accepting and nice people have been in the shooting community. I think the shooting community is comprised of the best people in the world.”












 Do I Need to Break-In a New Rifle Barrel?


 NRA Golden Bullseye Pioneer Award
 To learn more about John Nosler and his innovative bullet designs, get your hands on Going Ballistic, a “Professional Memoir” told by John Nosler to outdoor writer Gary Lewis.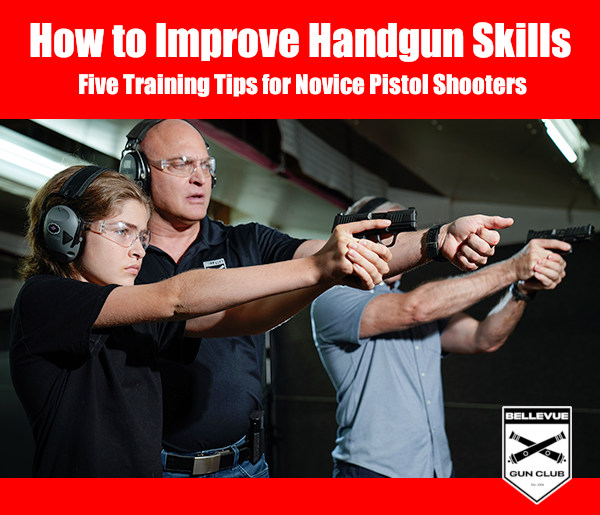


 It’s common for new pistoleros to start shooting at cans or clay birds at a public range. That can be fun, but it’s better to start with proper targets, placed at eye level, at 7-10 yards. We like to use targets with large, brightly colored circles. Focus on putting 5 shots in a circle.

 The
The 


