To succeed in long-range shooting matches, given the high level of competition these days, you’ll need solid wind-reading abilities. We’ve found an article by Emil Praslick III, retired USAMU Service Rifle coach and U.S. Palma Team Coach, that can help you make better wind calls in competition.
Emil Praslick, now retired from the U.S. Army, is considered one of the best wind gurus in the United States, if not the world. During his service with the USAMU he authored an excellent two-part article on wind reading that is available on the CMP (Civilian Marksmanship Program) website. Both articles contain helpful illustrations, and are “must-read” resources for any long-range shooter–not just Service Rifle and Highpower competitors.
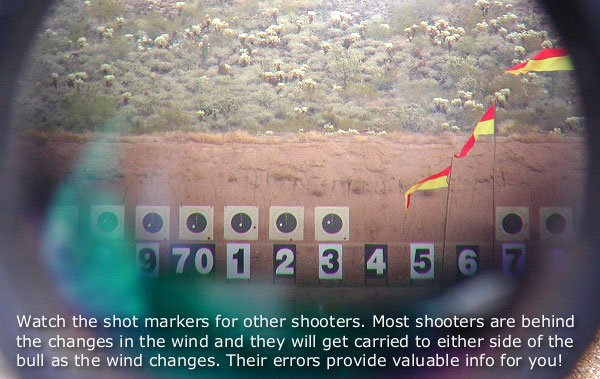
Part One covers basic principles, tactics, and strategies, with a focus on the 200-yard stages. Emil writes: “There are as many dimensions to ‘wind reading’ as there are stages to High Power competition. Your tactical mindset, or philosophy, must be different for the 200 and 300 yard rapid-fire stages than it would be for the 600 yard slow-fire. In the slow-fire stages you have the ability to adjust windage from shot to shot, utilizing the location of the previous shot as an indicator. Additionally, a change to the existing conditions can be identified and adjusted for prior to shooting the next shot.”
In Part Two, Praslick provides more detailed explanations of the key principles of wind zeros, wind reading, and the Clock System for determining wind values: “The Value of the wind is as important as its speed when deciding the proper windage to place on the rifle. A 10 MPH wind from ’12 o-clock’ has No Value, hence it will not effect the flight of the bullet. A 10 MPH wind from ‘3 o’clock’, however, would be classified as Full Value. Failure to correct for a Full Value wind will surely result in a less than desirable result.”
Praslick also explains how to identify and evaluate MIRAGE:
Determine the accuracy of the mirage. Mirage is the reflection of light through layers of air that have different temperatures than the ground. These layers are blown by the wind and can be monitored to detect wind direction and speed.
Focus your scope midway between yourself and the target, this will make mirage appear more prominent. I must emphasize the importance of experience when using mirage as a wind-reading tool. The best way to become proficient in the use of mirage is to correlate its appearance to a known condition. Using this as a baseline, changes in mirage can be equated to changes in the value of the wind. Above all, you must practice this skill!
Click HERE for more excellent instructional articles by Emil Praslick and other USAMU Coaches and shooters.
There is an informative article on the NRA’s American Hunter website regarding suppressor use for hunting. The article, What Hunters Need to Know About Suppressors, answers common questions about licensing, tax stamps, and suppressor types. The article explains the history of the $200 tax stamp which must be paid when acquiring a suppressor:
“Why the Tax? In 1934 … the federal government, while battling gangsters such as Al Capone, heavily restricted silencers with passage of the first National Firearms Act. Hoping to gain an advantage on criminals that often had better weapons than cops, the Feds placed a mandatory ‘sin’ tax on silencers that was so high it would effectively ban their purchase by all but the wealthiest individuals. In 1934, $200 was the equivalent of $3,500 today. The $200 tax still stands despite no evidence that a simple metal tube is capable of causing crime.” — American Hunter
The American Hunter article also discusses how well suppressors actually reduce noise. User should be aware that the sound level of a large, centerfire hunting cartridge will still exceed 130 decibels (dB) on average, even with a typical suppressor (silencer) in place. For that reason, we recommend that hunters continue to wear ear protection even when they shoot suppressed.
For example, Thunder Beast Arms says its latest Ultra 9 Suppressor will reduce the report of a .308 Win to 132-134 dB: “The ULTRA 9 will suppress a typical .308 bolt-action rifle down to approx. 132-134 dB. It also has very little or no ‘first round pop’ (FRP) in most applications.” NOTE: These dB levels are measured in accordance with MIL-STD-1474D using BK 2209 SLM offset one meter from muzzle.
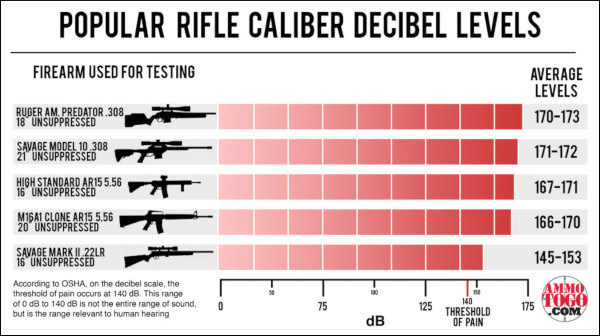
How Loud Are Unsuppressed Rifles?
Firearms Are Loud — 140 dB to 175 dB. Audiology group ASHA explains: “Almost all firearms create noise that is over the 140-dB level. Exposure to noise greater than 140 dB can permanently damage hearing. A small .22-caliber rifle can produce noise around 140 dB, while big-bore rifles and pistols can produce sound over 175 dB. Firing guns in a place where sounds can reverberate, or bounce off walls and other structures, can make noises louder and increase the risk of hearing loss. Also, adding muzzle brakes or other modifications can make the firearm louder. People who do not wear hearing protection while shooting can suffer a severe hearing loss with as little as one shot[.] Audiologists see this often, especially during hunting season when hunters and bystanders may be exposed to rapid fire from big-bore rifles, shotguns, or pistols.” Source: ASHA, Recreational Firearm Noise Exposure.
How Much Does a Good Suppressor Really Reduce Firearm Sound Levels?
That depends on the rifle, the cartridge, and the effectiveness of the suppressor. The American Hunter article explains: “Suppressors retard the speed of propellant gases from the cartridge that rapidly expand and rush out of the barrel. It’s these gases that produce the loud boom that’s heard for miles. A suppressor’s series of internal baffles slows these gases so they are not all released at once, thereby muffling the sound.” Many good commercial suppressors can achieve 30-35 dB sound suppression. However, Zak Smith of Thunder Beast Arms says: “There are a bunch of manufacturers who publish values that are not reproducible, or use an ad-hoc test instead of a mil-spec test. In many cases we’ve tested the exact same suppressors they’ve advertised with 30-40 dB reductions and found they are actually in the high 20s instead.”
Again, for this reason, we recommend that hunters use ear protection, such as electronic muffs, even when shooting suppressed.
Choosing a Suppressor for Hunting Use
The American Hunter article explains that there are many types of suppressors on the market. Bigger suppressors are heavier, but they normally are more effective. You also have a choice in muzzle attachments:
“For most hunting applications, direct thread is the best choice. If you intend to buy only one suppressor yet you have multiple guns, it’s advantageous to buy a model sized and rated for the largest caliber you intend to use. While a suppressor made specifically for a .223 Rem. will reduce the sound of that round slightly better than a model made for .30 caliber, for example, you can use a .30-caliber can for smaller calibers — but not vice-versa. In general, the bigger the can, the more it reduces sound. Smaller suppressors, however, are easier to carry in the woods.” — American Hunter
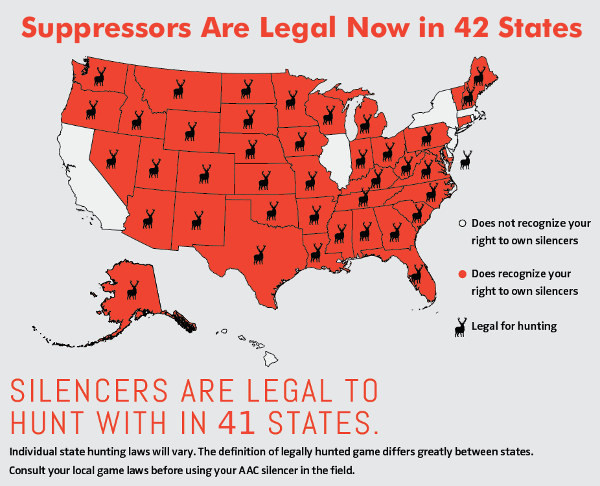
States Where Suppressor Ownership is Allowed
Currently, the following 42 states allow private ownership of suppressors: AL, AK, AZ, AR, CO, CT, FL, GA, ID, IN, IA, KS, KY, LA, ME, MD, MI, MN, MS, MO, MT, NE, NV, NH, NM, NC, ND, OH, OK, OR, PA, SC, SD, TN, TX, UT, VT, VA, WA, WV, WI, WY. NOTE: Suppressors are legal in Connecticut, but hunting with silencers is not allowed in Connecticut.
How to Apply for a Suppressor
To acquire a quality suppressor, you’ll first need to shop around, comparing verified performance. Unfortunately some manufacturer’s dB claims are exaggerated. Give due consideration to size, weight, and durability. When you’ve selected a brand and model, find a Class 3 dealer authorized by the ATF to sell suppressors. You must fill out ATF Form 4, get fingerprinted, and pass a background check. Along with two completed copies of Form 4, submit your fingerprint card, passport photo and a check for $200 to the ATF. Then you wait for the ATF to process your application. American Hunter says the average ATF suppressor processing wait time is now nine months.
BENEFITS OF SILENCERS
NOISE REDUCTION
According to OSHA, the threshold for a hearing safe impulse noise is 140 dB. Without hearing protection, exposure to any impulse noise over 140 dB causes varying degrees of permanent noise-induced hearing loss, which can also lead to tinnitus. Most well-engineered silencers take the dB level of their host firearm well below 140 dB, making those silencers effective primary hearing safety devices. You should always still wear hearing protection (muffs or plugs) when using suppressors.
RECOIL REDUCTION
By containing the explosion at the muzzle, suppressors significantly reduce perceived recoil energy, reduce the rifle’s rearward movement on recoil, and reduce rifle torquing and muzzle flip. The reduction of recoil (and rifle torquing/hopping) lessens shooter fatigue and helps the shooter get his sight picture back on target rapidly after firing. With smaller calibers, a suppressor may enable the shooter to maintain a nearly-continuous sight picture, following the shot into the target. In addition, by reducing felt recoil (and muzzle blast), a suppressor can help inexperienced shooters avoid flinching.
When shooting groups at long range on paper it can be difficult to distinguish which bullet holes belong to a particular sequence of shots. If, for example, you shot three 5-shot groups at 600+ yards on a paper target, you would have 15 bullet holes on the target (assuming no misses). But at that distance it would be difficult to see the holes on target (even with a spotting scope). Accordingly, when you inspected the target up close, it would be hard to tell which shots belonged to which group. You might have a vague idea, but couldn’t be sure, without a target camera recording the shot sequence.
Here is a method to separate multiple shots into specific groups so you can better evaluate your load and shooting skills. The trick is pretty simple — mark your bullets with a color from a Sharpie or other felt marking pen. If you are shooting three 5-shot groups, mark five with red, five with green, and five with blue (or purple). Then, when you inspect the target, you can identify the group placements by the colors that appear on the paper.
Round Robin: Using colors you can shoot “Round-Robin” to evaluate seating depths, neck tension, or other variables without having the shot order (and barrel heating) affect group sizes unequally. For example you might have three different neck tensions, each marked with a different color on the bullets. Then shoot Red, Blue, Green in that sequence for five total shots per color.
Smart Tip to Show Colors More Vividly
If the bullet inks are not showing up on your target paper clearly, here is a simple trick that can make the colors “bleed” to be more visible. In your range kit, bring some alcohol solution along with some Q-tips. Then dab the shots on the paper target lightly with wet Q-Tips. Here is the front of a target before and after application of alcohol:
Forum Member NewbieShooter explains: “Dabbing a bit of alcohol on the bullet holes with Q-Tips makes the color pop a bit… especially on the back side.” See below:
In short order you will see the colors spread into the paper, clearly marking the shot holes by distinguishing colors. If you were shooting a dark bullseye, view the the BACK side of the target to see the colors on a light background.
Credits: Bullet Tips photo by Forum Member Dave Way; Target photos by Forum Member NewbieShooter; Story tip from Boyd Allen.
To get the best accuracy out of any benchrest rifle, you need to find the optimal position of front rest and rear bag. The important point to remember is that each rig is different. One gun may perform best with the front rest right at the tip of the forearm (Position ‘D’ in photo), while another gun will work best with the rest positioned much further back. This Editor’s own 6mmBR rifle has a laminated stock that is pretty flexy in the front. It shoots best with the front rest’s sandbag located a good 6″ back from the forearm tip (position ‘A’).
Here’s some benchrest advice that can help you reduce vertical and shoot tighter groups… without spending another penny. Many benchrest shooters spend a fortune on equipment and devote countless hours to meticulous handloading, but they never experiment with their rifle’s position/balance on the bags. This article explains why you should test your rifle in various positions. What you learn may surprise you (and improve your scores).
Next time you go to the range, experiment with the position of your rifle on the front rest, and try a couple different positions for the rear bag. You may find that the rifle handles much better after you’ve made a small change in the placement of your gun on the bags. Recoil can be tamed a bit, and tracking can improve significantly, if you optimize the front rest and rear bag positioning.
This competitor has the front rest positioned fairly far forward but not all the way out. Note the stop on the front rest — this limits forward stock travel.
A small change in the position of the forearm on the front rest, or in the placement of the rear bag, can make a big difference in how your gun performs.
Balance Your Gun BEFORE You Spend Hours Tuning Loads
In the pursuit of ultimate accuracy, shooters may spend countless hours on brass prep, bullet selection, and load tuning. Yet the same shooters may pay little attention to how their gun is set-up on the bags. When you have acquired a new rifle, you should do some basic experimentation to find the optimal position for the forearm on the front rest, and the best position for the rear bag. Small changes can make a big difference.
Joel Kendrick, past IBS 600-yard Shooter of the Year, has observed that by adjusting forearm position on the front rest, he can tune out vertical. He has one carbon-fiber-reinforced stock that is extremely rigid. When it was placed with the front rest right under the very tip of the forearm, the gun tended to hop, creating vertical. By sliding the whole gun forward (with more forearm overhang ahead of the front sandbag), he was able to get the whole rig to settle down. That resulted in less vertical dispersion, and the gun tracked much better.
Fore/aft stock position is important even with very wide fore-ends.
Likewise, the placement of the rear bag is very important. Many shooters, by default, will simply place the rear bag the same distance from the front rest with all their guns. In fact, different stocks and different calibers will NOT behave the same. By moving the rear bag forward and aft, you can adjust the rifle’s overall balance and this can improve the tracking significantly. One of our shooters had a Savage 6BR F-Class rifle. By default he had his rear bag set almost all the way at the end of the buttstock. When he slid the rear bag a couple inches forward the gun tracked much better. He immediately noticed that the gun returned to point of aim better (crosshairs would stay on target from shot to shot), AND the gun torqued (twisted) less. The difference was quite noticeable.
A small change in the position of the forearm on the front rest, or in the placement of the rear bag, can make a big difference in how your gun performs. You should experiment with the forearm placement, trying different positions on the front rest. Likewise, you can move the rear bag back and forth a few inches. Once you establish the optimal positions of front rest and rear bag, you should find that your gun tracks better and returns to battery more reliably. You may then discover that the gun shoots smaller groups, with less vertical dispersion. And all these benefits are possible without purchasing any expensive new gear.
This coming Saturday, September 27th, is National Hunting and Fishing Day, held each year on the fourth Saturday of September. To help the avid hunters among our readers, here are Twenty Tips that can help ensure a safe and successful hunt. These tips have been compiled from our AccurateShooter Hunting Forum, with help from Hunting Editor Colton Reid (who has already been out hunting this month). Some items are preparatory — such as working with maps, sighting in the rifle, and improving physical fitness. We also talk about equipment — having the right gear, from proper boots to a GPS for multi-day hunts.
Of course there are entire volumes written on hunting, but these 20 Tips can benefit all hunters. Follow these suggestions and you should have a safer hunting experience with greater likelihood of success. If you liked these pointers, you’ll find two dozen more helpful hints on the NSSF Website.
Preparations Before The Hunt
1. Map Your Hunt and Notify Others — Before your hunt, make a plan and notify friends and family members about WHERE you are going and your intended return date and time. Print out a Google Satellite map and locate landmarks and trailheads. Mark where you plan to park your vehicle and give a copy of this map to friend and/or family members. A hunter may injure himself by falling off a rock, or tumbling in a creek-bed. After that kind of injury the hunter may be confused or unable to walk. If you get stranded in the wilderness, you want trusted persons to know where you are. So, before you leave on a trip, provide a map to a friend or family member. Show them where you will leave your vehicle, and where you expect to be every day of your hunting adventure.
2. Licenses and Permits — Make sure you have a valid hunting licenses and all the necessary tags. Begin this process with ample time before your intended hunt(s). The NSSF adds: “If you are crossing state or national borders, find out about any special considerations you must take care of. Border crossings can mean knowing about firearm transport laws or Chronic Wasting Disease-related regulations.”
3. Work on Your Fitness — On a multi-day hunt you may be trekking many miles. You need to be in good shape. If you are out of shape you may be putting yourself in a precarious situation, particularly if you underestimate the terrain difficulty. As the NSSF says: “Not being able to handle the conditions lessens your chances of success, can turn a great experience into an agonizing one and can endanger your health.”
4. Do Your Homework — Study the area you will be hunting. Talk to other hunters. Look at satellite photos. Get a real sense of the walking and terrain challenges. For a multi-day hunt, MAKE a PLAN. The NSSF states: “Eliminate surprises. Learn as much about where you will be staying, the area you will be hunting, what the weather might be like and what you need to bring[.]”
5. Rifle and Ammo — Make sure your rifle is sighted-in and your ammo is tested. Sight-in your rifle with the ammo you plan to use on your hunt. CLICK HERE for 4-Shot Sight-in Method. After sighting-in from the bench, confirm your zero by shooting from typical hunting positions (kneeling and with forearm supported on a rock or post).
6. Shooting Positions — Practice the shooting positions you will use in the field. Practice sitting, kneeling, and prone positions. You should also practice with shooting sticks, using your day pack as a rest, and with a bipod. Try to have a rock-steady rest before taking your shot.
7. Back-Up Irons — If possible, select a rifle with back-up iron sights. While modern scopes are very durable, they can and do fail (glass can crack). If you’ve invested a lot of time and money in your hunt, back-up iron sights can keep you in the game even if your riflescope fails.
8. Communications and GPS — Bring a GPS if you are in a wilderness area far from civilization. It’s a good idea to bring a cell phone, but you may not have coverage if you’re quite a distance from populated areas. A smart-phone also doubles as a digital camera to record your trophies. For navigation and safety, consider getting Garmin inReach Explorer+. This high-tech handheld unit features interactive SOS, connecting you to the GEOS 24/7 search-and-rescue monitoring center. They also allow you to send and receive text messages, no matter where you are, via advanced inReach satellite technology. Yes you can communicate even if you are miles from the nearest cell tower.
9. Select Good Gear — Make sure you have GOOD BOOTS that are comfortable — you’ll spend a lot of time on your feet. You may want a pack with harness for your rifle so you have both hands free. On a multi-day trip, make sure you can carry enough water, and that you will stay warm enough at night. Good practices for backpacking apply to multi-day hunts.
10. Make a Gear Checklist — Create a complete checklist of the gear and supplies you need. That includes arms, ammunition, rangefinder, binoculars, proper clothing (including spare clothes), hunting accessories, sleeping gear (on multi-day hunts), toiletries, medications. Don’t forget a good first aid kit — lots of bad things can happen during any wilderness trip. You can cut a hand, break an ankle or worse.
During The Hunt
11. Have a Plan — know where you plan to go and when. Try to be where you want in the early morning and early evening hours when deer are likely most active.
12. Take Your Time — If you spot a deer and get too excited and don’t take your time you may spook him. Go slow and glass. If possible, wait for the animals to bed down and relax. Then work out the best way to approach your prey. Remember, “You get so few opportunities, don’t screw it up!”
13. Glass More, Walk Less — Let your eyes do the walking — get good binoculars and use them. With their heightened senses of smell and hearing, deer/elk are able to spot you way better than you can spot them. If you are walking around a lot, chances are you are getting spotted by your prey.
14. Riflescopes Are Not Binoculars — Never use a riflescope as a substitute for binoculars. The temptation to do so is real, but when one does this, one is by definition pointing the muzzle of the gun at unknown targets. We like binoculars with built-in rangefinders. When glassing at long range, try supporting your binoculars on your pack.
15. Be Sure of Your Target before Shooting — Every year during whitetail season, farmers are forced to spray-paint their cattle or risk having them “harvested” by hunters who don’t bother confirming the species in their sights. Hunters with “buck fever” can make mistakes. When in doubt, don’t shoot.
16. Know When to Unload — When finished hunting, unload your firearm before returning to camp. You should also unload your gun before attempting to climb a steep bank or travel across slippery ground.
17. Bring Hearing Protection — While pursuing and stalking your prey you’ll want full sensory use of your ears. But when you’re finally ready to take the shot, slip in hearing protection. A shot from a large-caliber hunting rifle can exceed 170 decibels. Unprotected exposure to noise from a SINGLE 170+ dB shot can cause permanent hearing damage. (Source: ASHA.org). If you make a follow-up shot, you double that noise hazard. Therefore a hunter with a non-suppressed rifle should have hearing protection available.
You can keep a pair of easy-to-use quick-insert ear plugs on a cord around your neck. Or, get a lightweight neck band with earbuds, such as the Sellstrom Band, Peltor Band, or 3M Safety Band, all with a good 25 dB or better Noise Reduction Rating. You can keep these lightweight bands around your neck for quick deployment before you shoot.
“Once a hunter is successful, the REAL work begins.” — Colton Reid
18. Harvesting the Animal — When dressing your animal, be careful with the meat. You’ll want very sharp knives. Some hunters prefer knives with replaceable, razor-sharp blades. Don’t rush the task. Make sure you don’t get moisture or dirt on meat. The three spoilers of meat are heat, moisture, and dirt.
19. Pace Yourself When Packing Out — If you DO succeed, and bring down a big buck, will you be able to dress the animal and carry out the meat? Always be prepared to hike out with extra weight. If you are successful, make sure not to waste the meat you worked so hard for. Choose a pack that can help you carry a heavy load. Remember, this is not an insignificant challenge — you may be carrying 60 to 100 extra pounds in addition to your other gear. Again, take your time. Rest as needed. Don’t hurt yourself.
20. Remember to Enjoy the Experience — Our Hunting Editor, Colton Reid, offers this sage advice to all hunters, but particularly to novices: “Have fun, and appreciate your hunt, whether you bag a buck or not. It is a privilege to experience the wilderness and to get away from the city. Enjoy it while you’re out there. And keep your spirits up. You may get tired, but remember that ‘comes with the territory’. At the end of the day, yes you may be exhausted. And you may want to quit and go home. But stay positive, stay focused. Be patient, the experience is worth it.”
CLICK HERE for Hunter Training/Mentoring Programs State-by-State.
Visit WhereToHunt.org
There’s a great online resource for hunters that will help you find game locations in your state and ensure you have all the proper permits and game tags. WheretoHunt.org features an interactive map of the country. For all 50 states, the NSSF has compiled information about hunting license and permits, where to hunt, hunter education classes, laws and regulations and more. For each state you’ll also find a link for required applications and license forms.
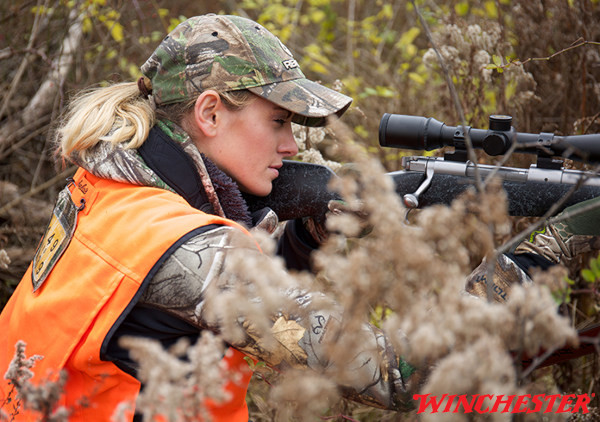
Deer hunting season is underway now across the country. If you plan a hunt in the days or weeks ahead, here are three important tips to follow if you want to successfully harvest a deer this fall. These tips come from an article by noted huntress Nikki Boxler for the Winchester Blog. CLICK HERE to read full article from Internet Archive.
Mistake #1: Not Sighting-In Your Gun with the Ammunition You Plan to Hunt With
You want to make sure you test the actual ammo you will use in your deer rifle. Make sure you are sighted-in properly with THAT ammo. Nikki says: “I always make it a point to shoot a few days before the season opens with the exact ammo and equipment that I will use while in the woods. Nothing gives me more confidence then knowing those last shots are hitting their target[.]”
Mistake #2: Rushing the SHOT — Focusing on Taking the Shot, Rather Than on MAKING the Shot
Being in the right place at the right time is essential to getting a shot on a deer. If you can’t MAKE the shot, being in the right place at the right time doesn’t matter. I have been guilty of this. A buck walks in and the conditions are perfect. He’s not far, but instead of taking my time I rush the entire shot and the results are not as I desired.
Mistake #3: Sticking to the Same Tactics Day in and Day Out
Throughout the course of the season, deer switch up their tactics. So, why wouldn’t we? When I was younger all of my hunting setups always looked the same — I’d have a ladder stand on the edge of a field. This was my comfort zone. I always stuck to it until recent years. I’ve now made it a point to step out of my comfort zone and explore new areas. This has definitely paid off with the percentage of deer I harvest.
Riflescopes are mechanical contraptions. One of the sad realities about precision shooting is that, sooner or later, you will experience a scope failure. If you’re lucky it won’t happen in the middle of a National-level competition. And hopefully the failure will be dramatic and unmistakable so you won’t spend months trying to isolate the issue. Unfortunately, scope problems can be erratic or hard to diagnose. You may find yourself with unexplained flyers or a slight degradation of accuracy and you won’t know how to diagnose the problem. And when a 1/8th-MOA-click scope starts failing, it may be hard to recognize the fault immediately, because the POI change may be slight.
How to Diagnose Scope Problems
When you see your groups open up, there’s a very good chance this is due to poor wind-reading, or other “driver error”. But my experience showed me that sometimes scopes do go bad. When your accuracy degrades without any other reasonable explanation, the cause of the problem may well be your optics. Here are some of the “symptoms” of scope troubles:
1. Large shot-to-shot variance in Point of Impact with known accurate loads.
2. Uneven tracking (either vertical or horizontal).
3. Change of Point of Impact does not correspond to click inputs.
4. Inability to zero in reasonable number of shots.
5. Unexpected changes in elevation click values (compared to previous known distance come-ups).
6. Visible shift in reticle from center of view.
7. Changed “feel” or resistance when clicking; or uneven click-to-click “feel”.
8. Inability to set parallax to achieve sharpness.
9. Turrets or other controls feel wobbly or loose.
10. Internal scope components rattle when gun is moved.
Even expensive scopes can fail, or start to perform erratically — and that can happen without warning, or for no apparent reason. Here are some signs that you may be having scope issues.
1. Click count has changed significantly from established zero at known range.
2. Noticeably different click “feel” as you rotate turrets, or turrets feel wobbly.
3. Inability to set Adjustable Objective or side focus to get sharp target image.
4. Shot Point of Impact is completely different than click value after elevation/windage change. For example, when you dial 2 MOA “up” but you observe a 6 MOA rise in POI.
When An Expensive Scope Goes Bad — Crazy Vertical Case Study
A few seasons back, this editor had a major-brand 8-25x50mm scope go bad. How did I know I had a problem? Well the first sign was a wild “drop-down” flyer at a 600-yard match. After shooting a two-target relay, I took a look at my targets. My first 5-shot group had five shots, fairly well centered, in about 2.2″. Pretty good. Everything was operating fine. Then I looked at the second target. My eye was drawn to four shots, all centered in the 10 Ring, measuring about 2.4″. But then I saw the fifth shot. It was a good 18″ low, straight down from the X. And I really mean straight down — if you drew a plumb line down from the center of the X, it would pass almost through the fifth shot.
Is My Scope Actually Malfunctioning or Is This Driver Error?
That was disconcerting, but since I had never had any trouble with this scope before, I assumed it was a load problem (too little powder?), or simple driver error (maybe I flinched or yanked the trigger?). Accordingly, I didn’t do anything about the scope, figuring the problem was me or the load.
Problems Reappear — Huge POI Swings Affirm This Scope is Toast
But, at the next range session, things went downhill fast. In three shots, I did manage to get on steel at 600, with my normal come-up for that distance. Everything seemed fine. So then I switched to paper. We had a buddy in the pits with a walkie-talkie and he radioed that he couldn’t see any bullet holes in the paper after five shots. My spotter said he thought the bullets were impacting in the dirt, just below the paper. OK, I thought, we’ll add 3 MOA up (12 clicks), and that should raise POI 18″ and I should be on paper, near center. That didn’t work — now the bullets were impacting in the berm ABOVE the target frame. The POI had changed over 48″ (8 MOA). (And no I didn’t click too far — I clicked slowly, counting each click out loud as I adjusted the elevation.) OK, to compensate now I took off 8 clicks which should be 2 MOA or 12″. No joy. The POI dropped about 24″ (4 MOA) and the POI also moved moved 18″ right, to the edge of the target.
For the next 20 shots, we kept “chasing center” trying to get the gun zeroed at 600 yards. We never did. After burning a lot of ammo, we gave up. Before stowing the gun for the trip home, I dialed back to my 100-yard zero, which is my normal practice (it’s 47 clicks down from 600-yard zero). I immediately noticed that the “feel” of the elevation knob didn’t seem right. Even though I was pretty much in the center of my elevation (I have a +20 MOA scope mount), the clicks felt really tight — as they do when you’re at the very limit of travel. There was a lot of resistance in the clicks and they didn’t seem to move the right amount.
And it seemed that I’d have four or five clicks that were “bunched up” with a lot of resistance, and then the next click would have almost no resistance and seem to jump. It’s hard to describe, but it was like winding a spring that erratically moved from tight to very loose.
At this point I announced to my shooting buddies: “I think the scope has taken a dump.” I let one buddy work the elevation knob a bit. “That feels weird,” he said: “the clicks aren’t consistent… first it doesn’t want to move, then the clicks jump too easily.”
Convinced that I had a real problem, the scope was packed up and shipped to the manufacturer. So, was I hallucinating? Was my problem really just driver error? I’ve heard plenty of stories about guys who sent scopes in for repair, only to receive their optics back with a terse note saying: “Scope passed inspection and function test 100%. No repairs needed”. So, was my scope really FUBAR? You bet it was. When the scope came back from the factory, the Repair Record stated that nearly all the internal mechanicals had been replaced or fixed:
Source of Problem Unknown, but I Have a Theory
Although my scope came with a slightly canted reticle from the factory, it had otherwise functioned without a hitch for many years. I was able to go back and forth between 100-yard zero and 600-yard zero with perfect repeatability for over five years. I had confidence in that scope. Why did it fail when it did? My theory is side-loading on the turrets. I used to carry the gun in a thick soft case. I recently switched to an aluminum-sided hard case that has pretty dense egg-crate foam inside. I noticed it took some effort to close the case, though it was more than big enough, width-wise, to hold the gun. My thinking is that the foam wasn’t compressing enough, resulting in a side-load on the windage turret when the case was clamped shut. This is just my best guess; it may not be the real source of the problem. Remember, as I explained in the beginning of this story, sometimes scopes — just like any mechanical system — simply stop working for no apparent reason.
The 2025 European F-Class Championships took place September 1-8, 2025 at the famed NRA Bisley Shooting Centre in the United Kingdom. Hundreds of talented competitors attended the match, with shooters from the USA finishing at the top in both F-Open and F-TR class.
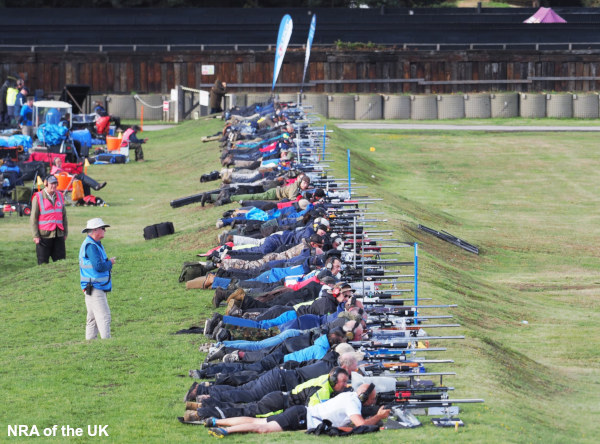
Here’s a report from the NRA UK Facebook Page: “That’s a wrap on the F-Class European Championship. As the biggest F-Class event in the world, it brought together the finest shooters to test their skills at our very own National Shooting Centre, Bisley. It was a true testament to the skill and dedication of every competitor, with Bisley’s Stickledown Range living up to its reputation as a challenging and dynamic range. The wind and conditions were relentless, but so were the competitors.
A huge well done to all the competitors who travelled from across the world to participate. And thank you to the incredible NRA staff and volunteers who made the event possible. We are so proud to have hosted this prestigious event at the National Shooting Centre and we are already looking forward to hosting the World Championships in 2026.”
Stunning rainbow on the Stickledown range at Bisley, England, UK.
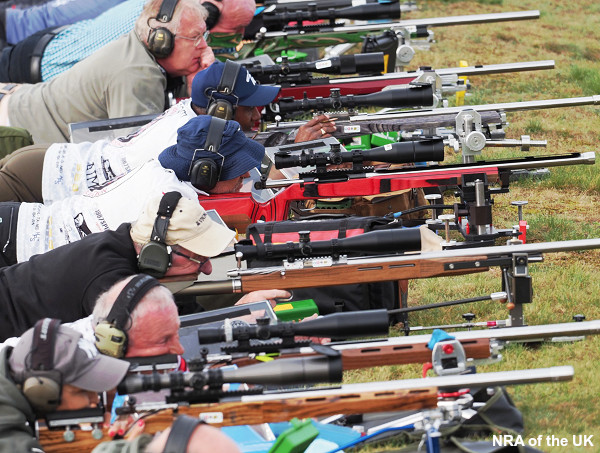
F-Class competitors on the firing line. CLICK HERE for more information about the famed Stickledown range at the NRA UK Bisley Centre.
The 2025 European F-Class Championships drew hundreds of shooters from around the globe, many from outside Europe. Top competitors from the USA wanted to gain experience at the challenging Stickledown range because the 2025 WORLD Championships will be held at the same venue. It was a demanding match, with very tough weather conditions during some sessions. CLICK HERE for full Individual and Team Results at 2025 Euro F-Class Championships.
Top 20 Finishers at 2025 European F-Class Championships
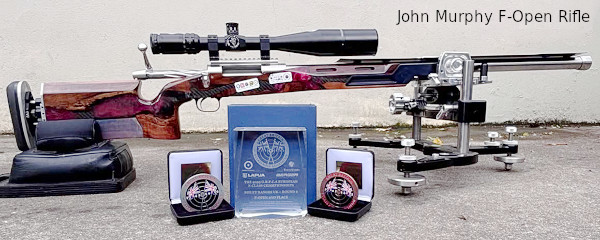
Congrats to F-Open Champion Peter Johns, who surpassed runner-up John Murphy of Ireland by 4 points. American shooters took three of the top five places in the F-Open competition.
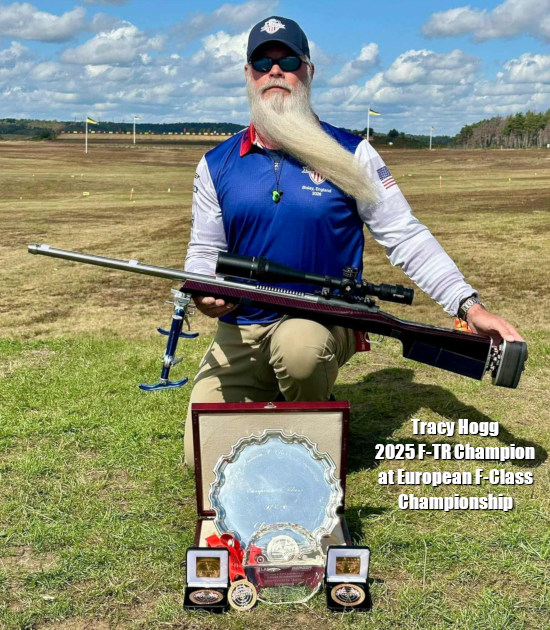
Praise to F-TR winner Tracy Hogg, who edged second-place Dale Lucy by 3 points. Americans took four of the top five place in the F-TR championships.
American Tracy Hogg Wins 2025 European F-TR Title
SEB Lambang, creator of SEB Rests and Joypod-X joystick bipods, posted: “Congratulations to Tracy Hogg for winning the 2025 F-TR European Championship!” Tracy, shown below with his awards, posted: “I’ll have to be honest I should have started years ago (using the Joypod-X). It really helped being able to move across the target so quickly in those tricky winds in Bisley”.
Report from John Murphy (2nd Place, F-Open)
American F-Open competitor John Murphy posted this report: “Finally back home and unpacked after an incredible week at the European F-Class Championship in Bisley. I’m thrilled to have finished 2nd overall [in F-Open], shooting through some of the toughest conditions I’ve ever faced and competing against many of the best in the world. Congratulations to Peter Johns on taking 1st place — he’s not only a world-class shooter but also a true gentleman.
A big thank you to Richie, the GBFCA, and the entire crew for organizing such a fantastic event. And of course, to my teammates, who made me proud in both the Team Matches and the America’s Cup. Already looking forward to seeing everyone again next August for the World Championships!”
Here’s a video report from Erik Cortina, who finished 7th overall in F-Open:
Rifle Images from the 2025 European F-Class Championships
F-TR competitor with alloy stock. Note the extremely low-profile bipod mounted close to bore axis. That helps minimize twist/roll on recoil.
F-Class competitors on the firing line. All shooters shown here had laminated wood stocks.
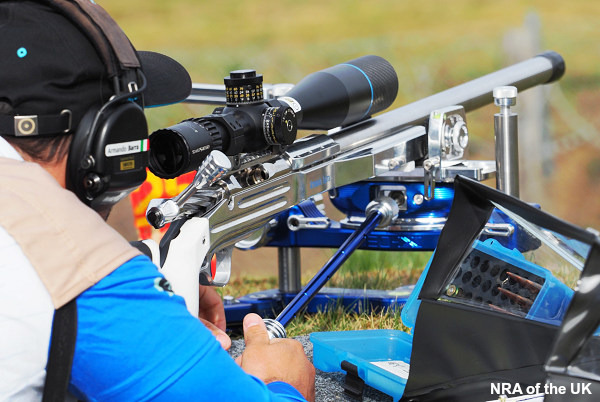
F-Open shooter with SEB NEO-X Front Rest. This rest folds compactly for transport yet is extremely stable during shooting, with superb joystick control.
Lady F-TR competitor with a handsome gold snakeskin pattern on her stock, with matching gold bolt shaft.
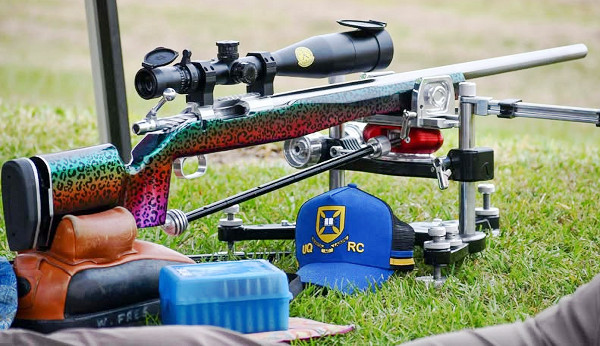
This rifle called “Sindy” features a leopard print on multicolour metallic. Very handsome. SEB Lambang posted: “Thank you Wendy LFree for sharing this lovely pix and for using my products!”
Heavy Rain and High Winds at Stickledown — Challenging Conditions
There were significant rainstorms during the 2025 F-Class Championship. Competitors needed tough wet-weather gear, and rainguards over their ammo and scoresheets. It was also wise to protect your scopes from moisture so that raindrops did not obscure the lens views.
For many Americans, real incomes have stayed flat in recent years, while inflation has increased the cost of living very significantly in the past three years. Accordingly, it’s important to save money whenever possible. Prices are going up, but wages aren’t following (for most of us). Here are six ways shooters can save money on gear purchases and other shooting-related expenses.
1. Watch for Our Deals of the Week. Every Monday, in our Daily Bulletin, AccurateShooter.com offers some of the best deals to be found. We search the web to find great deals on ammo, reloading components, optics, tools, firearms, gun safes, electronics and more. It’s not unusual to find savings of 20-35% through our Deals of the Week. And many of our vendors are now offering special deals just for AccurateShooter.com readers.
2. Check Out the Forum Classifieds. There are great deals to be found every day in the AccurateShooter Shooters’ Forum. The latest deals are displayed in the right column of every Forum page. To see all the listings, browse through the Forum MarketPlace section which has four main categories:
Guns, Actions, Stocks, & Barrels
Tools, Dies, Rests, Reloading Components & Misc
Scopes, Optics, Sights, Rings, Bases Etc.
Commercial Sales by Paid Sponsors
3. Share a Ride to Matches. Fuel prices are on the rise — Regular-grade gasoline is over $4.75 per gallon in California now and around $3.20/gallon nationwide. With many shooters living 30-100 miles from the nearest range, fuel remains a big part of a shooter’s hobby budget. We’d say 90% of shooters drive solo to matches, often in large, gas-guzzling trucks. If you drive 200 miles round-trip to attend a match in a 20-mpg vehicle, you’ll burn over $32.00 worth of gasoline on your trip. That adds up. By simply sharing the ride with one fellow shooter you cut your fuel expenditures in half. And, if you alternate vehicles with a buddy from one match to the next, you save on vehicle wear and tear. At $0.81/mile (overall operating costs) consider the savings.*
4. Use Discount Codes to Save. It’s always smart to check for discount codes before you buy. In the Daily Bulletin, we feature “Deals of the Week” every Monday morning, and we provide discount Coupon Codes when available. These can reduce the price substantially or lower shipping costs. Search codes for Brownells, Creedmoor Sports, EuroOptic, Graf’s, Midsouth, Powder Valley, Sportsman’s Warehouse, KYGUNCO, MidwayUSA, and Precision Reloading. Check your email also — some discount codes are only announced in email newsletters. If you can’t find a Coupon Code for your preferred vendor, visit Gun.deals and/or RetailMeNot.com. Both those sites list current coupon codes, and RetailMeNot.com covers thousands of vendors.
5. Shop for “Demo” Optics. Modern high-quality optics can easily cost $1500.00 or more, often exceeding the value of the rifle on which they are mounted. However, you can often save 20-30% by purchasing demo optics. These are normally display units used at trade shows. They may have slight ringmarks, but otherwise they are “as new”, having never been carried in the field or used on a rifle that has fired live ammo. When purchasing demo scopes, you should always ask about the warranty before consummating the sale. However, most demo scopes from name-brand manufacturers come with full factory warranties. EuroOptic.com and SWFA.com are two respected vendors that offer a good selection of demo optics.
6. Train with Rimfire Rifles. Good match-grade centerfire, hand-loaded ammo, counting premium bullets, powder, primers, and brass (figuring 10X loads), can now exceed $1.60 per round. And if your $600 (as chambered and fitted) competition barrel is toast after 1500 rounds, add $0.40 for barrel deprecation per shot. So you’re effectively spending two bucks a round total! By contrast, you can get quite good .22 LR target ammo for under $0.18 per round. Good rimfire barrels last a long, long time, so you don’t have to be concerned about wearing out your barrel quickly. A quality rimfire barrel can retain its accuracy for 7,000 rounds or more. If you run the ballistics, a .22 LR round at 100 yards can emulate the wind drift experienced by a centerfire cartridge at long range. This allows for effective cross-training with much less expensive ammo.
*The average cost to operate a car in the US is approximately $0.81 per mile, as reported by AAA. This includes fuel, depreciation, repairs, parts insurance, and registration.
On some internet shooting forums, self-declared “experts” advise new rifle shooters to stick to low-end factory rifles. These “experts” (many of whom don’t own a single really accurate rifle), claim that it will take years for a new shooter to learn how to shoot a rifle accurately. So, the argument goes, the accuracy offered by a precision-chambered rifle, with a custom barrel, is “wasted” on a new shooter.
We disagree with that viewpoint, at least when it comes to rifles shot from a rest. We’ve seen relatively new shooters, with help from a skilled mentor, do remarkably well with precision rifles right from the start. With a good bench gun, many new shooters can shoot well under 1 MOA on the first day. Certainly it takes time for a complete novice to learn how to handle the gun and to work the trigger smoothly. However, this editor has personally seen some inexperienced shooters try their hand at benchrest shooting, and within few month they are doing very well indeed at club shoots.
Accurate Rifles Reward Progress As Novices Build Skills
For bench shooting, we think a highly accurate rifle is a much better training device for a new shooter than a typical, cheap factory sporter. With a gun capable of 1.5-2.0 MOA at best, you can never really determine if a “flyer” is you or the gun. Conversely, when a novice shoots a gun that can put 5 shots through one ragged hole, if a shot goes way high or low, the shooter knows his aim, trigger control, or gun-handling is to blame. He (or she) can then correct the problem. And when the shooter does everything right, he or she will see a nice tight group on the target. The accurate rifle provides more meaningful feedback and it rewards progress. That helps the novice become a better shooter in a shorter period of time.
A while back, Forum Member Preacher and his “bunny hugger” niece from California proved this point. The young lady, with almost no shooting experience, took Preacher’s 6-6.5×47 and shot a sub-quarter-MOA, 3-shot group at 350 yards. Don’t tell her she needs to stick to a cheap factory rifle. Preacher reports: “My niece flew in from the west coast and came up to visit. When she saw a few of my full-blown varmint rifles, she wanted to shoot one. She did a super job even if she IS a ‘bunny hugger’. She pulled the 1.5 ounce Jewell on a few fired cases to check out the trigger pull and then got in behind the gun and put three shots into a 350-yard target with a one-inch circle.” We measured her group at 0.822″ (0.224 MOA). Don’t tell Preacher that accuracy is “wasted” on novices. He joked: “I sure don’t want her shooting at me ….”
Rifle Features BAT Action, Krieger Barrel, and Russo Laminated Stock:
For those who are interested, Preacher’s rifle features a BAT 3-lug action, 30″ Krieger 7.5-twist heavy contour barrel, and Russo stock (with clear coat by Preacher). Chambered in 6-6.5×47 Lapua, this gun “shoots the 108gr Bergers very well” according to Preacher. Yep, we agree with that — even when a novice “bunny-hugger” does the trigger-pulling.


 Part One covers basic principles, tactics, and strategies, with a focus on the 200-yard stages. Emil writes: “There are as many dimensions to ‘wind reading’ as there are stages to High Power competition. Your tactical mindset, or philosophy, must be different for the 200 and 300 yard rapid-fire stages than it would be for the 600 yard slow-fire. In the slow-fire stages you have the ability to adjust windage from shot to shot, utilizing the location of the previous shot as an indicator. Additionally, a change to the existing conditions can be identified and adjusted for prior to shooting the next shot.”


 For the next 20 shots, we kept “chasing center” trying to get the gun zeroed at 600 yards. We never did. After burning a lot of ammo, we gave up. Before stowing the gun for the trip home, I dialed back to my 100-yard zero, which is my normal practice (it’s 47 clicks down from 600-yard zero). I immediately noticed that the “feel” of the elevation knob didn’t seem right. Even though I was pretty much in the center of my elevation (I have a +20 MOA scope mount), the clicks felt really tight — as they do when you’re at the very limit of travel. There was a lot of resistance in the clicks and they didn’t seem to move the right amount.
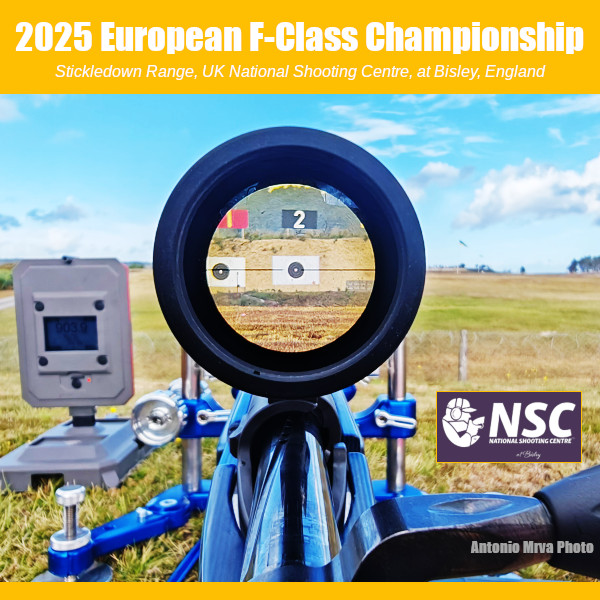


 2. Check Out the Forum Classifieds. There are great deals to be found every day in the AccurateShooter
  3. Share a Ride to Matches. Fuel prices are on the rise — Regular-grade gasoline is over $4.75 per gallon in California now and around $3.20/gallon nationwide. With many shooters living 30-100 miles from the nearest range, fuel remains a big part of a shooter’s hobby budget. We’d say 90% of shooters drive solo to matches, often in large, gas-guzzling trucks. If you drive 200 miles round-trip to attend a match in a 20-mpg vehicle, you’ll burn over $32.00 worth of gasoline on your trip. That adds up. By simply sharing the ride with one fellow shooter you cut your fuel expenditures in half. And, if you alternate vehicles with a buddy from one match to the next, you save on vehicle wear and tear. At $0.81/mile (overall operating costs) consider the savings.*
 4. Use Discount Codes to Save. It’s always smart to check for discount codes before you buy. In the Daily Bulletin, we feature “Deals of the Week” every Monday morning, and we provide discount Coupon Codes when available. These can reduce the price substantially or lower shipping costs. Search codes for Brownells, Creedmoor Sports, EuroOptic, Graf’s, Midsouth, Powder Valley, Sportsman’s Warehouse, KYGUNCO, MidwayUSA, and Precision Reloading. Check your email also — some discount codes are only announced in email newsletters. If you can’t find a Coupon Code for your preferred vendor, visit
  5. Shop for “Demo” Optics. Modern high-quality optics can easily cost $1500.00 or more, often exceeding the value of the rifle on which they are mounted. However, you can often save 20-30% by purchasing demo optics. These are normally display units used at trade shows. They may have slight ringmarks, but otherwise they are “as new”, having never been carried in the field or used on a rifle that has fired live ammo. When purchasing demo scopes, you should always ask about the warranty before consummating the sale. However, most demo scopes from name-brand manufacturers come with full factory warranties.
  6. Train with Rimfire Rifles. Good match-grade centerfire, hand-loaded ammo, counting premium bullets, powder, primers, and brass (figuring 10X loads), can now exceed $1.60 per round. And if your $600 (as chambered and fitted) competition barrel is toast after 1500 rounds, add $0.40 for barrel deprecation per shot. So you’re effectively spending two bucks a round total! By contrast, you can get quite good .22 LR target ammo for under $0.18 per round. Good rimfire barrels last a long, long time, so you don’t have to be concerned about wearing out your barrel quickly. A quality rimfire barrel can retain its accuracy for 7,000 rounds or more. If you run the ballistics, a .22 LR round at 100 yards can emulate the wind drift experienced by a centerfire cartridge at long range. This allows for effective cross-training with much less expensive ammo.


