|
|
November 20th, 2012
 How much does it cost you to send a round downrange? Ask most shooters this question and they’ll start adding up the cost of components: bullets, powder, and primers. Then they’ll figure in the cost of brass, divided by the number of times the cases are reloaded.
For a 6BR shooting match bullets, match-grade primers, and 30 grains of powder, in brass reloaded ten times, this basic calculation gives us a cost per shot of $0.51 (fifty-one cents):
Bullet $0.33 (Berger 105 VLD) Grafs.com
Primer $0.02 (Tula/Wolf SmR magnum) PVI
Powder $0.08 (Reloder 15 @ $19.15/lb) PVI
Brass $0.08 (Lapua @ $82.30/100, 10 reloads)
Total = $0.51 per round
NOTE: If you shoot a larger caliber that burns more powder, and uses more expensive bullets and/or brass, your total cost per round will be higher than $0.51.
$1.00 Per Shot True Cost? Yikes!
OK, we’ve seen that it costs about $0.51 per round to shoot a 6BR. Right?
Wrong! — What if we told you that your ACTUAL cost per round might be closer to double that number? How can that be? Well… you haven’t accounted for the cost of your barrel. Every round you fire down that tube expends some of the barrel’s finite life. If, like some short-range PPC shooters, you replace barrels every 700 or 800 rounds, you need to add $0.60 to $0.70 per round for “barrel cost.” That can effectively double your cost per round, taking it well past the dollar per shot mark.
Calculating Barrel Cost Per Shot
In the table below, we calculate your barrel cost per shot, based on various expected barrel lifespans.
 As noted above, a PPC barrel is typically replaced at 700-800 rounds. A 6.5-284 barrel can last 1200+ rounds, but it might need replacement after 1000 rounds or less. A 6BR barrel should give 2000-2600 rounds of accurate life, and a .308 Win barrel could remain competitive for 4,000 rounds or more.
The table below shows your barrel cost per shot, based on various “useful lives.” We assume that a custom barrel costs $540.00 total to replace. This includes $300.00 for the barrel itself, $200.00 for chambering/fitting (conservative number), and $40.00 in 2-way shipping costs. These are typical costs shooters will encounter when ordering a rebarreling job.

The numbers are interesting. If you get 2000 rounds on your barrel instead of 1000, you save $0.27 per shot. However, extending barrel life from 2000 to 3000 rounds only saves you $0.09 per round. The longer you keep your barrel the more you save, but the savings per shot decreases as the round count increases.

How to Reduce Your TRUE Cost per Round
What does this tell us? First, in figuring your annual shooting budget, you need to consider the true cost per round, including barrel cost. Second, if you want to keep your true costs under control, you need to extend your barrel life. This can be accomplished in many ways. First, you may find that switching to a different powder reduces throat erosion. Second, if you’re able to slow down your shooting pace, this can reduce barrel heat, which can extend barrel life. (A varminter in the field is well-advised to switch rifles, or switch barrels, when the barrel gets very hot from extended shot strings.) Third, modifying your cleaning methods can also extend the life of your barrel. Use solvents that reduce the need for aggressive brushing, and try to minimize the use of abrasives. Also, always use a properly fitting bore guide. Many barrels have been prematurely worn out from improper cleaning techniques.
November 18th, 2012
 In our articles collection, you’ll find a story of interest to varminters and game hunters. Choosing And Using Modern Reticles, by author John Barsness, reviews the many “hold-over” reticle options currently available for hunting scopes. The latest “hunting hold-over” reticles, such as Leupold’s Varmint Hunter Reticle, offer both vertical marks (for hold-over) and horizontal bars or dots (for wind compensation). The idea is to allow the shooter to move quickly from one target distance to another, without having to dial elevation changes with his scope turrets. Likewise, the horizontal wind-hold markings give the shooter reference points for winds of specific velocities. That makes the process of “holding-off” for wind much more predictable.
In the Barsness article, which originally appeared in Varmint Hunter Magazine, the author traces the history of ranging/hold-over reticles starting with the Mildot reticle. Barsness explains how to use the mildot reticle, noting how it is best used with a First Focal Plane scope design.
First Focal Plane vs. Second Focal Plane Designs
If nothing else, you’ll want to read this article just to improve your understanding of First Focal Plane (FFP) vs. Second Focal Plane (SFP) optics operation. If you want to use the markings on a reticle to range at various magnification levels, then you want the FFP design, preferred by the military. If, on the other hand, you prefer the viewed appearance of your reticle to stay constant at all power levels, then you’ll probably prefer the SFP design.

Barsness explains how the modern “Christmas Tree” design reticles, such as the Zeiss Rapid Z, evolved, and he explains how to use these reticles to adjust your point of aim for different target distances. These hold-over reticles can be very handy, but you must remember that the yardages which correspond to the stepped vertical markings are determined by the ballistics of your cartridge. Thus, if you change your cartridge, or even change your load significantly, your hold-over yardage values will change. You will then need to field-test to find the actual value of the reticle’s hold-over points.

Even if you are not a hunter, you can benefit from reading the Barsness article. For anyone shopping for a varmint scope, the article is a “must-read”. And Barness clears up some common misconceptions about FFP vs. SFP optics. Barsness also offers good, common-sense advice. We agree with Barsness when he says that some reticle designs have become too complicated. Barsness writes:
These days there are reticles with everything from a few extra dots along the vertical cross hair to reticles that cover the bottom third of the scope’s field of view, providing an aiming point for every blade of grass in North Dakota. Here we run into the basic fact that simpler reticles are easier to use, if not quite so versatile.
Personally, I particularly like simple reticles in shorter-range varmint rifles, whether rimfires or small centerfires such as the 22 Hornet. These aren’t likely to be used at extended ranges, or in any significant amount of wind. Hence, something like the Burris Ballistic Plex reticle provides about all the information we can realistically use — the reason there are Burris Ballistic Plex scopes on most of my rimfire or small centerfire varmint rifles.
CLICK HERE to Read ‘Choosing and Using Modern Reticles’, by John Barsness.
November 14th, 2012

 Are sound suppressors useful in competition shooting? In some disciplines, and in venues where sound “moderators” are permitted, the answer is “yes”. In the November edition of Shooting Sports USA eZine, you’ll find an interesting article about the use of sound suppressors (aka “cans”). The article explores the use of suppressors in Europe and in tactical matches in North America. You’ll also find an explanation of the rules and regulations governing suppressor ownership and use in the United States.
Shooting Sports Editor Chip Lohman tests three rifles from the bench and found that sound suppressors did not harm accuracy. In fact, all three test rifles (one each in .223 Rem, .308 Win, and .338 Lapua Magnum), shot slightly better 5-shot groups at 200 yards when a suppressor was fitted to the barrel. However, the suppressors did alter point of impact. Interestingly, velocity standard deviation (SD) values were lower with suppressors in place for all three test rifles. This observation calls for further study.*
CLICK HERE to Read Suppressor Article in Shooting Sports USA.

So the use of suppressors in competition could be a good thing. However, in the United States, current NRA High Power rules prohibit the use of sound suppressors. NRA Rule 3.16.1 subsection (a) states: “Sound Suppressors are not authorized for use in High Power competition.” In addition, there are some practical problems with suppressors — the heat rising off of a naked suppressor can create mirage problems (that’s why some shooters wrap their cans with a cover).
Despite such issues, we are starting to see moderators on rifles used in non-NRA-sanctioned tactical matches. For example, many competitors in the popular Steel Safari field challenge match use suppressors. The photo below shows our friend Zak Smith competing in the Steel Safari with his suppressed Accuracy International rifle.

*The article cautions that one should not extrapolate too much from the SD numbers, given the low number of test shots. Chronograph-maker Ken Oehler, when asked to comment on the SD values stated: “[You should] report the observed SDs, but draw no conclusions until… you can do more testing with larger sample sizes.”
October 25th, 2012
 Looking for a shooting facility close to home? Need a place to zero your hunting rifle? Or perhaps you’re planning a trip this fall and want to find a gun range near your vacation destination. Then check out WhereToShoot.org. This NSSF-sponsored website provides the most comprehensive online directory of shooting ranges in North America. Listings are updated frequently with range information for all U.S. States and Canadian Provinces. You can search by state, by zip code, or by keyword. You can also limit your search to specific types of facilities (such as indoor pistol ranges).
Where2Shoot App for iPhones
Folks with smart phones can access the WhereToShoot range database via the FREE Where2Shoot iPhone App. This handy App also provides shooting sports news and safety tips.
UPDATE Oct. 25: NSSF.org and WhereToShoot.org websites are having technical problems.

WhereToShoot.org allows anyone to search for a place to shoot in their area. Site users can simply enter their state or zip code and a list of shooting ranges is created. Searches can be further narrowed by selecting which shooting discipline you are interested in. NOTE: If you own a shooting range or if you’ve recently changed locations, NSSF encourages you to enter or update your range information.
Bonus Features on WhereToShoot.org
In addition to its range-locating capability, the site now offers a number of other Resources for Shooters, including links to video tips, free printable targets, news about local shooting events and opportunities, safety information and more. Below are three of the NSSF’s nine free PDF targets:
October 21st, 2012

Story by NRAHuntersRights.org and NRAblog.com
Shown above is the Belfast Wildlife Area rifle range in Kindards, South Carolina. Belfast was the first public, unmanned shooting range opened and paid for completely with funds raised by NRA Grants and the Wildlife and Sportfish Restoration Program … an act made possible through Pittman-Robertson grants. Several other state Natural Resource Departments have followed suit. Such facilities provide hunters and shooters with a convenient, low cost location to sight in firearms and practice shooting. Now that may be in jeopardy.
In the article below, NRAHuntersRights.org Managing Editor J.R. Robbins explains why government funding for Public Shooting Ranges is threatened:
OMB Threatens to Freeze Pittman-Robertson Funds
Sportsmen nationwide should be aware of a recently released report from the White House Office of Management and Budget that itemizes $31 million in Pittman-Robertson funds to be “sequestered” from the U.S. budget. Sequestration sets aside funding–effectively “freezing” it — until a debt is repaid.
 The listing of the P-R funding (as well as $34 million of Dingell-Johnson funds that support sport fishing) is part of a huge package of across-the-board government budget reductions planned to take effect January 2, 2013, unless Congress can develop a plan to cut $1.2 trillion over the next decade.
This year is the 75th anniversary of the Pittman-Robertson Act, more formally known as the Federal Aid in Wildlife Restoration Act. As most hunters know, the act put an 11 percent excise tax on rifles, shotguns, ammunition and archery equipment that is distributed to state game and fish agencies for the purposes of habitat acquisition and improvement, reintroduction of declining species, wildlife research, hunter education, shooting range development and other conservation projects. (The tax on handguns is 10 percent.)
It is this funding and these projects that have brought back species such as whitetail deer, turkeys, wood ducks, antelope, bald eagles and Canada geese from dangerously low levels a century ago to the strong, sustainable populations we see today. Hunters’ dollars are directly responsible for these and other conservation milestones.
Since 1937, hunters have contributed nearly $7 billion dollars through the Pittman-Robertson Act for the benefit of wildlife conservation. For any given project, P-R funding pays 75 percent of costs, and states must contribute at least 25 percent–most of which comes from hunting license fees …
Read the rest of NRAHuntersRights’ article on the threat to Pittman-Robertson HERE.
October 14th, 2012
|
Gun Digest offers a users’ guide for tactical rifles. Authored by Patrick Sweeney (Guns & Ammo Handguns Editor), the 224-page Gun Digest Book of the Tactical Rifle covers tactical rifle types, ammo, reloading, and tactical accessories. Most of the book’s sixteen chapters are gun-specific — detailed discussions of particular rifles such as the M15/M1A, the FN-FAL, and the Sig 556. There are also dedicated chapters on Bullpups, Rimfires, and “Sniper Rifles” (both bolt-action and semi-auto).
While the book sports an AR15 on its cover, AR-platform rifles are NOT the major focus of the book. If you are only interested in ARs, this is not the book for you. However, if you want to learn more about a variety of modern arms, you should find the book a valuable resource. Gun Digest claims: “No other book covers as many different styles of tactical rifles, and is written by a more qualified author.” |
|

About the Author
The handguns editor for Guns & Ammo magazine, Patrick Sweeney is a also a credentialed gunsmith and police firearms instructor. He has written many of Gun Digest Books’ best-selling titles including: Gun Digest Book of the 1911, Vols. I and II; Gun Digest Big Fat Book of the .45 ACP, Gun Digest Book of the AR-15, Gun Digest Book of the AK and SKS, among other titles.
October 9th, 2012
From the late ’70s through 1983, a huge, concrete-walled warehouse in Houston was used for benchrest testing. Virgil King and Bob Fisher set up a bullet-catching backstop at the end of a 30-yard-wide, 325-yard-long fire lane that remained unobstructed even when the warehouse was in use. This allowed accuracy tests in virtually perfect “no wind” conditions. Over a six-year period, about 30 shooters were invited to test their rifles. The results were amazing, with numerous “zero groups” being shot in the facility. Many of the lessons learned in the legendary Houston Warehouse still help benchresters achieve better accuracy today.
Dave Scott wrote a superb article, the Secrets of the Houston Warehouse which appeared in a special issue of Precision Shooting Magazine. That issue has long been sold out, but, thankfully, Secrets of the Houston Warehouse is now on the web: CLICK HERE to READ Secrets of the Houston Warehouse.
 Dave Scott explains why the Warehouse was so unique:
“Over a period of six years, the levels of accuracy achieved in the Houston Warehouse went beyond what many precision shooters thought possible for lightweight rifles shot from sandbags and aimed shot-to-shot by human eye. For the first time, a handful of gifted, serious experimenters — armed with the very best performing rifles (with notable exceptions) — could boldly venture into the final frontiers of rifle accuracy, a journey made possible by eliminating the baffling uncertainties of conditions arising from wind and mirage. Under these steel skies, a shooter could, without question, confirm the absolute limits of accuracy of his rifle, or isolate the source of a problem. In the flawlessly stable containment of the Houston Warehouse … a very few exceptional rifles would display the real stuff, drilling repeated groups measuring well below the unbelievably tiny .100″ barrier. The bulk of rifles, however, embarrassed their owners.”
Scott’s article also reveals some interesting technical points: “One thing that IS important is that the bullet be precisely seated against the lands. T.J. Jackson reported this fact in the May 1987 issue of Precision Shooting. In a letter to the Editor, T.J. wrote, ‘…in all our testing in that Houston warehouse… and the dozens and dozens of groups that Virgil King shot in there ‘in the zeroes’… he NEVER fired a single official screamer group when he was ‘jumping’ bullets. All his best groups were always seated into the lands, or at the very least… touching the lands. Virgil said his practice was to seat the bullets so the engraving was half as long as the width of the lands. He noticed an interesting phenomenon with rifles that could really shoot: if the bullets were seated a little short and the powder charge was a bit on the light side, the groups formed vertically. As he seated the bullets farther out and increased the powder charge, the groups finally became horizontal. If he went still farther, the groups formed big globs. He said the trick is to find the midway point between vertical and horizontal. That point should be a small hole.”
You should definitely read the complete article, as it provides many more fascinating insights, including shooting technique, barrel cleaning, neck-turning, and case prep.
October 7th, 2012
One of our Shooters’ Forum readers, Trent from Louisiana, asked for help deciding between a 260 Remington and a 6.5×55 for his latest gun project. In the Forum thread, respected UK gun writer Laurie Holland provided a good summary of the differences between the two chamberings. Laurie writes:
 “The 6.5×55 case has 6 or 7% more capacity than the .260s, even more in practice when both are loaded to standard COALs with heavy bullets, which sees them having to seated very deep in the .260 Rem using up quite a lot of powder capacity. So loaded up for reasonable pressures in modern actions, the 6.5×55 will give a bit more performance.
The issue for many is what action length is available or wanted, the 6.5 requiring a long action. So sniper rifle / tactical rifle competitors will go for the .260 Rem with the option of the many good short-bolt-throw designs around with detachable box magazines. If a bit more performance is needed, the .260AI gives another 100-150 fps depending on bullet weight.
Brass-wise, you’ve got really good Lapua 6.5×55 off the shelf that needs minimum preparation, and it’s strong and long-lived. There is an Ackley version too that was popular in F-Class in Europe for a while that isn’t too far short of 6.5-284 performance. If you go for .260 Rem, the American brass isn’t as good but you can neck-up Lapua or Norma .243 Win and trim them (or neck-down .308 Win or 7mm-08). This has the downside that doing so usually creates a noticeable ‘doughnut’ at the case-shoulder junction, that may cause problems depending on how deep bullets are seated.
For purely target shooting, I think I’d go with 6.5×55 if I was making the choice again today for performance and brass-preparation reasons. In fact, I’ve considered going back to the gunsmith to have the barrel rechambered.
You want a multi-purpose rifle though and that makes things trickier depending on the bullet weight(s) you want to use. The [typical] 6.5×55 and 6.5-08 throats are really designed for 140s, so 90-120s make a long jump into the rifling. If you’re always going to use 130s and up, it’s less of an issue. If you want to use the lighter stuff, I’d say go for .260 Rem and discuss the reamer with the gunsmith to come up with as good a compromise as you can depending on the mix of shooting. 1:8.5″ twist is the norm and handles all the usual sporting and match bullets; you can go for a little slower twist if you won’t use the heavies.
Over here in the UK, in Scotland to be precise, we have a top sporting rifle builder (Callum Ferguson of Precision Rifle Services) who almost specializes in .260 Rem usually built on Borden actions. He throats the barrel ‘short’ so it’s suited to varmint bullets, but will still handle the 100gr Nosler Partition which he says is more than adequate for any British deer species including Scottish red stags.
Accuracy-wise, I don’t think there’s anything between them if everything else is equal. The 6.5 has a reputation for superlative accuracy, but that was high-quality Swedish military rifles and ammunition matched against often not-so-high-quality military stuff from elsewhere. Put the pair in custom rifles and use equally good brass and bullets and you’ll be hard pressed to tell them apart.” – Laurie Holland
 After Laurie’s helpful comments, some other Forum members added their insights on the 260 Rem vs. 6.5×55 question:
“To me, the .260 Remington has no advantage over the 6.5×55 if one is going to use a long action. Likewise, the only advantage the .260 has in a modern rifle is it can be used in a short-action. There is more powder capacity in the 6.5×55 so you have the potential to get more velocity plus there is a lot of reloading data available to you for loading at lower velocity/pressure if you choose. The Lapua brass is great and Winchester brass is pretty good at low pressures. Having loaded a good bit for both, the 6.5×55 would always get the nod from me. To me, if someone wants to use a short-action, the 6.5×47 Lapua is even a better option than the .260 for a target rifle.” — Olympian
“There is just one small item that has been missing from this conversation — the 6.5×55 has a non standard rim diameter of .479″ vs. the standard .473″ of a .308 and all of its varients. Depending on your bolt this may be an issue, or it may not.” — Neil L.
September 29th, 2012
Last year, our friend Roy Bertalotto acquired a budget-priced Kimber 82G rimfire target rifle from the CMP. The Kimber comes with an oiled-wood stock that works fine for three-position training, but Roy wanted to shoot the gun for the bench. The original Kimber stock, with its narrow, radiused forearm, was not ideal for this purpose. Roy wanted a wide, flat fore-end, which is much more stable in the bags. Rather that spend hundreds on a new benchrest stock, Roy modified his Kimber’s original stock by slicing a section off the bottom of the stock and then replacing this with a 3/4″ X 2 3/4″ X 15″ piece of walnut. The finished product is in the second photo below.

Roy explains: “The modification I did on my Kimber 82G stock was done using a milling machine, hand planes, files, die grinder and sand paper. It can also be done with simple hand tools — it will just take longer. The first step is removing the wood on the bottom of the fore-end. This was accomplished in the milling machine. A scrap piece of 2X8 was mounted to the milling machine’s table and the surface milled to be perfectly flat. The Kimber stock was screwed to this 2X8 with two large screws and the bottom of the stock was milled flat. Once this was done, a piece of 3/4″ X 2 3/4″ X 15″ walnut was glued using West System epoxy to the cut out area. I use West System epoxy in boat building, but any good wood glue will work.” WATCH project stages in Slide-Show below:
After gluing the new bottom piece in place, Roy milled the sides to provide side flats with a radius to transition from the wider lower section to the narrower upper part of the fore-end. As a added enhancement, Roy contoured the rear of the fore-end to blend with the rear of the stock, adding what he calls “1965 Ford Mustang side scoops”. Roy then used a Die Grinder with a 1.5″ sanding wheel to modify the wrist area to provide more thumb relief.

Following the cutting, milling, gluing, and shaping, Roy sanded with 150 grit and 300 grit sandpaper before applying multiple coats of Tung Oil. Once the main stock was completed, Roy completed the project by crafting an extended buttplate from a couple pieces of 1/8″ aluminum and two 1.5″ aluminum tubes, “all polished to a slightly less than mirror finish”. NOTE: This metal buttplate assembly was made from scratch (other than the pad). This is not an aftermarket extension kit.

Overall the gun turned out very nicely. Log on to Roy’s RVB Precision webpage to learn more about this Kimber stock modification project, and view more photos of the building process.
September 22nd, 2012
  Bryan Litz, chief Ballistician for Berger Bullets (and a trained rocket scientist) has authored an impressive new book: Accuracy and Precision for Long Range Shooting. Bryan’s new book is a companion to his successful treatise, Applied Ballistics for Long-Range Shooting. Now in its Second Edition, Litz’s Applied Ballistics book has become the “go-to” Ballistics book for precision shooters worldwide.
While Bryan’s first book covers the science of ballistics and trajectory calculation, his new book examines practical issues involved in long-range accuracy. Bryan explains: “In a nutshell, this book focuses on the uncertainties of practical shooting which affect hit percentage on various size targets. In other words, classic ballistics teaches you how to calculate windage and elevation corrections. This book will help you understand what your chances are of hitting a target under certain conditions, and how to improve those chances through training and design.
Practical Examples
Does a low ES/SD really make a difference at long range? Absolutely. In Chapter 6, you can see that reducing muzzle velocity variation from 20 fps Standard Deviation (SD) to 10 fps SD improves hit percentage on a 5″ circle at 500 yards from 83% to 93%.
Ever wonder how much spin drift, Coriolis affect, or using G1 vs. G7 BC’s affect your chances of hitting a target? In Chapter 10 for example, you’ll learn that ignoring spin drift in ballistic calculations reduces hit percentage on a 10″ target from 21% to 15% at 900 yards for a specified environment and cartridge.
The new book is divided into three main sections.

Part 1 focuses on Precision, which explores how hit percentage is related group size. Litz explains the variable that affect group size: muzzle velocity variation, range estimation error, wind estimation error, and inherent rifle precision
Part 2 focuses on Accuracy, which is how well the group is centered around the aim-point. Topics include: leveling your sights, trajectory modeling and secondary effects, calibrating ballistic solutions, and live fire verification.
Part 3 focuses on Weapon Employment Zone (WEZ) analysis. WEZ evaluates firearm effectiveness in terms of hit percentage. The author applies WEZ in the contexts of score shooting, varmint and big game hunting, and tactical shooting. WEZ is also used to compare hit percentage for the 300 Win Mag vs. .338 Lapua Mag.
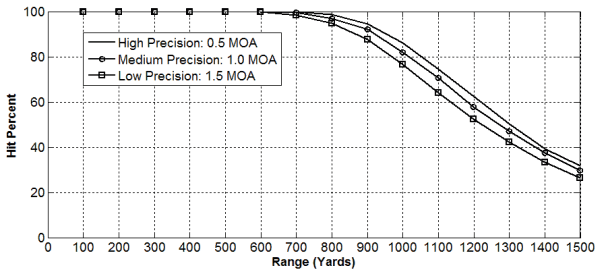
Book is 300-page, Hard-Cover Format
Accuracy and Precision for Long Range Shooting is a 6″x9″ hardcover book with 300 pages, and retails for $34.95. The book is currently at the printers, and should begin shipping by October 15, 2012. In the mean time, you can pre-order and save $5 off the regular $34.95 retail price.
|


