|
|
September 11th, 2007
 The editors of SHOOT! Magazine, have created a new print publication, Junior Shooters, promoting youth participation in hunting and all shooting sports disciplines. The debut issue of Junior Shooters highlights NSSF’s Scholastic Clay Target Program (SCTP) and features articles about smallbore and air rifle, Olympic shooting, and Western Action shooting. This issue includes an in-depth feature on Olympic Champion Kim Rhode who won a Gold Medal in shotgun at age 17. Click Here to download a preview of Junior Shooter’s first issue. SHOOT! Magazine donated 10,000 copies of the issue to NSSF that were distributed at SCTP’s national championships this year. SHOOT! Magazine covers Cowboy Action Shooting (CAS), Cowboy Mounted Shooting, Black Powder Cartridge Silhouette, Cowboy Fast Draw, and all forms of Western-action shooting.
August 4th, 2007
Want to build your own heavy-barrel accurized AR15 Upper? MidwayUSA offers a complete, step-by-step guide to upper assembly on its recently updated website. The 30-page AR15 Upper Assembly Guide (.pdf format) features excellent photos, clear instructions, and a full list of all the parts required–down to the smallest pins and fasteners.

We found it very easy to follow the step-by-step guidelines. Some how-to guides omit important steps, or assume a relatively high degree of gunsmithing experience. That’s not the case here. MidwayUSA’s guide shows you how to select and adjust your tools, and provides expert advice on important tasks that are often glossed over, such as setting the barrel torque: “Seat the Threads (recommended in the U.S. Marine Corps Technical Manual). If you are not using Loctite, make sure you hold onto the Outer Receiver Nut so the gas holes stay in alignment. Torque to 35 ft-lbs. Loosen. Torque to 35 ft-lbs. Loosen. Torque past 35 ft-lbs until gas holes are in alignment, making sure not to exceed 80 lbs.”


The AR15 Assembly Guide is part of the NEW “MidwayUSA Knowledge Center”. The online Knowledge Center combines the Gun-Tec Glossary, How-To Videos, Gunsmith Directory, and indices of Firearm Schematics and Product Information Sheets. There’s a ton of useful information offered in the Knowledge Center, and it’s all for free.
July 27th, 2007
Confused about the meaning of a term such as “meplat”, “magnaflux” or “obturate”? Need to know the OAL of an unusual Wildcat such as the .218 Donaldson Wasp? Well CCI and MidwayUSA offer handy answers on the web. CCI’s Shooters’ Glossary is a very complete collection of gun-related and reloading terms. MidwayUSA’s GunTEC Dictionary contains short descriptions of hundreds of cartridges, plus definitions of thousands of shooting-related words and phrases. How many of you knew that “Maggie’s Drawers” is “a colloquial term used for the red flag once used by pit workers to signal a missed shot at high-power rifle competitions”?

Consulting the dictionary, we learned that “Magnus Force” was not a Tom Selleck TV show. Rather, “Magnus Force is the movement of a bullet in the direction it is rotating (and downward) due to the lower air pressure surrounding it. The low pressure pocket is caused by the effect of the bullet’s fast rotation on the surrounding air.” MidwayUSA’s GunTEC dictionary even includes short “bios” of notable firearms inventors and marksmen, including J.M. Browning, Fredrich von Martini, and Peter Paul Mauser. A serious shooting buff could spend hours browsing the GunTEC dictionary, learning new facts (and a ton of obscure trivia.)
July 21st, 2007

SSG Emil Praslick, USAMU Service Rifle coach, is considered one of the best wind gurus in the United States, if not the world. He has authored an excellent two-part article on wind reading that is available on the CMP (Civilian Marksmanship Program) website. Both articles contain helpful illustrations, and are “must-read” resources for any long-range shooter–not just Service Rifle and Highpower competitors.
Click to Read Articles:
Reading the Wind (Part One) | Reading the Wind (Part Two)
 Part One covers basic principles, tactics, and strategies, with a focus on the 200-yard stages. Emil writes: “There are as many dimensions to ‘wind reading’ as there are stages to High Power competition. Your tactical mindset, or philosophy, must be different for the 200 and 300 yard rapid-fire stages than it would be for the 600 yard slow-fire. In the slow-fire stages you have the ability to adjust windage from shot to shot, utilizing the location of the previous shot as an indicator. Additionally, a change to the existing conditions can be identified and adjusted for prior to shooting the next shot.”
In Part Two, Praslick provides more detailed explanations of the key principles of wind zeros, wind reading, and the “Clock System” for determining wind values: “The Value of the wind is as important as its speed when deciding the proper windage to place on the rifle. A 10 MPH wind from ’12 o-clock’ has No Value, hence it will not effect the flight of the bullet. A 10 MPH wind from ‘3 o’clock’, however, would be classified as Full Value. Failure to correct for a Full Value wind will surely result in a less than desirable result.”

Praslick also explains how to identify and evaluate mirage:
Determine the accuracy of the mirage. Mirage is the reflection of light through layers of air that have different temperatures than the ground. These layers are blown by the wind and can be monitored to detect wind direction and speed.
Focus your scope midway between yourself and the target, this will make mirage appear more prominent. I must emphasize the importance of experience when using mirage as a wind-reading tool. The best way to become proficient in the use of mirage is to correlate its appearance to a known condition. Using this as a baseline, changes in mirage can be equated to changes in the value of the wind. Above all, you must practice this skill!
Click HERE for more excellent instructional articles by Emil Praslick and other USAMU Coaches and shooters.
July 10th, 2007
Many shooters and hand-loaders lack a clear understanding of certain elements of bullet design. While most serious shooters know that Secant and Tangent Ogive bullets are different, many of us would have trouble explaining the precise nature of the difference. Thankfully, Dan Lilja clarifies this and many other bullet design matters in his excellent article, Calculating Bullet Weights. Here’s the straight scoop on bullet ogive differences, in Dan’s words:
“Spitzer bullets all fall into one of several different design types. A bullet’s geometry can be broken down into symmetrical sections. The body (or shank) of the bullet is that part of the bullet that comes into full contact with the barrel rifling. It is the cylindrical portion of the bullet of nominal groove diameter for that caliber. It is also referred to as the Bearing Surface.
The term “Ogive” is commonly used to describe that specific point where the curving part of the bullet nose begins–i.e. where the bearing surface ends and the curved part begins. When we talk about “bearing surface length”, this is the distance from the top of the boattail to the point where the bullet starts to curve.

However, the terms “ogive” or “ogive profile” are also used to describe the entire forward curved section of the bullet, ahead of the bearing surface. The Ogive Profile, or nose of a bullet, can be one of three varieties, two being common*. The ogive can have a tangent radius; that is, the intersection of the body of the bullet and the radius of the ogive blend together at a tangent point. This is the most common type and is typical of most bullets handloaders use. The other common type is the secant ogive. In this case the intersection of the ogive and bullet body does not flow together smoothly. The point of intersection is not tangent, the ogive radius being a secant of the arc circle of the ogive.
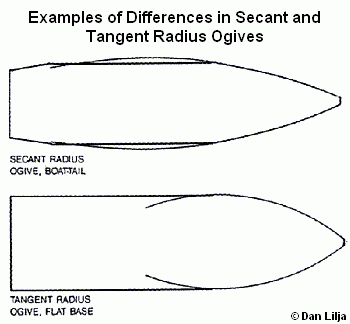
The radius of the ogive is generally given as a multiple of the bullet diameter. For example, a 30-caliber bullet might have a 7-caliber tangent ogive. That is to say that the radius, in inches, is seven times .308 or 2.156 inches. When a bullet is described as “7 Ogive” this is what is meant–the radius of the bullet’s nose section as a multiple of the bullet diameter. (A “7 Ogive” can be any caliber, not just 30 caliber–it is the ratio of the curve radius to diameter that counts).
The point or tip of the ogive is called the Meplat. This can vary in diameter from about .050″ to over 0.125″ for conventional spitzer-type bullets.
The base of the bullet can be either a boattail shape or flat base. If a boattail, its shape is determined by the axial length of the boattail and the angle at which the boattail leaves the body of the bullet.”
*The third bullet nose type is a cone. Cone-shaped bullets are not common with handloaders, but some experimental work is done with them.
June 20th, 2007
The $35.00 RCBS Precision MIC is a well-made and useful tool for measuring cartridge headspace and bullet seating depth. The Precision Mic measures from a datum point on the case shoulder to the base. Unfortunately the Precision MIC is not specifically made for the 6mmBR Norma, 22BR, 6XC or 6.5×47 Lapua cases. Don’t despair. Reader Caduceus has devised a clever way to adapt a .308 Winchester Precision Mic for short cases that match the .308 Win in rim diameter and case body diameter. He simply creates a spacer out of a pistol cartridge. He trimmed a 9mm case to 0.511″ and “found this to be a perfect fit which gave a zero micrometer reading when the FL-sized 6BR case was placed in it.”


 Caduceus explains: “I can use the 308 version of the RCBS Precision Mic to compare brass which has been fully sized in my 6BR body die with brass which has been fired in my chamber. With the spacer inserted, FL-resized cases mic 0.000” at the datum point on the shoulder. Using the same set-up, fire-formed cases measure +0.005”. In other words, my chamber has a headspace of +0.005″ above minimum dimensions. This is fairly typical of a custom rifle set up for switch-barrel use. If I were to FL-resize my brass down to minimum spec each time, this excessive working would shorten its life-cycle and might lead to case head separation. Now that I know the headspace of the chamber, I can substitute the standard shell holder on my press with a Redding +0.004” competition shell-holder. This ensures that my cases only receive 0.001” of shoulder set-back.”
Click HERE for a full article explaining how to adapt an RCBS Precision Mic for use with a 6BR. You can do the same thing with a 6XC or 6.5×47 case–just cut the spacer to a shorter length (for an 0.000″ mic reading). Note: You can also use this procedure with an RCBS .243 Winchester Precision Mic.
June 20th, 2007
On the Guns & Ammo Magazine website, there is a feature article, America’s Rifle: the AR, that AR15 shooters will enjoy. The article contains dozens of links for AR15 components and accessories, including barrels, upper and lower receivers, sights, optics, grips, stocks and more. You’ll find photos of many of the more propular add-ons such as folding stocks, accessory rails, and red dot sights.

For those times when the AR stumbles (yes, it does happen), the article provides a helpful Jam-Clearance procedure. You’ll also find an excellent Trouble-Shooting Guide for the AR’s five most common problems: insufficient extractor tension, loose carrier keys, improper headspace, failure to eject (FTE), and primer issues from hot loads.

If you’re a black rifle shooter, definitely check out this story. It’s worth the read for the extensive product/vendor links alone, not to mention the fix-it tips.
June 16th, 2007
Field Report by Zak Smith
One of the best field-style hike-and-shoot long-range rifle challenges is known only to a small number of shooters. Dave Wheeler has been running his “Steel Safari” match for about ten years on his 1000-acre private ranch near Logan, NM. The match showcases practical rifle shooting in the field. Competitors locate small and medium-sized steel targets (often hidden), range them, and engage with one shot only, under a challenging time limit. Some movement on the clock is required, and shoot positions are always improvised, the best you can do while on a reverse incline, over a rock face, shooting down a gully, or leaning out the side of a truck.

The Steel Safari is a “Hunting Rifle Championship, a non-standard contest that examines practical hunting skills, including target recognition, range estimation, wind doping, trail skills, and marksmanship”, according to the match entry form. (Dr. David Kahn’s Kenyathlon is another well-known “hunting match”.) However, these skills are not limited to hunting. Events such as the Practical Rifle Team Challenge (NM), Int’l Tactical Rifleman Championship (WY), and various Sniper Challenge matches around the country use a similar format. The game involves target location, ranging, and making first-round hits in field conditions, while moving through natural terrain. This is a far cry from Benchrest and NRA Highpower Long-Range events.

Click for Large PHOTO.
Billed as the “last Steel Safari,” this year’s event attracted 26 shooters (from TX to CA) shooting a variety of rifles and calibers. The match defines two classes: standard and light rifle. The light rifles are limited to 9.5 pounds, while the standard rifles can be as heavy as the shooter wants. Caliber must be .243 Win or larger, up to a max of .300 Win Mag.
The match is primarily composed of two, day-long field courses, each between 2 and 2.5 miles in length, termed the “short” and “long” courses. The short course had 11 shooting locations in addition to the first stage on the known-distance (KD) range. The long course had 9 shooting locations plus a 100-yard mover back near Match HQ.
Click HERE to read Zak’s full 2007 Steel Safari match report, with many more photos.
Editor’s Note: Reporter Zak Smith won the 2006 Steel Safari. This year he finished second, shooting his .260 Rem AI AW. Zak notes: “A local Colorado shooter Mike Dowd shot like a house on fire both days, winning light rifle and the over-all match by four points. My decent but consistent shooting on both days put me at first in standard class and second overall.” Though Dave Wheeler has announced he’ll no longer be sponsoring the match, several Colorado shooters hope to run the Safari again in 2008, in association with Colorado Multi-Gun LLC.
June 11th, 2007
Here’s a report from Mike in NZ about his recent deer-hunting trip: “Under the shadow of the Matemateaonga Range in the central North Island of New Zealand there is a magical piece of land. Initially broken in out of native bush in the early 1900’s, it was left to revert during the 1930’s before being partially developed again during the late 1940’s. Now it is run as a hunting block catering for local and overseas hunters.

“Aotearoa”, meaning “long, white cloud”, is the native Maori word for New Zealand.
The country is a rolling contour, and is a mixture of rough pasture, scrubby gullies and native bush. It bounds onto the Wanganui Forest Park, which is thousands of acres of dense bush. The only access is by jet boat up the Whanganui river, or by air. (There’s a flattish piece of land on the property that is quaintly referred to as an ‘airstrip’.)
Large Photos: NZ Mist | Aerial | Morning Light | Taking Off
The area is a hunting paradise containing good numbers of free range red deer, fallow deer, wild pigs and goats. It is run as a privately-owned hunting block. I have been fortunate enough to be able to hunt there over the past six years, and have just come back from a typical meat-hunting trip.

There were six of us (Mike, Mike, Chris, Al, Colin and Jeff), and the idea was to take a couple of meat animals each. Transport was by air (Cessna 206). This is a six-seater (including the pilot), so we elected to do two trips. The first trip caried five of us plus the pilot and a bit of gear. For the second trip the back four seats are removed allowing plenty of room to take lots of gear in, and (more importantly) plenty of room to (hopefully) take meat out at the end of the trip. Beats walking….

Hardware consisted of one Tikka T3 in .223 Rem with a Leupold 3-9 variable, one Rem Model 7 in 7-08 with a similar scope, one Sako Finnbear in .270 Win with a Redfield vari, one .223 Rem Zastava with a cheapo scope, and two scoped No. 4 Enfields in .303 British.
After a 15-minute flight, we made a couple of low passes over the ‘airstrip’ to make sure that everything looked OK (well, as good as it was going to get anyway), and then touched down. There were no baggage handlers or airline hostesses to greet us, so we carried our gear up to the lodge, had a bit of lunch and got organised for an evening hunt.

I headed down to some grass and scrub river terraces that are normally pretty productive. The wind was in my favor, and I opted to drop down to the terraces through the scrub rather than take the track down as that would mean that there would be less chance of being seen from the bottom. I was doing a slow sneak around the bush edge when a red hind appeared grazing around the edge of a finger of scrub at about 100 yards. I slowly sunk down and did a quick little crawl to a handy little rise to use for a rest. As I eased the rifle up onto the rise the deer saw the movement and was instantly on alert.
I was considering a neck shot, but as the deer was on the verge of doing a runner, I played it safe and put the crosshairs straight up the front leg and a bit under half way down. Allowing for the fact that she was slightly facing towards me, I squeezed the trigger, the .223 cracked and the deer trotted about 10 yards and piled up.” Here she is, a New Zealand Red Hind:

There’s more to this story (this was just the first part), and we may have Mike write full a feature story later this year.
© copyright 2007 Michael Falconer, All Rights Reserved.
May 21st, 2007
The Varmint Hunters Assn. (VHA), produces an outstanding print journal, the Varmint Hunter Magazine. Issues run 200 pages or more, and each issue is chock full of 20+ interesting articles. You will find more good reading in one copy of the Varmint Hunter than in three typical newstand “gun” magazines. In its April-June 2007 issue, Varmint Hunter has a feature story on 17-caliber cartridges, “17 Caliber–Redux” by Richard Cundiff. This article covers the history of the “seventeens” and provides descriptions of many of the popular 17 factory and wildcat catridges including: 17 Remington, 17 Mach IV, 17 Ackley Hornet, 17 PPC, 17-222, and 17-223. Author Cundiff even provides suggested load data for most of the featured catridges.
Click HERE to download the 17-Caliber story as an Adobe Acrobat (.pdf) file. And, if you want to read more sample articles from Varmint Hunter Magazine, click this LINK and then click “Sample Articles” that appears on the left menu. You’ll find two dozen articles from the past 8 years.

|


