In June 2020, Hornady introduced the 6mm ARC, a new SAAMI cartridge optimized for AR-platform rifles*. The new 6mm ARC is basically a 6.5 Grendel necked down to 6mm, with the shoulder moved back around .030″. That pushed-back shoulder does reduce case capacity (and velocity), but we assume Hornady did that to create a shorter, proprietary chamber so people could not simply neck-down Lapua 6.5 Grendel brass, as has been done for years with Robert Whitley’s outstanding 6mm AR wildcat.
What Is the 6mm ARC Cartridge? The 6mm ARC cartridge is a new SAAMI-spec cartridge based on the 6.5 Grendel case necked down for 6mm bullets, with the shoulder moved back 0.030. Yes it is designed to run in AR15-platform rifles. You’ll need a new barrel, bolt, and mags. If you already have an AR chambered in 6.5 Grendel, the ONLY thing you need to change is the barrel. Everything else — bolt, magazines, gas system – is compatible with 6mm ARC.
▶ Official SAAMI Cartridge (not wildcat)
▶ Fits standard AR15-platform rifles
▶ Fits Short/Mini action bolt rifles
▶ Efficient short, fat case design
▶ 30-degree case shoulder
What Do I Need To Shoot the 6mm ARC?
Faxon and Ballistic Advantage are already producing barrels, with more manufacturers sure to follow. All the other required components are already on the market for 6.5 Grendel rifles. Aero Precision already offers complete 6mm ARC uppers.
If you’re converting a standard 5.56×45 mm (.223 Rem) AR15 upper to shoot 6mm ARC, you’ll need a 6mm barrel, a Type II 6.5 Grendel bolt carrier group, and new magazines. Some folks have suggested standard AR mags will work, but trust us, you want the magazines that have been designed for 6.5 Grendel. Most of the hardware you need is available at Brownells.
* While 6-6.5 Grendel shooters are known to run stout pressures, the new 6mm ARC cartridge has a relatively moderate Maximum Average Pressure (MAP) rating of 52,000 psi according to the official SAAMI specifications. For a variety of reasons, is wise to keep pressures in a semi-auto rifle moderate. Don’t chase the velocities you might get in a bolt-action gun.
Sierra Bullets has released load data for the 6.5 Grendel, a popular cartridge that works equally well in bolt guns and AR15-platform gas guns. Sierra published comprehensive 6.5 Grendel load data, covering 19 powders and eight (8) different bullets from 85 to 130 grains. NOTE: Hornady-brand brass (see below) was used for Sierra’s 6.5 Grendel tests, not the stronger Lapua 6.5 Grendel brass. Hand-loaders using Lapua 6.5 Grendel brass may need to adjust their loads. Also Winchester WSR primers were used. We imagine most precision hand-loaders will prefer CCI or Federal primers.
Sierra Bullets Tested for 6.5 Grendel Load Data
85gr HP (#1700)
100gr HP (#1710)
107gr HPBT (#1715)
In developing its 6.5 Grendel load data, Sierra tested a very wide selection of propellants, 19 in all. For the 85gr to 100gr varmint bullets, modern powders such as XMR 2230, Power Pro Varmint, and Ramshot TAC offered the best velocity in the 24″ test barrel. For the heavier 120gr to 130gr match bullets, Sierra tested a selection of powders. Highest velocities came with Power Pro Varmint and TAC. If you’re looking for best accuracy, consider the slower burn-rate powders such as IMR 8208 XBR and Varget — but you’ll sacrifice some speed. Overall, Sierra’s latest 6.5 Grendel load data is an excellent addition to the 6.5 Grendel knowledge base. Thanks Sierra!
Here are Sierra’s 6.5 Grendel Load Data Charts for Sierra’s 123gr HPBT, 130gr HPBT, and 130gr TMK. There are a five other tables for lighter-weight Sierra bullets.
History of the 6.5 Grendel Cartridge
The 6.5 Grendel originated as a 6mm PPC necked up to 6.5 mm. After Alexander Arms relinquished the “6.5 Grendel” Trademark, the 6.5 Grendel was standardized as an official SAAMI cartridge. It has become popular with target shooters and hunters alike because it is accurate, efficient, and offers modest recoil. Good for small to medium game, the 6.5 Grendel is available in lightweight hunting rifles, such as the Howa Mini Action Rifle. And the 6.5 Grendel is one of the most accurate cartridges suitable for modern AR-15 platform rifles.
On the Applied Ballistics Facebook Page, there was a fascinating series of posts showing traces of bullets at various speeds from Mach 0.86 to Mach 3.0. At the slowest speed, Mach 0.86, i.e. 962 FPS, there is turbulence behind the bullet, but no clear shockwave. At the highest velocity, Mach 3.0 (3375 FPS at sea level, 68° F), there is a dramatic double nose and tail wave formation.
To learn more, visit TheScienceofAccuracy.com. On that site you’ll find exclusive video content and you can subscribe to member’s only Podcasts. And you can purchase Applied Ballistics books on the Science of Accuracy webstore.
Mach 3.00 Bullet Flight Image
At Mach 3 (3355 FPS) this bullet now has a strong and well established shock wave forming at the tip, and at the base. Unlike the transition through Mach 1.0, nothing really interesting happens to the aerodynamics or shock waves meaning the aerodynamics and stability are: continuous, easy to predict, and model. As you go faster, the shockwaves make a shallower angle because the bullet is moving forward 3X faster than the shock wave is moving away from it. So the shock wave makes an angle that has a rise/run ratio of 1/3.
If a bullet flew within 10 feet of you traveling this fast, it would be about as loud as a 22 magnum. You’d certainly want hearing protection as the energy contained in a Mach 3 shock wave is high! How high…? Well, in 10 yards, this bullet slows from 3355 FPS to 3334 FPS in a time of 0.0090 seconds. The 55 ft-lb of kinetic energy lost during this 10 yards is due to aerodynamic drag on the bullet, which is comprised of wave, base, and skin friction drag components with the majority of the drag being due to shock wave formation. Expending 55 ft-lb of energy in 0.0090 seconds requires a power output of 6111 ft-lb/sec = 11.1 horsepower, most of which goes into creating the shock wave. Remember it’s a 3-D cone that travels great distance, and it gets its energy by stealing velocity from your bullet!
Mach 1.00 Bullet Flight Image
Many shots were fired to capture an image of the transonic shockwave structure at exactly Mach 1.00. With the bullet now moving at the speed of sound, the local airflow on some parts of the bullet exceeds Mach 1.0. Anytime something is moving thru the air faster than the air can get out of the way, you get a compression wave, aka “shock wave”. That’s what’s visible in this image — the areas where the air density changes rapidly (in the compression wave) are visible as near vertical lines and a detached bow wave out front. As the bullet progresses through transonic speed, this shockwave structure develops which has strong effects on the drag (wind sensitivity) and stability of the bullet.
The exact development of the shockwaves and the resulting effects are unique and sensitive to the bullet geometry, and become very difficult to predict through the transition from subsonic (incompressible flow without shock waves) to supersonic (compressible flow with shock waves). Each bullet geometry does this differently which is why it’s difficult to determine transonic stability criteria for bullets of different shapes.
Mach 0.86 Bullet Flight Image
Here’s a bullet at Mach 0.86 (86% the speed of sound, which is 962 FPS at 61° F). As you can see, this 0.86 Mach is not fast enough to make any discernable waves but you can see turbulence in the bullet wake (right side in photo). The beginning of small shock waves can be seen on the bullet tip, and at the bearing surface/boat tail juncture. For the most part, all of the airflow around this bullet is subsonic. You wouldn’t hear a supersonic ‘crack’ from this bullet flying past the observer.
Figure 1. When the bullet is seated farther out of the case, there is more volume available for powder. This enables the cartridge to generate higher muzzle velocity with the same pressure.
Effects Of Cartridge Over All Length (COAL) And Cartridge Base To Ogive (CBTO) – Part 1 by Bryan Litz forBerger Bullets.
Many shooters are not aware of the dramatic effects that bullet seating depth can have on the pressure and velocity generated by a rifle cartridge. Cartridge Overall Length (COAL) is also a variable that can be used to fine-tune accuracy. It’s also an important consideration for rifles that need to feed rounds through a magazine. In this article, we’ll explore the various effects of COAL, and what choices a shooter can make to maximize the effectiveness of their hand loads.
Sporting Arms and Ammunition Manufacturers’ Institute (SAAMI)
Most loading manuals (including the Berger Manual), present loading data according to SAAMI (Sporting Arms and Ammunition Manufacturers’ Institute) standards. SAAMI provides max pressure, COAL and many other specifications for commercial cartridges so that rifle makers, ammo makers, and hand loaders can standardize their products so they all work together. As we’ll see later in this article, these SAAMI standards are in many cases outdated and can dramatically restrict the performance potential of a cartridge.
Bullet seating depth is an important variable in the accuracy equation. In many cases, the SAAMI-specified COAL is shorter than what a hand loader wants to load their rounds to for accuracy purposes. In the case where a hand loader seats the bullets longer than SAAMI specified COAL, there are some internal ballistic effects that take place which are important to understand.
Effects of Seating Depth / COAL on Pressure and Velocity
The primary effect of loading a cartridge long is that it leaves more internal volume inside the cartridge. This extra internal volume has a well known effect; for a given powder charge, there will be less pressure and less velocity produced because of the extra empty space. Another way to look at this is you have to use more powder to achieve the same pressure and velocity when the bullet is seated out long. In fact, the extra powder you can add to a cartridge with the bullet seated long will allow you to achieve greater velocity at the same pressure than a cartridge with a bullet seated short.
When you think about it, it makes good sense. After all, when you seat the bullet out longer and leave more internal case volume for powder, you’re effectively making the cartridge into a bigger cartridge by increasing the size of the combustion chamber. Figure 1 illustrates the extra volume that’s available for powder when the bullet is seated out long.
Before concluding that it’s a good idea to start seating your bullets longer than SAAMI spec length, there are a few things to consider.
Geometry of a Chamber Throat
The chamber in a rifle will have a certain throat length which will dictate how long a bullet can be loaded. The throat is the forward portion of the chamber that has no rifling. The portion of the bullet’s bearing surface that projects out of the case occupies the throat (see Figure 2).
The length of the throat determines how much of the bullet can stick out of the case. When a cartridge is chambered and the bullet encounters the beginning of the rifling, known as the lands, it’s met with hard resistance. This COAL marks the maximum length that a bullet can be seated. When a bullet is seated out to contact the lands, its initial forward motion during ignition is immediately resisted by an engraving force.
Seating a bullet against the lands causes pressures to be elevated noticeably higher than if the bullet were seated just a few thousandths of an inch off the lands.
A very common practice in precision reloading is to establish the COAL for a bullet that’s seated to touch the lands. This is a reference length that the hand loader works from when searching for the optimal seating depth for precision. Many times, the best seating depth is with the bullet touching or very near the lands. However, in some rifles, the best seating depth might be 0.100″ or more off the lands. This is simply a variable the hand loader uses to tune the precision of a rifle.
Shown above is David Tubb, the legendary 11-time National High Power Champion, posing with a very serious rifle used in the Extreme Long Range (ELR) game. David has jumped into the Extreme Long Range discipline in a very big way, producing a .375-caliber, long-barreled ELR version of his famous Tubb rifle, called the Adaptive Target Rifle (ATR). A version of this rifle, piloted by David’s son-in-law Nate Stallter, set an ELR World Record in January 2018. See video below for a full report.
This video shows Team TUBB setting a new ELR World Record of 2011 Yards using the Tubb Adaptive Target Rifle in .375 CheyTac. Nate Stallter nailed three shots at over one mile — 1768 yards. Then Nate broke his own record, going 3 for 3 at 2011 yards. ELR Central hosted this match, held at the Front Sight gun range, Pahrump, Nevada on January 21, 2018.
David Tubb Shoots ELR Adaptive Target Rifle at KO2M
For the Extreme Long Range (ELR) discipline, David Tubb developed a .375-caliber, long-barreled ELR version of his famous Tubb rifle, called the Adaptive Target Rifle (ATR). A version of this rifle, piloted by David’s son-in-law Nate Stallter, set an ELR World Record in January 2018.
David Tubb Talks about KO2M and Extreme Long Range Shooting
David Tubb’s long-range rifles have performed well in Extreme Long Range shooting. AT the 2019 NRA Extreme Long Range Championship, David Tubb won the Heavy Gun Division. In this video, created during the King of 2 Miles (K02M) competition at the Whittington Center in New Mexico, David talks about the challenges of ELR shooting, and cartridge selection. Big, heavy, large-caliber bullets with ultra-high BCs are favored for the ELR game, but recoil and cost must also be considered.
About the .375 CheyTac Cartridge
Some of the most successful ELR cartridges are based on the CheyTac family, including the .375 CheyTac (9.5×77) and .408 CheyTac (10.36 x 77). This .375 Cheytac cartridge has proven to be tough and accurate. And it is capable of winning — our friend Derek Rodgers won the 2017 King of 2 Miles (K02M) event shooting a .375 CheyTac (9.5×77).
Derek Rodgers was the 2017 King of 2 Miles. Derek is also the first-ever human to ever hit the maximum distance target target at 3368 yards (1.91 miles). His cartridge choice? The .375 CheyTac. Derek ran Cutting Edge Bullets in Peterson brass with Hodgdon H50BMG powder.
Q: Why did you choose the .375 CheyTac cartridge?
Derek: When I was asked to join the Applied Ballistics Team, I needed to get an ELR rifle built in a short period of time. I was under a very tight time schedule to get the project complete. In an effort to eliminate variables, I decided to keep things standard and as simple as possible. I chose the .375 CheyTac for the ease of getting components. The larger rifles are more difficult to get components quickly and I felt like the .375 CheyTac had enough attributes to be competitive at ELR distances.
Do you occasionally get completely unexplained flyers, or have a shot land straight down at 6 O’Clock, right below your point of aim? That could be caused by poor or inconsistent trigger technique. How you pull the trigger can and does affect your accuracy.
Many gun enthusiasts start with pistols. When they later start shooting rifles they may carry over some not-so-good practices acquired from shooting handguns with heavy 4 to 6-pound trigger pulls. You may want to “re-learn” your trigger techniques to get better rifle results.
Shooting Sports USA has a good article on trigger technique that offers many useful tips. That article also has many helpful illustrations, including the one shown above. Another illustration shows different types of trigger shoes (straight vs. curved) and explains how each makes a difference: “With a lightly curved trigger, the shooter’s finger can contact the trigger either high or low according to preference. Higher contact will increase the resistance.” READ ARTICLE HERE.
The article analyzes common errors, such as pulling the trigger with the very tip of the finger rather than the pad of the index finger: “Using the tip of the finger can lead to lateral pressure on the trigger, which throws off the shot.”
The article also explains that you should check your trigger regularly to make sure it is functioning properly and is not out of adjustment: “Just like any other moving part, the trigger can suffer from wear. In such a precise mechanism, tiny amounts of wear can cause major problems.”
The ergonomics of the Eliseo Tubegun allow a nice, straight trigger pull.
Trigger Tips
Six Suggestions for Making your Trigger Control More Consistent.
1. If your triggers are adjustable, set the pull weight appropriate to the discipline. For a hunting rifle, you don’t want an ultra-light trigger pull. For High Power, you may want a two-stage pull, while on a Benchrest rifle you may prefer a very light trigger.
2. If you have a two-stage trigger, experiment with different combinations of First Stage and Second Stage.
3. Have a friend watch you as you pull the trigger, and maybe even take a close-up video as you pull the trigger. This can reveal a variety of flaws.
4. Practice dry-firing to see if flaws in trigger technique are causing gun movement.
5. As an experiment, try pulling the trigger with your middle finger. Ergonomically, the middle finger has a more straight alignment with the tendons in your hand. This exercise can help you identify alignment issues with your index finger.
6. For stocks with adjustable Length of Pull you may want to set the LOP differently for bench shooting vs. prone or F-Class shooting.
Available in both single-stage and two-stage, Bix’N Andy triggers are extremely precise, repeatable and smooth. The unique internal, friction-reducing roller ball system allows for extremely low reset force, yielding an ultra-crisp let-off. Bix’N Andy triggers can be fitted with a variety of trigger shoes according to shooter preference.
Bix’N Andy triggers are available for a variety of actions and there are models for various competition disciplines. These triggers start at $210.00. We like the single-stage for benchrest rifles and the two-stage for Palma rifles and hard-hold competition disciplines.
Tomorrow, November 27th, is Thanksgiving. Today and tomorrow a large percentage of Americans will be on the road to visit relatives. We know many of our readers have concealed carry permits or will otherwise be traveling with firearms. When crossing into different states with guns in a vehicle, you need to be mindful of all state and local laws and restrictions.
Five Worst States for Traveling with Firearms
This article appears in the Cheaper Than Dirt Shooter’s Log.
The U.S. is a patchwork of confusing and cumbersome laws that change the rules of what you can carry, where you can carry, and whether you can possess the firearm, ammunition of magazine at without running afoul of the local laws. Now, if every state was like Vermont, law abiding gun owners could freely travel with their firearms with no worries. Unfortunately, many states have a history of being hostile to traveling gun owners.
The federal “Firearms Owner Protection Act” allows travel through any state as long as the firearm is unloaded, in a locked case, and not easily accessible to the passengers. However, that is not to say that certain states that are less friendly to firearms have not created their own laws that would snare unsuspecting otherwise law-abiding firearm owners. This led us to name the Top 5 States to Avoid while traveling with a firearm this holiday season.
CONNECTICUT
Connecticut does not have any gun reciprocity agreements with other states. This means nonresidents are not allowed to carry handguns in Connecticut under a permit issued by another state.
HAWAII
Every person arriving into the state who brings a firearm of any description, usable or not, shall register the firearm within three days of the arrival of the person or the firearm, whichever arrives later, with the chief of police of the county where the person will reside, where their business is, or the person’s place of sojourn. GET Hawaii Firearms INFO HERE.
MASSACHUSETTS
Massachusetts imposes harsh penalties on the mere possession and transport of firearms without a license to carry. Prospective travelers are urged to contact the Massachusetts Firearms Records Bureau at (617) 660-4780 or contact the State Police. GET Massachusetts Firearms INFO HERE.
NEW JERSEY
New Jersey has some of the most restrictive firearms laws in the country. Your firearm must be unloaded, in a locked container, and not accessible in the passenger compartment of the vehicle. The New Jersey Supreme Court ruled that anyone traveling within the state is deemed to be aware of these regulations and will be held strictly accountable for violations. If you’re traveling through New Jersey, you need to comply with state laws on firearm transport, which are very strict. GET New Jersey Firearms INFO HERE provided by a New Jersey legal team.
NEW YORK
Use extreme caution when traveling through New York state with firearms. New York’s general approach is to make the possession of handguns and so-called “assault weapons” illegal. A number of localities, including Albany, Buffalo, New York City, Rochester, Suffolk County, and Yonkers, impose their own requirements on the possession, registration, and transport of firearms. Possession of a handgun within New York City requires a New York City handgun license or a special permit from the city Police Commissioner. This license validates a state license within the city. Even New York state licenses are generally not valid within New York City unless a specific exemption applies. Possession of a shotgun or rifle within New York City requires a permit, which is available to non-residents, and a certificate of registration.
More Scary States for Gun Owners
Here are six other jurisdictions (five states and DC) where you need to be wary when traveling. California, for example, treats all handguns in vehicles as “loaded” if there is ammunition loaded into an attached magazine. It’s wise, when in California, to have handguns unloaded in a LOCKED case, with all ammunition or magazines in a separate section of the vehicle. These states (and DC) all have laws that can trap unsuspecting gun-owners. Be wary.
California
Delaware
Dist. of Columbia
Illinois
Maryland
Rhode Island
If you are evaluating a firearm for self-defense use, you should consider three main factors: Reliability, Functionality (sights, trigger, ergonomics), and Effectiveness (ability to halt/neutralize threats). Regarding effectiveness, you need to consider what happens when the projectiles from your firearm reach the target. That involves penetration and terminal ballistics.
A 12ga shotgun is very effective inside 20 yards, with less risk of over-penetration* vs. a centerfire rifle.
You’ve probably heard the term “Terminal Ballistics”. But do you really know what this refers to? Fundamentally, “Terminal Ballistics” describes the behavior of a projectile as it strikes, enters, and penetrates a target. Terminal Ballistics, then, can be said to describe projectile behavior in a target including the transfer of kinetic energy. Contrast this with “External Ballistics” which, generally speaking, describes and predicts how projectiles travel in flight. One way to look at this is that External Ballistics covers bullet behavior before impact, while terminal ballistics covers bullet behavior after impact.
The study of Terminal Ballistics is important for hunters, because it can predict how pellets, bullets, and slugs can perform on game. This NRA Firearm Science video illustrates Terminal Ballistics basics, defining key terms such as Impact Crater, Temporary Cavity, and Primary Cavity.
External Ballistics, also called “exterior ballistics”, is the part of ballistics that deals with the behavior of a non-powered projectile in flight.
Terminal Ballistics, a sub-field of ballistics, is the study of the behavior and effects of a projectile when it hits its target.
*This Shooting Illustrated article discusses over-penetration risks with a variety of cartridge types. “A bullet passing through a threat and continuing with the potential to cause unintentional damage to a bystander or object is a situation commonly described as over-penetration.”
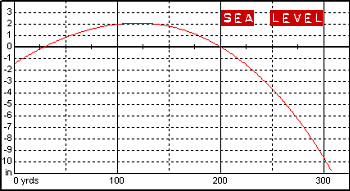
You can do your own experimental calculations using JBM Online Ballistics (free to use). Here is an extreme example, with two printouts (generated with Point Blank software), one showing bullet trajectory at sea level (0′ altitude) and one at 20,000 feet. For demonstration sake, we assigned a low 0.2 BC to the bullet, with a velocity of 3000 fps.
One of our readers asked “What effect does altitude have on the flight of a bullet?” The simplistic answer is that, at higher altitudes, the air is thinner (lower density), so there is less drag on the bullet. This means that the amount of bullet drop is less at any given flight distance from the muzzle. Since the force of gravity is essentially constant on the earth’s surface (for practical purposes), the bullet’s downward acceleration doesn’t change, but a bullet launched at a higher altitude is able to fly slightly farther (in the thinner air) for every increment of downward movement. Effectively, the bullet behaves as if it has a higher ballistic coefficient.
Forum member Milanuk explains that the key factor is not altitude, but rather air pressure. Milanuk writes:
“In basic terms, as your altitude increases, the density of the air the bullet must travel through decreases, thereby reducing the drag on the bullet. Generally, the higher the altitude, the less the bullet will drop. For example, I shoot at a couple ranges here in the Pacific Northwest. Both are at 1000′ ASL or less. I’ll need about 29-30 MOA to get from 100 yard to 1000 yards with a Berger 155gr VLD @ 2960fps. By contrast, in Raton, NM, located at 6600′ ASL, I’ll only need about 24-25 MOA to do the same. That’s a significant difference.
Note that it is the barometric pressure that really matters, not simply the nominal altitude. The barometric pressure will indicate the reduced pressure from a higher altitude, but it will also show you the pressure changes as a front moves in, etc. which can play havoc w/ your calculated come-ups. Most altimeters are simply barometers that read in feet instead of inches of mercury.”
As Milanuk states, it is NOT altitude per se, but the LOCAL barometric pressure (sometimes called “station pressure”) that is key. The two atmospheric conditions that most effect bullet flight are air temperature, and barometric pressure. Normally, humidity has a negligible effect.
It’s important to remember that the barometric pressure reported on the radio (or internet) may be stated as a sea level equivalency. So in Denver (at 6,000 feet amsl), if the local pressure is 24″, the radio will report the barometric pressure to be 30″. If you do high altitude shooting at long range, bring along a Kestrel, or remember to mentally correct the radio station’s pressure, by 1″ per 1,000 feet.”
Do you find that the crosshairs in your scope get blurry after a while, or that you experience eye strain during a match? This is normal, particularly as you get older. Focusing intensely on your target (through the scope or over iron sights) for an extended period of time can cause eye strain. Thankfully, there are things you can do to reduce eye fatigue. For one — breathe deeper to take in more oxygen. Secondly, give your eyes a break between shots, looking away from the scope or sights.
In our Forum there is an interesting thread about vision and eye fatigue. One Forum member observed: “I have noticed recently that if I linger on the target for too long the crosshairs begin to blur and the whole image gradually darkens as if a cloud passed over the sun. I do wear contacts and wonder if that’s the problem. Anyone else experienced this? — Tommy”
Forum members advised Tommy to relax and breath deep. Increase oxygen intake and also move the eyes off the target for a bit. Closing the eyes briefly between shots can also relieve eye strain. Tommy found this improved the situation.
Keith G. noted: “Make sure you are still breathing… [your condition] sounds similar to the symptoms of holding one’s breath.”
Phil H. explained: “Tom — Our eyes are tremendous oxygen hogs. What you are witnessing is caused by lack of oxygen. When this happens, get off the sights, stare at the grass (most people’s eyes find the color green relaxing), breath, then get back on the rifle. Working on your cardio can help immensely. Worked for me when I shot Palma. Those aperture sights were a bear! The better my cardio got the better and longer I could see. Same thing with scopes. Try it!”
Watercam concurred: “+1 on breathing. Take a long slow deep breath, exhale and break shot. Also make sure you take a moment to look at the horizon without looking through rifle or spotting scope once in a while to fight fatigue. Same thing happens when using iron sights.”
Arizona shooter Scott Harris offered this advice: “To some extent, [blurring vision] happens to anyone staring at something for a long time. I try to keep vision crisp by getting the shot off in a timely fashion or close the eyes briefly to refresh them. Also keep moisturized and protect against wind with wrap-around glasses”.
Breathing Better and Relaxing the Eyes Really Worked…
Tommy, the shooter with the eye problem, said his vision improved after he worked on his breathing and gave his eyes a rest between shots: “Thanks guys. These techniques shrunk my group just a bit and every little bit helps.”
Read more tips on reducing eye fatigue in our Forum Thread: That Vision Thing.
To avoid eye fatigue, take your eyes away from the scope between shots, and look at something nearby (or even close your eyes briefly). Also work on your breathing and don’t hold your breath too long — that robs your system of oxygen.


 The 6mm ARC cartridge is a new SAAMI-spec cartridge based on the 6.5 Grendel case necked down for 6mm bullets, with the shoulder moved back 0.030. Yes it is designed to run in AR15-platform rifles. You’ll need a new barrel, bolt, and mags. If you already have an AR chambered in 6.5 Grendel, the ONLY thing you need to change is the barrel. Everything else — bolt, magazines, gas system – is compatible with 6mm ARC.


 Effects Of Cartridge Over All Length (COAL) And Cartridge Base To Ogive (CBTO) – Part 1


 When Only the Best Will Do…


 One of our readers asked “What effect does altitude have on the flight of a bullet?” The simplistic answer is that, at higher altitudes, the air is thinner (lower density), so there is less drag on the bullet. This means that the amount of bullet drop is less at any given flight distance from the muzzle. Since the force of gravity is essentially constant on the earth’s surface (for practical purposes), the bullet’s downward acceleration doesn’t change, but a bullet launched at a higher altitude is able to fly slightly farther (in the thinner air) for every increment of downward movement. Effectively, the bullet behaves as if it has a higher ballistic coefficient.