With our inflationary economy, ammo continues to go up in price every year. Smart shooters can benefit by price-shopping to get the best deals on factory-loaded ammunition, particularly for popular cartridge types such as .22 LR, 9x19mm (9mm Luger), .357 Mag, .223 Rem (5.56×45), and 6.5 Creedmoor. It this article we list 15 reliable online sources for factory-loaded ammo. You may want to bookmark this page so you can quickly scan and price-check multiple vendors. In addition, you can use a service such as AmmoSeek.com.
Why Should You Shop for Ammo Online?
By shopping online for ammo, you can save money, get a wider selection, and get bulk discounts. GunDeals.com explains: “Online purchases [can] save you a lot of money [and can] also save your time… one of the most important advantages is definitively the huge selection.” With online retailers you can quickly compare prices, and you will often get a discount on a large order (300 rounds or more) that is not available in local stores. Note, with some large vendors such as Cabela’s and Sportsman’s Warehouse you can order online then pick up in a local store.
Are There Restrictions on Online Ammo Purchasing?
In most (but not all) U.S. states is it legal to order ammunition online to be shipped to your residence. However, you MUST check your State and local laws and regulations. In some states and/or cities, it is ILLEGAL to purchase ammunition online for shipment across state lines with direct delivery. For example, in California, though there have been legal challenges, all ammo must still be purchased from a licensed ammo dealer/vendor with a state background check (so much for the Second Amendment)*. Likewise Washington DC, and Hawaii do not allow online ammunition purchases. And there are restrictions in New York City. In Alaska there are multiple shipping regulations that impact ammo deliveries from online sales so many vendors do not ship to Alaska.
*In some instances ammo can be purchased online from an out-of-state seller who will then ship to an authorized, in-state California vendor who may transfer the ammo for a fee with background checks as required by CA law.
We’ve found a dozen great discount/rebate programs. These specials can save you big bucks on rifles, pistols, shotguns, ammo, and shooting accessories. Some of these rebates are worth $100 or more. For example you can get up to $350 off a Beretta Long Gun and save $100 on a Franchi Hunting Rifle. And there’s a $200 credit for a SilencerCo Suppressor. Note: Many of these promos are good through the end of December 2025, but some expire at the end of October 2025 — so check the dates.
Do you often load at the range? Or maybe you need to transport loading gear when you travel in your RV. Well here is a smart transport option — a metal box that holds tools, dies, arbor press, case-trimmer, even a ChargeMaster.
Some guys have built their own loading tool-boxes from wood. Other may stuff gear in a couple of plastic range boxes. But clever Chris Covell came up with an even better solution. Chris sourced a handsome, sturdy metal Horse Grooming Box from eBay. Chris reports the multi-feature metal box “works perfectly for reloading. My ChargeMaster is now out of the wind.”
Bullets, Trickler, and Priming Tool on Top
On top, below the hinged metal lid, is a large compartment that holds Covell’s funnels, scales, priming tool, trickler and other vital gear (photo on right). This top compartment is deep enough to handle wide-mouth funnels with no problem.
Slide-Out Drawer with Dividers
Below the top level is a handy sliding drawer with multiple dividers. This is perfect for holding Covell’s inline seating dies, case-neck deburring and chamfering tools, among many other smaller bits and pieces.
In the bottom of the Horse Grooming box is a large compartment that holds bigger gear. In the bottom section, Covell places his RCBS Chargemaster Lite, along with a case-trimming tool, an arbor press, and various other bulky tools. Check it out:
Folks who load at the range need to bring a lot of gear — reloading presses, powder dispensers, scales, funnels, sizing/seating dies, brass prep tools and more. And there may be other important items to transport — such as ammo caddies, LabRadar mounts, over-size rest feet, and even barrel fans. With this metal box you can easily organize (and protect) al that gear. This box was sourced affordably via eBay.
Before you load that new cartridge brass for the first time, run an expander mandrel down the case necks. This will iron out dents and provide more uniform neck tension. Chose a mandrel diameter that provides appropriate neck tension.
Lapua brass is so good that you’ll be tempted to just load and shoot, if you have a “no-turn” chamber. However, some minimal case prep will ensure more uniform neck tension. Keeping your neck tension very uniform allows more consistent bullet seating. That, in turn, usually yields better accuracy, and lower Extreme Spread and Standard Deviation (ES/SD). Lapua brass, particularly 6mmBR, 6.5×47, 6.5 Creedmoor, and .308 Win comes from the factory with tighter-than-optimal necks.
Before you seat bullets, at a minimum, you should inside chamfer the case mouths, after running an expander mandrel down the necks. The expander mandrels from both Sinclair Int’l (Brownells, $14.99 stainless, $24.99 Titanium Nitride coated) and K&M will both leave the necks with enough neck tension (more than .001″) so you can then seat bullets without another operation. We suggest putting a bit of lube on the mandrel before running it down the necks — but remove any lube that gets inside the necks before seating bullets. If you do a lot of loading you may benefit from a Titanium Nitride-coated mandrel.
Both Sinclair and K&M Tools make a die body specifically to hold expander mandrels. The $49.99 Sinclair version fits caliber-specific expander mandrels which measure approximately .001″ less than bullet diameter for each caliber. This is an updated “Gen II” design that completely captures the mandrel within the die so the mandrel cannot pull out. It also has an O-ring in the die cap that allows the mandrel to self-center within the case neck. Brownells offers two sizes of Sinclair die bodies for expander mandrels: .17 -.338 caliber (#749011715 $49.99); and .357 – .50 caliber (#749008843, $49.99). All Generation II dies are machined from stainless steel and the standard diameter 7/8-14 dies include the Sinclair Stainless Steel Split Lock Ring.
Once you run the expander mandrel down the necks of Lapua brass, after you account for brass spring-back, you’ll have about .002″ neck tension*. This will make the process of seating bullets go much more smoothly, and you will also iron out any dents in the case mouths. Once the case mouths are all expanded, and uniformly round, then do your inside neck chamfering/deburring. The same expander mandrels can be used to “neck-up” smaller diameter brass, or prepare brass for neck-turning.
Forum member Mike Crawford adds: “These expanders can also reduce runout from offset seating. Prior to bullet seating, expand the sized necks to force thickness variance outward. With the Sinclair system, the necks will springback fine, and will not be pulled out of center. This leaves plenty of tension, and bullets seated more centered. I do this, even with turned necks, to get improved seating.”
Mandrels vs. Expander Balls on Decapping Rods
If you haven’t acquired an appropriate expander mandrel for your brass, but you DO have a full-length sizing die with an expander ball, this will also function to “iron out” the necks and reduce tension. However, using a die with an expander ball will work the necks more — since you first size them down, then the ball expands them up again. Typically (but not always), run-out is worse when using an expander ball vs. an expander mandrel.
* This .002″ tension is what we have observed with Lapua 6mmBR, 6.5×47, 6.5 Creedmoor, and .308 Win brass. This might vary with much smaller or larger cases, and of course a different brand of brass might yield different results. If you get too little tension with your current mandrel, you can get a smaller-diameter mandrel from 21st Century Innovation, with stainless, Black Nitride, or Titanium nitride versions. The Nitride models have less friction.
In some areas of the country (California in particular), hunters are now forbidden to use bullets that contain lead. If you need a lead-free projectile for your deer rifle, consider Nosler’s E-Tip projectile. This has plenty of penetrating power and retained energy while complying with laws requiring “unleaded” ammunition. An “expansion chamber” behind the green polymer tip helps ensure reliable expansion with 95% weight retention. The video below shows a .30 caliber, 180gr lead-free E-Tip impressively power through TWO 12-inch blocks of Ballistics Gel at 100 yards. This was fired from a .308 Winchester.
Watch 180gr eTip Penetration and Expansion in Ballistic Gelatin:
Nosler claims the E-Tip (“Expansion Tip”) bullet has advantages over other solid copper hunting bullets: “Unlike the competitor’s one-piece designs, Nosler E-Tip bullets will not blow the petals off at extreme velocities nor will the low end expansion ever be questioned, as the minimum impact velocity is set at 1800 fps for standard calibers.” One hunter, posting on Facebook, gave the E-Tip high marks: “I have had the opportunity to take a pig with a 130 gr E-Tip from my .270 and they work flawlessly. My son took two pigs with his .300 Win Mag and 165gr E-Tips and they worked flawlessly as well.”
This video illustrates the design and construction of the Nosler eTip Bullet:
With hunting season in full swing, many folks will be shooting factory hunting ammunition. In setting scope elevation clicks for various distances, it would seem logical to use the velocity listed on the ammo box with your ballistics App or drop chart. But that could be a problem. You SHOULD still chronograph the ammo to determine its true velocity in your rifle. Read on to understand why.
Why You CANNOT Rely on the Muzzle Velocity
Printed on the Ammo Box!
When figuring out your come-ups with a ballistics solver or drop chart it’s “mission critical” to have an accurate muzzle velocity (MV). When shooting factory ammo, it’s tempting to use the manufacturer-provided MV which may be printed on the package. That’s not such a great idea says Bryan Litz of Applied Ballistics. Don’t rely on the MV on the box, Bryan advises — you should take out your chrono and run your own velocity tests. There are a number of reasons why the MV values on ammo packaging may be inaccurate. Below is a discussion of factory ammo MV from the Applied Ballistics Facebook Page.
Five Reasons You Cannot Trust the Velocity on a Box of Ammo:
1. You have no idea about the rifle used for the MV test.
2. You have no idea what atmospheric conditions were during testing, and yes it matters a lot.
3. You have no idea of the SD for the factory ammo, and how the manufacturer derived the MV from that SD. (Marketing plays a role here).
4. You have no idea of the precision and quality of chronograph(s) used for velocity testing.
5. You have no idea if the manufacturer used the raw velocity, or back-calculated the MV. The BC used to back track that data is also unknown.
1. The factory test rifle and your rifle are not the same. Aside from having a different chamber, and possibly barrel length some other things are important too like the barrel twist rate, and how much wear was in the barrel. Was it just recently cleaned, has it ever been cleaned? You simply don’t know anything about the rifle used in testing.
2. Temperature and Humidity conditions may be quite different (than during testing). Temperature has a physical effect on powder, which changes how it burns. Couple this with the fact that different powders can vary in temp-stability quite a bit. You just don’t know what the conditions at the time of testing were. Also a lot of factory ammunition is loaded with powder that is meter friendly. Meter friendly can often times be ball powder, which is less temperature stable than stick powder often times.
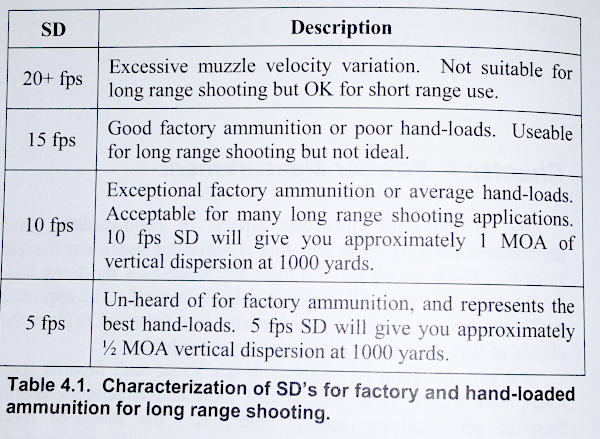
3. The ammo’s Standard Deviation (SD) is unknown. You will often notice that while MV is often listed on ammo packages, Standard Deviation (normally) is not. It is not uncommon for factory ammunition to have an SD of 18 or higher. Sometimes as high as 40+. As such is the nature of metering powder. With marketing in mind, did they pick the high, low, or average end of the SD? We really don’t know. You won’t either until you test it for yourself. For hand-loaded ammo, to be considered around 10 fps or less. Having a high SD is often the nature of metered powder and factory loads. The image below is from Modern Advancements in Long Range Shooting: Volume II.
4. You don’t know how MV was measured. What chronograph system did the manufacturer use, and how did they back track to a muzzle velocity? A chronograph does not measure true velocity at the muzzle; it simply measures velocity at the location it is sitting. So you need to back-calculate the distance from the chrono to the end of the barrel. This calculation requires a semi-accurate BC. So whose BC was used to back track to the muzzle or did the manufacturer even do that? Did they simply print the numbers displayed by the chronograph? What kind of chronograph setup did they use? We know from our Lab Testing that not all chronographs are created equal. Without knowing what chronograph was used, you have no idea the quality of the measurement.
5. The MV data may not be current. Does the manufacturer update that data for every lot? Or is it the same data from years ago? Some manufacturers rarely if ever re-test and update information. Some update it every lot (ABM Ammo is actually tested every single lot for 1% consistency). Without knowing this information, you could be using data for years ago.
CONCLUSION: Never use the printed MV off a box of ammo as anything more than a starting point, there are too many factors to account for. You must always either test for the MV with a chronograph, or use carefully obtained, live fire data. When you are using a Ballistic Solver such as the AB Apps or Devices integrated with AB, you need to know the MV to an accuracy down to 5 fps. The more reliable the MV number, the better your ballistics solutions.
When your cases become hard to extract, or you feel a stiff bolt lift when removing a cartridge, it’s probably time to full-length size your cases, and “bump” the shoulder back. We generally recommend bumping shoulders each time you reload, after the initial fire-forming. Benchrest and F-Class benchrest shooters, running relatively high pressures, typically full-length size every load cycle, bumping the shoulder .001-.003″. High Power shooters with gas guns generally full-length size every time, and may need to bump the shoulders .003″ or more to ensure reliable feeding and extraction.
Use Shims for Precise Control of Shoulder Bump
Some shooters like to set the “default” position for their full-length die to have an “ample” .003″ or .004″ shoulder bump. When they need less bump, a simple way to reduce the amount of shoulder movement is to use precision shims in .001″ (one-thousandth) increments.
Here are reports from Forum members who use the shims:
“Great product. I have my die lock ring(s) adjusted for the shortest headspace length on my multiple chambers 6BRs and 6PPCs. When needing a longer headspace, I just refer to my notes and add the appropriate shim under the lock ring. Keep it simple.” — F.D. Shuster
Mats Johansson writes: “I’ve been using [shims] since Skip Otto (of BR fame) came out with them. I set up my dies with the .006″ shim, giving me the option of bumping the shoulder a bit more when the brass gets old and hardens while still having room to adjust up for zero headspace, should I have missed the original setup by a thou or two. Hunting rounds can easily be bumped an extra .002-.003″ for positive, no-crush feeding. Being a safety-oriented cheapskate, I couldn’t live without them — they let me reload my cases a gazillion times without dangerous web-stretching. Shims are a must-have, as simple as that.” — Mats Johansson
Sinclair Die Shim Kit — Seven Shims for $14.99
Sinclair Int’l (through Brownells) offers a seven-piece set of Sizing Die Shims that let you adjust the height of your die (and thereby the amount of bump and sizing) in precise .001″ increments. Sinclair explains: “Some handloaders will set their die up to achieve maximum sizing and then progressively use Sinclair Die Shims between the lock ring and the press head to move the die away from the shellholder. Doing this allows you to leave the lock ring in the same position. These shims are available in increments of .001″ and work very well.”
Seven Shims from .003″ to .010″
Sinclair’s $14.99 Die Shim Kit (item 22400) includes seven shims in thicknesses of .003, .004, .005, .006, .007, .008, and .010. For ease of use, shim thickness is indicated by the number of notches cut in the outer edge of each shim. Even without looking you can “count” the notches by feel.
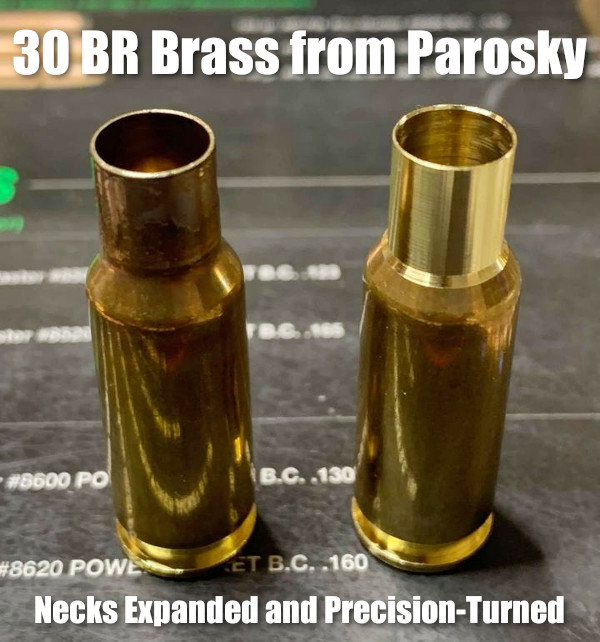
Here’s good news for 30 BR shooters. Paul Parosky, maker of the excellent PRP Custom Bullets, is now offering 30 BR neck-turned brass. This can save you considerable time and effort forming 30 BR cases from Lapua 6mmBR brass. And the neck-turning is superb, again representing time savings (and no tools to buy). You can order this 30 BR brass from PRPbullets.com. If you communicate with the PRP team, Paul may be able to neck-turn to your specific thickness. Paul notes: “Here are necks turned for a 0.330 neck. I’ll try my best to accommodate anyone’s neck dimensions as they wish. Just contact us through our website PRPBullets.com.”
About this Neck-Turning set-up — Paul Parosky notes: “For neck-turning I’m using an old drill press that has been re-worked. The cutter and spindle are all indicated before neck turning to ensure no runout. The RPM is around 520. The lube I use is a mixture of royal and mystery oil.”
Why the 30 BR Dominates 100/200 Benchrest for Score Competition
The 30BR, along with some wildcat variants, remains the dominant cartridge in short-range (100/200) benchrest-for-score competition. The 30BR’s .308″-diameter bullets are larger than the 6mm bullets used by the 6PPC (which rules group BR competition). The bigger 30-Cal diameter has an advantage in touching scoring rings. In addition, the 30 BR is also relatively easy to tune, and barrel life is considerably better than with smaller-caliber benchrest cartridges. For more information, see our AccurateShooter 30 BR Cartridge Guide.
Cases are Expanded, Then Neck-Turned
To produce his 30 BR brass, Parosky first uses a series of expander mandrels. Then he neck-turns with power using a converted drill press. Paul tells us: “This is done the old school way, I use three different tapered expander mandrels, then neck-turn it to the proper neck chamber, then run them up through a FL expander mandrel to ensure necks are straight. Then I clean all the cases.”
Paul Parosky Can Also Neck-Turn 6PPC Brass
Paul Parosky also expands and neck-turns 6PPC cases that are made from parent Lapua .220 Russian cartridge brass. Here, illustrating his 6PPC neck-turning operation, is a Paul Parosky post on the USA Benchrest & Extreme Precision Shooters Facebook page.
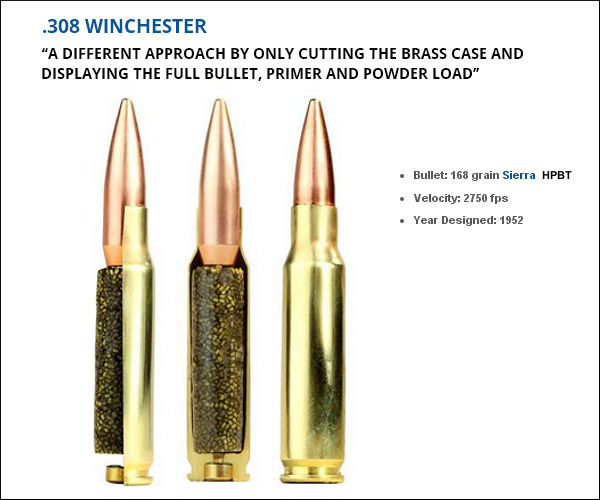
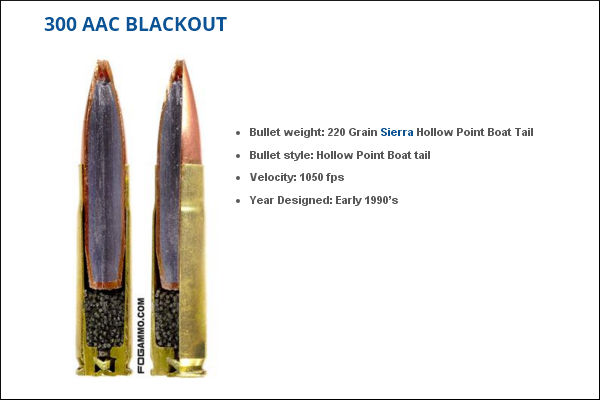
Here’s something you don’t see every day — the inside of loaded cartridges, sliced halfway through. This lets you see how bullet core, jacket, cartridge case, powder, and primer all fit together. Give credit to the folks at FOG Ammunition for creating this interesting series of cut-through ammo images. We show four cartridges here: the .308 Winchester, 9mm Luger, 300 BLK, and .50 BMG. You’ll find two more (the .223 Remington and .45 ACP) on the original FOG Ammo Blog Article.
This .308 Winchester model took on a different approach by only cutting the brass case and displaying the full bullet, primer and powder load. A spec amount of powder was used to create the model powder form. An estimated 10% volume was added during the forming process, along with an undetermined amount of air pockets.
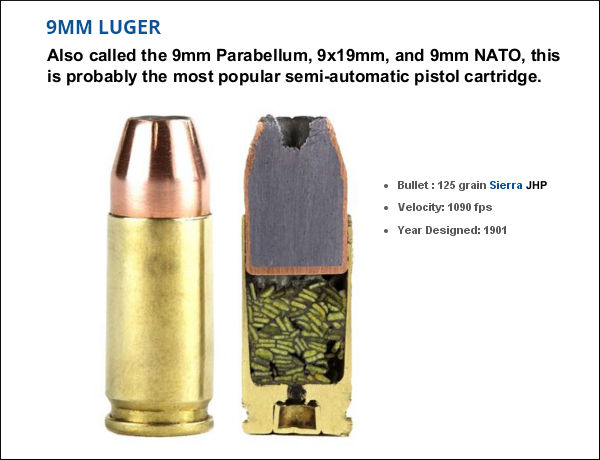
This bisection is a 9mm Luger Jacketed Hollow Point round with flake powder held together with super glue. After this self-defense round was cut by a trained professional the round was polished by hand. This might look like stick powder, but those are in fact flakes stacked up in cross-section. Designed in 1901 by Georg Luger, this popular cartridge is used by civilians, military, and law enforcement.
For this model of the .300 AAC Blackout (aka 300 BLK), a Dremel tool was used to create a pie cut within the bullet and brass case. A measured amount of power, roughly 65% of spec charge, was placed inside the case with super glue. This cartridge was originally optimized for subsonic use with a suppressor, so the amount of powder used is small relative to the nominal case capacity. That leaves more room for the relatively large .30-caliber bullet.
Last but definitely not least is the .50 Caliber BMG round (aka .50 Browning Machine Gun). Famed for its wartime use in the M2 Machine gun, the .50 BMG round is also used in civilian Long Range competitions. A typical .50 BMG cartridge holds over 225 grains of powder. That’s almost ten times the amount in a 5.56×45 NATO Round! To demonstrate the size of the .50 BMG, check out that .223 Rem for comparison.
At the request of our readers, we provide select “Deals of the Week”. Every Sunday afternoon or Monday morning we offer our Best Bargain selections. Here are some of the best deals on firearms, hardware, reloading components, optics, and shooting accessories. Be aware that sale prices are subject to change, and once clearance inventory is sold, it’s gone for good. You snooze you lose.
NOTE: All listed products are for sale to persons 18 years of age or older. No products are intended for use by minors.
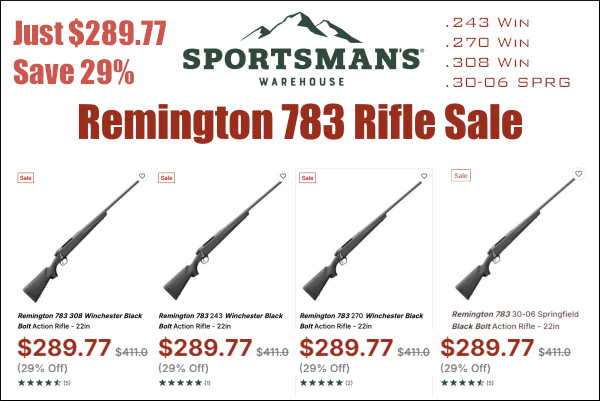
1. Sportsman’s WH — Rem 783 Rifle (Many Calibers), $289.77
⏺️ » Good quality hunting rifles under $300!
It’s hunting season. Here’s an amazing deal on a good Remington hunting rig. The Remington 783 rifle is available in a variety of popular chamberings for just $289.77 at Sportsman’s Warehouse. This modern rifle has a pillar-bedded action, free-floating button-rifled barrel, steel detachable magazine, and modern polymer stock. There are both 22″ and 20″ barrel options. The Rem 783 features Remington’s new user-adjustable Cross Fire trigger system.
2. Precision Reloading — FREE Hazmat On Purchases of $199+
⏺️ » Save $30-$45 with FREE Hazmat through 10/2/2025
When you purchase powder and/or primers, you normally must may the vendor a Hazmat fee of up to $45 per order. But right now Precision Reloading is offering FREE Hazmat on Powder and/or Primer Orders of $199 or More. To get FREE Hazmat use Coupon Code FREEHAZ at checkout. That can save you $30-$45 compared to other online retailers.
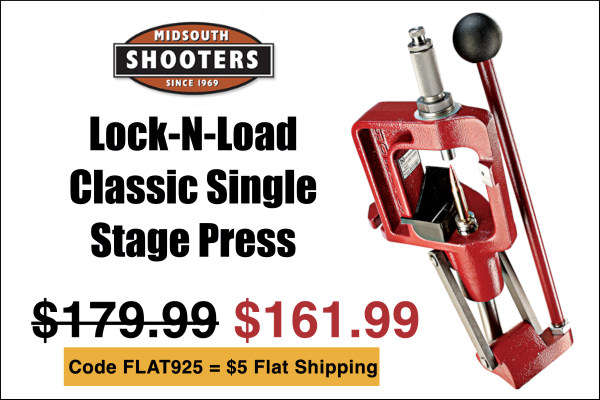
3. Midsouth — Hornady LNL Classic Press, $161.99
⏺️ » Good, strong single-stage press $38 less than elsewhere
The Hornady Lock-N-Load Classic Single-Stage Press is a very good press for loading pistol and rifle rounds. The Lock-N-Load Classic has a strong solid cast frame. The frame front is angled, allowing easier placement and recovery of cartridges. This press also works with Hornady’s Quick Change bushing system to allow rapid die changes. An optional Primer Feed tube system that holds up to 70 primers is available. NOTE: Midsouth is selling this press for just $161.99 — a great deal. This same press sells for $199.97 elsewhere.
4. Midsouth — ELEY .22 LR Rimfire Ammo Sale
⏺️ » Ultra high-quality .22 LR rimfire ammo with big discounts
ELEY .22 LR Rimfire Ammunition is favored by top rimfire shooters in multiple disciplines — Silhouette, Benchrest, Smallbore 3P/Prone, Field Target, NRL22 tactical, Steel Challenge, Biathlon, and Pistol. ELEY offers a wide range of ammo types starting at about $7.40 per box. Right now Midsouth has 14 types of ELEY rimfire ammo on sale including: Target, Ultra, TENEX EPS, Club, Match, Team, Semi-Auto BR Precision, High Velocity, Benchrest Outlaw, Bullseye, Subsonic, TENEX Pistol and more.
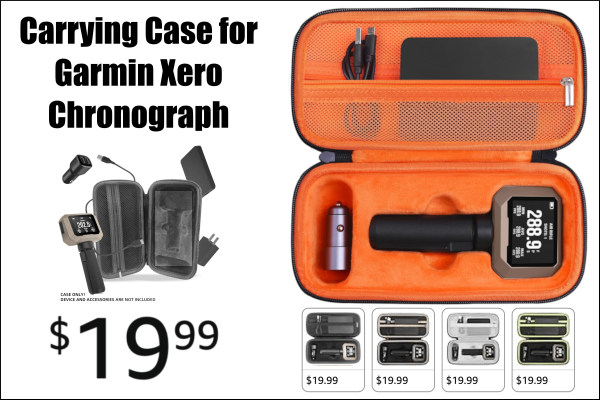
5. Amazon — Carry Case for Garmin Xero C1 Chronograph, $19.99
⏺️ » Handy, quality case for popular Garmin Radar Chronograph
This handy carry case is designed specifically for the Garmin Xero C1 Pro Chronograph. The nicely-padded, waster-resistant case holds the chrono mounted on its tripod, with a zippered compartment above for power cords and accessories. Three different inside colors are offered: Orange (as shown), Black, and Gray. And there are two other black interior versions with contrasting tan or green highlights. This kind of case is a “must-have” for transporting your $599 Garmin Chrono. There is also a smaller $9.99 Garmin Compact Travel Case that just holds the unit and a cord (not the power adapter). Both large and small cases provide protection from scratches, impacts, and everyday wear and tear.
6. Graf & Sons — Hornady Ammo Sale
⏺️ » Large selection of hunting and target ammo at good prices
Graf & Sons is currently running a major sale on Hornady Ammunition for both hunting and target shooting. Hornady Superformance ammo features polymer-tipped Hornady NTX bullets which are accurate and very effective on big game. Hornady’s Superformance ammo works in all action types, including semi‑autos. Along with Superformance ammo, many other ammo types are on sale, including .17 HMR rimfire.
7. Midsouth — Frankford Arsenal Perfect Primer Seater, $62.11
⏺️ » Excellent Primer Seating Tool with very positive user reviews
Amazon has the Frankford Perfect Primer Seater Tool for $62.11 (22% Off). This is a GREAT primer seating tool. It has good feel, plenty of leverage, and the primer tray works well. Importantly, it has a click-adjust wheel for precise primer seating depth control. Read our Frankford Primer Seating Tool Product Review. The tool comes complete with 12 precision shell holders. A quick thumb release system allows you to switch from small to large primers easily. Plus there is a hard stop so you won’t over-crush a primer.
8. Natchez — Federal .223 Rem, 500 Rounds, $199.99
⏺️ » Get 500rds of good .223 Rem ammo for just 40 cents each
Here’s great deal on quality Federal .223 Rem 55gr FMJ American Eagle Ammunition. A 500-round pack is now just $199.99, which works out to just 40 cents per round. American Eagle rifle ammunition offers consistent, accurate, affordable performance for the range. The loads feature quality bullets, reloadable brass cases and dependable primers.
Designed for the smaller heads of youth and women shooters, these Walker’s Slim Passive Earmuffs (#ad) feature a slim profile for comfort and convenience. Lightweight, foldable, and adjustable, these earmuffs are well-suited for female and younger shooters. The $18.02 price is a fantastic deal on good muffs with impressive 27dB Noise Reduction Rating (NRR). These are available in a variety of colors, including Flat Dark Earth (FDE) or Black for $18.02, Olive Green for $18.97, Coral for $20.16, and Teal for $22.53.
As an Amazon affiliate, this site can earn revenues through sales commissions.


 Bullets, Trickler, and Priming Tool on Top


 Both Sinclair and K&M Tools make a die body specifically to hold expander mandrels. The $49.99