Here’s a cool tool for your hand-loaders, particularly if you load large quantities of bulk ammo for a variety of firearms. Lyman’s handy Ammo Checkers check the diameters of reloaded rounds and factory ammo, so you can quickly confirm that your ammo fits a standard chamber. Just drop your loaded rounds in the Ammo Checker, and if the round fits into the gauge, it will fit in the gun’s chamber.
Lyman Ammo Checkers are multi-caliber — each orange block checks six or eight different cartridge types, with each caliber/cartridge name engraved on the gauge. Ammo Checkers are machined to SAAMI minimum chamber dimensions from solid blocks of 6061 T6 aluminum. Ammo Checkers are available in three versions covering most common handgun and rifle calibers:
Handgun Ammo Checker (#7833000) $37.99 on Amazon
Fits: .380 Auto, 9mm Luger, .38 Super, .40 S&W, .45 ACP, .38/357, .44 Spl/Mag, and .45 Colt
Cheaper Multi-Cartridge Pistol Ammo Checker Blocks
There are also some cheaper multi-caliber pistol ammo checker blocks from foreign makers.
Pistol Ammo Checker — Ludex Block, $24.00 on Amazon (Orange)
Fits: .380 Auto, 9mm Luger, .38 Super, .40 S&W, .45 ACP, .38/.357, .44 Mag/Spl, and 45 Colt.
Pistol Ammo Checker — LYHgogo Block, $19.81 on Amazon (Black)
Fits: .380 Auto, 9mm Luger, .38 Super, .40 S&W, .45 ACP, .38/.357, .44 Mag/Spl, and 45 Colt.
Why Use a Case Gauge?
We find that case gauges like the Lyman Ammo Checker are particularly useful for handgun reloaders using progressive presses. The chambers of many popular semi-auto pistols are partly unsupported. This allows the case to swell in the bottom quarter. The case may not be sized adequately by your sizing die, which can lead to misfeeds or malfunctions.
Additionally, if you have loaded a large quantity of ammo for a semi-auto rifle such as an AR15, it’s not a bad idea to check your cartridges before you load them into your magazines. All you need is one mis-sized round to cause a stoppage. That will ruin your day if you are competing in a Service Rifle match or 3-Gun event.
Here’s a very useful product that should please shooters who wet-tumble their brass with stainless media, or use ultrasonic cleaning machines to clean cartridge brass (and gun parts). Employing forced hot air circulation, the Lyman Cyclone Case Dryer will dry a large quantity of brass in under two hours. Internal racks provide five drying levels.
Currently priced at $81.99 at both MidwayUSA and Amazon.com, the Lyman Cyclone Case Dryer is an affordable and effective product for folks who use an ultrasonic or rotary-tumbler brass cleaning system.
The Lyman Cyclone Case Dryer works fast. No need to wait overnight (or longer) to air-dry your brass. Lyman states that “The forced heated air circulation of the Cyclone will dry your brass inside and out within an hour or two, with no unsightly water spots.” The handy individual trays keep different types of brass separate. The dryer can also be used for gun parts that have been ultrasonically cleaned.
Lyman Cyclone Case Dryer Features:
• Holds up to 1000 .223 Rem cases or 2000 9x19mm Luger cases
• Works with cartridge brass cases or gun parts
• Fast drying time — Typically 1 to 2 hours
• Timer control can be set up to 3 hours
• Durable ABS trays with recessed handles
Watch How Cyclone Case Dryer Functions with both Cartridge Brass and Gun Parts
Cyclone Case Dryer 115V (Part #7631560) MSRP: $99.95
Cyclone Case Dryer 220V (Part #7631561) MSRP: $112.00
Put the same load in a variety of barrels (with the same length and chamberings) and you’ll see a wide variance in muzzle velocity. In fact, it’s not unusual to see up to 100 fps difference from one barrel to the next. We demonstrated this with a comparison test of Lapua factory ammo.
Chron Testing Lapua Factory Ammo
At our Southern California test range some years ago, we chronographed Lapua 105gr 6mmBR factory ammo in three different 8-twist barrels of similar length. The results were fascinating. Lapua specs this ammo at 2790 fps, based on Lapua’s testing with its own 26″ test barrel. We observed a speed variance of 67 fps based on tests with three aftermarket barrels.
Barrel Velocity Variance
Brand ‘S’ and Brand ‘PN’ were pre-fit barrels shot on Savage actions. Brand ‘K’ was fitted to a custom action. All test barrels were throated for the 100-108 grain bullets, though there may have been some slight variances in barrel freebore. With a COAL of 2.330″, the rounds were “jumping” to the rifling in all barrels.
Among the four barrels, Brand ‘PN’ was the fastest at 2824 fps average — 67 fps faster than the slowest barrel. Roughly 10 fps can be attributed to the slightly longer length (27″ vs. 26″), but otherwise this particular barrel was simply faster than the rest. (Click Here for results of 6mmBR Barrel Length Velocity Test).
IMPORTANT: Results Are Barrel-Specific, Not Brand-Specific
These tests demonstrate that the exact same load can perform very differently in different barrels. We aren’t publishing the barrel-makers’ names, because it would be wrong to assume that ‘Brand X’ is always going to be faster than ‘Brand Y’ based on test results from a single barrel. In fact, velocities can vary up to 100 fps with two identical-spec barrels from the SAME manufacturer. That’s right, you can have two 8-twist, 26″ barrels, with the same land-groove configuration and contour, from the same manufacturer, and one can be much faster than another.
Don’t Demand More Than Your Barrel Can Deliver
We often hear guys lament, “I don’t get it… how can you guys get 2900 fps with your 6BRs and I can only get 2840?” The answer may simply be that the barrel is slower than average. If you have a slow barrel, you can try using more powder, but there is a good chance it may never run as fast as an inherently fast barrel. You shouldn’t knock yourself out (and over-stress your brass) trying to duplicate the velocities someone else may be getting. You need to work within the limits of your barrel.
Factory Ammo Provides a Benchmark
If you have a .223 Rem, 6mmBR, .243 Win, 6.5×47 Lapua, 6.5 Creedmoor, 6.5×55, .308 Win, .30-06 Springfield, or .338 LM Rifle, we recommend you buy a box of Lapua factory-loaded ammo. This stuff will shoot great (typically around half-MOA), and it can give you a baseline to determine how your barrel stacks up speedwise. [Editor’s NOTE: The original test was conducted in 2008. The velocity of current-production Lapua factory ammo might be higher or lower, so your results may vary.]
When you complete a new 6mmBR rifle, it’s definitely smart to get a box of Lapua factory ammo and chronograph it. That will immediately give you a good idea whether you have a slow, average, or fast barrel. Then you can set your velocity goals accordingly. For example, if the factory 105gr 6BR ammo runs about 2780-2790 fps in your gun, it has an average barrel. If it runs 2820+ in a 26″ barrel (or 2835 fps in a 28″), you’ve got a fast tube.
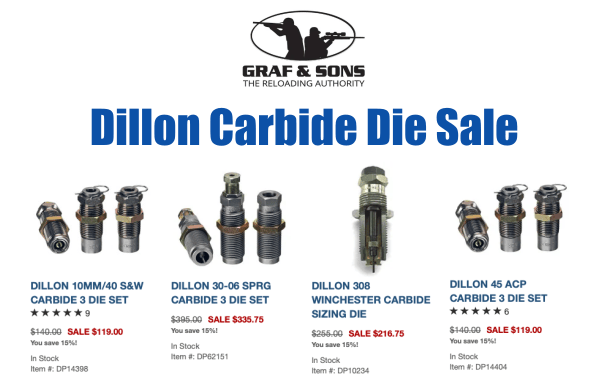
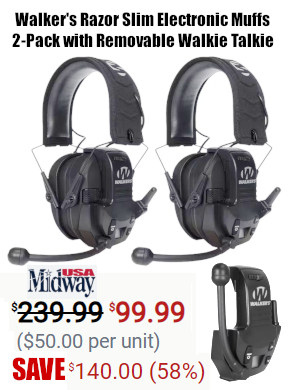
At the request of our readers, we provide select “Deals of the Week”. Every Sunday afternoon or Monday morning we offer our Best Bargain selections. Here are some of the best deals on firearms, hardware, reloading components, optics, and shooting accessories. Be aware that sale prices are subject to change, and once clearance inventory is sold, it’s gone for good. You snooze you lose.
NOTE: All listed products are for sale to persons 18 years of age or older. No products are intended for use by minors.
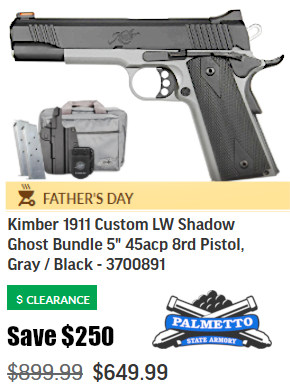
Brownells — June Tools Sale & Father’s Day 10% OFF
⏺️ » Great selection of reloading and shop tools at major discounts
This week Brownells is offering big discounts on a host of popular tools including priming tools, dies, case measurement tools, presses, scales, gauges, gun vises, and more. There are really some great deals right now. Plus, for a limited time, you can save 10% on nearly all Optics products in stock at Brownells with Discount CODE OPTICS10.
MidwayUSA — Hot Deals with Savings up to 75%
⏺️ » Great selection of tools, optics, accessories 25-75% Off MSRP
The 30 BR is an amazing little cartridge. However, 30 BR shooters do have to neck-up 6mmBR or 7mmBR brass and then deal with some issues that can arise from the expansion process. One of our Forum members was concerned about the donut that can form at the new (expanded) neck-shoulder junction. Respected bullet-maker Randy Robinett offers tips on how to deal with the “dreaded donut”.
The Forum member was concerned about thinning the brass if he turned his 30 BR necks after expansion: “Everything I have found on 30 BR case-forming says to simply turn off the bulge at the base of the neck caused by the old 6BR shoulder. I expanded my first case and measured the neck at 0.329″ except on the donut, where it measures 0.335″. Looking inside the case… reveals a groove inside the case under the donut. Now, it is a fact that when I turn that neck and remove the donut, the groove is still going to be there on the inside? That means there is now a thin-spot ring at the base of the neck that is .005 thinner than the rest of the neck. Has anyone experienced a neck cracking on this ring?”
Randy Robinett, who runs BIB Bullet Co., is one of the “founding fathers” of the 30 BR who help prove and popularize the 30 BR for benchrest score shooting. Randy offers this advice on 30 BR case-forming:
While the thinner neck-base was one of our original concerns, unless one cuts too deeply INTO the shoulder, it is not a problem. For my original 30BR chamber, thirty (30) cases were used to fire 6,400 rounds through the barrel. The cases were never annealed, yet there were ZERO case failures, neck separations, or splits. The case-necks were turned for a loaded-round neck diameter of .328″, and, from the beginning, sized with a .324″ neck-bushing.
The best method for avoiding the ‘bulge’ is to fire-form prior to neck-turning (several methods are successfully employed). Cutting too deeply into the shoulder can result in case-neck separations. I have witnessed this, but, with several barrels and thousands to shots fired, have not [personally] experienced it. The last registered BR event fired using that original barrel produced a 500-27x score and a second-place finish. [That’s] not bad for 6K plus shots, at something over 200 firings per case.
Check Out the 30 BR Cartridge Guide on AccurateShooter.com
You’ll find more information on 30 BR Case-forming in our 30 BR Cartridge Guide. Here’s a short excerpt from that page — some tips provided by benchrest for score and HBR shooter Al Nyhus:
30 BR Case-Forming Procedure by Al Nyhus
The 30 BR cartridge is formed by necking-up 6mmBR or 7mmBR brass. You can do this in multiple stages or in one pass. You can use either an expander mandrel (like Joe Entrekin does), or a tapered button in a regular dies. Personally, I use a Redding tapered expander button, part number 16307. This expands the necks from 6mm to .30 cal in one pass. It works well as long as you lube the mandrel and the inside of the necks. I’ve also used the Sinclair expander body with a succession of larger mandrels, but this is a lot more work and the necks stay straighter with the Redding tapered button. This button can be used in any Redding die that has a large enough inside diameter to accept the BR case without any case-to-die contact.
Don’t be concerned about how straight the necks are before firing them the first time. When you whap them with around 50,000 psi, they will straighten out just fine! I recommend not seating the bullets into the lands for the first firing, provided there is an adequate light crush-fit of the case in the chamber. The Lapua cases will shorten from approx. 1.550″ to around 1.520″ after being necked up to 30-caliber I trim to 1.500″ with the (suggested) 1.520 length chambers. I don’t deburr the flash holes or uniform the primer pockets until after the first firing. I use a Ron Hoehn flash hole deburring tool that indexes on the primer pocket, not through
Based on the questions we get on a daily basis on our 800 (Customer Support) line, twist is one of the most misunderstood subjects in the gun field. So let’s look deeper into this mystery and get a better understanding of what twist really means.
When you see the term 1:14″ (1-14) or 1:9″ twist, just exactly what does this mean? A rifle having a 1:14″ twist means the bullet will rotate one complete revolution every fourteen inches of the barrel. Naturally a 1:9″ turns one time every nine inches that it travels down the barrel. Now, here’s something that some people have trouble with. I’ve had calls from shooters thinking that a 1:14″ twist was faster than a 1:9″ because the number was higher with the 1:14″. The easiest way to remember this is the higher the number, the slower the twist rate is.
Now, the biggest misconception is that if a shooter has a .223 with a 1:8″ twist, his rifle won’t stabilize a 55gr bullet or anything lighter. So let’s look at what is required. The longer a bullet is for its diameter, the faster the twist has to be to stabilize it. In the case of the .223 with a 1:8″ twist, this was designed to stabilize 80gr bullets in this diameter. In truth the opposite is true. A 1:8″ will spin a 55gr faster than what is required in order to stabilize that length of bullet. If you have a bullet with good concentricity in its jacket, over-spinning it will not [normally] hurt its accuracy potential. [Editor’s Note: In addition, the faster twist rate will not, normally, decrease velocity significantly. That’s been confirmed by testing done by Bryan Litz’s Applied Ballistics Labs. There may be some minor speed loss.]
Many barrel-makers mark the twist rate and bore dimensions on their barrel blanks.
Think of it like tires on your truck. If you have a new set of tires put on your truck, and they balance them proper at the tire shop, you can drive down a street in town at 35 MPH and they spin perfect. You can get out on the highway and drive 65 MPH and they still spin perfect. A bullet acts the same way.
Once I loaded some 35gr HP bullets in a 22-250 Ackley with a 1:8″ twist. After putting three shots down range, the average velocity was 4584 FPS with an RPM level of 412,560. The group measured .750″ at 100 yards. This is a clear example that it is hard to over-stabilize a good bullet.
Twist-rate illustration by Erik Dahlberg courtesy FireArmsID.com. Krieger barrel photo courtesy GS Arizona.
Want to improve your understanding of Ballistics, Bullet Design, Bullet Pointing, and other shooting-related tech topics? Well here’s a treasure trove of gun expertise. Applied Ballistics offers dozens of FREE tech articles on its website. Curious about Coriolis? — You’ll find answers. Want to understand the difference between G1 and G7 BC? — There’s an article about that.
“Doc” Beech, technical support specialist at Applied Ballistics says these articles can help shooters working with ballistics programs: “One of the biggest issues I have seen is the misunderstanding… about a bullet’s ballistic coefficient (BC) and what it really means. Several papers on ballistic coefficient are available for shooters to review on the website.”
Credit Shooting Sports USA Editor John Parker for finding this great resource. John writes: “Our friends at Applied Ballistics have a real gold mine of articles on the science of accurate shooting on their website. This is a fantastic source for precision shooting information[.] Topics presented are wide-ranging — from ballistic coefficients to bullet analysis.”
Here are six (6) of our favorite Applied Ballistics articles, available for FREE to read online. There are dozens more, all available on the Applied Ballistics Education Webpage. After Clicking link, select Plus (+) Symbol for “White Papers”, then find the article(s) you want in the list. For each selection, then click “Download” in the right column. This will send a PDF version to your device.
Want to see a bullet hit a target in ultra-ultra-slow motion? Watch this video to witness some amazing things — such as a bullet jacket peeling back like a banana-skin (at time-mark 7:30). Some years ago, Werner Mehl of Kurzzeit.com produced a 10-minute video for the SHOT Show. This video has has been watched over 15 million times on YouTube, making it one of the most popular shooting-related videos in history. Employing cameras recording at up to 1,000,000 (one million) frames per second, Mehl’s bullet flight video has been called “astounding” and “mesmerizing”. If you haven’t seen it yet, sit back and enjoy!
Watch This Video! It’s Really Something Special…
Kurzzeit.com Video System
German engineer Werner Mehl developed super-sophisticated camera systems that can record at up to 1,000,000 frames per second. Werner also developed an advanced chronograph system that was the most sophisticated in the world prior to the development of the new-generation compact radar chronographs. Werner has now retired from business, but he was a brilliant engineer and his high-speed cameras were truly amazing.
At the request of our readers, we provide select “Deals of the Week”. Every Sunday afternoon or Monday morning we offer our Best Bargain selections. Here are some of the best deals on firearms, hardware, reloading components, optics, and shooting accessories. Be aware that sale prices are subject to change, and once clearance inventory is sold, it’s gone for good. You snooze you lose.
NOTE: All listed products are for sale to persons 18 years of age or older. No products are intended for use by minors.
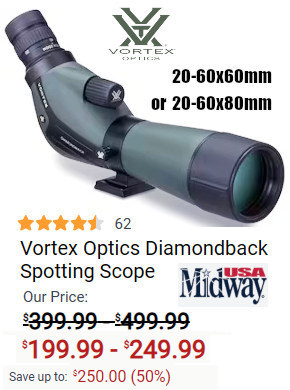
Midway USA — Vortex Optics Sale
⏺️ » Major savings on Vortex scopes, spotters, rangefinders
If you need to upgrade your pistol or rifle with new optics check out the Vortex Optics Sale over at Midway. From red-dots to rifle scopes to spotting scopes there’s something for all your needs at some of the lowest prices we’ve seen this year.
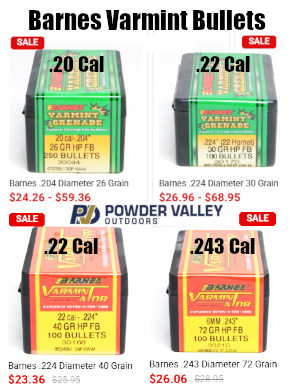
Powder Valley — Vihtavuori Powder Sale
⏺️ » Significant discounts on popular Vihtavuori powders
If you’re looking for powder, check out the Powder Valley Vihtavuori Powder Sale. Right now you’ll find everything from fast pistol powders to slow ELR powders at major savings. The choice of champions in many shooting disciplines, Vihtavuori (VV) powders are also reasonably priced. They are now some of the most cost effective, high-quality, ultra-consistent powders.
As an Amazon affiliate, this site can earn revenues through sales commissions.
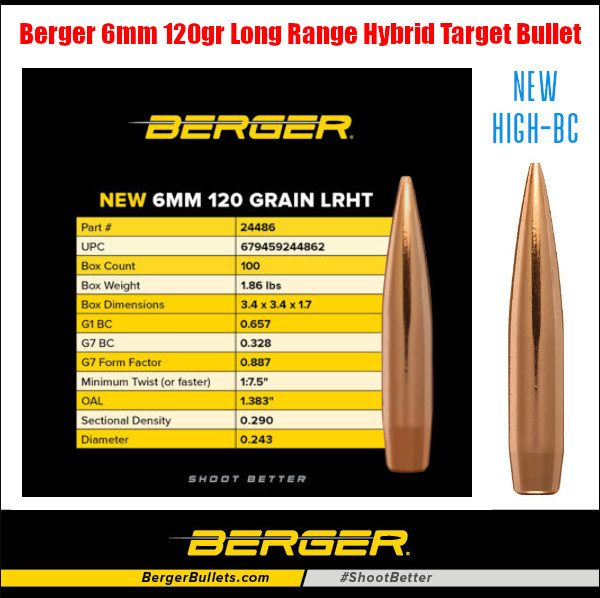
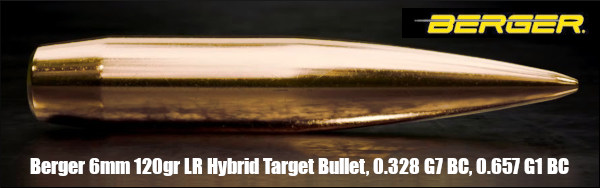
Berger has recently introduced a very impressive new projectile, a 120-grain 6mm (.243) Long Range Hybrid Target (LRHT) bullet, that offers an ultra-high Ballistic Coefficient (BC) along with very impressive accuracy. This new bullet has already proven itself in competition. Read on to learn more about tests of the new 120-grainer by Ultimate Reloader (Gavin Gear) and Applied Ballistics (Bryan Litz). Both those tests, featured in videos below, demonstrated the new 6mm 120gr LRHT bullet is very consistent and has an ultra-high BC. Berger reports these new heaviest-in-class 6mm bullets have “Doppler radar-verified performance with less than 1% BC Standard Deviation.”
Ultimate Reloader Tests New Berger 120gr LRHT 6mm Bullets
Here’s a good video with tests of Berger’s new 120gr 6mm bullet. The test was done with Lapua 6.5×47 brass necked down to 6mm. Ultimate Reloader’s Gavin Gear reports that the bullet proved to be extremely consistent in both weight and max ogive diameter and had a very consistent BC. This means it is relatively easy to find a very accurate load that also exhibits ultra-low ES and SD. The new 120-grainer should prove popular for mid- and long-range benchrest, PRS/NRL, silhouette matches, and 300m competition. Recommended minimum barrel twist rate is 1:7.5″.
Berger 6mm 120 Grain Long Range Hybrid Target bullets are available now in 100-count, 500-count, and new 1500-count Berger Competition Packs.
Bryan Litz Tests New Berger 120gr LRHT 6mm Bullet
Berger’s new 120gr 6mm LRHT bullet was also recently tested by Bryan Litz of Applied Ballistics. Bryan confirmed the new 120-grainer has an extremely high BC and has very consistent weight, dimensions, and BC values. In this video, the Berger .243 cal (6mm) 120 gr Long Range Hybrid Target bullet is tested at 300 yards with Doppler radar to measure ballistic performance, as well as precision. The results are discussed, as well as stability requirements.
Load with 6mm Creedmoor Cartridge:
Peterson small rifle primer brass
CCI-450 small rifle magnum primers
Vihtavuori N565 powder
Berger 6mm 120gr LRHT seated 0.015″ off lands
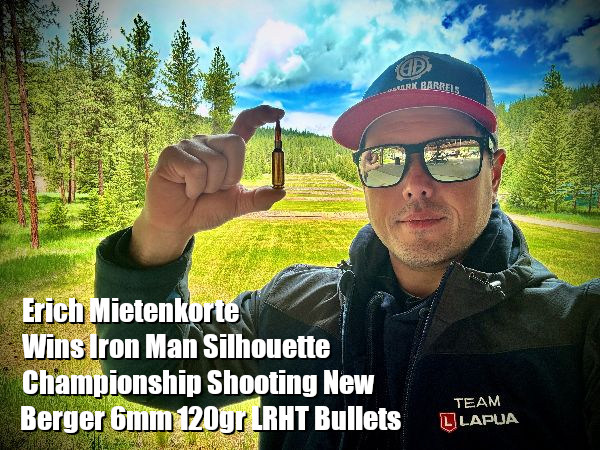
New 6mm Berger Bullet Wins Major Silhouette Championship
How does this new, high-BC 6mm Berger LRHT bullet actually perform in competition? Well the answer is this new 120-grainer in definitely a winner. This new bullet was recently used to win a major national silhouette championship, showing stellar performance.
Berger’s new 6mm 120gr Long Range Hybrid Target (LRHT) bullet was used by Erich Mietenkorte to win the recent 2026 Iron Man Metallic Silhouette Championship. Using the 120gr LRHT, Mietenkorte not only claimed the High Power and Overall Aggregate titles but also tied the all-time Aggregate record and completed the prestigious Bull River Ultra Slam (knocking down 20 consecutive rams).
“Berger’s new 6mm 120gr Long Range Hybrid Target bullets performed exactly how you’d want in a championship,” said Erich Mietenkorte. “Vihtavuori N140 with 120gr LRHTs produced outstanding precision from the start. Five-shot groups at 200 meters averaged 1/4 MOA, and that accuracy held all the way to 500 meters.”
Designed for long-range precision, the Berger 6mm 120 Grain LRHT is heaviest-in-class and offers exceptional performance and features:
Industry-leading 0.328 G7 ballistic coefficient (BC)
Hybrid ogive design for easy tuning and jump tolerance
Meplat Reduction Technology (MRT) for enhanced consistency
Doppler radar-verified performance with less than 1% BC Standard Deviation
About the Iron Man Silhouette Championship
The Iron Man Silhouette Championship lives up to its name. Over the course of the two-day event, competitors fire a grueling 320 shots for record, all from the standing offhand position—two 40-shot Smallbore Rifle matches each morning and two 40-shot High-Power Rifle matches each afternoon. Targets range from 40 to 100 meters for Smallbore (.22 LR) and 200 to 500 meters for High-Power (centerfire).


 Barrel Velocity Variance


 The 30 BR is an amazing little cartridge. However, 30 BR shooters do have to neck-up 6mmBR or 7mmBR brass and then deal with some issues that can arise from the expansion process. One of our Forum members was concerned about the donut that can form at the new (expanded) neck-shoulder junction. Respected bullet-maker Randy Robinett offers tips on how to deal with the “dreaded donut”.