Berger Twist-Rate Stability Calculator
On the Berger Bullets website you’ll find a handy Twist-Rate Stability Calculator that predicts your gyroscopic stability factor (SG) based on mulitiple variables: velocity, bullet length, bullet weight, barrel twist rate, ambient temperature, and altitude. This cool tool tells you if your chosen bullet will really stabilize in your barrel.
How to Use Berger’s Twist Rate Calculator
Using the Twist Rate Calculator is simple. Just enter the bullet DIAMETER (e.g. .264), bullet WEIGHT (in grains), and bullet overall LENGTH (in inches). On its website, Berger conveniently provides this info for all its bullet types. For other brands, we suggest you weigh three examples of your chosen bullet, and also measure the length on three samples. Then use the average weight and length of the three. To calculate bullet stability, simply enter your bullet data (along with observed Muzzle Velocity, outside Temperature, and Altitude) and click “Calculate SG”. Try different twist rate numbers (and recalculate) until you get an SG value of 1.4 (or higher).
Gyroscopic Stability (SG) and Twist Rate
Berger’s Twist Rate Calculator provides a predicted stability value called “SG” (for “Gyroscopic Stability”). This indicates the Gyroscopic Stability applied to the bullet by spin. This number is derived from the basic equation: SG = (rigidity of the spinning mass)/(overturning aerodynamic torque).
If you have an SG under 1.0, your bullet is predicted not to stabilize. If you have between 1.0 and 1.1 SG, your bullet may or may not stabilize. If you have an SG greater than 1.1, your bullet should stabilize under optimal conditions, but stabilization might not be adequate when temperature, altitude, or other variables are less-than-optimal. That’s why Berger normally recommends at least 1.5 SG to get out of the “Marginal Stability” zone.
In his book Applied Ballistics For Long-Range Shooting, 3rd Ed., Bryan Litz (Berger Ballistician) recommends at least a 1.4 SG rating when selecting a barrel twist for a particular bullet. This gives you a safety margin for shooting under various conditions, such as higher or lower altitudes or temperatures.
Story idea from EdLongrange. We welcome reader submissions.
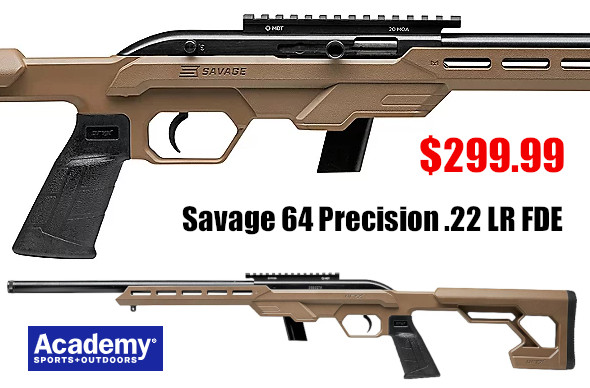
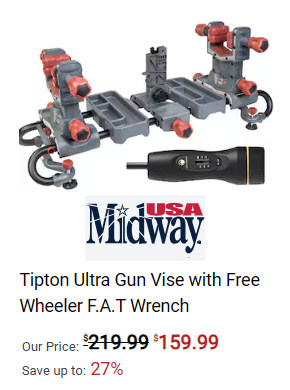
At the request of our readers, we provide select “Deals of the Week”. Every Sunday afternoon or Monday morning we offer our Best Bargain selections. Here are some of the best deals on firearms, hardware, reloading components, optics, and shooting accessories. Be aware that sale prices are subject to change, and once clearance inventory is sold, it’s gone for good. You snooze you lose.
NOTE: All listed products are for sale to persons 18 years of age or older. No products are intended for use by minors.
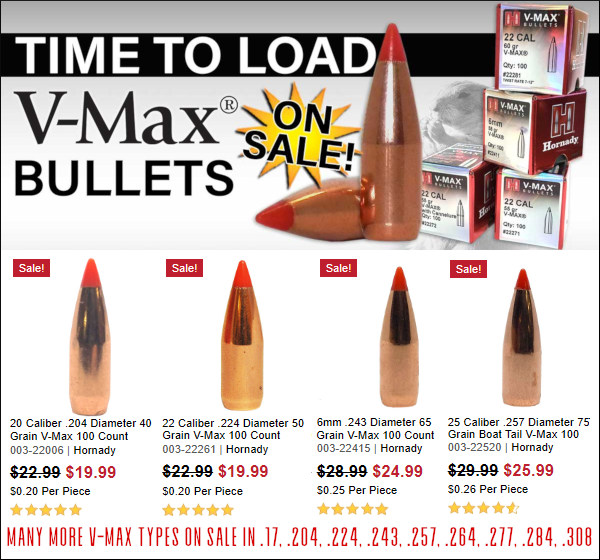
Midsouth — Hornady V-Max Bullet Sale
⏺️ » Superb varmint bullets at major discounts — save 13-14%
Ok varminters, here’s your chance to stock up on some of the best varmint bullets you can buy. Right now at Midsouth, along with the four (4) V-Max types shown above, there are 20+ other Hornady V-Max types on Sale in .17, .204, .224, .243, .257, .264, .277, .284, and .308 calibers. Bullet weights range from a mere 25 grains in .17 caliber, up to 120 grains in 7mm (.284).
Palmetto State Armory — SHOT Show Deals ARs, Pistol, Optics
⏺️ » Save hundreds on quality rifles, handguns, and optics
Currently, Palmetto State Armory is running a major SHOT Show sale. There are dozens of good deals on guns, components, optics, ammo and more. Three notable choices featured above are: Complete PSA M4 PA-15 Carbine for $479.99; SAR9 9mm Pistol for $179.99; Crimson Trace RAD 3 MOA Red Dot for $69.99. That SAR9 pistol is truly a steal at under $180.
As an Amazon affiliate, this site can earn revenues through sales commissions.
UltimateReloader.com offers some of the most thorough firearms and reloading tool tests on the internet. And the Ultimate Reloader YouTube Channel now has over 1300 videos that showcase reloading tools, accurate firearms, precision optics, gunsmithing methods, and top-tier reloading components. For today’s Saturday at the Movies feature, we showcase ten videos created by Gavin Gear and his UltimateReloader team. These videos feature ELR Rifles, Peterson and Lapua brass, a brand new RCBS trimmer system, BAT actions, a handsome 6x47L Custom Rifle, the Athlon Rangecraft Chronograph, and Ultimate Reloader’s impressive new RifleBuilderPro Software System. Enjoy this Saturday Video Showcase.
Extreme Long Range — One Mile Shooting
In this video, Gavin meets with Paul Phillips, an ELR “King of Two Miles” past Champion. Paul explains the features in his .375-caliber rifle designed to shoot to one mile and beyond. Along with a big action to hold the very long cartridge, an ELR rifle needs a special high-angle optics rail to allow the needed elevation. In addition, a long-wheelbase chassis is optimal for greater stability and balance. Recoil is very significant so Paul’s rifle boasts a massive 6-port muzzle brake on the very long barrel (ELR barrels can run 34-36″). For his projectiles, Paul is running Berger’s impressive new 410gr .375 caliber Hybrid Target Bullet (6:25 time-mark).
Peterson Cartridge — How High-Quality Brass is Crafted
Ever wondered how modern, top-quality rifle brass is made? Then watch this informative video from start to finish. It shows how the brass cases are drawn (lengthened) in stages, how the primer pockets and rims are formed, how the shoulders and case necks are crafted, and then how the brass cases are machine-annealed for consistent strength and neck tension.
6x47L Rifle Build with BAT Action & Woox Furiosa Ultra Chassis
Gavin Gear has completed many impressive custom rifles. This handsome rifle is one of Gavin’s best efforts. Chambered for the 6-6.5×47 Lapua wildcat cartridge (aka 6x47L), this rifle has show great accuracy. It boast a handsome black BAT Hammerhead action and a wood/metal composite WOOX Furiosa Ultra chassis. This high-tech hybrid stock/chassis combines wood sections over a full-length, aerospace-grade aluminum skeleton chassis, giving it the “feel” of a wood stock with the strength and stability of a metal stock. Gavin likes the way the stock feels on the trigger hand in particular and the smooth wood cheekpiece is also very nice. Made in Italy, the Furiosa is offered in three versions all with wood sections on the forearm, grip area, and cheekpiece. Choose natural Walnut Brown, Micarta Black, or Midnight Grey.
NEW RCBS MatchMaster Precision Case Trimmer System
At SHOT Show 2026, RCBS introduced the new MatchMaster Precision Case Trimmer system. Developed with Henderson Precision, this is a high-speed, motorized system that trims, deburrs, and chamfers .22 to .30 caliber brass in one step. With a $699.99 MSRP, the MatchMaster trimmer features a 3-way carbide cutter, micrometer adjustment for 0.001″ accuracy, and a brass shavings catcher. It is designed for high-volume reloaders, offering fast, consistent, and automatic case prep. In this video, Gavin shows the features of this new RCBS power tool.
BAT Actions — Insider Look at Manufacturing
Full Story:https://bit.ly/3hD2d11 BAT Machine Co. makes some of the finest custom actions you can buy. Numerous national and world records have been set with BAT actions. To create this 31-minute video, Gavin traveled to Idaho to visit the BAT Machine production center in Post Falls, ID. Gavin talked with BAT’s founder Bruce Thom. The video features extensive footage of advanced CNC machines used to produce the superb BAT actions.
New 6GT Cartridge Brass from Lapua
It’s great that Lapua is now offering 6GT brass. Developed by George Gardner of G.A. Precision and Tom Jacobs of Vapor Trail Bullets, the 6GT was designed to have the efficiency of a 6mm Dasher without the need for case forming. It was also designed with a longer case body so it feeds better from magazines.
Even with the added capacity, the 6GT is still very efficient, and can achieve good velocities with less powder than a 6mm Creedmoor. With outstanding brass now being offered by Lapua, the 6GT becomes a very good choice for PRS/NRL competition, and even mid-range F-class competition. It’s longer than a Dasher case so it runs better in magazines, but it’s still more efficient than a 6mm Creedmoor or .243 Win.
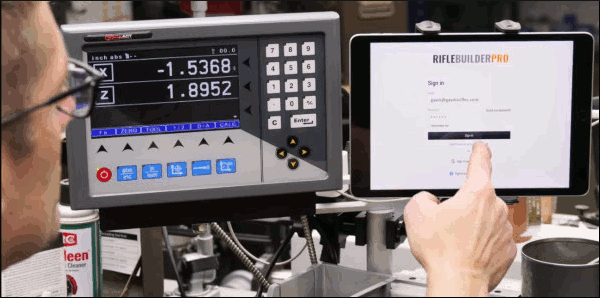
RifleBuilderPro Gunsmithing Program Unveiled
At SHOT Show 2026 Gavin Gear introduced an impressive new software/info system for gunsmiths and gun-building operations. Rifle Builder Pro provides key specifications and data for smithing operations. But it is more than just about machine controls — Rifle Builder PRO will be a subscription-based companion and digital reference library for Precision Rifle Gunsmiths, designed to help them achieve great results in less time. Subscribers will also automatically join an online community full of exclusive resources and support to improve their craft.
Rifle Builder PRO is currently targeted towards precision rifle gunsmiths working on bolt-action rifles but there are expansion plans to include additional types of rifle gunsmithing. At this time Rifle Builder Pro is still in development with a public Beta coming later this year. Sign up for email updates at RifleBuilderPro.com.
Athlon RangeCraft Chronograph (Two Videos)
Athlon’s Rangecraft Velocity PRO Doppler Radar Chronograph is a genuine rival to the popular Garmin. These two UltimateReloader vidoes cover the AThlon’s features, specs, and hardware. Then the video covers the testing process. The new Athlon Rangecraft Velocity Pro Radar Chronograph is an impressive and very affordable compact chrono, selling for $399.99 at most vendors. This employs Doppler radar allowing ultra-accurate velocity readings. Since the unit isn’t triggered by a muzzle blast, it can work with suppressors, muzzle brakes, and other muzzle devices.
The Rangecraft Vel Pro reads velocities between 65 FPS and 5000 FPS. So far field tests have shown that the Athlon Rangecraft chrono is reliable and picks up all shots fired with all types of rifles and pistols (even airguns). However the listed velocities may be a few FPS different than a Magnetospeed or Labradar. The unit includes a compact tripod.
BONUS: .223 Rem vs. 5.56x45mm — Ultimate Reloader’s Most Popular Video EVER with 7.8 Million Views
This video explains essential facts and corrects common misconceptions related to both .223/5.56 ammunition, as well as .223/5.56 rifles. Gavin provides insight on chamber specs, pressure levels, barrel twist rates, military 5.56 crimped brass, and other important topics. If you are new to the AR world, this video is definitely worth watching. And that’s why it now has garnered over 7.7 MILLION YouTube views, making it one of the most popular gun-related videos ever. Full Story:CLICK HERE for full written analysis of .223 Rem vs. 5.56x45mm with graphs and data.
“22 Plinkster” is an avid shooter who has produced a number of entertaining videos for his YouTube Channel. In the video below, he tackles the question “Why Do Misfires Occur in .22 LR Rimfire Ammunition?” This is the most common question posed to 22 Plinkster by his many viewers. He identifies four main issues that can cause .22 LR misfires or faulty ignition:
1. Damaged Firing Pin — The dry firing process can actually blunt or shorten the firing pin, particularly with older rimfire firearms. Use of snap caps is recommended.
2. Poor Ammunition — Some cheap brands have poor quality control. 22 Plinkster recommends using ammo from a manufacturer with high quality control standards, such as CCI and Federal.
3. Age of Ammunition — Rimfire ammo can function well for a decade or more. However the “shelf life” of rimfire ammunition is not infinite. You ammo’s “lifespan” will be shortened by heat, moisture, and humidity. You should store your rimfire ammo in a cool, dry place.
4. Mishandling of Ammunition — Tossing around ammunition can cause problems. Rough handling can cause the priming compound to be dislodged from the rim. This causes misfires.
Preventing misfires is essential if you want to succeed in NRL22 competition and other rimfire competition disciplines run “on the clock”.
The Making of MatchKings — How Sierra Produces SMKs
All Sierra bullets begin life as a strip of gilding metal, an alloy consisting of 95% copper and 5% zinc. To meet Sierra’s strict quality requirements, the gilding metal requires three times more dimensional and quality control standards than is considered standard in the copper manufacturing industry.
A blanking press stamps out a uniform disc and forms the cup that will be drawn into the MatchKing jacket. The cup is then polished and sent to a draw press to be drawn into a jacket that is longer than needed for the future MatchKing, thus allowing for the trim process. Press operators constantly check concentricity to ensures jacket quality. The jackets then go to a trimmer where they are visually inspected again.
After being polished a second time, the jacket travels to the bullet press. In the meantime, 80-pound lead billets are being extruded into lead wire for the cores where great care is taken so that the core wire is not stretched. The core wire is lightly oiled before continuing to the bullet press to be swaged.
The lead core wire and trimmed jacket meet at the bullet press where the first stage forms a boattail on the jacket. The lead core is then formed on top of the bullet press and fed down into the jacket. In one stroke of the press, the MatchKing is formed.
Quality control technicians pull samples from each lot of MatchKings to make sure they meet Sierra’s stringent standards. Samples are then sent to Sierra’s 300-meter underground test range (shown below) to be shot for accuracy on mechanical mounts referred to as “unrestricted return to battery rests” that Sierra designed and built in-house.
After inspection, the bullets are placed in the familiar green box along with reloading labels. They are then shrink-wrapped and shipped all over the world.
Most folks would be very impressed with a centerfire rifle that can shoot a quarter-inch group at 100 yards. But to do that with a rimfire rifle, shooting little .22 LR cartridges, that’s quite an accomplishment. Today’s Sunday GunDay story spotlights a superbly accurate new .22 LR Benchrest gun belonging to Forum member Dave Way. This rimfire tack-driver was crafted by respected gunsmith Alex Wheeler of Wheeler Accuracy. Check out this five-shot group Dave shot once he had figured out his optimal tuner position. That is mighty impressive for a rimfire rifle!
A sub-quarter-MOA group at 100 yards is impressive for a centerfire rifle. But for a rimfire rifle, it is truly stunning. Check it out — this rifle hammers!
I tested three lots of Lapua Super Long Range today. This lot looked really good so I bought a case. It’s a blast shooting this rifle over wind flags. It’s amazing how little wind it takes to move the bullet at 100 yards. I was having to hold off today to finish up groups. That’s when it’s the most fun. — Dave Way
Dave posted in our Shooters’ Forum: “To say I was impressed with the quality of the action and the accuracy of the rifle would be an understatement. I shot five different lots of Lapua Midas, Lapua Long Range, and Lapua Super Long Range ammunition. At 50 yards all the groups were pretty tight. I was shooting in some wind, using flags. One lot seemed to stand out so I put a target at 100 yards and shot three rounds in it as aiming points. I shot three five shot groups with the last 15 rounds of that lot that I had with me. All three groups were under 1/2″ and they were getting tighter as I moved the tuner!”
Above are initial 100-yard, 5-shot groups Dave Way shot with his rifle, while experimenting with different tuner positions. The largest group (on left) was a 0.416″, while the smallest (on right) was 0.296″. The average of the three groups was a stellar 0.369″ (0.352 MOA).
Dave Way treasures this rifle and praised Alex Wheeler’s skills as a gunsmith: “I have never received a rifle from Alex that didn’t shoot incredibly well and this one is no exception. I’m just getting into the .22 world so I don’t know if this is good, great, or excellent accuracy but it seems pretty accurate to me.”
Lot Testing and Tuner Experimentation Pays Off
Here are some initial groups Dave Way shot during initial ammo testing. They are all under half-inch at 100 yards. That’s pretty impressive — but read on. When Dave optimized his tuner position and found a great lot of Lapua Super Long Range .22 LR ammo — his groups got even smaller. Dave notes: “They could have been better but I was just getting used to the trigger and everything.”
Here are a series of three-shot, 50-yard groups. You can see this rifle is quite consistent. This is with five different lots of Lapua .22 LR ammunition.
Lot Testing with Lapua Ammo — Three-Shot Groups at 50 Yards
Rifle Components
Holeshot 2500X Right Bolt, Left Port Action
Muller Works 1:16″-twist, 8-groove Barrel
Holeshot Barrel Tuner
Bix-N-Andy Trigger
Holeshot 2500X actions and Holeshot tuners are now produced and sold by Precision Quest Products.
Have questions about this ultra-accurate rig? You can discuss this Wheeler-built rimfire rifle in a current AccurateShooter Forum Thread.
Three 50-Yard Groups, All Under 0.180″ — That’s Consistency!
With the right ammo, this rig is wicked accurate. Here are three groups shot at 50 yards one after another. Dave shot these three 5-shot groups consecutively while optimizing his tuner: “Working with tuner the last two trips to the range. [It was] very consistent and pretty tight at tuner setting 162. Here are three consecutive 50-yard groups (5 shots each).” The biggest group (at bottom) measured 0.175″ (0.334 MOA), while the smallest group (middle) was a stellar 0.154″ (0.294 MOA) — that’s mighty impressive!
Alex Wheeler Crafted His Own Superb Rimfire Rifle First
Gunsmith Alex Wheeler of Wheeler Accuracy has, over the years, concentrated on ultra-accurate mid-range and long-range centerfire benchrest rifles, along with some stellar long-range hunting rifles. But Alex has started to venture into rimfire shooting. Prior to building the Dave Way rimfire rifle featured here, Alex built a “sister rifle” for himself with similar components. That gun turned out so well that Dave asked Alex to build another. And, as you can see, Dave’s new Wheeler-built rimfire rifle turned out to be a true tack-driver.
Alex credits Dave’s shooting skills: “I don’t think its possible for anyone to send a rifle to Dave that doesn’t shoot. He just has a knack for it. I’m glad I got into the rimfire stuff. I don’t have any interest in rimfire competition but it’s taught me a lot about bench manners and I get a lot more trigger time. It’s a great tool to learn wind flags with as well. It should make me a better centerfire shooter. That was really why I built mine. I normally sell every gun I build eventually and Dave was going to get mine but I said you should start gathering parts, I think I’m keeping this one!”
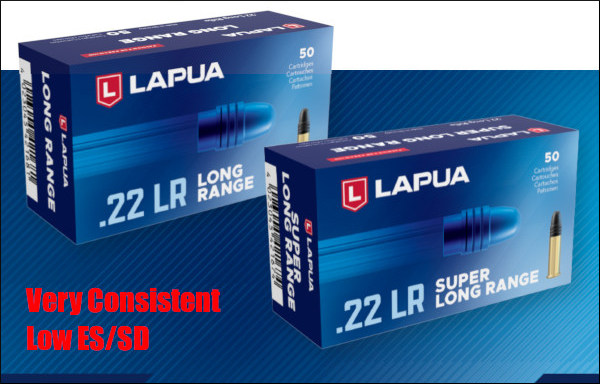
Lapua Long Range and Super Long Range .22 LR Ammunition
Dave Way had great results with his Lapua .22 LR ammo. Lapua Long Range and Super Long Range ammunition comes from Finland, and is designed for the growing long-range rimfire disciplines with targets at 100-300 yards. This ammo delivers very low ES and SD numbers. Our friend F-Class John tested this ammo and confirmed it performs very well (SEE Test Video).
Capstone’s Marketing Director, Geoff Esterline, explains: “Each production lot of Lapua’s [LR and Super LR] are test-fired in 50-round groups for dispersion. The results determine whether it makes Super Long Range or Long Range packaging.”
Need a top-notch Ballistics App for your iPhone or iPad? Start with Ballistic: Advanced Edition (AE), the number 1 (i.e. most installed) App for iOS systems (iPhones and iPads). Ballistics AE (Advanced Edition) is the most popular iOS ballistics program for many good reasons. It offers a full feature set with Ballistic Solver, Ballistic Comparison (with up to 8 projectiles), Target Log (records group sizes), Advanced WindKit, and more. The Ballistic: Advanced Edition software is easy to use, with nice controls. Underneath it all is the proven JBM Ballistics calculator. And here’s the kicker — this excellent mobile App software is now FREE to download and install on iPhones and iPads!
This Video Explains How to Set Up and Use Ballistic: Advanced Edition
Full-featured and easy to use, Ballistics AE has been refined over many years, and it supplies rock-solid solutions derived from JBM Ballistics solver (created by James B. Millard). Unlike some other Apps, Ballistics AE is STABLE on iPhones (with various OS levels). What’s cool is that Ballistics AE is now available for FREE for both iPhones and iPads. This software is now provided by Federal Premium Ammunition, with in-App purchase functionality.
We’ve used the Ballistic: Advanced Edition program on an iPhone 5S, iPhone 6, and iPad, and it performed well. Here are some of the features we liked:
1. Mirrors output from online version of JBM Ballistics we often use for initial calculations.
2. Controls are simple to use and (mostly) intuitive.
3. Handy comparison feature lets you compare ballistics for different projectiles side by side.
4. Advanced Wind Kit allows you to account for complex wind situations.
5. Projectile and BC Databases are very comprehensive.
6. Software is regularly updated to match Apple OS changes.
This article is Copyright 2025 AccurateShooter.com. No republication is authorized. Any appearance of this story on another site obliges that site to pay liquidated damages and/or licensing fees.
This article is part of Sinclair Int’l Step-By-Step Reloading Series. Most of the products mentioned in this article are sold through Brownells.com.
by Roy Hill, Brownells/Sinclair Copywriter
Making your own precision handloads is a meticulous journey with many steps, many important matters to consider, and many sets of measurements to calculate. For those who pursue the perfect group, the highest score, the really long accurate shot, the rewards more than outweigh the effort. Choosing the right cases, deburring the flash holes, making the primer pockets uniform, trimming the cases, and lubricating them are all familiar – and critical – steps along the journey. And now that your brass preparation is complete, you are at last ready to start running the cases through your press and fill them with primers, powder, and bullets. The very first die the brass encounters is the sizing die. You insert the case, work the press’s lever to return the case to its correct pre-fired dimensions – and the journey continues.
There are three types of sizing dies to think about: neck, full-length, and small base. All three have specific benefits and potential drawbacks, and you should choose the type of die you use by thinking very carefully about what kind of shooting you plan to do with your handloads. No matter which type you select, most sizing dies will also punch out the old spent primer with some sort of decapper assembly that uses a hardened steel rod. Many types of sizing dies use an expander ball inside the die to make sure the neck of the case will accommodate a bullet after being sized. With some size dies, the expanders are easily removable and interchangeable, letting you get exactly the neck tension you want. When sizing cases (neck of full-length), rifle cases always need lube.
Neck-Sizing Dies Neck-sizing dies resize only the neck of the case. The benefit of sizing only the neck is that the brass is “worked” very little, reducing the amount of changes to the brss. [We recommend full-length sizing for all applications after the first couple of firings, and semi-auto brass should be full-length sized every time!] Sinclair recommends that neck-sized-only cartridges should not be used any in other rifle besides the one they were originally fired from [unless they are also FL-sized], or in any action other than a bolt-action.
Full-Length Sizing Dies
Full-length sizing dies resize the full length of the case, not just the neck. Full-length sizing helps create handloads that will function in any rifle, not just the one from which the cases were originally fired. The potential downside of full-length sizing is that it may shorten case life because it works the brass more than neck sizing. But it’s possible to “tune” today’s full-length sizing dies so they barely work the brass at all, as this article by Sinclair Reloading Tech Ron Dague shows.
Illustration Shows How a Full-Length Sizing Die Works
Another way to reap the benefits of full-length sizing is to use Redding’s full-length bushing dies, which size the full length of the case but use a system of interchangeable bushings that enable you give the case neck the bare minimum of resizing needed. To see how finely adjustable bushing dies are, and how they resize the case while fully supported, CLICK HERE for Video. The neck bushing helps you precisely control the neck tension to help increase the consistency and accuracy of your handloads.
Small Base Dies
A Small Base Die is another type of full-length sizing die, but one that is typically used when reloading for semi-automatic rifles, like the AR-15, M14, or AR-style .308 rifles. (It may also work well for bolt guns that need extra sizing on the lower section of the case.) A small base die works exactly like a full-length sizing die, only it compresses the brass just a bit more, usually about .001″ more, and may even push the case shoulder back just a hair. Small base dies give that extra bit of compression to the brass to help make sure the case will properly extract from a semi-automatic firearm. The upside is that you get handloads that should work flawlessly in your semi-automatic. The downside is case life may be shortened as compared to brass used only in one bolt-action rifle, because the brass is worked more.
Shoulder Bump Gauges
A handy tool for setting up your full-length sizing dies as close as possible to your rifle’s chamber is a shoulder bump gauge. The bump gauge lets you resize the case as little as possible, to extend case life and help your handloads fit your rifle almost like a neck-sized only die. You use deprimed cases fired in your rifle and bump gauge inserts to help you set up the die so it resizes the case only about .001″ to .004″, depending on what type of rifle you’re shooting.
Video shows how to use a shoulder bump gauge to set up your full-length dies
Article Find by EdLongrange. We welcome reader submissions
NOTE: If you prefer drying your brass in an oven we recommend a temp setting no higher than 200° F. Better yet, use a dedicated case dryer that cannot possibly over-cook your cases.
Tech Tip by Craig Arnzen of Area419.com
As wet-tumbling brass has become more popular in recent years, guys have tried a LOT of ways to get their brass dry — towels, hair dryers, and even food dehydrators. (See Top Ten Brass Drying Methods). Another common method — albeit with some potential issues — is putting your wet brass in the oven to dry. Provided you monitor TEMP and TIME, this method is fast, effective, and easy (as long don’t use the wife’s favorite cooking pans — that’ll get you in trouble.)
With oven-drying, however, unexpected issues can arise, as illustrated by this worrisome story: “I put my brass in for an hour at 200° F and turned it off. Next thing I know I realize my wife has the oven pre-heating to 350° F. Is my brass ruined?”
If you search the AccurateShooter.com Shooters’ Forum, you’ll find at least three threads with stories like that (i.e. higher-than-expected oven temps when drying brass), and answers on both sides of the line. I know this, because it happened to me — I had some 6XC brass drying and the wife pre-heated the oven. Concerned about my cases, I consulted a genuine annealing expert, Andrew Rixon.
Andrew is the Director of Engineering and Manufacturing at Alpha Munitions, makers of premium-grade rifle brass. I had baked a batch of Alpha 6XC brass, which is exceptionally consistent and well-made. (This 6XC brass is currently out of production, but Alpha produces many other good 6mm cases including 6 PPC, 6mm ARC, 6mm BR, 6 Dasher, 6BRA, 6 GT, and 6mm Creedmoor).
Before Andrew would answer my question though, he gave me a little lesson on what really happens during annealing:
“Annealing is performed by heating the brass to specific temperatures. There are three phases of annealing: recovery, recrystallization, and grain growth. All of which have specific temperatures and or exposure times related to them. It is key for cartridge brass annealing processes to hit the recrystallization phase which allows for strain-free grains to grow. The growth of strain-free grains eliminate dislocations, drastically decreasing hardness and increasing ductility. For recrystallization to occur the material temperature must be within 600-1000 degrees Fahrenheit (F).”
He then got into really answering the question, and was (fortunately) definitive in his answer: “If the temps do not exceed 450 degrees F then there is nothing to worry about as it did not exceed the critical temperature for annealing to occur.” Editor: Caution — do NOT assume that the temperature marked on the oven knob is the actual temperature INSIDE the oven, particularly near the back. Some older ovens can be off as much as 75 degrees F. Be conservative!
Well, there you have it. If you’ve baked your brass, you’re probably OK. If you got it hotter than 450° F then there can start to be some changes to the metal.
At the request of our readers, we provide select “Deals of the Week”. Every Sunday afternoon or Monday morning we offer our Best Bargain selections. Here are some of the best deals on firearms, hardware, reloading components, optics, and shooting accessories. Be aware that sale prices are subject to change, and once clearance inventory is sold, it’s gone for good. You snooze you lose.
NOTE: All listed products are for sale to persons 18 years of age or older. No products are intended for use by minors.
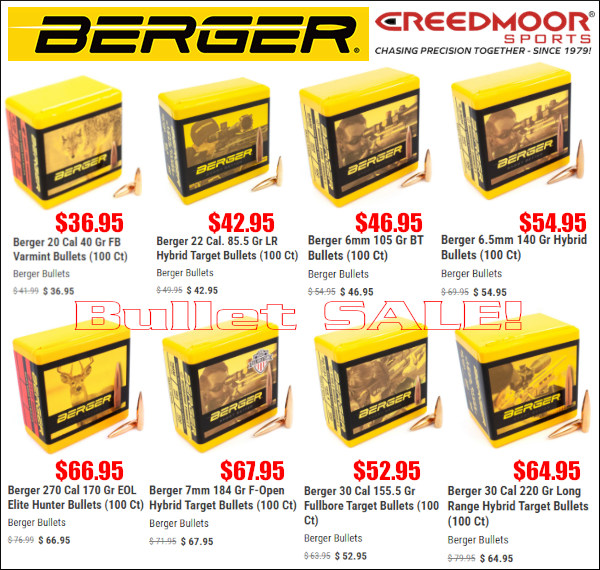
Creedmoor Sports — Major Berger Bullet Sale
⏺️ » Great savings on high quality Berger match and hunting Bullets
When it comes to competition, Berger Bullets are among the very best with countless wins in PRS, High Power, F-Class, and other disciplines. Berger also makes great varmint and hunting bullets. With the current Berger Sale at Creedmoor Sports you can enjoy major savings on hunting and match bullets in all popular calibers. Save now with this major sale, which includes top benchrest, fullbore, and F-Class bullets.
Graf & Sons — Lyman Ultimate Reloading System, $549.99
⏺️ » Complete system with turret press, powder measure, tumbler and more
Here is a truly great combo reloading kit at a fantastic price, just $549.99 at Grafs.com (Save $74!). The Lyman Ultimate Reloading System includes top-of-the-line tools including 8-station Turret Press, Gen 6 Digital Powder System, Universal Case Trimmer, Pro 1200 Turbo Tumbler, and everything else needed to turn out high quality rounds fast. Here is a list of everything you get with this Lyman combo kit:
All American 8-Station turret press
Gen 6 Electronic Powder Dispenser/Scale
Universal Case Trimmer
Pro 1200 Turbo® Tumbler
E-ZEE Prime Hand Priming Tool
Case Prep Multi-Tool
Magnum Inertia Bullet Puller


 Berger Twist-Rate Stability Calculator
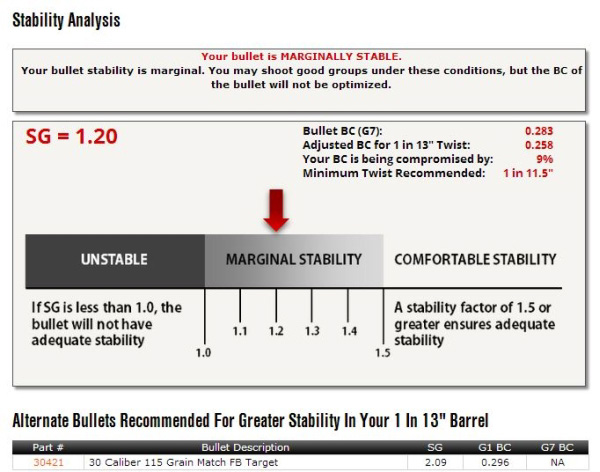


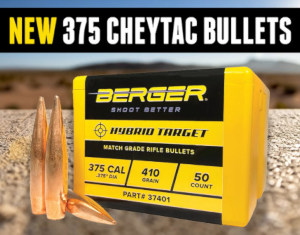 In this video, Gavin meets with Paul Phillips, an ELR “King of Two Miles” past Champion. Paul explains the features in his .375-caliber rifle designed to shoot to one mile and beyond. Along with a big action to hold the very long cartridge, an ELR rifle needs a special high-angle optics rail to allow the needed elevation. In addition, a long-wheelbase chassis is optimal for greater stability and balance. Recoil is very significant so Paul’s rifle boasts a massive 6-port muzzle brake on the very long barrel (ELR barrels can run 34-36″). For his projectiles, Paul is running Berger’s impressive new 410gr .375 caliber Hybrid Target Bullet (6:25 time-mark).
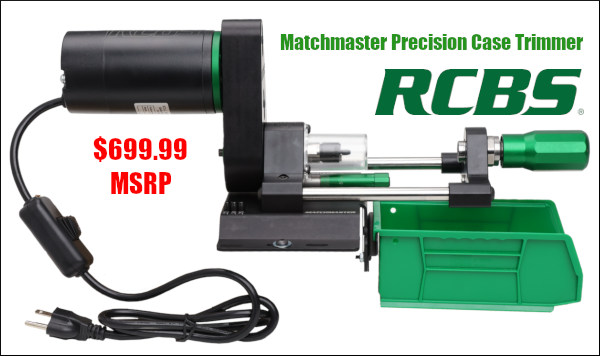


 Neck-sizing dies resize only the neck of the case. The benefit of sizing only the neck is that the brass is “worked” very little, reducing the amount of changes to the brss. [We recommend full-length sizing for all applications after the first couple of firings, and semi-auto brass should be full-length sized every time!] Sinclair recommends that neck-sized-only cartridges should not be used any in other rifle besides the one they were originally fired from [unless they are also FL-sized], or in any action other than a bolt-action.


 If you search the AccurateShooter.com