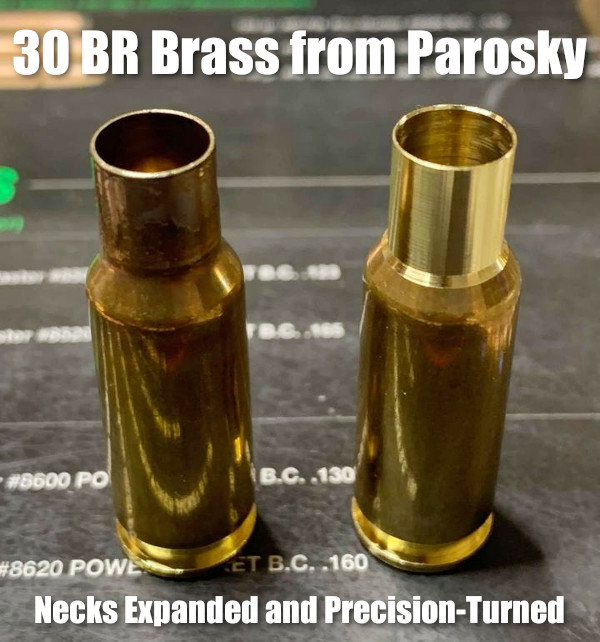
Here’s good news for 30BR shooters. Paul Parosky, maker of the excellent PRP Custom Bullets, is now offering 30BR neck-turned brass. This can save you considerable time and effort forming 30BR cases from Lapua 6mmBR brass. And the neck-turning is superb, again representing time savings (and no tools to buy). You can order this 30BR brass from PRPbullets.com. If you communicate with the PRP team, Paul may be able to neck-turn to your specific thickness. Paul notes: “Here are necks turned for a 0.330 neck. I’ll try my best to accommodate anyone’s neck dimensions as they wish. Just contact us through our website PRPBullets.com.”
About this Neck-Turning set-up — Paul Parosky notes: “For neck-turning I’m using an old drill press that has been re-worked. The cutter and spindle are all indicated before neck turning to ensure no runout. The RPM is around 520. The lube I use is a mixture of royal and mystery oil.”
Why the 30 BR Dominates 100/200 Benchrest for Score Competition
The 30BR, along with some wildcat variants, remains the dominant cartridge in short-range (100/200) benchrest-for-score competition. The 30BR’s .308″-diameter bullets are larger than the 6mm bullets used by the 6PPC (which rules group BR competition). The bigger 30-Cal diameter has an advantage in touching scoring rings. In addition, the 30BR is also relatively easy to tune, and barrel life is considerably better than with smaller-caliber benchrest cartridges. For more information, see our AccurateShooter 30BR Cartridge Guide.
Cases are Expanded, Then Neck-Turned
To produce his 30BR brass, Parosky first uses a series of expander mandrels. Then he neck-turns with power using a converted drill press. Paul tells us: “This is done the old school way, I use three different tapered expander mandrels, then neck-turn it to the proper neck chamber, then run them up through a FL expander mandrel to ensure necks are straight. Then I clean all the cases.”
Paul Parosky Can Also Neck-Turn 6PPC Brass
Paul Parosky also expands and neck-turns 6PPC cases that are made from parent Lapua .220 Russian cartridge brass. Here, illustrating his 6PPC neck-turning operation, is a Paul Parosky post on the USA Benchrest & Extreme Precision Shooters Facebook page.
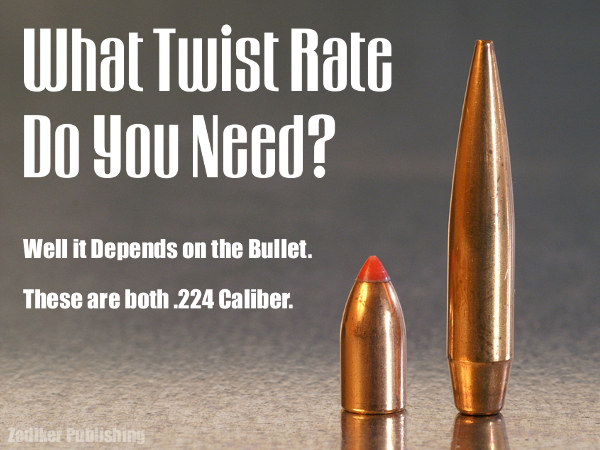
Here’s an extreme range of .224-Caliber bullets: 35gr varmint bullet and 90gr match bullet. Of course, along with bullet length/design, you need to consider MV when choosing twist rate.
Even with the same caliber (and same bullet weight), different bullet types may require different rates of spin to stabilize properly. The bullet’s initial spin rate (RPM) is a function of the bullet’s muzzle velocity and the spin imparted by the rifling in the barrel. You want to ensure your bullet is stable throughout flight. It is better to have too much spin than too little, according to many ballistics experts, including Bryan Litz of Applied Ballistics. The late Glen Zediker put together some basic tips concerning barrel twist rates and bullet stability. These come from Glen’s book, Top Grade Ammo.
Choosing the Right Twist Rate
I’d always rather have a twist too fast than not fast enough. Generally… I recommend erring toward the faster side of a barrel twist decision. 1:8″ twist is becoming a “new standard” for .224 caliber, replacing 1:9″ in the process. The reason is that new bullets tend to be bigger rather than smaller. Don’t let a too-slow twist limit your capacity to [achieve] better long-range performance.
Base your next barrel twist rate decision on the longest, heaviest bullets you choose to use, and at the same time realize that the rate you choose will in turn limit your bullet choices. If the longest, heaviest bullet you’ll shoot (ever) is a 55-grain .224, then there’s honestly no reason not to use a 1:12″. Likewise true for .308-caliber: unless you’re going over 200-grain bullet weight, a 1:10″ will perform perfectly well.
Bullet Length is More Critical than Weight
Bullet length, not weight, [primarily] determines how much rotation is necessary for stability. Twist rate suggestions, though, are most usually given with respect to bullet weight, but that’s more of a generality for convenience’s sake, I think. The reason is that with the introduction of higher-ballistic-coefficient bullet designs, which are longer than conventional forms, it is easily possible to have two same-weight bullets that won’t both stabilize from the same twist rate.
Evidence of Instability
The tell-tale for an unstable (wobbling or tumbling) bullet is an oblong hole in the target paper, a “keyhole,” and that means the bullet contacted the target at some attitude other than nose-first.
Increasing Barrel Length Can Deliver More Velocity, But That May Still Not Provide Enough Stability if the Twist Rate Is Too Slow
Bullet speed and barrel length have an influence on bullet stability, and a higher muzzle velocity through a longer tube will bring on more effect from the twist, but it’s a little too edgy if a particular bullet stabilizes only when running maximum velocity.
My failed 90-grain .224 experiment is a good example of that: I could get them asleep in a 1:7″ twist, 25-inch barrel, which was chambered in .22 PPC, but could not get them stabilized in a 20-inch 1:7″ .223 Rem. The answer always is to get a twist that’s correct.
These tips were adapted from Glen’s popular 2016 book, Top-Grade Ammo That work has numerous helpful articles on technical topics. Berger Bullets also has a FREE online Twist Rate Stability Calculator, developed by Applied Ballistics.
Over the past 12 months, this article was one of the TOP TEN most-read Daily Bulletin features. We’re reprising it today for those who may have missed it the first time. The above diagram comes from a TiborasurasRex YouTube Video comparing G1 and G7 BC models. CLICK HERE to watch the video.
The better, up-to-date ballistics programs let you select either G1 or G7 Ballistic Coefficient (BC) values when calculating a trajectory. The ballistic coefficient (BC) of a body is a measure of its ability to overcome air resistance in flight. You’ve probably seen that G7 values are numerically lower than G1 values for the same bullet (typically). But that doesn’t mean you should select a G1 value simply because it is higher.
Some readers are not quite sure about the difference between G1 and G7 models. One forum member wrote us: “I went on the JBM Ballistics website to use the web-based Trajectory Calculator and when I got to the part that gives you a choice to choose between G1 and G7 BC, I was stumped. What determines how, or which one to use?”
The simple answer is the G1 value normally works better for shorter flat-based bullets, while the G7 value should work better for longer, boat-tailed bullets.
G1 vs. G7 Ballistic Coefficients — Which Is Right for You?
G1 and G7 refer both refer to aerodynamic drag models based on particular “standard projectile” shapes. The G1 shape looks like a flat-based bullet. The G7 shape is quite different, and better approximates the geometry of a modern long-range bullet. So, when choosing your drag model, G1 is preferable for flat-based bullets, while G7 is ordinarily a “better fit” for longer, boat-tailed bullets.
Drag Models — G7 is better than G1 for Long-Range Bullets
Many ballistics programs still offer only the default G1 drag model. Bryan Litz, author of Applied Ballistics for Long Range Shooting, believes the G7 standard is preferable for long-range, low-drag bullets: “Part of the reason there is so much ‘slop’ in advertised BCs is because they’re referenced to the G1 standard which is very speed sensitive. The G7 standard is more appropriate for long range bullets. Here’s the results of my testing on two low-drag, long-range boat-tail bullets, so you can see how the G1 and G7 Ballistic coefficients compare:
G1 BCs, averaged between 1500 fps and 3000 fps:
Berger 180 VLD: 0.659 lb/in²
JLK 180: 0.645 lb/in²
The reason the BC for the JLK is less is mostly because the meplat was significantly larger on the particular lot that I tested (0.075″ vs 0.059″; see attached drawings).
For bullets like these, it’s much better to use the G7 standard. The following BCs are referenced to the G7 standard, and are constant for all speeds.
Many modern ballistics programs, including the free online JBM Ballistics Program, are able to use BCs referenced to G7 standards. When available, these BCs are more appropriate for long range bullets, according to Bryan.
[Editor’s NOTE: BCs are normally reported simply as an 0.XXX number. The lb/in² tag applies to all BCs, but is commonly left off for simplicity.]
Tech Report by B. Walker, owner of The Urban Rifleman LLC
I have been moly coating since I started shooting rifles nearly 26 years ago. I have always moly-coated my bullets. I figured if it was good enough for Walt Berger, it was good enough for me (Walt still moly coats his bullets to this day, if recent match pictures are any indication). I had always used the typical dry method (without the wax) and I had the same jar of moly (molybdenum disulfide) for many years.
I had tried all kinds of methods over the years. But then AccurateShooter Forum member “Bowfisher” sent me a message about moly-coating bullets using water. After his suggestion, I did several batches using the moly-in-the-water method. I was stunned with the great results. This Wet Moly method is the cleanest, easiest, and best coating method I have ever tried. I strongly believe Wet Moly should be the recommended method.
Traditional Dry Moly Coating Process is Dusty and Messy
Before I started the Wet Moly process, I always coated my bullets in small containers in my big Dillon tumbler. I would put the bullets in old EMPTY 1-lb powder containers and add the moly. I would place the powder containers in my big Dillon tumbler and tumble for at least three hours. I would then throw rice in with the bullets to soak up any excess moly dust and shine the bullets. Then I would shake out the rice using a lid with holes drilled in it. My coated stuff came out beautiful if I do say so myself even dry. However, there was always dust and moly mess (there was always some on my fingers when I would handle the bullets after). I only liked to doing coating in big batches to get it over with because it was a chore (by all means don’t get moly on the bottom of your shoes and track the carpet)!
Wet Moly Method — Tumbling in Bottles with Moly and Water
The new wet method entails adding water to the bullets during the tumble in the bottle, and it is way easier and cleaner. The final product is totally dust free and will not come off on your fingers as there is no dust or residue. I think they shoot better too, and the moly works as it is supposed to. I won’t get into the debates over the merits of moly. Some folks believe it works for them. This article is intended for those guys — it is not intended to convert handloaders who are happy with shooting uncoated bullets.
Editor: None other than John Whidden, Multi-Time National Long Range Champion, moly-coats his bullets. Whidden also uses a Wet Moly application method. He agrees that applying moly in a water solution delivers the best results, and doesn’t leave dusty residues.
Here is the basic outline of the Wet Moly application method. In addition to this outline, I created an instructional video that shows my entire process. [Editor: Definitely WATCH the video. It is important to see the post-tumbling rinsing and buffing processses.]
1. Use old 1-lb powder containers. Work over a sink. Add the bullets in reasonable batches to the containers (lets say 2-3 inches of bullets). I try to use use only enough water to cover the bullets and I use a little more moly than I used to with a dry application. I suggest using half a teaspoon of moly per two inches depth of bullets.
2. Tumble for four hours (at least). I tape the container lids shut before placing them in the tumbler. Then, simply place the powder container in your vibratory tumbler.
3. After the elapsed time, take the bottle to the sink and, dump contents into a plastic strainer. I use an old spaghetti strainer that I save just for moly. IMPORTANT: BE SURE you have a strainer that won’t let the bullets fall out! Stream water (from faucet) gently over the bullets to thoroughly clean excess residues off the bullets. Shake strainer to get all the water out. See video time 6:00-10:00.
4. Sift out the bullets onto a paper towel inside an old baking pan and shake to buff. Repeat until the bullets are completely dry and buffed to a high shine. The bullets are clean, dust-free and the moly is gorgeous! Leave for several days before storing or put them in your oven at about 130 degrees for 30 minutes to remove the last bit of any moisture. (WARNING: DO NOT use excessive oven heat or cook too long — set a timer!).
If you follow these instructions, the result should be the best moly coating you have ever seen!
Before and AFTER Wet Moly. Note how uniform the moly coating is on the bullets. The Wet Moly process also leaves a perfect glossy finish after rinsing and drying. And the bullets are totally dust-free! These are Sierra #1380 .224 69gr HPBT MatchKings.
Be sure to visit our online store at TheUrbanriflemanstore.com. We have a full compliment of front and rear bag riders for various rifles that we designed and produce in-house. We also stock Revolution laminated benchrest stocks, and we sell stainless steel Remington prefit barrels (which are getting rave reviews from customers). Also available are Wilson dies, Timney and Triggertech triggers, Berger and Sierra bullets, Magpul and Accuracy International chassis, and lots more.
We’re in the middle of summer, so many folks will head to the hinterlands on prairie dog safaris. On a good P-Dog adventure, you may shoot hundreds of rounds over a long weekend. So you’ll need plenty of ammo. With these ammo volume requirements, you probably won’t have time to load to benchrest standards, and you may not have the budget for match-grade bullets. To save time you may throw (rather than weigh) your charges, or even load on a progressive press. This all raises the question of ammo accuracy — how good is “good enough”? A Sierra Bullets expert answers that question here — explaining how to efficiently load ammo for varmint work.
Ammunition Accuracy Requirements 101 — Varmint Ammo
This story based on article by Sierra Bullets Chief Ballistician Tommy Todd
I load and shoot ammunition for a living. In my duties here at Sierra I constantly test bullet accuracy for our production needs. Because of this, I shoot a variety of different calibers and cartridges on a daily basis and a large demand of this shooting is keeping the guns and loads tuned for optimum accuracy. I have a very narrow window of tolerances to maintain in order to provide our customers (you) with the most accurate bullets on the market.
I have learned many tricks and techniques over the years to tuning a load, prepping brass, and cleaning barrels to keep a gun shooting. I often utilize the things I have learned and take them to extreme levels when competing in a shooting event. I also often ignore most of these things (other than safety) and simplify the process if the shooting I will be doing does not warrant.
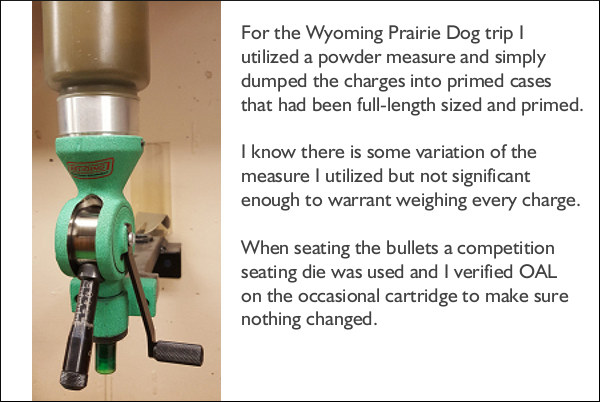
Recently I went on a prairie dog shoot in Wyoming with some good friends. The targets cooperated as did the weather with the exception of some challenging winds we experienced. We had a great time and make a lot of hits on those small rodents. When loading for the .223 Remington rifles and the TC Contender, I cut a few corners in the ammunition-loading process due to both time constraints and accuracy needed. When shooting at a prairie dog a miss is simply that, but when shooting at say the X-Ring at 1000-yard competition, a poorly-placed shot [harms your] placing in the match. Because of this, I can afford to miss an occasional shot at a varmint due to ammunition capability without worry but will not allow the same tolerances in my match ammo. For the Wyoming trip I utilized a powder measure and simply dumped the charges into primed cases that had been full-length sized and primed.
I had measured enough for length to know that while there was some variance all were under maximum length. I know there is some variation of the measure I utilized but not significant enough to warrant weighing every charge. When seating the bullets a competition seating die was used and I verified OAL on the occasional cartridge to make sure nothing changed.
This varmint ammo, with thrown charges, put TEN shots inside ONE inch at 200 yards. That’s half MOA. Good Enough? Absolutely!
The ammo produced shot under one inch at 200 yards in one of the guns I planned on taking on to Wyoming with me. [Editor: That was for TEN Shots — see above.] I knew I had loaded ammunition that was quite suitable for the task at hand which was evidenced by the number of hits I was able to make at fairly long range.
NOTE: The author, Tommy Todd, explains that, when loading ammo for F-Class matches, he uses more exacting methods. He weighs every charge and seats his bullets carefully with an arbor press. Todd adapts his methodology for his particular application. The lesson here is to load to the level of precision demanded by your discipline. READ Full Story HERE.
Forum member F-Class John is an avid F-Class competitor and expert handloader. John reviews reloading hardware and shooting-related products for his popular F-Class John YouTube Channel, which now boasts 500+ videos. John also does important product testing for AccurateShooter.com. Through his YouTube channel, John has reviewed many of the latest and greatest reloading tools and accessories. For today’s Video Showcase, we selected six F-Class John product reviews. Products tested include front rests, borescopes, precision triggers, ammo caddies, steel rimfire targets, and a concentricity checker.
If you like these informative videos, consider joining F-Class John’s Patreon Channel for live video meetings, more in-depth videos, and detailed explanations. Join Patreon via Patreon.com/fclassjohn for full length videos, live chats, and more.
SEB NEO-X and Rodzilla Raptor Front Rests
This video covers two outstanding front joystick rests, the SEB Neo-X and the Rodzilla Raptor. Both of these rests work great for both benchrest and F-Class shooters, centerfire and rimfire. Build quality is outstanding for both rests. Tester F-Class John observes: “Both are great units and user preference will really dictate which to get. I own both and find they give me consistent target acquisition.” To learn more about these two excellent front rests, visit TheRodzilla.com and/or SEB Rests USA.
Testing Flavio Fare Triggers
The Flavio Fare triggers are some of the best on the market. These are offered for various action types including Remington clones and custom actions. CLICK HERE for a discussion of these triggers on our Forum. The Flavio Fare Veloce Hunting Trigger (with safety) adjusts from 5 to 25 ounces pull weight and retails for $439.95. The Flavio Fare Whisper 2.1 BenchRest Trigger (no safety) adjusts from 0.7 to 2.8 ounces, and costs $419.95. Reviewer F-Class John says these Flavio Fare triggers are “smooth, crisp, with a wide range of trigger pull weights … I love these things.”
Steel Targets for Rimfire Competition — Options Reviewed
NRL-22 and PRS Rimfire matches are growing in popularity. These types of competition are fun because reactive targets are used at the matches. Such targets provide “instant gratification” for a good shot — you hear a “ping” and may see the target swing or rotate. This video reviews a large variety of rimfire steel targets from D-M Targets. F-Class John notes: “These D-M Targets rimfire metal targets set-up quickly and easily. These targets are made from good steel and produce a good sound when hit.” John also observed that these DM steel rimfire targets don’t hang up when hit.
Teslong BoreScope Comparison — NTG500H and NTG450H Models
All serious rifle shooters should have a good digital borescope that allows you to view the inside of your rifle barrels. That helps you diagnose fouling/wear issues and evaluate the effectiveness of your cleaning procedures. Teslong makes some of the most popular electronic borescope systems. There are versions that can connect to your smartphone, iPad, or mobile device. We like the Teslong units that have their own dedicated hard-case display unit. This ensures you don’t have to fiddle with smartphone software updates or security conflicts. In this video, F-Class John reviews two different Teslong Borescope systems: model NTG500H and model NTG450H. Both these units have their own control cases with glass display screens. John notes: “Both units are priced right, have great screens, and are easy to use.”
Ammunition Caddies for F-Class and Benchrest Competition
If you shoot at a quick pace during benchrest, varmint, or F-Class competition, you can definitely benefit by having a well-designed ammo caddie that puts your round within easy reach. This video reviews loaded ammo holders produced by Accurate Forum member BGInvestor using a 3-D printer. The video showcases two different versions, one dark blue for benchrest, and a second, larger black unit for F-Class which is shown above. This video review shows different ways to mount these ammo holders, and discusses the multiple block sizes which are offered. F-Class John says you’ll want to pick a caddie that suits your shooting style and particular discipline.
Concentricity Checking with Accuracy One Gauge
Every serious hand-loader needs a quality concentricity gauge. The Accuracy One Concentricity Gauge boasts a smart design that delivers precise, repeatable results. We like the unit’s easy adjustability and its ability to work in a variety of configurations. The Accuracy One Gauge measures internal and external neck runout of cartridge cases as well as seated bullet runout. It can also measure the runout of the ogive, bearing surface, and boat-tail of individual bullets. And it can even measure your primer pocket runout. Reviewer F-Class John notes: “I think this is the best concentricity tool on the market. Such a tool is a necessity for new loaders or those who are always setting up new dies.”
Want to improve your understanding of Ballistics, Bullet Design, Bullet Pointing, and other shooting-related tech topics? Well here’s a treasure trove of gun expertise. Applied Ballistics offers dozens of FREE tech articles on its website. Curious about Coriolis? — You’ll find answers. Want to understand the difference between G1 and G7 BC? — There’s an article about that.
“Doc” Beech, technical support specialist at Applied Ballistics says these articles can help shooters working with ballistics programs: “One of the biggest issues I have seen is the misunderstanding… about a bullet’s ballistic coefficient (BC) and what it really means. Several papers on ballistic coefficient are available for shooters to review on the website.”
Credit Shooting Sports USA Editor John Parker for finding this great resource. John writes: “Our friends at Applied Ballistics have a real gold mine of articles on the science of accurate shooting on their website. This is a fantastic source for precision shooting information[.] Topics presented are wide-ranging — from ballistic coefficients to bullet analysis.”
Here are six (6) of our favorite Applied Ballistics articles, available for FREE to read online. There are dozens more, all available on the Applied Ballistics Education Webpage. After Clicking link, select Plus (+) Symbol for “White Papers”, then find the article(s) you want in the list. For each selection, then click “Download” in the right column. This will send a PDF version to your device.
Have you ever expanded a .22 or 6mm cartridge all the way up to .30-caliber? If so, you know this can be a difficult procedure that stresses the case necks and neck-shoulder junction. A significant neck-size expansion done in one big jump can increase run-out, cause doughnuts, or worse yet, even split the brass. Therefore you want to proceed in increments, increasing the neck diameter in stages. One smart way to do that is to use a Progressive Press. This article explains how…
The most successful short-range benchrest-for-score cartridge is the 30 BR. That cartridge, as well as 30 BR variants such as the 30 BRX, all start with the 6mmBR Norma parent cartridge, typically with Lapua 6mmBR brass. To get a nice 30 BR case you want to expand in stages, increasing the inside neck diameter incrementally from .243 to .308.
Darrell Jones of DJ’s Brass Service creates thousands of 30 BR cases each year. He has found a clever way to speed up the process — Darrell uses a Progressive Press. He runs his 6BR brass through four (4) separate Hornady neck-sizing dies with expander mandrels. First there is a .257 die, followed by .264 (6.5mm), .284 (7mm), and then .308. Then a fifth and final K&M die provides one last, slight expansion so the newly-fashioned 30 BR cases perfectly fit the arbor of Darrell’s neck-turning tool.
So to repeat, the case starts as .243 (6mm), then moves in up stages .257, .264, .284, and .308, with a final “finishing” step prior to neck-turning. You can see the expansion in this video, which starts with 6mmBR brass that was first hydro-formed to 6 BRX:
Watch 6mm Cases Expanded to 30-Caliber (6BRX to 30 BRX)
For this demo video, Darrell expands just one case at a time. However, he can also put multiple cases in the progressive — one per station. This takes a little more effort, Darrell says, but the results are still excellent. Darrell tells us: “I do put multiple cases in the progressive to save time. The results are the same — I just wanted to show a single-step process and how it reduces run-out by not stressing the shoulder with one big expansion from 6mm straight to 30 caliber. Doing the operation in multiple stages avoids binds and helps keep the shoulders concentric.”
This same multi-stage procedure can be use to expand other cartridge types. For example you could take .221 Fireball brass in stages up to .308 to create 300 Blackout brass.
Darrell uses caliber-specific, Hornady neck-sizing-only dies with elliptical expanders. Darrell tells us: “The Hornady elliptical expander has a reduced bearing surface that puts less strain on the brass when expanding the necks to the next size.” The fitting at the bottom of the die is the Lock-N-Load die bushing that allows fast die changes.
These particular cases used in the video were first hydro-formed to 6BRX then expanded to 30 BRX before neck turning. DJ’s Brass offers hydro-forming for many popular wildcat cartridges such as 6 PPC, 6mm Dasher, and .284 Shehane.
Powder Valley, a leading distributor of reloading supplies, is pleased to announce the launch of a major update and enhancement to its PowderValley.com website. The enhanced website now has a completely updated look, improved search and browse features, along with a streamlined checkout experience. The updated website is also mobile-friendly so it works great with smartphones and mobile devices. And right now the Powder Valley website features special discounts, with some items up to 50% Off. For big savings, click the Weekly Deals tag on the home page.
There are convenient, one-click product category links for:
“We’re excited to provide our customers with a new website that is fast, easy to navigate, and helps them make an informed buying decision” said Bill Clinton, CEO of Powder Valley. “The new website is the first step in a series of strategic changes at Powder Valley which will improve our ability to implement significant improvement in how we serve customers, from enhanced product information to increased breadth and depth of our product offering.”
To learn more about Powder Valley and its full lineup of reloading supplies, visit PowderValley.com. On the updated website, as you scroll down the home page, you’ll see convenient major feature categories for:
1. Sales and Clearance | 2. New Arrivals | 3. Popular Products
About Powder Valley
Powder Valley began in 1984 as Dexter Automotive, the first master distributor of Accurate brand powder. In 2000, Bryan and Noel Richardson purchased the company and moved operations to Winfield, Kansas. Since then Powder Valley has become the single largest distributor of canister powder in the USA, stocking nearly every brand of Smokeless and Black Powder offered in the nation. Powder brands include Hodgdon, IMR, Vihtavuori, Alliant, Ramshot, Winchester, Hornady, Shooters World, Goex, Schuetzen, Swiss and more, along with an ever-expanding offering of bullets, brass, wads, shot, gun care items, and reloading equipment. Powder Valley also carries a wide selection of rifle, pistol, and shotgun primers.
A while back, Sinclair International’s Reloading Press Blog featured a “round-table” discussion of reloading techniques. Sinclair’s team of tech staffers were asked: “What do you feel is the one-most crucial step in precision reloading?”
Here are their responses (along with comments from our Editors):
Phil Hoham: “I feel that when working up a load do not go too high or too low in your powder charge. Stay away from ‘suggested loads’ you hear at the range, or on the internet. Always be sure to use a published reloading manual that presents not only minimums and maximums, but also pressure, velocity, and a proper range of powders used. Do not get distracted in the reloading process, and remain focused at all times during each step involved.”
AccurateShooter.com: Some loads presented on the Internet are OK as a starting point, but it is absolutely critical to understand that pressure maximums will vary considerably from one rifle to another (of the same chambering). For example, one 6mmBR rifle shooting 105gr bullets can max out with 30.0 grains of Varget powder, while another rifle, with the same chamber dimensions, but a different barrel, could tolerate (and perform better) with half a grain more powder. You need to adjust recommended loads to your particular rifle and barrel.
Pete Petros: “This could be a very broad topic, but if I were to pick one, it would be making sure to pay close attention, and weigh each and every powder charge to ensure that each load is exact and consistent. This is important not only for accuracy, but also for safety reasons.”
AccurateShooter.com: If you’re shooting beyond 200 yards, it is critical to weigh your loads with an accurate scale or automated system such as the AutoTrickler V3/V4. Loads that are uniform (within a few kernels) will exhibit lower Extreme Spread and Standard Deviation. And remember, even if you stick with the same powder, when you get a new powder lot, you may have to adjust your load quite a bit. For example, .308 Palma shooters have learned they may need to adjust Varget loads by up to a full grain from one lot of Varget to the next.
Ron Dague: “I feel that the most important step(s) in reloading for accuracy are in the initial case prep. Uniforming the primer pocket to the same depth to ensure consistency in primer seating is a crucial step. Additionally de-burring the flash holes, each in the same way to clean up and chamfer the inside is important. It ensures that the ignition from the primer is uniform and flows out in the same consistent pattern. Doing so will create uniform powder ignition and tighten up your velocity Extreme Spread.”
AccurateShooter.com: With some brands of brass, primer pocket uniforming and flash-hole deburring is useful. However, with the best Lapua, Norma, and RWS brass it may be unnecessary, or worse, counter-productive. So long as your Lapua brass flash-holes are not obstructed or smaller than spec, it may be best to leave them alone. This is particularly true with the small flash holes in 220 Russian, 6BR, and 6.5×47 cases. MOST of the flash-hole reaming tools on the market have cutting bits that vary in size because of manufacturing tolerances. We’ve found tools with an advertised diameter of .0625″ (1/16″) that actually cut an 0.068″ hole. In addition, we are wary of flash-hole deburring tools that cut an aggressive inside chamfer on the flash-holes. The reason is that it is very difficult to control the amount of chamfer precisely, even with tools that have a depth stop.
Rod Green: “I feel that bullet seating is the most important step. If you had focused on making sure all prior steps (case prep, powder charge, etc.) of the process have been carefully taken to ensure uniformity, bullet seating is the last step, and can mean all the difference in the world in terms of consistency. Making sure that the bullet is seated to the same depth each time, and time is taken to ensure that true aligned seating can make the load.”
Bob Blaine: “I agree with Rod. I strongly feel that consistent bullet seating depth is the most important step in creating the most accurate hand loads. I have seen the results in both my bench and long range rifles. Taking the time to ensure exactness in the seating process is by far, the number one most important step in my book.”
AccurateShooter.com: Agreed. When loading match ammo, after bullet seating, we check every loaded round for base of case to ogive length. If it varies by more than 3 thousandths, that round is segregated or we attempt to re-seat the bullet. We measure base of case to bullet ogive with a comparator mounted on one jaw of our calipers. You may have to pre-sort your bullets to hold the case-base to ogive measurement (of loaded rounds) within .003″.





 Increasing Barrel Length Can Deliver More Velocity, But That May Still Not Provide Enough Stability if the Twist Rate Is Too Slow
 The better, up-to-date ballistics programs let you select either G1 or G7 Ballistic Coefficient (BC) values when calculating a trajectory. The ballistic coefficient (BC) of a body is a measure of its ability to overcome air resistance in flight. You’ve probably seen that G7 values are numerically lower than G1 values for the same bullet (typically). But that doesn’t mean you should select a G1 value simply because it is higher.
 Drag Models — G7 is better than G1 for Long-Range Bullets


 Be sure to visit our online store at




 A while back, Sinclair International’s Reloading Press Blog featured a “round-table” discussion of reloading techniques. Sinclair’s team of tech staffers were asked: “What do you feel is the one-most crucial step in precision reloading?”


