Guns & Gear is back for its 14th season. Produced by Tom Gresham, Ryan Gresham, and the Gun Talk team, Guns & Gear showcases new products in the firearms industry. Each episode features interviews with industry experts/instructors, range demonstrations, tips, and training techniques. Guns & Gear content is all FREE — you can watch over 270 videos from Guns & Gear past seasons via the Guns & Gear Archive on GunTalkTV.com.
Examples of Guns & Gear Videos from GunTalk YouTube Channel
Five Past Broadcasts We Recommend ARE:
Season 13, Episode 7: Colt Anaconda, Frankford Arsenal X-10 Progressive Press, SIG Sauer Red Dot optics
Guns & Gear broadcasts are hosted online via Guntalktv.com and the Guntalk YouTube Channel. There are now over 850 Guns & Gear videos on YouTube. The shows can also be accessed free via Amazon Fire TV, Apple TV, and Android TV channel. On cable television, Guns & Gear airs on the Sportsman Channel on Wednesdays at 2:00 PM Eastern, Thursdays at 8:30 PM and 11:30 PM ET, Fridays at 2:30 PM ET, and Mondays at 5:00 AM ET. There are also cable connections via DirectTV Ch. 605, DISH Network Ch. 395/395 HD and 9483, and AT&T U-Verse Ch. 642/1642 HD.
13 Years of Guns & Gear Bloopers
If you want some light-hearted entertainment, this week on the Premiere episode of Season 14, the crew revisits some of the most memorable bloopers, outtakes, and mistakes from the past 13 years of filming.
Want to show off some groups you’ve shot? Or keep a handy pack of mini-targets in your range kit? Then check out this unique product from stockmaker Bell & Carlson. Shoot’n Aces cards feature a 1-inch black square aiming box with a 1/2-inch inner square. These cards are normal poker-playing-card size, 3.5″ high x 2.5″ wide (89 × 64 mm). Shoot’n Aces cards come 56 to a pack. Carry a few extras in your wallet or a pack in your vehicle glove compartment and you’ll always have a precision target to shoot at the range. Cards can be stapled or taped to target stands.
Sniper Central says these cards work well as targets: “The bold square is easy to pick up with the inner white portion making a nice aiming point. The material of the cards is the same as normal playing cards and the bullets make a very nice hole when passing through.” The sharp edges of the bullet holes makes it easy to measure group sizes with precision.
Each pack of Shoot’n Aces contains 56 premium-quality target cards. If you want some, order Bell & Carlson item SA-2006. This is a set of four (4) card-packs with 56 cards per pack (224 cards total) priced at $20.00 (i.e. $5.00 per pack).
Gavin Gear of UltimateReloader.com recently tested the impressive Henderson Gen 3 (V3) Trimmer. There is a full write-up on Gavin’s website, and you can watch Gavin’s 18.7-minute video review below.
Gavin states: “I met Todd Henderson at SHOT Show and it’s clear that quality control and customer experience are extremely important to him. The Henderson Gen 3 case trimmer is built on an adjustable tri-trim 3-way cutter with different pilots to accommodate different case necks. Three way cutters trim to length and chamfer the inside and outside all at once. This trimmer has a 1700 RPM spindle and a custom DC motor made in the USA. It is made of billet aluminum and has a taper-lock cutting head and is consistent to 0.002″” at least with the same brand of brass. The collets are Brown & Sharpe style collets and are interchangeable with Forster case trimmer collets. Henderson currently offers four collets, and one is supplied with each machine.”
Gavin explains the trimming process: “I had some 6mm Dasher brass I’ve fired a few times and wanted to take down 5-10 thousandths. The Henderson trimmer works much like a milling machine. You do not need much torque because of the way the taper works.”
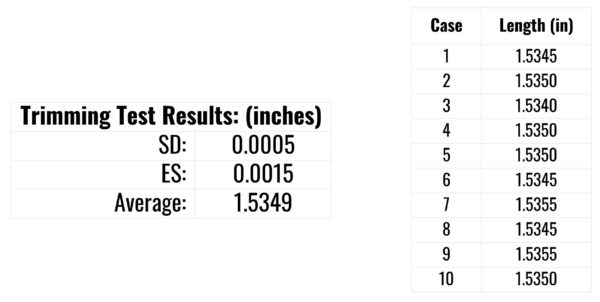
The Henderson Gen 3 trimmer delivered outstanding cartridge length consistency after trimming: “I was careful to ensure my trimming process was as consistent as possible. I measured the first ten cases I ever trimmed on the unit and found a standard deviation of 0.00047. The extreme spread is actually less than advertised. This trimmer is fast and easy to use and most importantly, returns consistent results.”
F-Class John Review of Henderson Gen 3 Trimmer
Our Editor F-Class John has also reviewed the Henderson Trimmer. He liked the product so much he purchased one, and he uses it regularly now to trim his .284 Win cases for F-Open competition.
John liked the precision of the Henderson trimmer and the overall design of the machine, which offers good ergonomics and very precise alignment of the cases. Cycling is smooth and positive, as you can see from the videos. Fit over the pilot was fine for John’s .284 Win brass, but he notes that other users may need to expand their case necks appropriately to fit their pilot.
Watch the video to see the Henderson trimmer in action. The dual, parallel horizontal support shafts provide precise alignment of the case as it moves inward toward the cutter blade. The Taper-Lock cutter provides a 14-degree inside chamfer and 30-degree outside chamfer. The trimming process is very consistent case after case, and the Henderson’s design captures brass shavings effectively.
One of the most popular features of our Shooters’ Forum is the ongoing “Pride and Joy” thread. Since 2009, Forum members have posted photos and descriptions of their most prized firearms. Here are some of our favorite “Pride and Joy” rifles recently showcased in our Forum. Do you have a gun you’d like to see featured there? Register for the Forum and you can add your favorite gun to the list. The photo above shows multiple wood-stocked Palma rifles belonging to Forum member SParker.
We hope these “pride and joy” rifles may provide inspiration for our readers, whetting their appetite for their next competition, varminting, or hunting rifle project.
22 BR Savage Varminter — Accuracy on a Budget
This 22 BR Savage, with upgrades from Sharpshooter Supply, is the “pride and joy” of Forum member Maynard. Note the heavy-contour custom barrel with brake. That 22 BR cartridge is a very effective choice for varmint work, as the ground hog in the photo proves. The 22 BR and 22 Dasher are capable of outstanding accuracy with a large variety of bullets and powders. A 22 Dasher can rival the ballistics of a 6mmBR out to 500+ yards, but with reduced recoil.
Daughter’s First Rifle — Built by Dad
Above is a nice field rifle built up by a father for his daughter. Forum member FrankZ explains: “This is my favorite rifle and it will become my daughter’s first centerfire. The action is from the first rifle I purchased with my own money 21 years ago (700VSS).” The rifle now sports a 24″ Brux barrel chambered in 6mm Creedmoor, with aftermarket PT&G Bolt and DBM metal.
6BR Ackley Improved from Alex Wheeler
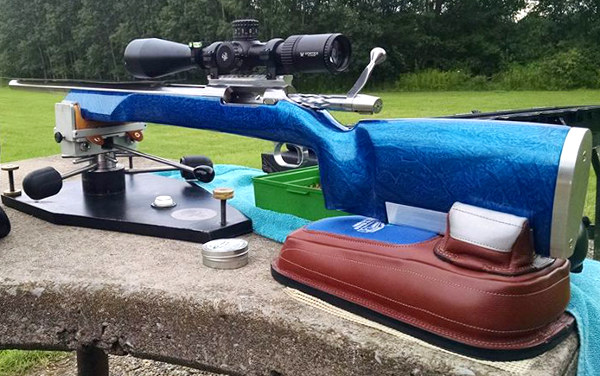
Here is a 6BR Ackley Improved (6BRA) built by Alex Wheeler. This blue marble-painted beauty features a BAT “B” action timed by Alex, fitted with Jewell trigger, and Borden trigger guard. The barrel is a Hawk Hill HV contour finished at 28 inches. The stock is a Deep Creek Tracker with 4″ forearm and rudder system (the toe of the stock adjusts for angle, allowing better tracking). This scope is a Vortex 15-60x52mm Golden Eagle riding in Burris Signature Zee rings.
F-Open Rifle with Borden Action + McMillan Kestros ZR Stock
This state-of-the-art .284 Shehane F-Open rifle belongs to Forum member Willow. This has a McMillan Kestros ZR stock fitted with a RAD (spring-loaded buttpad) system with custom spring. Other components are: Borden BRMXD LBRP DLC-coated action, Bartlein 32″, 4 groove, 1:8.5″-twist 400MOD steel barrel, and TriggerTech Diamond trigger. On top is a March HM 10-60x56mm scope in March Gen 3 rings. Below is a video by Editor F-Class John, showing the features of the Kestros ZR stock.
6BRX in the Country
Forum member Grimstod posted this nice 6BRX in a scenic setting: “Bill Goad at Premier Accuracy crated this fantastic 6BRX. It shoots better then I do.” The rifle features a single-feed Alpin action, with Hart 26″ 1:8″-twist barrel, chambered for the 6BRX (6mmBR wildcat) with .269 neck. Grimstod currently runs 95gr Berger VLDs in Lapua brass. On top is a Leupold 40x45mm scope on a Picatinny rail that Grimstod machined himself. The stock is an HS Precision painted by Premier Accuracy.
6mm Dasher for Benchrest Silhouette Matches
Here’s a gorgeous green 6mm Dasher. Forum Member Gunnermhr states: “This is my new 12-lb Dasher for the 1000 Yard Benchrest silhouette matches. My good friend at CRS Custom Rifle Stocks in Aaronsburg, PA made and painted the stock. It’s similar to a Tooley MBR with a few modifications. It still supported on a 3″ forearm and is full length. Hard to imagine it still makes weight with a wood stock and a 36 power Leopold. Crossed the scale at 11.7lbs. The rifle features a BAT “B” Action. The paint is Candy Apple Green, the forearm has a white base-coat, center section is gray base coat and the buttstock is black base coat, all covered with five coats of clear. It’s the new pride of the fleet as it shoots as good as it looks. This gun hammers with 105gr Berger Hybrids.”
Two Dashers and a Rimfire for Fun
Courtesy Forum member Dan H., here are two red-stocked Dashers plus an Anschutz 54.30 (Benchrest Stock) to make it a trio. Dan says: “The Anschutz provides good practice in trigger-pulling. It’s amazing what you can learn from a rifle that is as sensitive as this one.”
1917 Enfield Upgraded with Hand-Carved Figured Maple Stock
This impressive rifle features an “antique” 1917 Enfield action chambered for the .338 Win Magnum cartridge. The lovely Maple stock was hand-carved by Forum member Spitfire_ER. He tells us: “I found this piece of wood as a return at a lumber yard about 7-8 years ago. I asked the guy in the yard about it and he said it had been returned because it had too much figure for the job the customer was working on. First thing I thought was, ‘That would make a nice stock’.”
New 6PPC with Borden Action, Lederer Barrel, Loker Tuner
Here’s a modern, low-profile, short-range Benchrest rifle, finished proudly in bright red. Forum Member JimmyMac posted: “Picked up my new 6 PPC today. This red rig features a Borden B action (Jewell trigger) fitted with a Lederer 1:14″-twist barrel with a Loker tuner. The barrel action rides in a Roy Hunter stock. On top is a Nightforce 42x44mm Competition scope in BAT rings. The rifle was smithed by Dave Bruno.”
If you compete in PRS/NRL, tactical, or 3-Gun matches, and need to haul a lot of gear in the field, consider this Savior LRP gun case with integral shoulder straps. With multiple compartments, it can carry a spotting scope, laser rangefinder, binoculars, and even a small tripod. In addition the Savior case has detachable MOLLE pouches that fit magazines, Kestrels, or other accessories. And the case even has a removable scope cover and cleaning rod sleeve.
In our Shooters’ Forum, members have given positive reviews of the Savior Long Range Precision (LRP) carry cases. These are available in three sizes: 47″, 51″, and 55″. The 51″ version should be good with barrels up to about 28″. If you have a suppressor attached or have a longer barrel, we recommend the 55″ version. The 47″ case is available in black or dark FDE (as shown) for $159.99 on Amazon. The larger 51″ and 55″ cases are $169.99 and currently offered in black only (FDE should be available soon).
These cases include full heavy-duty, padded shoulder harness, carry straps, scope cover, tripod storage section, two MOLLE pouches, and a separate large, padded storage pocket that can be used for a spotting scope, and/or other accessories.
Owner Comment: “Well-built. Fits lots of gear. Been using mine weekly for two years now. Good soft case for the price. Solid so far… but a bit heavy. I think with my PRS rifle and accessories including a 5-lb gamer plate and bag, it weighs close to 40 pounds.” — Member DDRH65PRC
If you are considering purchasing a progressive reloading press — you’ve struck gold. Today’s Saturday at the Movies article showcases the most comprehensive video ever created about progressive presses. Hosted by Gavin Gear of UltimateReloader.com, this remarkable 79-minute video covers a dozen presses from six leading manufacturers: Dillon, Frankford Arsenal, Hornady, Lee, Mark 7 (Lyman), and RCBS.
Set aside plenty of time, because there is a wealth of information — the “mother lode” of progressive press coverage. Along with the big comparison video, Gavin has prepared a detailed, 17-page online article which covers all of the presses in the shootout. This 17-page article also includes many product-specific videos. We link to five of these videos below.
12 Progressive Presses are compared in this comprehensive video:
Here it is! Ultimate Reloader’s long-awaited Progressive Press Shootout. This online article and accompanying video represent the most exhaustive and most in-depth look at progressive press reloading equipment. The Ultimate Reloader Progressive Shootout covers a dozen different progressives from Dillon, Frankford Arsenal, Hornady, Mark 7 (Lyman), and RCBS. Reviewer Gavin Gear demonstrates how each press works and provides data on costs, output rates, capabilities, and accessories so that potential buyers can make informed purchasing decisions.
MORE INFO — Progressive Press Shootout Online Article
To accompany the remarkable 79-minute Progressive Press Shootout Video, Gavin Gear has posted a ton of information on his UltimateReloader.com website. A lengthy online article provides detailed information on the particular presses, press mounts, and lighting, as well as general details such as cost of ownership. We provide links to particular topics below. This is a GREAT RESOURCE — it’s like getting an entire chapter of a technical book all for FREE!
Below we provide links to each product-specific online page, along with the corresponding time-link to the related segment of the 79-minute Progressive Shootout video.
NOTE: Along with the presses featured in these six videos, the Ultimate Reloader Progressive Press Comparison video covers six other presses (12 total), in a comprehensive 1 hour 19 minute video linked at the top of this article.
We have used NO-LEAD Cleaner in rimfire benchrest rifles similar to this modified Suhl 150-1. It helped restore accuracy with minimal brushing.
Made by the same smart folks that created Wipe-Out™, and Carb-Out™, NO-LEAD Brushless Lead Remover™ really works. Honest. If you are an active rimfire shooter, or if you shoot cast lead-alloy bullets in centerfire rifles and pistols, you should try this product. We now use NO-LEAD in our rimfire benchrest rifles, and in some centerfire guns that receive a steady diet of soft-alloy cast bullets (90%+ lead). (With rimfire guns, you don’t need to use NO-LEAD very often — maybe every 300-400 rounds unless you have a real fouler of a barrel.)
If you’ve got stubborn lead fouling in a rimfire barrel, or on a pistol’s muzzle brake/compensator, you should definitely give this stuff a try. We don’t know how but it does soften lead deposits. The manufacturer says you don’t need brushes, but we found that a bit of brushing (after NO-LEAD application) can help remove more serious lead build-up.
Yes we were surprised to find a lead remover that really works. We tried a half-dozen other lead “cleaners” that promised to dissolve lead and most of them, we discovered, are nearly useless. There’s a reason for that, as the lead alloys used in bullets don’t react to typical petrochemical-based solvents. It took the Wipe-Out chemists over five years to perfect this water-based solution that really does dissolve lead.
NO-LEAD Cleaning Procedure — Read Carefully NO-LEAD Lead Remover is a clear, red gel that is easy to apply. Just swab it in your bore (or on muzzle brakes) with wet patches or bore mop and let it sit for a few minutes. (The manufacturer says you can leave the NO-LEAD for up to 20 minutes, but that long of a dwell time does not seem necessary with our rimfire barrels.) When it contacts lead it will start to foam and you’ll see that the NO-LEAD solvent turns a pastel pink when it dissolves lead. The pink comes from the formation of lead oxide. After the recommended dwell time, simply patch out the dissolved lead deposits (you can also use a nylon brush for stubborn lead build-up).
NOTE: After cleaning, it is very important that you get all the NO-LEAD out of your barrel, and neutralize it. We recommend following the application of NO-Lead with Wipe-out or Patch-Out to neutralize the NO-LEAD, clear the bore, and remove residual carbon and copper fouling. If you don’t have Wipe-Out or Patch-out, flush the barrel thoroughly with Rubbing Alcohol or even a solution of Dawn dish detergent — then re-oil the bore.
Be Sure to Neutralize NO-LEAD After Use
Remember that N0-LEAD is a strong, slightly acidic chemical that needs to be neutralized after use. If you leave it on a nice, blued barrel for too long, it can harm the bluing. NO-LEAD will remove all the surface oils from the barrel bore. For this reason it is recommended that you neutralize NO-LEAD with Wipe-Out, or Patch-Out, which both contain effective corrosion inhibitors. If you don’t have those products, once you’ve flushed the NO-LEAD with something like rubbing alcohol, then follow with a gun oil. Caution: A petroleum-based gun oil will NOT, by itself, neutralize NO-LEAD. You need to neutralize first, then apply the corrosion inhibitor (or do it all in one step with Wipe-Out or Patch-Out).
Where to Buy NO-LEAD Lead Remover
NO-LEAD Lead Remover costs $19.50 for an 8 oz. squeeze bottle with a flip-top spout. This product is sold directly by Sharp Shoot-R Precision Products through Sharpshootr.com, or you can purchase NO-LEAD through many other online vendors. For more information, send an email via the Sharp Shoot-R Contact Form or or contact SharpShoot-R at (785) 883-4444. You can ask for Terry Paul, Sharp Shoot-R’s owner and the master chemist who developed the NO-LEAD formula.
AccurateShooter’s Target Page provides over 50 FREE downloadable targets. You’ll find all types of targets — sight-in targets, varmint targets, rimfire targets, bullseye targets, tactical targets, load development targets and more. CLICK HERE for all our free targets, including our popular LOAD DEV target.
On this load development target, all your load data fits neatly in the boxes under each target. The diamonds have 1/2″ sides and you can align your cross-hairs on the horizontal and vertical lines. When we test, we crank in a little elevation, setting the point-of-impact higher. That way our shots fall in the gray circles, leaving the red diamonds intact for precise aiming.
Storm Tactical Targets — Hundreds of FREE, Printable Targets
If you want an even greater selection of targets, specialized for PRS and NRL shooters, Storm Tactical offers a vast collection of tactical targets, available in three different versions: MOA, MIL Yards, and MIL Meters. Storm Tactical also created a rimfire target set. This includes side-by-side target blocks for fun, one-on-one competition. Overall there are 299 Storm Tactical Targets in four downloadable sets.
CLICK links to launch each Storm Tactical target collection. Then you can click the download icon to save to your hard drive. OR, you can scroll up and down to select the target(s) you like which you can tell your printer to print. We do recommend downloading the complete archives. File sizes are listed.
Here’s a Tikka T3 in Third Eye Tactical cerakoted chassis.
Rimfire Twin Target, for One-on-One Shooter Challenges
You’ll find this fun target on the third page of the Rimfire Target Pack. Just download the PDF file and instruct your printer to deliver page three. Or print out all six (6) rimfire targets if you like.
Father’s Day is Sunday, June 19, 2022, so now’s the time to shop for a great gift for the “Old Man”. If your father enjoys the shooting sports and hunting, here are some recommended items. These will all benefit “Pops” when he goes to the range. All selections cost less than $100.00. If you have an Amazon Prime membership, you can get two-day shipping in most areas of the country.
TEN Great Father’s Day Gifts for Dad Under $100.00
Protect Dad’s hearing — Howard Leight Impact Sport Electronic Muffs These high-tech muffs provide NRR 22 dB sound protection with the ability to still hear conversations and range commands. These muffs offer Headphone Functionality via external audio jack, so Dad can listen to music. We recommend using muffs over plugs for maximum hearing protection.
Teslong Digital Borescopes are “game-changers”, hugely popular with our Forum members. These Teslong borescopes display clear, sharp digital images on your mobile device. Shown here is the latest rigid version. Get the Rigid Borescope for $99.99, or flexible cable model for $55.99.
The versatile MTM Range Box includes cradles so you can do gun maintenance while at the range. A lift-out tray holds small items such as patches and jags. This is a durable product that can hold ammo and other gear.
Are you looking for a secondary press to handle basic tasks such as decapping? We’ve used this inexpensive Lee Breech Lock Challenger press for many functions. It is sturdy and has a convenient primer ejection tube. This is a great value for $99.99 on Amazon, including one Breech Lock quick change bushing.
Plano’s AirGlide case is a unique, top-loading rifle case. Ideal for benchrest guns with wide forearms, the AirGlide case puts no side-pressure on scopes. We like the ease of loading. AirGlides are now out of production, so get one while you can.
This Columbia Bahama II guide shirt is durable and comfortable. More importantly it provides UPF 30 protection from the sun’s damaging rays. The added cape over the shoulder area provides extra protection for shooters in the prone position. This is offered in 17 colors in breathable nylon. This is popular for fishing, sailing, hiking and other outdoors sports.
Walkie-Talkies are “must-have” items for long-range shooting. The 22-CH Motorola T100 Two-Way Radio is an Amazon Favorite in FRS/GMRS Handheld Radios. This is a 2-Radio set for under $30.00.
The latest 2020 Edition of The Wind Book, is the best wind resource in print for competitive shooters. The Wind Book analyzes key aspects of wind reading — vectors, cycles, vertical elements, and mirage. This excellent resource is now $17.67 at Amazon.
The Corque Gun Cleaning Kit boasts 12 jags, 9 bronze brushes, 9 mops, nylon brushes, 100 patches, oil bottles, plus 6 brass rods and other gear. This even comes with a mat and gloves. NOTE: we recommend one-piece rods for rifles.
This cleverly-designed Shotshell thermos will make Dad smile. Styled just like a 12ga shotgun shell, the Stansport Thermo Bottle holds 25 oz. of hot or cold liquids. Current price is $29.99 for black, a few bucks more for green or red.
When your cases become hard to extract, or you feel a stiff bolt lift when removing a cartridge, it’s probably time to full-length size your cases, and “bump” the shoulder back. Short-range benchrest shooters, running high pressures, typically full-length size every load cycle, bumping the shoulder .001-.002″. The vast majority of mid-range and long-range F-Class shooters also full-length size every time. High Power shooters with gas guns should definitely full-length size every time, and may need to bump the shoulders .003″ or more to ensure reliable feeding and extraction.
Use Shims for Precise Control of Shoulder Bump
Some shooters like to set the “default” position for their full-length die to have an “ample” .003″ or .004″ shoulder bump. When they need less bump, a simple way to reduce the amount of shoulder movement is to use precision shims in .001″ (one-thousandth) increments. Sinclair Int’l offers a set of seven (7) shims for your standard 7/8-14 FL sizing dies for $14.99.
Sinclair explains: “Each shim is notched for easy size identification. Just set your die using one of the middle thickness shims. Adjustments can be made easily by changing shims to increase or decrease die depth without changing the stem setting. This is a great upgrade for non-micrometer adjustable dies.”
Here are reports from Forum members who use the shims:
“Great product. I have my die lock ring(s) adjusted for the shortest headspace length on my multiple chambers 6BRs and 6PPCs. When needing a longer headspace, I just refer to my notes and add the appropriate shim under the lock ring. Keep it simple.” — F.D. Shuster
Mats Johansson writes: “I’ve been using [shims] since Skip Otto (of BR fame) came out with them. I set up my dies with the .006″ shim, giving me the option of bumping the shoulder a bit more when the brass gets old and hardens while still having room to adjust up for zero headspace, should I have missed the original setup by a thou or two. Hunting rounds can easily be bumped an extra .002-.003″ for positive, no-crush feeding. Being a safety-oriented cheapskate, I couldn’t live without them — they let me reload my cases a gazillion times without dangerous web-stretching. Shims are a must-have, as simple as that.” — Mats Johansson
Brownells offers the seven-piece set of Sizing Die Shims that let you adjust the height of your die (and thereby the amount of bump and sizing) in precise .001″ increments. Sinclair explains: “Some handloaders will set their die up to achieve maximum sizing and then progressively use Sinclair Die Shims between the lock ring and the press head to move the die away from the shellholder. Doing this allows you to leave the lock ring in the same position. These shims are usually available in increments of .001″ and work very well.”
Seven Shims from .003″ to .010″
For use with 7/8-14 threaded dies, Sinclair’s $14.99 Die Shim Kit (Sinclair item 22400 or Brownells Code 749-001-325WB) includes seven shims in thicknesses of .003, .004, .005, .006, .007, .008, and .010. For ease of use, shim thickness is indicated by the number of notches cut in the outer edge of each shim. Even without looking you can “count” the notches by feel.
NOTE: These shim sets can also be use to adjust bullet seating depth for dies that lack micrometer adjustment. Use the same 7/8-14 shims with your non-micrometer seating dies.
Shims for Arbor Dies
Do you seat with an Arbor Press? No problem…
Brownells offers a $14.99 10-shim Arbor Die set for use with L.E. Wilson seating dies employed with arbor presses. Frankly we prefer micrometer-top Wilson dies, but if you have the standard Arbor dies, these shims come in handy. Order either Brownells Code 749-001-370WB (.22 to .243 caliber) or Brownells Code 749-001-326WB (.25 to .30 caliber).









 Made by the same smart folks that created Wipe-Out™, and Carb-Out™,
  Where to Buy NO-LEAD Lead Remover

 If you want an even greater selection of targets, specialized for PRS and NRL shooters,



 Shims for Arbor Dies


