GunsAmerica Digest has a new Suppressor Academy webpage that provides host of helpful information about suppressors (aka “silencers” and “cans”). The Suppressor Academy online resource page features in-depth articles with important information for anyone considering acquiring a suppressor. The articles explain the key benefits of suppressors, how to choose a suppressor, and how to comply with Federal and state laws regulating suppressors. Below we link to four Suppressor Academy articles. Click the title for each topic to read the full-length article.
Suppressors are now legal in 42 U.S. States. There are certain legal requirements for obtaining a suppressor, including paying a $200 Tax Stamp. To own a suppressor you must be legally eligible to purchase a firearm, pass a BATFE background check, pay a one time $200 Transfer Tax, and satisfy age requirements. (SEE ALL Requirements). In most (but not all) of those states you can use a suppressor for hunting. The eight (mostly blue) states which still prohibit civilian suppressor ownership are: California, Delaware, Hawaii, Illinois, Massachusetts, New Jersey, New York, and Rhode Island. READ FULL ARTICLE on GunsAmerica Digest.
Suppressors serve one main purposes — to reduce the sound levels produced when firing pistol or rifle rounds. But GunsAmerica Digest editor True Pearce notes there are many other reasons to own a suppressor. A suppressor can reduce muzzle blast and felt recoil. The suppressor may prevent hearing damage that occurs through bone conduction better than earplugs and muffs because it reduces the noise energy at the source. When hunting, the reduced shot noise can help avoid spooking game. Having a suppressor also makes it easier to communicate when working as a team on a hunt. And, when compared to a muzzle BRAKE, suppressors are much less likely to kick up dust, dirt, sand, and snow when you shoot prone. READ FULL ARTICLE on GunsAmerica Digest.
There is some confusion surrounding the laws concerning suppressors, which are now legal in 42 U.S. States. In most jurisdictions that allow suppressor ownership, no additional state permit or license is required. But you do have to comply with Federal requirements when acquiring the suppressor. You may wish to create a trust to own the suppressor — there are some important practical advantages to having a suppressor trust. The Traditional NFA Gun Trust allows multiple responsible parties, i.e. “trustees”, to legally have possession of the suppressor. Each trustee must be verified and for each suppressor owned by the trust there will be a $200 Tax Stamp. READ FULL ARTICLE on GunsAmerica Digest.
When shopping for a suppressor there are many factors to consider: price, build quality, materials, sound level reduction effectiveness, weight, ease of mounting, and ease of cleaning and maintenance. We recommend that all suppressor buyers research the options. Check the manufacturer’s reputation, check diagrams for disassembly and maintenance. There are always trade-offs. Shorter suppressors may save some weight, but if they don’t cut the decibels as well you may be disappointed. You also need to consider the caliber — will your suppressor be used on multiple firearms? If so then get one that fits the largest caliber you will shoot. READ FULL ARTICLE on GunsAmerica Digest.
SIG Sauer has been awarded the Next Generation Squad Weapons System (NGSW) contract by the U.S. Army after a 27-month testing/evaluation process. This contract is for a new basic rifle and a new lightweight machine gun. Both new NGSW arms will use a new high-velocity 6.8mm cartridge — the 6.8×51 FURY. This 6.8×51 FURY Hybrid Ammunition features a patented bi-metal hybrid case designed to handle pressures higher than conventional ammo, resulting in significantly increased velocity and on-target energy in lighter weapons. These new rifles will also feature SIG Sauer suppressors.
The SIG-LMG (XM250) lightweight belt-fed machine gun and SIG MCX-SPEAR Rifle (XM5) are purpose-built to use SIG FURY 6.8 Common Cartridge Ammunition enabling greater range and increased lethality while reducing the weapon/ammo weight carried by soldiers. Both the SIG-LMG (XM250) and MCX-SPEAR (XM5) deliver significant advancements compared to the current M249 and M4/M4A1.
SIG Sauer’s new 6.8×51 XM250 and XM5 combat weapons both have a suppressor as standard issue equipment. SIG SLX Suppressors are designed to reduce sound signature and flash, and they feature a patented quick-detach design for easy installation/removal.
“The U.S. Army is taking a bold step toward the command of the 21st-century battlefield and SIG SAUER is immensely proud to be the selected provider for this historic revolution in infantry weapons. The fielding of the SIG SAUER Next Generation Squad Weapons System will forever change the dynamic of military engagement for America’s warfighters with American innovation and manufacturing,” stated Ron Cohen, President, and CEO of SIG Sauer, Inc.
SIG Sauer states: “The SIG FURY Hybrid Ammunition, SIG-LMG (XM250), SIG MCX-SPEAR Rifle (XM5), and SIG SLX Suppressors meaningfully advance soldier weapons technology to meet the emerging requirements of the U.S. Army.”
But is there a downside to switching to a completely new cartridge type? Yes — the problem is building ammo supplies. BreakingDefense.com notes: “While both the legacy rounds [5.56×45 and 7.62×51] have significant stockpiles built up over the years, getting ammunition levels to where they need to be is a daunting challenge”. At a Pentagon media briefing, Brig. Gen. William Boruff, executive officer for armaments and ammunition explained: “Current ammunition is such that the availability is almost an afterthought. This is because the Army has spent decades refining its process to ensure a sufficient inventory of 5.56 ammunition is available and the industry base is present to continue replenishing on a consistent basis. The Army has not introduced a new caliber for about 65 years[.] Doing so will require extensive coordination” to ramp up production and build 6.8×51 inventories.
The SIG Sauer XM5 rifle offers advantages over current U.S. military rifles. The new SIG rifle is built on the MCX platform with the added firepower of the 6.8×51 round. The XM5 features familiar AR-style ambidextrous ergonomics for easy transition from the legacy weapons to the SIG NGSW system. The weapons will also employ SIG Sauer “Next Generation” Suppressors.
SIG Sauer is proud to offer the advancements of the NGSW System in the SIG 277 FURY Hybrid Ammunition (the commercial variant of the SIG 6.8×51 FURY Ammunition round), SIG MCX-SPEAR Rifle, and the SIG SLX Suppressors available to the consumer. For more information about these products visit sigsauer.com.
Here’s something all shooters need — a smartphone App that calculates bullet-hole group sizes from your own photos. The Ballistic-X App is simple to use. Take a photo of your target, set some values (such as bullet diameter and distance to target), then use the touchscreen to place circles around each hole. The App will calculate group size (in MOA or Mils), distance to point of aim, and provide all the info in an overlay. Then click “save” to record your group for posterity!
This App works well, is relatively easy to set-up, and costs just $7.99. It is available for both Android devices and iOS (Apple) devices. There are other ways to measure group sizes from target images, such as the excellent On-Target program, which we have used for years. However On-Target requires a software installation on a Windows platform desktop or laptop. Ballistic-X is a simple, easy-to-install App with versions for both Android and iOS (Apple) Mobile devices.
The Ballistic-X App has a relatively easy-to-use interface. Of course you can choose either MOA or Milrad group values, and Inch or Metric dimensions. There are various labeling options that provide useful info for Load Development. There is even an ATZ (Adjustment To Zero) feature for adjusting your turrets.
How to Use Ballistic-X App
1. Select Photo Source — Choose Camera to take new photo or get image from Photo Library.
2. Set Reference Values — Select Bullet Diameter and enter Distance to Target.
3. Establish Scale on Image — Mark two points on target photo to set scale. For example, if the target has a 1″-square grid lines, mark two points on grid for 1″ distance.
4. Mark Point Of Aim — Put the central X on the aim point.
5. Designate Shot Locations — Place the green circles around each shot.
6. Finalize Data Display — Position Overlay, select size/color options, and export file.
Android Options — Range Buddy FREE App
Along with Ballistic-X, there is another Mobile App, Range Buddy, that also measures shot groups. Range Buddy is currently offered for Android devices only. It is FREE, but has adverts. Range Buddy isn’t bad, but users complained about the program crashing, and there are compatibility issues with newer phones. We recommend you pay $7.99 and stick with Ballistic-X.
Here’s something truly innovative — a 3D-printed metal rimfire receiver!
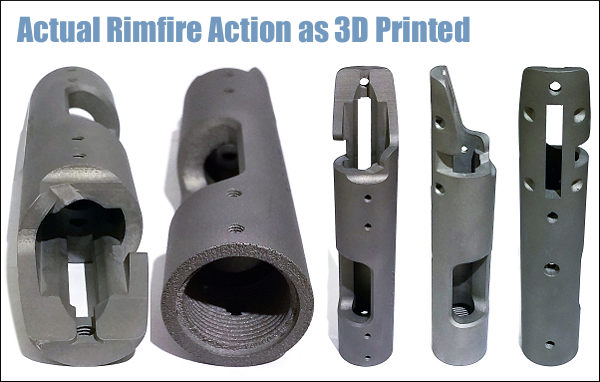
Forum member Marcos G. (aka MFP_BOP) has designed and created his own rimfire action. But it’s not machined or forged. This new action was created with a 3D sintered metal printer. A 3D modeler by profession, Marcos has the requisite skill set and access to a very high-tech (and expensive) metal printer. As printed, the actual receiver is shown below. It has just been sent out to be age-hardened to 40 HRC, after which final finish work (e.g. cleaning up tenon threads) will be done. To learn more about this 3D-printing project, read this FORUM Thread.
When most of us think of 3D printing, we think of small plastic parts — nothing as strong as steel. But there are 3D printers that employ sintered metal to build complex metal components. Marcus says the receiver he’s created should have “stated yield and tensile strength similar to investment casting.” The material used for the action is 15-5 PH® Stainless Steel (in sintered form).
The action was designed to use a PT&G 40X rimfire bolt. Marcos notes that “There is an extraction cam inside of the action, something that would be very hard or impossible to do by regular machining and/or EDM.”
Born in Brazil, Marcos now lives in New Zealand. He tell us that: “New Zealand is a very gun-friendly country. I just need my A-CAT license to make [a receiver.]” So there are no special legal restrictions (as might apply in the USA). The printer is EOS270 laser metal sintering machine. Marcos says: “The current price for one of those machines is in five figures, but I am 99.99% sure that in 5-7 years this technology will be readily available to anyone.”
As designed, the receiver was 1.4″ in diameter. Marcos reports it came out of the printer at 1.403″. The designed boltway is .690″ and it came out .687″. Marcos notes: “I haven’t noticed any warping. The threads are rough, really! Interior and exterior finishes are really good though, probably because of the way it’s been printed: upside down (must have gone through tumbling afterwards). I will have to run some taps and single-point-cut the tenon threads to clean them up.”
Marcos says the actual printing process took a lot of time: “I should have asked how long it took to be printed!” But consider this, the 7″-long receiver is created in layers only 20 microns thick, so you can understand why the process took so long.
Reasons to Print a Rimfire Receiver
Marcos 3D-printed his own action basically to save money: “Some may be asking why I printed this receiver. Here’s a little history… I tried different ways to bring a Stiller 2500X action into New Zealand. The final price to my door was NZ $3000.00 (about $2195.00 USD). Designing and making one would be way cheaper, but I felt nobody here could machine the internal abutments with precision. Also printing was still a little cheaper and printing offered the chance to put in it all details I wanted — such as M4 threads, internal cam, and fillets.”
Q: What is the most popular gun book in the history of the planet?
A: That distinction goes to the Shooter’s Bible, which has sold over 7 MILLION copies since it was first published over 80 years ago.
Released in November 2021, the 113th Edition of this respected resource is better than ever. This latest Shooter’s Bible boasts 608 pages with over 270 color photos and more than 1000 black-and-white photos. The new 113th Edition features many new firearms as well as new optics. This paperback book is now just $21.05 on Amazon.
Published annually for more than eighty years, the Shooter’s Bible is one of the most comprehensive firearms reference guides in print. The publishers claim that “nearly every firearms manufacturer in the world” is included. The 113th Edition also contains new and/or enhanced sections on ammunition, optics, and accessories, along with updated handgun and rifle ballistic tables. There are also extensive charts of currently available hunting and match bullets for hand-loaders.
While many shooters are now using the internet to get reloading data and equipment specifications, the Shooter’s Bible remains a valuable resource with a great legacy. As one recent Shooter’s Bible purchaser explains: “While it’s true that much of the information contained in the Shooter’s Bible can be found on the Internet, there are many of us who would first rather relax in our easy chair and page through the book at our leisure. If you find an item that catches your fancy, you can then follow up by going to their Web site.”
Another buyer observed: “This [2020 edition] is proof that, even with all the attacks on our 2nd Amendment right over the years, the industry has persevered and grown. I hope the day never comes when there will no longer be a reason to publish the Shooter’s Bible.”
The Shooter’s Bible contains a vast collection of firearms product information and descriptions. Hundreds of firearms are listed, complete with specifications and photos. Products from nearly all commercial gun makers on the planet are included.
More Great Gun Books From Shooter’s Bible Publishers
Here are three other books from the publishers of the Shooter’s Bible that you may want to add to your library: Guide to Cartridges; Gun Trader’s Guide; and Guide to Firearms Assembly, Disassembly & Cleaning. These are all available in softback print and Kindle (digital) editions:
How to Fill Shooting Sandbags Most Effectively
For both front and rear Edgewood bags, start by looking for the black nylon/cordura flap. This flap will have white stiches running along both sides. Note that the flap is actually two pieces of nylon/cordura which are sewn together. These two pieces must be separated at the end where there are no stitches in order to insert a funnel or other filling device.
Hold the bag so that the flap is pointed straight up and fill half way. Using a blunted rod and alternating between filling and packing, begin packing the sand firmly into the bag until the shape is uniform and you are satisfied with the firmness. Slam the base of the bag firmly on the bench several times to compact and evenly seat the sand. Then, check to see if more sand needs to be added. Repeat this process for the ears if you are filling a rear bag. Note that as the sand continues to condense during use, the bag may occasionally require additional sand until it reaches maximum capacity. NOTE: This tip is from Creedmoor Sports, which carries Edgewood Shooting Bags.
Edgewood offers an innovative rear Twisted Gater bag with an unusual asymmetrical footprint. This provides arm/hand support for the shooter while still providing superb rear support for your bench rifles.
SANDBAG Fill Options — Yes Weight Matters
For most shooting applications, “heavy is good” when it comes to sandbags. The more your sandbag weighs, the better it will resist movement or mis-alignment that can throw off a shot. In order to increase the weight of their rear bags, serious shooters have turned to exotic sand formulations that offer greater density (hence higher weight by volume) than plain silica sand (aka “play sand”).
In this article, Jason Baney reviews three popular alternatives to play sand for rear sandbags. He tested each variety to determine its density, i.e. how much volume it would displace per pound. Then he calculated how much each type of sand would weigh in various sizes of rear sandbags: standard, large, and ultra-large (Bigfoot). Check our Rapid Reference Chart to see how much weight you can add to your sandbag by switching to heavy sand.
Is heavy sand worth the added expense? For serious shooters, the answer is yes. More mass equals more stability, and a more stable bag will help you shoot tighter groups. By switching from conventional sand to Zircon or Chromite, you can DOUBLE the weight of sand in your rear bag.
Shown above are the latest SEB Bigfoot Bags. Note that the bags sit perfectly flat — there is no bulge on the bottom even though the bags are “packed to the brim with sand”.
Heavy Sand — Weighing the Benefits by Jason Baney
Many serious Benchrest shooters fill their sand bags with “heavy sand”. This practice may seem “overkill” to most shooters, but its benefits are realized quickly when shooting from a bench. Heavy sand is more dense than normal silica “play sand” and therefore makes the sandbag heavier and more stable. How much heavier is the heaviest sand? Check the chart below and you’ll see that Zircon sand weighs essentially TWICE as much as ordinary play sand. More weight equals more inertia opposing bag movement, plus more gravity-induced “stiction” on the bottom of the bag. In other words, using heavy sand helps your rear bag stay planted on the bench during a string of fire. When you shoot a hard-recoiling gun, the difference between a bag filled with play sand vs. Zircon is very noticeable. The Zircon-filled bag stays put. The play sand-filled bag may not.
Rapid Reference Chart
Comparative Sand Weights by Sandbag Size
SandBag Type
Play Sand
Riverbed Sand
Chromite
Zircon
Standard 5″x6″
5.1 lbs.
7.9 lbs.
9.9 lbs.
10.1 lbs.
Large 6″x8″
6.8 lbs.
10.5 lbs.
13.2 lbs.
13.4 lbs.
BigFoot 6″x13″
10.2 lbs.
15.8 lbs.
19.7 lbs.
20.1 lbs.
Weight Increase Compared to Play Sand
Zincon +98%
Chromite +94%
Riverbed Sand +55%
The Benefits of Heavier Sand
Heavy Sand helps your sandbag resist the tendency to shift or change alignment (relative to the stock) during recoil. This ability to maintain sandbag alignment is vital when shooting competitive Benchrest, either short-range or long-range. Having to fight a “migrating” rear bag during a group at 1000 yards will not do anything to help your accuracy. In non-competitive use, heavy sand can still benefit shooters. Friction from the stock on the rear bag, or bumping the bag on recoil with either a body part or pistol grip can move a lighter bag out of place and necessitate realigning the bag to get on target.
Of course there are some shooting situations where you don’t need (or don’t want) maximum sandbag weight. During a “walk-around” varmint session you may prefer a lighter bag. Beanbags that I carry around the groundhog fields stay filled with plastic beads, making the bag handier to tote. But, any rear bag used on a bench will be as heavy as I can make it while still using “sand” as filler.
Heavy Sand, Lead Shot, and Competition Rules
Some will say, “Well if you want a heavier sandbag, why not just add lead shot?” That is a great idea, but as far as I know, it is also illegal in every form of Benchrest competition. The material in sandbags must actually be “sand”, and only sand. It’s tempting to filter in a mix of shot and sand to increase weight, but that would also violate the rules.
Heavy Sand — Available Types and Properties
Heavy sand comes in several different varieties. In this article we tested three types: Zircon, Chromite, and commercial Riverbed sand (Exo-Terra brand “Reptile Sand”). All these are heavier alternatives to normal silica “play sand.” There are other types of Heavy Sand not tested here, such as Garnet Sand, which is between Chromite and Zircon in weight.
Sources: Sinclair Int’l sells black “Heavy Sand”, basically chromite. Large quantities of Zircon and Chromite are available from IFS Industries, and other industrial suppliers.
Exo-Terra Riverbed sand (amber). Available at pet stores.
Silica “Play Sand” (tan or light gray). Available at Home/Garden stores.
Zircon — Heavy-Weight Champion
To my knowledge, “Dupont Zircon M” is the heaviest “sand” that a normal human can acquire. It is also the most expensive. Zircon is a very light tan/brown color and is very similar in appearance to normal sandbox “play sand”. Zircon is normally rated as having the greatest density among heavy sands and it has the smallest particle size, though some Chromite sand density values overlap the Zircon numbers.
1.00 pound of Zircon displaces 149cc vs. 295cc for Play Sand. So, that means Zircon is 98% heavier than an equal volume of Play Sand.
CONSUMER TIP: Real ZIRCON sand is TAN in color, not black or dark gray. Some “heavy sand” vendors promise Zircon but deliver a dark gray sand that is something else entirely!
Chromite — Almost as Heavy as Zircon, and 30% Cheaper
Chromite sand is nearly the same density as Zircon but it costs quite a bit less. Chromite typically sells for about 25-30% less than Zircon (comparing bulk prices of both types of sand). Chromite sand is black in color. So when you buy “heavy sand,” make sure you are getting what you pay for.
1.00 pound of Chromite displaces 152cc vs. 295cc for Play Sand. So, that means Chromite is 94% heavier than an equal volume of Play Sand.
Riverbed Sand — Weighs Less but Costs More than Chromite
Riverbed sand, is about 30% less dense than Zircon or Chromite, but is about 150% more dense than silica sand. Depending upon where you buy this sand, and the quantity, you will most likely pay more for this sand than you would Zircon or Chromite. Riverbed sand is a conglomerate of several different sizes and colors and appears red and black. Unless you are unable to get Zircon or Chromite, I would not bother with the riverbed sand.
1.00 pound of Riverbed Sand displaces 190cc vs. 295cc for Play Sand. So, that means Riverbed Sand is 55% heavier than an equal volume of Play Sand.
Density/Volume Testing and Weight Comparisons
All four sand varieties mentioned above were tested for volumetric density by weight. Each type of sand was weighed out to 1.00 lbs. on a commercial postal scale. Each 1.00 lb sample of sand was then poured loosely into a 600ml beaker and shaken minimally to level the top surface. This served to determine the volume that the sand occupied.
1.00 pound of sand displaced the following volumes:
Zircon: 149 cc
Chromite: 152 cc
Riverbed sand: 190 cc
Play Sand: 295 cc
How do the density-volume numbers translate to the real world? Here is an estimate of how much each sand would weigh in various sizes of rear bag:
Standard Bunny Ear Bag
5″ by 6″ footprint or about 1500cc
Zircon: 10.1 lbs.
Chromite: 9.9 lbs.
Riverbed Sand: 7.9 lbs.
Play Sand: 5.1 lbs.
Protektor Doctor Bag
6″ by 8″ footprint or about 2000cc
Zircon: 13.4 lbs.
Chromite: 13.2 lbs.
Riverbed Sand: 10.5 lbs.
Play Sand: 6.8 lbs.
Seb BigFoot Rear Loaf Bag
6″ by 13″ footprint or about 3000cc
Zircon: 20.1 lbs.
Chromite: 19.7 lbs.
Riverbed Sand: 15.8 lbs.
Play Sand: 10.2 lbs.
Conclusions and Recommendations
What’s the best choice? For most users, we recommend Chromite. Chromite delivers nearly the same bag weight as Zircon but is more economical to buy. But for those who demand the maximum weight in their sandbag (without consideration of cost), Zircon is the top choice because it is sold at a finer grade (higher density) than Chromite. However, Chromite will save you money, and deliver very nearly the same amount of weight by volume. When purchased in bulk, Chromite is typically 25-30% LESS expensive than Zircon.
I would not suggest using the Riverbed sand unless you really need to fill a sandbag immediately and can’t wait to locate a source for either Zircon or Chromite. Keep in mind that Sinclair Int’l and other major mail-order vendors do sell heavy sand (though Zircon and Chromite may be much less expensive when purchased in larger quantities from local industrial sources.) The price of the Riverbed sand will vary quite a bit depending on the pet store and quantity bought. The Riverbed sand I tested, Exo-Terra Reptile sand (photo right), was fairly expensive as purchased at a pet store.
Bottom Line: When it comes time to fill your new rear bag, you may want to save a few dollars and go with cheaper Chromite sand, but if you want to gain every bit of weight possible, step up to the heavier Zircon.
Lenzi Rear bags work very well and are popular with top competitors. This are sold through PMA Tool.
With the high cost and reduced availability of factory ammo, more shooters are loading their own ammo. When good 9mm pistol ammo was $10/box, it might be hard to justify handloading. Now that 50 rounds of factory 9mm can run $25 or more it certainly makes sense to reload. The same is true with rifle ammo if you shoot large quantities, or if you simply can’t find your preferred ammo for sale these days.
To increase productivity when reloading large quantities of ammunition, many shooters are thinking of getting a progressive press. Because multiple operations take place with a single pull of a lever, a progressive press can produce way more ammo in a given period of time than any single stage press. With a progressive, on the ram up-stroke, the multiple stations can simultaneously remove spent primer, full-length size case, drop powder, seat bullet, and crimp (if desired). Most progressives are also set up to prime cases with the ram in the lower position — though some guys prefer to prime manually.
Progressive presses aren’t just for high-output pistol ammo or bulk rifle ammunition. Good progressives can be adapted to do certain reloading tasks for top-on-the line match ammo. You might use a progressive for decapping, priming, and sizing, then throw powder and/or seat bullets separately. Some Champion shooters do use progressives to load their match ammo! For example 5-Time National Long Range Champion John Whidden and 2020 Berger SWN F-Open Champion Jay Christopherson both use progessive presses for some (but not all) operations.
To help you get started with progressive presses, here are six videos from UltimateReloader.com that cover seven popular machines, from the elite Mark 7 Evolution to the affordable Lee Loadmaster. With many of these machines you can add separate vertical bullet feeder systems that further increase loading efficiency. Machines Covered: Lyman Mark 7, Dillon XL-650, Dillon XL-750, Dillon RL-550c, RCBS Pro Chucker 7, Hornady Lock-N-Load AP, and Lee Load Master.
Mark 7 Evolution Press — Distributed by Lyman
Dillon XL-650 vs. Dillon XL-750
RCBS Pro Chucker 7 with Bullet Feeder
Dillon 550C with 6mm Creedmoor and 9x19mm
Hornady Lock-N-Load AP Progressive
Lee Load-Master Features and Loading 9mm
SAFETY BONUS — Why You Need a Lock-Out Die
The RCBS Lock-Out Die can also be used with some Dillon and Hornady progressive presses.
If you load pistol or rifle ammo with a progressive press, we strongly recommend you get a Lock-Out Die from RCBS. This unique reloading die will prevent your progressive press from advancing if the dispensed powder charge is more or less than about 0.3 grains too high or too low. The Lock-Out Die really works.
The Lock-Out Die works by using a central die detection rod that sets its vertical position based on the height of the powder column in the case. Through an ingenious design, if the powder column height is too low or too high, the rod locks in place as you start to pull the press handle. This halts the press before the ram can lift and the cartridge plate can advance. Unlike a beeping alarm system (which can be ignored or defeated), the Lock-Out Die physically stops the movement of the press ram and prevents a bullet being seated in the “problem” case.
It takes a bit of tweaking to get the Lock-Out Die detection rod setting just right, but once it is correctly positioned, the Lock-Out Die works smoothly in the background. The Lock-Out Die won’t interfere with the loading process unless it detects a high or low charge — and then it positively stops the progressive loading cycle.
While crafted for use in RCBS progressive presses, the RCBS Lock-Out Die can also be used on a Dillon XL Progressive or Hornady Lock-N-Load progressive — though it does take up one station which could otherwise be used for a final crimp die (after the seating die). This Editor has used the RCBS Lock-out die very successfully on an RCBS 2000 progressive press for many years.
News from New Zealand — AMP to Ship 10,000th Annealing Machine Annealing Made Perfect (AMP) can celebrate a real milestone. After shipping its very first induction annealer six years ago in February 2016, Annealing machine number #10,000 will leave the New Zealand factory next week. In that time, the AMP annealer has progressed from the original part-analogue Mark I through to today’s smart, fully digital Mark II annealer. Over the six years of production, over 55,000 annealing pilots have also shipped. Company president Alex Findlay says “AMP annealers are now standard equipment in many ballistics laboratories. We are proud that our annealer is considered mandatory on the reloading bench of precision marksmen worldwide. We export to every sports-shooting country. Our patented AZTEC system means that even a novice reloader can anneal with the same precision as a world champion.”
How the Computer-Controlled AMP Induction Annealing Machine Is Crafted
New Book about Annealing Made Perfect’s Business Development
To mark the occasion, AMP has released “Making Perfect”, a 320-page full-color book which chronicles the company’s growth from first concept in 2012, through the years of R&D, right up to today’s market-leading products, including the ground-breaking AMP Press diagnostic bullet seating instrument. This excellent book includes the full “Annealing Under the Microscope” series of research articles, which are fascinating reads for any AMP owner, or potential buyer.
In the process, Alex and Matt have worked with many of the leading figures of the shooting world. This fascinating book explains how two guys in New Zealand created a unique new product, and who helped them along the way. Alex send AccurateShooter a copy of this book recently, and we can affirm it is a well-written, interesting guide to the creation of the AMP annealer, and its remarkable technology. There are plenty of color photos that show, from start to finish, how the AMP machine was developed and perfected. AMP’s new Making Perfect Book is available on the AMP USA webstore with shipping from Las Vegas. It is also sold through AMP’s international webstore with shipping from New Zealand.
Shiny brass — it may not shoot more accurately, but it does make you feel better about your hand-loaded ammo. While it’s not necessary to get brass “bright and shiny” after every firing, it is a good idea to clean powder residue, grime, and grit off your brass before you run cases into sizing dies. There are many ways to clean cartridge cases. A quick wipe with solvent on a patch may suffice for recently-shot cases. Older brass with baked-on carbon may require lengthy tumbling. Ultrasonic cleaning is another popular option that gets your brass clean inside and out.
Sinclair International has a series of helpful videos on brass cleaning. These short “how-to” videos, hosted by Bill Gravatt, Sinclair’s past President and current Creedmoor Sports President, cover the various processes you can use — tumbling, ultrasonic cleaning, chemical cleaning, and cleaning by hand.
Video ONE — Cleaning Brass in Vibratory or Rotary Tumbler
TIP: Brass that has recently been shot will clean more easily than brass that has been sitting many days or weeks. If your tumbling media is fresh the job should be done in an hour or less. It’s your choice whether to tumble with primers removed or with primers still in the cases. If you choose to tumble with primers out, we suggest you deprime with a depriming die, rather that put dirty brass into your sizing die. Some people like to add a teaspoon of liquid polish to the media. This does work, cutting tumble time, and making your brass more shiny. However, if you add liquid polish, do that BEFORE you add the brass and let the tumbler run for a 15 minutes to get the polish completely mixed into the media. Otherwise you can else up with gooey gunk inside your cases — a very bad thing.
Video TWO — Ultrasonic Case Cleaning
TIP: There are many different types of solutions you can use. Soapy water suffices for some folks, particularly if you add a little Lemi-Shine. The Hornady One-Shot Sonic Clean and Lyman Turbo Sonic solutions both work well, and can be used multiple times, provided you strain the solution to remove dirt and grit after cleaning sessions. Many ultrasonic cleaning machines have timers. Experiment with dwell time to see how long you need to immerse your brass. A very small amount of Ballistol in the solution will help lubricate your necks on the inside. This can make bullet seating go more smoothly, with more consistent neck tension.
Video THREE — Chemical Cleaners (Soaking without Ultrasound)
TIP: After using chemical cleaners, such as the Iosso solution, you need to water-rinse your brass thoroughly. A kitchen strainer helps with this (see video at 0:20). Also, don’t forget your brass in the chemical solution — follow the manufacturers recommendations and don’t exceed the recommended dwell time. Chemical cleaners work surprisingly well to remove grease and grime, and the solution can be re-used multiple times. However, if you want your cases to look bright and shiny (like new brass), you will probably have to tumble. [Editor: A very effective new chemical cleaner is the Brass Monkey product from the makers of Wipe-Out and Carb-Out. Add a teaspoon to a gallon of water then soak your brass for 20-30 minutes. It really works — the cases clean up dramatically].
Video FOUR — Manual Cleaning (By Hand)
TIP: Keep some oversize patches in your range kit. At the end of your shooting sessions, wipe off your fired brass with a patch dampened with a mild, non-corrosive solvent (once again Ballistol works well). Before the carbon sets up on your brass it is very easy to remove. For tougher jobs, you can use 0000 Steel Wool (as Bill recommends in the video). You may find that timely hand-cleaning lets you avoid tumbling altogether — or you may choose to tumble (or ultra-sound) your brass only after a half-dozen or so firings.
Credit our buddy Joe Friedrich for this simple yet effective accessory for your benchrest rifle. Joe shoots a .22 LR benchrest rig with a barrel tuner. When he added weights to his tuner, he found his rifle no longer balanced well. He wanted to add some weight in the rear without drilling holes in the stock. He also wanted the weight to be removable, and easily placed on another rifle in his stable. He wanted a weight that could be moved from gun to gun as needed.
At a local sporting goods shop Joe found a 1.5-lb ankle weight that comes in a padded, tubular elastic cover. It’s like a 1.5-lb sausage in a soft, stretchy nylon cover. (Imagine a really fat, heavy bungee cord). Joe simply attached a plastic zip tie at the end to make a loop that fits perfectly over his buttstock. CLICK HERE for full-screen photo.
To “tune” the rifle’s balance, Joe just slides the ankle weight fore and aft on the stock. We have tried this moveable ankle weight on a variety of different BR stocks (including a McMillan Edge) and it worked perfectly. This is a great invention, and would work with sporter rifles and ARs just as well.
NOTE: Obviously, this ring will increase the measured weight of your rifle. So, if you are competing in a registered match with weight restrictions, you have to ensure that your rifle still makes class weight limits with the ankle weight ring in place.




 How to Fill Shooting Sandbags Most Effectively
 For most shooting applications, “heavy is good” when it comes to sandbags. The more your sandbag weighs, the better it will resist movement or mis-alignment that can throw off a shot. In order to increase the weight of their rear bags, serious shooters have turned to exotic sand formulations that offer greater density (hence higher weight by volume) than plain silica sand (aka “play sand”).
 Many serious Benchrest shooters fill their sand bags with “heavy sand”. This practice may seem “overkill” to most shooters, but its benefits are realized quickly when shooting from a bench. Heavy sand is more dense than normal silica “play sand” and therefore makes the sandbag heavier and more stable. How much heavier is the heaviest sand? Check the chart below and you’ll see that Zircon sand weighs essentially TWICE as much as ordinary play sand. More weight equals more inertia opposing bag movement, plus more gravity-induced “stiction” on the bottom of the bag. In other words, using heavy sand helps your rear bag stay planted on the bench during a string of fire. When you shoot a hard-recoiling gun, the difference between a bag filled with play sand vs. Zircon is very noticeable. The Zircon-filled bag stays put. The play sand-filled bag may not.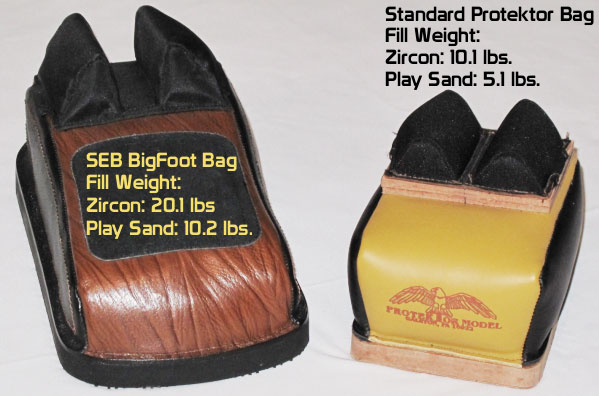
 Dupont Zircon M (pale tan): 165-175 lb/cu.ft; avg. particle size 0.01″.

 Zircon — Heavy-Weight Champion
 Chromite — Almost as Heavy as Zircon, and 30% Cheaper
 Riverbed Sand — Weighs Less but Costs More than Chromite


 I would not suggest using the Riverbed sand unless you really need to fill a sandbag immediately and can’t wait to locate a source for either Zircon or Chromite. Keep in mind that





 Shiny brass — it may not shoot more accurately, but it does make you feel better about your hand-loaded ammo. While it’s not necessary to get brass “bright and shiny” after every firing, it is a good idea to clean powder residue, grime, and grit off your brass before you run cases into sizing dies. There are many ways to clean cartridge cases. A quick wipe with solvent on a patch may suffice for recently-shot cases. Older brass with baked-on carbon may require lengthy tumbling. Ultrasonic cleaning is another popular option that gets your brass clean inside and out.
 Credit our buddy Joe Friedrich for this simple yet effective accessory for your benchrest rifle. Joe shoots a .22 LR benchrest rig with a barrel tuner. When he added weights to his tuner, he found his rifle no longer balanced well. He wanted to add some weight in the rear without drilling holes in the stock. He also wanted the weight to be removable, and easily placed on another rifle in his stable. He wanted a weight that could be moved from gun to gun as needed.


