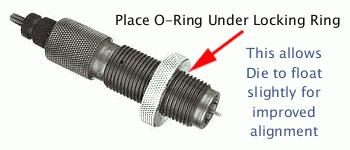
Here’s an inexpensive procedure that can help you load straighter ammo, with slightly better measured concentricity (i.e. less run-out) on the case necks and bullets. Simply use a Rubber O-Ring on the underside of the die locking ring. This allows the die to self-align itself (slightly) to the case that is being sized. Without the O-Ring, if the flat surface on the top of your press is not perfectly square with the thread axis, your die can end up slightly off-angle. This happens when the bottom of the locking ring butts up tight against the top of the press. The O-Ring allows the die to float slightly, and that may, in turn, reduce the amount of run-out induced during case sizing.
Top prone shooter GSArizona, who sadly passed in 2022, tried this trick and said it works: “Go to your local hardware store and get a #17 O-Ring (that’s the designation at Ace Hardware, don’t know if its universal). Slip the O-Ring on the die and re-adjust the lock ring so that the O-Ring is slightly compressed when the die is at the correct height. Size and measure a few more cases. You will probably see a slight improvement in neck concentricity as the die can now float a bit as the case enters and leaves it. This isn’t going to be a dramatic improvement, but it’s a positive one.”
We want to stress that adding O-Rings to sizing dies may help some reloaders, but we don’t offer this as a panacea. Try it — if using the O-Ring reduces measured runout that’s great. If it doesn’t, you’ve only spent a few pennies to experiment.
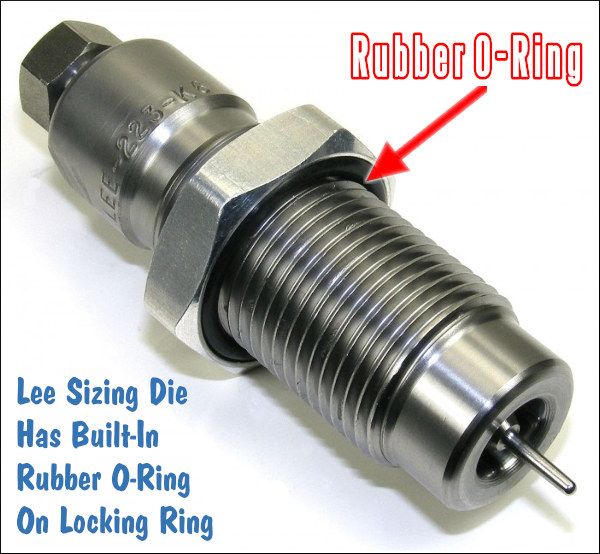
Lee Precision makes die lock rings with built-in O-Rings. Lee’s distinctive lock ring design allows the same kind of self-alignment, which is good. However, Lee lock rings don’t clamp in place on the die threads, so they can move when you insert or remove the dies — and that can throw off your die setting slightly. By using an O-Ring under a conventional die lock ring (that can be locked in place), you get the advantages of the Lee design, without the risk of the lock ring moving.
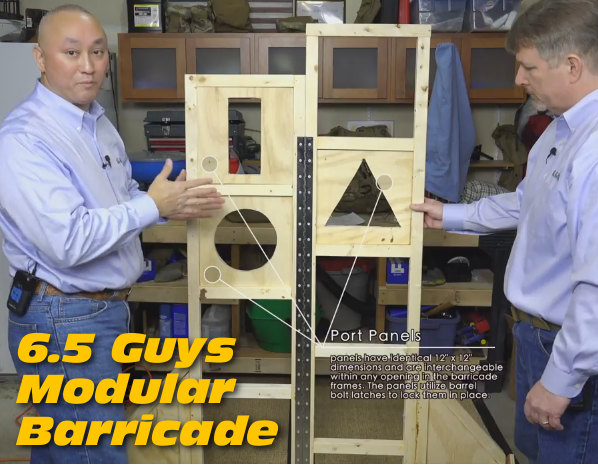
Here’s a great Do-It-Yourself project for tactical shooters. Ed and Steve of 65Guys.com have created a versatile wooden barricade designed for easy transport. The goal with this design was to create a stable barricade that offers a variety of shooting positions, but can also fit in the bed of a pick-up or the back of an SUV. The 69″ tall barricade is hinged in the middle, so it’s just 27″ wide. To deploy the Barricade you simply fold it open and then nest the lower wings in ground-level stands.
We call this the BYOB Project — Build Your Own Barricade. Anyone with basic wood-working skills should find the Barricade pretty easy to make. The only tricky part is cutting the side Dado joints for the left and right lower wings. But when you’ve got it completed, you have a low-cost unit that is versatile and sturdy yet easy to pack in a truck and carry out on the range. In the video below the 6.5 Guys showcase their Gen 2 barricade and explain how to build one just like it.
Looking at the 6.5 Guys Modular Barricade
The Modular Barricade was drawn up by Steve in PowerPoint and then dimensions added. Once the entire plan was created, Steve cut components to size and then used ordinary wood screws and wood glue to assemble the barricade frame. This was done to ensure maximum rigidity due to the light weight construction using 2″ x 2″ frame members. A long piano hinge was used to allow the Barricade to fold in half, while still having high torsional rigidity. Each of the Barricade openings are 12″ x 12″ square. This consistent ‘window’ spacing allows interchangeable panels with different cut-out shapes to be placed at varies heights/locations in the Barricade.
Modular Barricade Key Features
— Lightweight construction using low-cost 2×2 wood beams.
— Collapsible frame with center hinges for easy transport and deployment.
— Multiple Support levels at 6″ vertical intervals (6″ variance R to L).
— Modular port design allows ports to be changed and moved as desired.
6.5 Guys’ Modular Barricade — Construction Tips
The Modular Barricade can be constructed over a weekend with the proper materials and basic shop tools such as a power saw and electric screwdriver. Steve used a router for the side panel dado joints but a table saw could also be used for that task. Steve’s only real issue with the build involved the port panels — getting them to fit right. The 2″ x 2″ frame wood wasn’t always straight; even a small variation in the wood could cause a port panel to be too tight or too loose. Steve had to do a lot of extra sanding and planing to get the port panels to fit just right.
Where and How to Use the Barricade for Training
Because the 6.5 Guys’ Modular Barricade is so easy to move, you can simply pack it up and deploy it at your local range for practice. (Do ensure club/range rules allow shooting from barricades.) While the Barricade is designed to sit on the natural ground, the base stands can also be placed on concrete if your range does not allow deployment forward of the normal firing line. While you can use the Barricade for training on your own, Ed and Steve say novice shooters can benefit from a formal clinic.
In the video below, the 6.5 Guys discuss precision rifle training with Scott Satterlee, an instructor with Core Shooting Solutions. This video explains why new shooters should consider enrolling in a formal training clinic. Topics covered are: typical course format and “curriculum”, the gear needed to participate in a precision rifle clinic, and skills shooters should practice before attending the clinic.
We’ve always liked the capacious, durable range boxes from MTM Case-Gard. And MTM offers a special “Tactical” version for AR shooters. This detachable-lid Tactical Range Box features a magwell-filling “action block insert” to support your AR securely during cleaning. Magwell posts like this have been used for years by AR gunsmiths. It’s a fast and convenient way to secure your AR.
The Tactical Range Box also comes with two adjustable cradles that will support most conventional bolt-action rifles and lever guns. These plastic cradles are gentle on fancy stocks, and they can be removed and stowed in the bottom of the box during transport.
The Tactical Range Box uses a two-piece design. The removable top storage compartment holds oils, solvents, brushes, patches, and small accessories. Unlatch the top box to reveal a large, deep storage area that will hold tools, earmuffs, ammo boxes and other larger items. MTM Range Boxes are big enough to hold pretty much everything you need at the range, except your front rest and rear sandbag. Midsouth Shooters Supply offers the MTM Tactical Range Box (item 008-TRB40) for just $52.23. Like MTM’s standard Shooting Range Box (RBMC-11), the Tactical Range Box is well-built and much less flexy than generic plastic tool-boxes. Check out the features of this range box in the videos below.
Practical USER TIP — Keep some heavy items in the box for more stability. Forum member Tom Alvez explains: “I have one of those range boxes… It’s a great product, really. But, unless there is some pretty heavy stuff in the box when the rifle cleaning starts it may get pretty skittery. Maybe [add] a block or two of lead — that could come in handy later.”
For more info, contact MTM® Molded Products at (937) 890-7461 or visit MTMCase-gard.com.
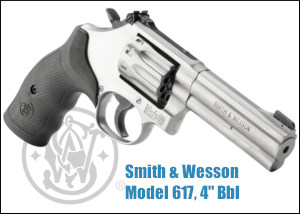
S&W Model 617 now has a 10-round cylinder, but early models were six-shooters.
In recent years, the ranks of first-time gun buyers have grown dramatically. Millions of Americans have purchased their first-ever handgun. With so many handgun options (from derringers to Desert Eagles) many first-time buyers have trouble making a choice. What should those millions of new gun buyers have acquired first? Perhaps it should have been a rimfire revolver. Here is why…
The Argument for a Rimfire Revolver Some years back, a close relative contacted this Editor. Wanting to get started in handgunning, he sought my advice on purchasing his very first handgun. “Should I get a Glock?”, he asked. “No” was my response. “Well how about an M&P?” he inquired. “Better ergos” I said, “but ‘No’ is still my reply.” “OK, how about a KelTec, they’re cheap…”
“Absolutely not”, I replied.
I could tell he was getting annoyed, when he said “OK, Mr. know-it-all, so what handgun should I get?” Calmly, I replied: “Get a .22-caliber rimfire revolver. You will never out-grow it. You will learn sight alignment and trigger control. You can practice with inexpensive ammunition. A good .22 revolver will be considerably more accurate than 90% of the self-loading pistols you could buy. If you get a Smith & Wesson, you will keep the gun for the rest of your life and pass it on to your kids. If you or your heirs ever wear out the barrel or cylinder, Smith & Wesson will replace the parts for free, forever.”
This Editor’s first really accurate handgun was a .22 LR Smith & Wesson Model 617 that could easily stack ten shots in a dime at 10 yards. It remains my favorite and most-used handgun. What can we say about the Model 617? The single-action trigger pull is superb, and the accuracy surpasses most any semi-auto rimfire pistol, except for a few, very expensive target pistols. We like the 6″ version for the longer sight radius, but the 4″-barrel 617 is also very accurate, and it balances better.
You can learn all the fundamentals with this ultra-reliable handgun, shooting inexpensive .22 LR ammo. The model 617 is rugged, durable, and can give you a lifetime of shooting fun. Once you have mastered the basics of shooting with a .22 LR, you can move on to larger caliber handguns suitable for self-defense. Below is a slide-show illustrating a S&W model 617 ten-shot, with 6″ barrel. S&W also makes a 4″-barrel version of this revolver. (See: Shooting Demo Video with 4″ model 617.)
Another .22 Revolver Option, the Smith & Wesson Model 63
The current S&W Model 63 is a J-Frame .22 LR with 3″ barrel and fiber optic front sight. The Model 63 is compact enough for comfortable carry and well-balanced. The older Model 63, aka the “Kit Gun”, is an appreciating classic.
Old “Number 2″ belonging to Ray Gross. Click Photo for full-screen Image.
Ray Gross, one of America’s great rifle competitors, has served as captain of the United States F-TR Team. While Ray is best known for his F-Class shooting and leadership, Ray is also an experienced service rifle shooter, who secured his Distinguished Rifleman Badge 31 years ago. Ray has shot many rifles during his competitive shooting career, but the M1A rifle above held a special place in Ray’s heart. This old semi-auto earned Ray his Distinguished Badge, and he’ll never forget that, though he parted with the rifle in 2016.
Posting back in 2016, Ray told us:
“I said goodbye to an old friend… Affectionately known as ‘Number 2′, she is the rifle that I earned my Distinguished Rifleman Badge with in 1995 (#1159).
That rifle was also responsible for a fair amount of Venison in the ’90s, as well. But since then, she has spent a lot of time in the closet. Last time I got her out was to destroy a bunch of hard drives containing evidence collected during my Computer Forensics days. She deserved better than that.
I will miss the beautiful sound of all that American steel slamming into battery when I tripped her bolt.” – Ray Gross
Ray Gross was profiled in Shooting Sports USA a few seasons back. Ray explained how he started his competitive shooting career with an M1A rifle:
How did you begin in competitive shooting?
I began competing in 1991, at age 27. I bought an M1A and joined the Midland County Sportsman’s Club. One day I was at the club shooting the M1A when a member, Rich Koskela, came over and invited me to join them shooting competitions. Up until that point, I had no idea there was such a thing as NRA Competitive Shooting and I had been a member since 1986. Anyway, Rich and some of his friends showed me the basics and at my first match, I finished in the top half and first MU.
What are your major accomplishments in the shooting sports?
In 1995, I earned the Distinguished Rifleman Badge and a few years later switched to Palma rifle. On the way to making my first Palma team in 2003, I won the Army Cup, the Andrus trophy twice and the Sierra Trophy once. As a coach, I won the Herrick match, and seven F-TR National Championship team matches. Internationally, I’ve coached three gold medal America Match teams (The USA has only won four in Palma Rifle), and earned a Silver and Bronze coaching on the Palma Team in 2015 and 2019. In 2017, I led the U.S. F-TR Team to a World Championship. In 2019, I also won the NRA ELR National Championship (25-lb max Division).”
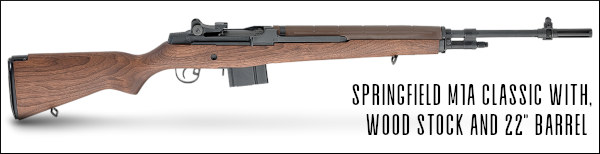
“Descended from the M1 Garand, the M14 utilized multiple improvements that made it a far superior firearm for combat and a much better rifle for competition.” — Dick Jones, Shooting Sports USA.
In the April 2018 issue of Shooting Sports USA, you’ll find a good article on the civilian version of the M14, now sold commercially as the Springfield M1A. An evolution of the battle-proven M1 Garand, the M14 was designed to shoot the 7.62×51 (.308 Win) round instead of the larger .30-06 Springfield cartridge used in WWI, WWII and Korea. While the vast majority of today’s M1As are chambered for .308 Win/7.62×51, Springfield Armory also produces a 6.5 Creedmoor version.
Dick Jones reports that accurized M14/M1As could post remarkable scores: “The accuracy potential of the M14/M1A is unquestionable. During their reign as service rifles, they produced multiple perfect 200 scores at 600 and 1000 yards in the hands of top shooters. This is a difficult feat with a modern, scoped, magnum-caliber rifle and remarkable with an iron-sighted battle rifle. Good competition rifles can group 10 shots under one MOA, and the meticulously-massaged rifles used by the top shooters during my career would consistently put up 10 shots under an inch at 200 yards off a test cradle.”
For many years, the semi-auto version of the M14 was “top dog” in iron sights Service Rifle competition. Now that discipline is dominated by .223 Rem (5.56×45) AR-type rifles, but the bigger .308-caliber rifle, now sold as the M1A, remains popular. And in non-pandemic years, the CMP hosts a major M1A Match at Camp Perry, sponsored by Springfield Armory. This is a very popular event with 100+ competitors and significant cash prizes.
This Springfield Armory video explains M1A field-striping, cleaning, and maintenance.
As racing improves automobiles, competition improves firearms, and the current crop of Springfield M1As, from the Basic to the top-of-the-line Super Match and Loaded models, reflects the years of development. The M14 and its variants are … still considered by many to be the best battle rifle in the history of the U.S. Military. — Dick Jones, Shooting Sports USA
Military Version Operation Revealed — M14 Training Film
The original military version of the M1A was the select-fire M14. The 27-minute official U.S. Army video below demonstrates the operation of the M14. Field-stripping is shown from the 5:13 time-mark through 8:30. Cut-away drawings show the M14’s gas operation at 8:40.
Watch M14 Functioning Cycle Starting at 9:25 Mark:
The M14’s complete 8-step functioning cycle is demonstrated from the 9:25 time-mark through 22:41. These eight operations are: 1) Feeding; 2) Chambering; 3) Locking; 4) Firing; 5) Unlocking; 6) Extracting; 7) Ejecting; and 8) Cocking. This movie is fairly long, but fans of battle rifles will find it well worth their time. Every M1A owner should definitely watch this video start to finish.
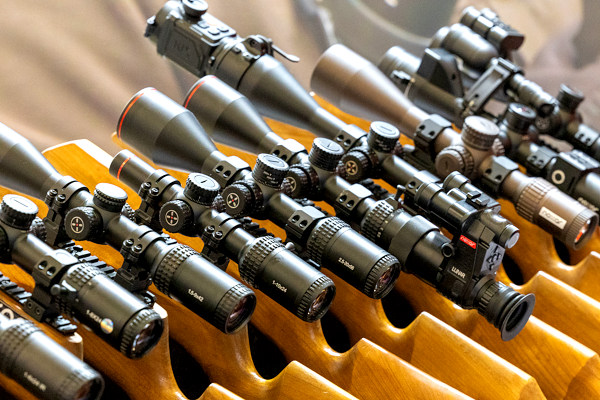
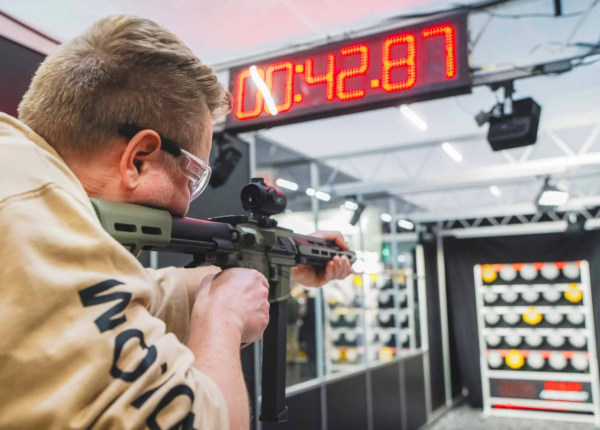
The IWA Outdoor Classics (Euro SHOT Show) event in Germany is the largest hunting/shooting/outdoor trade show outside North America. Every year the IWA Outdoor Classics showcases thousands of products from manufacturers from around the world. This year’s IWA event ran 2/26/26 through 3/1/2026 in Nuremberg. For this Saturday Movies Showcase we feature notable new rifles, pistols, and optics.
To see other products on display in Germany this week, visit the IWA Outdoor Classics Product Showcase. Product names are listed alphabetically, and you can also search by product type and/or country. Images and descriptions of 335 Featured Products are available online..
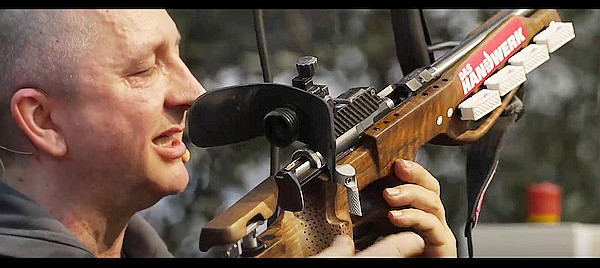
This cool cutaway Feinwerkbau competition air rifle reveals inner working parts.
Walther RS3 Straight-Pull Bullpup Hunting Rifle
The new Walther RS3 hunting rifle is an innovative straight-pull, bolt-action rifle with bullpup-type stock. In the first video, TFBTV chats with Walther CEO Bernhard Knöbel about the new RS3 rifle, which blends traditional European hunting aesthetics with modern engineering. The premium RS3 features a handsome wood stock and deluxe refined finish. In the second video above, the respected All4Hunters channel examines the Walther CS3’s key features and what makes it stand out among high-end hunting rifles.
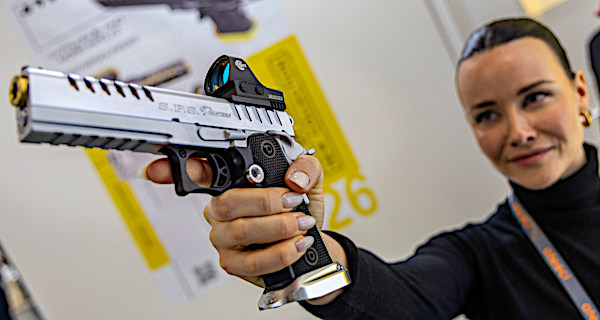
CZ TS 3 Orange Competition Pistol
The new CZ TS 3 Orange pistol was one of the more notable semi-auto pistols at the 2026 IWA Outdoor Classics. The CZ TS 3 ORANGE is the flagship model of the new CZ TS 3 competition series, developed for IPSC Optics and USPSA Limited Optics divisions. This new competition pistol has a great trigger, good balance, ported slide, and red-dot optic. This CZ factory video shows the new TS3 Orange being used in rapid-fire sessions.
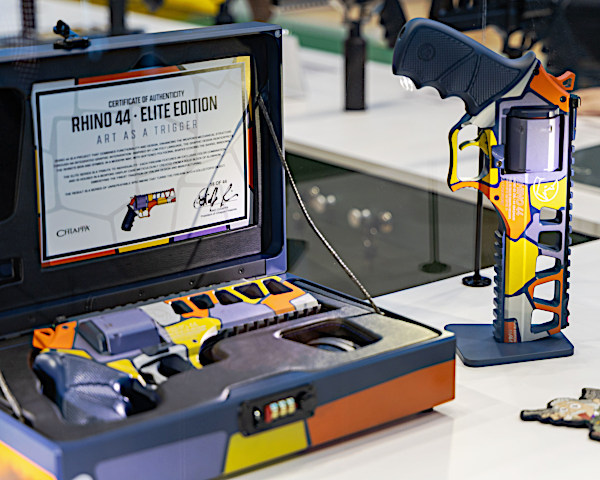
Chiappa Rhino .44 Magnum Revolver
At IWA 2026 TFBTV checked out the Chiappa Rhino chambered in .44 Magnum, the latest large-frame addition to the Chiappa Rhino lineup. The Rhino’s low bore axis design fires from the bottom chamber of the cylinder. This reduces muzzle rise, making heavy calibers more controllable. This video examines the design, and explains how recoil impulse compares to traditional revolvers. Available in various finishes, this revolver can make high-energy cartridges more controllable.
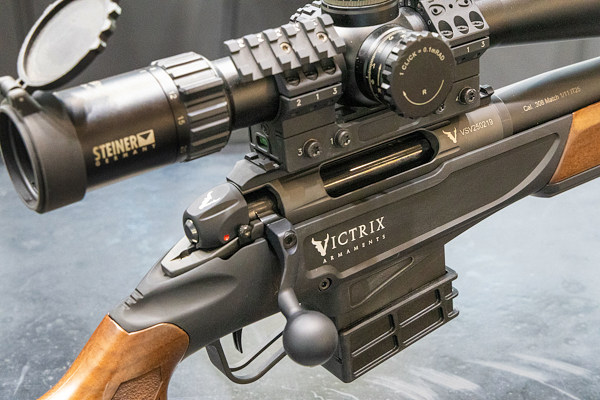
Victrix Corvo CS Compact .50 BMG Rifle
This video features Victrix’s Corvo CS, a compact variant of their .50 BMG platform. Victrix designed the Corvo CS with an 18″ barrel and folding stock to create a more compact system while maintaining the capability of the .50 BMG cartridge. The Corvo CS features a stainless steel action and bolt, a 2-stage trigger, a folding stock, and multiple QD attachment points. The rifle includes a 45 MOA top rail, M-LOK interface, barricade stop, muzzle brake, and compatibility with Victrix monopod and bipod systems.
New Triggertech Triggers
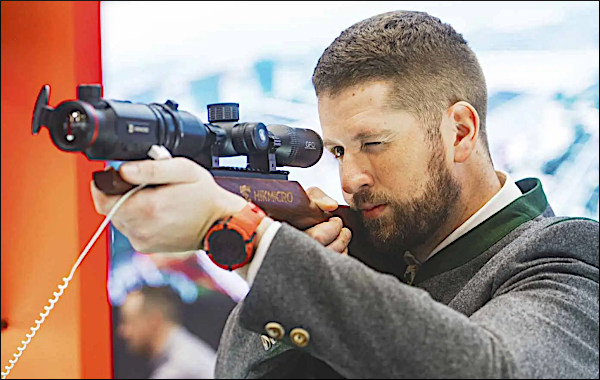
Orion Clip-On Thermal Optic
Orion Clip-On Thermal Optic for Riflescopes
This new Orion C series clip-on thermal sight can be a major upgrade for hunters who want to see more in low-light conditions. The Orion mounts directly to the front of a conventional scope, and transforms the capabilities, giving it thermal, night-vision viewing ability. This Orion unit activates in 3 seconds and the battery runs for four hours.
New Series Veracity Rifle Scopes from Burris
This video features the new updated Veracity scope series from Burris. The 2026 Veracity riflescopes represents a complete redesign that elevates this proven platform with enhanced optical performance, refined ergonomics, and innovative new features to help hunters.
BONUS: Cutaway Inside Look into Hausken Rifle Suppressors
The 2026 IWA Outdoor Classics event is hosted in Nuremberg, Germany. Here’s an interactive map.
The 2026 IWA Outdoor Classics trade show kicked off yesterday in Nuremberg, Germany. This major outdoor/hunting/shooting trade show, the largest event of its kind outside the USA, runs February 26 through March 1, 2026. A vast selection of new rifles, pistols, and shotguns are on display.
In addition there are large selections of optics, bipods/tripods, rangefinders, and other accessories. Plus the IWA show features outdoor clothing, packs, and hunting gear. Vendors also showcased collections of beautiful hardwoods suitable for fine rifle and shotgun stocks.
For more than 50 years, outdoor and shooting industry companies have come together in Nuremberg to present the latest products and services for hunting and shooting sports. For 2026, Europe’s leading outdoor trade show will host more than 1,080 German and international exhibitors in nine exhibition halls. In addition, there will be a wide variety of seminars, meetings, and interactive demonstrations.
This video covers some notable new hunting rifles at the IWA show. Whether you want the best straight-pull rifle for rapid follow-up shots or the one of the top quality new, affordable hunting rifles, this video explores notable current options. Video highlights are listed with time-marks:
1:18 – Haenel Jaeger EVO (Classic)
2:45 – CZ 600+ Series (Good Modularity)
4:20 – Mauser M25 (Straight-Pull)
5:50 – Blaser R8 Professional 2.0 (High-End Rig)
7:25 – Walther RS3 (Bullpup Revolution)
9:00 – Final Thoughts
Notable Products at IWA Outdoor Classics 2026
Manufacturers and vendors from the hunting, shooting sports, and outdoor segments offer a vast range of products this year. From hunting, sport shooting, and airsoft firearms to optics and technologies, ammunition, knives, hunting accessories, clothing and outdoor equipment, there is plenty to discover in the nine halls at IWA Outdoor Classics 2026. IWA Outdoor Classics allows buyers and retailers from around the world to see thousands of new products in one location.
The National Shooting Sports Foundation (NSSF) has released a 26-page PDF document covering all aspects of firearms safety and safe storage. We recommend that gun owners review this Safety Brochure. In addition, NSSF and Project ChildSafe offer a variety of other educational materials and resources:
Message from the NSSF:
“The National Shooting Sports Foundation reminds Americans to practice responsible safety measures at home, including safe and responsible firearm handling and storage. “It’s important to remember that the holidays can be a challenging time of year for many, and that may be especially true this year — particularly for those who are unable to see loved ones due to the pandemic, or who may be feeling isolated or alone for other reasons,” said Joe Bartozzi, NSSF President and CEO. “We want to ensure families are practicing safe firearm storage habits to reduce the chance of a firearm accident this holiday season.”
Springtime is just a few weeks away (Vernal Equinox, the official start of Spring, is March 20, 2026), so the outdoor season will be underway soon. Do you have a good first-aid kit in your vehicle to deal with possible injuries to family members of all ages? For just $18.41 on Amazon you can get an excellent kit from Be Smart/TRI, the #1 maker of First Aid Kits in the USA. Don’t delay, we expect this sale price to go up soon.
TRI’s Be Smart Get Prepared First Aid Kit has 303 items inside a sturdy case with shoulder strap and carry handle. There is also a handy, detachable mini pouch with key essentials for first aid on-the-go. You can easily bring the mini-pouch along on a bike ride or hike.
This multi-purpose First Aid Kit includes:
• 50 – Bandages 3/4 x 3
• 30 – Bandages 3/8 x 1 1/2
• 6 – Bandages Closure
• 3 – Knuckle Bandages
• 1 – Tapes – .5 x 2.5yd Waterproof
• 10 – Cotton Tips – 2.75″”/10 Pack
• 4 – Finger Splints
• 1 – First Aid Guide
• 4 – Gauze Pad – 2 x 2 / 4 ply
• 4 – Gauze Pad – 4 x 4 / 4 ply
• 1 – Gauze Pad – 5 x 9
• 2 – Nitrile Gloves
• 1 – Instant Cold Pack – 5 x 6
• 1 – Metal Pointed Scissors 4.5″
To help ensure that outdoor adventures remain safe and trouble-free, the CTD Shooters’ Log has a helpful Essential Summer Survival Guide. This is worth reading before you venture away from civilization.
Here are some highlights of the article with links for MORE INFO:
First Aid Kits for Campers
You should never venture outside without a first aid kit close at hand. While exploring the outdoors, all types of accidents can occur—from cuts, scrapes, and burns to broken limbs and severe allergic reactions.
Basic Survival Skills
Basic survival skills are a necessity if you plan to spend any amount of time outdoors. These five tips, plus a how-to on what to pack in a lightweight, basic survival kit will help if you are ever stuck, lost, stranded or injured in the field.
How to Treat Burns
Fireworks, barbeques and campfires — in the summer we are frequently around fire, which increases our chance of getting burned. A first-degree burn is most likely home treatable, while a third degree burn requires immediate medical attention. Learn how to spot the differences between minor and severe burns.
Did you know you can damage your hearing even if you are wearing the best hearing protection available? Well, have you ever heard of concussion (or concussive) hearing loss? There is no amount of anything you can put in or over your ears to protect you from concussion loss. My audiologist explained to me the concussion comes through the facial bone structure and damages the ear’s tiny bones.
Editor’s NOTE: This a very important article that explains how you can suffer inner ear damage and hearing loss even if you use quality earplugs and/or muffs. Read that again — hearing loss can happen even with typical hearing protection. This kind of concussive hearing loss can result from shooting with muzzle brakes in confined spaces. Using a suppressor (aka sound moderator) can reduce the risk of concussive hearing loss. You may not have the ability to use a suppressor, but this article explains how you should be more mindful of your hearing.
Why I Use a Suppressor (Preventing Concussive Hearing Loss)
It must have been the road noise. I thought I was having a hard time hearing my five-year-old daughter speaking to me on my cell phone because of the road noise. That old SUV was kind of loud inside. Until I switched the phone to my left ear and suddenly I could hear her just fine. Wait, what just happened? I moved the phone back to the right ear and there was that muffled voice again. That’s when I knew I had a problem.
“What?” Lots of us in the shooting community have lost some hearing along the way due to our time on the range or in the field. Those of us who hunt have certainly discharged a firearm or three without ear protection and without concern for our hearing. After all, it’s just one shot, right? How much can it hurt?
Actually, that one shot DOES hurt your hearing. Any sound over 140 dB is immediate hearing loss. It just happens to be killing a small amount of our hearing so most of us continued the practice without a care. Living with hearing loss now makes me wish I could go back 20 years and better protect my hearing. I can’t change what I did in the past, but going forward I can certainly do the most to protect the hearing I still have.
I decided to shoot about a year’s worth of matches with just braked rifles. That year is when I lost significant hearing in my right ear and some in the left. I’ve gone back to shooting only suppressed rifles whenever possible.
I shot my first suppressed firearm, a .22 LR pistol, in 2003. After a few rounds I wondered why everyone (who can do so legally) didn’t shoot suppressed? No one drives without a muffler. Why would you? Point is I immediately appreciated the hearing protection benefits of suppressors. That passion got me into the business of selling suppressors and it wasn’t long before I was one of the biggest retailers for companies like AAC, SWR, SilencerCo, Ops Inc. and others. [Editor: The author’s business, Accurate Ordnance, no longer sells suppressors. So this article is NOT a sales pitch. Mark just wanted to share his experience so others might protect their hearing.]
Did you know you can damage your hearing even if you are wearing the best hearing protection available? You’ve heard guys say, “I’ll wear plugs and muffs, so I’ll be just fine shooting that .50 BMG!” Well, ever heard of concussion (or concussive) hearing loss? Yeah, I hadn’t either. I’ll sum it up the way the last audiologist I spoke with about my hearing loss did – there is no amount of anything you can put in or over your ears to protect you from concussion loss.
A hand grenade went off right next to a buddy of mine. He lost some hearing as a result of the blast. No one is really surprised by that. I mean it is an EXPLOSION. It’s loud. Duh. But I had no idea the blast from a muzzle brake could basically hurt my hearing the same way. The doctor explained to me the concussion comes through the facial bone structure and damages the ear’s tiny bones. Same thing as what can happen through any TBI (traumatic brain injury).
I’ve owned quite a few different suppressors over the years and have shot just about everything out there. I’m still as big a fan as ever. However, I wanted to see if using a suppressor in PRS (Precision Rifle Series) and similar matches was actually a hindrance. Some people feel the added length and weight of a suppressor can make getting into some shooting positions slower or problematic. So I decided to shoot about a year with a muzzle brake instead of a suppressor. I sure regret that decision…
Getting Headaches at PRS Matches Was Warning Sign
It is fairly common in PRS matches to shoot through pipes, vehicles, inside “shoot houses” and around other obstacles that echo a rifle’s blast. I noticed I was starting to get headaches about halfway through a day of PRS match shooting. I knew the issue wasn’t hydration. I mean look, if you are peeing every other stage down at the amazing CORE range facility in mid-summer you are NOT dehydrated. So, what was causing the headaches? It wasn’t until I went back to shooting suppressed in those same environments that it became clear the little mini concussions from that muzzle brake was causing my headaches. And of course the doctors confirmed that.
Let me stop here and say I am NOT anti-brake. Muzzle brakes are useful tools and for some situations are the best tools. An aggressive brake can be more effective at reducing recoil than a good suppressor. A suppressor does add some recoil reduction, just not as much as most quality brakes. Don’t forget to factor other variables, such as caliber and rifle weight, into the equation though. For example, a 15-lb 6mm Creedmoor rifle doesn’t need much recoil reduction in the first place.
So, I started shooting matches long before the PRS even existed and always shot suppressed in those days. The suppressors made communication with a partner or RO easier and it was just a more pleasant shooting experience. On the recommendations of a few people I decided to shoot about a year’s worth of matches with just braked rifles. That year is when I lost significant hearing in my right ear and some in the left. I’ve gone back to shooting only suppressed rifles whenever possible and especially at matches. I’ve only once or twice found the extra length of the suppressor made it a little more inconvenient to run a stage, but not by much. Trust me, the points I missed were not because I took two extra seconds getting the muzzle in a port or window.
My hearing is something I value and will do everything to protect from this point forward. You’ll never again see me on a match field with an un-suppressed rifle. To me the minimal gains of running a braked rifle aren’t worth losing more hearing.
Choosing a Suppressor — What to Consider
Okay, so I have hearing loss that I can’t get back and realize I need to go back to shooting matches with a suppressor. But which one? I’ll still be shooting matches with custom fit plugs so I just need something to add a little recoil reduction and kill that concussion.
At our shop, Accurate Ordnance, we generally recommend direct-thread suppressor solutions to our customers. The main reason for that is all the problems we’ve seen with other fast-attach muzzle devices. It doesn’t take much tolerance stacking to result in accuracy issues. There are a few exceptions for us and the Rugged Suppressors products top the list. Since the Razor 762 uses a muzzle brake adapter on the rifle to attach the suppressor, I can use the same suppressor on my .223 Rem training rifle. My primary match rifles are chambered in 6mm Creedmoor and 6.5 Creedmoor and the muzzle threads on those is a standard 5/8×24. My .223 Rem training rifle has .5×28 threads on the muzzle, which is standard for that caliber. Thus, the muzzle adapter interface lets me share the suppressors between all the rifles. And on that .223 Rem training rifle I have the option of switching the end cap on any of the Rugged products to a .223 aperture size, which makes the suppressors slightly more sound efficient (meaning quieter).


 We’ve always liked the capacious, durable range boxes from

 Some years back, a close relative contacted this Editor. Wanting to get started in handgunning, he sought my advice on purchasing his very first handgun. “Should I get a Glock?”, he asked. “No” was my response. “Well how about an M&P?” he inquired. “Better ergos” I said, “but ‘No’ is still my reply.” “OK, how about a KelTec, they’re cheap…”


 Ray Gross was profiled in