We’ve been fans of the Howa Mini Action rifles since they were introduced a decade ago. With actions that are nearly an inch shorter than typical “short actions”, these Mini Action rigs work great as a compact “truck gun” or carry-around varminter. Current chamberings are: 22 ARC, .223 Rem, 6MM ARC, 6.5 Grendel, 7.62x39mm, 350 Legend. These feature a 20″ barrel with a 16.5″ option for the 350 Legend.
6.5 Guy Ed Mobley Tests the 7.62×39 Howa Mini Action Rifle
The Howa Mini Action rifles come with the excellent HACT 2-stage trigger and a 5-round or 10-round, synthetic detachable box mag (depending on caliber). The Mini Action’s bolt is 13% shorter than on regular short actions, providing a shorter, faster bolt throw. Weight is also reduced. This makes for a nice, compact (and very shootable) package.
6.5 Guys Test Howa Mini Actions in 6.5 Grendel and 7.62×39
The 6.5 Guys recently secured a pair of Howa Mini Actions, one chambered in 6.5 Grendel and the other in 7.62×39 Russian: “After trying out the Howa Mini Action rifles at SHOT Show 2017, we got a couple of loaners in 6.5 Grendel and 7.62×39 courtesy of Legacy Sports. These rifles are known for their smooth cycling and lightweight actions, as well as some unique chamberings for bolt rifles (6.5 Grendel, 7.62×39). Long story short, we really enjoyed them.” In fact Steve liked his 6.5 Grendel enough that he plans to purchase the gun. Get the full scoop in this VIDEO REVIEW:
The folks at Legacy Sports also conducted extensive accuracy tests of commercial ammunition in 6.5 Grendel and 7.62×39. The most accurate 6.5 Grendel ammo, with a stunning 0.29″ group, was Alexander Arms with Lapua 123gr Scenar; second best (0.56″ group) was Hornady with 123gr A-Max bullet. The most accurate 7.62×39 ammo was Hornady 123gr SST with a 0.62″ group in the 20″ Heavy Barrel version. View Howa’s Test Reports with these links:
When a rifle isn’t shooting up to it’s potential, we need to ask: “Is it the gun or the shooter?” Having multiple shooters test the same rifle in the same conditions with the same load can be very revealing…
When developing a load for a new rifle, one can easily get consumed by all the potential variables — charge weight, seating depth, neck tension, primer options, neck lube, and so on. When you’re fully focused on loading variables, and the results on the target are disappointing, you may quickly assume you need to change your load. But we learned that sometimes the load is just fine — the problem is the trigger puller, or the set-up on the bench.
Here’s an example. A while back we tested two new Savage F-Class rifles, both chambered in 6mmBR. Initial results were promising, but not great — one gun’s owner was getting round groups with shots distributed at 10 o’clock, 2 o’clock, 5 o’clock, 8 o’clock, and none were touching. We could have concluded that the load was no good. But then another shooter sat down behind the rifle and put the next two shots, identical load, through the same hole. Shooter #2 eventually produced a 6-shot group that was a vertical line, with 2 shots in each hole but at three different points of impact. OK, now we can conclude the load needs to be tuned to get rid of the vertical. Right? Wrong. Shooter #3 sat down behind the gun and produced a group that strung horizontally but had almost no vertical.
Hmmm… what gives?
Shooting Styles Created Vertical or Horizontal Dispersion
What was the problem? Well, each of the three shooters had a different way of holding the gun and adjusting the rear bag. Shooter #1, the gun’s owner, used a wrap-around hold with hand and cheek pressure, and he was squeezing the bag. All that contact was moving the shot up, down, left and right. The wrap-around hold produced erratic results.
Shooter #2 was using no cheek pressure, and very slight thumb pressure behind the tang, but he was experimenting with different amounts of bag “squeeze”. His hold eliminated the side push, but variances in squeeze technique and down pressure caused the vertical string. When he kept things constant, the gun put successive shots through the same hole.
Shooter #3 was using heavy cheek pressure. This settled the gun down vertically, but it also side-loaded the rifle. The result was almost no vertical, but this shooting style produced too much horizontal.
A “Second Opinion” Is Always Useful
Conclusion? Before you spend all day fiddling with a load, you might want to adjust your shooting style and see if that affects the group size and shape on the target. Additionally, it is nearly always useful to have another experienced shooter try your rifle. In our test session, each time we changed “drivers”, the way the shots grouped on the target changed significantly. We went from a big round group, to vertical string, to horizontal string.
Interestingly, all three shooters were able to diagnose problems in their shooting styles, and then refine their gun-handling. As a result, in a second session, we all shot that gun better, and the average group size dropped from 0.5-0.6 inches into the threes — with NO changes to the load.
That’s right, we cut group size in half, and we didn’t alter the load one bit. Switching shooters demonstrated that the load was good and the gun was good. The skill of the trigger-puller(s) proved to be the limiting factor in terms of group size.
Wouldn’t it be cool if you could adjust the bolt cycling energy on your AR-platform rifle? Turn down the cycling rate for slow fire at the bench or varmint hunting. Crank up the energy for 3-Gun matches and rapid-fire disciplines. This IS possible with a handy accessory that fits on your barrel. Wilson Combat offers an Adjustable Lo-Profile AR Gas Block for direct gas impingement AR-type rifles. Wilson Combat’s adjustable gas block replaces a standard AR gas block and allows you to tune your AR’s gas system for smoother cycling and enhanced reliability. Wilson Combat explains: “Adjusting your rifle’s gas port will lower or increase your bolt’’s cyclic rate. This tailors your rifle’s performance to your unique needs.”
A simple adjustment of the hex screw at the front of the block modulates the gas volume allowing you to tune your rifle’s function to your favorite loads. This is very handy when shooting non-standard AR calibers, unusual hand-loads, or suppressed rifles. Adjustable Gas Block systems are sold as complete kits starting at $61.07. Wilson Combat offers two diameters (.750″, .875″) so you can select the right dimensions for your rifle configuration and barrel diameter. The blocks are Chromoly steel with a black Melonited finish.
Package Includes:
Adjustable Gas Block (Melonite Finish)
Adjustment Set Screw (Installed)
Straight Gas Tube (Installed, Gas Tube Pin Installed)
Editor: This story by Tommy C. (aka “dc.fireman”) comes from our Shooters’ Forum. It’s fascinating to see how a relatively inexpensive Savage M12 BVSS varmint rig was transformed into a sophisticated 300M match rifle with a modern chassis, Shilen barrel, and top-of-line sights. With some ingenuity, and careful parts selection, Tommy created a rifle that can compete with match rifles costing many thousands of dollars more. American ingenuity at work!
Savage Reborn — Old BVSS Transformed into 300M Match Rifle
by Tommy C. (aka “dc.fireman”)
So, I began the project of building a 300M International competition gun, about a year ago, intending to compete at the 300M Nationals this year in Minnesota at the Minneapolis Rifle Club. Realistically, I didn’t want to pay the price-tag demanded of the Bleikers, Grunig & Elmigers, Hammerlis, or Tanners that (infrequently) pop-up for sale from time to time. So I decided to build my own 300M Match rifle with an American action, barrel, chassis, and trigger.
Here is Tommy’s completed 300M Match rifle with Savage action in PDC Custom chassis.
I had decided on the .260 Remington (aka 6.5-08) as the caliber choice. This beat out 6.5×47 Lapua simply due to the cost/availability of brass. The .260 Rem cartridge is based on the .308 Win parent. I made my first batch of brass by necking down some Federal .308, and it worked great. [Editor: We do recommend Lapua .260 Remington brass for match purposes for those who don’t have a supply of good .308 Win brass.]
I had an older Savage M12 stagger-feed action, originally from an old .22-250 BVSS. I contacted James at Northland Shooter Supply, and he walked me through the game plan and equipment I needed: Shilen Select Match 26″ barrel, NSS Stainless recoil lug and nut, a set of Forster headspace gauges, and the NSS action wrench.
Catalog photo of current Savage M12 BVSS in .22-250 Rem.
A few months later, I replaced the original Accu-trigger with a Rifle Basix SAV-II trigger, and immediately wondered why I waited so long to do that. The Rifle Basix is perfect for my application. Mind you the he safety DOES NOT work now, but, I don’t need it for my application.
Another member on the AccurateShooter Forum sold me a BVSS stock that has been re-worked by Alex Sitman of Masterclass Stocks, and it served as a placeholder, until I could find a maker who could nearly replicate my Feinwerkbau 2700 Alu stock in my smallbore match gun.
After scouring the AccurateShooter Forum, and multiple internet searches, I found PDC Custom in Michigan. I spoke with Craig Kierstadt a few times, before finally deciding to pull the proverbial trigger on his chassis. He had a few of the older chassis stocks with spacing for the Savage stagger-feed action. He machined an Anschutz rail into the fore-end for my hand stop and sling. Then he powder-coated the chassis black, and sent it to me sans grip and butt plate.
Photo of action/chassis. Tommy says: “It locks up really tightly, and you can tell Craig spent some time on the CNC work need to make this all fit.”
There are a few minor issues with the PDC chassis, but overall, I would rate this a 9.5 out of a possible 10. The price, and the features built into it, plus the ease of which everything fit together, far outweigh any minor issues. And two of the issues I quickly corrected with Teflon tape. I will need to make a walnut cheek piece — a curved one isn’t conducive to aperture iron sight shooting.
Savage Action .260 Rem 300M Match Rifle Components:
Action, Barrel, Stock, Grip
Savage M12 stagger-feed action, 4.27″ spacing
Shilen Select Match Barrel, 26″
Rifle Basix SAV-II Trigger
PDC Custom Chassis — tool-less adjustments
Bobsled SLED for single loading (required)
MEC Contact III Butt plate (German)
MEC handstop/sling swivel (German)
Walnut Target grip for AR-15 (eBay sourced)
Sight Components and Hardware
MEC Spy Long rear sight (German)
Centra front sight tunnel (German)
Centra adjustable aperture (German)
Medesha sight extension tube + collar
Champion’s Choice front sight base
Champion’s Choice mirage band
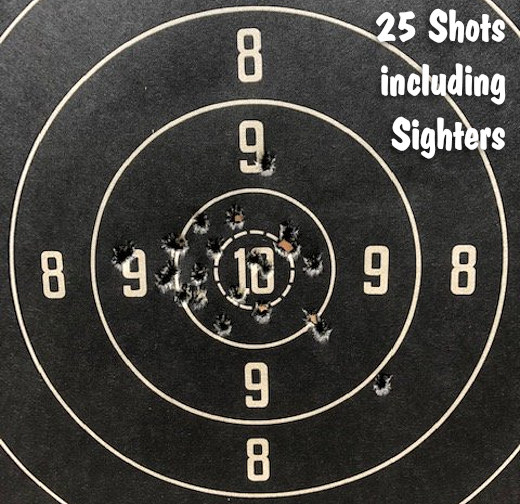
For his practice load, Tommy shot 123gr Hornady ELD-M bullets with H4831 powder and CCI BR2 primers. This load performed well — Tommy posted: “My 25-shot initial prone test today shows promise. There are five sighter shots, and 20 record shots. One of the 9s at 9 o’clock is my first sighter, the other one I own. The 8 out at 4 O’clock was a round that was difficult to chamber. My initial scoring puts me somewhere in the vicinity of 193-7X.”
The target used is the NRA C2, “300M International Rifle Target, reduced for 200 yards”. The 10 Ring is 2.40″ in diameter, while the Inner 10 (X-Ring) is 1.24″.
Match Load — Varget and Nosler Bullets
For his match load, Tommy switched to Varget and Nosler bullets: “My match load uses 37.9 grains Hodgdon Varget with a Nosler 123gr bullet. This was a recommendation by a gentleman with a lot of experience in 300M shooting.”
Tommy adds: “The amount of knowledge gained via the AccurateShooter Forum has made this all a reality, instead of just a passing thought.”
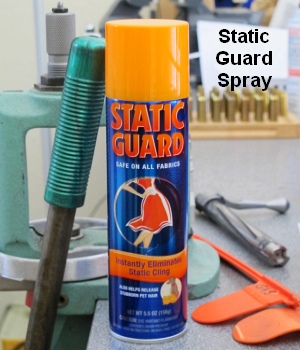
Apparently reducing static charges on and around electronic scales can reduce their propensity to drift, lessening the problem of “wandering zero”. Just how and why static charges interfere with scale performance is unclear, but many shooters have noticed that static electricity can cause electronic scales to behave strangely. So how do you reduce static charges around your digital balance? Our late friend German Salazar (aka “GS Arizona”), creator of the Rifleman’s Journal Blog, found a very simple solution — an anti-static aerosol spray — that, by all indications, actually works. When this “spray-can solution” was suggested to German by a fellow shooter, German was skeptical. However, he tried the stuff and he says that it really does help the scale maintain zero over time, with much less observed drift.
Static Guard Reduced Scale Drift
German Salazar explained that the use of “Static Guard” spray helped mitigate the problem of a drifting zero on his Ohaus Navigator electronic scale. He writes: “My electronic scale… suffers from drifting zero (as they all seem to). I’ve read dozens of forum posts about drift and how to minimize its occurrence, so I know this problem isn’t limited to my scale or my workshop. Sometime last year, John Lowther mentioned the use of anti-static spray as a solution to the drift problem. John stated that the spray had virtually eliminated drift for him.”
Salazar found that the Static Guard actually worked: “The spray works great, just as John said it would. I spray all surfaces that I touch with my hands and arms as well as the pan (top and bottom), the metal tray on which the pan rests and the table under the scale. In six months or so of using the spray I’ve re-applied it about two or three times; it certainly isn’t something that you need to do each time you sit down to load. Before using the spray, it was not uncommon for me to re-zero the scale 10 times in the course of loading 72 rounds; now it might need it once during a session.”
If you will be flying with firearms this summer, here are six videos you should watch before you travel. You need to familiarize yourself with current Federal Regulations on gun transport before you get anywhere near an airport. Thankfully, the Transportation Security Administration (TSA) has an official INFO page that states the important requirements for airline passengers traveling with firearms and/or ammunition.
You’ll want to visit the TSA Firearms and Ammunition webpage, and read it start to finish. In addition, before your trip, you should check the regulations of the airline(s) with which you will fly. Some airlines have special requirements, such as weight restrictions.
We have two other key tips: 1) WEIGH Your Guns and ammo (as packed) BEFORE you get to the airport — so you comply with all airline flight limits without being surcharged; 2) Carry a printed copy of TSA and airline baggage regulations pertaining to firearms — this can help when dealing with airline personnel.
TSA offers this general advice: “You may transport unloaded firearms in a locked, hard-sided container as checked baggage only. Declare the firearm and/or ammunition to the airline when checking your bag at the ticket counter. The container must completely secure the firearm from being accessed. Locked cases that can be easily opened are not permitted. Be aware that the container the firearm was in when purchased may not adequately secure the firearm when it is transported in checked baggage.”
Traveling by Air with Firearms — Advice from Legal Expert
This is a good video by a very knowledgeable attorney. Washington Gun Law President William Kirk goes over everything you need to know in order to fly safely, and legally, with a firearm if you travel domestically. Kirk states: “While many believe this is a complicated formula of various state laws, in actuality TSA regulations govern all travel domestically with a firearm. There are very specific rules which must be followed in order to do this correctly.”
Colion Noir — Air Travel with Packed Firearms
Popular YouTube host and lawyer Colion Noir has created a good video that shares important points about traveling with firearms. Colion says: “Don’t risk making costly mistakes — get informed and ensure your firearm journey is hassle-free and lawful.” In this video, Colion covers these key points:
1. Bag Check: Learn the crucial pre-flight checklist to avoid any unwanted surprises at the TSA checkpoint.
2. Airline Check: Discover the differences in airline policies and ensure a smooth journey by reviewing your chosen carrier’s firearm guidelines.
3. Law Check: Stay on the right side of the law by understanding the gun regulations in every state you’ll visit during your trip.
4. The Gun Case: Explore the essential details about the TSA-required hard-sided lockable case and find out which one is my top choice.
5. Ammo Transport: Learn the correct way to transport ammunition separately from your firearm, all while staying within the weight limit.
Step-By-Step Guide to Gun Transport — Good Tips
This 18-minute Spiritus Systems video provides some very valuable practical tips for gun owners traveling by air. The host explains what to look for in a rifle case and locking system. He also explains how to pack the rifle and gear efficiently and how to label and track your gun/ammo cases. If you’re new to airline travel with guns, this video is worth watching start to finish. Here are highlights are listed by video times:
00:01 Introduction and Regulations
00:51 Storage Container Options
2:50 Type of Lock You Should Use
6:25 Tape Tip
7:16 Contact Information, and Labeling Your Bag
8:07 Firearm Considerations / Configuration
10:03 Documents
12:30 Tracking Your Bag
13:20 Packing Your Ammo
16:00 Prepping Your Magazines
How to Efficiently Pack Your Rifles and Gear
Our friend F-Class John often travels by air to major F-Class matches (most recently to the V2 Finale in Texas). John has learned how to transport valuable match rifles and optics most efficiently and economically. In these two videos F-Class John shows how to pack your rifles and equipment, and how to employ carry-on bags to secure optics and other non-regulated equipment.
TSA Video about Airline Travel with Guns and/or Ammo
This is the latest official TSA video covering gun/ammo transport via airlines. When packing for a flight be sure to start with an empty bag (make sure there are no forgotten gun parts or ammo inside before you pack). If you’re planning to travel with a firearm, follow the tips in this video and remember that you may NEVER bring a firearm in your carry-on bag. Also make sure you are not “packing” when entering the airport even if you have a CCW permit. TSA.gov Firearms/Ammo Transport INFO Page.
Official TSA Guidelines for Airline Travel with Firearms and Ammo
When traveling, comply with the laws concerning possession of firearms as they vary by local, state, and international governments.* Declare each firearm each time you present it for transport as checked baggage. Ask your airline about limitations or fees that may apply.
Firearms must be unloaded and locked in a hard-sided container and transported as checked baggage only. As defined by 49 CFR 1540.5 a loaded firearm has a live round of ammunition, or any component thereof, in the chamber or cylinder or in a magazine inserted in the firearm. For civil enforcement purposes, TSA also considers a firearm to be loaded when both the firearm and ammunition are accessible to the passenger.
Only the passenger should retain the key or combination to the lock unless TSA personnel request the key to open the firearm container to ensure compliance with TSA regulations. You may use any brand or type of lock to secure your firearm case, including TSA-recognized locks.
Bringing an unloaded firearm with accessible ammunition to the security checkpoint carries the same civil penalty/fine as bringing a loaded firearm to the checkpoint. You may find information on civil penalties at the Civil Enforcement page.
Firearm parts, including magazines, clips, bolts and firing pins, are prohibited in carry-on baggage, but may be transported in checked baggage. Replica firearms, including firearm replicas that are toys, may be transported in checked baggage only.
Rifle scopes are permitted in carry-on and checked baggage.
TSA Guidelines for Transporting Ammunition on Flights
Ammunition is prohibited in carry-on baggage, but may be transported in checked baggage. NOTE: Check with your airline for quantity limits for ammunition.
Firearm magazines and ammunition clips, whether loaded or empty, must be securely boxed or included within a hard-sided case containing an unloaded firearm. Read the requirements governing the transport of ammunition in checked baggage as defined by 49 CFR 175.10 (a)(8).
Small arms ammunition (up to .75 caliber and shotgun shells of any gauge) must be packaged in a fiber (such as cardboard), wood, plastic, or metal box specifically designed to carry ammunition and declared to your airline.
Ammunition may be transported in the same hard-sided, locked case as a firearm if it has been packed as described above. You cannot use firearm magazines or clips for packing ammunition unless they completely enclose the ammunition. Firearm magazines and ammunition clips, whether loaded or empty, must be boxed or included within a hard-sided, locked case.
*INTERNATIONAL: If you are traveling internationally with a firearm in checked baggage, please check the U.S. Customs and Border Protection website for information and requirements prior to travel.
Edgewood Shooting Bags makes some of the best front and rear shooting bags you can buy. And the Edgewood rear bag are offered with a modern, hybrid “slick material overlay”. This combines the shape retention and stability of leather ears, with slick, low-friction material where the stock rides. This “best of both worlds” solution delivers both bag stability and improved tracking. Derek Rodgers, the only man who has won BOTH the F-Open and F-TR National Championships, has used this bag and he says his gun tracks great with the slick material on top of leather-based ears.
New Copperback Edgewood Rear Bags
Edgewood’s new Copperback bags boast a new bag shape and ear geometry that maximizes stability while minimizing interference with shooter’s body. The Cooperbacks also feature a new ear material specially coated to reduce friction for smooth recoil and return to battery.
Along with great front and rear bags, Edgewood also offers quality leather OWB holsters and IWB holsters. And we bet you didn’t know that Edgewood got its start making tack and bridles for horse riders. Here’s a short history of Edgewood Leather, a family-run business based in Albuquerque, New Mexico.
The History of Edgewood Leather
by Jack Snyder
I’ve always enjoyed working with leather and still do to this day. Something about starting with an idea and building a useful and hopefully, beautiful piece does it for me. There’s nothing like leather to stimulate my imagination. It brings out my creativity and makes me happy.
I began doing leatherwork as a kid, 12 or 13, and the first piece I made was a pair of shoes. Got a job in a leather shop in the late ’60s and made purses and belts, wallets and sandals — many pairs of sandals. I opened a small retail shop in Estes Park, CO and made even more of the same, adding vests, halter tops, hats, mountain man gear of all sorts from skunk hats to goat fur high-top moccasins.
After a decade or so, I became restless for something new and taught myself bridle work. I discovered a niche market with English riders who were always looking for beautiful, well-fitting show bridles and over a period of about twenty years developed and produced many products for these riders — numerous types of nosebands, breastplates, martingales, girths and many different varieties of reins. At the same time I observed that for every horse and rider there were at least two dogs trotting along beside. I began making dog products which closely resembled their horse buddies bridle work. Sales were good. Leashes, leads, halters and collars showed up at dog shows around the country. My bridles were worn by many champions in every horse discipline — dressage, show ring, hunter-jumpers, and my polo gear became popular among the players. All of that was fun and I’m still proud of those products (still being made today), but it was time for a change. I sold my interest to my partner and tried to retire. Didn’t work, though.
My plan was to shoot benchrest matches, as many as I could. And I did for some time and loved every minute. I’ve made many friends among the shooters, discovering early on that these people are the most interesting, smart folks a guy could ever associate with. To the man, they’ll share what they know with you and even hand you their gun when yours malfunctions during a match, and grin and slap you on the back when you beat ‘em with it!
When I was getting started in benchrest, one aspect of the game was somewhat disappointing to me-the quality and stability of the shooting bags. It was natural with my past leather experience to make what I thought would be a better product. I cobbled up a couple of bags and went to a match in Oklahoma. All hell broke loose. Most of the shooters had to have one. By the end of the summer, I had so many orders for shooting bags, I couldn’t keep up the pace. I was improving the designs, based on the shooters telling me what worked and didn’t work. I was adding new products, experimenting with materials, processes and configurations and having a great time. Completely by accident, Edgewood Shooting Bags was born. My wife Cindy and my two kids Jackie and Aaron jumped in and we became a bag-making machine — always looking to improve and expand upon the products. Jackie’s husband Ryan joined us several years ago and together, we’ve made a pretty awesome team.
Latest Rear Bag Design — Leather Ears with ‘Slick Material Overlay’
Edgewood constantly strives to improve its products. Witness the new “slick material overlay” bag ears. This is a major design improvement over our regular “slick ears”. The development of the overall design all started when we noticed some shooters applying household products like talcum powder or dryer sheets to the ears of their bag in an effort to reduce friction and speed up their rifle’s return to battery. We found a material that would achieve this function without the need to raid their wife’s pantry for powders or laundry accessories and began sewing the ears up using this “microscopic glass bead impregnated” fabric. We were happy with the results. However, we soon began to realize that the slick material could have the longevity of our nylon as well as its slick properties, if we found a way to increase its thickness without causing wrinkles or inconsistencies.
First, we ended up hunting down some similar fabric with a much higher strength and thickness. It even has a fireproof backing that makes it far more durable — even if shooters aren’t planning on exposing it to temperatures higher than the Arizona desert can offer. This material was definitely superior and even more representative of the quality and durability that shooters have come to expect from products wearing the Edgewood logo. We didn’t stop there, either.
We started experimenting with a way to combine our toughest ear design, which is made from soft leather, with the slick material to create the best of both worlds. We deemed it the “slick overlay” option and many of the world’s top shooters now swear by it. There is no compromise with this ear set — shooters gain all of the advantages of the slick material, in addition to durability and consistency that exceeds even our tried and true nylon ears. Many of our original bags have been punished by shooters for over a decade and are still performing. We expect this design to last even longer.
Keeping ahead of the curve with innovations that create and help propel evolution in the sport is a signal of our commitment to retain our status into the future. Along with other new products like our second generation of concealed and open carry holsters, range bags for sighting in hunting rifles, radius front bags for AR-style rifles, camouflage color options and more. Check us out online or give us a call. We’re ready to meet the demands of shooters — from Benchrest and F-Class to concealed carry and IDPA.
Jack Snyder
President – Edgewood Shooting Bags and Gun Leather
When developing loads, it is important to know the true internal capacity of your cases, both fired and “as FL-sized”. In particular, when using the QuickLOAD program, it is vital to determine true case capacity. The default case capacity values listed by QuickLOAD may be off half a grain (or more) because brass from different manufacturers can vary considerably in capacity. Case capacity is a very important variable that will affect the pressure of a load and the velocity of your bullets.
To determine the true internal capacity of your cases, first weigh an empty cartridge case, then fill the case with water (all the way to the top of the neck) and weigh the case again. The difference in weight is your H20 capacity in grains. But how do you keep the H20 from flowing out the bottom? When measuring fired, unsized cases, you can simply leave the spent primer in the pocket. However, if you want to measure new brass or “as-FL sized” cases that have been deprimed, you’d have to insert a spent primer to “stem the tide”. Until now that is… 21st Century Shooting sells a great little $5.50 tool that plugs the bottom of the case so you can measure H20 capacity with ease.
When we saw 21st Century’s Primer Pocket Plug we thought “That’s smart — why didn’t someone think about that a long time ago?”. This handy “end-cap” lets you quickly measure multiple new brass cases or deprimed FL-sized cases so you can get an average H20 capacity. The primer pocket plugs are NOT case-specific (they feature an O-ring that fits the pocket). One version will work with all small-primer-pocket cases, while another works with all large-primer-pocket cartridge types. Price is $11.99 for either small-pocket or large-pocket version.
ALTERNATIVE: >If you want to measure H20 capacity on fired, sized brass, but don’t want to shell out the money for the tool (or re-insert a spent primer), here’s a simple suggestion. When you size your case, first remove the decapping rod from the die. Then you can FL-size the case without removing the primer. Of course, you will eventually have to knock the primer out, and that requires putting the decapping rod back in the die and running the case through a second time. To avoid that hassle, the Primer Pocket Plug may be worth the $5.50 over the long haul.
Product Find by ELR Reseacher. We welcome reader submissions.
In Tennessee, when you order a take-out pizza, you get a cardboard shooting target at no extra charge. Nashville, Tennessee-based Hunt Brothers Pizza has come up with a clever idea to promote pizza consumption among the hunting and shooting fraternity. They’ve put targets on the pizza boxes — a very cool idea.
Hunt Brothers offers cardboard pizza boxes with five red and black bullseyes printed on the back. Now your used empty pizza boxes can do more than just take up space in the trash can. This is a pretty smart idea we think — it’s a great example of clever “dual-use” packaging. Hopefully pizza parlors in other locations nationwide will follow suit someday….
Give credit to The Firearm Blog for finding this story and publishing it first.
You have to admire someone with serious do-it-yourself skills. Not just hammer and nail skills, but formidable design and fabrication skills. Well Forum Member Dave D. (aka “AKShooter”) has a DIY skill set that might put some trained machinists to shame. You see, “DIY Dave” crafted his own pedestal front rest from scratch, using his own design and about $100.00 in materials (not counting the Edgewood front bag). Dave estimates he put 20 hours of labor into the project, but the end result was worth it: “This Do-It-Yourself rest drives like a dream. I’ve played with the Caldwell and a Sinclair, they have nothing on this one.”
Dave tells us: “Here is my Do-It-Yourself front rest. I wanted to show other folks who are handy that a solid front rest is doable with a bit of time — and you don’t need to spend $1000.00. (You could say this is a design for shooters with more time than money.) This is for F-Class. I was originally overwhelmed by the equipment needed, so I decided to make my own rest. I didn’t have the money for a SEB or Farley Coaxial. This is what I’ll run this season (my second as an F-Class competitor).”
We asked Dave what equipment was used to make the rest. He explained: “My brother has a CNC cutter. But most water-jet outfits would do the work for $100 or less. All the plates are tapped and screwed. I found small machine screws on eBay.” Dave says there are other ways to build a front rest: “You could do the same with a welder and plate stock for base. It’s easier to do the top out of aluminum though, with all the tapping.”
Dave enjoys fabricating his own gear, but he admits the process can be time-consuming: “I’m a DIY guy. Sometimes I wrap up a project and wonder why the heck I just spent X amount of time on it.” Dave has other projects in the works: “Another option we are making for a friend is taking a cheap front rest and bolting to a 3/4″ thick, wide MDF base and adding additional adjustment screws. The hardware store is your friend!”
On the competition front, Dave is tuning up a 6mm Dasher: “My rifle last year was a .260 Rem Savage repeater. I was about middle of the pack in my group of shooters. Just went with unsorted Bergers and Lapua brass, and had a ton of fun. Now I’m in — hook, line, and sinker. I have an unfired 6 Dasher barreled action from the folks at Kelbly’s to break in. I’m cheap, so I ended up with a Do-It-Yourself stock for the Dasher.” Hopefully Dave will send us a photo of his DIY-stocked Dasher when the gun is dialed-in and “ready to rumble”.


 Match Load — Varget and Nosler Bullets
 Apparently reducing static charges on and around electronic scales can reduce their propensity to drift, lessening the problem of “wandering zero”. Just how and why static charges interfere with scale performance is unclear, but many shooters have noticed that static electricity can cause electronic scales to behave strangely. So how do you reduce static charges around your digital balance? Our late friend German Salazar (aka “GS Arizona”), creator of the Rifleman’s Journal Blog, found a very simple solution — an anti-static aerosol spray — that, by all indications, actually works. When this “spray-can solution” was suggested to German by a fellow shooter, German was skeptical. However, he tried the stuff and he says that it really does help the scale maintain zero over time, with much less observed drift.


 I began doing leatherwork as a kid, 12 or 13, and the first piece I made was a pair of shoes. Got a job in a leather shop in the late ’60s and made purses and belts, wallets and sandals — many pairs of sandals. I opened a small retail shop in Estes Park, CO and made even more of the same, adding vests, halter tops, hats, mountain man gear of all sorts from skunk hats to goat fur high-top moccasins.


 In Tennessee, when you order a take-out pizza, you get a cardboard shooting target at no extra charge. Nashville, Tennessee-based

 You have to admire someone with serious do-it-yourself skills. Not just hammer and nail skills, but formidable design and fabrication skills. Well Forum Member Dave D. (aka “AKShooter”) has a DIY skill set that might put some trained machinists to shame. You see, “DIY Dave” crafted his own pedestal front rest from scratch, using his own design and about $100.00 in materials (not counting the Edgewood front bag). Dave estimates he put 20 hours of labor into the project, but the end result was worth it: “This Do-It-Yourself rest drives like a dream. I’ve played with the Caldwell and a Sinclair, they have nothing on this one.”


