The SCATT MX-02 is an electronic shooter training system that is capable of operating outdoors with live, centerfire ammunition, at distances from 25 yards to 600 yards. Tony Chow tested this product for AccurateShooter.com. As fitted to his AR-15 Service Rifle, Tony concludes this is a very useful tool that can help High Power competitors refine their technique and shoot higher scores. CLICK HERE for MX-02 3000-word Review.
How the SCATT MX-02 Works
The SCATT sensor mounted on the end of the barrel has a digital camera that recognizes the black bullseye in the target, even in broad daylight outdoors. Using the bullseye as a reference, the SCATT software tracks the movement of the muzzle relative to the center of the target. The unit can plot these movements as a continuous trace, which appears on a monitor as a squiggly, colored line. By sensing the exact moment of shot release, the SCATT can also interpolate relative shot placement (for a single shot or series of shots) — but this is not the same as an electronic target which actually records the exact shot impact location on the target.
Some time ago, we reviewed this product from the perspective of a smallbore competitive shooter. (Read Previous Review.) Here we test SCATT MX-02 again, this time on an AR-15 service rifle, in order to assess its suitability for the High Power competition community.
We put the MX-02 through its paces in all three High Power shooting positions and in various environmental conditions. We wanted to find out whether the system can reliably operate in the harsher outdoor settings and withstand the recoil of a centerfire rifle. We also wanted to assess whether it provides added values for High Power shooters over older generation of electronic trainers such as SCATT’s own venerable WS-01.
On both counts, we came away impressed. The SCATT MX-02 stood up to centerfire recoil after hundreds of shots and was able to consistently recognize the often less-than-pristine High Power target faces. Both indoors and outdoors, the MX-02 acts as SCATT should and dutifully captures useful aiming traces and other data. It does that even during outdoor live-fire sessions, where shooter performance often differs from indoor dry-firing due to the sensation of recoil and environmental factors.
SCATT Rapid Fire Results (paper target on left, screen on right).
In particular, SCATT MX-02 allows shooters to effectively troubleshoot and improve their rapid-fire performance, a service that no previous-generation trainers are capable of providing. The unit isn’t perfect — the SCATT MX-02 had some mounting issues with small-diameter barrels, but a cardboard shim provided a quick and effective solution.
Overall, performance was impressive. In most realistic training conditions that High Power shooters experience, the system performed well. We can certainly recommend SCATT MX-02 as an extremely valuable tool for High Power competitors looking to take their performance to the next level.
For more information or to order SCATT products, including the MX-02, visit ScattUSA.com or call toll-free: 1-855-57-SCATT (72288).
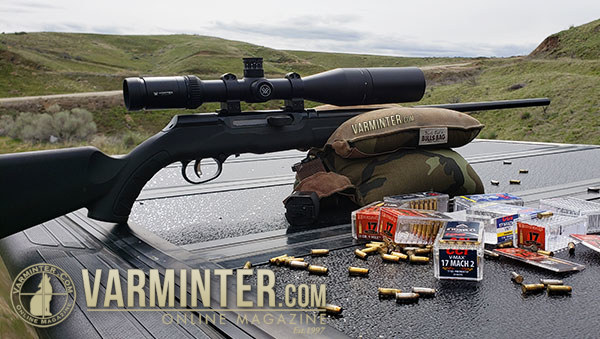
The 17 Mach 2 (aka “17 HM2″) is making a come-back. We’re glad. This high-velocity round fits actions and magazines designed for the .22 LR, so it’s an easy barrel-swap upgrade for most rimfire bolt-guns (semi-autos are more complicated). The 17 Mach 2 cartridge doesn’t deliver the velocity of the 17 HMR, but it is still way faster than a .22 LR. Expect 2000-2100 fps with 17 Mach 2 compared to 1250 fps for “High-Velocity” .22 LR ammo. And, importantly, 17 Mach 2 ammo is much less expensive than 17 HMR. If you shop around, you can get 50 rounds of 17 Mach 2 for about $6.50. That’s 35% cheaper than the average $10 price of 17 HMR — a significant savings!
17 Mach 2 Major Selling Points:
1. 60% more velocity than typical “High-Velocity” .22 LR ammo.
2. 35% less cost than average 17 HMR ammo.
3. 17 Mach 2 OAL is compatible with .22 LR receivers and magazines.
17 Mach 2 Rifle Reviews
Gun-makers have taken notice of the availability of 17 Mach 2 ammo, introducing new models chambered for this versatile little rimfire round. For a high-volume, small-species varminting, the 17 Mach 2 is much more effective than the .22 LR, and much less expensive than the larger 17 HMR.
New Savage A17 in 17 Mach 2
There are a number of reviews on new-generation 17 Mach 2 rifles. Recently Varminter.com reviewed the Savage A17 in 17 HM2. Editor Eric Mayer wrote: “This new addition to the A17 line comes at a time when the 17 Mach 2 round is experiencing a resurgence, with ammo now available from CCI and Hornady, including the lead-free NTX round from Hornady. This means … you don’t have to break the bank to buy a current, functioning, semi-auto 17 Mach 2 and you don’t have to … convert your 10/22.”
Eric shot four different types of 17 Mach 2 ammo, putting 1000+ rounds through the Savage. He was impressed: “I am very excited that Savage Arms has chambered their A17 rifle in the 17 Mach 2 / 17 HM2 round. After shooting the prototype, I can confidently say that this new A17 will become my go-to 17 Mach 2 rifle. This new rifle is a great option for varminters everywhere!”
Toggle Bolt Volquartsen Summit in 17 HM2
It’s rare for us to see a new rimfire that we’d really like to own, but the new Summit from Volquartsen fits the bill. This versatile rifle features a cool, straight-pull toggle bolt, similar to those on elite Biathalon rifles. You can see how this gun shoots in this informative 22 Plinkster video:
22 Plinkster Tests Volquartsen Summit Rifle in 17 Mach 2
The 17 Mach 2 (17 HM2) is making a comeback. Now leading manufacturers are offering this efficient little rimfire cartridge in some nice rifles. Both Anschutz and Volquartsen will offer new 17 Mach 2 rifles in 2019. The Volquartsen Summit features a lightweight, carbon fiber-wrapped barrel threaded 1/2-28 for brakes or suppressors. The Summit boasts a nice 1.75-lb trigger pull. The Summit’s CNC-machined receiver features a +20 MOA Rail. NOTE: The video shows a silhouette-style laminated wood stock. However, the Summit comes standard with a composite Magpul stock that actually works better for shooting from a bench.
17 Mach 2 — Best Rimfire Bang for the Buck?
If you are looking for a capable, squirrel-busting round or a fun plinking round, you should definitely consider the 17 Mach 2, especially since CCI has committed to production of the little cartridge. CCI recently rolled out its “Gen 2″ 17 Mach 2 VNT Ammo with polymer tip (see top of article).
Considering that 17 HMR ammo is now running $10 to $12 a box, the 17 Mach 2 is an excellent value by comparison. It is available from many vendors for under $6.50 per 50ct box. That’s just $0.13 per round. When you consider overall “bang for the buck”, for many shooters, it makes sense to use the 17 Mach 2 rather than a 17 HMR. You save money, barrel life is a little longer, and the 17 Mach 2 is still a much more potent cartridge than the .22 LR. Check out this comparison, and note how the 17 Mach 2 has a much flatter trajectory than the .22 LR. For varmint shooting, the 17 Mach 2 is clearly the better choice.
Hornady’s 17 Mach 2 has a 2100 FPS muzzle velocity vs. 1255 FPS for “High-Velocity” .22 LR.
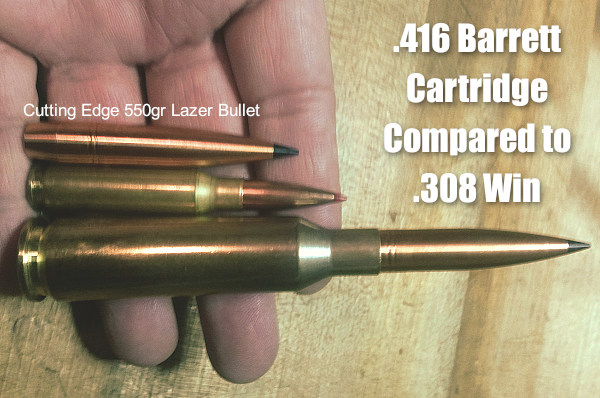
In the ELR game, particularly the King of 2 Miles (KO2M), it’s “go big or go home”. The top shooters run large-capacity cartridges that push large-caliber, ultra-high BC bullets at very high velocities. Bullets launched by cartridges such as the .416 Barrett can sustain supersonic velocities at Extreme Long Ranges — and that’s what it takes to win. The .416 Barrett can launch a 550-grain solid bullet at 3000+ FPS.
Photo from ELR Competitor Corbin Shell.
2018 and 2019 Kings of 2 Miles Loaded on RCBS Presses
So how do you load jumbo cartridges such as the .416 Barrett? It takes a big, heavy, super-strong reloading press. We’ve learned that the last two Kings of 2 Miles, Paul Phillips (2019) and Robert Brantley (2018) both loaded their KO2M ammo on RCBS AmmoMaster .50 BMG presses. Phillips loaded .416 Barrett ammo, while Brantley loaded custom .416 MCS rounds.
In 2018, Robert Brantley topped the field using his custom .416 MCS loads perfected on the AmmoMaster .50 BMG Press. The next year, Brantley took a close second to 2019 KO2M winner Paul Phillips. Both Phillips and Brantley use the AmmoMaster .50 BMG single stage press kit and RCBS .416 Barrett dies to hand-load for extreme long-range. “My ammo has been much more consistent after switching to the RCBS press and dies,” remarked Phillips, who runs the Global Precision Group. Brantley said he uses RCBS products for most of his reloading needs — from the dies and AmmoMaster, to the ChargeMaster and Brass Boss. His custom .416 MCS loads launch a 550-grain bullet more than 3,100 fps.
The KO2M competition is a two-day extreme long-range (ELR) match held at the NRA Whittington Center in New Mexico. Teams consist of one shooter and up to two wind coaches/spotters, who fire on steel targets ranging from about 1,500 to 3,500 yards. The photo below show 2019 Winner Phillips with the King’s crown at the NRA Whittington Center in Raton, NM.
Loading with RCBS AmmoMaster .50 BMG Press
This video shows reloading with the RCBS AmmoMaster .50 BMG press. While this video shows .50 BMG cases being loaded, the principles are the same for loading the .416 Barrett used by both Brantley and Phillips. Big cases need big presses!
RCBS is a leading manufacturer of ammunition reloading equipment for rifles and pistols, offering reloading equipment throughout the world. For more information, visit www.RCBS.com
Many thousands of hand-loaders, including this Editor, acquired the original RCBS ChargeMaster 1500 powder scale/dispenser. Mine has worked well for many years. Yes I do have to watch for scale drift, and I use a high-end Force-Restoration scale when loading for major matches, but the original ChargeMaster has served me well, throwing thousands of charges over the years.
RCBS ChargeMaster Lite Reviews
A couple years ago, RCBS introduced a new version of the ChargeMaster, the RCBS Chargemaster Lite. This newer unit has some features we really like. The new touch screen is easy to use and the powder tray cover slips off easily — no more hinges to fight. Most importantly the CM Lite has a redesigned, fluted dispensing tube which delivers powder kernels in a smooth flow with no clumps. The RCBS Rep told us “No more McDonald’s straw required”. We tested the unit and it does seem like the newly-designed dispensing tube is better. In fact, this new design will be adapted to the next generation of larger ChargeMasters. The ChargeMaster Lite ships complete with calibration check weights and cleaning brush. MSRP is $299.95 with “street price” around $238.00 at Amazon.
If you’re interested in the RCBS ChargeMaster Lite, here are three recent video product reviews. By watching these videos you can see all the features of the ChargeMaster Lite demonstrated. In the third video, the host also “compares and contrasts” the ChargeMaster Lite with the original ChargeMaster 1500, explaining the differences between the two units. Have at it:
Panhandle Precision ChargeMaster Lite Bench Test and Demo (Good Detailed Review):
Here is the RCBS Press Release: “The new RCBS ChargeMaster Lite packs unparalleled powder-measuring accuracy in a compact package. The one-piece unit features an LCD touchscreen display that ensures accurate data input. The hopper holds nearly a pound of smokeless powder, and can dispense anywhere between 2 to 300 grains with a +/-0.1-grain accuracy.”
UltimateReloader ChargeMaster Lite Unboxing:
Original ChargeMaster 1500 vs. ChargeMaster Lite:
Worth Considering Also — the Frankford Arsenal Platinum Series Intellidropper
Frankford Arsenal has a new electronic powder scale/dispenser, the Intellidropper. This unit dispenses quickly, loads can be controlled with a Mobile App. We recently did an in-depth Intellidropper Review. If you are in the market for a powder scale/dispenser, you should definitely consider the Intellidropper as well as the RCBS Chargemaster Lite. Watch this video to see how it works:
The Intellidropper is the latest automated powder scale/dispenser to hit the market. This new-for-2019 machine offers a unique powder calibration mode and the first-ever, mobile APP-controlled powder dispensing system. With a retail price under $200, the new Intellidropper is $30-$40 less than the ChargeMaster Lite.
Army of Minis getting ready to conquer the world (well at least the world of shooting).
The Minis are Coming! The Minis are Coming!
Good new for fans of the SEB Mini coaxial tripod rest. This superb compact joystick rest has been in high demand, creating a long waiting period. Now scores of bright new Minis are being readied for shipment to the USA, Canada, and other nations. On Monday, July 13, Sebastian (“Seb”) Lambang posted a Facebook photo of Minis getting ready to ship. That inspired scores of “likes” from Seb’s Facebook fans including action-maker Jim Borden and past F-Class National Champ James Crofts. Larry Bartholome, another former F-Class Champion, wrote: “Hey SEB — people are looking forward to more Mini Mondays!”
Sebastian (“Seb”) Lambang’s SEBRests.com team is shipping these out worldwide to meet demand. The great thing about the Mini is that it folds up into a small package, making it much easier to transport than a conventional coaxial front rest such as the Seb NEO or Farley.
Responding to Seb’s Facebook post, Todd Banks posted this photo with the comment “Love my Mini!”:
SEB Mini in Action at Berger Southwest Nationals
Even though the Mini is compact and relatively light weight, it is very stable and gives up very little in performance to a full-sized joystick front rest such as the SEB NEO. Our Systems Admin Jay Christopherson uses a SEB Mini. In the 2017 Berger SWN, Jay finished Second in F-Open Class just one point behind winner David Gosnell, thereby proving the SEB Mini is “competition ready”. Jay reports: “I’m glad I had the SEB Mini — it worked great and was much easier to transport and carry from position to position.” Here’s Jay using the SEB Mini to drill a string of Xs with his .284 Winchester F-Open rifle.
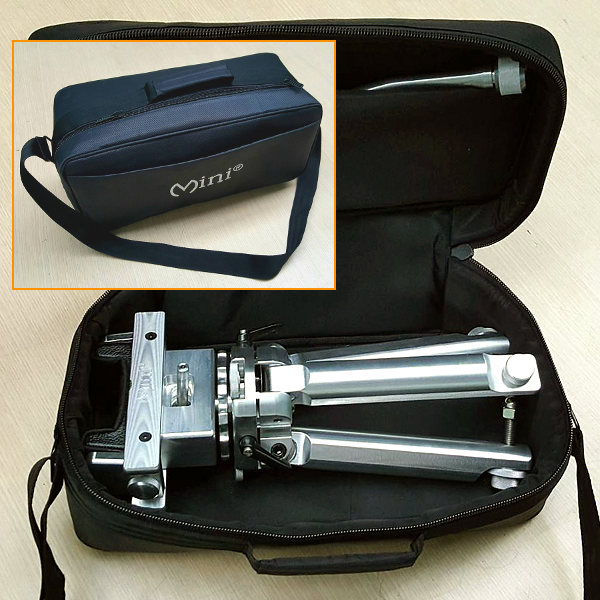
Carry Bag for SEB Mini
With the success of the SEB Mini, Seb Lambang has designed some accessories. Here is a prototype carry package, the Mini Transporter. This compact bag will hold a Mini even with big F-Class feet attached.
Are you a do-it-yourself kind of guy with a creative eye? Then you’ll love the Target Generator from the folks at ShooterShed.com. This free, interactive webpage allows you to design a variety of fun targets, including grids, benchrest-type Score Shooting targets, sight-in targets, and even playing card targets. Choose the paper size and orientation (vertical or horizontal), then select the number of target elements on the page. For example, you could have four (4) bulls or 52 playing cards. You can include a grid on the target, or tell the program to include load information blocks. For bullseye targets, you can control the number, color, and spacing (diameter) of the rings. LINK to TARGET GENERATOR.
The program provides a preview of each target you generate. If you like a particular design, save the file, and then print as many targets as you want. Check it out, this program is fun and handy to use. Here are four (4) targets your Editor created just for this article. With a bit of practice, you can be generating your own custom targets in minutes. Have fun.
About the Creator of the Target Generator
The Target Generator program was created by Rod Brown of Sheridan, Wyoming. Rod tells us: “I build custom rifles and coach shooters. I’ve got a 100-yard range out my back door. I shoot short- and long-range benchrest competitively around the country. I’m a full-time software development consultant and an FFL holder. When I’m not developing custom software for my clients, I’m usually fiddling in the shop, building a custom benchrest rifle, traveling to a match, chambering a barrel, or reloading some ammunition.
Story tip from Boyd Allen. We welcome reader submissions.
Jason Cohen’s “We the People” patriotic .284 Shehane F-Class rifle. It has already demonstrated great promise, scoring second place in its very first match, a 3×20 at 1000 yards in Wyoming.
Rifle Report by Jason Cohen
The rifle began its life as a Will McClosky Cerus stock. I approached Will at the Berger SW Nationals about a rifle I wanted to build. I wanted to do something different — PAINT it. He said he had just the stock that I could use, and sent that to Bryan Blake at Blake Machine. I chose Bryan for two reasons — first, I have shot with him a few times at National matches and he is approachable and very helpful. Second I visited his shop during the SWN in February and liked what I observed and how he approached things. Bryan never seems to be happy with the status quo. He is always trying new ideas.
I noticed that Bryan had been adding aluminum rails to the front of Cerus stocks to lower the center of gravity and improve tracking. I asked him to modify my stock and fit it with the new forearm rails, shown in the photo below. I sent him a Panda F-Class action with a +20 MOA Picatinny rail. Bryan did all the stock work and fitted the action, rails, and RAD recoil pad. Everything turned out flawless.
The barrel is a Blake Machine 1:8″-twist finished at 32 inches. It was fitted to my action by Dale Woolum of Woolum Accuracy. Dale chambers all my barrels on all my rifles. Dale also threaded the barrel for a Woolum Accuracy tuner. This has proven to be a valuable tool in my load development. On this build, I am trying a Bix’N Andy trigger for the first time.
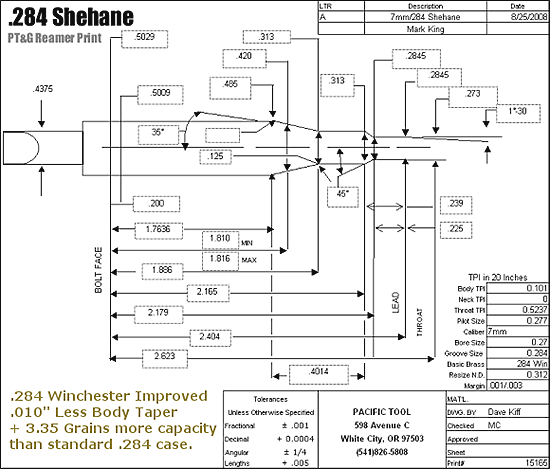
The 284 Shehane has a proven record of accomplishments and that is why I have chosen it. I use Lapua brass (6.5-284 necked-up), CCI BR-2 primers, Hodgdon H4350 powder, and Berger 184gr bullets. All these components have been a successful combination that has worked flawlessly in my other rifle.
.284 Shehane Load Development
Load development for me starts with each new barrel. I screw on the new barrel, fire 25 rounds of whatever I have left over and then clean it. I push out to 600 yds and do a ladder test in round-robin format. I start 0.6 grains lower than my last charge that worked. I work up from that reduced charge weight in increments of 0.3 grains. The paper tells the rest of the story. Once I get something that works well at 600 yards I go back in work around that by 0.1 grains. After that I play a little with seating depth and look for a change. I will occasionally mess with the tuner and tighten things up if possible.
About the Patriotic Paint Job
So I had the idea of painting the stock because there are so many wood stocks with clear coat these days. Unless you really get some exotic woods they all seem to blend together. I have nothing against clear-coated wood, but I wanted something different, as this was my first all-wood rifle. (For short-range benchrest, I was shooting a Bob Scoville carbon stock and Terry Leonard laminate).
We started with all white on the stock and came up with the idea of an American Flag on the buttstock. I was thinking of ribbons on the front in red and blue but we could not get the layout right. Then the idea of “We the People” popped into the head. My painter said “awesome!” and he was able to airbrush the stock with a little yellow and brown to give it that vintage paper look.
The front rest is a SEB Max (see above). I chose the Max because I was shooting Group Benchrest first then made the transition to F-Class. This rest proves to be versatile in all my shooting — Short- and Long-Range Benchrest AND F-Class. The rear bag is a Edgewood EDGEbag Gator. The gun gets transported in a Pelican Hard case when I travel. Locally, I use a Champions Choice soft bag.
Jason Jumped to Open Class after Starting with F-TR
This “We the People” rifle will be one of my primary rifles for F-Open competition. I will run it through its paces shortly and see how well it does. I have high hopes of it being an great gun. I shoot primarily local and regional matches — Colorado, Wyoming, and possibly Nebraska this summer. I will travel to the F-Class Nationals in Raton as well. I used to shoot F-TR before this and made the transition to Open last season. This is my second season shooting F-Open. 2018 was my first National event and was a learning experience for me. But I was hooked after that match.
Tips for F-Class Competitors
Get some good equipment and eliminate having issues that can be caused by budget builds. It’s OK to be frugal, but sometimes cutting corners will cause you more problems and have you chasing your tail. If you’re looking for the “recipe for success”, get a good action plus a top-tier barrel and great glass.
The .284 Shehane — Accurate and Forgiving Wildcat
The 284 Shehane is amazing, very forgiving and not temperamental. I choose this because I really did not know otherwise and was steered to the Shehane by a friend. Its proven track record helped as well. Straight .284 or Shehane — you cannot go wrong. I run a 184gr Berger at about 2850 FPS and get great brass life in my other rifles. I usually start to consider tossing the brass around 15 firings. Primer pockets start to get a little looser and the brass seems to need more sizing than the newer brass with less firings.
Many of our Forum members who shoot F-Class and Long Range Benchrest have asked: “Is there a reliable high-magnification zoom scope under $1100?” The answer is yes — the Sightron SIII 10-50x60mm scope will do the job, and you can buy one now for under $1100.00. In fact, at the 2017 IBS 600-yard Nationals, four of the Top 10 shooters (including the 2nd-place finisher) used Sightron 10-50x60mm scopes. This quality 10-50x60mm optic is definitely good enough to win long-range benchrest and F-Class matches. Here is a review by James Mock. Note James tested a version with 1/4-MOA clicks. Sightron also offers versions of this scope with 1/8-MOA clicks.
Sightron 10-50x60mm Riflescope Field Test Review by James Mock
Mr. Allen Orr of Sightron was kind enough to loan me one of their fine SIII riflescopes for testing. Since I shoot 600-yard score matches more than anything else, I requested the 10-50x60mm model with MOA-2 reticle. This is a premium scope in every way and it may be the very best buy for a long range scope today. Real world price for this scope is around $1100 ($1089.99 on Amazon.com). This represents a good value considering the scope’s build quality and features: 50X max magnification, 1/4-MOA adjustments with 10 MOA per revolution, ExactTrack windage and elevation system, Zack-7 lens coating, 60mm objective lens, target knobs with zero stop, and lifetime warranty. The MOA-2 reticle’s hash marks span 2 MOA at 24X and 1 MOA at 48X. Eye Relief is ample: 4.5″ at 10X and 3.8″ at 50X. Field of view at 100 yards is 9.6′ at 10X, 2.2′ at 50X.
NOTE: Sightron also offers this scope with 1/8-MOA clicks with a Fine Cross-Hair Reticle, Target Dot Reticle, and Mil-Dot Reticle. There are also multiple Sightron SIII 10-50x60mm models with illuminated reticles.
Sightron SIII 10-50x60mm Shows Excellent Repeatability
After receiving the scope, I mounted it on my BAT 6mm Dasher and did my “standard tests”. I shot the “square” and the adjustments were spot on and the repeatability was faultless. I also shot a group at two powers (24X and 50X) and the point of impact was the same.
In our August 600-yard match, I used the scope and was favorably impressed. I did not have the opportunity to shoot 600 yards prior to the match but I do have a 100-meter range at my house. From past experience, after zeroing my Dasher at 100 I simply dial up 11 MOA to shoot at 600 yards. The weather in Louisiana has been something that I have never seen before and the August 20th match was moved to August 27th, but there was still standing water in front of the targets. Also, the fog was so heavy that the start of the match was delayed for 45 minutes.
Sightron Nails a 50 Score on First-ever Match Target
When the match started, the Sightron with 11 MOA dialed in was perfect for elevation and a little right. After a couple of clicks I was ready to shoot. My first target was a pleasant surprise — scoring a 50-1X. I was very impressed with this scope and I shot it at 48X all day in the heavy mirage. I ended up finishing third, two points behind the winner.
This video is from Europe, but it does a good job explaining the 10-50x60mm Sightron’s features:
With its 60mm objective lens, this is a large scope. It is 16.9″ long and weighs 30.1 ounces. If you can tolerate that weight in the discipline you shoot this scope represents a great value for the long-range shooter. I am favorably impressed with it. For you varmint shooters, this scope with its wide range of power would make a superb addition to you favorite prairie dog rig. Do note, as we explained above, there are other versions of this scope with 1/8-MOA clicks if that is your preference. Good shooting — James Mock
He who dies with the most toys wins — right? Well Sinclair has another interesting gadget you can add to your reloading bench. The Sinclair Case Neck Sorting Tool lets you quickly sort brass by neck-wall thickness. For those who shoot “no-turn” brass, this can improve neck-tension consistency. Large variances in neck-wall thickness can cause inconsistent neck “grip” on the bullet. Generally, we’ve found that more consistent neck tension will lower ES and (usually) improve accuracy. We know some guys who shoot no-turn 6mmBR brass in competition with considerable success — but their secret is pre-sorting their brass by neck-wall thickness. Cases that are out-of-spec are set aside for sighters (or are later skim-turned).
Watch Case Neck Sorting Tool Operation in Video
How the Case Neck Sorting Tool Works
Here’s how the Sinclair tool works. Cases are rotated under an indicator tip while they are supported on a case-neck pilot and a support pin through the flash hole. The unit has a nice, wide base and low profile so it is stable in use. The tool works for .22 through .45 caliber cases and can be used on .17- and .20-caliber cases with the optional carbide alignment rod. The MIC-4 pin fits both .060 (PPC size) and .080 (standard size) flash holes. Sinclair’s Case Neck Sorting Tool can be ordered with or without a dial indicator. The basic unit without dial indicator (item 749-006-612WB) is priced at $59.99. You can also buy the tool complete with dial indicator (item 749-007-129WB) for $89.99. IMPORTANT: This sorting tool requires caliber-specific Case Neck Pilots which must be ordered separately.
Editor’s Comment: The purpose of this Sinclair tool is rapid, high-quantity sorting of cartridge brass to ascertain significant case-neck-wall thickness variations. Consider this a rapid culling/sorting tool. If you are turning your necks, you will still need a quality ball micrometer tool to measure neck-wall thickness (to .0005) before and after neck-turning operations.
Ric Horst’s 7 WSM is a game-slayer with serious long-range accuracy. Here’s a hunting rifle (with tactical trappings) that performs as well as some purpose-built benchrest rifles, delivering half-MOA ten-shot groups at 1000 yards–from bipod no less! That was noteworthy in itself. But Ric’s rifle, built to take game in Wyoming’s backcountry, also proves the viability of the 7mm Win Short Mag as a true precision cartridge. With the capacity to drive hard-hitting, ultra-high-BC bullets, the 7 WSM is a bonafied rival to the big 30s. This rifle sets a very high bar for long-range hunting rigs.
The Challenge: Creating the Ultimate Long-Range Hunting Rifle
Q: Tell us how you got interested in the 7 WSM and how you got started on this project?
Ric Horst: Chris Matthews and I were invited to help out with a new hunting show on a cable network. We wanted to showcase a rifle that wasn’t typical for the TV program which was about Antelope and Mule Deer hunting in Wyoming. We considered a variety of calibers, but then Sierra announced their new 175gr (.284) MatchKing and that got our attention. In Wyoming, the key thing in choosing a caliber is the availability of good high-BC bullets–the wind will own you out here. After seeing Sierra’s projected BC for the 175s this seemed to be a no brainer. So I told Chris to make the rifle a 7mm WSM.
Q: What were your objectives with this project rifle? Sounds like you wanted to build a state of the art long-range hunting rig?
Our goals were simple–we wanted a tack-driver with long-range capabilities, from 400 to 1000 yards. Really, at the time, the choice of the 7 WSM was easy–no one else was really doing it, and if they were, they weren’t talking about it. So we wanted to be the first make it work, one way or another. There were actually no real surprises or problems along the way, other than it was the first time I was shooting a 7mm and the accuracy of the 175gr bullets was better than I expected. I have total faith in Chris’s gunsmithing abilities. This 7 WSM is the sixth rifle he’s built for me–and they’ve all been tack-drivers.
Q: Give us your perspectives on living and shooting in Wyoming. What makes it such a great hunting ground? How do the game mix and terrain dictate your selection of a rifle?
My requirements for my rifles are, I guess, unique. I like tactical-style rifles. This “style” seems to fit my type of hunting here in Wyoming–tough, rugged terrain where you need to be able to make the long shot should one present itself. Living in Wyoming? Well, if you choose to live in the “out of town” places you need to be well-prepared and tough. Going to town means a 50-mile trip. You don’t just run to the convenience store if you need something. Plus the weather is hard in the winter and always windy. We joke that we have just two seasons, three months of summer and nine months of winter. Our spring and fall are each about two weeks long.
Despite the weather, Wyoming is a great place for a hunter. Game here is second to none: deer (whitetail and mulies ), antelope, elk, sheep, moose, plus varmints galore. What is great about my location is that I can shoot just about anytime I want. I have the ability to shoot as far as 3500 yards out my back door if I choose. Here’s a shot of my playground.
Putting It Together: Exceptional Components and Accurate Ammo
Q: Your 7 WSM has logged 10-shot groups at 1000 yards that could win many 1K benchrest matches. What kind of components does it take to deliver this kind of accuracy?
There is nothing super-exotic in this rifle, but it IS fitted out with some of the best components on the market. We did start with a factory action, however, a Remington 700 short action. Chris trued the action, added an SSG over-sized bolt knob, and fitted the action with a Broughton 5C, 9-twist #7 contour barrel finished at 24″. To reduce recoil we added a Badger brake. The stock is a fiberglass McMillan HTG (General Purpose Hunting) stock in Desert Camo. (This McMillan stock design replicates the original M40A1 Marine Sniper Rifle stock.) Since this is a repeater we added a Wyatts Mag Box. The gun features Badger bottom metal, Badger scope rail and Badger Rings. The Scope is a 4-16 Nikon Tactical, which, so far, has proven to be excellent. All the metal is Teflon-coated in Mil-Spec OD Green. I have a bubble-level mounted on the scope rail.
Q: To achieve the results you’re getting you must have exceptional hand-loads. What is your reloading procedure and do you have any “secret tips” to share?
I use Winchester-brand brass and Winchester Large Rifle Magnum primers. My current load is 64.0 grains of H4831sc for the Hornady 162s (2950 fps) and 61.0 grains of H4831sc for the Sierra 175s (2830 fps).
The only sizing dies I have used are the Basic Redding FL dies–I have since started using the Forester Ultra-Seater and used it when I shot the outstanding groups. My reloading technique is pretty basic. I full-length size and trim all to length. I use the RCBS powered Trim Mate™ station to do most of the brass prep. I do use the VLD case mouth deburrer. I uniform the primer pocket and chamfer as well. I then fire-form those prepped cases. I’ve noted that the new brass usually shoots just as well as fire-formed cases. I then use the FL die to bump the shoulder back .002″. I haven’t really noticed and major difference between Forester and Redding dies except price. I don’t have any “special” secret loading techniques. If you use quality components, I’ve found that you don’t need to weigh this weigh that etc. I tried that for years and it never really showed results to justify the time and effort. I quit doing all the weighing ( except for bullets ) and I shoot just as well. The two things I am anal about are the powder charge and seating depth–these all have to be exactly the same for each round!
I do take time to uniform the brass. First, when I get a bag of brass, I’ll check to make sure all the flash holes are centered, and I’ll pitch the ones that aren’t. Then I’ll measure the shortest case and trim all to that length (after ensuring that fits my chamber). Next, I’ll uniform the primer pockets, and debur and bevel the flash hole on both sides. Beveling both sides is one trick I think helps keep ES down. By beveling the flash side it basically takes the flash and tapers/funnels it to the hole. I think you get more consitency with the primer flash this way. Finally I’ll debur/champfer the inside and outside of the neck using a VLD chamferer.
After firing the cases once, I clean them all up and make one pass on the neck turner just to “clean” the necks to a consistient diameter. Note, I am not necessarily turning for a specific diameter because I have enough clearance to start with. I do this light turn just for consistency. Sometimes the neck turner might only shave a bit off one side.
Q: What’s your load-testing procedure? Do you have any special methods to evaluate/tune your loads?
Again, my methods are pretty simple. I start with the Sierra Load Manual, select the bullet weight, then find the max load for a recommended accurate powder. I like Hodgdon powders, so I start with an “H” powder with an appropriate burn rate, drop the “max” load about 0.5 grains and start there. Typically there is a sweet spot within half a grain up or down from that starting point. I usually seat my bullets to touch the lands or seat just in a bit. I feel this makes up for any bullet-run out when seating them.
When load-testing, I try to get 100-yard groups to be half an inch or less (quarter-MOA is pretty good for me, but not something I can count on regularly.) I then go to the 300- and 500-yard steel plates to see if the load holds its accuracy. If it does, then the load is good to go. However, I will shoot a 5-shot group every now and again to see if I am still in tune. In fact I was re-testing the 162gr A-Max and 175 gr SMK loads the day I shot the screamers at 1013 yards. Two great groups back to back.
Q: How does your 7 WSM perform in terms of recoil and accuracy? Has it met your expectations?
This rifle is by far one of the most fun rifles I have ever had. The recoil is very minimal with either of the loads and the rifle just plain flat-out shoots. The break-in took all of 21 rounds I think. This rifle shoots sub-2″ groups at 500 yards all day every day (often closer to 1″). Note that I don’t do any shooting from a bench and rests except for the initial load work up. The rest of the time I shoot from a bipod. I would really like to stress that I shoot exclusively with bi-pod and “sand-sock”. So many guys out there think that you have to shoot from a bench to get outstanding results. This simply isn’t true. If you are a disciplined shooter and have correct shooting techniques you can do amazing things from any shooting position. Long Range doesn’t have to be from a rest or bench!
What makes this rifle special is that it has an identical twin, built by Chris for my hunting partner Steve. Both rifles shoot exactly the same–same accuracy, same velocity, same trajectories. I never shot a 1K group with Steve’s gun, but at other distances, including 500 yards, it has performed identically to mine. I shot a sub-moa group of 12 shots one day with the Twins. I shot six shots from each rifle, alternating rifles between shots. Remember this is from the prone position and off a bipod–same load, two different rifles–and it produced a single, sub-MOA group. Now that’s consistency. Both these rifles I call point and shoot rifles–point them on target and they’ll shoot it.
Q: What technique do you use when shooting from bipod?
I basically do Froggy’s technique when shooting from a bipod. I get my natural point of aim, then push forward a bit to pre-load the bipod legs. In gripping the stock, I use just my two middle fingers to apply firm pressure straight back into my shoulder. I’m careful not to torque with the thumb or pinky finger. With my focus on the intended point of aim, I’ll let the cross hairs blur a bit and gently press the trigger until it goes boom. Then follow through, watch for the impact, and chamber the next round.
Looking Out to 1000 Yards, and the Results from Ric’s 7 WSM










 He who dies with the most toys wins — right? Well Sinclair has another interesting gadget you can add to your reloading bench. The Sinclair


 There is nothing super-exotic in this rifle, but it IS fitted out with some of the best components on the market. We did start with a factory action, however, a Remington 700 short action. Chris trued the action, added an SSG over-sized bolt knob, and fitted the action with a Broughton 5C, 9-twist #7 contour barrel finished at 24″. To reduce recoil we added a Badger brake. The stock is a fiberglass
  I use Winchester-brand brass and Winchester Large Rifle Magnum primers. My current load is 64.0 grains of H4831sc for the Hornady 162s (2950 fps) and 61.0 grains of H4831sc for the Sierra 175s (2830 fps).
 This rifle is by far one of the most fun rifles I have ever had. The recoil is very minimal with either of the loads and the rifle just plain flat-out shoots. The break-in took all of 21 rounds I think. This rifle shoots sub-2″ groups at 500 yards all day every day (often closer to 1″). Note that I don’t do any shooting from a bench and rests except for the initial load work up. The rest of the time I shoot from a bipod. I would really like to stress that I shoot exclusively with bi-pod and “sand-sock”. So many guys out there think that you have to shoot from a bench to get outstanding results. This simply isn’t true. If you are a disciplined shooter and have correct shooting techniques you can do amazing things from any shooting position. Long Range doesn’t have to be from a rest or bench!


