Are you a sling shooter who would like to get into the F-Class game? Gary Eliseo has a great, affordable solution for TubeGun owners. A simply bolt-on forearm accessory lets your TubeGun ride a conventional front bag like a dream, with less torque effect and great tracking.
Competition Machine’s Gary Eliseo is a very smart designer as well as a talented shooter. The inventor/builder of the popular Competition Machine Tubegun chassis systems, Gary has come up with something new, which he calls the PickleForks. These are rails that fit to the sides of the tubular fore-end/handguard on his chassis systems. This allows you to use a pedestal-style front rest for F-Class competition. It also provides a much more stable platform for load testing, varmint hunting, or any kind of rest-assisted precision shooting. These new PickleForks transform a Tubegun into an ultra-stable, straight-tracking rig when used with a competition-style front rest.
Gary explains: “Now you can have the same super low-boreline, long ‘wheelbase’ and vertical sides of our innovative F1 F-Class chassis system for your tube chassis. The new PickleForks attach directly to the sides of the F-Class/Tactical fore-ends, no modifications are required. They are very rigid with no flex or twist and make the rifle track like it’s on rails.” The new Eliseo Competition Machine PickleForks are offered for a very reasonable $70.00 per pair, with Cerakote finish. (You get two metal units, one for each side of the fore-arm). For more information, visit www.GotXRing.com or call (928) 649-0742.
New Product Tip from EdLongrange. We welcome reader submissions.
The AutoTrickler/AutoThrow system dispenses powder with 1-2 kernel accuracy in just 10-12 seconds.
Review by Craig Arnzen of Area419.com
Guys in the PRS world are finally ready to admit — the more accurate we want to be, the more we should borrow practices from the F-Class and Benchrest worlds. There are no better examples of this that have popped up in the last year than the widespread adoption of highly accurate powder dispensers and high-end annealing techniques.
I’ll talk about the annealers another time, but today I want to introduce you to the powder dispenser contraption that is popping up on reloading benches everywhere — the AutoTrickler plus AutoThrow running with an A&D FX-120i magnetic force restoration scale.
The setup is priced firmly between the standard RCBS Chargemaster and the high-end $3,800 Prometheus powder dispensers. Depending on how you outfit it, and where you buy it, an AutoTrickler/AutoThrow setup will cost between $900 and $1,200. Figure $500-$525 for the A&D scale, $399.00 for AutoTrickler + AutoThrow (for A&D), and up to another $300 for Area 419 accessories.
The AutoTrickler V2 by itself is $229-$269 (depending on scale model), while the AutoThrow is $199.00 purchased separately. Current AutoTrickler owners can add the AutoThrow as an upgrade. It’s worth it — the AutoThrow speeds up the dispensing process dramatically. Watch this video with the smart guy who invented the AutoTrickler and AuthoThrow systems, Adam McDonald:
AutoTrickler Inventor Adam McDonald Demonstrates the AutoThrow System:
How the AutoTrickler + AutoThrow System Works
The “brain” of this system is a micro-processor that controls the motors on the AutoThrow powder dispenser and the AutoTrickler, taking more than 100 readings per second from the scale. The process starts with the AutoThrow first dropping 90% of the charge directly into the pan via a vertical drop tube. Then the AutoTrickler finishes dispensing the charge with super precision, using its horizontal tube. This two-stage process allows the system to throw powder within a kernel or two of your target weight every time — in just 10-12 seconds.
Powder is dispensed onto an A&D FX-120i scale (other models, including a Sartorius Entris 64-1S can also be used) that is able to detect and register the weight of individual kernels very quickly, providing data back to the “brain”. The initial powder drop from the AutoThrow gets you within about 2 grains and then the AutoTrickler finishes in just a few seconds with amazing accuracy. When set up right, this system can weigh repeatably to within one or two kernels of powder.
Area 419 Accessories for AutoTrickler and AutoThrow
The system can also be outfitted with milled aluminum accessories from Area 419, adding adjustability, stability, and ergonomics to the process. We sell a base for the AutoTrickler that adds weight (to reduce movement when the stepper motor runs) and has adjustable feet to help tune the powder flow, a larger cup with handle (to reduce powder splashing when dumped from above) and upgrades for the auto-throw that enhance powder capacity and reduce noise and vibration.
All in all, this is one of the most popular new ways to throw powder of the last year, and these systems are becoming common enough that we think they are here to stay. This video review by the 6.5 Guys offers some tips for setting up your AutoTrickler System with Area 419 base.
AutoTricker with Billet Base and AutoThrow Review by 6.5 Guys:
Love your LabRadar chronograph? Or wish you owned one? Well now the LabRadar is even better. The makers of the advanced, Doppler-radar LabRadar system have introduced a versatile new LabRadar Mobile App that works with iOS (Apple) and Android systems.
The Mobile App lets you control the LabRadar remotely with your smartphone or laptop. This makes it easier when you position the LabRadar beyond arms reach (such as when using a suppressor). The App also makes it much easier and faster to change settings, display shot data, and download test results.
LabRadar Android Mobile App:
Initial feedback on the LabRadar Mobile App has been very positive, though it took some guys a couple tries to get everything working right. Android users — be sure to turn on your “Location Services”. You’ll find a full discussion of the LabRadar App, with set-up tips, on our Shooters’ Forum. Read HERE.
LabRadar iOS (Apple) App, iPad Version:
Here’s a recent review from a LabRadar owner using an Android phone: “[This App] makes the LabRadar exponentially more useful without additional cost. Firmware update to 1.20 was uneventful and quick. No issues running this on a Samsung Galaxy S9+. Shot series can be reviewed on the phone while disconnected from the radar. While connected you can change the radar settings from within the App. Great features and flawless execution.”
LabRadar Mobile App Functionality
With the new Mobile App, you can control your Labradar from your smartphone or tablet with its Bluetooth connection. Manage, store or delete the information in your series as you wish. View your data and summaries displayed in list or table formats. Even view a graph of speed vs. distance.
– Control your LabRadar from your smartphone or tablet
— Display Single Shot Stats: Velocity, Energy, Power Factor
— Display Shot Series Stats: Average, ES, SD, Hi/Lo Shot
— View Velocity by Distance as Graph and List
— Arm, disarm, and change your settings
How to Install and Use LabRadar Mobile App
First get the LabRadar App for your mobile device. Download the Android App from Google Play. Get the iOS (Apple) Version from the Apple App Store. You may also need to update your LabRadar Firmware.
Firmware Update to Enable Bluetooth
LabRadar owners may need to upgrade their chrono’s Firmware to allow the unit to communicate with the Mobile App. The latest firmware will enable the Bluetooth connectivity on your LabRadar device. Download the new Firmware v1.2.2 by following the link below.
1. Go to http://www.mylabradar.com/download/
2. Select: Labradar Firmware v1.2.2 (English) Mobile App Ready.
3. Copy the FWA and FWB files to a SD card (or use the USB cable method).
4. Insert the SD card in your Labradar and turn it on.
5. On your Android Device, make sure your location services is enabled.
6. IMPORTANT — Do NOT PAIR your Bluetooth device to the Labradar! When using the mobile App simply connect to your Labradar from within the App.
At the SAKO/Tikka booth at SHOT Show, we saw some tactical shooters admiring the smooth Tikka T3 action and crisp trigger. They liked the action but they told us they wished they could get the T3 action in a configuration similar to the Ruger Precision Rifle. Well folks, there is a way to build a Tikka T3-based tactical/practical rig.
Gary Eliseo of Competition Machine offers a tubegun chassis for Tikka T3 actions in both Target and Tactical versions. The T3 kit is set up for AICS short action magazines. This is a “no gunsmithing” installation — no modifications to the action are required and the chassis kit works with the factory T3 trigger and safety. Along with the new Target and Tactical versions, a lower-cost Light-Weight Hunter T3 Chassis is also offered which accepts most AR-type buttstock assemblies.
Tikka’s T3 action is a very nice unit that works well as the centerpiece of a precision rifle. The T3 action is rigid and robust. It cycles smoothly and has a short 75° bolt lift. The T3 features a Sako-style extractor, with angled-leading-edge bolt lugs for smooth lock-up.
The T3 action can be installed in Gary’s Chassis Kit with either a recoil disc (and bolts) or glue-in action mounting. Price for the Tactical model is $1050.00, with a rugged Cerakote finish. Price for the Target version is $950.00 with a powdercoat finish or $1025.00 with a Cerakote finish. The Light-Weight Hunter chassis (that accepts owner-installed AR-type buttstocks) starts at $685.00. (Check for current pricing.) Tikka T3 action and AICS 5-round or 10-round magazines sold separately. For more info, visit GotXRing.com, call 928-649-0742, or send email to: spraynandprayn [at] gmail.com . CLICK HERE for order page.
New Technology — Electronic Reticle Level. Activate level by pushing illumination button for 15 seconds. The level warning deactivates automatically when you rotate the scope over 30 degrees.
The latest Leupold VX-6HD scopes have a feature we’d like to see incorporated in other optics: a tilt-correction warning system. When the rifle is canted more than 1 degree off level, the VX-6HD’s new electronic reticle level flashes, telling the shooter to square up his rifle. This kind of innovation helps both hunters and target shooters. Even a small bit of cant variance from shot to shot will change the point of impact at long range (Canting Demo HERE). Proprietary MST (Motion Sensor Technology) automatically deactivates illumination after 5 minutes of inactivity, yet reactivates instantly as soon as any movement is detected.
The electronic reticle level and other advanced VX-6HD features were praised by Petersen’s Hunting magazine, which awarded the VX-6HD an Editor’s Choice award. Leupold put a lot of advanced optics technology in this scope. Leupold says: “We gave it new high-definition lenses for sharpened clarity, Twilight Max Light Management System, an in-scope cant indicator, a throw lever for fast magnification changes, and a more robust erector system.”
Leupold offers six VX-6HD series riflescopes: 4-24x52mm, 3-18x50mm, 3-18x44mm, 2-12x42mm, 1-6x24mm, and 1-6x24mm multigun. All Leupold VX-6HD riflescopes are CDS-capable and include one free Custom Ballistic Dial with purchase.
The VX-6HD series of scopes also feature a very clever, button-controlled return-to-zero system for both windage and elevation. A visible button snaps out at the zero point, locking the turret. Press the ZeroLock button to release and dial your needed elevation or windage. Simply spin the turret back and the lock snaps into place automatically at the designated zero point. Simple, easy, effective.
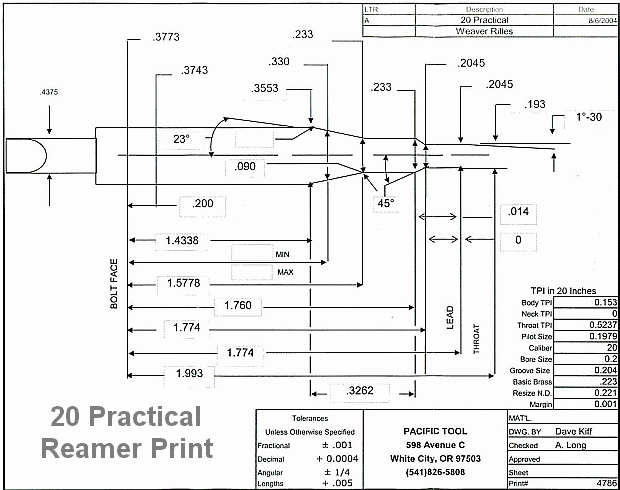
The new .224 Valkyrie for AR15-platform rifles has garnered lots of attention lately. That new cartridge has gotten people thinking about the options for an AR shooter beyond the venerable .223 Remington (and 5.56x39mm NATO). While the .224 Valkyrie is good for shooting long heavy bullets (such as Sierra’s new 95gr SMK), there is a simpler, cheaper option for folks who favor “fast and light” — smaller, lower-mass bullets traveling at very high velocities. That option is the 20 Practical, which is simply a .223 Remington necked down to 20 caliber. This little cartridge can launch 40-grainers at over 3900 fps. That’s bookin’. This makes the 20 Practical a great choice for an AR-based varmint rifle.
20 Practical Ultimate Varminter
A decade ago, as a “proof-of-concept”, AccurateShooter.com created a 20 Practical AR15 Ultimate Varminter with a custom 20-caliber upper from Robert Whitley of AR-X Enterprises, LLC. That project rifle was ultra-accurate — every 5-shot group out of the gun was less than the size of a dime. That gun was auctioned off, but Robert Whitley continues to produce custom 20 Practical AR15 uppers. (The 20 Practical cartridge is simply the .223 Rem necked down to 20 caliber — you can use standard .223 brass and load with standard.223 Rem dies. Just swap in a smaller expander and use smaller neck bushings.)
Robert reports that the accuracy of the first 20 Practical AR15 was no fluke. After building six (6) more 20 Practical uppers, he tested them for accuracy and they all shot great. These uppers feature DPMS low-pro receivers with side charging handles. They are fitted with PacNor 1:11″ twist, three-groove stainless barrels.
Robert reports: “We have been making more 20 Practical AR15 uppers and I have to say I am astounded by the accuracy of these things. For shooting little tiny groups out of an AR15 with bullets going 3500+ fps, it’s hard to beat the 20 Practical. Today I test-fired six more uppers, all with 11-twist barrels. Three of the uppers had 24″ barrels, two had 20″ barrels, and one had an 18″ barrel (we call it ‘Stubby’).
In four of these uppers I shot re-sized Winchester brass using 25.3 grains of WC844 powder with Berger 40gr BTHP bullets loaded at 2.225″ OAL (about .015″ off the lands). WC844 is inexpensive military surplus powder that is nearly identical to H335. I tried three different primers and the choice did not seem to matter (CCI BR4, Rem 7 1/2s and Win Small Rifle — the old silver ones). All these four uppers shot great. Here is an animated GIF with targets from uppers #6, 10, and 11. All groups are mag-fed, 5-shot groups shot at 100 yards using a front rest and rear bag.”
Targets Shot with Three Different 20 Practical AR Uppers
For more information visit www.6mmAR.com, or contact Robert Whitley via email: rcw3 [at] erols.com.
“Garbage In, Garbage Out.” You have to input key variables with precision if you want your Ballistics Apps to deliver reliable long-range trajectories. So says Tom Beckstrand, Field Editor for Guns & Ammo magazine. A former U.S. Army Special Forces Officer, and avid long-range competitor, Beckstrand knows the importance of using your ballistic calculator correctly. Here are his tips on how to achieve the best results using Ballistics Calculators.
“The most important inputs to make any ballistic calculator work correctly are muzzle velocity, ballistic coefficient, and sight height,” says Beckstrand.
Ascertain Accurate Muzzle Velocity with a Good Chronograph
“Cheap chronographs will not give an accurate muzzle velocity, so the serious shooter needs to spend the money on a quality chrono.” When you chronograph, make sure to measure the distance from the muzzle to the chrono unit. That input is also important to your Ballistic calculations.
Use Reliable G1 and G7 Ballistic Coefficients
Beckstrand added, “Ballistic Coefficients are available from ammunition and bullet manufacturers, and most of these coefficients the manufacturers provide are really quite accurate.” Ballistic Coefficient or BC, is a number that reflects how well a bullet cuts through the air. The higher the BC, the less the bullet is affected by air drag.
Measure Sight Height Correctly Using Calipers
Beckstrand has found that many shooters aren’t inputting sight height or they are guessing at the correct height. As target distance increases, just a half-inch of sight height inaccuracy can mean several inches up or down.
“Sight height is the input most often overlooked and is usually the source of greatest error. I think a lot of shooters, especially those new to long-range shooting, simply don’t understand the importance of this input.”
Sight height is the distance from the centerline of the scope to the centerline of the bore. Some shooters, Beckstrand believes, just “eye it up” and estimate the distance. “Really, you should use a set of calipers to measure the sight height distance … within 0.1 inch”.
Get Leading Ballistics App for iOS Devices
Need a top-notch Ballistics App for your iPhone, iPad, or iPod? Start with Ballistic AE, the number 1 (i.e. most installed) App for iOS systems. Ballistics AE (Advanced Edition) is the most popular iOS ballistics program for many good reasons. Full-featured and easy to use, Ballistics AE has been refined over many years, and it supplies rock-solid solutions derived from JBM Ballistics solver (created by James B. Millard). Unlike some other Apps, Ballistics AE is STABLE on iPhones (with various OS levels). What’s cool is that Ballistics AE is now on sale for $12.99.
We’ve used the Ballistic AE program on an iPhone 5S, iPhone 6, and iPad, and it performed well. Here are some of the features we liked:
1. Mirrors output from online version of JBM Ballistics we often use for initial calculations.
2. Controls are simple to use and (mostly) intuitive.
3. Handy comparison feature lets you compare ballistics for different projectiles side by side.
4. Advanced Wind Kit allows you to account for complex wind situations.
5. Projectile and BC Databases are very comprehensive.
6. Software is regularly updated to match Apple OS changes.
AR-platform rifles are fun and versatile, but the standard, mil-spec triggers leave much to be desired. They tend to be gritty, with creep and heavy pull weight. One of the easiest, most effective AR upgrades is a trigger group swap. An improved fire control group makes a huge difference. There are many aftermarket trigger options for the AR platform rifles. Choose single-stage or two-stage, either standard trigger assembly or unitized “drop-in” trigger, such as those made by Timney or Triggertech.
When upgraded with a precision trigger and match barrel, AR-platform rigs work great in NRA High Power competitions (Photo from NRA Blog, at Camp Perry).
Two-Stage vs. Single-Stage Triggers
Two-stage triggers have two separate movements. The first stage offers a light, spring-loaded pressure that works against the shooter’s pull until stopping at the second stage – this is called “take-up”. If there is no spring pressure, it is known as “slack”. Should the shooter continue to pull the trigger once he’s arrived at the second stage, the mechanism will operate like a single-stage trigger from there until engaging the sear and firing the gun. Good trigger reset requires the shooter to keep pressure on the trigger, even during reset, to minimize movement of the muzzle.
Single-stage triggers feature no take-up or slack, as they begin engaging the sear as soon as the shooter begins pulling the trigger. Some competitive shooters prefer the two-stage trigger because of the feedback it provides during its first stage, while other shooters, including those using their rifle in tactical scenarios, may want the surety of a single-stage trigger, ready to engage and fire once their finger is inside the trigger guard. Regardless of preference, a good trigger will feature minimal creep and should be free of grittiness, providing a smooth, even break.
Drop-In Trigger Assembly vs. Standard Trigger Group
Once you decide between a single-stage or two-stage trigger, you can choose between standard and drop-in trigger groups. Standard trigger groups feature all the fire control group parts separated, and need to be pieced together and installed much like a mil-spec trigger, while drop-in trigger are pre-assembled and contained within a casing that simply drops in to the receiver and accepts the pins, hence the name.
After-Market Trigger Comparison
Some shooters prefer drop-in triggers due to the ease of installation, while others opt for standard groups so they can access the components individually for cleaning adjustment or replacement. If one piece of a drop-in trigger fails, you’ll need to either replace the entire unit or send it to the manufacturer for repair, whereas you may be able to simply replace the broken component of a standard trigger without needing a whole new trigger set.
Trigger Terminology — “Creep”, “Stacking”, “Overtravel”
“Creep” or “travel” is the distance the trigger moves between the end of take-up and when the trigger breaks to fire the fun. Too much creep can affect accuracy, but no creep can be unsafe, as the shooter may not be prepared to fire. “Stacking” occurs when the trigger weight actually increases during travel — this shouldn’t happen. Lastly, “overtravel” is the distance the trigger continues moving back after the gun fires.
This article is based on a longer story in the NRA Blog.
PMA Tool offers lightweight yet sturdy cleaning cradles that are handy, affordable, and easy to transport. PMA’s single-gun cradle, priced at $75.95, is ideal for benchrest rigs. It measures about 17″ in length and weighs about one pound. PMA now also offers a two-gun cradle for $119.95. Both single and double cradles secure your rifle(s) in a muzzle-down position that allows easy cleaning and prevents solvents from running back into the action. The front “saddle” and all contact surfaces are covered by thick silicone rubber padding which grips the rifle securely yet protects the stock and components from scratches.
These cradles are currently available either with a 3″-wide front saddle for Benchrest and F-Open style stocks, or a 2.5″-wide front saddle for rifles with narrower narrower, flat fore-ends such as those found on Hunter Class and modern varmint stocks.
Double Rifle Cradle is a Smart, Versatile Design
PMA’s double rifle cleaning cradle was was designed from the ground up to work perfectly for two rifles side-by-side. Using the same tie bar and protective saddles found on the single cradel, PMA widened the base and created new uprights to support the saddles, making the cradle as narrow and light as possible, while retaining all the protective and non-slip features from our single unit. This unit is available in double 3″ front saddles, double 2.5″ front saddles or combination 3″ / 2.5″ front saddle configurations to accommodate multiple classes of rifles for centerfire and rimfire benchrest competition.
Product Tip by EdLongrange. We welcome reader submissions.
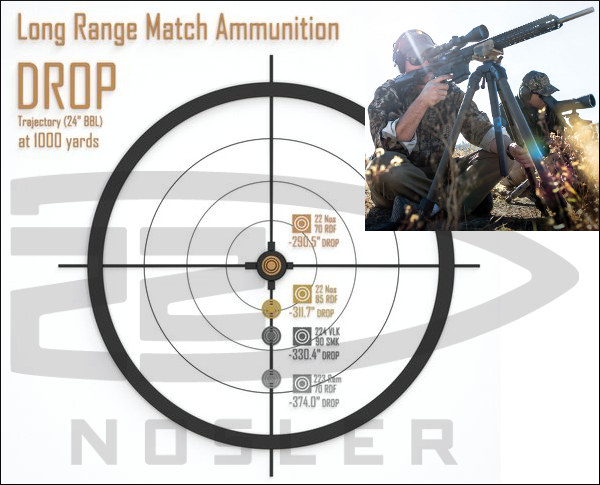
Nosler created the 22 Nosler cartridge to wring the highest possible ballistic performance from a .22-caliber, AR-compatible cartridge that also provides adequate barrel life and maximum ease of conversion. The 22 Nosler achieved these objectives and much more — it delivers far better performance than the .223 Remington and even out-runs the 224 Valkyrie.
In ballistics, there’s no free lunch. Larger powder capacity at similar operating pressures equates to higher velocity potential. In the case of the 22 Nosler, this is evidenced by a 4-5 grain capacity increase over the tried and true .223 Remington, and a 2-3 grain capacity advantage over the newly-introduced 224 Valkyrie. This larger “engine room” allows the 22 Nosler to deliver higher velocities. That translates to less drop (flatter trajectory) at long range.
Faster than .223 Rem and 224 Valkyrie
When loaded with 80 grain low-drag match bullets and fired from the same 24″ barrel (bolt actions, not gas guns) the 22 Nosler outruns the 224 Valkyrie by about 150 fps. Compared to the .223 Remington, the difference is even more remarkable — the 22 Nosler runs over 300 fps faster! These velocity improvements give the 22 Nosler a clear advantage in long-range trajectory and downrange energy retention.
How to Run the 22 Nosler in Your AR-Platform Rifle
Converting your AR to 22 Nosler is as simple as a barrel and magazine change, and there are countless AR-platform MSRs in circulation with the proper 0.378” (.223 Rem) sized bolt face. By comparison, to make the swap to 224 Valkyrie, you must purchase a dedicated .224-Valkyrie upper (not cheap!), or at the minimum add a new barrel, modified bolt with proper bolt face, and 6.8 SPC-compliant mags.
This video compares the specifications of the 22 Nosler and .223 Remington. Bolt face dimensions are identical for the 22 Nosler and the 223 Rem / 5.56 NATO at 0.378″, so no bolt swap is required.
Many Factory Ammo Options — from 55 to 85 grains
Nosler offers a variety of factory loads in 22 Nosler, suited to a wide range of applications. Will you be shooting long range targets? Try the 70 or 85 grain RDFs loaded in Nosler Match Grade Ammunition. Are hogs or deer on the menu? Choose Nosler Trophy Grade Ammunition, with either the 55 grain E-Tip (non-lead) bullet or the 70 grain AccuBond®. Taking out varmints or predators? Nosler’s Varmageddon with 62 grain Hollow Point or Trophy Grade Varmint ammo with 55 grain Ballistic Tip (the world’s first polymer tipped varmint bullet) — will stop any varmint in its tracks.
If you want to turn your AR-platform MSR into a completely different animal, the 22 Nosler can open up a whole new level of performance.


 Tikka’s T3 action is a very nice unit that works well as the centerpiece of a precision rifle. The T3 action is rigid and robust. It cycles smoothly and has a short 75° bolt lift. The T3 features a Sako-style extractor, with angled-leading-edge bolt lugs for smooth lock-up.

 The electronic reticle level and other advanced VX-6HD features were praised by Petersen’s Hunting magazine, which awarded the VX-6HD an Editor’s Choice award. Leupold put a lot of advanced optics technology in this scope. Leupold says: “We gave it new high-definition lenses for sharpened clarity, Twilight Max Light Management System, an in-scope cant indicator, a throw lever for fast magnification changes, and a more robust erector system.”

 20 Practical Ultimate Varminter