|
|
June 2nd, 2015
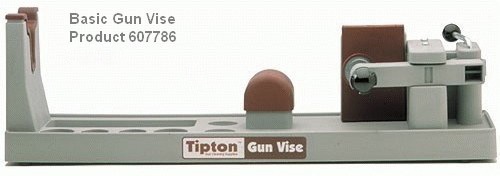
This Editor has a MidwayUSA injection-molded gun cradle, now sold as the Tipton Gun Vise. This product has worked well for everything from an 18″-barreled lever gun to a 32″-barreled F-Class rifle. The unit has proven invaluable for many tasks: cleaning barrels, stock refinishing/bedding, scope mounting, trigger adjusting, bore-scoping barrels, and checking throat length with a Hornady OAL tool. To be honest, I can’t understand how any serious shooter can get along without a product such as this (MTM makes a similar plastic cleaning cradle). That said, The unit isn’t perfect. This gun vise will NOT fit rifles with forearms wider than 3 inches. And if your butt-stock is very shallow (vertically) from comb down to toe, it may not fit the clamping system very well. But, for 95% of the rifles out there, the Tipton Gun Vise works great.
| Bargain Pricing on Amazon.com
The Tipton Gun Vise is on sale on Amazon.com for $39.89.
That’s a very good deal for a product you’ll use for years.
|
|
May 28th, 2015

Bullets.com has released a new, advanced handle-actuated primer seating device. Bullets.com President Shiraz Balolia tells us: “We have designed a new bench-mounted Bald Eagle Primer Press. It seats primers very consistently and you can adjust the depth of the primer in .002″ increments. I have been using one for months. In fact, I used it for the Canada win and also during the Nationals last year where our Team won the National Championships.”

May 23rd, 2015

In our Shooters’ Forum, one member recently asked: “What makes an AR accurate? What parts on an AR can really affect accuracy — such as free-floating handguards, barrels, bolts, bolt carriers?” He wanted an honest, well-informed answer, not just sales pitches. Robert Whitley posted a very comprehensive answer to this question, based on his experience building and testing dozens of AR-platform rifles. Robert runs AR-X Enterprises, which produces match-grade uppers for High Power competitors, tactical shooters, and varminters.

Building an Accurate AR — What is Most Important
by Robert Whitley
There are a lot of things that can be done to an AR to enhance consistent accuracy, and I use the words “consistent accuracy” because consistency is a part of it (i.e. plenty of guns will give a couple great 5-shot groups, but won’t do a very good 10- or 20-shot groups, and some guns will shoot great one day and not so good on others).
Here are 14 key things we think are important to accuracy.
1. Great Barrel: You’ll want a premium match-grade barrel, well-machined with a good crown and a match-type chambering, true to the bore and well cut. The extension threads must also be cut true to the bore, with everything true and in proper alignment.
2. Rigid Upper: A rigid, heavy-walled upper receiver aids accuracy. The typical AR upper receiver was made for a lightweight carry rifle and they stripped all the metal they could off it to make it light to carry (which is advantageous for the military). The net result are upper receivers that are so thin you can flex them with your bare hands. These flexible uppers are “strong enough” for general use, but they are not ideal for accuracy. Accuracy improves with a more rigid upper receiver.
May 22nd, 2015

Here’s something you’ve never seen before, a joy-stick (coaxial) bipod with a front counter-weight. This one-of-a-kind “JoyPod” was produced by Seb Lambang for our friend Darrell Buell. With a very porky ultra-long-range rifle to support, Darrell needed a JoyPod that wouldn’t sink under a heavy load.
Seb explains: “This is the world’s first Joypod equipped w/ an adjustable counterweight, to balance his 75-lb gun. I did some experiments and put some weights ranging up to 60+ lbs on the top, and I found that the joystick action works like a regular one….it’s smooth, light, and precise. In addition, the counterweight can be bent down to not interfere with the bottom of the barrel. I would guess Darrell would only need one ‘ring’ for his 75-lb gun. He can move the ring back and forth to find the best balance. Once the gun is on the bipod, it would only take a few minutes to tune or find the balance. The counterweight is secured into the front center shaft by a thumb screw, and there is a tightly fitted pivotal joint on the counterweight to allow angle adjustment.”
May 12th, 2015
 With the end summer, the shooting season in full swing. When you head to the range you’ll want to be prepared. That means collecting all the gear you’ll need at the range. It’s easy to forget small, critical items, so we’ve provided a checklist of the small “extras” you should pack before you head out to the range. In addition to rifle, rests, ammo, targets, and cleaning gear, here are a dozen essentials you should include in your range bag. With the end summer, the shooting season in full swing. When you head to the range you’ll want to be prepared. That means collecting all the gear you’ll need at the range. It’s easy to forget small, critical items, so we’ve provided a checklist of the small “extras” you should pack before you head out to the range. In addition to rifle, rests, ammo, targets, and cleaning gear, here are a dozen essentials you should include in your range bag.
 • Shell-Holder — If you don’t have calipers, you can use a shell-holder to check for excessive case expansion from hot loads. If a fired case doesn’t slip into the shell-holder easily, your load is definitely TOO HOT. • Shell-Holder — If you don’t have calipers, you can use a shell-holder to check for excessive case expansion from hot loads. If a fired case doesn’t slip into the shell-holder easily, your load is definitely TOO HOT.
• Extra Earplugs — Always use ear protection when shooting. We bring a 35mm film canister with extra sets of foam earplugs.
 • Hex Wrench or Screwdriver for action screws — Action screws can work loose with time. Always bring the appropriate hex wrench or screwdriver whenever you go to the range. • Hex Wrench or Screwdriver for action screws — Action screws can work loose with time. Always bring the appropriate hex wrench or screwdriver whenever you go to the range.
• Small Wrench for Scope Rings — Check the tension of your scope base and ring fasteners before you go. Bring along a small Torx wrench for the ring screws (or other tool that fits your fasteners).
April 30th, 2015
 This is an interesting technical article prepared by Action Target, a leading steel target manufacturer based in Provo, Utah. With technical data provided by the American Iron and Steel Institute in Washington D.C., this report is designed to cut through the recent hype and establish a basis of fact for accurate evaluation and comparison. This is an interesting technical article prepared by Action Target, a leading steel target manufacturer based in Provo, Utah. With technical data provided by the American Iron and Steel Institute in Washington D.C., this report is designed to cut through the recent hype and establish a basis of fact for accurate evaluation and comparison.
What Is Steel?
 Steel is an alloy metal composed of iron and varying amounts of carbon and/or other elements such as chromium, nickel, tungsten, manganese, and so on. Steel with specific properties and characteristics is created by adjusting the overall chemical composition or by altering the various production processes such as rolling, finishing, and heat treatment. Because each of these factors can be modified, there is potentially no limit to the number of different steel recipes that can be created. Currently, there are over 3,000 cataloged grades or chemical compositions of steel available. Steel can utilize a wide variety of alloying elements and heat treatments to develop the most desirable combination of properties. Steel is an alloy metal composed of iron and varying amounts of carbon and/or other elements such as chromium, nickel, tungsten, manganese, and so on. Steel with specific properties and characteristics is created by adjusting the overall chemical composition or by altering the various production processes such as rolling, finishing, and heat treatment. Because each of these factors can be modified, there is potentially no limit to the number of different steel recipes that can be created. Currently, there are over 3,000 cataloged grades or chemical compositions of steel available. Steel can utilize a wide variety of alloying elements and heat treatments to develop the most desirable combination of properties.
April 23rd, 2015
 AccurateShooter.com Forum members often ask: “Is there a reasonably-priced ammo box that fits PPC and BR cases just right?” The answer is yes — check out the 50-round Frankford Arsenal model 512 ammo box. It is offered in transparent blue or smoke gray for $3.49 per box at MidwayUSA (or $3.99 per box at Amazon.com). AccurateShooter.com Forum members often ask: “Is there a reasonably-priced ammo box that fits PPC and BR cases just right?” The answer is yes — check out the 50-round Frankford Arsenal model 512 ammo box. It is offered in transparent blue or smoke gray for $3.49 per box at MidwayUSA (or $3.99 per box at Amazon.com).
The cartridge slots are just the right size for 22BR, 6mmBR, 30BR, 220 Russian, 6 PPC, 6.8 Rem SPC, 6.5 Grendel, and 7.62×39 cartridge cases. Cells are 1.687″ high x 0.392″ square, with a divider height of 0.94″. That will hold BR-type cases securely, and fired brass won’t get jumbled if you tip-over the box.

April 20th, 2015
The $52.99 RCBS Precision MIC is a well-made and useful tool for measuring cartridge headspace and bullet seating depth. The Precision Mic measures from a datum point on the case shoulder to the base. Unfortunately the Precision MIC is not specifically made for the 6mmBR Norma, 22BR, 6XC or 6.5×47 Lapua cases. Don’t despair. Reader Caduceus devised a clever way to adapt a .308 Win Precision Mic for short cases that match the .308 Win in rim diameter and case body diameter. He simply creates a spacer out of a pistol cartridge. He trimmed a 9mm case to 0.511″ and “found this to be a perfect fit which gave a zero micrometer reading when the FL-sized 6BR case was placed in it.” We expect many readers already own a Precision Mic for their .308s. Now you can adapt this tool for the 6BR family of cartridges, for no extra cost. Cut the spacer shorter for the 6.5×47 Lapua and 6-6.5×47 cartridges.


How to Use the Precision Mic with a Spacer
 Caduceus explains: “I can use the .308 version of the RCBS Precision Mic to compare brass which has been fully sized in my 6BR body die with brass which has been fired in my chamber. With the spacer inserted, FL-resized cases mic 0.000″ at the datum point on the shoulder. Using the same set-up, fire-formed cases measure +0.005″. In other words, my chamber has a headspace of +0.005″ above minimum dimensions. This is fairly typical of a custom rifle set up for switch-barrel use. If I were to FL-resize my brass down to minimum spec each time, this excessive working would shorten its life-cycle and might lead to case head separation. Now that I know the headspace of the chamber, I can substitute the standard shell holder on my press with a Redding +0.004″ competition shell-holder. This ensures that my cases only receive 0.001″ of shoulder set-back.” Caduceus explains: “I can use the .308 version of the RCBS Precision Mic to compare brass which has been fully sized in my 6BR body die with brass which has been fired in my chamber. With the spacer inserted, FL-resized cases mic 0.000″ at the datum point on the shoulder. Using the same set-up, fire-formed cases measure +0.005″. In other words, my chamber has a headspace of +0.005″ above minimum dimensions. This is fairly typical of a custom rifle set up for switch-barrel use. If I were to FL-resize my brass down to minimum spec each time, this excessive working would shorten its life-cycle and might lead to case head separation. Now that I know the headspace of the chamber, I can substitute the standard shell holder on my press with a Redding +0.004″ competition shell-holder. This ensures that my cases only receive 0.001″ of shoulder set-back.”
Click HERE for a full article explaining how to adapt an RCBS Precision Mic for use with a 6BR. You can do the same thing with a 6XC or 6.5×47 case–just cut the spacer to a shorter length (for an 0.000″ mic reading). Note: You can also use this procedure with an RCBS .243 Winchester Precision Mic.
April 11th, 2015
Gear Review by Germán A. Salazar, Contributing Editor
Reloading at the range with an arbor press and Wilson dies is my preferred method of load development. I’ve had a chance to test and evaluate the Arbor Press from 21st Century Shooting. I have to say I’m very favorably impressed by it.
 An arbor press’ basic function is simple enough: exert sufficient downward pressure on the die to either size the case neck or seat the bullet depending on which die is in use. It isn’t a mechanically challenging function. So why do we use an arbor press and what should be look for in one? Consistent operation, sensitive feel, quality of design and machining are the hallmarks of a good arbor press and this one from 21st Century comes away with good marks in all areas. An arbor press’ basic function is simple enough: exert sufficient downward pressure on the die to either size the case neck or seat the bullet depending on which die is in use. It isn’t a mechanically challenging function. So why do we use an arbor press and what should be look for in one? Consistent operation, sensitive feel, quality of design and machining are the hallmarks of a good arbor press and this one from 21st Century comes away with good marks in all areas.
For my initial session with the press, I seated 72 bullets in .30-06 cases, another 70 in .308 cases and neck sized a handful of cases (just for evaluation since I prefer to full-length size). The design of the actuating arm, which angles slightly away from the press was very convenient, allowing me to operate it with less jostling of the press because my fingers weren’t bumping into the press head as they sometimes do with my previous press that has the handle parallel to the press head. That’s a nice touch and shows the press was designed by someone who has used these things.
 |
 |
The press uses a relatively light return spring which materially aids the feel of seating pressure. I prefer this to a heavier return spring which would reduce the feel that I really look for in an arbor press. For someone who uses very heavy neck tension this might not be a big concern, but because I usually use 0.001″ to 0.002″ neck tension, the ability to detect small levels of variance in seating pressure is important to me.
 High Quality Machining and Parts Finishing High Quality Machining and Parts Finishing
Every part of the 21st Century press reflects careful thought and skilled machining. The knurled wheel for adjusting the height of the press head is a distinct improvement over the plastic hardware store knobs seen on many presses.
The aluminum press head itself is nicely anodized, the steel base well blued and the shaft nicely polished. Even the decapping base (photo at left) reflects careful design as well as precise machining. Overall, the press gives a look and feel of quality and is a welcome addition to my range reloading setup.
 Editors’ Note: The designer of the 21st Century Arbor Press has decades of tool-making experience, and he has designed tools for many “big-name” companies. 21st Century stands behind the product with a lifetime warranty for the original purchaser. The Arbor Press is currently offered in four different versions, with two post heights (8.5″ or 10.5″), and two baseplate sizes (small 3″ x 4″ or large 4″ x 5″). Prices start at $94.99 for the 8.5″ post and small baseplate. CLICK HERE for more info. Editors’ Note: The designer of the 21st Century Arbor Press has decades of tool-making experience, and he has designed tools for many “big-name” companies. 21st Century stands behind the product with a lifetime warranty for the original purchaser. The Arbor Press is currently offered in four different versions, with two post heights (8.5″ or 10.5″), and two baseplate sizes (small 3″ x 4″ or large 4″ x 5″). Prices start at $94.99 for the 8.5″ post and small baseplate. CLICK HERE for more info.
21st Century Shooting
www.21stCenturyShooting.com
(260) 273-9909
This review originally appeared in RiflemansJournal.com in 2010. 21st Century Shooting Inc., a site advertiser, supplied an Arbor Press for testing and evaluation.
March 4th, 2015
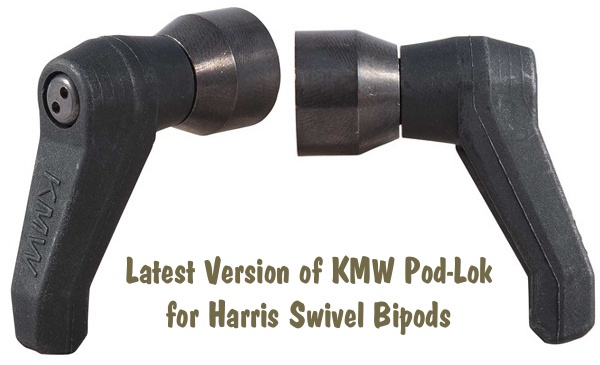
 If you’ve ever used a Harris Swivel Bipod, you know that, without tools, it is difficult to put enough tension on the swivel locking knob to really lock the unit solid. And, if you do manage to get the knob really tight (perhaps by using pliers), it is difficult to loosen with fingers alone. If you’ve ever used a Harris Swivel Bipod, you know that, without tools, it is difficult to put enough tension on the swivel locking knob to really lock the unit solid. And, if you do manage to get the knob really tight (perhaps by using pliers), it is difficult to loosen with fingers alone.
That was why Terry Cross and the folks at KMW Long Range Solutions invented the Pod-Loc™. This system replaces the knurled swivel tension knob with a push-button adjustable handle. Using the handle you can easily set the swivel tension at any level from loose to “rock solid”. And you can release tension to adjust the bipod to different terrain just as easily. The KMW Pod-Loc™ retails for $24.99 at Brownells.com and Sinclair Int’l.
Pod-Loc™ Installation Instructions
How to Build Your Own Bipod Swivel Locking System
While we use genuine KMW Pod-Locs on our rifles, readers on a tight budget, or who have a large collection of bipod-equipped rifles, can economize by putting together their own swivel locking systems from off-the-shelf components. You need two parts per installation: a push-button swivel handle and a 3/16″ spacer. Levers and spacers are both available online from www.T-Nuts.com. The spacer is part #SS1 ($1.00). T-Nuts offers a variety of suitable handles, ranging in price from $7.00 to $10.00. So, by sourcing the parts, you can outfit three bipods with swivel adjusters for the cost of one Pod-Loc.

We recommend the Nylon/Stainless BPL/NS model ($7.70), but you may prefer the all-metal BPL-Z ($8.50), or the shorter BPL-Micro model ($8.50). The compact Micro lock does not protrude past the body of the bipod, yet is still easily grasped. T-Nuts supplies one 3/16″ spacer with most of its bipod handles. T-Nuts handles are also available with a metric M6x1.0 thread for use with imported bipods such as Outers and Rockport.
Installation is Easy — With the Right Socket
To install a swivel locking system, first you’ll need a 1/4″ socket to remove the keeper nut from the threaded pivot rod. (During this process, you’ll need to keep pressure on the pivot rod retaining pin on the opposite side of the bipod.) Don’t try to remove the keeper nut with pliers or an open-end wrench. You really need the correct socket. Once that keeper nut is removed, then unscrew the knurled tension knob/ring. This is attached to the same threaded shaft as the keeper nut but you should be able to remove it without tools.
After the knurled tension ring is off, it is easy to put your handle on the bipod. First slip the 3/16″ spacer over the threaded pivot rod. Keeping finger pressure on the pivot rod retaining pin (on reverse side), then spin on the T-Nuts handle. Rotate the handle inwards until it firmly locks the bipod swivel mechanism. By pushing the button in the head of the handle, you can swing the handle left or right to set its position without altering the swivel tension.
|


