Many of our readers ask: “Where can I find a top-quality rifle case that will hold my scoped, long-barreled F-Class, or Benchrest rifle?” Most of the cases you’ll find at retailers are only good for guns with max barrel lengths in the 27-28″ range. And many of these cases are a tight fit if you have a large scope with big tall turrets and side parallax knobs.
Well here’s good news for owners of rifles with long barrels (up to 32″ in length). Starlight Cases offers the SC-081454 Double Rifle Case featuring a deep lid that measures 3″ from top to bottom. The increased clearance provided by the 3″-thick lid provides additional protection, without creating side loads on your scope that can cause reliability issues. What’s more, making the lid taller allows the hard case to better fit wide-forearm rifles and rifles with attached bipods.
SC-081454 cases are currently on sale at StarlightCases.com for $288.00 (10% off). That’s not inexpensive…. but when you’re hauling up to $7000.00 worth of rifle and optics, that’s money well spent for the added protection it provides, particularly during airline transport.
Internally, the SC-081454 Double Rifle Case is 8″ Deep X 14″ Wide X 54″ Long. That’s long enough to hold rifles with barrels up to 32″ — so this case can hold Palma, Long-Range Benchrest, and F-Class rifles. Case weight, unladen, is 26 pounds. You can custom-fit the interior to your rifle by cutting the layered foam with a hot knife. The SC-081454 hard-case also includes a molded-in recessed wheel kit for ease of transport. These cases are offered in black, Olive Drab, and “flat dark earth” colors.
Why the Deep Lid is a Good Thing: We’ve seen issues with bulky rifles (with large scopes) jammed into cases with insufficient clearance from top to bottom. This can put side-loads on your scope turrets that can lead to problems down the road. While you don’t want your rifle to shift during transport, at the same time you don’t want the case lid and bottom pressing on the rifle optics. We do recommend cutting the foam to create a fitted recess for your rifle.
The patented Latch-Lock™ System (with O-ring seal) on Starlight Cases ensures an airtight, watertight, chemical resistant protective case. Fitted with a pressure equalizer valve, Starlight cases are tested watertight and airtight to 400′ pressures. These durable hard cases are temp-tested from -65° to 200°. ATA-approved Starlights exceed the stringent Military MIL-C 4150J testing standards. All Starlight cases are Made in the USA and backed by an Unconditional Lifetime Warranty. In addition, If for any reason you are not satisfied with your case when it is delivered, you have 7 days to return the case to the manufacturer for a full refund.
In the benchrest game, a rock-solid front rest with precise, easy-use controls, is essential. The Farley and Sebastian rests provide a joystick that allows the shooter to adjust both horizontal and vertical position with a single move. However, many top shooters prefer more traditional rests. When you’re centered up horizontally and just want to make a very tiny vertical adjustment, a rest with a separate vertical control is hard to beat. Likewise, separate windage controls ensure that you can move left to right without altering your vertical point of aim one tad.
Among the premium non-joystick rests we’ve tried, the John Loh (JJ Industries) rest and the Randolph Machine (Fulghum) rest stand out for quality of workmanship and the smooth, precise functioning of the windage and elevation controls.
In this article we review the Fulgham Front Rest, produced by Ken Fulghum of Randolph Machine in North Carolina. It offers a unique, belt-driven elevation control. This rest has been very successful in IR 50-50, ARA Outdoor, and RBA Indoor rimfire disciplines. (Ken Fulgham himself is a highly successful rimfire benchrest shooter.) But, when fitted with a conventional front sandbag top, the rest also works great with centerfire rifles.
NOTE: The test unit shown in the photos is fitted with a Fudd Rest Top. Randolph Machine no longer sells Fudd tops. Instead Randolph produces a similiar adjustable front top with thin sand bag sections. This cost $150.00.
Fulghum Rest is Beefy and Stable
The Fulghum Front Rest is rock-solid and very stable on the bench. A large knob on the left controls the windage. The entire center section of the rest slides left and right on precision-machined cross-shafts riding in bronze, oil-impregnated bushings. The movement is super-smooth, with no grabbing or jumping. As we’ve seen with the John Loh rest, horizontal tracking is superb, and you can easily make very fine sideways adjustments with ZERO vertical shift.
Belt-Drive for Vertical Adjustment
What’s really special about the Fulghum Rest is the vertical adjustment system. This uses a synthetic toothed belt that connects a large knob in the center of the rest to the ram which supports the rest top. The belt drive runs over sprockets that provide plenty of mechanical advantage. This allows you to effortlessly raise/lower even very heavy rifles. The up/down movement is very smooth. However, there is a little slack in the belt and you can feel the belt’s teeth engage the sprockets one by one. Once you get used to the feel of the belt and how it engages the sprockets, however, you can make very precise adjustments.
Importantly, after you’ve adjusted the vertical, there is enough drag in the system that it holds vertical perfectly. There’s no “post-adjustment” vertical slippage at all. You can take your hand off the vertical knob and shoot with confidence that your aiming point won’t shift.
Overall, this is an excellent unit. Since you have to adjust windage and elevation separately, it’s not as fast as a joystick rest, but it has its advantages. There’s none of the vertical notchiness we’ve seen in some joystick units. Unless you are 100% certain you want a joystick-type rest, you should definitely “test-drive” a Fulghum Rest and see how it suits you.
Rest Retails for $750.00 without Top The Fulghum Front Rest currently retails for $750.00 with no top. Randolph Machine offers two different tops for the unit: the $120.00 Randolph MK1 Top (User supplies owl-ear bag), or the $150.00 Adjustable MKII Top (see photo at right; similar to Fudd Top). Fulghum also offers a one-piece rest (front and rear support) for $750.00.
All Randolph Machine Rests are made one at a time, by hand, so you should call for availability. Normal delivery time is “about a month” once you place your order. Here’s the contact info:
Ken Fulghum
Randolph Machine, Inc. www.randolphmachine.com
P.O. Box 147, 1206 Uwharrie St.
Asheboro, NC 27204
Phone: (336) 625-0411
Fax: (336) 625-0410
A Forum member recently asked if anybody makes a thinner, less-blocky earmuff that won’t interfere with head placement on the stock. We understand his inquiry — big, over-sized muffs tend to bang into the stock and sometimes even disturb the gun in the bags.
Our first suggestion is use quality foam earplugs. The Noise Reduction Rating (NRR) for a quality foam plug is better than nearly all earmuffs. But for those who prefer earmuffs, or who “double up” muffs over plugs, AO Safety (Peltor), makes the ShotGunner Folding Earmuffs, item # 97013. Peltor’s ShotGunner muffs feature tapered ear domes, which are cutaway on the lower half for stock clearance. These muffs, which retail for $16-$20, also fold up into a very compact package for storage. This Editor has used the Shotgunner Muffs (NRR 21) and they are very comfortable. Because they fit well they actually seem to work better than some big bulky muffs (with higher NRRs) that don’t seal so well.
Comparative Noise Reduction Ratings
The ShotGunner folding muffs have a NRR of 21 db — compare that to 25-30 db NRR for big, heavy muffs and 29-33 db NRR for good ear plugs, such as the Howard Leight Max UF plugs (33 NRR). Of course, to achieve those 30+ Noise Reduction Ratings, earplugs must be inserted correctly. The 3M Occupational Health and Environmental Safety Division has prepared two YouTube videos which illustrate how to properly use foam earplugs and flanged (pre-molded) earplugs.
Ph.D Engineer Boris Teper has invented a remarkably compact yet effective torque-setting tool that is ideal for tensioning scope ring fasteners and action screws on rifles. The Torque Settings Driver from Borka Tools is brilliant in its simplicity. The lightweight tool is basically a lever, with a series of hex slots through which a spindle is fitted. The slot position sets the effective lever arm length. How does the tool prevent over-torquing? That’s the magic of Teper’s invention. On one end of the tool is a handle with a spring-loaded ball detent. Once desired torque is reached, the handle overrides the detent, snapping forward so you can’t crank too hard (figure 2 below).
The Borka Driver is very easy to use, and despite its simplicity, it is very precise. Lab testing of the Borka driver show that the tool yields the correct torque setting within 4-6% of the true nominal torque measured with a calibration device. That means, for example, if you set the driver for 40 inch-lbs. it will torque the fastener within ± 2.5 lbs of your target setting. That’s as good as some full-size torque wrenches — pretty impressive for a tool that weighs only 4 ounces complete with spindle. And every Borka driver is calibrated to ensure accuracy before it ships.
Borka offers many versions of its tool, with torque ranges from 10 inch-lbs. up to 72 inch-pounds. The basic Borka driver, priced at $55.00, offers six (6) preset torque values. For $15.00 more Borka sells a driver that offers twelve (12) preset torque values. This 12-setting tool, which is not any bigger or heavier than the 6-setting model, is cleverly designed — you simply flip it over to switch from the first six torque settings to the second six. This works because the handle has variable “break” resistance depending on direction of travel. Smart.
Borka’s most popular torque tool is the 12-setting $75.00 “Military Grade” MG driver, model ATD-15×72-12FS-MG. This offers a dozen torque settings from 15- to 72-inch-pounds. We recommend the “Military Grade” model because it has torque settings laser-etched on the surface of the driver arm (see video). That way you’ll always know your torque values. The “Military Grade” model also comes with 1/4″ hex to 1/4″ square (M) and 1/4″ square (F) to 3/8″ square (M) adapters. The Military Grade Model, intended for use in the field by both DOD and LE personel, has already proved popular with “civilian” tactical shooters. You can store the tool in the supplied fabric carry pouch, or stash it (with needed bits) in your range kit.
Video Shows How to Use Borka Driver When Mounting Scope
We suspect many readers are still a bit confused as to how the Borka driver actually works. We could explain in greater detail but a video is worth a thousand words. In the YouTube video below, Frank Galli (aka “LowLight”) from Snipers’ Hide explains how to use the Borka torque driver. Frank demonstrates the $75.00 “Military Grade” Model, but all the Borka lever arm drivers share the same basic operation. Frank shows how to set the spindle position to your desired torque setting and hold to hold the unit properly. Watch carefully and you’ll see how the cylindrical handle at the end of the tool snaps forward or “breaks” when the desired torque setting is reached. Frank notes that: “there is no backlash when torquing. This is an excellent feature as it breaks clean at the desired weight.”
Where can you get a Borka torque setting driver? All models can be purchased directly from Borka Enterprises by emailing info@borkatools.com. You can also purchase through Manson Precision Reamers, (810) 953-0732. (Dave Manson worked with Boris Teper to get this product to market.) In addition, four models are available from Brownells: ATD-20X4006FS (Brownells item #080-000-734), ATD25X5006FS (Brownells item #080-000-735), ATD-36X7206FS (Brownells item #080-000-736), and ATD-15X7212FS (Brownells item #080-000-737).
New Nightforce 15-55x52mm Competition Scope — Field Report by Darrell Buell
A few weeks ago at SHOT Show, Nightforce Optics introduced a new Competition Scope. When Nightforce heard about the upcoming U.S. Team practice session in Phoenix, the optics-maker overnighted us two prototype Comp Scopes to wring out under match conditions.
From the start, we were impressed by these new 15-55X Competition Scopes. Darrell mounted one on his personal competition rifle, and the other on a mocked-up action, so people could hold it up safely in a steady fashion behind the firing line. The new scopes acted like magnets, drawing people from all over the Berger SW Long Range Nationals to check them out.
The new Competition Scope is a 15-55x52mm. The new scope’s ED (extra-low dispersion) glass yields outstanding resolution. Remarkably, the resolution in the Competition scopes is even slightly better than the Nightforce 12-42x56mm NXS, with its larger 56mm objective lens. The color is definitely ‘crisper’ as well. Not surprisingly, the image quality is what most people noted first (see through-the-lens photo at right). The glass is great, and Nightforce included other thoughtful features as well. First is the side parallax adjustment that competitors have been wanting for years (this is one of the draws for the NXS scope in competition). The higher zoom range (with 55X power on tap), and the 60 MOA of vertical travel is also a much-asked-for (and useful) feature.
In competition, the high-quality glass in the new Comp Scopes proved very beneficial. The Berger SW LR Nationals took place in Phoenix, in February, so conditions ranged from cold and windy, to warmer with moderate mirage. In some of the heavier mirage conditions (not massive mirage, by any means, but enough that the magnification on a 12-42X NXS would probably have been turned down to 32-35 power), the Competition Nightforce stayed at 45 power and above. The turrets were the usual Nightforce precision, good defined, tactile adjustment clicks (5 MOA per revolution). The only improvement there would be to have the windage turrets adjust in ¼ MOA clicks (yielding 10 MOA per revolution), which Nightforce assures us that will be done for the Team scopes. [Current production 15-55X Competition Scopes have 1/8 MOA windage clicks.]
The Team’s response to the prototype scopes was overwhelmingly positive. Nightforce has generously agreed to provide 10 new Competition scopes for the USA F-Class Team competing in South Africa next month. The Bloemfontein Range will be an excellent test of the new 15-55X scope’s capabilities!
Visit to Nightforce Production Center in Idaho
The prototype scopes had to be returned to Nightforce, and as it wasn’t much of a detour, Team Captain Darrell Buell paid a visit to Nightforce’s Orofino, Idaho production facility. Nightforce rolled out the welcome mat, providing not only a highly detailed tour of the location, but also the opportunity to say a few words in front of a meeting of all of the day shift and evening shift staff. It was good fun for everyone, the staff seemed genuinely fascinated by what the Team was doing with their scopes all over the world, and Darrell was equally interested in the attention and quality that was invested by the staff there in each scope produced.
During the tour Nightforce provided a convincing demonstration of the rugged durability of NF optics. Each assembly station had a steel pillar fixture near the bench; the pillars were covered in a thin layer of rubber padding. As a scope was completed, the technician would grasp it by the ocular end, and strike the objective end (quite sharply) on the rubber-coated pillar three times. The scope would then be placed back on a optical test stand, and the image checked for shifting. This ‘strike test’ was then repeated three additional times (with associated checks), so that the top, bottom, left side, and right side were all tested and checked.
Lyman has introduced a number of new products for 2013 for gunsmiths and hand-loaders. An impressive new offering is the new, large-capacity Turbo® Sonic Power Pro Ultrasonic Cleaning machine. This new unit, one of the largest and most powerful on the market, can ultrasonically clean items up to 34″ in length. The Lyman Power Pro’s large, stainless-steel heated tank and ten transducers allow gunsmiths, armorers, and gun-owners to quickly clean a wide variety of metal items. Designed for high-volume cleaning or for larger-than-normal items, the new Turbo Sonic Power Pro’s 34.75″-long* heated stainless steel tank can easily handle most barreled actions, upper receivers, as well as multiple handguns. The Power Pro includes both a timer and adjustable heat control (you can select temps up to 175° F).
With an MSRP of $1395.00 and a 70-lb shipping weight, this is a big, heavy, and costly unit. But if you need a hard-working machine for big jobs, this may be worth the investment.
Ten Transducers Do the Job Fast
The Power Pro’s TEN high-output transducers aggressively clean and degrease items, both inside and out. In fact, the Power Pro is such an effective cleaner that Lyman recommends that cleaned parts immediately be treated with Lyman’s Turbo Sonic Gun Lube. Changing from cleaning to lubrication is easy with the built-in drain system. Lyman now offers both cleaning concentrate and parts lubricant in gallon containers.
(*Note: the tank is listed as 35.75″ in product photo, but Lyman’s spec sheet states 34.75″.)
How-To Video: Ultrasonic Brass Cleaning (Click Arrow in lower left to start video)
Video playback requires HTML5. This may not work with older browser versions.
Product tip from EdLongrange. We welcome reader submissions.
We had a chance to try out the new power case trimmer head from Little Crow Gunworks. Dubbed the “World’s Finest Trimmer” (WFT) by its inventor, Dale Hegstrom, this device proved fast, precise, and easy to use. When compared to a Hornady Lock ‘N Load hand-crank trimmer, the WFT processed cases twice as fast, and delivered a more uniform cut length with our test brass.
The WFT features a steel shell-holder, aluminum body, and steel drive shank. You can chuck it into any electric drill or power device that can handle the 3/8″ shank. Unlike most case trimming tools, the WFT indexes off the shoulder datum. This permits you to trim cases very quickly, without fiddling around with rim-grabbing collets, or shell-holders. Watch the videos to see the WFT in action.
WFT is Fast and User-Friendly
Mark LaFevers, our tester, was easily able to trim five (5) cases in under 30 seconds. It took quite a bit longer to trim five cases with the Hornady trimmer he used for comparison. Mark noted that, after just a 20 or so manually-trimmed cases, his arm would start to fatigue. By contrast, he could effortlessly trim 100 or more cases with the WFT. For older folks with a bit of arthritis, the WFT makes life easier. Mark observed that the WFT produces a “nice, square, clean cut”, while offering a “very fast cycle rate”. He tells us, “once you get the hang of it, you probably can trim your brass two, if not three times as fast.”
Mark really liked the WFT tool, and a WFT will be replacing his hand trimmer for big jobs. One downside is that, currently, the WFT is cartridge specific — you normally need to have a different tool for each cartridge type you trim. And there are no swappable inserts allowing you to trim different cartridge types with the same tool. However some WFT versions WILL trim different cartridge types within the same “family”, such as .270 Win and .30-06.*
Hi-Rez Video Shows “Trim-Off” Challenge between WFT and Hornady Trimmer
You should definitely watch the five-minute video below. Mark trims five cases with the WFT, and then five more with the Hornady tool. He times the operation of each device and then measures the trimmed cases. The total variation (in length) of the WFT-trimmed cases was .001. With the Hornady tool, there was a much larger spread: .007″ (seven thousandths). Mark cautioned: “Normally the Hornady tool does a bit better than this — the variance won’t be so large. But getting better results (with the Hornady) might require trimming, measuring, then trimming again. In the video I was trying to move pretty quickly and the measurements were all taken after the initial trim. Possibly, if I slowed down when using the Hornady trimmer, the OAL measurements would have been more consistent. But that just further reinforces the point that the WFT is faster.”
NOTE: If you have a fast connection, we suggest you select 720p (HiRez) and expand to full screen.
In the video below, WFT creator Dale Hegstrom demos his device and shows how quickly it can trim a large quantity of brass. Note how the WFT is attached to a common rechargeable power drill.
“World’s Finest Trimmer” Costs $69.95
The Little Crow Gunworks “World’s Finest Trimmer is available for $69.95 from various vendors including Creedmoor Sports. WFTs index off the shoulder, not the base. The case fits tightly into a steel bearing which has been machined to a specific caliber. This decouples the stationary case from the spinning cutting blade and body, giving you a smooth, exact cut each time. While the WFT makes a nice, square cut, we do recommend chamfering inside and outside after the brass is trimmed to length.
*Most WFTs are cartridge specific. Available sizes include: .204 Ruger, .223 Rem, 22-250, 6mmBR, 6.5 Grendel, 6.5×47 Lapua, 6.5 Creedmoor, 6.5-284 (and 6mm-284), 6.8 SPC, 270 WSM, 7mm Rem Mag (and 300 Win Mag), .308 Win, 300 WSM, .338 Lapua Magnum. There is a ‘5 in 1′ WFT unit that will handle .17 Rem, .221 Fireball, .222, .223 Rem, and .222 Mag. The 6mmRem unit also works with .257 Roberts and 7×57 Mauser. The .30-06 WFT will trim .270 Win, .280 Rem, and .25-06 as well. And the WFT for Ultramags works with 7mm, 300, and .338 Ultramags.
After Shiraz Balolia (President of Grizzly Industrial) won the F-Open Division at the 2013 Berger Southwest Long Range Nationals, folks wanted to know more about Shiraz’s match-winning .300 Winchester Short Magnum (WSM) rifle. That gun is a great piece of work, we can assure you. The Masterclass stock was extensively customized by Shiraz himself, who is a talented wood-worker (as well as a superb F-Class trigger-puller). CLICK PHOTO to see large “centerfold” shot of rifle.
The rifle features a BAT Machine ‘M’ action, with a 32″, 1:10″-twist Bartlein barrel. Metal work was done by Gordy Gritters. The scope is a March 10-60x52mm, which sits on a +20 MOA angled rail. The primary stockwork, including fitting of the adjustable cheek-piece and buttplate, was done by Alex Sitman of Masterclass Stocks. Shiraz customized the stock with finger grooves, fore-end channel, and a bottom rear slide. Shiraz did the final stock finishing as well.
Listen to Shiraz Balolia Talk about his F-Open Victory (Click PLAY to Launch Audio File)
[haiku url=”http://accurateshooter.net/Video/shirazmemo1.mp3″ title=”Shiraz Talks about F-Open”]
Q&A with Shiraz Balolia
Q: Is the .300 WSM the “next big thing” in F-Open Competition?
Shiraz: The .300 WSM takes a bit to get used to. With more powder you have a bigger bang next to your head, plus you have to deal with the mule kick. My gun recoils so hard that it was coming to rest down on the neighbor’s target. I had to be careful about not cross-firing. Once you get these behind you it can be a very accurate caliber to shoot because of the great .30 cal bullet choices. There were about five .300 magnums in Phoenix, but only one in the top ten. You still have to read the wind!
Q: What’s your match load for the .300 WSM?
Shiraz: I use Norma brass with turned necks. At the Berger SW Nationals I used Berger 215gr Hybrids, Fed 215 LR magnum primers, and a stout load of Hodgdon H4831 SC. This drives the 215s at around 2910 FPS. If that sounds fast, remember I’m using a a 32″-long barrel.
Q: Can you tell us about your chamber and your fire-forming process?
Shiraz: On the .300” WSM [I run] a tight-neck .336” chamber for turned necks. Basically, I fire-form all my brass in a fire-form barrel and save the good barrels for matches. Gordy is so good that he can chamber different barrels to within .0002” in the headspace dimension. That way I can have several same-caliber barrels and can use the same brass for all those barrels. I use a .0005″ shoulder bump for my brass. I load the bullets so that the bearing surface sits above the doughnut ring.
Q: Do You Think Tuners Will Become Popular in F-Class?
Shiraz: Tuners are a double-edged sword. In order to use them most efficiently you need to load test the barrel in many different conditions and record the results, fine tuning and turning the dials to find the best harmonic of that barrel in a given condition. When you encounter a similar condition at a match to what you tested previously, you would look up your notes and turn the dials so that it matches your tested condition. I am over-simplifying this, as it is quite complex and there are many articles about tuners. I do not see tuners catching on in F-Class as 99% of the users would not want to go through the aggravation.
Q: The stock looks highly customized. What special work did you do?
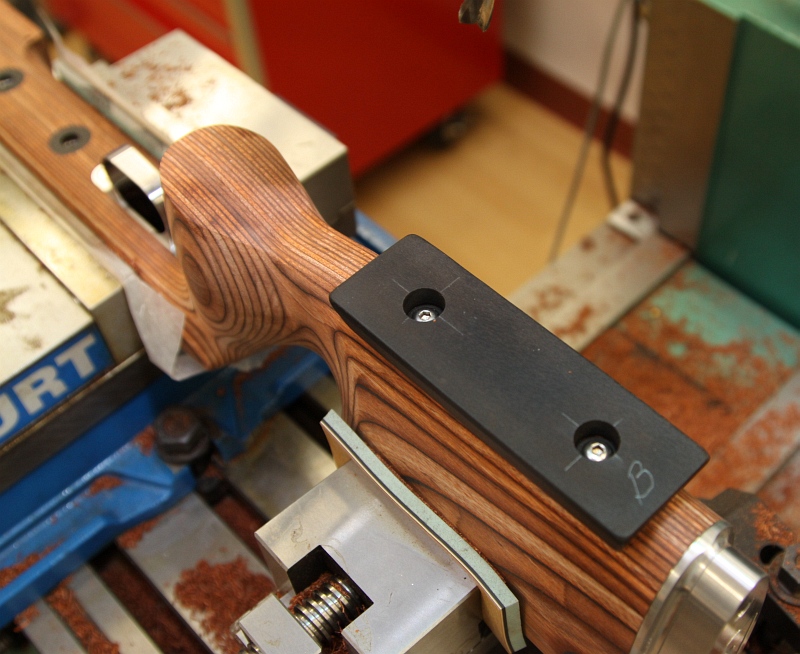
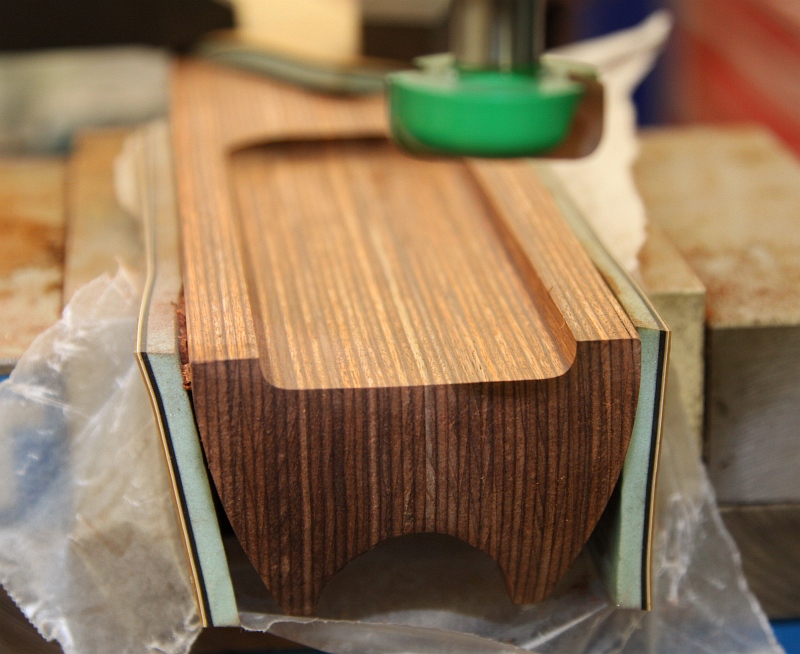
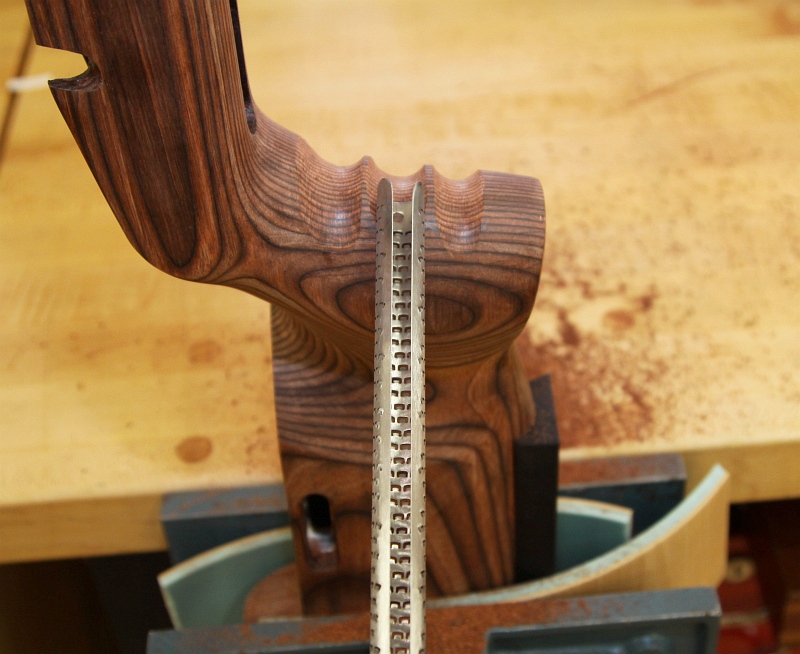
Shiraz: The stock is a Master Class F-Class stock that was highly modified by me. I channeled out the fore-end so the stock would ride on two “rails” on the front bag and not rock. I also added a wide 1.25″ base on the bottom of the stock that rides on the rear bag. There is a matching rear bag with a wide slot in it. The gun slides back and forth nicely and is very stable. I wanted finger grooves that fit my hand so I carefully filed those by hand with a round file, making sure to fit it many times during the process. Once all the modifications were complete I sanded and sprayed the stock with clear UV lacquer. My UV booth cures the spray in minutes. I usually assemble the gun the same day I spray it. As you know, I build guitars as a hobby as well.
Gerry Gereg makes two precision tools that let rimfire shooters pre-sort their ammo for improved accuracy. The first tool, the G3 Rimfire Thickness Gauge, lets you sort rimfire ammo by rim thickness. This tool clamps to the jaws of your calipers and is very simple to use. Just slide a cartridge into the gauge and slide the jaws closed. With mid-grade rimfire ammo you’ll see variances of up to .006″ in rim thickness. High-end ammo, such as Eley Tenex, shows much tighter tolerances. With no moving parts (other than the thumb screw), this simple gauge is easy-to-use and very repeatable. It also has a convenient lanyard you can loop around your wrist. You can learn more about this tool in a full RifleMagazine.com review.
Gereg’s second tool is a very nicely-crafted gauge that measures rimfire rounds from base of rim to the bullet ogive. The G3 MK II Pro tool fits comfortably in the hand while inserting a cartridge in the measuring chamber at the bottom of the tool. This G3 MK II Pro tool features a built-in dial indicator making read-outs quick and easy. Just slide a rimfire cartridge in the base of the unit and gently yet firmly push the round into the measuring chamber until the dial indicator comes to rest. The dial indicator on the gauge gives you a number which you can use to compare base to ogive lengths. Note: The piston is indexed to assure its return to the original setting. When we used the gauge with inexpensive ammo, we saw variances in rim base-to-ogive lengths of up to .025″. The high-end ammo, such as Eley Tenex, is much more consistent, with 80% of rounds falling within .008″ rim base-to-ogive length spread.
To purchase either tool, email Gerry Gereg, gerry.gereg@snet.net, or call 860-354-7500.
Texas Testing: Sorted vs. Unsorted Rimfire Ammo
Texas rimfire shooter Ben Peal ran a series of tests to determine how rimfire ammo sorted with the G3 tools performs vs. “out of the box”, unsorted ammo. Ben shot a series of 5-shot groups at 50 yards, after sorting the ammo for rim thickness and then rim base-to-ogive lengths. Ben tested four (4) types of ammo: Eley Target, Federal Champion, Remington Target, and SK Standard Plus. Ben’s tests, conducted with a CZ 452 rifle shot from the bench, produced some interesting results. Ben’s tests showed that sorting resulted in a meaningful reduction in average group size for all ammo types. In each case, the sorted ammo shot smaller than unsorted ammo (biggest improvement was with the SK Standard). Admittedly these tests are far from definitive because only one factory rifle was used. We certainly don’t claim that sorted ammo will shoot better in every rimfire rifle — and the benefits of sorting high-end ammo may be hard to quantify. But Ben’s tests do suggest that sorting may be worthwhile with low- and mid-priced rimfire ammo. Here is a chart showing Ben’s results:
Ben writes: “Using the ogive gauge, cartridges may be sorted into those of similar measurements, or a narrow range of measurements, allowing us to select cartridges to be chambered with the ogive at or near the same distance from the lands. Cartridges were to be grouped into two categories for test firing. Group one of each brand were cartridges ‘as received’ with no sorting, measuring, or weighing. This represents an accuracy baseline for each particular brand. Group two were cartridges first sorted by rim thickness and then separated into sub-groups based on rim base-to-ogive measurements. I included rim thickness to eliminate a controllable variable that could possibly affect accuracy. I wanted the groups from test firing to reflect the influence of rim base to ogive measurements only.”
I found a considerable difference between brands as I measured and sorted cartridges. Eley Target and Remington Target had the least variance in rim base-to-ogive measurements and very little difference in rim thickness. Federal Champion and Standard Plus had the largest percentage of cartridges longer or shorter than the norm and a wider range of rim thickness. Standard Plus turned in the largest average groups before sorting, Eley turned in the smallest. These two brands had near equal small groups after rim to ogive sorting.
The groups below were shot by tool-maker Gerry Gereg with his Winchester Model 52 and a 20-power scope. In that rifle the rounds with shorter rim base-to-ogive lengths shot best, as you can see:
You can learn more about the G3 rimfire gauges and Ben Peal’s testing by reading Ben’s full, 2940-word report. CLICK HERE to read Ben Peal TEST REPORT (PDF file).
Editor’s Note: Along with rim thickness, and rim base-to-ogive length, we have found that rimfire cartridge run-out (measured on the bullet) can have a dramatic effect on accuracy. In fact, in some of our barrels, we have noted that rounds with very high run-out (poor concentricity) often result in “flyers” that ruin a group. For this reason, we believe that concentricity checking is another procedure that can potentially benefit rimfire shooters.
Report by Monte Milanuk
With the proliferation of wide bipods for competitive F-TR shooting, we’ve seen a lot of cool gear hitting the market. Whatever you can imagine, someone is either building now, or working on prototype plans. One new design that seems to have stayed under the radar thus far is the FLEX bipod by Dan Pohlabel.
The FLEX bipod’s designer, Dan Pohlabel, offers these instructions:
The bipod feet are shipped loose. Note there is a left foot and a right foot. Mount them as shown in the diagram above. Determine the balance point of your rifle and mount the bipod approximately two inches forward of that point. You may want to move it further forward after shooting. Experiment with its placement to minimize movement of the bipod. When setting up, first grab each foot and ‘dig’ them in to the shooting surface, dirt, gravel, grass, carpet — it doesn’t matter. After making sure each foot has a hold, raise or lower the bipod to your target and use the cant adjustment to level your rifle. Loading the bipod with your shoulder is the preferred method of position. Contact me with any FLEX bipod questions you may have: danielp123 [at] earthlink.net.
The FLEX bipod is a very simple design — no Mariner’s wheel for vertical adjustment, no joystick head, no changing width as it goes up and down. And the FLEX bipod is very light (as are most, these days), but also very durable. I haven’t actively tried to destructively test it, but so far it’s held up to being tossed in the back of the truck, hauled around to the range and everywhere else in between. It definitely has not been ‘babied’ in any way, and it’s not noticeably any worse for wear. An added bonus is that it breaks down very flat for airline travel. Once I take the feet off, remove the ratchet lever (with screw), the whole bipod nestles very nicely in the bottom layer of foam in my gun case (with cuts for the head etc. in the foam). I’m definitely not worried about it in there. If someone bashes the case hard enough to damage what is essentially a plate of spring steel, then I’ve got bigger worries.
This view (below) shows a bit of the adjustment controls. Each leg has independent control for height, and there is a ratcheting locking lever that controls the cant. Instead of being directly centered like most other designs I’ve seen, this one is off-set a little, allowing a fair amount of movement without allowing it to completely ‘flop’ over to one side. (By contrast, using other bipod designs, I’ve had guns literally flip over as they tipped over too far.) Also having the tilt control relatively close/tight to the bore of the gun helps with the stability as well.
Inventor Dan Pohlebel developed the FLEX bipod for use in his native Ohio, where apparently grassy firing lines are the norm. Here in the Pacific Northwest, I seem to encounter concrete or gravel more often, which is why I usually place a mat under the bipod to keep it from sinking in too far. On Dan’s newest models, the “feet” have teeth to give better traction on hard surfaces such as the hard-pack clay/dirt (beneath a skim layer of gravel) that you’ll find at Raton, NM.
Why would you want more traction? Well, not everyone wants a bipod that slides around like a hog on ice. Some people manage to get things tracking straight back and forth, almost like it was constrained by a front rest. Personally, I have a hard time doing that in a repeatable fashion. While the FLEX Bipod shoots quite well with a [loose] hold, it was designed for those of us who like to ‘lean’ into the gun a bit. Quite literally, the idea is that you get the feet to dig in slightly, and push against the rifle butt with your shoulder and the bipod will ‘flex’ or bow forward slightly. It is one of those things that sounds wonky until you try it. It may take a few times to get a feel for it, but once you do, it is surprisingly repeatable.
The system does have a few quirks to it. Personally, I wish the rail attachment had a ratchet lever like the pivot control. Currently you need a separate tool to take the bipod on/off the gun. Also, the FLEX bipod seems to work better mounted somewhat further back than other designs. Some experimenting may be necessary to find what works best. Then again, we all need more trigger time….


 The Fulghum Front Rest currently retails for $750.00 with no top. Randolph Machine offers two different tops for the unit: the $120.00 Randolph MK1 Top (User supplies owl-ear bag), or the $150.00 Adjustable MKII Top (see photo at right; similar to Fudd Top). Fulghum also offers a one-piece rest (front and rear support) for $750.00.
 Ph.D Engineer Boris Teper has invented a remarkably compact yet effective torque-setting tool that is ideal for tensioning scope ring fasteners and action screws on rifles. The Torque Settings Driver from

 Borka offers many versions of its tool, with torque ranges from 10 inch-lbs. up to 72 inch-pounds. The basic Borka driver, priced at $55.00, offers six (6) preset torque values. For $15.00 more Borka sells a driver that offers twelve (12) preset torque values. This 12-setting tool, which is not any bigger or heavier than the 6-setting model, is cleverly designed — you simply flip it over to switch from the first six torque settings to the second six. This works because the handle has variable “break” resistance depending on direction of travel. Smart.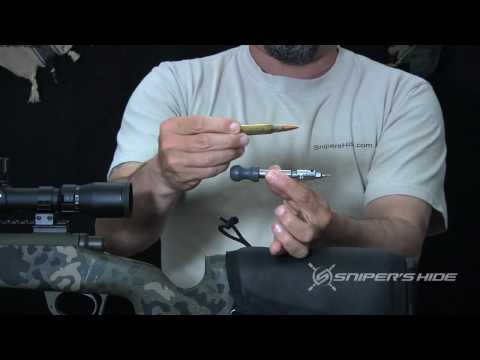

 The new Competition Scope is a 15-55x52mm. The new scope’s ED (extra-low dispersion) glass yields outstanding resolution. Remarkably, the resolution in the Competition scopes is even slightly better than the Nightforce 12-42x56mm NXS, with its larger 56mm objective lens. The color is definitely ‘crisper’ as well. Not surprisingly, the image quality is what most people noted first (see through-the-lens photo at right). The glass is great, and Nightforce included other thoughtful features as well. First is the side parallax adjustment that competitors have been wanting for years (this is one of the draws for the NXS scope in competition). The higher zoom range (with 55X power on tap), and the 60 MOA of vertical travel is also a much-asked-for (and useful) feature.


 Ten Transducers Do the Job Fast
 “World’s Finest Trimmer” Costs $69.95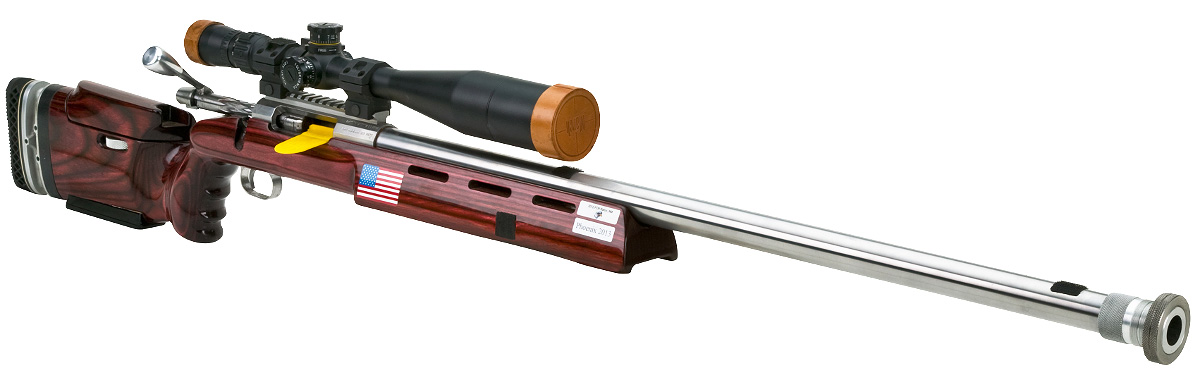


 Shiraz: Tuners are a double-edged sword. In order to use them most efficiently you need to load test the barrel in many different conditions and record the results, fine tuning and turning the dials to find the best harmonic of that barrel in a given condition. When you encounter a similar condition at a match to what you tested previously, you would look up your notes and turn the dials so that it matches your tested condition. I am over-simplifying this, as it is quite complex and there are many articles about tuners. I do not see tuners catching on in F-Class as 99% of the users would not want to go through the aggravation.