Conventional brass jags work great — except for one thing. They can react to solvents, leaving a blue “false positive” on patches. In recent years, jag-makers have experimented with many different materials in an effort to cure the solvent-reaction problem. Today we have polymer jags, nickel-plated jags, and stainless steel jags. And the latest innovation is the aluminum jag from Dewey.
J. Dewey Mfg. offers a series of “Copper Eliminator” jags and brush adapters made from aircraft-grade aluminum with the same hardness as brass. Dewey claims that its aluminum jags will not become embedded with grit or particles that could harm your bore. At the same time, Dewey’s aluminum jags will not react to ammoniated bore solvents that can turn patches blue green when used with brass jags. Dewey aluminum jags are offered with either male OR female 8/32 threads. The $5.25 aluminum jags and $3.70 brush adapters are offered in a wide variety of calibers. You can order these products from Dewey Mfg. or Brownells.
Story Tip from Boyd Allen. We welcome submissions from our readers.
Each day, on Facebook, the NRA National Firearms Museum showcases something special from the Museum collections. A while back the Museum displayed a trio of snakes — three very special Colt Pythons. From bottom to top, these three prized wheelguns are: Colt Python serial number 2, number 3, and number 5. And yes, that is the original box for Python #2 (at bottom). The museum says such low serial number guns were typically produced for a company executive or key members of the gun design team.
Loved for their beautiful finish, nice balance, and great trigger, Colt Pythons have proven to be excellent investments. Since the Colt Python was first introduced in 1955, Python prices have gone through the roof. A pristine, LNIB early-era Colt Python can now command $4400.00 or more, more than 35 times the original price.
How much did a Python cost in 1955? You could purchase the handsome Royal Blue model for just $125.00! Factory-engraved models started at $245.00, according to this Colt advertisement from June, 1955:
History and Design Evolution of Colt Python Revolvers
You can see hundreds of other interesting firearms on the National Firearm Museum website, www.NRAMuseum.com. Or, if you’re lucky, you can see the collections in person. The NRA now operates three Museum locations: the NRA National Firearms Museum in Fairfax, Virginia; the NRA National Sporting Arms Museum in Springfield, MO; and the Frank Brownell Museum of the Southwest in Raton, NM.
One of our Forum members asked us the question: “Does anybody make a good range box with cradles for cleaning at the bench?” The answer is yes — the MTM model RBMC Range Box offers slide-in plastic cradles that provide a reasonably sturdy platform for a quick clean when you’re done shooting. The RBMC box also offers plenty of storage for jags, brushes, solvents, ammo boxes and other miscellaneous gear you need for the range.
Among the many range boxes available, the MTM model RBMC Range Box leads the pack in terms of versatility. It is rugged, it has plenty of storage space, and it doubles as a handy cleaning station. This Editor has used the MTM Range Box to clean rifles and as a “range expedient” rifle holder when adjusting scopes and tensioning action screws. It’s a good product that does the job and stands up to rough handling. The MTM Shooting Range Box is in stock now for $49.99 at Midsouth (green version).
Fitted Cleaning Cradles
The key feature setting MTM’s RBMC apart from most range boxes is the rubber-coated cradle system. Wide enough to fit a 3″-wide fore-arm, the cradles slide into vertical slots on either end of the box. This allows your range box to serve as a maintenance station. The RBMC is really pretty stable in this role, and the cradles won’t mark your stock. The cradles even feature slots on each side to hold your cleaning rods. The MTM Range Box is secure enough to stay in place when you’re brushing the barrel. However, if you’re working on a carpeted bench top, keep one hand on the box when running a cleaning rod through the bore, just to ensure the box doesn’t slide.
Versatile Upper Tray with Dividers
The MTM Range Box has two major components — the box base (with cradles), and a large upper tray with hinged top and carry handle. This large upper tray clamps securely to the bottom unit for transport. The top tray has a long section that holds cleaning rod guides, long brushes, grease syringes and the like. There are two, clear-plastic fitted divider trays. These will hold your patches and jags, plus comparators, ring wrenches, and other small tools.
MTM offers a black “tactical” Range Box for $50.71 at Midsouth. This black Tactical Range Box includes a special bracket that supports AR-type rifles through the magazine well. As show at right, this is red. However, some previous production models had black magwell brackets (see below).
What Might Be Improved
Though we really like the MTM Range Box, it’s not perfect. First, we wish the box was a bit deeper, to have added carrying capacity. The dimensions of the MTM Range Box are: 25″ long x 11.5″ wide x 8.75″ high. We’d like to see it 12″ high/deep to allow larger solvent bottles to stand upright and to provide more space to carry tools and shooting muffs. However, it is deep enough to hold the large 100-round MTM cartridge boxes that are popular with many shooters (see photo at right).
While we like the twin clear plastic dividers that fit into the removable top-tray, but we wish the dividers had individual hinged tops. This would keep small items more secure.
Are you looking to have some shooting fun this holiday season — perhaps having a fun day with the kids or grand-kids? Then check out the colorful, innovative Game Series of paper targets from Action Target, a leading manufacturer of steel targets and shooting supplies. These can be used in indoor ranges or outdoors in warmer climates where there’s no winter snow on the ground.
Inspired by arcade games, tabletop gaming, circus themes, and team sports, the new Game Series paper targets are designed to be engaging — to involve the shooter in a fun process, rather than just aiming at dots on paper. The sports targets let you enjoy Baseball and Hockey. The nostalgic arcade target designs capture the fun of an amusement park. Some targets, such as ‘Alien Invasion’ (above), feature fluorescent colors that “glow” when used indoors with black lights. You can even enjoy darts and billiards targets.
The selection of games is impressive — there are currently 18 different Game Series targets — really something for everyone. NOTE: These Game Series targets are not inexpensive. A single Game Series target costs $1.59. However, if you buy at least 100 targets (one or more types), the cost per target goes down to $0.87, a 45% savings.
This video shows a variety of Game Series Targets being used at an indoor range. You can see they are large, brightly colored, and fun to shoot.
Hornady sponsored shooter Jerry Miculek — Yamil Sued Photo.
If you are considering acquiring a revolver for fun shooting, self-defense, or competition, you should definitely watch this YouTube video. In this 23-minute presentation, legendary wheelgun ace shooter Jerry Miculek puts three .357/.38 SPL wheelguns through their paces. Jerry, one of the greatest revolver shooters in history, hosts a “Revolver Showdown” with three popular wheelguns: 1) S&W L frame (3″ bbl); 2) Colt Python (6″ bbl); and 3) Ruger Speed Six (2.75″ bbl).
Smith & Wesson Model 686 Plus, L-Frame, 7-rd .357 Magnum/38 SPL, 3″ Barrel.
Testing at 10 Yards and 50 Yards
In the video, Jerry shoots all three revolvers rapid-fire, double-action at 10 yards. Then he shoots the three guns single-action, slow-fire at 50 yards (starting at time mark 7:19).
After his range session, Jerry examines nine medium frame revolvers, comparing and contrasting design features. Jerry considers these factors:
1. Accuracy
2. Balance and Handling
3. Speed and Sureness of Trigger Return (watch video at 3:45″ re Colt.)
4. Reliability
5. Barrel Twist Rate
6. Strength of Construction/Durability
Jim Borden, the very knowledgeable owner of Borden Accuracy, provided an interesting historical insight about barrel fitting and the term “blueprinting”. Jim has posted on his Borden Accuracy Facebook page an explanation of the term “blueprinting” as it originally was used with respect to barrel/shoulder/lug fitting.
Barrel/Shoulder Fit and Blue-Printing
Jim told us: “Something often overlooked on barrel installation is the shoulder fit. Many are so overly obsessed with doing a crank-on fit of threads that the shoulder contact is overlooked. Full, solid barrel shoulder to recoil lug or action face is critical to optimum accuracy and precision.
Many years ago part of the ‘blueprinting’ of an action was the use of Prussian blue to ‘blueprint’ lug fit, thread fit, and barrel shoulder fit. It was a colloquial expression that had nothing to do referring to a blueprint or drawing of the action.” Bet you didn’t know that!
About the photo below, Jim noted: “the fuzzy look on the threads is a liberal coating of Never-Seez thread lubricant.”
Look carefully to see the Prussian Blue applied to the barrel shoulder, plus Never Seez on threads.
Some years ago, Forum Member Jeff R. (“aJR”) from Australia crafted a slick, handsome cartridge holder to use with his heavy Benchrest Gun. This is a simple, elegant design that would be relatively easy to build in a home workshop. Composed of two blocks of wood with parallel metal arms, the unit adjusts for height and block angle. Jeff tells us: “This is my new cartridge dispenser I knocked up in the shed. I wanted to get the record rounds up next to the action and this is adjustable for just about any gun/port configuration, right or left.” The cartridge caddy has ten round holes (for record shots) in the top wood block, stacked in two rows. The base piece has five holes for sighters, with the holes cut at an angle for easy access.
For the blocks, Jeff used “Jarrah” wood, a deep, red hardwood native to West Australia. Jeff says he did not stain the wood–what you see is the natural color, just sprayed with acrylic lacquer. A similar wood available in the USA is Satiné, also known as “Bloodwood”.
By the way, Jeff’s 1000-yard rifle shown in the top photo is worth mentioning in its own right. The gun shot a large 30-cal magnum wildcat cartridge and 17 years ago set many Australian BR records. The rifle features a tensioned barrel system, custom Magnum drop-port action, and a metal/composite stock. Click HERE for more info. There’s even a YouTube Video showing Jeff shooting his big boomer at 1000-yard match at Brisbane QRA.
Product Review by F-Class John
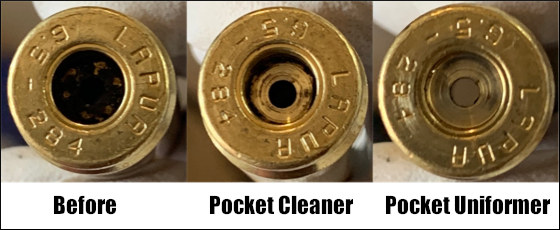
Case preparation is critical for precision reloading. One must trim cases, debur/chamfer case mouths, clean necks, spruce up primer pockets and do other important tasks. Complete case prep can involve many separate processes, each requiring its own tools. With each of those tools comes additional cost as well as the need for more storage and bench space. To make case prep easier, faster, and more convenient Lyman created the Case Prep Xpress (#ad). The Case Prep Xpress, introduced a few years back, combines up to five prep stages into one well-built, stable, versatile unit. Watch this video to see the machine in action:
The Case Prep Xpress features five (5) independently-turning spindles all with the common 8/32 thread. This allows you to attach multiple tools supplied with the unit PLUS many other screw-on prep tools. For our testing we started out using a variety of the 12 included tools and found they cover the majority of case prep tasks. Lyman supplies deburr and chamfer tools, pocket uniformers, reamers and cleaners, as well as an assortment of neck brushes.
The deburr and chamfer tools worked really well, creating beautiful bevels all while leaving a nice flat edge across the top of the neck which is critical for accuracy and brass life. We found the primer pocket cleaning tool did a good job, but for truly clean pockets we recommend using the primer pocket uniforming tool, which very efficiently removes even hard residues.
The benefit of having interchangeable heads is that you can add your own accessories. We like to use a bore brush with bronze wool wrapped around it for use inside our necks. This worked perfectly once we screwed it in. In fact, we couldn’t think of any 8/32-threaded accessory that wouldn’t work well on this machine. Another great design feature is how all the accessories are oriented straight up. This allows for perfect visual alignment of your cases onto the tools which is critical — especially when performing cutting operations such as primer pocket uniforming.
Along with the five power stations there are six female-threaded storage spots on the sides where tools can be placed to ensure they don’t get lost. We like this feature since there will be more than five accessories you want to use and having them easily available is a great feature. You can keep 11 tools right on the machine (5 on top, 6 on the sides). That way you don’t have to dig through storage bins.
The Case Prep Xpress has a removable front bin to hold brass shavings, and there are two circular trays on either side of the bin. In front is a long tray that holds the provided brush. This makes it relatively easy to clean off brass shavings and other debris from case prep processes.
SUMMARY — Versatile Case Prep Xpress Is A Good Value
For the money, Lyman’s Case Prep Xpress is tough to beat. It performs multiple tasks well while being stable and easy-to-use. Yes there are some multi-spindle prep centers that offer variable or fast/slow RPM spindles while the Lyman’s spindles are all fixed RPM. (See, e.g. the RCBS Brass Boss). However those other systems don’t include all the convenient on-board storage of the Case Prep Xpress, and are typically more expensive. The Lyman Case Prep Xpress sells for about $180-$199 “street price”. It’s currently on sale for $174.99 on Amazon (#ad). This makes the Lyman Case Prep Xpress a good value — it offers great versatility while saving space and saving money compared to buying five or more separate, powered tools.
As an Amazon affiliate, this site can earn revenues through sales commissions.
One Shooters’ Forum member asked: “What makes an AR accurate? What parts on an AR can really affect accuracy — such as free-floating handguards, barrels, bolts, bolt carriers?” He wanted an honest, well-informed answer, not just sales pitches. Robert Whitley posted a very detailed answer to this question, based on his experience building/testing scores of AR-platform rifles. Robert operated AR-X Enterprises, which produced match-grade uppers for High Power competitors, tactical shooters, and varminters.
Building an Accurate AR — What is Most Important
by Robert Whitley
There are a lot of things that can be done to an AR to enhance consistent accuracy, and I use the words “consistent accuracy” because consistency is a part of it (i.e. plenty of guns will give a couple great 5-shot groups, but won’t do a very good 10- or 20-shot groups, and some guns will shoot great one day and not so good on others).
Here are 14 key things we think are important to accuracy.
1. Great Barrel: You’ll want a premium match-grade barrel, well-machined with a good crown and a match-type chambering, true to the bore and well cut. The extension threads must also be cut true to the bore, with everything true and in proper alignment.
2. Rigid Upper: A rigid, heavy-walled upper receiver aids accuracy. The typical AR upper receiver was made for a lightweight carry rifle and they stripped all the metal they could off it to make it light to carry (which is advantageous for the military). The net result are upper receivers that are so thin you can flex them with your bare hands. These flexible uppers are “strong enough” for general use, but they are not ideal for accuracy. Accuracy improves with a more rigid upper receiver.
3. True Receiver Face: We’ve found that truing the receiver face is valuable. Some may argue this point but it is always best to keep everything related to the barrel and the bore in complete alignment with the bore (i.e. barrel extension, bolt, upper receiver, carrier, etc.).
4. Barrel Extension: You should Loctite or glue the barrel extension into the upper receiver. This holds it in place all the way front to back in the upper receiver. Otherwise if there is any play (and there typically is) it just hangs on the face of the upper receiver completely dependent on the face of the upper receiver as the sole source of support for the barrel as opposed to being made more an integral part of the upper receiver by being glued-in.
5. Gas Block: You want a gas block that does not impose pointed stress on the barrel. Clamp-on types that grab all the way around the barrel are excellent. The blocks that are pinned on with tapered pins that wedge against the barrel or the slip on type of block with set screws that push up from underneath (or directly on the barrel) can deform the bore inside of the barrel and can wreck the accuracy of an otherwise great barrel.
6. Free-Float Handguard: A rigid, free-float handguard (and I emphasize the word rigid) really makes a difference. There are many types of free-float handguards and a free-float handguard is, in and of itself, a huge improvement over a non-free-float set up, but best is a rigid set-up. Some of the ones on the market are small diameter, thin and/or flexible and if you are shooting off any type of rest, bipod, front bag, etc., a rigid fore-end is best since ARs want to jump, bounce and twist when you let a shot go, as the carrier starts to begin its cycle before the bullet exits the bore.
7. Barrel Contour: You want some meat on the barrel. Between the upper receiver and the gas block don’t go real thin with a barrel (we like 1″ diameter if it’s workable weight-wise). When you touch off a round and the bullet passes the gas port, the gas system immediately starts pressuring up with a gas impulse that provides vibrations and stress on the barrel, especially between the gas block back to the receiver. A heavier barrel here dampens that. Staying a little heavier with barrel contour through the gas block area and out to the muzzle is good for the same reasons. ARs have a lot going on when you touch off a round and the gas system pressures up and the carrier starts moving (all before the bullet exits the bore) so the more things are made heavier and rigid to counteract that the better — within reason (I’m not advocating a 12-lb barrel).
8. Gas Tube Routing Clearance: You want a gas tube that runs freely through the barrel nut, through the front of the upper receiver, and through the gas key in the carrier. Ensure the gas tube is not impinged by any of them, so that it does not load the carrier in a stressed orientation. You don’t want the gas tube bound up so that when the gas tube pressures up it immediately wants to transmit more force and impulse to the barrel than would normally occur. We sometimes spend a lot of time moving the gas block with gas tube on and off new build uppers and tweaking gas tubes to get proper clearance and alignment. Most gas tubes do need a little “tweaking” to get them right — factory tubes may work OK but they typically do not function optimally without hand-fitting.
9. Gas Port Tuning: You want to avoid over-porting the gas port. Being over-gassed makes the gas system pressure up earlier and more aggressively. This causes more impulse, and increases forces and vibration affecting the top end and the barrel. Tune the gas port to give the amount of pressure needed to function properly and adequately but no more.
10. Front/Back Bolt Play: If accuracy is the game, don’t leave a lot of front/back bolt play (keep it .003″ but no more than .005″). We’ve seen factory rifles run .012″ to .015″ play, which is OK if you need to leave room for dirt and grime in a military application. However, that amount of play is not ideal for a high-accuracy AR build. A lot of front/back bolt play allows rounds to be hammered into the chamber and actually re-formed in a non-consistent way, as they are loaded into the chamber.
11. Component Quality: Use good parts from a reputable source and be wary of “gun show specials”. All parts are NOT the same. Some are good, some are not so good, and some aftermarket parts are simply bad. Don’t be afraid to use mil-spec-type carriers; by and large they are excellent for an accuracy build. Also, remember that just because a carrier says “National Match” or something else on it does not necessarily mean it’s any better. Be wary of chrome-plated parts as the chrome plating can change the parts dimensionally and can also make it hard to do hand-fitting for fit and function.
12. Upper to Lower Fit: A good upper/lower fit is helpful. For quick and dirty fit enhancement, an Accu-Wedge in the rear helps a lot. The ultimate solution is to bed the upper to a specific lower so that the upper and lower, when together, are more like one integral unit. For the upper receivers we produce, we try to get the specs as close as we can, but still fit the various lowers in the market place.
13. Muzzle Attachments: Don’t screw up the muzzle (literally). Leave as much metal on the barrel at the muzzle as you can. People like to thread the muzzle for a flash hider, suppressor, muzzle brake, or some other attachment, but if you really want accuracy, leave as much metal as you can there. And, if you have something that screws on, set it up so that it can be put on and have it stay there without putting a lot of torque and stress on it right where the bullet exits the bore. If you are going to thread the end of the barrel, make it concentric with the bore and make sure what you screw on there is as well. For all muzzle attachments, also ensure that the holes through which the bullet passes through are dead true to the bore. Many aftermarket screw-on things are not so good that way. Anything that vents gas should vent symmetrically (i.e. if it vents left, it should vent equally right, and likewise, if it vents up, it should vent down equally). Uneven venting of gas can wreck accuracy.
14. Quality Ammunition: Ammo is a whole story by itself, but loads that are too hot typically shoot poorly in an AR-15. If you want accuracy out of an AR-15, avoid overly hot loads. Shown below are test groups shot with four (4) different uppers, all with moderate loads. These four uppers all pretty much had the same features and things done to them as explained in this article, and they all shot great.
This deluxe, roll-out Rush Creek Creations 42-0000 69″ x 16″ gun cleaning mat (with pockets), is available from Amazon for $69.84 (#ad).
We normally use a gun cradle when cleaning or adjusting our rifles. But there are situations, such as when working on a barreled action, when it’s nice to use a pad that lies flat. Many work pads are too small — they’re nothing more than oversize mouse pads. Here are three gun pads that are big enough to work well with rifles and/or barreled actions.
DryMate Gun Cleaning Pad
The Drymate Gun Cleaning Pad is a full 59″ x 16″. That’s nearly five FEET from end to end — longer than most rifles, so you have plenty of surface area for working. Conveniently, this product can be washed with soap and water. It is offered in Green and Charcoal Gray colors. We prefer the Green version because the color makes it a bit easier to see small black and gray parts such as screws and springs.
Boyt Harness Counter Pad
The 48″ x 12″ Boyt Harness Counter Pad was originally designed more for display purposes than for serious work sessions, but we like this product. It is useful if you want to lay your gun on a bench to make small adjustments. The Boyt Counter Pad, $27.99 at MidwayUSA, is nice and big, a full four feet from end to end. The back side is canvas while the top-size is a quilted cotton fabric. This product has received high praise from buyers. Here are actual owner reviews:
Worth every penny. I bought three of them because I want to have at least one always around. I use one for a shooting bench or tailgate mat and another for my primary gun cleaning workbench mat. Awesome for both purposes. This one was perfect for my array of needs. — Joe D.
This mat is great for cleaning guns and keeping your surfaces clear of oil or solvent. The mat has plenty of space for a rifle or handgun and the padding is thick enough[.] I would definitely buy again and have recommended this to my friends and family. — Safety Guy
I bring this to the rifle range with me every time, to rest my rifle on the table without worrying about scratches. It fits nicely in my soft rifle case. One side is a tough canvas material that doesn’t show scratches, and the other side is a soft fleece material that protects the finish of your gun. — MACPSU
Hoppes Gun Cleaning Pad
The Hoppes Gun Cleaning Pad is 36″ wide x 12″. That’s big enough for many barreled actions (unless you have a really long barrel). This pad has a non-slip nylon backing, and Hoppes claims that the “Soft acrylic material absorbs 8 times its weight in fluids.” This Hoppes Cleaning Pad is very affordable. It costs just $12.66 at Amazon (#ad).


 J. Dewey Mfg. offers a series of “Copper Eliminator” jags and brush adapters made from aircraft-grade aluminum with the same hardness as brass. Dewey claims that its aluminum jags will not become embedded with grit or particles that could harm your bore. At the same time, Dewey’s aluminum jags will not react to ammoniated bore solvents that can turn patches blue green when used with brass jags. Dewey aluminum jags are offered with either male OR female 8/32 threads. The $5.25 aluminum jags and $3.70 brush adapters are offered in a wide variety of calibers. You can order these products from Dewey Mfg. or Brownells.


 MTM offers a black “tactical” Range Box for
 What Might Be Improved


 Testing at 10 Yards and 50 Yards
 Barrel/Shoulder Fit and Blue-Printing


 5. Gas Block: You want a gas block that does not impose pointed stress on the barrel. Clamp-on types that grab all the way around the barrel are excellent. The blocks that are pinned on with tapered pins that wedge against the barrel or the slip on type of block with set screws that push up from underneath (or directly on the barrel) can deform the bore inside of the barrel and can wreck the accuracy of an otherwise great barrel.


 The
The 

 The
The 


