AR-15 Cartridge line-up image from 80% Arms, used with permission. This selection omits our favorite alternative — the 20 Practical (.223 Rem necked down to .204 Caliber).
Instead of using the standard .223 Remington or 5.56x45mm NATO round, you have many options for an AR-15, as shown above. This photo is from Complete Guide to Alternative AR-15 Rounds in the 80% Arms Blog. Some of the most notable alternative chamberings for AR-15s are:
20 Practical — Simply the .223 Rem necked down to .204 caliber. Requires new barrel. Same bolt, same magazines. Best Bang for the Buck. 6.5 Grendel — Moderately expensive, 6.5 Grendel requires a new barrel, bolt, and magazines. Most use the 6.5 Grendel for competitive shooting and/or hunting. .300 Blackout — Moderately expensive, the .300 Blackout requires a barrel change. This is used for home defense, and hunting. WARNING — with some bullets this round can be chambered in a .223 Rem barrel, with disastrous consequences. .458 SOCOM — Pretty expensive, requires new barrel and bolt. The .458 SOCOM round is typically used for hunting though it was originally designed for Close Quarters Battle (CQB). .50 Beowulf — The most expensive alternative AR-15 cartridge, this requires new barrel and bolt. The .50 Beowulf was created for game hunting, but most hunters use something more practical.
Of these five options, our top choice is the 20 Practical, followed by the 6.5 Grendel. Check out our featured 20 Practical AR Rifle Report. This 20 Practical cartridge is highly effective on small varmints, and has shown outstanding accuracy in AR-platform rifles crafted by Robert Whitley.
20 Practical — High-Velocity, Affordable Alternative
The 20 Practical is simply a .223 Remington necked down to .204 caliber. This efficient little cartridge can launch 32-grainers at over 4200 fps, with impressive results on P-Dogs. This makes the 20 Practical a great choice for an AR-based varmint rifle.
20 Practical Ultimate Varminter
A decade ago, as a “proof-of-concept”, AccurateShooter.com created a 20 Practical AR15 Ultimate Varminter with a custom 20-caliber upper from Robert Whitley of AR-X Enterprises, LLC. That project rifle was ultra-accurate — every 5-shot group out of the gun was less than the size of a dime. That gun was auctioned off, but Robert Whitley continues to produce custom 20 Practical AR15 uppers. (The 20 Practical cartridge is simply the .223 Rem necked down to 20 caliber — you can use standard .223 brass and load with standard .223 Rem dies. Just swap in a smaller expander and use smaller neck bushings.)
The 6.5 Grendel — Accurate, Plus Good for Hunters
The 6.5 Grendel round is one of the most accurate cartridges for the AR-15 platform. The 6.5 Grendel round offers a larger-diameter, .264-caliber (6.5mm) bullet running at good velocities. This provides ample energy for smaller game and deer. The 6.5 Grendel is often used for hunting deer up to 300 yards.
History of the 6.5 Grendel Cartridge
The 6.5 Grendel originated as a 6mm PPC necked up to 6.5 mm. After Alexander Arms relinquished the “6.5 Grendel” Trademark, the 6.5 Grendel was standardized as an official SAAMI cartridge. It has become popular with target shooters and hunters alike because it is accurate, efficient, and offers modest recoil. Good for small to medium game, the 6.5 Grendel is becoming a popular chambering in lightweight hunting rifles, such as the Howa 1500 Youth Model.
The .300 Blackout — Risky Business
The .300 Blackout appeals to folks who want a .30-caliber defense round. This can be loaded at various velocities. Loaded at subsonic speeds and shot with a suppressor, the .300 BLK offers very low sound levels. Unfortunately, that .300 Blackout cartridge can fit in a .223 Rem chamber. Shooting a .308-caliber bullet in .223 bore is a recipe for disaster.
The .300 AAC Blackout aka “300 BLK”, is a compact 30-caliber cartridge designed to work in AR-15 rifles. It has a shorter cartridge case to accommodate the bigger 30-caliber bullet while still fitting in a standard AR-15 magazine. Unfortunately, that’s the danger. A careless shooter can toss a .300 Blackout cartridge in with .223 Rem rounds without noting. And because the case-head size is the same as the .223 Rem (5.56×45) the rifle’s bolt assembly will happily chamber and fire the .300 BLK round. Problem is, that forces a .308 diameter bullet down an undersized .223-caliber bore. Not good!
This images were provided by Tactical Rifle Shooters on Facebook. The message was clear: “Don’t try to run 300 Blackout in your .223/5.56mm. It won’t end well. The problem is identical rifles and identical magazines but different calibers.”
Image from Accurate Shooter Forum. Cutaway shows the jammed .30-Cal bullet:
For those who MUST have a .300 Blackout, here are some things you can do:
1. Use different colored magazines for .300 Blackout vs. .223 Remington.
2. Mark .223 Rem upper handguards with the caliber in bright paint.
2. Fit all your uppers with caliber-labeled ejection port covers.
4. Mark all .300 BLK Rounds with heavy black marker.
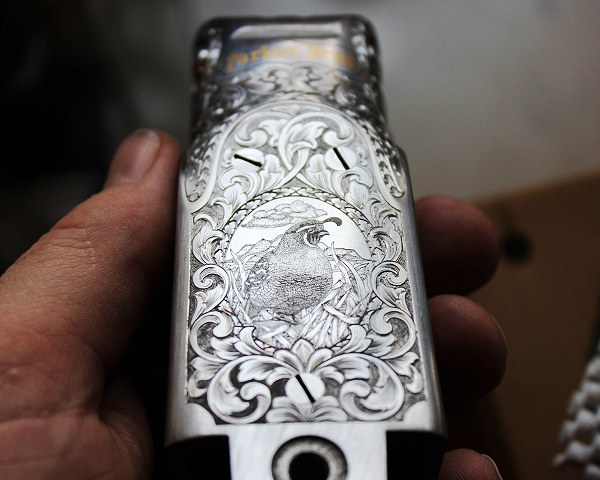
Impressive engraving by Jesse Kaufmann. Note how the scope rings have been engraved to perfectly match the engraving pattern on the Remington 547 action.
Who says fine craftsmanship is dead? There’s a fellow up in South Dakota, Jesse Kaufmann, who produces some of the most handsome engraving we’ve seen. Jesse, who operates Black Hills Gunstocks and Engraving LLC, is a true master at metal engraving and he also does superb stock checkering. Here are some examples of Jesse’s engraving work:
About Jesse Kaufmann, Master Engraver
Jesse Kaufmann was a professional stockmaker for Dakota Arms for over a decade. In 2009, he was inducted in the American Custom Gunmakers Guild as a checkering specialist. In January 2017, Jesse was awarded his Master Engraver certification by the Firearms Engravers Guild of America. With his broad skill set, Jesse is able to offer his clients a unique and complete package of stock work, finish, checkering, and engraving for a custom package that is all completed under one roof by his own hands.
Jesse Kaufmann’s work has been featured in American Rifleman, American Hunter, FEGA’s The Engraver, Sports Afield, Waidmannsheil Journal of German Gun Collectors Assn., Gun Digest 71st Edition, Modern Custom Guns Volume 2, Dangerous Game Rifles 2d. Edition. For more info, visit BlackHillsgunstocksandengraving.com, email blackhillsgunstocks [at] gmail.com, or call Jesse at (605) 499-9090.
Most of us own a .223 Rem rifle. Now, thanks to our friends at Rifleshooter.com we can assess exactly how velocity changes with barrel length for this popular cartridge.
Rifleshooter.com performed an interesting test, cutting the barrel of a .223 Rem rifle from 26″ all the way down to 16.5″. The cuts were made in one-inch intervals with a rotary saw. At each cut length, velocity was measured with a Magnetospeed chronograph. To make the test even more interesting, four different types of .223 Rem/5.56 ammo were chron’d at each barrel length. The Rifleshooter.com team that conducts these tests has a full-service gun shop, 782 Custom Gunworks — visit 782guns.com.
Test Barrel Lost 25.34 FPS Per Inch (.223 Rem Chambering)
How much velocity do you think was lost, on average, for each 1″ reduction in barrel length? The answer may surprise you. The average speed loss of the four types of .223/5.56 ammo, with a 9.5″ shortening of barrel length, was 240.75 fps total (from start to finish). That works out to an average loss of 25.34 fps per inch.
5.56/.223 Barrel Cut-Down Speed Test 26″ to 16.5″
Start FPS at 26″
End FPS at 16.5″
Total Loss
Average Loss Per Inch
UMC .223 55gr
3182*
2968
214
22.5 FPS
Federal M193 55gr
3431
3187
244
25.7 FPS
Win m855 62gr
3280
2992
288
30.3 FPS
Blk Hills .223 68gr
2849
2632
217
22.8 FPS
*There may have been an error. The 25″ velocity was higher at 3221 fps.
Rifleshooter.com observed: “Cutting the barrel from 26″ to 16.5″ resulted in a velocity reduction of 214 ft/sec with the UMC 223 55-grain cartridge, 244 ft/sec with the Federal M-193 cartridge, 288 ft/sec with the Winchester M855 cartridge and 217 ft/sec with the Back Hills 223 68-grain match cartridge.”
How the Test Was Done
The testers described their procedure as follows: “Ballistic data was gathered using a Magnetospeed barrel-mounted ballistic chronograph. At each barrel length, the rifle was fired from a front rest with rear bags, with five rounds of each type of ammunition. Average velocity and standard deviation were logged for each round. Once data was gathered for each cartridge at a given barrel length, the rifle was cleared and the bolt was removed. The barrel was cut off using a cold saw. The test protocol was repeated for the next length. Temperature was 45.7° F.”
See More Barrel Cut-Down Tests on Rifleshooter.com
Rifleshooter.com has performed barrel cut-down tests for many other calibers/chamberings including 6mm Creedmoor, .308 Winchester, and .338 Lapua Magnum. See these test results at Rifleshooter.com.
Much Different Results with 6mmBR and a Longer Barrel
The results from Rifleshooter.com’s .223/5.56 test are quite different than the results we recorded some years ago with a barrel chambered for the 6mmBR cartridge. When we cut our 6mmBR barrel down from 33″ to 28″ we only lost about 8 FPS per inch. Obviously this is a different cartridge type, but also our 6mmBR barrel end length was longer than Rifleshooter.com’s .223 Rem start length. Velocity loss may be more extreme with shorter barrel lengths. And, of course, different cartridge types and powder/bullet combinations will yield different results.
Here’s a great YouTube video that shows the creation of a high-end, 22-250 varmint rifle from start to finish. The rifle was crafted by Chad Dixon for O’Neill Ops. Once the build is complete, the video shows the rifle being tested at 440 yards. With the camera filming through the scope, you can even watch the trace, starting at the 2:36″ time mark (this is very cool).
Watch this Video in HD!
Any person with an interest in gunsmithing should watch this video. It shows barrel profiling, tenon-thread cutting, chambering, CNC stock inletting, bedding, and stock painting. This is one of the best short videos of its kind on YouTube.
For this build, Chad Dixon of LongRifles, Inc. teamed up with O’Neill Ops. The video shows the “Coyote Rifle” build, step by step, from the cutting of the tenon threads, to the 440-yard field test at the end of the build. To learn more about this rifle’s components and its performance in the field, contact James O’Neill, www.oneillops.com, (605) 685-6085.
Chad Dixon of LongRifles, Inc.
Chad Dixon’s introduction to firearms began in 1991 as a marksmanship instructor and competitive shooter in the U.S. Marine Corps. Chad began building rifles in 2000 at the Anschutz National Service Center, where he worked with U.S. Olympic shooters. In 2003 Chad took a position with Nesika Bay Precision/Dakota Arms. After leaving Nesika, Chad deployed to the Middle East as a security contractor for the U.S. Dept. of State. On his return to the USA, Chad started LongRifles Inc., a custom rifle-building company.
Dixon-built rifles combine modern CNC manufacturing methods with traditional expert craftsmanship. Chad’s rifles have won major int’l and national level competitions in Smallbore, Smallbore Silhouette, High Power, and Long Range Palma disciplines.
If you’re a fan of “Heavy Artillery” here’s an impressive rifle that Forum member “Straightpipes” crafted himself nearly a decade ago. Even today, it remains a state-of-the-art engineering Tour De Force, complete with a custom-built, joy-stick REAR rest. We’re mightily impressed by the innovative design and superb metal-work displayed by this “home-built special”. ‘Straightpipes’ certainly proved that American “know-how” and creativity is still alive….
Coaxial (joy-stick) rests allow both vertical and horizontal movement with a single control. If you want to make a diagonal shift in point of aim, you can do this with one, smooth, continuous movement. Until now, this advantage has been limited to front rests. Well there’s some new technology in the benchrest world. Forum member ‘Straightpipes’ has created a coaxial rear joystick rest. He built this simple, compact rear rest in his home workshop for use with his 40-lb Heavy Gun. In combination with a vertically adjustable front rest, this innovative rear joystick rest allows aiming to be controlled from the rear, with your left hand in a comfortable position. Yes this kind of adjustable rear rest is legal in NBRSA HG and LG classes, and in IBS Heavy Gun class.
Straightpipes Rear Coaxial Rest — Design and Features
The rear rest is crafted from aluminum with a stainless steel forward-pointing joystick. Total weight, including the long, stabilizing base foot, is about 10 pounds. Though the rear rest doesn’t seem to have a large movement range, the system offers plenty of “on-target” travel. At 100 yards, the rest offers 10 MOA left, 10 MOA right, 5 MOA up, and 5 MOA down adjustment. That’s plenty of range for most targets, once you center the Point of Aim vertically using the captain’s wheel on the front rest, which Straightpipes also crafted himself. Click Square Photos Below to see Large Images.
Inside the rear cradle sits a Protektor rear sandbag, with Cordura fabric filled with ordinary sand. This fits the 3″-wide bottom of Straightpipes’ 40-lb heavy gun. There are some sophisticated components you can’t see in the photos. The rear rest can pivot (right or left slightly) to stay aligned with the front rest (as adjusted to level the cant of the rifle). Straightpipes says: “With the pivot, whatever I do to the front, the rear follows.” The basket (cradle) also employs a 20-lb bias spring system to handle the weight of the Heavy Gun. This prevents the co-axial system from binding, so it is fluid and easy to operate. Even with 20 pounds of gun weight on the rear, the joystick can be easily manipulated with a light touch of thumb and fore-finger.
Video Shows Rear Coaxial Rest in Action
Watch the video below to see how the joystick controls the rear rest. Total joystick movement is about a 2.5″ sweep. This gives 20 MOA total windage adjustment at 100 yards, and about 10 MOA vertical.
About the Straightpipes Front Rest
The coaxial rear rest is designed to work with the massive front rest as a system, though they are NOT connected, so as to comply with IBS Heavy Gun rules. The 30-lb front rest supports exactly half the weight of the rifle and is used to set gross elevation. Windage and fine elevation is controlled in the rear. Straightpipes also designed and built his beefy front rest himself. As with his rear coaxial unit, the front rest pieces were all shaped by hand on a belt sander after being milled out. Straitpipes even “finish-sculpted some pieces with hand files the old craftsmen way.” The main center support column was milled with extremely fine threads. This allows the captain’s wheel to turn with little effort and no locking mechanism is required. Straightpipes does not need to fuss with locking knobs when he sets gross elevation. To help keep the unit from binding, there are stainless guide shafts on the left and right. These shafts slide in oil-impregnated bronze bushings.
40-lb Barrel Block Heavy Gun with Savage Action
Straightpipes built this beautiful set of rests to work with his 40-lb Heavy Gun. Chambered in 7mm WSM, the gun features a Savage Target Action, and a Brux 32″, 1.300″ straight-diameter barrel fitted with a custom barrel nut. The barrel is clamped forward of the action in a 9″-long barrel block. This allows the Savage action to free-float. The block, also built by Straightpipes, looks fairly standard, but it has some clever design features. Between the barrel and the block there is sleeve that is slightly compressed when the block’s bolts are tensioned. This sleeve, made of a proprietary material, eliminates metal to metal contact between barrel and block. Straightpipes believes this enhances accuracy and provides some damping. Other shooters with barrel-block guns have used epoxy between block and barrel, but that makes disassembly difficult. The sleeve system on Straightpipes’ gun allows the barreled action to be easily removed from the stock. In addition, the compressed sleeve system is very stable — Straightpipes doesn’t have to fiddle with the bolt torques on his block.
‘Black Beauty’ Stock Made from Resin-Soaked Laminated Wood, with Rust-Oleum Finish
Straightpipes built the beefy stock himself. It is made from “red oak” wood soaked in resin and then laminated together with JB Weld. The rear section features a polished aluminum buttplate and twin metal “runners” on the underside, where the stock rides the Protektor Cordura bag. Straightpipes says the stock is very stable: “it absolutely does not flex or warp with changes in temp or humidity”. We asked Straightpipes about the stock finish. To our surprise, “Pipes” revealed he used inexpensive Rust-Oleum fine texture outdoor furniture paint. “Pipes” told us: “I’ve been using this stuff for years. It’s abrasion proof and tough as nails — the bags won’t wear it off. It’s solvent-proof, won’t get soft or bubble up. It cleans up with a damp cloth, just rub it down and it looks like new.”
As designed and crafted by Straightpipes, this Heavy Gun rest system is impressive. The rear rest is brilliantly simple, and beautifully finished. But the important question is: “how does it shoot?”. Straightpipes reports that the whole system exceeds his expectations: “The rear rest actuation is smooth and positive. It works smoothly in conjunction with the front rest. Everything is working together — there’s nothing that’s fighting another element of the system. The gun tracks straight. When it returns to battery, the thing is pretty much waiting for you shot after shot.” The rear rest’s small footprint allows the “driver” to sit comfortably behind the rig. Straightpipes reports: “Shooters can ‘address the rifle’ just like a Light Gun — you’re not straining to wrap your arm around something overly massive. Anybody can shoot this, it’s a very easy gun to shoot.”
Is it accurate? In a word, “Yes”. Straightpipes doesn’t want to make claims before the rig has been tested in competition, but he says it has “shot groups at 600 and 1000 yards that would be very competitive.” We promised not to publish group sizes yet, but we can tell you that at 600 yards in good conditions it drilled some “scary small” 5-shot groups, well, well under 1/4 MOA.
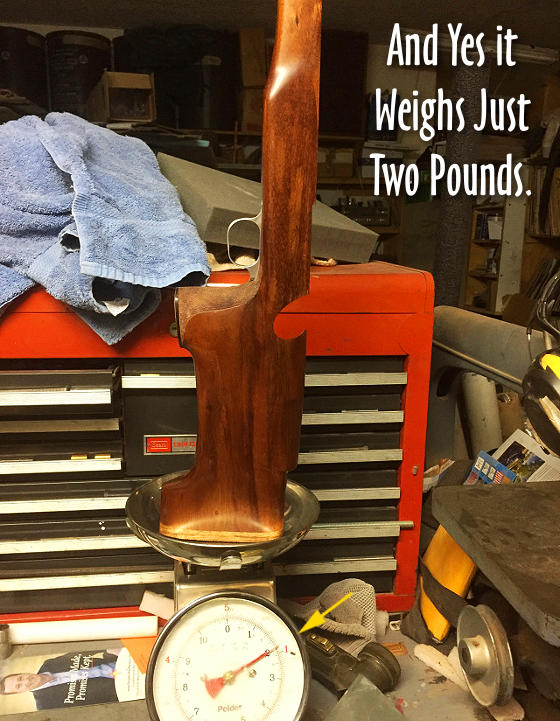
Gunsmith/stockmaker Doan Trevor created a lovely, one-of-a-kind silhouette stock for an Anschutz rimfire action. Built as a true custom design, this stock combines ideal standing position ergonomics with light weight — the entire stock weighs a mere two pounds. This project really showcases Doan’s remarkable skills with wood. Read the full story about this project (with more photos) at DoanTrever.com.
Doan explains his design process: “A customer came to me wanting to know if I could build a silhouette stock that was 2 pounds or less. I used the Koa wood because it is a lower specific gravity than Walnut (which makes it lighter) and stronger. I was still able to use pillar bedding and keep the weight down. The fore-end could be shortened to reduce the weight even more.
Since the drops on a silhouette rifle are different than a prone rifle, I kept the pistol grip from the prone rifle which is comfortable and tried to come up with a higher cheek piece and more drop to the buttplate. All of this required lots of hand carving.”
Sako Ltd. was founded on April 1, 1921. So this week Sako celebrates its 100th birthday. Now part of the Beretta firearms family, this prestigious Finnish firearms manufacturer has a rich history of producing quality rifles constructed by skilled master craftsmen.
The original Sako factory was established as part of the Finnish Civil Guard and was designed to meet its gun repair needs. The workshop became an independent financial unit on April 1, 1921. Sako marks that date as its moment of establishment. The workshop was initially called Suojeluskuntain Ase-ja Konepaja Osakeyhtiö (Civil Guard Firearm and Engineering Co Ltd). In 1927, it became a limited company with its name abbreviated to the acronym Sako.
The company then moved from Helsinki to a factory site in Riihimäki, where it continues to operate to this day. In Riihimäki, the assembly of a new model of rifle, the M28, began. Nicknamed ‘Pystykorva’ (the dog breed ‘Spitz’), this rifle proved to be of even better quality than similar weapons being used by Finnish defense forces. Simultaneously, the company also began to manufacture cartridges.
During the 1950s, Sako entered the U.S. market. The Sako L46 rifle impressed American hunters. The L46’s build quality and excellent performance quickly drew loyal American customers, and exports of Sako products to the USA steadily increased year after year.
One Million Tikka T3s Have Been Sold
For the past 21 years, Sako has seen major growth in yearly product volumes. In 2020, Sako manufactured and sold the one-millionth unit of the Tikka T3, a rare feat for any bolt action rifle. 2020 also saw the launch of the revamped Sako S20 hybrid rifle. This versatile rifle allows the user to switch between hunting or precision shooting by simply exchanging the fore-end and stock.
Also, Sako reached its all-time production record at more than 113,000 rifles produced in a year and broke its record for cartridge production with more than 11 million cartridges made. Additionally, Sako launched its first copper bullet designed and manufactured in-house, the Sako Powerhead Blade.
In 1996, Sako saw a huge success in their Sako 75 range of products, which was Sako’s first model to be designed as new from the very beginning. This success launched Sako into its next step with major international sales. In 1999, Beretta Holding Group acquired all the company’s shares. “At Beretta USA, we are proud to partner with the highly skilled and experienced men and women of SAKO as they continue to innovate and deliver top-quality, high-performing, precise, and reliable rifles to our demanding American customers,” Francesco Valente, GM and COO of Beretta USA, said.
This video shows the process of cut-rifled barrel-making by Krieger Barrels, one of the world’s best barrel manufacturers. Krieger cut-rifled barrels have set numerous world records and are favored by many top shooters. The video show the huge, complex machines used — bore-drilling equipment and hydraulic riflers. You can also see how barrels are contoured, polished, and inspected.
For anyone interested in accurate rifles, this is absolutely a “must-watch” video. Watch blanks being cryogenically treated, then drilled and lathe-turned. Next comes the big stuff — the massive rifling machines that single-point-cut the rifling in a precise, time-consuming process. Following that you can see barrels being contoured, polished, and inspected (with air gauge and bore-scope). There is even a sequence showing chambers being cut.
Click Arrow to Watch Krieger Barrels Video:
Here is a time-line of the important barrel-making processes shown in the video. You may want to use the “Pause” button, or repeat some segments to get a better look at particular operations. The numbers on the left represent playback minutes and seconds.
Krieger Barrel-Making Processes Shown in Video:
00:24 – Cryogenic treatment of steel blanks
00:38 – Pre-contour Barrels on CNC lathe
01:14 – Drilling Barrels
01:28 – Finish Turning on CNC lathe
01:40 – Reaming
01:50 – Cut Rifling
02:12 – Hand Lapping
02:25 – Cut Rifling
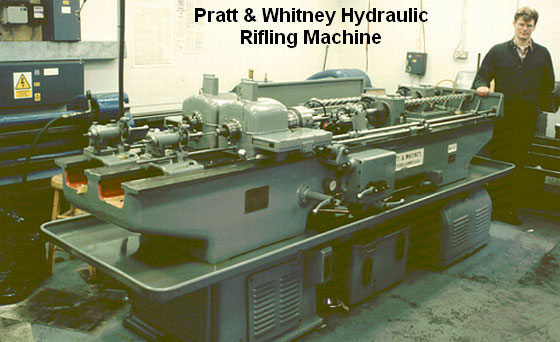
“At the start of World War Two, Pratt & Whitney developed a new, ‘B’ series of hydraulically-powered rifling machines, which were in fact two machines on the same bed. They weighed in at three tons and required the concrete floors now generally seen in workshops by this time. Very few of these hydraulic machines subsequently became available on the surplus market and now it is these machines which are sought after and used by barrel makers like John Krieger and ‘Boots’ Obermeyer. In fact, there are probably less of the ‘B’ series hydraulic riflers around today than of the older ‘Sine Bar’ universal riflers.” — Geoffrey Kolbe, Border Barrels.
This Armalite AR-50A1 .50 BMG rifle was modified by G.A. Precision.
If you’re a fan of big boomers, and love shooting steel, then definitely watch this Wide Open Magazine video. This covers a .50 BMG build by our friends at G.A. Precision (GAP). The rifle started as an Armalite AR-50A1 ($3359.00 MSRP). Then GAP fluted the barrel and swapped the factory muzzle brake with a more compact brake from American Precision Arms*. Then, as modified, the entire rig was given a rugged Cerakote finish.
The video has nice background music, great aerial drone footage, and of course some serious firepower. Using Hornady .50 BMG ammo, GA Precision’s George Gardner and his Wide Open friends shoot the big Fifty from the bench as well as prone. Enjoy!
About the .50 BMG Cartridge
The .50 Browning Machine Gun (.50 BMG, aka 12.7×99mm NATO or 50 Browning) is a cartridge developed for the Browning .50 caliber machine gun in the late 1910s, entering official service in 1921. Under STANAG 4383, it is a standard cartridge for NATO forces as well as many non-NATO countries.
John Browning had the idea for this round during World War I in response to a need for an anti-aircraft weapon, based on a scaled-up .30-06 Springfield design, used in a machine gun based on a scaled-up M1919/M1917 design that Browning had initially developed around 1900. According to the American Rifleman: “The Browning .50 originated in the Great War. American interest in an armor-piercing cartridge was influenced by the marginal French 11 mm design, prompting U.S. Army Ordnance officers to consult Browning. They wanted a heavy projectile at 2700 FPS, but the ammunition did not exist. Browning pondered the situation and, according to his son John, replied, ‘Well, the cartridge sounds pretty good to start. You make up some cartridges and we’ll do some shooting’.”
* In the video, George mistakenly says “American Patriot Arms”, but the brake is made by Georgia-based American Precision Arms.
This article was originally written by noted rimfire gunsmith Bill Myers. Sadly, Bill passed away in May 2010, but his legacy lives on. He pioneered many advancements in rimfire gunsmithing and Myers-built guns still win matches in benchrest competition.
Crafting competitive rimfire benchrest rifles is considered an art as much as a science. The smith must understand subtle, yet critical aspects of vibration control, barrel tuning, and rifle balance. In the United States, only a handful of gunsmiths consistently turn out rimfire BR rifles that consistently run at the front of the pack at major matches. Bill Myers was one of those master craftsmen. In this article Bill discussed the process of building a winning rimfire BR rig. He reveals some interesting secrets, including his procedures for testing bedding performance and his barrel indexing system. Bill’s methods obviously work, as the Suhl-actioned rifle featured here won a truckload of trophies in its very first match.
Building a Match-Winning Rimfire Benchrest Rig
by Bill Myers
In my opinion, a winning rimfire benchrest rifle is probably twice as difficult to build as a competitive centerfire rifle. The relatively slow .22 LR bullets stay in the barrel much longer than centerfire bullets. This means that vibration control is critical. Likewise bedding is critical. Bore finish and lapping are very important. The amount of bore taper or “choke” can have a huge effect on accuracy. Ignition is also very important and above all, rimfire BR rifles need a very stable stock that tracks perfectly. A rimfire that shoots great is a complete marriage of all components and of the shooter’s need to be aware of everything possible.
Click Photo to Zoom
The rifle featured in this article was built from scratch with attention to all the details that go into accuracy. The goal was to build a gun that could win from the get-go. This would be a “Spec Gun”, meaning a rifle that was personally tested and tuned by me for optimum performance before it went out to the customer.
The Suhl trigger is as good as it gets so no change was needed. It easily adjusts down to about 2 ounces.
Baer Stock in Bubinga Wood
There are many choices when you start to build a complete rifle. It has to shoot well and it has to catch ones eye, or it’s just another rifle on the line. I prefer wood stocks on rimfires for two reasons: they are very stable if the right wood is used and they have a certain traditional appeal to many shooters. I chose Bubinga wood for this particular gun because it is very stable and heavy, it has a very dense grain and a very pronounced figure with a natural red color. The Bubinga is a very forgiving wood to work with.
Gerry and Bruce Baer in Pennsylvania do all my stock blanks. I do all my own inletting and bedding. The blank weighed 4.5 pounds when it came off of Bruce Baer’s duplicator. This Bubinga wood is so hard that it did not need pillars, but I put them in anyway. I bed all my stocks with Loctite Steel Bed liquid and add filler to desired thickness. The final bedding is done with an aircraft tooling epoxy that does not deteriorate over time. The stock has an ebony butt plate and six (6) coats of automotive clear, polished to a “high buff” finish.
Suhl 150-1 Action Accurized and BN-Nickel Plated
I used a new, unfired Suhl 150-1 action. As explained in the sidebar below, the Suhl 150 actions were originally crafted in East Germany for position rifles. They have a very fast lock-time and come with an outstanding trigger. However, they need some work when adapted to a modern BR gun. The action needed to be accurized and threaded. I have a special tool that I use to accurize actions. It uses two sets of spiders for dialing-in the bolt raceway. After the bolt raceway is running true, one can thread and true up all bearing surfaces so that everything is in perfect alignment with the action raceway bore.
BN-Nitride Plating on Action
I decided to plate the action and all bolt parts with Boron Nitride nickel plating. I bough the BN Electroless Nickel Kit from Caswell Plating and did the job myself. I started by bead-blasting the action so that it would end up with a “satin” finish. The plating material is then applied in a tank. The Boron Nitride goes directly into the plating solution, but you need to use a pump to keep the solution agitated so the BN distributes evenly.
Once the action is completely ready (the metal must be perfectly prepped, with no contaminants), the process goes easily and can be completed in about half an hour. The end result is a very slick, low-friction finish, that is .0002″ (two ten-thousandths) thick and hard as glass. The Boron Nitride makes everything very smooth. After the plating job, the action was noticeably slicker than before.
The cone breech (photo below) permits the barrel to be INDEXED (rotated around bore axis) to any position on the clockface. You then test various rotation settings to find the best accuracy. The system does work. Some barrels shoot best in a particular rotational setting. E.g. with index mark at 3 O’clock vs. 12 O’clock.
Fitting and Chambering the Barrel
As for a barrel, I had two good choices: one Shilen 1:16″-twist, 4-groove ratchet and one Benchmark 1:16″-twist, 3-groove. Both barrels were very accurate and at the end, I decided to leave the Shilen on the rifle because I wanted to put the Benchmark on another Suhl I’ve set aside for myself. I chambered the barrel for Eley flat nose EPS. We’ve found the gun also shoots the new Lapua X-ACT ammo very well.
The barrel finished at 25″ long and features a tuner by the Harrell brothers of Salem, Virginia. I use a flat 90° crown–it’s the most accurate and its gives a good seal against the tuner. I also use a 45°, 12-flute cutter that leaves no burr when cutting the crown. This chamfer protects the crown when cleaning the barrel. There is no sharp edge for the brush or jag to hit on the return stroke. The barrel was headspaced at .043″ and I use a tapered reamer ground by Dave Kiff of Pacific Tool & Gauge in Oregon. The chamber leade area is lightly polished to remove reamer burrs. The breech end of the barrel is machined with a 1/2″ ball end mill to produce what I call a “Myers cone breech.” Technically, it has a sloping radius as you can see, rather than a straight-sided cone. Finishing the breech in this fashion facilitates indexing the barrel, as the barrel can be rotated to any position (on the clockface), without requiring new extractor cuts.
Barrel Indexing — Finding the “Sweet Spot”
When indexing a barrel, one rotates it to different clockface positions relative to the action. Imagine marking a barrel at TDC or 12 o’clock, and then rotating it so the mark is at 3 O’clock, 6 )’clock, 9 O’clock and so on. At each position one shoots groups to determine at which index setting best accuracy is achieved.*
I know that barrel indexing is controversial. I don’t want to get into a lengthy debate other than to say that I believe that careful and thorough testing can reveal a “preferred” index position for a good barrel. With the barrel set in that particular position relative to the action I believe the barrel can yield optimal performance.
I perform the indexing tests indoors at 50 yards. I use a rail-gun with floating action. The barrel is held in place with a clamping fixture similar to an Anschutz 2000-series action. Basically, two vertically-stacked metal blocks clamp around the barrel. I can index the barrel this way simply by unclamping the barrel blocks, rotating the barrel and then re-clamping the system. I have a special system so the action can stay in the same position, even as the barrel is rotated.
It takes time and effort to get solid indexing results. Normally I shoot at least 400 rounds of ammo in 3-4 indexing sessions. Shooting a handful of groups is not enough. You may think you’ve identified the best index position, but you need to shoot many more rounds to verify that. Also, in a very good barrel, the effects of indexing may be subtle, so it will take many groups to confirm the optimal position. In my experience, really good “hummer” barrels do not benefit as much from indexing as an “average” barrel.
Accuracy Testing with Both Barrels
I tested the rifle indoors at 50 yards at the Piney Hill Benchrest Club range. There was no finish on the stock, but it shot well in my one-piece rest with the Benchmark 16-twist, 3-groove barrel and no added weight on the tuner. I shot 30 rounds of Eley Match EPS Black Box (1064 fps) and had 25 Xs and five 10s on the IR 50/50 style target. Not too shabby for a new barrel with no special break-in.
When the Shilen barrel arrived, I installed it on the rifle. By this time the stock had been clear-coated and finished, and the action had been polished and plated. I shot the Shilen barrel outside since it was too hot in the building. The first target was a 250-19X with a new lot of Eley Match EPS Black Box (1054 fps). The gun shot well. My friend Tony Blosser asked to shoot the gun, and he drilled a 250-20X in a steady wind using the same Eley ammo. See target at right.
Advanced Procedures — Vibration Control and Tuner Position
Barrel Tuning Using 2-Way Electronic Indicators
Before competing with this rifle, I put it in a firing fixture I use to tune the barrel. I employ a pair of very expensive Swiss 2-way electronic min/max hold indicators. These measure both up movement and down movement of the barrel as the gun is fired. I can measure the actual vertical travel of the barrel at any position from the front of the receiver to the tuner. I can also tell how long the barrel vibrates, time-wise. Using this fixture I found that the Shilen barrel was very consistent in readings and seemed to work well with no additional weight on the tuner. No barrel ever stops vibrating completely — but this was close, showing less than .002″ of total movement.
Bedding and Vibration Control
I have found that measuring the actual movement of the barrel during firing tells me a lot about the quality of the bedding. I have learned that if I see very big movements (e.g. .010″ up and .005″ down), then there may be a problem with the bedding. I saw this kind of big swing on a rifle with bedding that had not cured properly.
Another pattern I watch for is uneven vertical movement. For example, if the barrel vibrates .008″ up but only .002″ down, that tells me the bedding has issues. As noted above, I look for minimal vibration travel (after the tuner is fitted and optimized), and I also want that travel to be relatively equal both up and down. Good rimfire gunsmiths agree that proper bedding has an important influence on vibration control and tuning. By measuring actual barrel movement during firing, we can, to an extent, quantify how well the bedding is working. At a minimum, we can see if there’s a serious bedding problem.
Trial by Fire — Shooting the Gun in Competition
After semi-gluing in the action, the rifle was shooting great. So, I decided to take it to the Maryland State Unlimited Championship to see if it was truly competitive — whether it could “run with the big dogs”. As it turns out, the Bubinga Suhl was more than just competitive. The rifle won three of the six cards and won the meters championship. In the photo below you can see all the trophies the gun won in its very first match. One of the other competitors in Maryland, dazzled (and perhaps a bit daunted) by the Bubinga Suhl’s stellar performance, told me: “Sell that gun Bill. Whatever you do, just get that darn rifle out of here.” Confident that this was a rifle capable of winning major matches, I packed up the rifle and shipped it to Dan Killough in Texas. Killough has shot some impressive scores with the gun.
Suhl Target Rifles — East Germany’s Legacy
Suhl 150 rifles were manufactured in former East Germany (GDR) by the Haenel firearms factory in the town of Suhl. This region has a long history in arms production. In 1751, Sauer & Sohn founded the first German arms factory in Suhl. Following WWII, Suhl 150s were produced for Communist Bloc marksmen, including East German Olympic shooters. Prior to German unification, the East German national shooting arena was located at Suhl and hosted many top-level competitions including the 1986 ISSF World Championships.
Superb Rifles with Amazing Triggers
As a product of East Germany, the “mission” of the Suhl 150 was to rival the accuracy of the Anschütz, Walther and other premium match rifles built in the West. East German shooting teams wanted to finish on top of the podium, so they needed a rifle with superb inherent accuracy. The Suhl 150s have an outstanding trigger that can be adjusted down to about two ounces. The Suhl 150 action, like the Anschütz 54, boasts an extremely fast lock-time — an important factor in a position rifle. And Suhl barrels were legendary for accuracy.
Suhl 150 Benchrest Conversions
Many of the first used Suhl 150s that made it to America were converted to Benchrest rifles because the action/trigger/barrel combination was unbeatable for the price. Some of the barrels on these “surplus” Suhls were phenomenal — as good as any custom barrels available today. It was not unknown for a Suhl 150 barreled action, transplanted into a benchrest-style stock, to win BR matches with the original barrel. Today, however, most of the Suhl benchrest conversions end up with modern, American-made barrels. While some older Suhl barrels can “shoot with the best of ‘em”, new barrel designs optimized for use with tuners have an edge, at least in benchrest circles. That’s why builders such as Bill Myers swapped out the Suhl barrel with something like a Benchmark reverse-taper two-groove.
Today Suhl 150 rifles are very hard to find in North America. In 2006, a used Suhl 150, even without sights, might fetch $1200.00 or more. Then, in 2007 through early 2008, hundreds of Suhl match rifles were imported. This drove prices down, and those “in the know” snapped up complete Suhl 150s at prices ranging from $450 to $850 (see 2007 advert at right), depending on condition.
Many of these rifles were left “as built” and used successfully in prone competition. Others were converted into benchrest and silhouette rifles, “parted out” for the actions and triggers. If you were able to grab one of those imports at a good price–consider yourself lucky.
* Bill Myers actually created his own clamping rimfire action to facilitate barrel indexing. CLICK HERE for Myers Rimfire Action. To index the barrel, Myers simply loosened three clamping-bolts and rotated the barrel in the action. Because there is no thread to pull the barrel in or out, the headspace stays the same no matter how much the barrel is rotated. With a threaded action, you might have to use shims to test different rotational positions, or otherwise re-set the shoulder with each change.


 20 Practical Ultimate Varminter


 The .300 AAC Blackout aka “300 BLK”, is a compact 30-caliber cartridge designed to work in AR-15 rifles. It has a shorter cartridge case to accommodate the bigger 30-caliber bullet while still fitting in a standard AR-15 magazine. Unfortunately, that’s the danger. A careless shooter can toss a .300 Blackout cartridge in with .223 Rem rounds without noting. And because the case-head size is the same as the .223 Rem (5.56×45) the rifle’s bolt assembly will happily chamber and fire the .300 BLK round. Problem is, that forces a .308 diameter bullet down an undersized .223-caliber bore. Not good!


 About Jesse Kaufmann, Master Engraver


 Here’s a great YouTube video that shows the creation of a high-end, 22-250 varmint rifle from start to finish. The rifle was crafted by Chad Dixon for O’Neill Ops. Once the build is complete, the video shows the rifle being tested at 440 yards. With the camera filming through the scope, you can even watch the trace, starting at the 2:36″ time mark (this is very cool).


 Accurized and BN-Nickel Plated
 BN-Nitride Plating on Action
 Fitting and Chambering the Barrel
 Accuracy Testing with Both Barrels


 Today Suhl 150 rifles are very hard to find in North America. In 2006, a used Suhl 150, even without sights, might fetch $1200.00 or more. Then, in 2007 through early 2008, hundreds of Suhl match rifles were imported. This drove prices down, and those “in the know” snapped up complete Suhl 150s at prices ranging from $450 to $850 (see 2007 advert at right), depending on condition.


