We first ran this story a couple seasons back. Since they we’ve received many questions about this gun, so we thought we’d give readers another chance to learn about this truly innovative, switch-barrel “convertible” rifle. This gun works for both short-range and long-range benchrest matches.
You interested in a really wild, innovative bench gun that can shoot both short-range and long-range matches? Check out Seb Lambang’s latest “do-it-all” rifle. It’s a switch-barrel rifle combining two very different chamberings: 6 PPC and .284 Winchester. With that caliber combo, Seb’s covered from 100 yards (LV/HV mode) all the way out to 1000 (LR Light Gun mode). But the dual chambering is not the rifle’s only trick feature. Exploiting the new long-range benchrest rules, Seb has fitted a 3″-wide, flat rear metal keel to the buttstock. That counter-balances his 30″-long 7mm barrel, improves tracking, and adds stability. Seb built the stock and smithing was done by Australian gunsmith David Kerr.
Detachable Hammerhead Wing Section Plus Fat-Bottom Keel
To further reduce torque and improve tracking, the stock features an 8″-wide, detachable fore-end fixture. This “hammerhead” fore-end section has extended “wings” on both sides, making the rifle super-stable. The hammerhead unit can be removed, leaving the stock 3″ wide for use in registered benchrest matches where 3″ is the maximum width. The photos below show Seb’s gun in .284 Win Long-Range (LR) Light Gun mode.
Manners Composite Stocks produces some of the best tactical, hunting, and competition stocks you can buy. Learn more about Tom Manners’s company in an insightful Factory Tour Story in LongRangeHunting.com. Author David Fortier recently visited Kansas City, Missouri to tour the Manners Composite Stocks factory. There, Fortier found an impressive facility, with 37 employees producing stocks under the guidance of founder Tom Manners.
The history of Manners Composite Stocks is a classic American success story of dedication and hard work. Tom Manners, a competitive long-range shooter, started producing stocks at home as a hobby. Demand for stocks rose and Tom had to finance expansion. To do that, Manners sold his beloved 427 Cobra replica to purchase a mill and compressor, and pay shop rent for a year. After that initial sacrifice, business has boomed. Tom’s dedication has been rewarded. Fortier reports:
Since he expanded from working at his home, [Tom’s] business has grown by 30 to 40 percent every year. Within five years he had outgrown the shop and secured a larger facility. Business growth has continued, and when I met with him he had just added another 4,000-square-foot building. Today he has 37 employees and runs two shifts trying to keep up with orders. Over the years, his offerings have steadily grown. Some of his biggest supporters have always been George Gardner (G.A. Precision) and Marty Bordsen (Badger Ordnance). They combined and created one of his first tactical stocks, the MCS-GAT. This stock became his first piece to be torture tested. To see just how rugged it was, he took it and put it on the arms of a chair and stood on it (USMC stock test) to try to break it. The stock shrugged off the abuse, so he used it to hit softballs, without issues. He then drove over it with a truck. When this failed to harm it, he put angle iron under each end and parked the truck on it. Despite all the abuse, it never failed and therefore the MCS-GAT caught people’s attention.”
This is the kind of family-friendly, “feel-good” story we like. Texan Richard King created a rimfire benchrest rifle using a classic Martini Mark III smallbore action. He fitted the gun with a new flat, wide forearm and a new buttstock, allowing the gun to sit steady on the bags and track smoothly. The narrow action was also fitted with a cantilevered top rail to hold a high-magnification scope.
Here is Vicki King, with Martini Mark III and her trophy.
But here’s the best part. Richard provided this updated classic to his wife Vicki, who proceded to win a rimfire benchrest match (Vintage class) with the old Martini. Richard reports: “Here is my lovely wife with her High Overall Vintage trophy. That is a Martini Mark III that I re-stocked in walnut for 50-yard, .22-caliber benchrest matches. It’s great to have her shooting with me again.” FYI, last summer Richard and Vicki celebrated their 50th wedding anniversary!
Bravo Richard — kudos to you AND to your lovely bride. It’s great to see a couple shooting together. It’s also great to see a classic rifle brought back to the winner’s circle with some inspired stock-work and other upgrades.
Here is Richard King, with his handiwork — an updated Martini Mark III smallbore rifle.
Our Irish Friend Enda Walsh has been working overtime on a new project, and it’s a beauty. Enda has produced some stunning wood stocks for long-range F-Class applications, and now he’s come up with a new design for the short-range rimfire game. Enda’s new stock combines an ergonomic, prone-style grip area with a stiff, carbon-reinforced fore-end. The very front of the stock features “winglets” for smooth bag-riding. Believe it or not, this stock weighs under two pounds!
Enda tells us: “This Benchrest stock was the most time-consuming job I’ve done in a while as there was a two-pound weight limit. I used black walnut and carbon fiber to achieve a very strong yet lightweight stock. The stock features a lacquer finish and the .22LR Anschütz action was pillar-bedded into the stock. I’m delighted to have ended up with a stock weight of one pound, 15 ounces.”
About Enda Walsh, Master Stock-Maker
There are few master craftsmen who can create a truly “bespoke” wood stock customized for the owner. Ireland’s Enda Walsh is one such talent. Through Custom & Precision Rifles Ireland, Enda creates high-quality stocks for hunters, prone shooters, and F-class competitors. Enda first started building stocks in 2001 for himself and friends, and grew the business over time. Enda explains: “Demand gradually increased until in 2009 the decision was taken to make it my full-time occupation. My goal with my business is to manufacture precise custom rifle stocks to the highest standard, tailored in every detail to best serve the shooters requirements.” Enda adds: “I started Guns Stocks Ireland (now Custom & Precision Rifles Ireland) to produce custom, individually-tailored gunstocks. I build from hand casts so your gun is genuinely an extension of your arm.”
When evaluating firearm finishes, one should consider hardness, chemical resistance, lubricity, abrasion resistance, and color. However, none of these factors are as critical as corrosion protection. The average firearm owner deals with corrosion more than any other finish-related problem. Accordingly, when selecting an exterior finish for the metal components of your guns, you should look for a product with superior corrosion resistance. Thanks to Cerakote, we now have some science to help you make that decision….
How well do various firearm finishes resist corrosion?
Watch the video below to find out.
Eight Gun Finishes Tested — With Surprising Results
Eight (8) various finishes are tested, including Blueing, Cerakote, DuraCoat, FailZero, Ion Bond, KG Gun Kote, NiBX, and Phosphate (Parkerizing). Eight metal firearm components (each with a different finish) are placed into the salt chamber to see how long it takes for each finish to show initial signs of corrosion. To provide a baseline for comparison, a “naked” 416 stainless steel barrel was also placed inside the test chamber. The test was started, and for each coating, the time was recorded when corrosion started to appear. FYI, if you thought “stainless steel” can’t rust, think again. The stainless barrel sample (along with the blued metal sample) showed visible corrosion after just 24 hours!
After 24 Hours in Salt Chamber
After 48 Hours in Salt Chamber
After 172 Hours in Salt Chamber
Salt Chamber Testing — 5% Salt Concentration at 95°F
According to ASTM B117-03, the Corrosion Test provides a controlled corrosive environment which has been utilized to produce relative corrosion resistance information for specimens of metals and coated metals exposed in a given test chamber. The salt chamber is set to a temperature of 95 degrees Fahrenheit with a 5% salt concentration. Salt Chamber testing is used to draw a comparison between metals and finishes and does not correlate to a specific number of hours of real world use.
Story tip by EdLongrange. We welcome reader submissions.
With today’s plastic-framed Glocks and Keltecs, aesthetics have been sacrificed on the altar of functionality. Not so in the early 20th century — in that period, the best firearm designers created guns that looked as good as they worked. One example is the classic Colt Woodsman. This design came from the legendary John Moses Browning and was later refined by Colt before the pistol’s introduction in 1915. The Colt Woodsman’s frame design evolved over time in three distinct series: Series One 1915–1947, Series Two 1947–1955, and Series Three 1955–1977. Shown below is a stunning Carbonia-blued and engraved Third Series model with ivory grips.
Click Photo to View Larger Image Photo courtesy NRA Museum
Engraved Colt Woodsman from NRA Museum
In the NRA Museum’s Robert E. Petersen Gallery are many fine engraved arms. This Colt Woodsman .22 pistol is one of the Third Series guns that were made until 1977. Heavy barrels in either 4.5 or 6 inch lengths were offered in this variation. The Museum’s staff says: “We think the poised golden rattlesnake near the serial number is the [best] embellishment without putting down in any way the ivory grip panels or gold outline inlays.”
You can see this lovely Colt and countless other fine firearms at the NRA Museum in Fairfax, Virginia. The Museum is open every day from 9:30 am to 5:00 pm, and admission is free.
Now through April 20, 2015, the Museum hosts a Theodore Roosevelt exhibit: “The Trappings of an Icon”. This includes Roosevelt memorabilia on loan from Sagamore Hill National Historic Site.
Our friend Robert Whitley of ARX Enterprises LLC has learned, through careful measurement and testing, that some barrels threaded 5/8″ x 24 tpi at the muzzle may not deliver optimal accuracy. The reason is that the end of the barrel can bell out slightly, like a trombone, because too much steel has been removed. This is particularly true with .30-caliber barrels, but it can also be a problem with smaller caliber barrels (even 6mm). Robert demonstrates this phenomenon in the video below. All gunsmiths, and anyone considering threading a barrel, should watch the video. At 1:00 – 1:30 Robert gauges a 5/8″ x 24-threaded .30-Caliber barrel. You can see the belling effect clear as day.
“When setting up a commercial barrel in the lathe, we noticed that the maximum-sized bushing that would fit in the bore at the chamber end was almost .0015” smaller [than what would fit] at the muzzle. That precipitated my pin-gauging of a number of different commercial barrels that were threaded for 5/8” x 24 tpi. What I found is what’s shown on the video.” – R. Whitley
Solve Problem with a Larger Thread Diameter
If 5/8″ x 24 threading is potentially harmful to accuracy, is there a solution? Yes, you simply need to leave a little more steel on the barrel. (See Video starting at 02:40.) Frank Green of Bartlein barrels states: “We get these questions all the time. I say run the largest thread diameter that is possible.” Robert Whitley has found that a 3/4″ x 28 tpi threading does not cause the “belling effect”. Accordingly Robert recommends 3/4″ x 28 if you need to thread your barrel for a muzzle brake or suppressor. Robert explains: “We only make 3/4” x 28 tpi muzzle brakes and that’s what we recommend to customers.”
“See how much meatier the 3/4″ threading is vs. the 5/8″. The 3/4″ threading offers a lot more metal around the bore. There’s a lot less opportunity for the bore to become bell-mouthed…” – Robert Whitley
Barrel Threading Diameter — What’s Important to Know By Robert Whitley
In truth, the 5/8” x 24 tpi threading never came out of any accuracy-based think tank or set-up, it’s a military .30-Cal threading for barrels that someone has to carry around (they needed to keep the barrel weight down so it was smaller in diameter and the threading had to work with that situation). People have somehow assumed because the military uses that threading for certain things that it must mean that it’s also fine for a highly accurate rifle too, but that’s not really correct.
I don’t think there is any better and realistic option than the 3/4” muzzle threading, and we also do it so there is no relief cut behind the threads on the barrel (i.e. put the relief cut on the brake or jam nut, don’t chop down on the muzzle of the barrel). For some reason many have a hard time grasping that the metal at the muzzle end of a rifle is “sacred” and you should not cut it down any more than absolutely necessary. A little threaded pencil diameter nub on the end of a barrel is not ideal for accuracy especially if it’s threaded and you need to torque on it. I cringe when I see a barrel with something like an MTU or Heavy Varmint contour, only to have an itty-bitty pencil thin threaded nub right at the muzzle so someone can “screw on a can” or a muzzle brake.
Lessons Learned Over the Years
A number of years ago I did a 30BR rifle project with Craig Kostyshyn who was big in the 30BR game and he made some of the best 30BR rifle barrels for benchrest competition. When I did the project I wanted a medium-heavy Palma type contour barrel I could use and also have a muzzle turndown for a front sight band. When he found out I was going to have the muzzle turned down he said “whoa, I need to provide for that when I make the barrel because if you turn the front down later you’ll be shooting a trombone” (i.e. the muzzle bore dimension would open up).
What he did was rough contour the barrel with the turndown (about .010” oversize) before he lapped the barrel, then when he lapped the barrel he took it easy in the muzzle area and worked the back of the barrel more. I thought he was a little bit excessive in his concerns but the barrel shot great and I wasn’t going to argue with him, after all he was shooting groups in the ones. I kind of just filed that away and never thought about it until recently when I went to have Fred from Sabreco do some chamber re-work on a commercial .30-caliber barrel I had. When setting up the barrel in the lathe and indicating things Fred noticed that the maximum-sized bushing that would fit in the bore at the chamber end was almost .0015” smaller [than what would fit] at the muzzle and he mentioned it to me. That precipitated my pin- gauging of a number of different commercial barrels I had that were threaded for 5/8” x 24 tpi. What I found is what’s shown on the video.
NOTE: This is a copyrighted article. Do not reproduce or re-link more than 75 words without written permission from AccurateShooter.com.
Advancements in barrel technology in recent decades have been impressive. Today’s premium barrels deliver accuracy that could only have been dreamed-of decades ago. And now a new development promises to help barrel-makers craft the most uniform, consistent, and stable barrels ever.
What’s the new technology? You may be surprised. It’s not a surface treatment, or a cryogenic bath. The latest development in barrel manufacturing is Degaussing — the process of de-magnetizing metal objects. Degaussing is now used in many industries to uniform metallic products and to prevent unwanted interactions with magnetic fields. LEARN MORE.
Degaussing is the process of decreasing or eliminating a remnant magnetic field. It is named after the gauss, a unit of magnetism, which in turn was named after Carl Friedrich Gauss.
At the recent IWA show in Germany, Vallon GmbH, a German manufacturer of degaussing machines, told us that two major Wisconsin barrel-makers have purchased Vallon industrial degaussing units. The units sold to the American barrel-makers are similar to Vallon’s EMS unit show below. This can degauss (i.e. de-magnetize) 50 barrel blanks in one pass.
The Vallon degausser works by passing the barrel steel through a coil. Vallon explains: “The density of magnetic field lines is at its maximum in the coil centre, and is strongly decreasing towards the outside. If a ferromagnetic work piece (steel) is introduced into the coil, the field lines are concentrating and flooding the work piece. The conductivity of steel is up to 800 times higher than that of air. Degaussing is done during a continuous movement of the work piece, leading out of the coil. Decreasing field strength is achieved by a slow extraction from the coil.”
How Degaussing Improves Barrel Steel and Rifle Performance
So what does magnetism have to do with barrel performance? How can degaussing help make a barrel better? Vallon’s scientists tell us that degaussing has three major benefits. First, it aligns ferrous elements within the barrels, strengthening the steel at the molecular level from the inside out. Second, by reducing static surface charges, degaussing reduces chatter during drilling, which creates a straighter bore with a better surface finish. Lastly, there is evidence that degaussed barrels produce slightly more velocity. When a copper-clad bullet spins through a non-degaussed (magnetically-charged) barrel, this creates waste electrical energy. The energy expended reduces velocity very slightly. You can see this effect yourself if you spin a copper rod in the middle of a donut-shaped magnet. This creates an electrical charge.
Here a barrel is checked after degaussing with a Vallon EMS. The meter records a zero magnetic value, showing complete degaussing success.
Degaussing Will Add $50.00 to Barrel Cost
We know what you’re thinking: “All right, degaussing seems beneficial, but how much will this add to the cost of my new barrel?” Based on off-the-record conversations with two barrel-makers, we estimate that degaussing will add less than $50.00 to the cost of a new barrel blank. That’s a small price to pay for greater accuracy and barrel life.
Ask a Sailor — F-Class Champion and U.S. Navy Veteran Explains Degaussing
We asked reigning F-TR Champion James Crofts about barrel degaussing. A U.S. Navy veteran, he immediately understood the potential benefits of this process. “I served in nuclear submarines. Since before World War II, the U.S. Navy degaussed its subs and smaller warships. This had many benefits. Principally, it helped reduce the risk of triggering magnetic mines. But that wasn’t the only benefit — the degaussing process gave the steel greater resilience and longevity. And that’s why the Navy degaussed non-combat vessels as well. Will a degaussed barrel shoot better? Honestly I can’t say. But based on my Navy experience, I bet degaussed steel will be more uniform and will last longer. I’m glad somebody is trying this out on rifle barrels. Put me on the waiting list!”
The above photo show a U.S. nuclear submarine during a degaussing (also called “deperming”) session. This reduces the vessel’s electromagnetic signature, making it more stealthy. Deperming also adds to the vessel’s longevity. With steel-hulled ships, static electricity builds up as the hull slices through the water. A powerful, constant static charge will cause the steel to deteriorate. Degaussing (deperming) helps prevent this, extending the life of the hull.
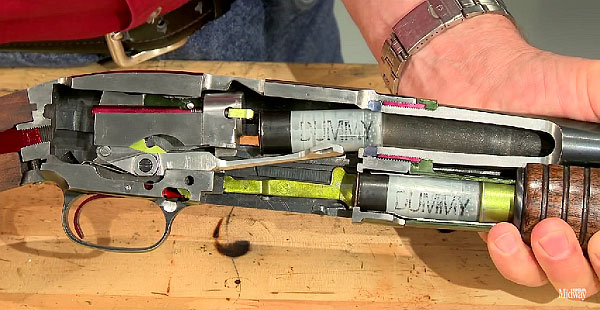
Even wonder how a pump shotgun works? Then watch this fascinating video from MidwayUSA. The operation of a pump-action shotgun is illustrated with a special cut-away version of a Winchester Model 12. The shotgun has been modified to reveal the inner workings. This cut-away Model 12 still loads and ejects dummy shells, but you can see how the lugs, slides, locks, ramps, springs and other internal parts work. You’ll be amazed how complicated this old pump-gun is. (The Model 12, Winchester’s first hammerless shotgun, is one of the most popular scatterguns ever made. Over 2,000,000 were sold.)
Skip Ahead to 3:00 to See Cut-Away in Action
To see how the Model 12 works, you can skip forward to the 3:00 minute mark in the video. The first part of the video shows how the Model 12 was “sliced and diced” to expose the inner workings. Larry Potterfield of MidwayUSA explains that “the factories often used cut-aways as sales tools to show how a specific model operated”. In addition the U.S. Military used cut-aways for training purposes.
Here is the cut-away completed. Even the pump grip has been sliced to reveal the inner workings.
Here’s a close-up, showing how the bolt retracts to eject a round.
A round has been picked up from the feed tube, and then is lifted into the chamber.
In a corner of the Blaser booth at the IWA show in Germany was a very special rifle — Blaser R8 Serial Number 100,000. This one-of-a-kind Blaser is blinged to the max, befitting its milestone status as the 100,000th R8. “Designed without compromise” this rifle features mind-blowing wood, and elaborate engraving. It is highly decorated with images of the Argali, a type of big-horned sheep.
CLICK Photo to See Large, Full-Screen Image (More Detail)
What’s in a number? Blaser tell us: “In serial number 100,000… Nothing short of perfection would be acceptable from the masters of wood and steel. Two internationally recognized artists were selected, each working in their unique mediums. Painter Rudi Kohl has drafted, in his signature style, a painstaking depiction of Argali, the king of wild sheep, in their natural habitat. Engraver Jürgen Göser was then responsible for implementation of the drafts. The master engraver went about his task in his usual manner, meticulously and with absolute attention to detail.” Skeletonized octagonal pistol grip cap and steel butt plate, inlayed with ebony, were then added to complete the frame.
This R8 has some interesting hardware. The barrel is a fluted octagonal tube, the first of its kind on a Blaser R8. Front and rear sights were custom-machined from billet to blend with the silhouette of the rifle. Both receiver and bolt housing were shaped and polished by hand.
Story Tip from EdLongrange. We welcome reader submissions.


 Our Irish Friend


 Ask a Sailor — F-Class Champion and