Are you re-barreling a match rifle and need to know if you will still make weight? Or perhaps you want to select the right contour to hit an optimal carry weight for a new varmint rifle? Dan Lilja offers FREE software that will calculate barrel weight for straight contour, straight taper, and radius-tapered barrels. Dan’s software even calculates how fluting alters barrel weight.
For general info on barrel weight calculation for straight and straight tapers, read this article on Lilja’s website. Click HERE for another article explaining weight calculation with barrels that have a radiused (curved) contour section.
Here are the free software programs offered by Dan Lilja. Right click and “Save As”:
Just another YouTube video … NOT. This video is a winner. If you want to see state-of-the-art 21st Century rifle-building, with advanced CNC milling operations, watch this clip. It shows how man and machine combine to create a fine custom rifle.
One of the best short features of its kind, this video shows the creation of a high-end, 22-250 varmint rifle from start to finish. All aspects of the build are covered. The rifle was crafted by Chad Dixon for O’Neill Ops. Once the build is complete, the video shows the rifle being tested at 440 yards. With the camera filming through the scope, you can even watch the trace, starting at the 2:36″ time mark (this is very cool).
Watch this Video in HD!
Any person with an interest in gunsmithing should watch this video. It shows barrel profiling, tenon-thread cutting, chambering, CNC stock inletting, bedding, and stock painting.
For this build, Chad Dixon of LongRifles, Inc. teamed up with O’Neill Ops. The video shows the “Coyote Rifle” build, step by step, from the cutting of the tenon threads, to the 440-yard field test at the end of the build. To learn more about this rifle’s components and its performance in the field, contact James O’Neill, www.oneillops.com, (605) 685-6085.
Chad Dixon of LongRifles, Inc.
Chad Dixon’s introduction to firearms began in 1991 as a marksmanship instructor and competitive shooter in the U.S. Marine Corps. Chad began building rifles in 2000 at the Anschutz National Service Center, where he worked with U.S. Olympic shooters. In 2003 Chad took a position with Nesika Bay Precision/Dakota Arms. After leaving Nesika, Chad deployed to the Middle East as a security contractor for the U.S. Dept. of State. On his return to the USA, Chad started LongRifles Inc., a custom rifle-building company.
Dixon-built rifles combine modern CNC manufacturing methods with traditional expert craftsmanship. Chad’s rifles have won major int’l and national level competitions in Smallbore, Smallbore Silhouette, High Power, and Long Range Palma disciplines.
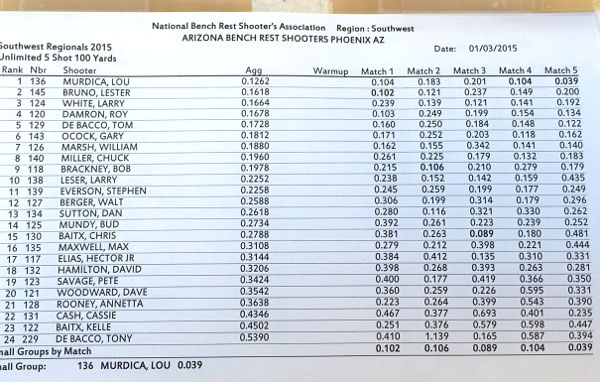
Sometimes superlatives really aren’t necessary. Just look at that target. Yes that is FIVE shots (although it truly appears like one hole). And it is centered! This remarkable group, measured at 0.039″, was shot by Lou Murdica in Phoenix on January 3, 2015. Lou drilled this group with his 6 PPC railgun. Rounds were loaded with Accurate LT-32 powder and Berger 65gr BT bullets. The target will be submitted to the NBRSA as a potential new 100-yard Benchrest record in the Unlimited (Railgun) Class. The current NBRSA record small group (Unlimited) is a 0.049 shot by Hall-of-Famer Gary Ocock in 2009.
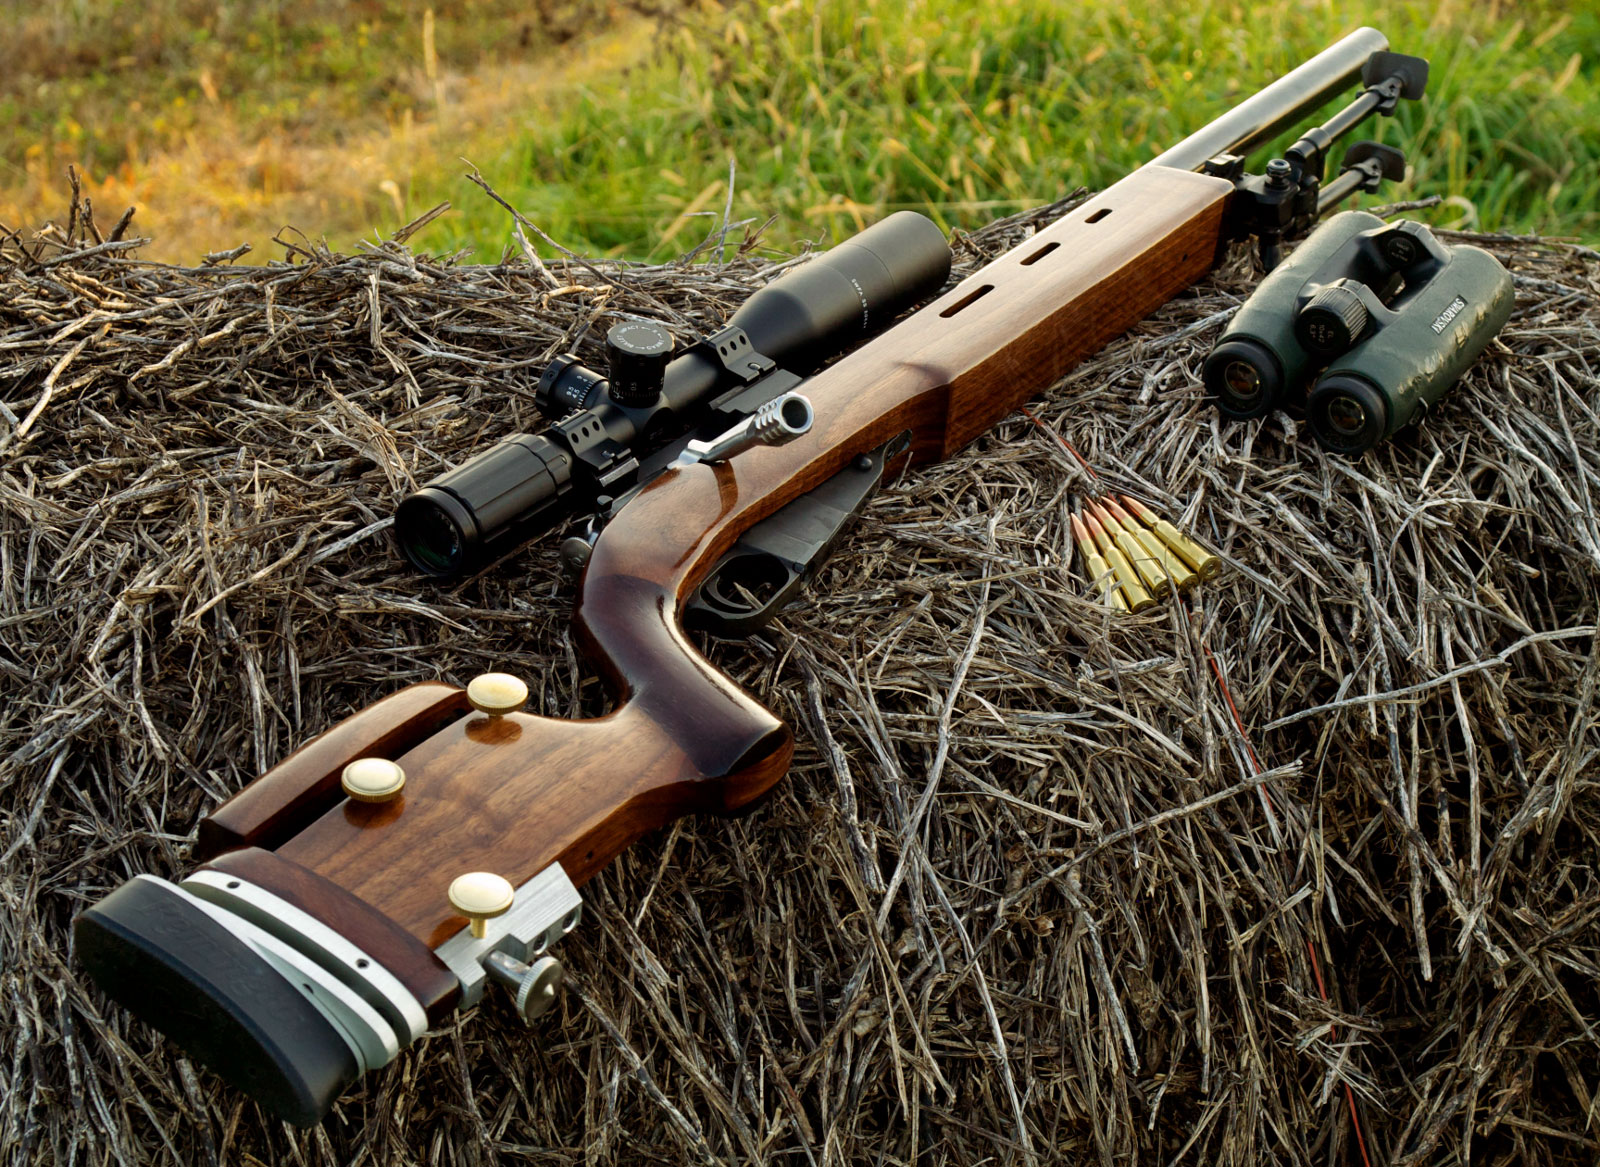
This is a file photo with a different railgun.
This wasn’t the only tiny group shot by Lou over the weekend. Murdica shot a sizzling 0.1262 five-target 100-yard Unlimited Aggregate. That 0.1262 Agg will also be submitted for consideration as a possible record. Here are the individual group sizes: 0.104, 0.183, 0.201, 0.104, 0.039. At this match Lou won both the Unlimited and Sporter class. “It was a great weekend” Lou reported.
About the Gun
What kind of rifle can put five shots in one hole? Lou was shooting an Unlimited-class railgun. This return-to-battery rig (a Kensler railgun) allows the shooter to focus on firing at the perfect time for the conditions. Lou’s Kensler railgun (see below) features a Kelbly top-loader Grizzly action, Shilen 6-groove barrel, and March 10-60X scope. The Shilen is chambered for the 6 PPC cartridge. But there’s something special about this particular 6 PPC — read on….
Click photo for larger version:
Radical New Reamer Design from PT&G
Lou used a new chamber reamer from Pacific Tool & Gauge (PT&G) with special geometry in the leade/throat section. Called a “Bore Rider” (or sometimes “bore-runner”), this new reamer design cuts a staged, variable taper in the leade/throat area that is quite different than the taper in a typical throat. It’s a little hard to explain, so we’ve included the 6 PPC Bore Rider reamer print below. (Download the PDF file for a better view.) Experts should look at the leade angle(s), freebore, and throat dimensions. You may be surprised. Dave Kiff of PT&G says this Bore Rider design has worked successfully for other cartridge types/calibers as well. Apparently this design helps the bullet center up smoothly in the bore before the bullet engages “hard” in the rifling — or so we’ve been told.
Forum member K.W., aka ‘CigarCop’, has spotlighted his handsome long-range F-Class and Bench Rifle in our Forum’s Show Off Your Bat! thread. This is built with a BAT Multi-Flat action, Brux barrel, and a fiberglass McMillan F-Class stock. As you can see, it’s one handsome rifle. Be sure to click the image below to see the much more impressive wide-screen image!
The smithing was done by Bob Green and CigarCop was full of praise for Bob’s work: “I can’t really say enough about Bob Green, his attention to every detail and his ability to build an awesome shooting rifle… but once again he turned a pile of parts into a masterpiece! This irf was built on a Bat MB Multi-flat in .284 Win with a Brux 1:8.5″ twist barrel. It’s almost identical to my 6.5x47L that [Bob] also built. Once again, thanks Bob!”
Bob Green told us: “There was nothing really unusual about this build — this is the quality we try to maintain on all our guns. The barrel was chambered with the client’s reamer to a min-spec SAAMI .284 Win. The Multi-Flat BAT is pillar-bedded and bolted in, with no extra weight added to the stock. CigarCop provided the nice metal spacers on the buttstock and I polished them up. The finish is plain black but it looks good.”
Based in York, Pennsylvania, Bob Green is one of AccurateShooter.com’s recommended gunsmiths. To learn more about his Bob’s work visit GreensRifles.com, email Bob [at] Greensrifles.com, or call (717) 792-1069.
We can predict, with some certainty, how long a light bulb will last (in use), or a shingle roof, or even a nuclear reactor. But how about barrels? Is there a way to reliably estimate barrel life based on known characteristics? This article explains one effort to quantify barrel life…
How long will a barrel last before the accuracy “goes south”? There are so many variables involved (powder type, bore diameter, bullet coatings etc.) that it’s hard to predict. You might say “Well, my buddy has a .243 and he got 1500 rounds before the throat was shot out” — those kind of comparisons can be useful, but they’re not very scientific, and they won’t help much if you’ve got a gun in a new chambering (such as the 6.5×47) for which long-term test results are lacking.
Is there a more reliable way to predict barrel life — one that will work for a broad range of calibers? Well, Forum member MikeCr has developed an Excel spreadsheet that accounts for a number of variables, and gives a pretty good estimate of useful barrel life, whether you’re shooting a .223 Rem or a 338 Lapua Magnum. Mike’s program predicts barrel life using five variables: 1) Bullet Diameter; 2) Powder Charge weight; 3) Powder Heat Potential (KJ/kg); 4) Pressure (in psi); and 5) Bullet Coating (yes/no). Mike provides a table with Heat Potential ratings for most popular powder types. The user needs to know the pressure of his load. This can be estimated with QuickLOAD.
You can download the lastest version of Mike’s spreadsheet below. You’ll need Excel or an Excel viewer to open the file.
Shown below is Mike’s Spreadsheet, with variables for a 6BR shooting 105gr “naked” bullets with 30.3 grains of Hodgdon Varget powder. The formula predicts 2401 rounds of barrel life. That corresponds pretty well to what we’d expect for a 6BR — about 2500 rounds.
Mike observes: “There has been a lot of discussion lately related to cartridge design and resulting barrel life. This is a really important factor to consider amongst a myriad of choices. Barrel life is controversial, and subjective. There are no clear-cut standards for comparison. But a few years ago, I put together a spreadsheet based on Bart Bobbit’s rule of thumb. It worked pretty good, only occasionally failing some tests when validated against posted barrel lives.
According to Ken Howell, I had to account for pressure. And Henry Child’s powder temperature testing provided another piece needed. So, I’ve tweaked it here and there to pass more tests. From 223 Rem to 300 UltraMagnum. Another element added, but turned off, is shot interval. I would need way more tests to lock in on this. But everyone knows, the faster you shoot, the worse the barrel life.
Anyway, another factor hard to define is ‘accurate’ barrel life. This cannot be quantified without standards. Barrels are replaced when expectations are no longer met. I feel that a [barrel] passes peak potential in a finite period due to throat erosion. But that don’t mean it’s toast, if it still shoots well enough. It’s just as likely that many of us never see that peak potential anyway. It’s a slippery thing. Point-blank BR competitors will toss a barrel when it leaves the 1s. I could get another 4000 rounds from it, and be content with its performance, I’m sure.”
NOTE: Mike says: “This spreadsheet may show a lower barrel life than you prefer. But it pretty well spotlights cartridges to stay away from if you plan much time at the range or in dog town.”
Editor’s Comment: Mike’s spreadsheet is a helpful tool, but it is NOT a definitive “take-it-to-the-bank” indicator of barrel life. Mike cautions that predicting barrel life involves so many different factors (including how hot the barrel is run), that the task is a bit like predicting tread life on car tires. Still, the spreadsheet is very helpful. It can certainly warn us that some chamberings (such as the 6-284) are likely to be barrel burners. That can help you make a smart decision when choosing a chambering for your next rifle.
This video shows the process of single-point, cut-rifled barrel-making by one of the world’s best barrel manufacturers. See Krieger barrels being made, start to finish. Krieger cut-rifled barrels have set numerous world records and are favored by many top shooters. The video show the huge, complex machines used — bore-drilling equipment and hydraulic riflers. You can also see how barrels are contoured, polished, and inspected.
For anyone interested in accurate rifles, this is absolutely a “must-watch” video. Watch blanks being cryogenically treated, then drilled and lathe-turned. Next comes the big stuff — the massive rifling machines that single-point-cut the rifling in a precise, time-consuming process. Following that you can see barrels being contoured, polished, and inspected (with air gauge and bore-scope). There is even a sequence showing chambers being cut.
Here is a time-line of the important barrel-making processes shown in the video. You may want to use the “Pause” button, or repeat some segments to get a better look at particular operations. The numbers on the left represent playback minutes and seconds.
One of the most popular features of our Shooters’ Forum is the Official ‘Pride & Joy’ Rifle thread. There you’ll find dozens of interesting rifles, with photos and descriptions supplied by proud owners. Today we’re spotlighting one of the more interesting ‘Pride & Joy’ rifles unveiled this year, a Mosin Nagant “senior citizen”. This 72-year-old Russian bolt gun is not like any Mosin Nagant you’ve ever seen before. It has been brought into the 21st Century with a handsome target stock and some first-class upgrades, including Lothar Walther barrel and Timney trigger. Here’s a look at a very nice Russian rifle, belonging to Forum member Ben C. (aka “Grimstod”):
CLICK TO See Full-Screen Photo:
Video Shows Rifle Shooting Sub-Half-MOA from Bipod (in the Snow):
Name of rifle: Smyert Mk3 (Modified Mosin Nagant)
Make: Izhmekh/Izhevsk (“Izzy”) High Wall
Model: 91/30 | Year: 1942
Scope mount: Rock Solid (looks like an action sleeve)
Scope: SWFA 20x42mm MRAD
Gunsmith: Sheppard
Bolt handle: Rock Solid with Surgeon tactical handle
Bipod: Versa Pod
Total Weight: 18.6 lbs
Grimstod’s Mosin Nagant Custom Shoots Under 0.5 MOA From Bipod
Even in harsh winter conditions, the rifle shot well. (I guess we should expect that for a Russian gun). The photo below shows a group shot from bipod. (The video shows Grimstod’s snow-bound range session). Grimstod calculated the group at 0.394 MOA measuring from outside edge to edge. Using our On-Target software, which measures center to center of most distant shots, we came up with 0.428 MOA. Still that’s impressive for an ancient action being shot in the dead of winter with snow falling. To learn more about this rifle (and view photos of the build process), visit the SurplusRifleForum.com.
We recently featured the “Hornady Number One”, a showcase rifle featureing a CAD-designed, machine-cut stock. While many viewers liked that one-of-a-kind Hornady rifle, others lamented the absence of hand-shaped curves on the Hornady’s angular stock. So, for fans of curvy, hand-crafted rifles, we’re presenting this homage to a truly great stock-maker, Doan Trevor, an artist in the old style.
Doan Trevor is a master gunsmith and stock-maker who works in the old style. He still hand-crafts stocks from start to finish, and does all the metal-work on the custom rifles he builds. Starting with highly-figured woods, Doan carves and shapes his stocks largely by hand, with meticulous attention to detail. Each rifle he builds is optimized for its intended discipline, and custom-fitted for the customer.
With the help of his talented wife Sue (who does the photography and builds the web pages), Doan has created a wonderful website, DoanTrevor.com, that is a feast for the eyes. You can see beautiful wood-stocked rifles being hand-crafted. Doan also illustrates how he creates custom metal parts, and how he beds barreled actions into the finished stocks.
Set aside a few minutes and visit Doan’s website. Be sure to click on the site’s secondary pages: Rifle Building, Woodworking, and Metalworking. You’ll find dozens of high-quality photos and fascinating information on gun-building.
For more information, visit DoanTrevor.com, or call (505) 890-0368, 10am-5pm M-F.
Hornady Manufacturing has created its first-ever rifle. Well, kind of, sort of, maybe…. In actuality, Hornady hired Bill Wiseman & Company to craft the barrel and action and Hornady commissioned Lucid Solutions (Clem Boyd) to build the stock. But the Hornady name IS now engraved on the side of a rifle receiver and that does represent a genuine first. This one-of-a-kind rifle, serial number “H-001″, is a bolt-action hunter, chambered for the .300 RCM cartridge. The historic “Hornady Number One” rifle has two (2) stocks — a highly figured walnut stock plus a second camo-pattern Hogue synthetic stock. So this rifle is not just a safe queen — it was designed to work in the field as well.
This “Hornady Number One” rifle was commissioned as the featured 2015 SHOT Show Gun. It will be displayed in Las Vegas and auctioned on Gunbroker.com. As of December 22, the bid price was already over $14,525 with 45 bidders. The action and bottom metal is elaborately engraved by Baron Engraving of Trumbull, Connecticut. “We’ve had the privilege of designing and engraving more than a dozen SHOT Show rifles, shotguns, handguns and knives but it’s a unique privilege to be asked to help craft the Hornady Number One”, said David Baron.
Not Just a Beauty Queen, This Rifle Can Shoot Bill Wiseman & Company, of College Station, Texas crafted the barrel and action for this special rifle. This outfit is the leading producer of test receivers/barrels for the firearms industry. About the Hornady project gun, Bill Wiseman commented: “Our Wiseman barrels have earned a bit of a reputation for accuracy. Now I guess there will be at least one other rifle out there as accurate as our Texas Safari rifles.” The 24-inch blued barrel is fluted and fitted with a muzzle brake. Thus far, the gun has shown impressive accuracy. Three test-firings of the “Hornady Number One” using 180-grain SST, 165-grain GMX and 150-grain SST Hornady cartridges produced groups between ¼” and ½” at 100 meters.
About the Stocks
“Hornady Number One” is equipped with two separate custom-fitted stocks, one for shooting and one for display. A very special select American Walnut stock was selected, fitted and checkered by Clem Boyd of Lucid Mfg. Systems & Solutions (Mitchell, SD). Boyd’s challenge was to design a functional walnut wooden stock that would frame the beauty of the Wiseman barreled-action. Several weeks of design went into a Solidworks 3-D CAD model before the group made any CNC machine cuts. The stock was produced from a XXX walnut blank grown in the Great American Heartland and selected for the vertical-line color pattern. The stock shape incorporates the natural hex design of the receiver.
The trademark Hornady name was inlaid into the stock using African Padauk wood wafers. Padauk was also used for red-tone grip cap and butt pad spacers. Oops. Someone mounted the Leupold scope incorrectly. The diopter marks should be TDC, meaning the scope should be rotated 90° clockwise.
The Lucid stock design repeats the hexagon features in the forearm, allowing a wide forearm floor to aid in bench rest practice. The stock features a distinctive 13.5° linear checkering pattern on the grip and side panels. A custom aluminum bedding block supports the barreled action. Recoil is absorbed through a 1″ black recoil pad. Three swivel studs provide multiple options for carry and tripod use.
Auction Details and Extras
The GunBroker.com auction will conclude at 5:00 pm Eastern Time on Friday, January 23, 2015, the last day of the 2015 SHOT Show. During the Show, the rifle will be displayed at the GunBroker.com booth in a custom glass and walnut display case. In keeping with SHOT Show tradition, this 2015 SHOT Show rifle will be auctioned on GunBroker.com. At its current $14.5K bid price, “Hornady Number One” has a ways to go before it sets a record. The all-time record SHOT Show auction price was $136,014.00 set in 2013. To complement the Hornady package, the gun will be delivered with a case of Hornady .300 RCM ammo, with each box signed by Hornady President, Steve Hornady. In addition, the high bidder will receive a signed Letter of Authenticity from Hornady Manufacturing.
Sometimes you’ll get a barrel that doesn’t stabilize bullets the way you’d anticipate, based on the stated (or presumed) twist rate. A barrel might have 1:10″ stamped on the side but it is, in truth, a 1:10.5″ twist or even a 1:9.5″. Cut-rifled barrels, such as Kriegers and Bartleins, normally hold very true to the specified twist rate. With buttoned barrels, due to the nature of the rifling process, there’s a greater chance of a small variation in twist rate. And yes, factory barrels can be slightly out of spec as well.
Before you purchase a bunch of bullets and set off to develop loads it’s wise to determine the true twist rate of your new barrel. Sinclair International, in its Reloading Press Blog provides a simple procedure for determining the actual twist rate of your barrel. Read on to learn how….
How Twist Rate Affects Bullet Stability
Most of you know that the twist of the rifling in the barrel is what puts spin on the bullet. As a bullet is pushed down the barrel and compressed into the rifling, the bullet follows the path or twist of the rifling. The combination of velocity and bullet spin is what stabilizes the bullet. Finding the twist rate for your barrel will help you in selecting appropriate weight bullets for your firearm. Remember, the general rule is that the faster the twist rate for a given caliber, the longer the bullet (of that caliber) you will be able to stabilize. (Generally speaking, a longer bullet will also be a heavier bullet, but the bullet geometry dictates the needed twist rather than the weight per se.)
Determining Barrel Twist Rate Empirically
Twist rate is defined as the distance in inches of barrel that the rifling takes to make one complete revolution. An example would be a 1:10″ twist rate. A 1:10″ barrel has rifling that makes one complete revolution in 10 inches of barrel length. Rifle manufacturers usually publish twist rates for their standard rifle offerings and custom barrels are always ordered by caliber, contour, and twist rate. If you are having a custom barrel chambered you can ask the gunsmith to mark the barrel with the twist rate.
Sinclair’s Simple Twist Rate Measurement Method
If are unsure of the twist rate of the barrel, you can measure it yourself in a couple of minutes. You need a good cleaning rod with a rotating handle and a jag with a fairly tight fitting patch. Utilize a rod guide if you are accessing the barrel through the breech or a muzzle guide if you are going to come in from the muzzle end. Make sure the rod rotates freely in the handle under load. Start the patch into the barrel for a few inches and then stop. Put a piece of tape at the back of the rod by the handle (like a flag) or mark the rod in some way. Measure how much of the rod is still protruding from the rod guide. You can either measure from the rod guide or muzzle guide back to the flag or to a spot on the handle. Next, continue to push the rod in until the mark or tape flag has made one complete revolution. Re-measure the amount of rod that is left sticking out of the barrel. Use the same reference marks as you did on the first measurement. Next, subtract this measurement from the first measurement. This number is the twist rate. For example, if the rod has 24 inches remaining at the start and 16 inches remain after making one revolution, you have 8 inches of travel, thus a 1:8 twist barrel.
This rifling illustration was created by Danish graphic artist Erik Dahlberg. It is published here courtesy FireArmsID.com, an excellent website for forensic firearms examiners.


 Are you re-barreling a match rifle and need to know if you will still make weight? Or perhaps you want to select the right contour to hit an optimal carry weight for a new varmint rifle? Dan Lilja offers FREE software that will calculate barrel weight for straight contour, straight taper, and radius-tapered barrels. Dan’s software even calculates how fluting alters barrel weight.
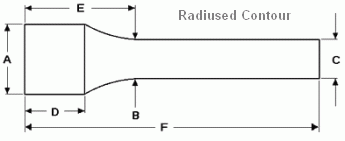

 Just another YouTube video … NOT. This video is a winner. If you want to see state-of-the-art 21st Century rifle-building, with advanced CNC milling operations, watch this clip. It shows how man and machine combine to create a fine custom rifle.


 How long will a barrel last before the accuracy “goes south”? There are so many variables involved (powder type, bore diameter, bullet coatings etc.) that it’s hard to predict. You might say “Well, my buddy has a .243 and he got 1500 rounds before the throat was shot out” — those kind of comparisons can be useful, but they’re not very scientific, and they won’t help much if you’ve got a gun in a new chambering (such as the 6.5×47) for which long-term test results are lacking.


 Sometimes you’ll get a barrel that doesn’t stabilize bullets the way you’d anticipate, based on the stated (or presumed) twist rate. A barrel might have 1:10″ stamped on the side but it is, in truth, a 1:10.5″ twist or even a 1:9.5″. Cut-rifled barrels, such as Kriegers and Bartleins, normally hold very true to the specified twist rate. With buttoned barrels, due to the nature of the rifling process, there’s a greater chance of a small variation in twist rate. And yes, factory barrels can be slightly out of spec as well.


