When we recently ran a story about Dennis Santiago’s new snakeskin Eliseo Tubegun, folks asked us if this kind of rifle can be competitive in F-Class competition. Here’s a detailed answer to that question by G. Salazar, who runs the Riflemans Journal Website.
A while back, G. Salazar published a three-part article on Shooting The Tubegun in F-Class. Links for all three segments are found below. The article covers some of the hardware German engineered to adapt his tubegun for long-range F-Class shooting with scope. If you’re an F-Classer, or just a fan of tubeguns, you should read German’s article, in all its parts.
In the intro to his multi-part F-Class Tubegun article, German explains:
Salazar: The tubegun has truly changed the face of High Power shooting over the past five years or so. Specifically, the CSS (Gary Eliseo) tubeguns, which are made for a broad variety of actions and configurable to single-shot or repeater, have truly helped the sport to grow. That’s not just idle talk, the two principal factors that made the tubegun so important to our growth are the ease of transition for AR15 shooters moving into a bolt-action rifle and the absolutely ridiculous length of time it currently takes to get a stock from the conventional stock makers. My last conventional stock took well over two years from order to delivery (plain fiberglass). One of my friends has now been waiting four years for a simple wood stock for a smallbore rifle. By contrast, tubeguns, which are largely CNC machined, are delivered in a reasonably short time — weeks or a couple of months at most.
Notwithstanding the foregoing, the tubegun would never have attained its present success if it weren’t for one simple fact — they are brutally accurate. I have three CSS tubeguns, one chambered in .308 and two in .30-06 and they are my favorite prone rifles due to their accuracy and great ergonomics. Those factors are just as appealing to an F-Class competitor as to a prone shooter, and indeed, the tubegun is making solid inroads into F-Class. READ MORE…
Frank Galli, aka “Lowlight”, runs the popular SnipersHide.com website. A while back, Frank completed a gunsmithing course with Robert Gradous. Frank recounts the learning process in an informative, nicely-illustrated article on the ‘Hide. Frank explains how he put together a new 6.5 Creedmoor tactical rifle using a Bartlein barrel, Bighorn Action (Rem clone with floating bolt-head), and a “lightly used” Accuracy International 1.5 chassis. The HD video below shows the process start-to-finish. READ Full Article.
During Frank’s “hands-on” training sessions with Gradous, Frank learned to thread and chamber a barrel, fit a recoil lug, and install the barreled action in the AI chassis. Chambering was done with great care: “We spent the better part of the day working the barrel. I feel this is a critical component and seeing the attention to detail in Robert’s approach confirmed it for me. When it came time to chamber Robert had a custom tight chamber reamer there for a 6.5CM but I’m shooting a tactical rifle, tight chambers aren’t for me, and this was clear, as out came the standard SAAMI reamer.”
Frank also learned how to modify an aluminum chassis: “the AI chassis had the recoil lug opened up, but it was opened in the wrong direction. This was going to require milling increasing the gap to at least a 1/2″ in size. Robert was really leery of this, but my attitude was, ‘it’s just a chassis and nothing a little Marine Tex can’t handle’.” Thankfully the chassis mod came out OK.
Once the barreled action was complete and the AI chassis was successfully milled, Frank applied a tan Cerakote finish to the barreled action. This would give a proper tactical look to the rifle, while providing superior corrosion resistance for the metal parts. To learn more about Cerakote finishing, check out the Cerakote Application Video, published last week in the Daily Bulletin.
When the rifle was complete, Frank took it out for testing with a variety of ammo, both factory fodder and handloads. There were some initial worries about accuracy as it took a while for the barrel to break in. A few sessions of bore cleaning were required before the barrel stopped fouling and then — like magic — the rifle started printing really small groups.
By the end of his load testing session, Frank was getting good groups with Hornady 120gr GMX factory 6.5 Creedmoor ammo, and really superb groups with handloads. The 120gr GMX ammo “was going 3100 fps with no ill effects”. The best handloads were approaching 1/4 MOA for three shots, and Frank’s load with Berger 130 VLDs shot even smaller than that: “In my opinion the load development we did was worth its weight in gold. Where else can you build in a rifle in two days, then go out and develop a baseline load using everything from 120gr ammo to 140gr ammo with a few in between? My favorite load and clearly the rifle’s too, was the [Berger] 130gr VLD. This gave us great velocity, awesome groups [with some one-holers] and really nice results at distance.”
Lowlight’s Gunsmithing Story is a ‘Must-Read’
We recommend you read Frank’s story. It shows that, with the right tools, and the supervision of a master smith, even a novice can produce an ultra-accurate rifle. For those of you who have considered taking a gunsmithing class, Frank’s successful experience with gunsmith Robert Gradous should give you plenty of motivation.
Forum member Erick C. (aka cncmill) has produced a very nice laminated stock featuring wood inlays. A tool and die maker from Pennsylvania, Erick is justifiably proud of his handiwork. Erick tells us: “Here is my latest build — just finished. The rifle features a Kelbly’s Atlas action, with Hawk Hill custom barrel chambered for the .284 Winchester. The stock is made from three types of wood: Birdseye Maple, African Padauk wood, and Wenge wood (for the dark stripes).” Erick explained that the Wenge inlays served a useful (as well as aesthetic) purpose: “I put the Wenge stripes in to fix two cracks in the Birdseye Maple. I was not sure about it at the time but it turned out well.”
Home-built Laminated Stock features three different woods.
Stock before final finishing.
Detail of Fore-End.
If you like this example of rifle-building, check out the ‘Pride and Joy’ thread in the AccurateShooter Forum to see other “home-built” project guns.
Craters may look interesting on the moon, but you don’t want to see them on your primers. Certain mechanical issues that cause primer craters can also cause primer piercing — a serious safety problem that needs to be addressed. If you have a gun that is cratering primers (even at moderate pressure levels), there is a solution that works with many rifles — send your bolt to Greg Tannel to have the firing pin hole bushed.
Shooters who convert factory actions to run 6BRs, 6PPCs or other high-pressure cartridges should consider having the firing pin bushed. These modern cartridges like to run at high pressures. When running stout loads, you can get cratering caused by primer flow around the firing pin hole in the bolt face. The reason is a little complicated, but basically the larger the hole, the less hydraulic pressure is required to crater the primer. A limited amount of cratering is normally not a big issue, but you can reduce the problem significantly by having a smith fit a bushing in the firing pin hole. In addition to reduced cratering, bushing the firing pin often produces more consistent ignition.
This is a highly recommended procedure that our editors have had done to their own rifles. Greg Tannel (Gre-Tan Rifles) is an expert at this procedure, and his turnaround time is fast — usually 2-3 days (shop time). Current price for a bushing job, which includes turning the firing pin to .062″, is $87.00 including USPS Priority Mail return shipping.
If you have a factory rifle, a bushed firing pin is the way to go if you are shooting the high-pressure cartridges such as 6PPC, 6BR, 6-6.5×47 and 6.5×47. This is one of the most cost-effective and beneficial upgrades you can do to your factory rifle. For more info on the Firing Pin Bushing process, visit GreTanRifles.com, or email greg [at] gretanrifles.com. (After clicking the link for GreTanRifles.com, Click on “Services” > “Shop Services” > “Bolt Work”, and you’ll see a listing for “Bush Firing Pin Hole & Turn Pin”. Select “View Details”.)
Firing Pin Hole Bushing by Greg Tannel
Work Done: Bush firing pin hole and turn pin.
Functions: Fixes your cratering and piercing problems.
Price: $80.00 + $7.00 return shipping Total Price: $87.00
Actions for which Bushing is Offered: Remington, Winchester, Savage, Sako, Kimber, Cooper, Nesika, Stiller, Bat, Kelbly, Lawton, Surgeon, Borden, Wichita, Hall, CZ, Ruger, Mauser, Howa, Weatherby, Dakota, Pacific Tool, Phoenix, RPA Quadlite, and Defiant bolt action rifle or pistol. Note: There may be extra tooling charges for case-hardened style bolts (Mauser, CZ, and similar) .
Actions for which Bushing is NOT Available: ARs, Accuracy International, Desert Tactical Arms, Big Horn, Rim fires, Falling block, Break open, Lever, Pump rifles.
How to send your bolt in to be bushed:
You can send your bolt snail mail, priority mail, UPS, Fed-Ex. What ever you prefer. Please include your name, phone number, and return shipping address. Turn around is normally 1 to 3 days shop time (plus shipping time). We usually do them the day that we get them in. Total cost is $87.00 for one bolt or $167.00 for two (this includes return shipping, priority mail.) Three or more will be sent back to you UPS and we will have to calculate extra shipping. We can overnight them at your expense. Check, money order, or credit card is fine with us.
Have a good look at the photos below — this may be one of the most noteworthy target strings we’ve ever published. What you can see is the effect of barrel tuner position on point of impact (POI). You can clearly see that the tuner position alters the up/down POI location in a predictable fashion.
This remarkable 15-shot sequence was shot by French benchrester Pascal Fischbach using his 6 PPC fitted with a CG (Carlito Gonzales) action and a Bukys barrel tuner.
Pascal reports: “After [bullet] seating and load validation, I put the Bukys tuner on, screwing it out 10 turns. According to Carlito, the CG’s super stiff action-to-barrel fit gives a faster vibration modulus that is detrimental below 10 turns [position of the tuner].” Pascal’s procedure was to screw out the tuner 1/4 turn progressively from one shot to the next. He shot one bullet at each tuner position, with a total of 15 shots.
Left Half of Target Strip (shots with 1/4 rotation change of tuner in sequence)
Right Half of Target Strip (shots with 1/4 rotation change of tuner in sequence)
Pascal observed: “Note the point of impact displacement [from shot to shot] tracks clearly along a sinusoide (sine wave curve).” This is indeed notable and significant! This shows how the tuner’s ability to change barrel harmonics can alter the position of the muzzle as each bullet exits, resulting in a higher or lower POI. Pascal sent his results to Carlito Gonzales in Argentina for analysis.
Pascal poses this question to readers: “Guess which three positions Carlito recommends to try?”
Editor’s Note: While this target sequence clearly shows how tuner position can alter bullet point of impact, this, by itself, does not tell us which tuner position(s) are best for accuracy. That will require further multi-shot group testing, involving careful experimentation with tuner position (and powder charge weights). But for those folks who doubt that a tuner can make a difference on a short, fat barrel, just take another look at the photos. The up/down changes are undeniable, and noteworthy in the wave pattern they follow.
Classic American battle rifles have regained popularity via M1 Garand matches, service rifle matches, the M1A Match at Camp Perry, and Vintage Sniper competitions. If you own a classic M1 Garand, or an M1A, the modern semi-auto descendant of the M14, you should enjoy the two videos presented here. With help from our friend Grant G., we managed to located two original U.S. Army training films, one for the M1 Garand, and one for the M14. Both films use clever animated drawings to show the gas guns’ internal operations and cycling processes.
M1 Garand Training Film
Here is a U.S. Army training film for the M1 Garand (officially the United States Rifle, Caliber .30, M1). The M1 Garand was the first semi-automatic battle rifle to be generally issued to the infantry of a major nation, though other countries issued semi-auto rifles to special units. Gen. George S. Patton called the Garand “The greatest battle implement ever devised.”
Animated Diagrams Show M1 Garand Operational Cycle starting at 2:00-Minute Mark:
M14 Training Film
The successor to the M1 Garand was the M14. The 27-minute official U.S. Army video below demonstrates the operation of the M14. Field-stripping is shown from the 5:13 time-mark through 8:30. Cut-away drawings show the M14’s gas operation at 8:40.
The complete 8-step functioning cycle is demonstrated from the 9:25 time-mark through 22:41. These eight operations are: 1) Feeding; 2) Chambering; 3) Locking; 4) Firing; 5) Unlocking; 6) Extracting; 7) Ejecting; and 8) Cocking. This movie is fairly long, but fans of battle rifles will find it well worth their time. Every M1A owner should definitely watch this video start to finish.
Watch M14 Functioning Cycle Starting at 9:25 Mark:
“How do silencers work?” We hear that question often. Now, thanks to Silencerco.com, we can answer that question. Here’s a helpful infographic that illustrates the features of a suppressor (aka “silencer”, “can”, or “sound moderator”). Silencers reduce gunshot noise by providing a contained space where hot gases can dissipate and cool before exiting. Silencers are typically divided into multiple, internal expansion chambers. A quality suppressor can reduce gunshot noise by 30 decibels (db) or more. See the chart for comparative firearm noise levels (suppressed vs. un-suppressed).
In the United States, suppressors have become much more popular in recent years. In fact, the number of licensed silencers has doubled since 2011. Over 571,750 suppressors are now lawfully registered in the USA. Firearm sound moderators can now be purchased legally in 39 states, provided one obtains the requisite Federal tax stamp. (Texas is the leading suppressor state.) Seven European countries also allow suppressor ownership.
Suppressors Featured in Modern Shooter
Legal for private ownership in 39 states, suppressors are more popular than ever (though many gun owners are still not aware that silencers can be acquired without much difficulty). The Fall 2014 issue of Modern Shooter focuses on the popularity of today’s suppressors and sound-moderating technology available for handguns, rifles, and shotguns. This entire issue is dedicated to suppressors and their benefits. This comprehensive guide explains how suppressors work and how gun owners can easily (and lawfully) purchase them. The issue includes a detailed history of the suppressor, which was first patented in 1909 by the son of the inventor of the machine gun. There is also a feature story on hunting with suppressors in Europe. Modern Shooter is available on newsstands and as a digital download at GunDigestStore.com.
Put the same load in a variety of barrels (with the same length and chamberings) and you’ll see a wide variance in muzzle velocity. In fact, it’s not unusual to see up to 100 fps difference from one barrel to the next. We demonstrated this with a comparison test of Lapua factory ammo.
Chron Testing Lapua Factory Ammo
At our Southern California test range, we chronographed Lapua 105gr 6mmBR factory ammo in three different 8-twist barrels of similar length. The results were fascinating. Lapua specs this ammo at 2790 fps, based on Lapua’s testing with its own 26″ test barrel. We observed a speed variance of 67 fps based on tests with three aftermarket barrels.
Brand ‘S’ and Brand ‘PN’ were pre-fit barrels shot on Savage actions. Brand ‘K’ was fitted to a custom action. All test barrels were throated for the 100-108 grain bullets, though there may have been some slight variances in barrel freebore. With a COAL of 2.330″, the rounds were “jumping” to the rifling in all barrels. Among the four barrels, Brand ‘PN’ was the fastest at 2824 fps average — 67 fps faster than the slowest barrel. Roughly 10 fps can be attributed to the slightly longer length (27″ vs. 26″), but otherwise this particular barrel was simply faster than the rest. (Click Here for results of 6mmBR Barrel Length Velocity Test).
Results Are Barrel-Specific, Not Brand-Specific
These tests demonstrate that the exact same load can perform very differently in different barrels. We aren’t publishing the barrel-makers’ names, because it would be wrong to assume that ‘Brand X’ is always going to be faster than ‘Brand Y’ based on test results from a single barrel. In fact, velocities can vary up to 100 fps with two identical-spec barrels from the SAME manufacturer. That’s right, you can have two 8-twist, 26″ barrels, with the same land-groove configuration and contour, from the same manufacturer, and one can be much faster than another.
Don’t Demand More Than Your Barrel Can Deliver
We often hear guys lament, “I don’t get it… how can you guys get 2900 fps with your 6BRs and I can only get 2840?” The answer may simply be that the barrel is slower than average. If you have a slow barrel, you can try using more powder, but there is a good chance it may never run as fast as an inherently fast barrel. You shouldn’t knock yourself out (and over-stress your brass) trying to duplicate the velocities someone else may be getting. You need to work within the limits of your barrel.
Factory Ammo Provides a Benchmark If you have a .223 Rem, 6BR, .243 Win, 6.5×47 Lapua, 6.5×55, .308 Win, 30-06, or 300 WM Rifle, we recommend you buy a box of Lapua factory-loaded ammo. This stuff will shoot great (typically around half-MOA), and it can give you a baseline to determine how your barrel stacks up speedwise. When you complete a new 6BR rifle, it’s wise to get a box of the factory ammo and chronograph it. That will immediately give you a good idea whether you have a slow, average, or fast barrel. Then you can set your velocity goals accordingly. For example, if the factory 6BR ammo runs about 2780-2790 fps in your gun, it has an average barrel. If it runs 2820+ in a 26″ barrel (or 2835 fps in a 28″), you’ve got a fast tube.
Have you ever wondered how a cut-rifled barrel is made? This process, used by leading barrel-makers such as Bartlein, Border, Brux, Krieger, and Obermeyer, can yield a very high-quality barrel with a long useful life. Cut-rifled barrels have been at the top in short- and long-range benchrest competition in recent years, and cut-rifled barrels have long been popular with F-Class and High Power shooters.
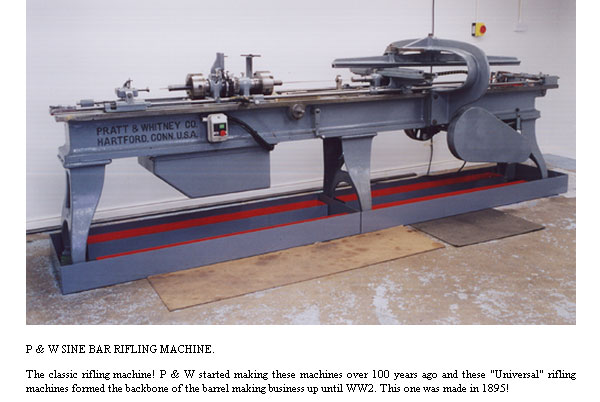
You may be surprised to learn that cut-rifling is probably the oldest method of rifling a barrel. Invented in Nuremberg around 1520, the cut-rifling technique creates spiral grooves in the barrel by removing steel using some form of cutter. In its traditional form, cut rifling may be described as a single-point cutting system using a “hook” cutter. The cutter rests in the cutter box, a hardened steel cylinder made so it will just fit the reamed barrel blank and which also contains the cutter raising mechanism.
Above is a computer animation of an older style, sine-bar cut-rifling machine. Some machine features have been simplified for the purposes of illustration, but the basic operation is correctly shown. No, the cut-rifling machines at Krieger don’t use a hand-crank, but the mechanical process shown in this video is very similar to the way cut-rifling is done with more modern machines.
Read About Cut-Rifling Process at Border-Barrels.com
Read About Cut-Rifling Process at Border-Barrels.com
To learn more about the barrel-making process, and cut-rifling in particular, visit FirearmsID.com. There you’ll find a “must-read” article by Dr. Geoffrey Kolbe: The Making of a Rifled Barrel. This article describes in detail how barrels are crafted, using both cut-rifling and button-rifling methods. Kolbe (past owner of Border Barrels) covers all the important processes: steel selection, hole drilling, hole reaming, and rifling (by various means). You’ll find a very extensive discussion of how rifling machines work. Here’s a short sample:
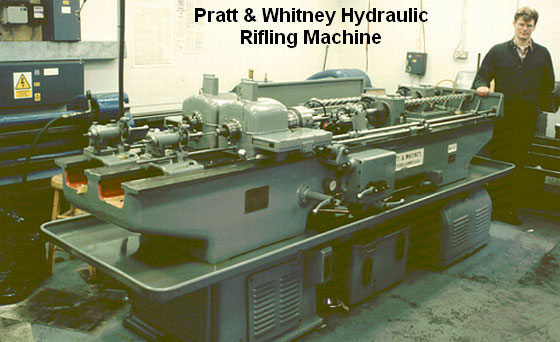
“At the start of World War Two, Pratt & Whitney developed a new, ‘B’ series of hydraulically-powered rifling machines, which were in fact two machines on the same bed. They weighed in at three tons and required the concrete floors now generally seen in workshops by this time. About two thousand were built to satisfy the new demand for rifle barrels, but many were broken up after the war or sold to emerging third world countries building up their own arms industry.
Very few of these hydraulic machines subsequently became available on the surplus market and now it is these machines which are sought after and used by barrel makers like John Krieger and ‘Boots’ Obermeyer. In fact, there are probably less of the ‘B’ series hydraulic riflers around today than of the older ‘Sine Bar’ universal riflers.
The techniques of cut rifling have not stood still since the end of the war though. Largely due to the efforts of Boots Obermeyer the design, manufacture and maintenance of the hook cutter and the cutter box have been refined and developed so that barrels of superb accuracy have come from his shop. Cut rifled barrel makers like John Krieger (Krieger Barrels), Mark Chanlyn (Rocky Mountain Rifle Works) and Cliff Labounty (Labounty Precision Reboring)… learned much of their art from Boots Obermeyer, as did I.” — Geoffrey Kolbe
Video find by Boyd Allen. Archive photos from Border-Barrels.com. In June 2013, Birmingham Gunmakers Ltd. acquired Border Barrels. Dr. Geoffrey Koble continues to work for Border Barrels, which maintains operations in Scotland.
If you own a Savage rifle, here’s a product you should consider. Pacific Tool & Gauge now offers precision-machined replacement bolt heads for Savages. This product, available in a variety of bolt face sizes for $49.50 per unit, can benefit nearly everyone who shoots Savage bolt guns.
German Salazar’s excellent Rifleman’s Journal website features an in-depth review of the PT&G Replacement Bolt Head for Savage Bolts. Written by Norm Darnell, this detailed review explains the benefits of the PT&G replacements, compared to the standard Savage bolt heads. After polishing, the factory bolt head can become slightly dished. According to Darnell: “The area around the firing pin hole sometimes has an indentation deep enough to allow the primer to flow into this void. This makes an unsightly blemish on a fired primer and can lead to hard extraction or worse. One [Savage] rifle I inspected had a continuing problem with pierced primers despite reasonably mild loads[.]” Even after machining the factory bolt face to make it flat, Darnell encountered problems: “The firing pin hole seemed to wear excessively which was of some concern. Material strength of the … bolt head* appears to be the source of these recurring problems.”
After testing out PT&G replacement bolt heads, Darnell found that his problems were solved. With the PT&G replacement bolt head, “the cartridge case heads and primers indicated no case-head rounding or primer damage”. Darnell was convinced, so he proceeded to fit PT&B bolt heads “on all three of my 308 bolts and one 223 with one spare bolt of each.” It appears that PT&G has a winner here — a smart, very affordable product that remedies a commonly-observed problem with factory Savage bolt heads.
* In the article, author Darnell writes that Savage factory bolt heads are investment cast. Fred Moreo of Sharp Shooter Supply says this is not correct: “Savage bolt heads were NEVER investment cast. From the get-go they were machined from solid stock. In 1988 they went to special profiled 41L40 bar stock to save machining operations and heat treated to 35-42 RC.”


 Once the barreled action was complete and the AI chassis was successfully milled, Frank applied a tan Cerakote finish to the barreled action. This would give a proper tactical look to the rifle, while providing superior corrosion resistance for the metal parts. To learn more about Cerakote finishing, check out the
  By the end of his load testing session, Frank was getting good groups with Hornady 120gr GMX factory 6.5 Creedmoor ammo, and really superb groups with handloads. The 120gr GMX ammo “was going 3100 fps with no ill effects”. The best handloads were approaching 1/4 MOA for three shots, and Frank’s load with Berger 130 VLDs shot even smaller than that: “In my opinion the load development we did was worth its weight in gold. Where else can you build in a rifle in two days, then go out and develop a baseline load using everything from 120gr ammo to 140gr ammo with a few in between? My favorite load and clearly the rifle’s too, was the [Berger] 130gr VLD. This gave us great velocity, awesome groups [with some one-holers] and really nice results at distance.”


 Craters may look interesting on the moon, but you don’t want to see them on your primers. Certain mechanical issues that cause primer craters can also cause primer piercing — a serious safety problem that needs to be addressed. If you have a gun that is cratering primers (even at moderate pressure levels), there is a solution that works with many rifles — send your bolt to
 Firing Pin Hole Bushing by Greg Tannel
 Have a good look at the photos below — this may be one of the most noteworthy target strings we’ve ever published. What you can see is the effect of barrel tuner position on point of impact (POI). You can clearly see that the tuner position alters the up/down POI location in a predictable fashion.


 Classic American battle rifles have regained popularity via M1 Garand matches, service rifle matches, the M1A Match at Camp Perry, and Vintage Sniper competitions. If you own a classic M1 Garand, or an M1A, the modern semi-auto descendant of the M14, you should enjoy the two videos presented here. With help from our friend Grant G., we managed to located two original U.S. Army training films, one for the M1 Garand, and one for the M14. Both films use clever animated drawings to show the gas guns’ internal operations and cycling processes.

 Suppressors Featured in Modern Shooter