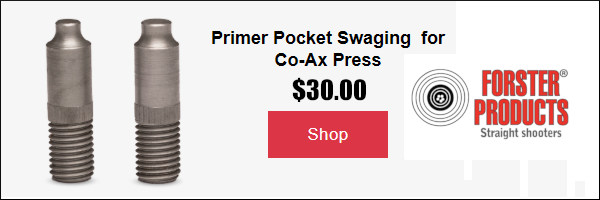
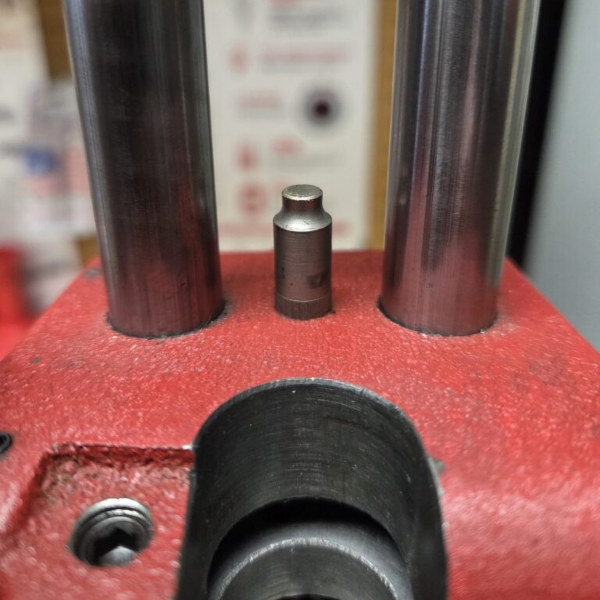
A few months ago, Forster Products released a limited run of a new prototype Primer Pocket Swaging Tool for the Co-Ax press. This is a metal shaft that attaches to the base of the press. After receiving very positive feedback from initial testers, Forster has determined to offer the product again, priced at $30.00 for a set of two (2) swage tools (for both small and large primer pockets). CLICK HERE to order.
Intial Testing Feedback on Forster’s Swaging Tool:
Several reloaders told us the tool required less force than expected and preferred using it over other swaging methods. Setup was straightforward, and overall performance removing military crimps from .223/5.56 brass was consistent and effective.
One customer ran over 270 cases through the tool across multiple headstamps and reported solid results removing 3- and 4-point crimps. Others noted that once properly adjusted, it did a clean job swaging primer pockets and allowed primers to seat properly afterward.
A few important observations also came through:
• Brass varies — even cases with the same headstamp can behave differently.
• Heavily crimped brass may require more care during operation.
• As with any swaging operation, excessive force can damage rims if the operator overpowers the case.
In other words — the tool works well, but like most case prep operations, proper setup and feel matter. Overall, Forster reports that user reports have been very positive given the good performance on real benches. Because of that response, Forster has made another limited quantity available.
If you process crimped military brass on your Co-Ax press and want to streamline primer pocket prep without adding another expensive, standalone tool to your bench, the new swaging tool for the Co-Ax is now available for $30.00. This include both small and large swaging units. CLICK HERE to order.
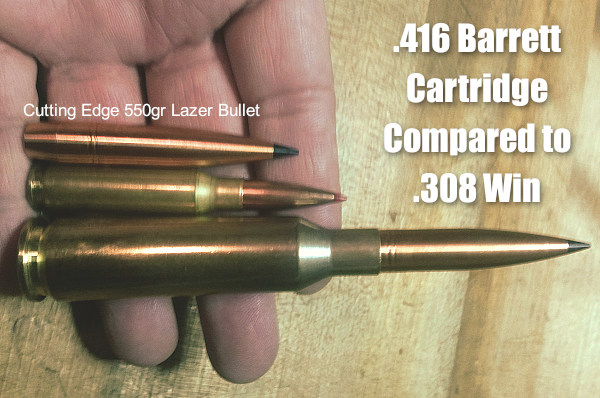
In the ELR game, particularly the King of 2 Miles (KO2M), it’s “go big or go home”. The top shooters run large-capacity cartridges that push large-caliber, ultra-high BC bullets at very high velocities. Bullets launched by cartridges such as the .416 Barrett can sustain supersonic velocities at Extreme Long Ranges — and that’s what it takes to win. The .416 Barrett can launch a 550-grain solid bullet at 3000+ FPS.
Photo from ELR Competitor Corbin Shell.
2018 and 2019 Kings of 2 Miles Loaded on RCBS Presses
So how do you load jumbo cartridges such as the .416 Barrett? It takes a big, heavy, super-strong reloading press. We’ve learned that two recent King of 2 Miles champions, Paul Phillips (2019) and Robert Brantley (2018) both loaded their KO2M ammo on RCBS AmmoMaster .50 BMG presses. Phillips loaded .416 Barrett ammo, while Brantley loaded a similar .416 MCS cartridge.
In 2018, Robert Brantley topped the field using his custom .416 MCS cartridge. Then in 2019, Paul Phillips won the K02M competition shooting a .416 Barrett, with Brantley a close second. Both Phillips and Brantley use the RCBS AmmoMaster .50 BMG single stage press kit and RCBS .416 Barrett dies to hand-load for extreme long-range. “My ammo has been much more consistent after switching to the RCBS press and dies,” remarked Phillips, who runs the Global Precision Group. Brantley said he uses RCBS products for most of his reloading needs — from the dies and AmmoMaster, to the ChargeMaster and Brass Boss. His custom .416 MCS loads launch a 550-grain bullet more than 3,100 fps.
Loading with RCBS AmmoMaster .50 BMG Press
This video shows reloading with the RCBS AmmoMaster .50 BMG press. While this video shows .50 BMG cases being loaded, the principles are the same for loading the .416 Barrett cartridge or other big rounds. Big cases need big presses!
Before you load that new cartridge brass for the first time, run an expander mandrel down the case necks. This will iron out dents and provide more uniform neck tension. Chose a mandrel diameter that provides appropriate neck tension.
Lapua brass is so good that you’ll be tempted to just load and shoot, if you have a “no-turn” chamber. However, some minimal case prep will ensure more uniform neck tension. Keeping your neck tension very uniform allows more consistent bullet seating. That, in turn, usually yields better accuracy, and lower Extreme Spread and Standard Deviation (ES/SD). Lapua brass, particularly 6mmBR, 6.5×47, 6.5 Creedmoor, and .308 Win comes from the factory with tighter-than-optimal necks.
Before you seat bullets, at a minimum, you should inside chamfer the case mouths, after running an expander mandrel down the necks. The expander mandrels from both Sinclair Int’l (Brownells, $14.99 stainless, $24.99 Titanium Nitride coated) and K&M will both leave the necks with enough neck tension (more than .001″) so you can then seat bullets without another operation. We suggest putting a bit of lube on the mandrel before running it down the necks — but remove any lube that gets inside the necks before seating bullets. If you do a lot of loading you may benefit from a Titanium Nitride-coated mandrel.
Both Sinclair and K&M Tools make a die body specifically to hold expander mandrels. The $49.99 Sinclair version fits caliber-specific expander mandrels which measure approximately .001″ less than bullet diameter for each caliber. This is an updated “Gen II” design that completely captures the mandrel within the die so the mandrel cannot pull out. It also has an O-ring in the die cap that allows the mandrel to self-center within the case neck. Brownells offers two sizes of Sinclair die bodies for expander mandrels: .17 -.338 caliber (#749011715 $49.99); and .357 – .50 caliber (#749008843, $49.99). All Generation II dies are machined from stainless steel and the standard diameter 7/8-14 dies include the Sinclair Stainless Steel Split Lock Ring.
Once you run the expander mandrel down the necks of Lapua brass, after you account for brass spring-back, you’ll have about .002″ neck tension*. This will make the process of seating bullets go much more smoothly, and you will also iron out any dents in the case mouths. Once the case mouths are all expanded, and uniformly round, then do your inside neck chamfering/deburring. The same expander mandrels can be used to “neck-up” smaller diameter brass, or prepare brass for neck-turning.
Forum member Mike Crawford adds: “These expanders can also reduce runout from offset seating. Prior to bullet seating, expand the sized necks to force thickness variance outward. With the Sinclair system, the necks will springback fine, and will not be pulled out of center. This leaves plenty of tension, and bullets seated more centered. I do this, even with turned necks, to get improved seating.”
Mandrels vs. Expander Balls on Decapping Rods
If you haven’t acquired an appropriate expander mandrel for your brass, but you DO have a full-length sizing die with an expander ball, this will also function to “iron out” the necks and reduce tension. However, using a die with an expander ball will work the necks more — since you first size them down, then the ball expands them up again. Typically (but not always), run-out is worse when using an expander ball vs. an expander mandrel.
* This .002″ tension is what we have observed with Lapua 6mmBR, 6.5×47, 6.5 Creedmoor, and .308 Win brass. This might vary with much smaller or larger cases, and of course a different brand of brass might yield different results. If you get too little tension with your current mandrel, you can get a smaller-diameter mandrel from 21st Century Innovation, with stainless, Black Nitride, or Titanium nitride versions. The Nitride models have less friction.
Many shooters these days clean their cartridge brass ultrasonically, or wet-tumble their cases with stainless media (above). Both methods get brass clean and shiny, inside and out. However, when those wet-cleaning processes are completed, you’re left with a pile of soaking wet brass. How do you dry your brass quickly and efficiently, without unsightly water spots? Read on for some great answers…
In our Shooters’ Forum, Member Terry asked: “How do you dry your brass after Ultrasonic cleaning?” In a Reloading Forum Thread, many smart suggestions were posted. A dozen fellow members outlined a variety of effective case-drying procedures, which work equally well for both wet-tumbled brass and ultrasonically-cleaned cases. Here are the Top 10 brass-drying suggestions from our Forum members.
TOP TEN Ways to Dry Cartridge Brass After Wet Cleaning
1. Food Dehydrator — Shake the brass in towel to get the bulk of water off. Next leave in the food dehydrator for 45 minutes or until there are no signs of moisture inside the cases. — Lawrence97
2. Lyman 5-Level Case Dryer — Rinse off cleaning solution(s), then load brass by type into racks in Lyman Cyclone Case Dryer. This is easier to load/unload than food dehydrators and holds more cases.
3. Hot Water + Compressed Air — Rinse all your cases as a batch using scalding hot water from the kitchen sink. Hot water evaporates off of brass very very quickly. Then hit them with compressed air. Takes 10 minutes. Simple. — SG4247
4. Oven Dry in Pre-Heated Oven — After pre-heating to 200° or so, turn off oven and put brass inside on a tray. Most important! Tell your wife what you are doing so she doesn’t crank it up to 425 to heat pizza! — MClark
NOTE: Many other members suggested oven drying at 150-200°. We recommend turning OFF the oven so you don’t cook your brass if you forget to remove the cases.
5. Towel Dry then Warm with Heat Gun — Roll brass in a towel until no more water shakes out. Lay out on cardboard box top and blow off with Harbor Freight heat gun. $9.99 on coupon. Two minutes of heated air and about half hour of wait and they are good to go. This is with primers removed. — Shaggy357
6. Compressed Air, then Sun Dry Outside – I rinse the brass, then blow them out with compressed air. Then, dependent on the time of year, lay them on a towel in the sun. — HogPatrol
7. Dishwasher on Dry Cycle – In the winter, I drop my wet brass cases neck-down on the rack pegs in the dishwasher, then turn on the dry cycle. In the summer…well, I’m in Texas. They go to the porch for a bit. — Toolbreaker
8. Alcohol Rinse then Air or Oven Dry — Rinse in 90% Isopropyl alcohol and either let air dry or stick in 175° oven for half an hour. Alternatively, use a dehydrator. — Zipollini
9. Slow Air-Dry in Loading Blocks — I have a reloading block with holes drilled in it. I simply load the block up and let it air-dry in the cupboard for a couple of days. — JCS
10. Wipe with Towel Then Anneal Normally — This thread is stirring my OCD side. Seems complicated for just drying — my brass dries just fine when I anneal it. This entire process can’t take an hour per batch. When finished, the brass is cleaned, annealed, and ready to size. — CHLuke
Deprime, then tumble brass with stainless media, water, Lemishine, and dish detergent.
Shake them easily in a strainer to knock out most media then grab 4-5 pieces, shake them over the bucket for the last of the media then inside a towel.
Finally blow out the primer pockets and wipe with a towel, load in the Annealeez.
Here is a clever DIY tool we learned about from Frank Shuster, a Forum member, who, sadly, passed away in 2015. Frank was a very knowledgeable shooter who was always willing to help others. Here is one of Frank’s smart inventions. He devised a way to measure the length of a rifle’s chamber using a fired cartridge case. Frank’s system works by cutting a “collar” from part of the case neck. This then slips over a bullet seated in a case loaded without powder or primer. As you chamber the dummy round, the collar will move back to indicate the full length of the chamber. (Make sure the bullet is seated well off the lands so the dummy round can chamber fully.)
The pictured gauge can be home made (for free) with components you already have on hand. Frank explained: “I used a Dremel cut-off wheel to cut the front half of the case neck off. A jewelers needle file to de-burr both rough-cut edges. The cut-off surface does not need to be perfectly square, because you are using the original straight mouth to make contact at the front of the chamber. Seat any old bullet to the approximate normal seating length. Next apply a tiny drop of oil on the ogive of the bullet, and slide the ‘collar’ over the bullet. Then chamber the dummy round and close the bolt. Extract the round slowly and carefully and take the measurement with calipers (see top photo).”
Frank’s DIY chamber length gauge works well. In a related Shooters’ Forum thread, Frank posted: “I’ve compared length dimensions doing it this way and with the chamber length shown on my chambering reamer drawings, and the Sinclair gauge, and they are all within .001″ or so.”
Commercial Chamber Length Gauges May Not Work with Custom Chambers
Frank did use Sinclair chamber-length gauges for some applications. These bullet-shaped gauges slip into a cartridge, but “it’s inconvenient to order that little gauge only… without spending $6 shipping for a $7 item.” Moreover, the Sinclair gauges may not fit a custom chamber with a tighter neck dimension because the diameter of the ring at the end is too large.
As an alternative to commercial gauges, the collar-type, homemade gauge will function properly in a custom chamber. The homemade gauge will work with smaller-than-standard chamber neck dimensions, as long as you use a piece of appropriately-turned fired brass that fits your chamber.
He who dies with the most toys wins — right? Well Sinclair has another interesting gadget you can add to your reloading bench. The Sinclair Case Neck Sorting Tool lets you quickly sort brass by neck-wall thickness. For those who shoot “no-turn” brass, this can improve neck-tension consistency. Large variances in neck-wall thickness can cause inconsistent neck “grip” on the bullet. Generally, we’ve found that more consistent neck tension will lower ES and (usually) improve accuracy. We know some guys who shoot no-turn 6mmBR brass in competition with considerable success — but their secret is pre-sorting their brass by neck-wall thickness. Cases that are out-of-spec are set aside for sighters (or are later skim-turned).
Watch Case Neck Sorting Tool Operation in Video
How the Case Neck Sorting Tool Works
Here’s how the Sinclair tool works. Cases are rotated under an indicator tip while they are supported on a case-neck pilot and a support pin through the flash hole. The unit has a nice, wide base and low profile so it is stable in use. The tool works for .22 through .45 caliber cases and can be used on .17- and .20-caliber cases with the optional carbide alignment rod. The MIC-4 pin fits both .060 (PPC size) and .080 (standard size) flash holes. Sinclair’s Case Neck Sorting Tool can be ordered with or without a dial indicator. The basic unit without dial indicator (item item 749006612) is priced at $59.99. With this standard tool you can use your own dial indicator with standard specifications. You can also buy the tool complete with dial indicator (item 749007129) for $89.99. IMPORTANT: This sorting tool requires caliber-specific Case Neck Pilots which must be ordered separately.
Editor’s Comment: The purpose of this Sinclair tool is rapid, high-quantity sorting of cartridge brass to ascertain significant case-neck-wall thickness variations. Consider this a rapid culling/sorting tool. If you are turning your necks, you will still need a quality ball micrometer tool to measure neck-wall thickness (to .0005) before and after neck-turning operations.
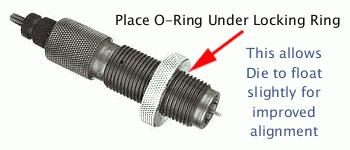
Here’s an inexpensive procedure that can help you load straighter ammo, with slightly better measured concentricity (i.e. less run-out) on the case necks and bullets. Simply use a Rubber O-Ring on the underside of the die locking ring. This allows the die to self-align itself (slightly) to the case that is being sized. Without the O-Ring, if the flat surface on the top of your press is not perfectly square with the thread axis, your die can end up slightly off-angle. This happens when the bottom of the locking ring butts up tight against the top of the press. The O-Ring allows the die to float slightly, and that may, in turn, reduce the amount of run-out induced during case sizing.
Top prone shooter GSArizona, who sadly passed in 2022, tried this trick and said it works: “Go to your local hardware store and get a #17 O-Ring (that’s the designation at Ace Hardware, don’t know if its universal). Slip the O-Ring on the die and re-adjust the lock ring so that the O-Ring is slightly compressed when the die is at the correct height. Size and measure a few more cases. You will probably see a slight improvement in neck concentricity as the die can now float a bit as the case enters and leaves it. This isn’t going to be a dramatic improvement, but it’s a positive one.”
We want to stress that adding O-Rings to sizing dies may help some reloaders, but we don’t offer this as a panacea. Try it — if using the O-Ring reduces measured runout that’s great. If it doesn’t, you’ve only spent a few pennies to experiment.
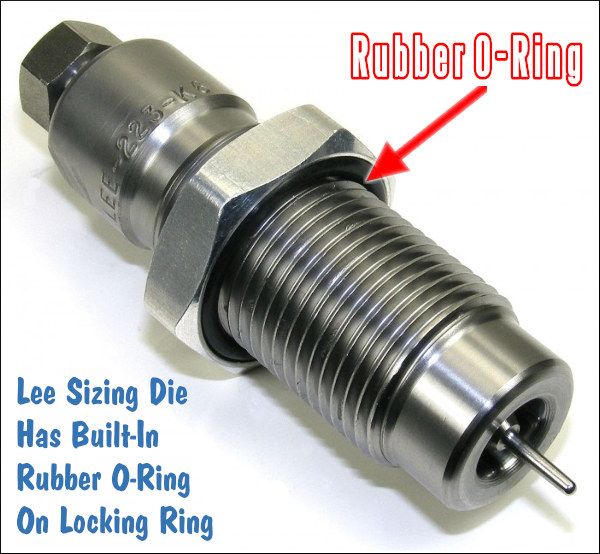
Lee Precision makes die lock rings with built-in O-Rings. Lee’s distinctive lock ring design allows the same kind of self-alignment, which is good. However, Lee lock rings don’t clamp in place on the die threads, so they can move when you insert or remove the dies — and that can throw off your die setting slightly. By using an O-Ring under a conventional die lock ring (that can be locked in place), you get the advantages of the Lee design, without the risk of the lock ring moving.
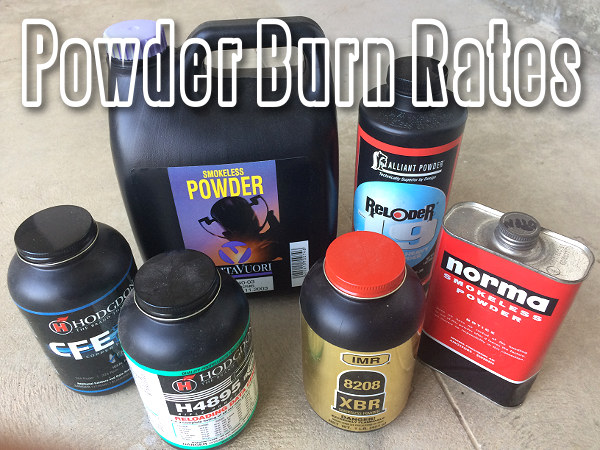
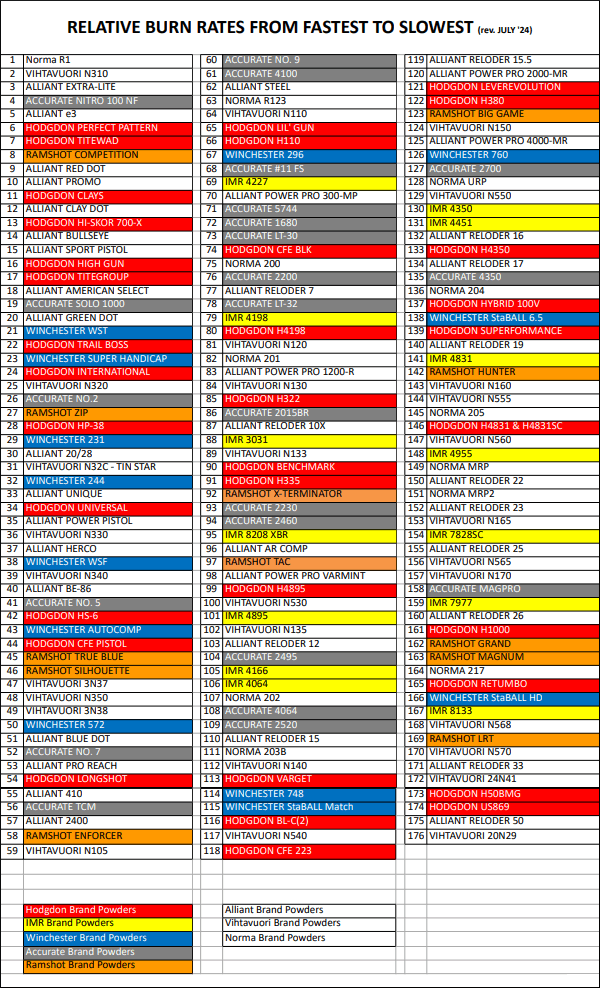
Among AccurateShooter’s most-visited web pages have been powder relative burn rate reference guides ranking powders from fastest to slowest. Here is the latest version of the Powder Burn Rate Table. Compiled by Hodgdon Powder Co., this Burn Rate Chart displays the relative burn rates of 176 different powders. Shown below is the latest table, released by Hodgdon in July 2024.
You’ll want to download this Powder Burn Rate Chart PDF. This 176-entry comparison table provides vital information for hand-loaders — with tested burn-rates. Note — this invaluable chart is not limited to Hodgdon and IMR propellants. This burn rate chart includes powders from eight major powder-makers: Accurate, Alliant, Hodgdon, IMR, Norma, Ramshot (Western), Vihtavuori, and Winchester.
This chart (July 2024 version) provides useful information for all hand-loaders. When doing load development, and testing one powder versus another, it’s generally wise to choose propellants that share the same relative burn rate, as least for starters.
NOTE: Hodgdon powders are red, IMR powders are yellow, Winchester powders are blue, Accurate powders are gray, and Ramshot powders are orange. Powders from Alliant, Norma, and Vihtavuori appear on the chart with white background. DOWNLOAD Burn Rate Chart HERE as PDF.
Sierra Bullets has published load data for the 6mm Creedmoor cartridge, a necked-down version of the popular 6.5 Creedmoor. Sierra has released very comprehensive 6mm Creedmoor load data, covering fifteen (15) different bullets from 55 to 110 grains. NOTE: Hornady-brand brass was used for Sierra’s 6mm Creedmoor load tests, not the newer, stronger Lapua 6.5 CM brass with small primer pockets. Hand-loaders using Lapua 6.5 Creedmoor brass necked to 6mm may have to adjust their loads.
Sierra writes: “As soon as the 6.5 Creedmoor was released in 2007, a 6mm version was being envisioned. After the 6mm Creedmoor demonstrated its worth at 1000 yards it began to catch the attention of Precision Rifle Series (PRS) competitors. The 6mm Creedmoor is a great fit for those looking for an AR platform-friendly cartridge. It delivers velocities very similar to the .243 Win and yet fits the AR10 magazine length[.] The 30-degree shoulder makes this a very efficient case and helps prolong case life as well. The 6mm Creedmoor works well with powders such as H4350, [RE-16], RE-17, and Ramshot Hunter for heavier long-range bullet weights. Slightly faster powders such as RE-15, Win 760, and Vihtavuori N540 work well with lighter weight bullets.”
Sierra Bullets Tested for 6mm Creedmoor Load Data
55gr BlitzKing (#1502)
60gr HP (#1500)
70gr HPBT (#1505)
70gr BlitzKing (#1507)
75gr HP (#1510)
In developing its 6mm Creedmoor load data, Sierra tested a very wide selection of propellants, two dozen overall. For the smaller bullets, fast-burning powders such as Benchmark, H4895, and CFE223 were tested. For the heavier 100+ grain bullets, Sierra tested a selection of medium-burn-rate powders including H4350, Reloder 16, Reloder 17, Varget, and Superformance. Sierra did a very thorough job. We know this information will be welcomed by 6mm Creedmoor shooters.
Don’t know what powder to try first? For the 107-110 grain bullets, if you want best accuracy and low ES/SD, our Forum members recommend Alliant Reloder 16 and Hodgdon H4350. If you are seeking max velocity with the 110-grainer, look at Hodgdon Superformance and Reloder 19.
Here are Sierra’s 6mm Creedmoor Load Data Charts for 90-95 grain bullets plus the 107gr MK and 110gr MK. There are five other tables for other bullet types.
BONUS: PRB 6mm Creedmoor and 6.5 Creedmoor Load Survey
The Precision Rifle Blog compiled Load Data from PRS Competitors, for both 6mm Creedmoor and 6.5 Creedmoor. This is a good place to start. PRB surveyed the match loads for “173 of the top-ranked precision rifle shooters in the country”. One cautionary note: These PRS guys may be loading fairly hot, so work up gradually, 0.3 grains at a time. CLICK HERE.
Photo 1: Three Near-Equal-Weight 7mm Bullets with Different Shapes
TECH TIP: Bullets of the same weight (and caliber) can generate very different pressure levels due to variances in Bearing Surface Length (BSL).
This article, from the USAMU Facebook Page, concerns reloading safety. In the relentless quest for more speed and flatter ballistics, some hand-loaders load way too hot, running charges that exceed safe pressure levels. Hint: If you need a mallet to open your bolt, chances are your load is too hot. Stay within safe margins — your equipment will last longer, and you won’t risk an injury caused by over-pressure. In this article, the USAMU explains that you need to account for bullet shape, diameter, and bearing surface when working up a load. Don’t assume that a load which is safe for one bullet will be safe for another even if both bullets are exactly the same weight.
How Bullet Profile and Bearing Surface Affect Pressure Levels
Today, we continue our handloading safety theme, focusing on not inadvertently exceeding the boundaries of known, safe data. Bullet manufacturers’ loading manuals often display three, four, or more similar-weight bullets grouped together with one set of load recipes. The manufacturer has tested these bullets and developed safe data for that group. However, seeing data in this format can tempt loaders — especially new ones — to think that ALL bullets of a given weight and caliber can interchangeably use the same load data. Actually, not so much.
The researchers ensure their data is safe with the bullet yielding the highest pressure. Thus, all others in that group should produce equal or less pressure, and they are safe using this data.
However, bullet designs include many variables such as different bearing surface lengths, hardness, and even slight variations in diameter. In fact, diameters can occasionally range up to 0.001″ by design. Thus, choosing untested bullets of the same weight and caliber, and using them with data not developed for them can yield excess pressures.
This is only one of the countless reasons not to begin at or very near the highest pressure loads during load development. Always begin at the starting load and look for pressure signs as one increases powder charges.
Bullet Bearing Surface and Pressure
Bullet bearing surface length (BSL) is often overlooked when considering maximum safe powder charges and pressures. In Photo 1, note the differences in the bullets’ appearance. All three are 7 mm, and their maximum weight difference is just five grains. Yet, the traditional round nose, flat base design on the left appears to have much more BSL than the sleeker match bullets. All things being equal, based on appearance, the RN/FB bullet seems likely to reach maximum pressure with significantly less powder than the other two designs.
TECH TIP: Bullets of the same weight (and caliber) can generate very different pressure levels due to variances in Bearing Surface Length (BSL).
Bullet 1 (L-R), the RN/FB, has a very slight taper and only reaches its full diameter (0.284 inch) very near the cannelure. This taper is often seen on similar bullets; it helps reduce pressures with good accuracy. The calculated BSL of Bullet 1 was ~0.324″. The BSL of Bullet 2, in the center, was ~0.430″, and Bullet 3’s was ~ 0.463″. Obviously, bullets can be visually deceiving as to BSL!
Some might be tempted to use a bullet ogive comparator (or two) to measure bullets’ true BSL for comparison’s sake. Unfortunately, comparators don’t typically measure maximum bullet diameter and this approach can be deluding.
Note: Due to time constraints, the writer used an approximate, direct measurement approach to assess the bullets’ different BSLs. While fairly repeatable, the results were far from ballistics engineer-grade. Still, they are adequate for this example.
Photo 2: The Perils of Measuring Bearing Surface Length with Comparators
In Photo 2, two 7mm comparators have been installed on a dial caliper in an attempt to measure BSL. Using this approach, the BSLs differed sharply from the original [measurements]. The comparator-measured Bullet 1 BSL was 0.694” vs. 0.324” (original), Bullet 2 was 0.601” (comparator) vs. 0.430” (original), and Bullet 3 (shown in Photo 2) was 0.602” (comparator) vs. 0.463” (original). [Editor’s comment — Note the very large difference for Bullet 1, masking the fact that the true full diameter on this bullet starts very far back. You can use comparators on calipers, but be aware that this method may give you deceptive reading — we’ve seen variances just by reversing the comparators on the calipers, because the comparators, typically, are not perfectly round, nor are they machined to precision tolerances.]
Thanks to the U.S. Army Marksmanship Unit for allowing the reprint of this article.


 Both Sinclair and K&M Tools make a die body specifically to hold expander mandrels. The $49.99

 5. Towel Dry then Warm with Heat Gun — Roll brass in a towel until no more water shakes out. Lay out on cardboard box top and blow off with Harbor Freight heat gun. $9.99 on coupon. Two minutes of heated air and about half hour of wait and they are good to go. This is with primers removed. — Shaggy357


 Commercial Chamber Length Gauges May Not Work with Custom Chambers
 He who dies with the most toys wins — right? Well Sinclair has another interesting gadget you can add to your reloading bench. The Sinclair
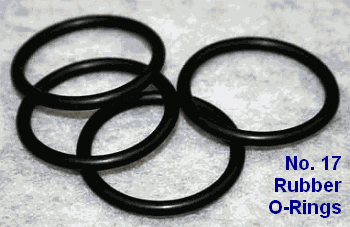


 Bullet 1 (L-R), the RN/FB, has a very slight taper and only reaches its full diameter (0.284 inch) very near the cannelure. This taper is often seen on similar bullets; it helps reduce pressures with good accuracy. The calculated BSL of Bullet 1 was ~0.324″. The BSL of Bullet 2, in the center, was ~0.430″, and Bullet 3’s was ~ 0.463″. Obviously, bullets can be visually deceiving as to BSL!


