Every serious hand-loader benefits from a precise, repeatable, and efficient powder dispensing system. There are many electronic powder dispensers on the market, starting at about $195 for a Frankford Arsenal Intellidropper and $240 for a Lyman Gen6. At the high end, the ultimate powder weighing/dispensing system would be an Auto-Trickler V4 mated to an top-tier electronic Force Restoration scale. Such a system can run $1200 or more, depending on scale cost.
In today’s Saturday video showcase we feature eight videos about electronic powder dispensers, as well as Auto-Trickler systems (both V3 and V4). If you are in the market for a new powder scale/dispenser system, we recommend you watch these videos. You may be surprised by some of the findings, and you will certainly learn more about these machines — their pros and cons. That knowledge can help you decide what electronic powder dispenser best deserves your hard-earned dollars.
Five Powder Dispenser Comparison Test (All Units Purchased)
If you are in the market for a sub-$500 electronic powder dispenser, definitely watch this review. This Backfire comparison test is notable because the tester spent his own money to purchase all five powder dispensers being reviewed. That means Backfire could tell the full truth, both good and bad, about the machines. In fact, Backfire bought TWO ChargeMaster Lites because one failed (See 14:12 time-mark). The reviewer liked the RCBS ChargeMaster Supreme, but his top choice overall was the Hornady Auto Charge Pro. He favored the overall design, and really liked the way the dispensing speeds could be easily set faster or slower. Here are highlights from the video review:
00:08 Speed Test
03:09 Accuracy Test
07:57 Frankford Arsenal Intellidropper
09:08 Lyman Gen 6
10:44 RCBS Chargemaster Supreme
12:03 Hornady Auto Charge Pro
14:12 RCBS Chargemaster Lite
14:41 Conclusions
AutoTrickler V3 vs. Hornady Auto Charge Pro
In the Backfire comparison video above, the Hornady Auto Charge Pro powder dispenser earned top marks among sub-$500 units. Here the Auto Charge takes on some tougher competition — an ultra-precise Force Restoration scale fitted with an Auto-Trickler V3, a system that cost upwards of $1150.00 U.S. Dollars. The Australian duo running the comparison found the Auto-Trickler system was more accurate and consistent. Notably, with a dispense speed of just 14 seconds. the Auto-Trickler V3 system was significantly faster than the Hornady machine. The Auto-Tricker V3 has been superseded by the new Auto-Trickler V4 which retails for $490.00 USD. Add $630 or more for a good Force Restoration scale such as the A&D FX-120i.
RCBS New ChargeMaster Supreme and Other ChargeMasters
In this well-made video, Gavin Gear of UltimateReloader.com does a detailed review of the new-generation RCBS ChargeMaster Supreme. He puts it through his paces, verifying its accuracy and repeatability. He shows how the unit can be programmed. At the 17:20 time-mark, Gavin employs an A&D FX-120i Force Restoration scale to check the ChargeMaster Supreme’s charge-weighing precision. The results were good.
Frankford Arsenal Intellidropper vs. RCBS ChargeMaster Link
The Frankford Arsenal Intellidropper, now just $194.49 on Amazon, was very innovative when first released, offering remote Bluetooth access and a wide range of programmable features. The downloadable App stores your load data and has preloaded bullet and powder databases. This video compares the Intellidropper with another Bluetooth-enabled modern powder dispenser, the RCBS Chargemaster Link. A free RCBS App allows you to control settings remotely.
Hornady Auto Charge Pro Review by Ultimate Reloader
As the $359 Hornady Auto Charge Pro dispenser was top-rated in the Backfire comparison at the start of this article, we thought we’d include a detailed review from Gavin Gear of UltimateReloader.com. If you are thinking of buying a Hornady Auto Charge Pro, definitely watch this video, as it is the most thorough Auto Charge Pro review on the web and Gavin is by far the most articulate tester. SEE FULL TEST.
AutoTrickler V4 and Force Restoration Scale
The AutoTrickler V4, paired with a quality Force Restoration scale, is the “Rolls Royce” of electronic powder dispensing systems, offering unrivaled charge-weight accuracy, great repeatability, and ultra-fast dispensing speeds. If you have the budget — $490 for the V4 plus $625+ for scale — the AutoTrickler V4 is a superb system that lets you load extremely accurate, consistent ammo. This detailed F-Class John video shows how to set up the system properly and control the dispensing and trickling functions.
RCBS MatchMaster vs. AutoTrickler V3 with A&D FX-120i Scale
This video is interesting because it compares the most advanced and expensive mass-market electronic dispenser, the $899 RCBS MatchMaster, with an AutoTrickler V3 mated to an ultra-precise Force Restoration scale. The AutoTrickler V3 + scale system offers wicked fast dispensing while delivering near-single-kernel precision and great repeatability. The MatchMaster has some interesting features, including dual dispensing tubes and a special slower, “Match Mode” dispensing function which provides enhanced precision.
BONUS Video: RCBS ChargeMaster Dispenser vs. Four Scales
This video answers the question “How does a common powder dispenser’s weighing accuracy compare to stand-alone scales?” Here the tester compares the weighing precision of an early-model RCBS ChargeMaster with four dedicated scales: A&D FX-120i (Force Restoration), Hornady G2-1500, Hornady GS-1500 (Gen 1), and a WAOAW milligram scale. These scales range significantly in price, with the FX-120i Force Restoration the most expensive by far. The features/prices of the four scales are listed at 4:41 time-mark. Accuracy/repeatability comparison testing with test weights starts at 10:12 time-mark.
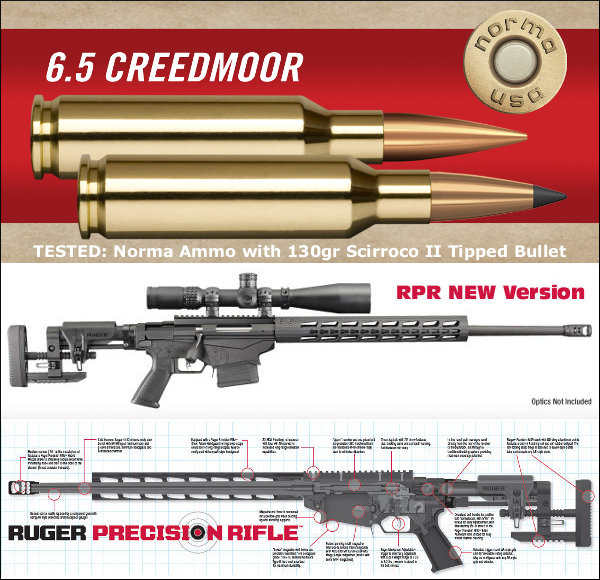
The 6.5 Creedmoor cartridge has become extremely popular in the last few years. It is a popular cartridge among PRS and tactical competitors, and has been used successfully by deer hunters and silhouette shooters. Notable major manufacturers such as Ruger and Savage are selling popular rifles chambered for this mid-sized cartridge. The availability of affordable factory rifles chambered in 6.5 Creedmoor further fuels its popularity.
To mark the popularity of the 6.5 Creedmoor, we’ve sourced five videos from YouTube. These videos cover loading for the 6.5 Creedmoor and also test accuracy in both custom and factory rifles. Enjoy this 6.5 Creedmoor Video Fest:
1. Gas Gun Shoot-Out: 6.5 Creedmoor vs. .308 Win
In this TFB TV video, testers put a 6.5 Creedmoor up against a .308 Winchester with AR-10 type rifles. The head-to-head test compares the ballistics, trajectory, recoil, and inherent accuracy of the two popular cartridge types. We can’t call this a definitive test because most 6.5 Creedmoor shooters run bolt-action rifles. The key take-aways are that the 6.5 Creedmoor has significantly less recoil, and a flatter trajectory (at least with typical factory ammo). Still, the video is a good starting point for anyone considering a gas gun in 6.5 Creedmoor.
2. Ruger Precision Rifle with Norma 6.5 Creedmoor Ammo
In this video Gavin Gear tests Norma-brand factory ammo in a Ruger Precision Rifle chambered in 6.5 Creedmoor. Gavin reports: “Norma is known for its high-quality brass and ammunition. Recently, I saw that Norma had announced a new addition to their Professional Hunter lineup of ammunition: in 6.5 Creedmoor! I thought I should try some out with the Ruger Precision Rifle. As you saw in the video, this ammunition behaves more like match ammunition.”
3. 6.5 Guys Test Lapua 6.5 Creedmoor Brass in Tactical Rifles
If you have a 6.5 Creedmoor rifle, or are considering getting a gun chambered for this cartridge, we strongly recommend you watch the full 6.5 Guys Video. Ed and Steve spent a lot of time conducting this test, and the video includes helpful summaries of their findings.
4. Reloading for the 6.5 Creedmoor — Gear and Components
If you own a 6.5 Creedmoor rifle, and plan to start hand-loading for the popular cartridge, this video may help you select effective load components. The video examines a wide variety of brass, powder, and bullets options for the cartridge. In addition the reviewer looks at various reloading dies and tools suitable for 6.5 Creedmoor hand-loading.
5. The Springfield Armory M1A — Now Offered in 6.5 Creedmoor
Many folks may not realize that Springfield Armory now makes an M1A chambered in 6.5 Creedmoor. With considerably less recoil, this 6.5 CM version is easier to shoot than the classic 7.62×51 M1A: “Having a 6.5 Creedmoor caliber in the M1A lineup gives long-range shooters more choices with the precision and accuracy they require,” says Springfield Armory CEO Dennis Reese.
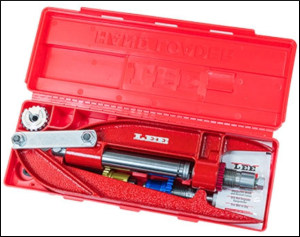
The LEE Breech Lock Hand Press is a useful addition to any reloader’s tool collection. This Hand Press allows you to resize brass or seat bullets while at the range or away from your loading room. No it won’t replace your Co-Ax or Rockchucker, but this is a handy piece of gear. And it’s VERY affordable. The LEE Breech Lock Hand Press (by itself) is $51.99 at MidwayUSA — a great deal. Or, for $72.99 at Midsouth you can get a complete Lee Hand Press Kit including Breech Lock Hand Press, Reloading Die Set, Lock Ring Wrench, Breach Lock Ram Prime, and Storage Box. Choose one of four cartridge types for the provided dies: .223 Remington, 9mm Luger, .38 SPL/.357 Mag, and .45 ACP.
LEE Hand Press Quick-Change Die Functionality
This LEE Press includes the Breech Lock Quick-Change Die Feature, so you can instantly change dies with just a twist of the wrist. One Breech Lock Quick Change Bushing is included. The Breech Lock Hand Press is light and compact. It tips the scale at a mere 1 3/4 pounds and overall product length is 11.5″. Note: the maximum overall length cartridge the LEE Hand Press can accept is 3.650 inches.
While we don’t recommend the Hand Press for major full-length sizing chores, it does a good job seating bullets. This makes it a handy “field expedient” tool when doing load development at the range. For example you can experiment with seating depth by loading a batch of cartridges at home with the bullets deliberately seated long. Then, at the range, you can re-seat the bullets progressively shorter (in a series of rounds), until you find the optimal Cartridge OAL.
LEE’s Hand Press is also great for decapping operations. One verified buyer reports: “I mostly use it for decapping while watching TV, with a universal decapper die. Of course it is also useful for other operations. I wouldn’t love sizing large rifle cases with it, but if you’ve prepped your cases on a bigger press you could comfortably take it to the range for load development, one round at a time, working right there at the line instead of making a bunch of loads at home that you’ll have to disassemble later. It’s smaller and more lightweight than it looks[.]”
Using LEE Hand Press to Load at the Range
To learn more about using the LEE Hand Press in the field with a compact scale, read Reloading Without a Bench on GunsAmerica.com. Author Christopher Mace explains: “Whether you want a better way to do load development, the capability to reload out of your ‘bugout bag’, or you’re short of space but wanting to get into reloading, the LEE Loaders and the LEE Hand Press offer you some options.”
Here’s a helpful hint for hand-loaders from Sierra Bullets. While this article focuses on Sierra’s new Tipped Match-King bullets, the recommended solutions apply to other bullet types as well. The article explains how sharp edges on a seating stem can cause a ring to be pressed into the bullet jacket — especially with compressed loads that resist downward bullet movement. Here Sierra technician Rich Machholz diagnoses the problem and provides a solution.
Solutions for Ring Marks Caused by Seating Stems
by Sierra Bullets Ballistic Technician Rich Machholz
Now that the new Tipped MatchKing® (TMK) bullets are being shipped and shooters are putting them to use I have received several calls regarding marking on the bullet ogive from the seating stem.
The cause can be traced to one of several things. In the .223 and especially with the long, 77 grain TMK seated at 2.250” or even 2.260” most loads of Varget® and Reloder® 15 are compressed loads, sometimes heavily compressed. This puts a great deal of pressure on the bullet through the seating stem. The result of all this pressure is a mark of varying depth and appearance on the ogive of the bullet. [Editor: We have seen this issue with a variety of other bullet types/shapes as well, including non-tipped VLDs. The solution is profiling the internal cone of the seating stem to match your bullet shape.]
Some older seating stems might even bear against the tip of the bullet which can make a slight bulge in the jacket just below the junction of the resin tip and the copper jacket in a compressed load. If this is the case there is not a ready fix other than calling the die manufacturer and requesting a new deeper seating stem.
Polish Your Seating Stem to Remove Sharp Internal Edges
If the seating stem is of proper depth the culprit most generally is a thin sharp edge on the inside taper of the seating stem. This is an easy fix that can be accomplished by chucking a spare 77 grain bullet in your drill, coating it with valve grinding compound or even rubbing compound or in a pinch even tooth paste.* Remove the seating stem assembly from the seating die. Turn the drill on and put the seating stem recess over the spinning bullet with the polishing compound to break or smooth the sharp edge that is making the offending mark. This might take more than one application to get the proper polish depending upon what you use, but the more you polish the better the blend of angles which will [ensure the stem matches the bullet contours, not leaving a sharp ring].
If the above is a little more than you care to tackle you might try very fine emery cloth twisted to a point that can be inserted into the mouth to the seating stem and rotated to polish the inside to eliminate any sharp edges that might be present.
Load Advice for 77gr TMKs in the .223 Rem
And last but certainly not least. Actually, even though we don’t say you need additional data for the TMKs, remember you are dealing with heavily-compressed loads in some cases because of the additional bullet length. Due to the additional length of these new bullets and in the interest of gaining some room in the case you might consider trying a slightly faster extruded powder like BenchMark or the 4895s or an even more dense powder like the spherical H335®, CFE223 or TAC. The extra room will allow for trouble free bullet seating also.
Good luck and remember we are no further away than your telephone: 1-800-223-8799.
Close-up of the Tri-Way Trimmer with clear plastic chip guard removed.
Giraud Tool offers a case trimmer/chamferer device that works with a power drill (or other power source). Giraud’s patented Tri-Way Trimmer is a self-contained unit powered by your drill or motor. Using a sharp carbide blade it will trim your cases to length, deburr, and cut both inside and outside chamfers — all in one pass. That’s pretty impressive for a $120.00 tool that fits in the palm of your hand.
Product Features
1. Fully adjustable for cartridge length (and depth of chamfer).
2. Carbide blade cuts a 15° inside case mouth chamfer and 45° outside chamfer.
3. Case holder supported by sealed ball bearing raceway.
4. Tool includes removable, transparent plastic chip guard.
5. Tool can work in any orientation (vertical, horizontal, or any angle).
The Giraud Tri-Way Trimmer is designed to be powered by a portable hand drill, drill press, or other dedicated rotating power source. The tool indexes off the shoulder of your cases, but the blade adjusts so that cartridge overall length (COAL) can be controlled with precision. Constructed out of 6061-T6 aluminum and 303 stainless steel, the Tri-Way tool should last a lifetime. Note: This tool is not universal. The Tri-Way is dedicated to a single cartridge and “related” cartridges with similar body dimensions. Thus you need a specific tool for each cartridge family. For example, the .308 Win tool will also trim .243 Win, .260 Rem, and 7mm-08.
Do you often load at the range? Or maybe you need to transport loading gear when you travel in your RV. Well here is a smart transport option — a metal box that holds tools, dies, arbor press, case-trimmer, even a ChargeMaster.
Some guys have built their own loading tool-boxes from wood. Other may stuff gear in a couple of plastic range boxes. But clever Chris Covell came up with an even better solution. Chris sourced a handsome, sturdy metal Horse Grooming Box from eBay. Chris reports the multi-feature metal box “works perfectly for reloading. My ChargeMaster is now out of the wind.”
Bullets, Trickler, and Priming Tool on Top
On top, below the hinged metal lid, is a large compartment that holds Covell’s funnels, scales, priming tool, trickler and other vital gear (photo on right). This top compartment is deep enough to handle wide-mouth funnels with no problem.
Slide-Out Drawer with Dividers
Below the top level is a handy sliding drawer with multiple dividers. This is perfect for holding Covell’s inline seating dies, case-neck deburring and chamfering tools, among many other smaller bits and pieces.
In the bottom of the Horse Grooming box is a large compartment that holds bigger gear. In the bottom section, Covell places his RCBS Chargemaster Lite, along with a case-trimming tool, an arbor press, and various other bulky tools. Check it out:
Folks who load at the range need to bring a lot of gear — reloading presses, powder dispensers, scales, funnels, sizing/seating dies, brass prep tools and more. And there may be other important items to transport — such as ammo caddies, LabRadar mounts, over-size rest feet, and even barrel fans. With this metal box you can easily organize (and protect) al that gear. This box was sourced affordably via eBay.
Before you load that new cartridge brass for the first time, run an expander mandrel down the case necks. This will iron out dents and provide more uniform neck tension. Chose a mandrel diameter that provides appropriate neck tension.
Lapua brass is so good that you’ll be tempted to just load and shoot, if you have a “no-turn” chamber. However, some minimal case prep will ensure more uniform neck tension. Keeping your neck tension very uniform allows more consistent bullet seating. That, in turn, usually yields better accuracy, and lower Extreme Spread and Standard Deviation (ES/SD). Lapua brass, particularly 6mmBR, 6.5×47, 6.5 Creedmoor, and .308 Win comes from the factory with tighter-than-optimal necks.
Before you seat bullets, at a minimum, you should inside chamfer the case mouths, after running an expander mandrel down the necks. The expander mandrels from both Sinclair Int’l (Brownells, $14.99 stainless, $24.99 Titanium Nitride coated) and K&M will both leave the necks with enough neck tension (more than .001″) so you can then seat bullets without another operation. We suggest putting a bit of lube on the mandrel before running it down the necks — but remove any lube that gets inside the necks before seating bullets. If you do a lot of loading you may benefit from a Titanium Nitride-coated mandrel.
Both Sinclair and K&M Tools make a die body specifically to hold expander mandrels. The $49.99 Sinclair version fits caliber-specific expander mandrels which measure approximately .001″ less than bullet diameter for each caliber. This is an updated “Gen II” design that completely captures the mandrel within the die so the mandrel cannot pull out. It also has an O-ring in the die cap that allows the mandrel to self-center within the case neck. Brownells offers two sizes of Sinclair die bodies for expander mandrels: .17 -.338 caliber (#749011715 $49.99); and .357 – .50 caliber (#749008843, $49.99). All Generation II dies are machined from stainless steel and the standard diameter 7/8-14 dies include the Sinclair Stainless Steel Split Lock Ring.
Once you run the expander mandrel down the necks of Lapua brass, after you account for brass spring-back, you’ll have about .002″ neck tension*. This will make the process of seating bullets go much more smoothly, and you will also iron out any dents in the case mouths. Once the case mouths are all expanded, and uniformly round, then do your inside neck chamfering/deburring. The same expander mandrels can be used to “neck-up” smaller diameter brass, or prepare brass for neck-turning.
Forum member Mike Crawford adds: “These expanders can also reduce runout from offset seating. Prior to bullet seating, expand the sized necks to force thickness variance outward. With the Sinclair system, the necks will springback fine, and will not be pulled out of center. This leaves plenty of tension, and bullets seated more centered. I do this, even with turned necks, to get improved seating.”
Mandrels vs. Expander Balls on Decapping Rods
If you haven’t acquired an appropriate expander mandrel for your brass, but you DO have a full-length sizing die with an expander ball, this will also function to “iron out” the necks and reduce tension. However, using a die with an expander ball will work the necks more — since you first size them down, then the ball expands them up again. Typically (but not always), run-out is worse when using an expander ball vs. an expander mandrel.
* This .002″ tension is what we have observed with Lapua 6mmBR, 6.5×47, 6.5 Creedmoor, and .308 Win brass. This might vary with much smaller or larger cases, and of course a different brand of brass might yield different results. If you get too little tension with your current mandrel, you can get a smaller-diameter mandrel from 21st Century Innovation, with stainless, Black Nitride, or Titanium nitride versions. The Nitride models have less friction.
Readers who have just recently discovered the Daily Bulletin may not realize that AccurateShooter.com has hundreds of reference articles in our archives. These authoritative articles are divided into multiple categories, so you can easily view stories by topic (such as competition, tactical, rimfire, optics, shooting skills etc.). One of the most popular categories is our Technical Articles Collection. On a handy index page (with thumbnails for every story), you’ll find over 120 articles covering technical and gunsmithing topics. These articles can help you with major projects (such as stock painting), and they can also help you build more accurate ammo. Here are five popular selections from our Technical Articles archive.
Stress-Free Pillar Bedding. Richard Franklin explains how to do a top-quality bedding job, start to finish.
OnTarget Software Review. Our Editors test free software that measures shot groups with great precision. We explain how to use the program and configure advanced features.
Savage Action Tuning. Top F-TR shooter Stan Pate explains how to enhance the performance of your Savage rifle by optimizing the torque settings of the action screws.
Complete Precision Case Prep. Jake Gottfredson covers the complete case prep process, including brass weight sorting, case trimming, primer pocket uniforming, neck-sizing, and, case-neck turning.
Stock Painting Instructions. Step-by-step guide for stock painting by expert Mike Ricklefs. Mike shows both simple coverage and fancy effects.
When your cases become hard to extract, or you feel a stiff bolt lift when removing a cartridge, it’s probably time to full-length size your cases, and “bump” the shoulder back. We generally recommend bumping shoulders each time you reload, after the initial fire-forming. Benchrest and F-Class benchrest shooters, running relatively high pressures, typically full-length size every load cycle, bumping the shoulder .001-.003″. High Power shooters with gas guns generally full-length size every time, and may need to bump the shoulders .003″ or more to ensure reliable feeding and extraction.
Use Shims for Precise Control of Shoulder Bump
Some shooters like to set the “default” position for their full-length die to have an “ample” .003″ or .004″ shoulder bump. When they need less bump, a simple way to reduce the amount of shoulder movement is to use precision shims in .001″ (one-thousandth) increments.
Here are reports from Forum members who use the shims:
“Great product. I have my die lock ring(s) adjusted for the shortest headspace length on my multiple chambers 6BRs and 6PPCs. When needing a longer headspace, I just refer to my notes and add the appropriate shim under the lock ring. Keep it simple.” — F.D. Shuster
Mats Johansson writes: “I’ve been using [shims] since Skip Otto (of BR fame) came out with them. I set up my dies with the .006″ shim, giving me the option of bumping the shoulder a bit more when the brass gets old and hardens while still having room to adjust up for zero headspace, should I have missed the original setup by a thou or two. Hunting rounds can easily be bumped an extra .002-.003″ for positive, no-crush feeding. Being a safety-oriented cheapskate, I couldn’t live without them — they let me reload my cases a gazillion times without dangerous web-stretching. Shims are a must-have, as simple as that.” — Mats Johansson
Sinclair Die Shim Kit — Seven Shims for $14.99
Sinclair Int’l (through Brownells) offers a seven-piece set of Sizing Die Shims that let you adjust the height of your die (and thereby the amount of bump and sizing) in precise .001″ increments. Sinclair explains: “Some handloaders will set their die up to achieve maximum sizing and then progressively use Sinclair Die Shims between the lock ring and the press head to move the die away from the shellholder. Doing this allows you to leave the lock ring in the same position. These shims are available in increments of .001″ and work very well.”
Seven Shims from .003″ to .010″
Sinclair’s $14.99 Die Shim Kit (item 22400) includes seven shims in thicknesses of .003, .004, .005, .006, .007, .008, and .010. For ease of use, shim thickness is indicated by the number of notches cut in the outer edge of each shim. Even without looking you can “count” the notches by feel.
SUMMARY: Powder can have a very long shelf life. You need to watch for changes in smell and color. A reddish tinge, almost like rust on the powder, is a bad sign, as is a foul odor, not to be confused with a normal chemical smell. Either of these signs indicate it is time to dispose of your powder by means other than shooting.
Ever wondered about the stability of the propellants in your reloading room? There are some important things you should know about powder storage, to ensure consistent powder performance and safety. Western Powders (which has been acquired by Hodgdon) published an informative Q & A series entitled Dear Labby: Questions for our Ballistics Lab . Here are some excerpts that pertain to powder storage and shelf life. Worried that your powder may be too old? Western’s experts explain how to check your propellants for warning signs.
Proper Powder Storage
Q: I live in southern Arizona where it is very hot. I am told powders will become unstable if stored in an area not air-conditioned. My wife says no powder or primers in the house. Can powder be stored in a refrigerator? What about using a fireproof safe? I would appreciate your ideas. — M.C.
Lab Answer: SAAMI guidelines are pretty clear on issues of storage. They recommend storing smokeless powder in containers that will not allow pressure to build if the powder is ignited — ruling out gun safes and refrigerators.
In their original containers, the lifespan of smokeless powders is quite long, even in hot, arid climates. In fact the lifespan is typically longer than the average handloader would need to store them. Stored safely in a garage or outbuilding, your powder should last years. If you see the powder developing a reddish tint, or giving off a foul odor, it is time to discard it.
Clumps in Powder Container
Q: I ordered some of your Accurate 1680 powder back about in December. I just now opened it … and it is full of clumps. My knowledge tells me that means moisture. Am I wrong? I just now broke the seal and it has been stored in a ammo can with desiccant packs around it and a dehumidifier running 14-16 hours a day. I can’t imagine this being my fault, if this does indicate moisture. I don’t know if the pink part on the label is suppose to be red or not, but it is definitely pink, so if it was red I am wondering if I was shipped an old container? I hope that this isn’t bad and I am stuck with it…
Lab Answer: All powder contains a certain amount of moisture. When the powder is stored or during shipping, it can go through temperature cycles. During the cycling, the moisture can be pulled to the surface and cause clumping. Clumping can also be caused by static electricity if too dry or the powder has limited graphite content. You can break up the clumps before metering and they shouldn’t be a problem. This will not affect the powder performance, so your product is fine. Accurate 1680 labels are designed in Pink. As a side note, specification for testing powder is at 70° F and 60% humidity.
Shelf Life and Packaging Dates
Q: Does powder ever get to old to use and what identifying marks does your company put on the canister for when it is made, You have helped me out a while ago when I asked about keeping my cowboy shooting under 950 fps and it works great less stress on the hand and the recoil is very minimum. — R.B.
Lab Answer: On one pound bottles, the number is on the corner in a silver box. If the powder was poured today, it would read 012815 followed by a lot number. The whole number would look something like 012815749. Eight pound bottles have a sticker on the bottom with an obvious date code. The lot number appears above the date.


 LEE Hand Press Quick-Change Die Functionality


 Bullets, Trickler, and Priming Tool on Top


 Both Sinclair and K&M Tools make a die body specifically to hold expander mandrels. The $49.99


