Here’s an inexpensive product that can make your case prep and loading tasks easier. We use and recommend the cleverly-designed Lyman Bleacher Blocks. These multi-level (stepped) cartridge holders save space on your bench AND make it easier to select a particular case/cartridge from a full block. Each row is a different height for convenience. With Bleacher Blocks it’s also easier to check for powder levels, or place bullets before the seating process.
Lyman’s Bleacher Block cartridge holders have many advantages over conventional, single-level blocks. Use the different levels for sorting brass. Or, migrate the brass from top to bottom as you proceed through case prep stages. If you are assembling loads with different bullets for load testing, you could arrange the loaded rounds on different levels for easy recognition. For example put V-Max loaded rounds on the top tier, and Berger Hybrid loaded rounds on the bottom tier. Or, if you are experimenting with neck tension, you can use different rows for cases processed with different bushings.
Made of durable orange polymer, Lyman Bleacher Blocks are now molded in five sizes — small pistol, large pistol, and three rifle sizes. The smallest rifle block (with 0.388″-diam holes) fits .223 Rem-size case heads. The middle size rifle block (with 0.485″-diam holes) fits .308 Win-size case heads. That works for 6mmBR/Dasher sized cases perfectly. The biggest rifle Bleacher Block has 0.565″-diameter recesses for magnum-size cases. There are also two pistol blocks — .445″ hole size for 9mm/.357 size and .565″ diameter for larger .44/.45 pistol cartridges.
Here’s what Lyman says about its innovative cartridge block design: “Our [stepped] loading blocks allow for easier handling of cases in and out of the loading block. Our stepped design allows you to easily grip a single case without jamming your fingers down into a group of cases like in traditional loading blocks, and allows for a smaller ‘footprint’ on your bench.”
Lyman Bleacher Blocks are among the Reloading Tools reviewed in this helpful video:
Our friend Gavin Gear has just released an excellent video showing how to make a threaded Modified Case for use with the Hornady Lock-N-Load Overall Length Gauge. You can watch Gavin make a Modified Case start to finish in the video below:
Video Shows How to Drill and Tap Modified Case
Gavin has some clever tricks. First he uses a sizing die to hold the cartridge case during the threading process. Second he uses two drill bits in sequence — a smaller bit to ream out the primer pocket, and then a larger “M” bit to increase the hole diameter before threading the brass. Finally he leaves the threading tap IN the brass, locks the tailstock, and then “gently pulls on the quill” to remove the brass from the die held in his lathe (See 5:46 timemark).
Get the Correct 5/16″-36 RH Tap
Unfortunately, Hornady has selected an uncommon thread type for OAL Gauges. You probably won’t be able to buy the correct 5/16″ – 36 RH HSS Tap at your local hardware store. However you CAN order this special tap from Amazon for $9.99.
Modified Case Q & A — TECH TIPS
Why do I need a Modified Case?
Every serious reloader should have a Modified Case for each cartridge type they shoot. The reason is that this allows you to get very precise measurements of the length-to-lands in your chamber. When used with the Hornady OAL Gauge, with some practice, you should be able to get repeatable length-to-lands measurements within about 0.0015″. We generally do 4-5 measurements with the OAL Gauge and usually 3 or 4 will be “on the money”. NOTE: We recommend a gentle, easy pressure on the plastic pusher rod. Don’t push too hard or you will jam the bullet hard into the lands, which produces inconsistent results.
Can’t I Just Buy a Modified Case?
Hornady makes a variety of Modified Cases sold on Amazon and through retailers such as Midsouth. While Hornady makes modified cases for many standard cartridges, if you shoot a wildcat such as the 6mm Dasher or .284 Shehane, you’ll need to create a custom modified case. And even if you shoot a standard cartridge such as the .308 Win, you can get more consistent measurements with a custom Modified Case.
If you do decide to make your own modified case, you’ll want to start with a case that’s been fired in your rifle. That way you get the best fit to YOUR chamber. Also, you won’t need to expand the neck to provide bullet clearance. Then you need to drill out the primer pocket and tap the base of the case to match the threads on the Hornady OAL Gauge tool. Make at least two modified cases, as you’ll probably misplace one at some point.
MORE INFORMATION: Want to learn more? We published a much longer story in which Erik Cortina explains in greater detail how to made the Modified Case. That article illustrates the 5/16″ – 36 RH HSS Tap required and shows how to set up the lathe to drill and tap your case. If you are serious about making your own Modified Cases, you should Read the Full Article.
Labor Day 2025 (September 1st) is just 5 days away. Soon we’ll be enjoying a major 3-day holiday weekend. We know many of our readers will be out on the road visiting friends or enjoying end-of-summer getaways. How do you do your reloading chores while traveling on holiday? Here’s a solution from Forum member Dave Gray (U.S. Army Retired).
Dave is a self-declared “full-time RVer” who spends most of his time on the road. Behind his Ram 3500 pickup, Dave tows a huge 41-foot Heartland Cyclone toy hauler featuring a 12X8 foot garage in the rear. In the rear garage area, which holds a compact Smart Car, Dave has set up a removable reloading bench complete with RCBS Rockchucker single stage press and Dillon progressive press.
Reloading Bench Mounts to RV Wall with Brackets
Dave explains: “I used a 2″X6″X5′ board for the bench. It’s perfect for my needs, and is easy to disassemble. I made it this small so that I can park my Smart Car in the garage during travel to my destinations. The bench, attached to the wall frames, is very solid. The presses’ centers are 3″ and 6.5″ from the brackets. [There are] four bolts on the wall into aluminum wall frame and 3 bolts in the bench. If I ever have to replace the current board, I’ll do so with oak or birch or hickory. When I’m not reloading, I remove the presses and store them in a protected space. I can easily attach other equipment to the bench by using C-Clamps.” Dave’s “rolling reloading room” looks very well thought-out. We commend Dave for his inventiveness.
At the request of our readers, we provide select “Deals of the Week”. Every Sunday afternoon or Monday morning we offer our Best Bargain selections. Here are some of the best deals on firearms, hardware, reloading components, optics, and shooting accessories. Be aware that sale prices are subject to change, and once clearance inventory is sold, it’s gone for good. You snooze you lose.
NOTE: All listed products are for sale to persons 18 years of age or older. No products are intended for use by minors.
1. EuroOptic — Sauer 100 Hunting Rifle Sale, $499.99 and up
⏺️ » Excellent hunting rifle with savings up to 49%
Hunting season is coming soon. If you’re looking for a handsome, reliable, and accurate hunting rig, check out the Sauer 100 rifles at EuroOptic. Many models have close-out pricing with discounts up to 49%. Choose among 10 standard and magnum chamberings including .223 Rem, .243 Win, 6.5 Creedmoor, 6.5 PRC, .270 Win, 7mm-08, 7mm Rem Mag, .308 Win, .30-06, and .300 Win Mag. Both synthetic and handsome wood stock options are offered.
2. Midsouth — RCBS Promo FREE Hazmat and FREE Powder
Here’s a great offer if you need reloading hardware, such as a press, powder scale/dispenser, or reloading tools. With the RCBS Buy Green Get Black Promo you get FREE HazMat with purchase of $200+ of RCBS products, you get FREE Powder if you spend at least $350 on RCBS items. NOTE: This offer expires at 11:59 PM CST on Thursday, August 28, 2025. Here are the terms:
1. Buy $200-$349.99 in RCBS Products and get FREE HazMat on an order with Hodgdon, Ramshot, Accurate, IMR, or Winchester Powders.
2. Buy $350-$549.99 in RCBS Products and get FREE HazMat and 1 FREE pound of select Hodgdon, Ramshot, Accurate, IMR, or Winchester Powders.
3. Buy $550+ in RCBS Product and FREE HazMat plus 2 FREE pounds of select Hodgdon, Ramshot, Accurate, IMR, or Winchester Powders.
3. Grafs.com — Frankford Arsenal F-1 Press, $124.99
⏺️ » Versatile press, good primer exit, plus built-in light
Here’s a handy, single-stage press with some cool features. The new Frankford Arsenal F-1 press has an open front for easy case placement, plus a built-in LED lamp at the top (great for inspecting cases). And after decapping, spent primers go straight down a tube into a handy, clear, twist-off catch cylinder (as on a Forster Co-Ax). We think this would be an excellent secondary press used for decapping or bullet seating. This intro price — just $124.99 at Graf & Sons — is a great deal. NOTE: This press does NOT have priming capability — you must prime cases with a separate tool. Also, the power cord for the LED light is NOT included. For more details see Frankford Arsenal F-1 Press Review.
4. KYGUNCO — Mossberg Night Train Rifle Combo, $758.99
⏺️ » Good hunting rifle, complete with 6-24x50mm scope
Here’s good hunting rifle package — rifle AND 6-24X scope — at a very attractive price. For $758.99, you can get a Mossberg Patriot Night Train Rifle and Scope combo package in 6.5 Creedmoor, or .308 Win. For a few bucks more ($768.76) more get the .300 Win Magnum version. A high quality 6-24x50mm scope and rings are included with all three models, and the .308 Win and .300 WinMag models include a fitted muzzle brake. This is a nice, complete package with good chamberings for deer and elk.
5. Palmetto SA — Taurus GX4 T.0.R.O. 9mm Pistol, $269.99
⏺️ » Great Value plus FREE 50rds of Hornady 9mm ammo
Here’s a compact modern 9mm carry pistol with great owner reviews and a bargain $269.99 price. The Taurus GX4 T.O.R.O. can mount modern red/green dot optics on the slide. The trigger is good and the grip adjusts with swappable backstraps. Here’s one buyer review: “My new and favorite EDC pistol. Paired it with a Holosun green dot and love it… perfect compact.” BONUS AMMO: If you purchase a G-series Taurus this month you get two FREE 25rd boxes of Hornady Critical Defense HTX 9mm ammo. Qualifying purchases must be made between August 1st, 2025 and August 31st, 2025.
⏺️ » Save $100 (40%) on good armored 10X bioculars
Hunting season is just around the corner. Here’s a good set of 10-power HD Burris Binoculars for just $149.00. That’s $100 discount off the regular price — a massive 40% savings. These Burris Droptine Binocs feature fast focus, plus a durable rubber armored coating. The optics chambers are nitrogen filled for waterproof and fog-proof performance in harsh weather.
7. Precision Reloading — Frankford Arsenal Tumbler Lite, $99.99
⏺️ » Good compact tumbler under $100 with FREE Shipping
You can save $18 on a good tumbler at Precision Reloading AND get free shipping. The Frankford Arsenal Tumbler Lite features a clear viewing window, simple ON/OFF switch, and leak-proof cap design. The 3.3L capacity holds up to 300 cases of .223 brass. This unit is big enough for most popular varmint and match rifle cartridge types. And it’s plenty big for pistol cases. Sold elsewhere for $118 or more, this is on sale for $99.99 with FREE Shipping.
⏺️ » Popular NRR24 electronic ear plugs now 60% Off MSRP
Protecting your hearing is vital when at the range. One popular option is the NRR24 Walker’s Silencer 2.0 Bluetooth Electronic Ear Plugs. These have a good 24-dB sound reduction rating, are pretty comfortable, and can communicate with your smartphone via wireless BlueTooth. Auto-Shut off helps preserve battery life (6-8 hours). Available in black, FDE, or Olive Drab, these rechargeable electronic ear plugs feature a free control App for your SmartPhone. These $99.99 plugs come with: USB Charging Dock with rechargeable lithium battery, 3 sizes of Sure-Lock fins and foam tips, and cleaning brush.
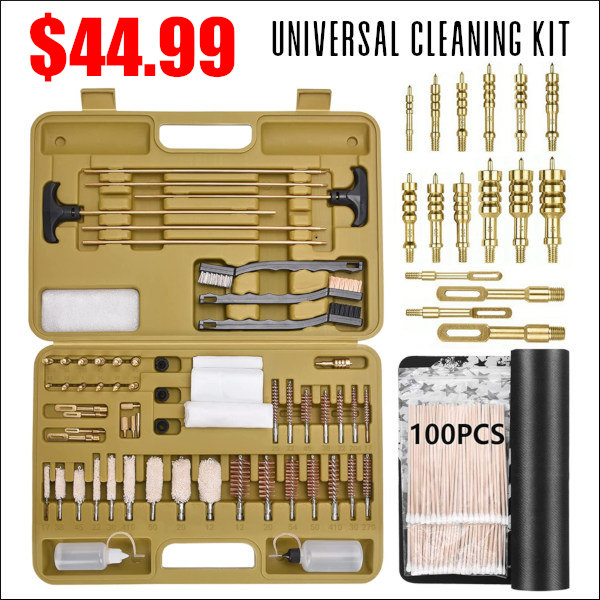
9. Amazon — Universal Gun Cleaning Kit, $44.99
⏺️ » Great value for cleaning kit for pistols, rifles, and shotguns
This Universal Gun Cleaning Kit (#ad) has just about everything you need to clean any firearm, all packed in a handy case. This $44.99 kit includes jags, brushes, bore mops, slotted tips, and lots more. The fitted jags and slotted tips are made from solid brass and marked by caliber. The cleaning rods and accessory adapters are also made from brass. Included in this easy-to-carry kit are: 6 gun rods, 13 gun jags, 4 slotted tips, 9 gun mops, 14 bore brushes, 3 muzzle guards, 3 utility brushes, 3 accessory adapters, 4 polishing cloths, 100 cleaning patches, 2 oil bottles (empty), and even a gun cleaning mat. NOTE: For competition rifles, we recommend using high-quality ONE-PIECE cleaning rods.
10. Amazon — Digital Trigger Pull Gauge, $18.99
⏺️ » Cool sub-$20 tool that works really well — great buy
The Pridefend Professional Digital Trigger Pull Gauge (#ad) offers great performance for a very low price. We’ve used this “smart” pull gauge with success on match rifle triggers. This gauge measures in 1 oz. increments from 0 to 12 pounds. The gauge display is easy to read and you can choose ounce, pound, or Kg units. Though it costs just $17.99, this digital gauge offers better consistency than many conventional spring-type gauges. Plus, when you do a sequence of multiple pull tests on one gun, the unit automatically calculates maximum, minimum, and average pull weights.
As an Amazon affiliate, this site can earn revenues through sales commissions.
Close-up view of a sectioned case. This one here was “fixin’ to pop”, observed Glen Zediker.
Here are highlights from an article Glen Zediker wrote for the Midsouth Blog. In that article Glen, who sadly passed away in 2020, focused on cartridge brass. Glen identified the most common failures that appear with brass that has been shot multiple times, or which has been fired at excessive pressures. Glen explained some simple ways to check your cartridge brass to detect “early warning signs” of case failure, particularly case head separation, which can be very dangerous.
How Cases Degrade with Multiple Firings By Glen Zediker
This article explains when, and then how, to check after the progress of changes commencing with the firing on a new case. It’s the “progress of degeneration,” in a way of looking at it because the concern is getting a handle on when enough change in the brass has come about to require attention. Or abandonment. As said then, for me that’s 4 firings. That, as said last time, is when I might see changes that need attention. Also as said, that figure didn’t come out of a hat, but from my own notes in running my competition NRA High Power Rifle loads. [Editor’s Note: With Lapua brass, using moderate loads, in bolt-action rifles, we typically get about 10 good (match-worthy) firings. But if you anneal your Lapua brass, and run modest pressures, Lapua brass can perform well for 20 or more load cycles.]
The areas most affected are the case neck and case head area. Case neck walls get thicker [but] the case head area body walls get thinner. Primer pockets get shallower and larger diameter.
This case shows a cracked neck AND a crack (separation) above the case head. Zediker says it is “rare to see one case with both of the most common failures. [This case] was attacked by an M14.”
Case Head — Causes of Separation and Cracking
When a case is under pressure during firing, the brass, like water, flows where it can, where it’s more free to move. Of course, the chamber steel limits the amount it can expand. The case shoulder blows fully forward and the case base is slammed back against the bolt face. There is, therefore and in effect, a tug on both ends — it gets stretched. The shoulder area is relatively free to expand to conform to the chamber, but the other end, the case head area, is not. Since that’s the area of the case with the thickest walls, it doesn’t expand “out” much at all. What it does is stretch. The “case head area,” as I refer to it here, is the portion of the case above the web, which is just above the taper that leads in to the extractor groove. The “area” extends approximately an eighth-inch up the case body.
Here’s a “pressure ring.” You’ll see this after firing, if you see it. And, if you see it, that case is done. The bright ring indicates excessive stretching, which indicates excessive thinning. If you see a ring circling the case, noticeable because it’s lighter color than the case body, and it’s in this area, I’d say that case is done. And that’s right where a “head separation” occurs. It can crack and also blow slap in two, and that’s the “separation” part of case head separation.
Photo courtesy GS Arizona.
This is a spot to keep close watch on as cases age. It is also the area that is more “protected” by sizing with less case shoulder set-back. That is, pretty much, where the freedom for the stretching movement in this area comes from (the case shoulder creates a gap). If you’re seeing a sign that a head separation [might happen with relatively few firings], chances are the shoulder set-back is excessive, and also… the load pressure level.
Bent Paper Clip Case-Wall Gauge
Editor: You can use a bent paper clip to detect potential case wall problems. Slide the paper clip inside your case to check for thin spots. GS Arizona explains: “This simple little tool (bent paper clip) will let you check the inside of cases before you reload them. The thin spot will be immediately apparent as you run the clip up the inside of the case. If you’re seeing a shiny line on the outside and the clip is really hitting a thin spot inside, it’s time to retire the case.” Photo by GS Arizona.
Monitor Primer Pocket Dimensional Changes
Another case-head-area and pressure-related check is the primer pocket. As said, the primer pocket will get larger in diameter and shallower in depth each firing. As with many such things, the questions are “when” and “how much,” and the main thing, “how much?”
If the pocket gets excessively shallow, and that’s judged by a primer that seats fully but isn’t at least a tick below flush with the case base, there could be function issues. There’s a risk of a “slam-fire” with a semi-auto that uses a floating firing pin, and, if there is actual protrusion, that has the same effect as insufficient headspace. A primer pocket uniformer can reset the depth of a shallowed primer pocket to what it should be, but the real test for me is how easily the next primer seats into it. If it’s significantly less resistance, I’ll say that case is done. Shallower can be refurbished. That’s a primary function of a primer pocket uniformer. Larger diameter, though, can’t be fixed. I’ve mentioned in another article or two that, any more at least, my main gauge of load pressure has become how much primer pocket expansion there’s been.
Many short-range Benchresters have thought about converting their 6 PPC to shoot a 30BR for score matches, or a Dasher for mid-range (or even 1000-yard) games. That way you have a rifle that does double duty, giving you the most bang for your buck. Though an action with a PPC bolt won’t normally work with 30BR/6BR/Dasher cases with their larger .308-class rim (0.4728″ diameter), there is a pretty easy solution that allows you to cycle these bigger cartridges with a 6PPC-style bolt (designed to fit .220 Russian rims).
“Rebating case rims … lets you shoot a 30BR in score matches using your PPC action. All you need is a new barrel. This saves buying another bolt, receiver, or rifle.” — Butch Lambert
Butch Lambert of ShadeTree Engineering provided this tip. Butch notes that many 6 PPC benchrest group shooters also enjoy shooting in score matches. But to be really competitive in the BR for score game, that means shooting a 30BR, which has a wider, .308-class rim (0.4728″ diameter). Likewise, if you want to compete in 600-yard registered BR events or in varmint matches, you probably want to run a bigger case, such as the 6BR, 6mm Dasher, or 6-6.5×47. Those cartridges also have the larger 0.4728″ rims.
Rebate Your 30 BR Rims
To convert a PPC-boltface action to shoot bigger cases you can spend a ton of money to buy a new bolt. That can cost hundreds of dollars. The simpler solution is to turn down the diameter of the larger cases on a lathe. Butch explains: “We’ve seen plenty of interest in rebating case rims. This lets you shoot a 30BR in score matches using your PPC action. All you need is a new barrel. This saves buying another bolt, receiver, or rifle if you have a PPC boltface. Anyone who has access to a lathe can do this job pretty easily. Yesterday I turned 150 case in about an hour.”
At right is the lathe form tool Butch uses to rebate the case rims.
Tech Report by Brian Williams
Reloading for a military surplus gun is different than loading for a modern precision rifle in my opinion. There are a few tasks that carry over from one to the other, but the main goal is slightly different. The target shot in the CMP games matches has a rather generous 10 ring, and with a little larger target your focus needs to change from a round with ultra accuracy to a round that is safe and functions well in your particular rifle.
Reloading for Vintage .30-06 Springfield Rifles
Bullet Selection — With the .30-06 for my Garands and Springfields I stick mostly with 168gr bullets plus some 155-grainers. These bullet weights have just worked for me in the past.
Cartridge Brass (Milsurp vs. Commercial) — I use both military and commercial brass, having success with each. I do prefer commercial brass as it is easier to prep for the first reload. Military brass usually has a primer crimp of some kind that needs to be removed, and I have found that trimming these cases can sometimes leave you scratching your head as the OAL on military cases varies considerably.
Powder Charge and Dispensing — I have always had good success with Hodgdon H4895 powder. My load has always been right around 47.0 grains, with both the 168gr and 155gr bullets. I also use the Auto-Trickler to drop all of my powder charges. This is a fantastic piece of equipment that not only gives super-consistent powder charges quickly, but it also makes one less thing that you have to worry about while on the firing line. With the Auto-Trickler, there is never a question about the powder charge in your ammo. As for primers, I have been shooting CCI 200 Large Rifle primers for many years and have never had an issue.
Case Care and Trimming — With most of the .30-06 brass that I use, I will only reload them 5 times maximum. I don’t push the brass too much, because the Garand’s semi-auto cycling can be tough on the cases. I also trim my cases for OAL each reload cycle. I use a Giraud power trimmer, so trimming is relatively quick and easy.
The chambers in some of the older rifles are not perfectly-machined like a modern high-end rifle. This can cause the brass to grow a little inconsistently, so I find trimming every load cycle helps to make sure that everything stays in a nice safe spec.
Case Annealing — A few years ago I started to anneal my .223 Rem service rifle brass. Now I have added that process for all my match ammunition. I anneal after every firing. It is a rather easy step as I can have my auto-feeding Annealeez machine running while doing something else, so annealing does not add a great deal of time or effort to the reloading process.
The .30-06 case was the father of the .308 Winchester, which was adopted as the 7.62×51 NATO cartridge.
VIDEO Showcase — Brian Williams Shoots M1903A3 Prone in May 2021
Bullet sorting station — quilted Maple with marble tile inlay, created by JVW2008.
We have a master woodworker in our Shooters’ Forum, Jerry from Colorado (aka JVW2008). In a Shooters’ Forum thread, Jerry showcases multiple examples of his handiwork — various wood projects for the reloading room. Beautifully made, these one-of-a-kind custom cabinets and tool stands deserve to be on display in a museum.
Jerry’s creations exhibit exquisite craftsmanship and some very clever design features. What is your favorite item among the Jerry’s wood wonders shown here? You can reveal your favorites in the comment section below.
Throne for a Sartorius Analytical Balance
Jerry built this “Throne” for his ultra-precise Sartorius Entris force restoration scale, which is linked to a V2 Auto-Trickler. This is a true state-of-the-art powder measuring system on a beautiful base unit.
Cabinet for Balance Beam Scale
Here is an oak balance beam scale cabinet and weighing surface. Note the mulitiple tiers, side wings, and other smart design features.
Custom Arbor Press Base
Below is a handsome, well-designed base for K&M Arbor Press and Wilson dies. Look at the fitted recesses for the hand dies — very nice!
Jumbo Walnut/Maple Loading Block
And here is a beautiful 100-cartridge reloading block, crafted from Walnut over Maple. It’s impressive to see 100 cartridges all lined up like that!
To see more impressive wood projects by our Shooters’ Forum members, visit the Wood Working Ideas Forum Thread. Along with Jerry’s reloading toom wonders, you’ll see cleaning cradles, shooting benches, transport boxes, and much more. Check out this amazing inlaid rifle case crafted by Forum member Nando-AS for his son.
As a cartridge case is reloaded multiple times, burnt powder residue and carbon builds up on the inside of the case. Unless the case interior is cleaned in some fashion, eventually you’ll see a slight reduction in case capacity. One of our Forum members from Australia wonders about the effects of reduced case capacity: “If the capacity of the case decreases as the crud builds up, then it effectively reduces the size of the cartridge (inside). Wouldn’t that change the pressure produced from that of an equivalent clean case?”
Interesting Test of Case Capacity Changes
Forum member Fred Bohl has actual test results that can help answer the above question. Fred proved that, over a 20-reload cycle, the case capacity of uncleaned cases did decline a small amount. However, surprisingly, this did not seem to affect the actual chronographed velocity of the load. Extreme Spread (ES) did increase, but Fred believes the higher ES was due to changes in case-neck tension, rather than due to the slight reduction in case capacity. Fred reports:
“Back when beginning to use ultrasonic case cleaning, part of the motivation was to get the inside clean based on the assumption that allowing burnt residue to build up inside cases would affect capacity, and, ultimately, performance. An experiment was done to test this hypothesis. The load used, 30.5 grains of RL15 behind 107gr SMKs in a 6mmBR, was selected for best group and lowest ES in prior load development. It turned out to be 92% of initial case capacity and neither “full” or compressed. (I would suspect that different powders, load weight, and total case capacity might produce very different results.)
We took 30 cases of identical initial capacity and tracked three lots of 10 each:
LOT 1: No Internal cleaning LOT 2: Cleaned with media in tumbler LOT 3: Cleaned with Ultrasound machine
Each case (in each lot) was shot and reloaded 20 times. The simplified results after 20 reloads of each lot were as follows:
Lot 1 (not cleaned) – 0.3 to 0.4 gr. loss of capacity, 5 to 8 fps greater ES.
Lot 2 (tumble cleaned) – 0.1 to 0.3 gr. loss of capacity, 4 to 6 fps greater ES.
Lot 3 (ultrasonic cleaned) – no loss of capacity, no detectable change in ES.
FINDINGS
There was no detectable correlation of velocity change to the lots. An oddity was that on very hot days Lot 1 velocities were, occasionally, slightly higher. From results of another ongoing test, I believe the above differences in ES are probably due more to variance in bullet grip tension than case capacity. The ultrasound cleaned cases (LOT 3) did maintain the lowest ES, but we are not 100% sure of the reasons why. More consistent bullet seating might be the reason.”
Editor’s NOTE: Fred’s results do suggest that carbon build-up inside the uncleaned cases might cause a slight increase in pressure that shows up on hot days. Fred has posted that: “A local shooter reported doing the 20 reload, no-clean test on a .308 that gave a loss of capacity of 2.0 grains, doubled ES and significant velocity changes. However, I don’t have any details on his load weight or powder.” Obviously a lot of carbon can build up with 20 reloads. Many shooters retire their brass before then.
Ultrasonic Cleaning and Neck Lube
Some time ago, Jason Baney did a lengthy test on ultrasonic cleaning. Jason found that with his ultrasonically-cleaned cases, the inside of the necks got so “squeaky clean” that he needed to use dry lube in the necks. Jason uses the $21.50 dry lube kit from Neconos.com. This applies ultra-fine Moly powder to the neck using small carbon steel balls.
The Shooting Sports USA website includes two excellent articles about the basics of metallic cartridge reloading. These two articles provide an excellent summary of the key procedures. If you are new to reloading, we recommend you read both articles:
Part II is particularly helpful because it explains the entire reloading process step-by-step, with 14 listed steps. The author notes: “In this, the second installment on metallic cartridge reloading, we’ll follow the sequence of steps involved in reloading a rifle cartridge and refining a metallic cartridge load. These steps are based on the use of a single-stage reloading press and a separate priming tool.”
Much important advice is provided as this article runs through the 14 Steps of Reloading. For example, when explaining Step 13, Bullet Seating, the article states:
“Proper seating depth is critical. Too much bullet protrusion and the cartridge may not work through the gun’s magazine, or it may fail to chamber. Too little and the bullet intrudes excessively into the powder chamber, decreasing volume and raising pressure. Neck tension is also important; any bullet that fails to seat with some resistance may be held only loosely by the neck and may be driven back into the case when the round is chambered, especially in semi-automatic arms.”
Important Guide to Detecting Over-Pressure Signs in Brass
As an example of the invaluable advice provided in these two articles, here’s a sample from Part II that explains how to determine if your load is over-pressure. We recommend that EVERY reader read this twice. There are more things to consider than a stiff bolt lift. You need to inspect cartridges very carefully:


 Labor Day 2025 (September 1st) is just 5 days away. Soon we’ll be enjoying a major 3-day holiday weekend. We know many of our readers will be out on the road visiting friends or enjoying end-of-summer getaways. How do you do your reloading chores while traveling on holiday? Here’s a solution from Forum member Dave Gray (U.S. Army Retired).
 Reloading Bench Mounts to RV Wall with Brackets


 Bullet Selection — With the .30-06 for my Garands and Springfields I stick mostly with 168gr bullets plus some 155-grainers. These bullet weights have just worked for me in the past.
  Powder Charge and Dispensing — I have always had good success with Hodgdon H4895 powder. My load has always been right around 47.0 grains, with both the 168gr and 155gr bullets. I also use the Auto-Trickler to drop all of my powder charges. This is a fantastic piece of equipment that not only gives super-consistent powder charges quickly, but it also makes one less thing that you have to worry about while on the firing line. With the Auto-Trickler, there is never a question about the powder charge in your ammo. As for primers, I have been shooting CCI 200 Large Rifle primers for many years and have never had an issue.


