The 13th Edition of Cartridges of the World is a handy reference that contains illustrations and basic load data for over 1500 cartridges. The latest edition (released in October 2012) includes 55 new cartridges. This important reference guide can be ordered through Amazon.com for $24.73. Cartridges of the World, the most widely-read cartridge reference book, is now even more comprehensive, with 55 new cartridges added since the last edition including popular wildcats and new offerings for AR-platform rifles.
The 13th Edition of Cartridges of the World (ISBN: 9781440230592) includes updated cartridge specs, plus essays by leading writers on the topics of SAAMI guidelines, wildcatting, and new cartridge design trends. Cartridges of the World is the most authoritative cartridge reference guide in print. If you are a cartridge collector or are interested in the history of cartridge development, this book is a “must-have” resource.
Cartridges of the World by author Frank C. Barnes was first published in 1965. The 13th Edition is edited by Richard Mann, a contributing editor for Shooting Illustrated and American Rifleman magazines. Frank Barnes (1918-1992) began collecting information on handgun cartridges at the early age of 12, thanks to his father, a police officer. Frank Barnes was an innovative cartridge designer, who invented the original 308 x 1.5″ Barnes, predecessor of the 30BR case. Before Frank began a law enforcement career, he was a college professor. Frank was also a pilot, and a race-car driver. Learn more about Cartridges of the World (13th Ed.) at www.gundigest.com.
The web-based JBM Ballistics Program is one of the most sophisticated and accurate ballistics calculators available — and it’s free. The latest version of the JBM Trajectory Calculator includes field-test-derived actual G7 BCs, as well as bullet drag data from Lapua’s Doppler radar testing. You can also change weather variables, and generate come-up tables for distances out to 3000 yards.
Whenever we have web access, the JBM program is our “go-to” resource for dependable ballistics calculations. In our experience, with most bullets, if you input all the correct variables for the JBM program, it should get you within 1/2 moa (2 clicks), at 600 yards.
New URLs for JBM Ballistics Calculators
With the release of the latest version of the JBM program, some URLs for the calculations pages have changed. You may want to update your bookmarks with the following web addresses:
Little Crow Gunworks has updated its popular “World’s Finest Trimmer” (aka WFT). The new WFT 2 version is more versatile — it can now easily change from one cartridge family type to another. That makes the $69.95 product an even better value. Trimming works the same way as before — just push the cartridge case into the trimmer and cut depth is pre-set. When ordering the WFT 2, choose a trim chamber for your particular cartridge family (such as .308, 7mm-08, .243 Win). You can trim multiple cartridge types (with one trim chamber) by ordering the largest chamber in the family you plan to trim. To trim cartridges from a different family, simply order (and install) a different chamber insert.
The WFT 2’s designers explain: “The two main improvements are the ability to trim up to 45 caliber and interchange trim chambers. The WFT 2 has a half-inch shaft and requires a half-inch chuck to drive it. The feature most customers asked for was the ability to interchange trim chambers. After many prototypes (and much testing) the solution came from our friend, Jim Lambert. Instead of press-fitting the trim chambers, as on our original WFT, the trim chambers on our WFT 2 feature a slight slip-fit-in bearing with a groove cut for an O-ring which creates a press fit.”
How to Change Trim Chambers
Changing out trim chambers is accomplished by removing the cutter and pushing out the trim chamber with the knock-out dowel that is provided with the WFT 2. To install the trim chamber, set the trim chamber on a flat surface and steadily push the housing onto the trim chamber. To set cut depth (COAL trim length) place a ‘master case’ in the trim chamber and slide the cutter up to the case mouth. The tighten the set screws.
Product Tip from EdLongrange. We welcome reader submissions
This article by Corey Swantz originally appeared in The Reloading Press, the Sinclair Int’l Blog.
Much less precision is required to get good scores in 3-gun competition than in strictly accuracy-oriented disciplines like F-Class or Benchrest. In 3-gun, [the game is] about hitting targets in the shortest amount of time, not how close to the center of the target you can get or how small the group can be. Ammunition that’s accurate to 1-2 MOA is more than sufficient for 3-gun competition, as the targets tend to be 4-6 MOA in size.
For my personal 3-gun load testing, I used three powders: Varget, IMR 8208 XBR, and Accurate 2230. All three powders gave me good results, but the 8208 XBR was the leader of the pack. I settled on a moderate charge that pushes a 73gr Berger BTHP at about 2,500 fps through my 16″-barreled AR15. While I’m sure I could obtain a higher velocity with these bullets, this speed yielded the best accuracy results in my initial testing with fully prepped brass.
With the high volume of ammunition that I need for 3-gun matches and practice, I wanted to eliminate as many case prep steps as possible and still end up with ammunition that was accurate enough for 3-gun. I fully prepped some once-fired brass from primer pocket to case mouth and everything in between. I also took some once-fired cases that had simply been trimmed to length, and loaded them without doing any other prep work. With these loads in hand, I headed out to the range to shoot some groups. Below are the results from my 200 yard group tests:
Prepped Brass Delivered Higher Score on Bullseye Target
As you can see from the photos, the groups yielded results along the lines of what I expected. The fully-prepped brass produced five 10s , whereas the un-prepped brass produced only two 10s, and both of those just touched the outer edge of the 10-ring.
However, the un-prepped brass kept all the shots inside the 8-ring, which is plenty precise for shooting the large targets used in 3-gun matches.
National Defense Match at Camp Perry
I decided to further test my un-prepped brass loads by shooting them in the National Defense Match (NDM) at Camp Perry and the Rockcastle 3-Gun Pro-Am Championship. At the NDM, the target used in the longer-range stages was a standard-size NRA Tombstone target, similar to the targets used in most 3-gun matches. Using the un-prepped brass loads, I was able to keep all my shots on the tombstone targets from 100-300 yards, and had only one miss from the 400-yard line. That one miss was my fault, as I jerked the trigger on the last shot, pulling it off to the left. Un-prepped brass held up quite well under Camp Perry NDM conditions.
Un-Prepped Good Enough for Class Win at Rockcastle 3-Gun Pro-Am Championship
Two weeks after the NDM, I traveled to Kentucky for the Rockcastle 3-Gun Pro-Am Championship. There were seven stages in this match, two of which required long-range rifle shots with my AR15. The longest stage of the match had eight steel targets sized from 4″ to 10″ in diameter, placed from 75 to 265 yards. My ammunition proved accurate enough at these distances to neutralize all the steel targets with single shots, something few other shooters were able to do. I finished over two seconds ahead of the nearest competitor on this stage and ended up winning the event. Clearly un-prepped brass was plenty good for the Rockcastle 3-Gun Pro Am, too!
Because of the results I’ve gotten on the practice range, and two very solid performances in competition last year, I feel confident that my loading process for the upcoming 3-Gun Nation Semi-Pro Series will consist of simply sizing and trimming brass, then loading it with my preferred recipe. While the fully prepped brass was indeed more accurate, the un-prepped brass loads were accurate enough to allow me to hit 3-gun targets . Now, I can take the time I save in the reloading room and spend it out on the practice range.
When developing loads, it is important to know the true internal capacity of your cases, both fired and “as FL-sized”. In particular, when using the QuickLOAD program, it is vital to determine true case capacity. The default case capacity values listed by QuickLOAD may be off half a grain (or more) because brass from different manufacturers can vary considerably in capacity. Case capacity is a very important variable that will affect the pressure of a load and the velocity of your bullets.
To determine the true internal capacity of your cases, first weigh an empty cartridge case, then fill the case with water (all the way to the top of the neck) and weigh the case again. The difference in weight is your H20 capacity in grains. But how do you keep the H20 from flowing out the bottom? When measuring fired, unsized cases, you can simply leave the spent primer in the pocket. However, if you want to measure new brass or “as-FL sized” cases that have been deprimed, you’d have to insert a spent primer to “stem the tide”. Until now that is… 21st Century Shooting has come up with a simple tool that plugs the bottom of the case so you can measure H20 capacity with ease.
When we saw 21st Century’s Primer Pocket Plug we thought “That’s smart — why didn’t someone think about that a long time ago?”. This handy “end-cap” lets you quickly measure multiple new brass cases or deprimed FL-sized cases so you can get an average H20 capacity. The primer pocket plugs are NOT case-specific (they feature an O-ring that fits the pocket). One version will work with all small-primer-pocket cases, while another works with all large-primer-pocket cartridge types. Price is $19.95 for either small-pocket or large-pocket version.
NOTE: If you want to measure H20 capacity on fired, sized brass, but don’t want to shell out the money for the tool (or re-insert a spent primer), here’s a simple suggestion. When you size your case, first remove the decapping rod from the die. Then you can FL-size the case without removing the primer. Of course, you will eventually have to knock the primer out, and that requires putting the decapping rod back in the die and running the case through a second time. To avoid that hassle, the Primer Pocket Plug may be worth the $19.95 over the long haul. We just ordered one of each (small and large).
Product Find by EdLongrange. We welcome reader submissions.
Service Rifle shooters and varminters burn through a lot of ammunition. If you’re shooting more than 250 rounds of ammo a month, you may want to consider getting a progressive press — at least for your practice and varmint ammo. New technologies have made today’s progressives more efficient than ever. RCBS has developed a rifle-bullet feeding system that works with the RCBS Pro 2000 Progressive. The bullet-feeder can also be fitted to some Dillon units with modifications. There are four main components to the RCBS rifle-bullet feeder system: 1) base and two-piece adjustable column; 2) collator (bowl and motor); 3) drop tube and shutoff assembly; and 4) bullet feed die assembly.
Our friend Gavin Gear has tested the RCBS bulet feeder on an RCBS Pro 2000 for his UltimateReloader.com website. You can see his hands-on video review above. I’m pleased Gavin did this review because I have a Pro 2000 myself, and I can confirm that it is a very good machine. It is sturdy, the rotary-style powder measure is very precise, and the strip primer system works great. (I can change from small primer feeding to large primer feeding in a couple of minutes — honest.) I’ve also found the strip primer system virtually foolproof — so long as you insert the strips in the right direction! I haven’t used the Bullet Feeder yet, but you can see the Pro 2000 in action with the feeder in Gavin’s video above.
On UltimateReloader.com, Gavin puts the RCBS Bullet Feeder through its paces. Gavin writes: “As you can see from this picture (at left), the RCBS Rifle Bullet Feeder adds quite a bit of overall height to the progressive reloader.This is the case with all bullet feeders that use a collator (some add more than others). One of the reasons that these units are tall is to allow for a sufficient ‘buffer’ of dropped bullets so that the collator can keep up with fluctuations in loading speed and to allow enough ‘stack weight’ on the column of bullets so that they drop/feed correctly.” As fitted to the Pro 2000, Gavin says the bullet feeder system achieves “very efficient loading with excellent COL consistency and bullet concentricity.”
Lyman’s new E-Zee Trim Case Trimmer allows you to easily trim cases by hand or with an electric drill (for power). With both pistol and rifle brass, a cartridge-specific pilot affixed to the cutter head slips into the case. Case trim length is set by the length of the pilot. You need a different pilot for each cartridge type you intend to trim. Pilots are offered in rifle sets and pistol sets, or pilots can be purchase individually for $4.95 each. For $29.95 you can get a complete kit (for either rifle or pistol cases) that includes: case-locking device, cutter, five (5) trim-to-length pilots, and both hand and power trimming adapters.
The Lyman E-Zee system is versatile. Using the same case-holder, you can trim-to-length manually, or use the included power-adapter fixture to drive the cutter with a cordless drill (you still hand-hold the case). We think power is the way to go. Your hands get tired after manually trimming just a handful of cases. The trimmer comes with a case locking device, cutter, trim-to-length pilot, cutter head and both hand and power trimming adapters. The trimmer works with any standard shell-holder including Lyman, Redding, RCBS, Hornady & Lee Precision.
Editor’s Comment: With this system you have very limited control over cut length. OAL is preset based on the pilot dimensions. Also the cutter blades are not as sharp as those you’ll find on a Forster or Wilson trimmer. And there are only ten (10) types of rifle pilots — no 6mmBR, no PPC, no 6XC, no 6.5×47, no .284 Win. For these reasons, we wouldn’t select a Lyman E-Zee system as a primary rifle case-trimming system (though we can see how it might appeal to .223 Rem and .308 Win shooters).
On the other hand, with the inexpensive set of pistol pilots, you can trim ALL the most popular handgun cartridge types: 9mm, .38 SPL, .357 Mag, .40 SW, .44 Mag, and .45 ACP. Having a pre-set trim length isn’t a problem for pistol brass. In fact it’s normally a good idea to trim all your brass (of a particular cartridge type) to the same length so that you get a uniform crimp on every case. The complete handgun E-Zee Trimmer kit, with pilots for 9mm, 38 SPL, .357 Mag, .40 SW, 44 Mag, and 45 ACP costs just $29.95. If you reload pistol ammo and don’t yet own a power-capable case-trimmer, Lyman’s E-Zee Trim may be a good choice. For under $30.00, the E-Zee Trim is definitely worth considering for handgun brass trimming chores.
Hornady has a handy new product will helps eliminate shadows when you’re working in your reloading area. Hornady’s Lock-N-Load LED light strip places light right where you need it. This is especially useful when using a progressive press. With progressives, you need to watch multiple cartridges in various stages of loading. Good lighting helps you ensure cases aren’t split, powder levels are correct, and bullets are seated straight.
Designed to be affixed to your press, the light strip mounts six (6) long-lasting LED lights in a line. The low-profile light strip has an adhesive backer for easy attachment. Just “peel and stick” to attach the LED strip directly to your press. Watch the video below to see how it’s done.
While Hornady’s light strip was made to be attached to loading presses, this useful device can be affixed anywhere you need extra light on your loading bench or work areas. The strip plugs into any 110 volt outlet, so you never have to replace batteries. The LED strip retails for about $15.00. CLICK HERE for more details.
Product Tip from Boyd Allen. We welcome reader submissions
We’ve had some problems with our venerable RCBS Chargemaster (overcharges that display incorrectly, even after a second weighing), so we decided to dispense one grain low and then trickle up on a Lab Scale with the latest Magnetic Force Restoration (MFR) load cell technology. Though still quite expensive, MFR scales respond very quickly and accurately, so they are ideal for trickling. To optimize the trickling process, we acquired an Omega 2-Speed Powder Trickler. This $69.95 gadget works great with an MFR scale, allowing you to quickly and easily “finish off” charges with extreme precision — no more than a couple of kernels variance in your load. (With a typical extruded powder, a tenth of a grain is four to five kernels).
Omega 2-Speed Trickler
Most reloaders have used a manual powder trickler at one time or another. However, they can be frustrating to use for a variety of reasons — e.g. the tube is too short, or the trickler is too low, or the unit isn’t stable enough, or the unit doesn’t hold enough powder.
Well, the inventors of the Omega 2-speed Powered Powder Trickler have considered all those practical shortcomings in existing tricklers, and built a superior product — a “better mouse trap.”
Every aspect of the battery-powered Omega 2-Speed Trickler (from Dandy Products LLC) shows smart thinking. First, hopper height can be adjusted from 1/2″ to 5.5″ high. The tube is long enough to reach the middle of large-footprint electronic scales. And the outer end of the tube is cut at an angle, so you can see the powder kernels as they flow out — no more surprise clumps that raise your charge 0.3 grains. The powder hopper itself is bigger than most, holding a full 1000 grains. That lets you load all afternoon without having to constantly replenish your trickler.
There is also a vinyl-clad, yellow “tuner” weight. You can slide this back and forth on the arm to adjust the powder flow. Once you get it set for your choice of powder, with a little practice, you can dispense one to two kernels reliably with a single, quick touch of the Omega’s dispense button.
In practice, the Omega trickler is easy to use. It is reasonably fast, while being as precise as anything on the market. The unit is controlled by a two-button control pad, with a black button for slow feed and red button for fast feed. You can use the fast button to load the bulk of reloading powder and then use the slow button to maximize the accuracy of your load. The control pad is connected to the dispenser by a 24″ cable. That two-foot cable run allows plenty of trickler placement options on your bench. Watch the video review below to see the Omega Trickler in use. (Review by UK-based “1967 Spud”).
Review of Omega Two-Speed Tricker
Omega User Comments
Posting on 24HourCampfire.com, JasonK gave the Omega Trickler high marks: “This thing rocks! It can trickle fast, it can trickle slow, it can drop a kernel or two at a time. After ordering my Omega I quickly shopped for an Acculab VIC-123 scale, accurate to within .02 grains.”
Another Omega user, In2Deep, writes: “You can actually tap the low-speed button and drop kernels while watching the scale. After a little practice it only takes a few seconds to trickle up a load. Using an Acculab 123 scale, it can drop charges that repeatedly read down to around 4 one-hundredth’s of a grain. It turned out to be a tool that really works and saves time. There are rubber feet on the unit and surprisingly it does not cause interference with the digital scale which is often mentioned as a problem with most of the vibratory tricklers. Not many products are even worth the time to do a testimonial but this is a winner[.]”
Forum member Barry O (aka TheBlueEyedBear) has been using an Omega Trickler for a while, and he currently has a second-generation (upgraded) unit on his bench. Barry likes the unit, with some reservations. Barry tells us: “it took me some time to get used to it. One main gripe is the length of time it takes to get the thing primed and ready to dispense powder. But after that, not too bad. I still use my trusty tweezers for fine tuning loads.”
Thanks to Boyd Allen for suggesting this product for review.
Want smoother chamfers on your case-mouths? Here’s a simple tip that can: 1) remove the sharp edge left by chamfering blades; and, 2) create a smoother entry for your bullets. Smoothing the inside chamfer can avoid nicks on your bullet jackets, and can also make bullet seating more consistent.
If you are using a 45° rocket tool on newly-trimmed brass, start your inside chamfer with two or three turns in the normal cutting direction. Keep the tool centered, and use light-to-moderate pressure — you don’t need to remove a lot of brass. After your cutting turns (which should reveal a shiny chamfer line), take out the tool, inspect the neck and remove any small brass chips or shavings.
Now here’s the secret — put your tool back in the neck and go in the reverse direction for a couple partial turns. Again, be sure to keep the tool centered and use a light touch. The reverse rotation of the rocket tool inside the case mouth will burnish and smooth the chamfer. Next you can make a quick spin with some fine steel wool held in your fingers. Don’t grind away — you do NOT want to get rid of all the carbon in the neck. As a last step we run a hand-held nylon brush in the neck for 2-3 quick passes to further smooth out the chamfer and remove any residue from the steel wool.
We think, if you use this procedure, your will find that your bullets seat more smoothly and consistently. That can improve accuracy and help avoid mysterious fliers.
You can use this same technique even if you prefer a sharper angle chamfer tool for your initial inside-neck chamfering operation. Reverse your tool gently a couple turns to burnish and smooth the cut. And always remove brass chips and shavings before you run the tool backwards (in the non-cutting direction).
Don’t Forget to Smooth the Outside Chamfer Too
You can also use the backwards rotation trick on outside chamfers to smooth and soften the sharp edge. A little steel wool, applied judiciously, can help here. If you are chamfering a large number of cases after trimming, you may want to tumble the brass in corn-cob or walnut media after the chamfering procedure. Tumbling further smooths the chamfer. You want a nice, smooth chamfer with no burrs or sharp edges.


 The 13th Edition of Cartridges of the World is a handy reference that contains illustrations and basic load data for over 1500 cartridges. The latest edition (released in October 2012) includes 55 new cartridges. This important reference guide can be ordered through Amazon.com for $24.73. Cartridges of the World, the most widely-read cartridge reference book, is now even more comprehensive, with 55 new cartridges added since the last edition including popular wildcats and new offerings for AR-platform rifles.
 The web-based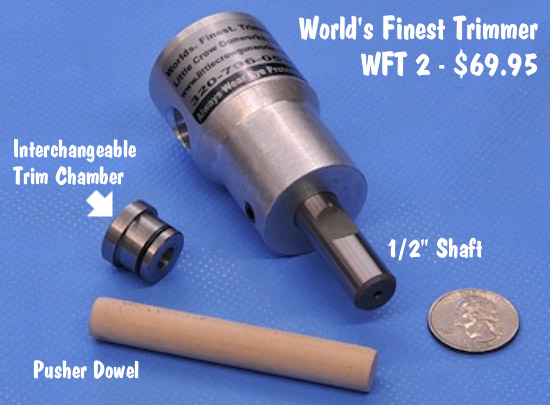
 This article by Corey Swantz originally appeared in The Reloading Press, the Sinclair Int’l Blog.

 Our friend Gavin Gear has tested the RCBS bulet feeder on an RCBS Pro 2000 for his
  Lyman’s new
 On the other hand, with the inexpensive set of pistol pilots, you can trim ALL the most popular handgun cartridge types: 9mm, .38 SPL, .357 Mag, .40 SW, .44 Mag, and .45 ACP. Having a pre-set trim length isn’t a problem for pistol brass. In fact it’s normally a good idea to trim all your brass (of a particular cartridge type) to the same length so that you get a uniform crimp on every case. The complete handgun E-Zee Trimmer kit, with pilots for 9mm, 38 SPL, .357 Mag, .40 SW, 44 Mag, and 45 ACP costs just $29.95. If you reload pistol ammo and don’t yet own a power-capable case-trimmer, Lyman’s E-Zee Trim may be a good choice. For under $30.00, the E-Zee Trim is definitely worth considering for handgun brass trimming chores.
 Omega 2-Speed Trickler


 You can use this same technique even if you prefer a sharper angle chamfer tool for your initial inside-neck chamfering operation. Reverse your tool gently a couple turns to burnish and smooth the cut. And always remove brass chips and shavings before you run the tool backwards (in the non-cutting direction).


