Winchester’s new “Introduction to Ammunition — Ammo 101” is a four-part series including custom illustrations and information for four major ammunition categories: rifle, pistol, rimfire, and shotshell. The Ammo 101 series provides a detailed overview of centerfire rifle, centerfire pistol, rimfire, and shotshell ammunition, showcasing ammunition construction, components, calibers, and common usage. The Ammo 101 resource is free to download from Winchesters.mediaassets.com. Or, simply click one or more diagrams below. Each image will launch a large PDF which you can print or download.
TIP: Click Each Image for Full-Screen Printable PDF
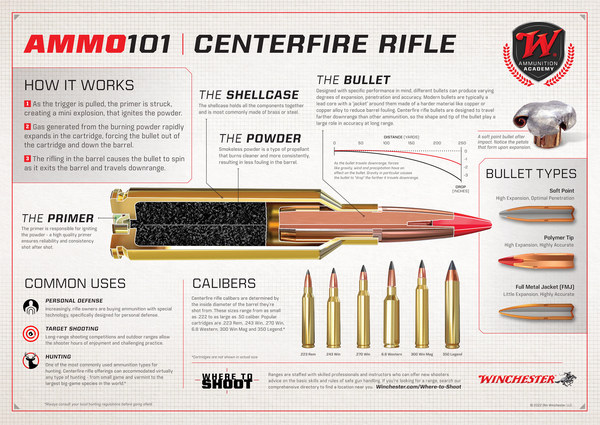
Shown below are the first four ammunition information sheets prepared by Winchester. These show all the key components of cartridges and shotshells, and explain the functions. These diagrams are useful for training, and for persons getting started in reloading.
Ammo 101 Centerfire Rifle Cartridge Diagram (click for PDF)
Ammo 101 Rimfire Cartridge Diagram (click for printable PDF)
Ammo 101 Pistol Cartridge Diagram (click for printable PDF)
Ammo101 Shotshell Diagram (click for printable PDF)
About the Ammo 101 Series
The FREE Ammo 101 resources can help instructors nationwide who introduce new entrants to the shooting sports and hunting. Instructors can incorporate these resources into their training presentations, use them as handouts, or have them printed locally.
“The basics of ammunition… is what we want to deliver with the Ammo 101 series,” said Matt Campbell, Winchester V.P. of Sales & Marketing. “With millions of people across the United States starting their journey in the shooting sports as new firearm owners, providing easy-to-understand information on ammunition types is one way we can help educate our customers.”
After purchasing a new set of dies from Forster, Hornady, Redding, or Whidden Gunworks, you’ll want to disassemble the dies, inspect then, and then remove the internal grease and/or waxy coatings placed on the dies by the manufacturer. Below are two videos that show how to de-grease and clean dies as they come “out of the box” from the manufacturer. The videos also explain how to clean your dies after regular use. Cleaning your dies helps remove carbon, brass shavings, lube residues and other stuff that can get inside the dies.
In the first video, from Creedmoor Sports, Bill Gravatt (Creedmoor’s President) shows various methods for cleaning dies both when new and after they have accumulated carbon and lube after use. This video is definitely worth watching. In the second video, a Hornady technician shows the method for degreasing dies before first use. A convenient aerosol spray cleaner is used in the video. You can also use a liquid solvent with soft nylon brush, and cotton patches. NOTE: After cleaning you may want to apply a light grease to the external threads of your dies.
Creedmoor Sports Die Cleaning Video with Bill Gravatt
Hornady Video Showing Aerosol Cleaner
Clean Your Sizing Dies and Body Dies Regularly
These same techniques work for cleaning dies after they have been used for reloading. Many otherwise smart hand-loaders forget to clean the inside of their dies, allowing old case lube, gunk, carbon residue, and other contaminants to build up inside the die. You should clean your dies fairly often, particularly if you do not tumble or ultrasound your cases between loadings. It is most important to keep full-length sizing and body dies clean. These dies accumulate lube and carbon residue quickly.
The Hornady Handbook of Cartridge Reloading is now available in App form. Like the print and eBook versions of the Reloading Handbook, the new Hornady Reloading Guide App provides comprehensive reloading information. It covers rifle cartridges from the 17 Hornet to the 50 BMG and handgun cartridges from the 22 Hornet to the 500 S&W. This is a convenient mobile App, that works with both iOS (Apple) and Android devices. There are versions for both smartphones and tablets (iPads and Android). With this App you can access load data at the range, making it easier to do efficient load development at the range.
Hornady Reloading App Features:
Velocity and powder charts
An impressive lineup of powders
Find reliable loads by cartridge and bullet weight
Information on bullet design and shooting application
Very comprehensive load data from .17 Cal up to .50 Cal
Download FREE APP — Apple and Android compatible
The Hornady Reloading App is FREE to download. The App includes more than 200 calibers with a variety of loads featuring Hornady bullets, such as the A-Tip Match, ELD-X, and ELD® Match line.
Subscription Options
The iOS and Android download pages explain that fees may be required for detailed information: “Derived from extensive testing by Hornady Manufacturing Company, this App includes reloading data for over 200 cartridges and 300 bullets. [Hornady reports] only data that proved safe in our research. Users have the ability to purchase data for individual cartridges, purchase the whole current edition of the handbook, or subscribe and receive the entire handbook plus more. Subscription provides access to all handbook data on your mobile device and real updates for all new data without waiting for the new handbook publication to be produced.”
Coating bullets with a friction-reducing compound such as Molybdenum Disulfide (Moly) offers potential benefits, including reduced barrel heat, and being able to shoot longer strings of fire between bore cleanings. One of the effects of reduced friction can be the lessening of internal barrel pressures. This, in turn, means that coated bullets MAY run slower than naked bullets (with charges held equal).
To restore velocities, shooters running coated bullets are inclined to “bump up” the load — but you need to be cautious.
Be Careful When Increasing Loads for Coated Bullets
We caution shooters that when your start out with coated bullets in a “fresh barrel” you should NOT immediately raise the charge weight. It may take a couple dozen coated rounds before the anti-friction coating is distributed through the bore, and you really start to see the reduced pressures. Some guys will automatically add a grain or so to recommended “naked” bullet charge weights when they shoot coated bullets. That’s a risky undertaking.
We recommend that you use “naked” bullet loads for the first dozen coated rounds through a new barrel. Use a chronograph and monitor velocities. It may take up to 30 rounds before you see a reduction in velocity of 30-50 fps that indicates that your anti-friction coating is fully effective.
We have a friend who was recently testing moly-coated 6mm bullets in a 6-6.5×47. Moly had not been used in the barrel before. Our friend had added a grain to his “naked” bullet load, thinking that would compensate for the predicted lower pressures. What he found instead was that his loads were WAY too hot initially. It took 30+ moly-coated rounds through the bore before he saw his velocities drop — a sign that the pressure had lowered due to the moly. For the rounds fired before that point his pressures were too high, and he ended up tossing some expensive Lapua brass into the trash because the primer pockets had expanded excessively.
LESSON: Start low, even with coated bullets. Don’t increase your charge weights (over naked bullet loads) until you have clear evidence of lower pressure and reduced velocity.
Procedure After Barrel Cleaning
If you shoot Moly, and clean the barrel aggressively after a match, you may want to shoot a dozen coated “foulers” before starting your record string. Robert Whitley, who has used Moly in some of his rifles, tells us he liked to have 10-15 coated rounds through the bore before commencing record fire. In a “squeaky-clean” bore, you won’t get the full “benefits” of moly immediately.
To learn more about the properties of dry lubricants for bullets, read our Guide to Coating Bullets. This covers the three most popular bullet coatings: Molybdenum Disulfide (Moly), Tungsten Disulfide (WS2 or ‘Danzac’), and Hexagonal Boron Nitride (HBN). The article discusses the pros and cons of the different bullet coatings and offers step-by-step, illustrated instructions on how to coat your bullets using a tumbler.
The shooting season is now in full swing. When you head to the range you’ll want to be prepared. That means collecting all the gear you’ll need at the range. It’s easy to forget small, critical items, so we’ve provided a checklist of the small “extras” you should pack before you head out to the range. In addition to rifle, rests, ammo, targets, and cleaning gear, here are a dozen essentials you should include in your range bag.
• Shell-Holder — If you don’t have calipers, you can use a shell-holder to check for excessive case expansion from hot loads. If a fired case doesn’t slip into the shell-holder easily, your load is definitely TOO HOT.
• Extra Earplugs — Always use ear protection when shooting. We bring a 35mm film canister with extra sets of foam earplugs.
• Hex Wrench or Screwdriver for action screws — Action screws can work loose with time. Always bring the appropriate hex wrench or screwdriver whenever you go to the range.
• Small Wrench for Scope Rings — Check the tension of your scope base and ring fasteners before you go. Bring along a small Torx wrench for the ring screws (or other tool that fits your fasteners).
• Normal and Under-sized Jags — It is often wise to use one-caliber undersize jags when applying solvent with cotton patches. You should have a couple sizes in your range kit.
• Extra Batteries — Bring extra batteries for all your electronic gear — which can include chronograph, windmeter, digital camera, GPS etc.
• Small Notebook and Pen or Pencil — Use the notebook to record chron data, log group sizes, and make notes about wind and weather conditions.
• Adhesive dots — Bring a few sheets of adhesive dots (sold at office supply stores). Use small white or black dots as target pasters. Use larger red or orange dots as aiming points (target centers).
• Folding Chair or Camp Stool — This comes in handy if you’re spotting for another shooter, or if you reload away from the firing line.
• Water Bottle — You can’t shoot well if you’re dehydrated. Bring at least two quarts of water with you and keep a bottle at the bench.
• Surveyors’ Tape and Wood Stakes — You can make inexpensive wind indicators using surveyors’ tape attached to the top of wood stakes.
• Small Plastic Ruler — Use this to measure your group sizes. A transparent (see-through) ruler works best. Rulers are also useful for drawing lines on targets.
This list is not intended to be exclusive. There are many other items you may wish to include. Obviously bring safety glasses, and Sharpie-type pens are always handy to mark targets. We invite our readers to add other “essentials” to the list. The important thing is to plan ahead, packing your key items before you drive to the range.
Most of us assume that if we weigh our powder carefully (down to the tenth of a grain or less) we can achieve a uniform powder fill from case to case in our handloads. Weighing does ensure that the weight of the propellant in each case is the same, but is the column of powder the same by volume each time? “Not necessarily” is the answer. An interesting experiment by our friend Boyd Allen demonstrates that the manner in which you place kernels in the case can make a significant difference in the height of the powder column within the brass case.
Using a Gempro 250 scale, Boyd measured exactly 30.6 grains of Vihtavuori N-133 powder. He then inserted this powder in the same cartridge case multiple times. (The case has a fired primer in place.) But here is the key — Boyd used various filling techniques. He did a slow fill, and a fast fill, and he also experimented with tapping and drop tubes. What Boyd discovered was that you can start with the exact same weight of powder (in fact the very same set of kernels), yet end up with vary different fill heights, depending on how you drop the kernels into the case. Look at the photos. Despite variations in lighting, the photos show the same 30.6 grains of powder, placed in the same cartridge, with four different methods.
Using funnels with long drop tubes packs kernels more tightly, creating a shorter powder column. That allows you to get more propellant (by weight) into the case.
Boyd Explains the Procedure Used for his Experiment.
EDITOR’s NOTE: So there is no misunderstanding, Boyd started with a weighed 30.6 grain charge. This identical charge was used for ALL four fills. After a fill the powder was dumped from the case into a pan which was then used for the next fill technique to be tried. So, the powder weight was constant. Indeed the exact same kernels (of constant weight and number) were used for each fill.
Boyd writes: “I used the same powder for all fills, 30.6 gr. on a GemPro 250 checked more than once. All fills employed the same RCBS green transparent plastic funnel. The fast drop with the funnel only overflowed when it was removed from the case neck, and 15 granules of powder fell on the white paper that the case was sitting on. The fast-funnel-only drop with tapping, was done with the funnel in place and the case and funnel in one hand, while tapping the case body with the index finger hard, many times (about 20 fast double taps). My idea here was to “max out” the potential of this tapping technique.
The slow drop with the funnel and 10″-long .22 cal. Harrell’s Precision drop tube, was done by holding the scale pan over the funnel and tapping the spout of the pan repeatedly on the inside of the funnel about 1/3 down from the top, with the scale pan tilted just enough so that the powder will just flow. Many taps were involved, again, to max out the technique.
Again, to be clear, after each case filling, the powder was poured from the case back into the scale pan carefully. You may notice the similarity between the fast drop with the drop tube, and the funnel only with tapping. Although I did not photograph it, fast tube drop and tapping (combined) improved on tapping alone, but only to about half as far down the neck as the slow with drop tube. Due to the endless possible permutations, I picked four and left it at that.
I believe that I can make the rough judgment that the scale pan funnel and drop tube technique, which involved a longer drop period, and probably less velocity at the top of the tube, left more room in the top of the case neck than the slow drop from the measure with the same drop tube. You have both pictures, so you can make the comparison.” — Boyd
Does Powder Column Height Variance Make a Difference?
Boyd’s experiment proves pretty conclusively that the method of dropping a given weight of powder can affect the height of the powder column in the case and the degree of powder compression (when a bullet is seated). He showed this to be true even when the exact same set of kernels (of constant weight) was used in repetitive loadings. This raises some interesting questions:
1. Will subsequent cartridge transport and handling cause the powder to settle so the variances in powder column height are diminished?
2. If significant inconsistencies in powder column height remain at time of firing, will the difference in fill level hurt accuracy, or result in a higher extreme spread in velocity?
3. Is there any advantage (beyond increased effective case capacity) for a tight (low level) fill vs. a loose (high level) fill?
We don’t know the answer to these follow up questions. This Editor guesses that, if we tested low-fill-height rounds vs. high-fill-height rounds (all with same true fill quantity by weight), we might see meaningful differences in average velocity. I would also guess that if you fired 10 rounds that exhibited quite a difference in powder column heights, you might see a higher ES/SD than if you shot 10 rounds loaded with a very consistent powder column height (either high or low). But further testing is needed to determine if these predictions are true.
A while back, we featured a portable reloading bench built on a Black & Decker Workmate. That proved a VERY popular do-it-yourself project so we’re showing it again, in case you missed it the first time.
Texan Robert Lewis made himself a great portable reloading bench from plywood mounted to a Black & Decker Workmate 225. The bench, roughly 22″ x 19″ on top, folds up to fit easily in your car’s trunk or behind the seats in a pick-up truck cab. Four recessed bolts hold the wood top section to the collapsible B&D Workmate. The sides and back of the unit are attached to the base with small nails. There is a small shelf (also nailed in place) which can be used to clamp a powder measure or hold a scale. Shown in the photo is a Harrell’s Benchrest measure and Harrell’s single-stage “C” press.
Originally, the whole unit could be built for about $65.00 with pine, or $80.00 with oak (as shown). Robert explained: “The Workmate was $40. If someone bought a 2’x4′ sheet of 3/4″ oak plywood, I think it is around $30. Using pine plywood would be about half that. Fasteners were $3. Spar Urethane would be $5.” [Editor: We have seen major inflation — the Workmate is now about $80 and you’ll be spending more for the wood, so figure the whole project might be $150.00.]
Robert told us: “I used a couple ideas I found on the web. The Larry Willis website gave me the idea to use the Black and Decker Workmate as a base. I found the Workmate on sale for $40 and the top is made from oak plywood I had in my shop. I sealed the wood with three coats of Spar Urethane. The whole thing folds into a nice package for transportation to and from the range.”
NOTE: Since we first ran this story, the price of a Black & Decker Workmate WM225 has increased substantially. But good news — Amazon is currently selling WM225-A Workmates for $74.99, a decent price, particularly for Prime members who get FREE shipping. And for $79.34 at Home Depot, you can get the Workmate WM225 with Local Store Pickup or home delivery (in most states).
Our friend Jim See of Elite Accuracy LLC tested the depth-adjustable hand priming tool from Frankford Arsenal. This product, called the Platinum Series Perfect Seat Hand Primer has some unique features. Primer seating depth can be adjusted with a handy wheel in the tool’s center handgrip. Each “click” of the wheel moves the primer post .001″ (one one-thousandth of an inch). Additionally, the design of the case-holder allows quick and easy removal of a primed case. The unit ships with a full set of shell-holders to match all types of cases. Like many other hand priming units, the primers are loaded into a flip tray that attaches to the head of the tool.
Here is Jim See’s quick review of the Frankford priming tool:
“The Frankford Arsenal perfect hand-priming tool is legit. The tool is built heavy and strong. The only plastic parts in it are the tray and lid. The [primer] seating depth adjustment… is simple and accurate. Easy to operate. I primed 1000 cases, averaging 23 per minute. I adjusted the depth of seating between two different lots of brass in seconds. The system seats primers easily with one hand operation. The cases slide out on their own after seating. Insert, seat, reach for a new case at the same time as you are operating the lever, case slides out and you are inserting the next piece.”
Overall, Jim was “Super impressed with the quality and the results. This thing is super smooth — way less pressure needed than my Lee or RCBS. It’s a lot faster too.” Jim add that one can switch from small to large primer posts in 10-15 seconds.
This Video Shows the Frankford Priming Tool in Operation:
Even with premium brass you may want to adjust your primer seating depth: “Every thing has a tolerance that is acceptable in manufacturing. If primer pocket depth has a .005″ tolerance and the primers themselves have a .002″ tolerance you can see why adjustments would be needed. In this case the two lots were manufactured on year apart. Could you expect them to be identical?”
At the request of our readers, we provide select “Deals of the Week”. Every Sunday afternoon or Monday morning we offer our Best Bargain selections. Here are some of the best deals on firearms, hardware, reloading components, optics, and shooting accessories. Be aware that sale prices are subject to change, and once clearance inventory is sold, it’s gone for good. You snooze you lose.
NOTE: All listed products are for sale to persons 18 years of age or older. No products are intended for use by minors.
1. Midsouth — Primer Sale w/ CCI, Federal, Rem, Magtech & more
⏺️ Large supply of magnum, large, and small primers at good prices
Over the last few years premium brand primers have been pricey and hard to source. Thankfully, things are getting much better. And right now Midsouth is running a major Midsouth Primer Sale with significant savings on CCI, Federal, Winchester, Magtech and other brand primers. Yes there are large rifle primers and CCI BR-4, CCI 450s, and Federal 205M small rifle primers — popular with competitive shooters. Both 1000ct and 5000ct packages are on sale.
2. Natchez — Reloading Press Sale w/ Redding, RCBS, Lyman, Lee
⏺️ Big discounts on many good Redding, RCBS, Lyman, and Lee Presses
With the Giant Press Sale at Natchez you’ll find major discounts (up to 30%) on popular presses from Redding, RCBS, Lyman, and Lee. Single-stage, progressive, and turret-top presses are on sale. If you need a good primary or secondary press, this is a great buying opportunity. For folks who load multiple pistol cartridge types, we can recommend the Lyman BrassSmith 8-station turret. This is offered in a complete Combo Package for $499.99.
3. Amazon — Folding 4-Wheel Gear Cart, $53.99
⏺️ Great deal on folding cart that can handle all your shooting equipment
How many times have you gone to a match or the range and had to make multiple trips for all your gear? Now you can haul the gear easier with a Collapsible Foldable Beach Wagon (#ad). Often used at matches to haul rifles, rests, mats, windflags, spotting scopes etc., these handy carts make life easier at the range or out in the field. The large oversized wheels traverse rough terrain and roll through sand with ease.
⏺️ Very complete kit with good press and quality tools
The Redding Boss ProPak Loading Kit is a great combo for both new reloaders getting started and for more advanced reloaders wanting to upgrade their equipment. And right now this quality Redding ProPak is just $285.94 — over 50% off the regular $577.95 MSRP. The Boss Pro-Pak includes the Redding Boss reloading press, powder and bullet scale, powder trickler, lube pad, deburring tool, case prep kit, powder funnel, and loading manual. Just add dies and you’re ready to handload high-quality ammo.
5. Howa M1100 .22 LR Bolt-Action Rifle, $199.99
⏺️ Major savings on good, accurate bolt-action rimfire rifle
The Howa M1100 is a good first rifle for a young family member or a nice plinking rig. And this bolt-action .22 LR rimfire rig is ultra-affordable — it costs just $199.99 at Vance Outdoors. This same rifle is $283.75 at Buds Gun Shop — nearly $84 more. This 6.3-lb rifle has an 18″ 1:16″-twist blued barrel, synthetic black polymer stock, tactical bolt handle, and a 10-round .22 LR magazine. Buyers report the M1100 rifle is very accurate and Howa offers a solid warranty.
⏺️ Innovative system that cleans both suppressors and muzzle brakes
This product cleans suppressors and muzzle brakes. The Bore Tech Decimator Suppressor Cleaning System is specifically formulated to safely and effectively remove fouling inside suppressors AND remove carbon fouling from ported muzzle brakes. On sale for $219.99 at Graf’s ($30 off MSRP), this Bore Tech kit includes Part A and Part B solvents, vertical stand with overflow catcher, and a spray system that goes inside your suppressor. The Spray Handle and Flushing Lance effectively remove fouling from the chambers and metal parts in both sealed and take-apart suppressors. BoreTech says its Decimator solvents are safe for aluminum, stainless steel, titanium and a wide variety of alloys and coatings.
7. Amazon — Frankford Arsenal Universal Case Trimmer, $66.70
⏺️ Handy, affordable tool that works for small to magnum cases
Unlike conventional trimmers, the Frankford Arsenal Universal Precision Case Trimmer (#ad) requires no specific pilots or shellholders. The included collets index off the case shoulder to trim any shouldered case from 17 Remington to 460 Weatherby Magnum. Simply install the correct collet, adjust the trimmer to your desired length, and secure the trimmer into a drill or drill press. Cases are then fed into the trimmer by hand. Overall this is a very affordable and versatile system that, in many respects, is more efficient than traditional case trimmers.
8. Palmetto SA — Crimson Trace RAD Max Red Dot, $89.99
⏺️ Quality 3 MOA Reflex sight for pistols/shotguns, 74% OFF
If you need a red dot optic for your pistol or shotgun, consider the Crimson Trace RAD Max. Featuring a red 3 MOA aiming dot, the RAD Max has a recessed, multi-coated lens with a quick acquisition window. Along with a manual on/off button, the RAD Max has an AUTO Shut-off Function that automatically shuts off after 8 hours of operation to conserve battery life. This Red Dot optic has earned praise from purchasers with 88% 5-star ratings. This is a great deal — $260 off MSRP, a 74% discount.
⏺️ Good advanced powder dispenser now $40 Off with FREE Shipping
Here’s a good, modern powder scale/dispenser offered with a HUGE discount. At Midsouth, the Lyman Gen6 Compact Powder Dispenser System is now $40 Off with FREE Shipping. So your total price, delivered, is $219.99 — a great deal. This unit is accurate to +/- 0.1 grains and can use any type of smokeless powder. It has a fast warm-up, anti-static/anti-drift technology, with sophisticated electronic shielding to resist interference from other electronic devices. This unit comes with calibration weight, powder tray, and cleaning brush.
10. Amazon — 52″ Double Rifle Case, $39.99
⏺️ Great price for rugged, dual-rifle carry case
Here’s a very affordable rifle case that can hold long competition rifles. The Huntsen 52″ Double Rifle Case features a removable divider that enables the carrying of one or two rifles up to 50″ OAL. This case includes a large zipper pocket, 3 magazine pouches, plus MOLLE straps for other accessories. For the same $39.99 sale price, this 52″ case is offered in black (#ad), green (#ad), or tan digital camo (#ad) colors.
As an Amazon affiliate, this site can earn revenues through sales commissions.
Do you know what the inside of a rifle chamber (and throat zone) really looks like? Do you understand the concept of headspace and why it’s important? If not, you should read the Brownells GunTech article Gauging Success — Minimum Headspace and Maximum COL. This article explains the basics of headspace and shows how to measure headspace (and length to lands) in your barrels with precision. The article also explains how to adjust your full-length sizing dies to “bump the shoulder” as needed.
Why is headspace important? The article explains: “Controlling headspace and setting proper C.O.L. also represent improved safety and reduced cost of handloading. Excessive headspace can cause case head separation and gases in excess of 60,000 PSI escaping from a rifle’s chamber. Too little headspace can result in a chamber forced bullet crimp and a bullet that becomes an obstruction more than a properly secured projectile. Excessive C.O.L. can result in a rifling-bound bullet, a condition that could result in spikes of excessive pressure.”
[Editor’s NOTE: It is common for competitive benchrest shooters to seat bullets into the rifling. This can be done safely if you reduce your loads accordingly. With some bullets we often see best accuracy .010″ (or more) into the lands. However, this can generate more pressure than the same bullet seated .010″ away from initial lands contact. As with all reloading, start low and work up gradually.]
Headspace is a measurement from the bolt-face to a point in the chamber. This point of measurement will vary based on the type of cartridge. Improper headspace, either excessive or (conversely) under SAAMI specifications, can cause a variety of problems, many serious.
How is headspace specified? Most cartridges used within the United States are defined within ANSI/SAAMI Z299.3-4. Brownells explains: “In the case of the .243 Winchester, as an example, there are pressure specifications, cartridge drawings and, as pictured above, chamber drawings. Armed with a chamber drawing, each manufacturer producing a firearm for the .243 Winchester knows the proper standard dimension to cut chambers and set headspace. Notice there are two headspace reference dimensions for the chamber. The upper is a place in the chamber where the shoulder is .400″ in diameter; the “datum” or “basic” line. The lower is the 1.630″~1.640″ minimum – maximum dimension from the breech face (bolt face) to that point in the chamber that measures .400″.”
The actual headspace of any firearm is the distance from the breech face to the point in the chamber that is intended to prevent forward motion of a cartridge.
Finding Cartridge Length to Lands with OAL Gauge
Using a comparator on a set of calipers, you can quickly determine cartridge base-to-ogive length. This is the measurement from the base of the case to the forward-most full diameter section of the bullet, which is for convenience called the ogive. (Technically, the “ogive” is the full curve from bullet tip back to full-diameter ring). Shown here, that ogive is 0.243″ diameter.
The next step is using a modified (threaded) case with a Hornady OAL tool to determine Length-to-Lands (LTL) in your rifle’s chamber. During this measurement process, the modified case, with a bullet in its neck, is inserted in the chamber. Go slow, take your time. Here are 5 tips that will help you get repeatable and reliable LTL measurements:
1. Start with a clean chamber and clean barrel throat.
2. Make sure the modified case is fully screwed down and seated on the OAL Gauge. It can sometimes unscrew a bit during repeated measurements.
3. Insert the modified case slowly and gently, but ensure the shoulder of the modified case is fully seated on the end of the chamber.
4. Push the gray plastic rod GENTLY. It is common for the bullet to be tilted a bit. You want to allow the bullet to self-center in the throat BEFORE you apply much pressure. Then tap a couple times and push until you feel resistance. Do NOT push too hard — that will jam the bullet in the lands.
5. Repeat the measurement at least 3 more times. If you follow our instructions, you should, typically, get a repeatable measurement, within 0.0015″ or so, 3 out of 4 times.


 Velocity and powder charts


 The shooting season is now in full swing. When you head to the range you’ll want to be prepared. That means collecting all the gear you’ll need at the range. It’s easy to forget small, critical items, so we’ve provided a checklist of the small “extras” you should pack before you head out to the range. In addition to rifle, rests, ammo, targets, and cleaning gear, here are a dozen essentials you should include in your range bag.
 • Shell-Holder — If you don’t have calipers, you can use a shell-holder to check for excessive case expansion from hot loads. If a fired case doesn’t slip into the shell-holder easily, your load is definitely TOO HOT.
 • Hex Wrench or Screwdriver for action screws — Action screws can work loose with time. Always bring the appropriate hex wrench or screwdriver whenever you go to the range.
 • Extra Batteries — Bring extra batteries for all your electronic gear — which can include chronograph, windmeter, digital camera, GPS etc.
 • Folding Chair or Camp Stool — This comes in handy if you’re spotting for another shooter, or if you reload away from the firing line.
 • Small Plastic Ruler — Use this to measure your group sizes. A transparent (see-through) ruler works best. Rulers are also useful for drawing lines on targets.

 A while back, we featured a portable reloading bench built on a Black & Decker Workmate. That proved a VERY popular do-it-yourself project so we’re showing it again, in case you missed it the first time.


 Finding Cartridge Length to Lands with OAL Gauge


