Many shooters prefer to deprime their brass before resizing. That way they can tumble cases or keep primer debris off their main press. To deprime cases before sizing or cleaning you can use a Decapping Die. This pushes out the spent primer without changing the neck or body of a case. Such decapping dies work fine, but they do require the use of a press. Here is a handy alternative — a cool tool that allows you to deprime brass anywhere — no press needed.
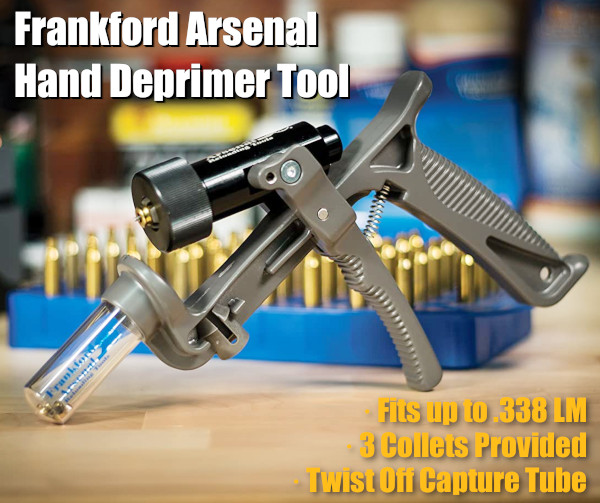
Handheld Primer Removal Tool From Frankford Arsenal
This cleverly-designed Hand Deprimer Tool allows you to deprime cartridge cases without a press. This hand-tool from Frankford Arsenal will deprime brass and capture primers conveniently. You can deprime your cases while watching TV or relaxing in your favorite chair.
This device lets you remove spent primers anywhere — no press needed and all the mess (cups/anvils/residue) stays in the capture chamber. This tool comes works with nearly all common case types up to .338 Lapua Magnum. With good leverage, this tool does the job quickly and efficiently. Forum members have praised this handy tool, but recommend wearing a thick glove if doing more than 100 cases in a session.
How to Adapt Tool for Small Flash Hole Brass
The Frankford Arsenal Deprimer Tool was designed for LARGE flash-hole brass. To deprime brass with small (1.5mm/0.59″) small flash-holes, as found on Lapua .220 Russian and 6mmBR cases, you will need to reduce the pin diameter. Frankford Arsenal currently recommends purchasing a replacement pin and “sanding it down” to the smaller diameter. NOTE: This is NOT difficult — simply spin the stock pin in some sandpaper.
This handy depriming tool is very versatile. With a universal, cylinder-style cartridge-holder, the tool can deprime a wide variety of cartridge types from .20 caliber up to .338 caliber. Three different plastic collets are provided to handle for different diameter cases. Spent primers are captured in a removable spent primer catch tube. Simply twist off the clear catch tube to dump the spent primers. With die-cast metal construction, this tool should last through many thousands of depriming cycles. MSRP is $54.99. Right now it is $52.00 on Amazon with 81% 5-star ratings.
User Modifications — Grip Padding and High-Volume Capture
Many users recommended putting some kind of padding on the grip and front lever to reduce pressure on the fingers. This can be done with a wrap or a rubber covering. In addition, users have adapted the unit with an attached hose and large primer capture jug. If you depriming hundreds of cases at a time, this hose conversion may make sense.
Review from actual owner: “I have owned one of these for about eight years and deprimed over 10,000 cases with this tool. I have never had to replace a single part on it. You will have to adjust the return spring every so often, but that is a very easy task. If you are depriming a LOT of brass, the handle can tear up your hand a bit. Solution: Wear a Mechanics Glove. Easy Peasy! You will NOT regret this purchase.”
by Sierra Bullets Ballistic Technician Paul Box
One thing that plays a major role in building an accuracy load is neck tension [one of the factors that controls the “grip” on a bullet]. I think a lot of reloaders pretty much take this for granted and don’t give that enough thought.
So, how much neck tension is enough?
Through the years and shooting both a wide variety of calibers and burn rates of powder, I’ve had the best accuracy overall with .002″ of neck tension. Naturally you will run into a rifle now and then that will do its best with something different like .001″ or even .003″, but .002″ has worked very well for me. So how do we control the neck tension? Let’s take a look at that.
First of all, if you’re running a standard sizing die with an expander ball, just pull your decapping rod assembly out of your die and measure the expander ball. What I prefer [for starters] is to have an expander ball that is .003″ smaller than bullet diameter. So for example in a .224 caliber, run an expander ball of .221″. If you want to take the expander ball down in diameter, just chuck up your decapping rod assembly in a drill and turn it down with some emery cloth. When you have the diameter you need, polish it with three ought or four ought steel wool. This will give it a mirror finish and less drag coming through your case neck after sizing.
Tips for Dies With Interchangeable Neck Bushings
If you’re using a bushing die, I measure across the neck of eight or ten loaded rounds, then take an average on these and go .003″ under that measurement. There are other methods to determine bushing size, but this system has worked well for me.
Proper Annealing Can Deliver More Uniform Neck Tension
Another thing I want to mention is annealing. When brass is the correct softness, it will take a “set” coming out of the sizing die far better than brass that has become too hard. When brass has been work hardened to a point, it will be more springy when it comes out of a sizing die and neck tension will vary. Have you ever noticed how some bullets seated harder than others? That is why.
Paying closer attention to neck tension will give you both better accuracy and more consistent groups.
Here’s a very useful product that should please shooters who wet-tumble their brass with stainless media, or use ultrasonic cleaning machines to clean cartridge brass (and gun parts). Employing forced hot air circulation, the Lyman Cyclone Case Dryer will dry a large quantity of brass in under two hours. Internal racks provide five drying levels. With “street price” under $80.00, the Cyclone Case Dryer is an affordable and effective addition to an ultrasonic or rotary-tumbler cleaning system.
The Lyman Cyclone Case Dryer works fast. No need to wait overnight (or longer) to air-dry your brass. Lyman states that “The forced heated air circulation of the Cyclone will dry your brass inside and out within an hour or two, with no unsightly water spots.” The handy individual trays keep different types of brass separate. The dryer can also be used for gun parts that have been ultrasonically cleaned.
Lyman Cyclone Case Dryer Features:
• Holds up to 1000 .223 Rem cases or 2000 9x19mm Luger cases
• Works with cartridge brass cases or gun parts
• Fast drying time — Typically 1 to 2 hours
• Timer control can be set up to 3 hours
• Durable ABS trays with recessed handles
Watch How Cyclone Case Dryer Functions with both Cartridge Brass and Gun Parts
Cyclone Case Dryer 115V (Part #7631560) MSRP: $94.95
Cyclone Case Dryer 220V (Part #7631561) MSRP: $112.00
Starline Brass offers a series of videos with helpful reloading tips. Focused primarily on pistol cartridges, these short videos can help anyone get started with metallic cartridge reloading. If you load pistol rounds on a progressive, this video series is particularly helpful. The on-camera host is Hunter Pilant, son of Carroll Pilant of Sierra Bullets.
Preventing Double Charges
Tip: Use a bulky powder that fills your case more than half way with a correct charge. This will overfill the case if it is double-charged, making it very difficult to seat a bullet.
Tumble New Brass Before Loading the First Time
Tip: Tumble new pistol cartridge brass in used media for 30 minutes before loading for the first time. This will add enough graphite (carbon residue) to smooth case entry into dies. You can also lube the case mouths with graphite, or use spray lube.
Powder Through Expander — How to Eliminate Hang-ups
Tip: When loading pistol brass with a progressive press, sometime the powder-through expander is hard to remove, especially with short cases. There are two fixes — first, try deburring the inside of the case mouth on your cases. Second, the radius of the powder through expander plug can be modified to smooth entry and exit (see photo). Starline will do this modification for free.
If you’ve been thinking about a big purchase at Brownells, here are some money-saving codes. Brownells is currently offering $50 Off a $500+ purchase, $25 Off a $250+ purchase, and 10% Off most purchases (through the end of July). It’s simple to get these discounts — there are no buyers’ clubs to join, no forms to fill out. Just use the appropriate Discount Code during online check-out.
Listed below are the Codes to use. Simply use the appropriate Code for your purchase at Brownells.com. As these Codes may be deactivated without notice, if one Code doesn’t work, try a different Code and you can still save some buck$. Also if the highest value code no longer works, try a lesser value CODE.
Coupon Code: OUTLAW10 — 10% Off sitewide
Expiration date: 7/30/2025
Coupon Code: PRIMER10 — 10% Off sitewide
Expiration date: 7/29/2025
Coupon Code: JULY50 — $50 off $500 or more
Expiration date: 7/31/2025
Coupon Code: JULY25 — $25 Off $250 or more
Expiration date: 7/31/2025
NOTE: If a specific code does not work, try another code. Some of these codes have no listed expiration date, so Brownells could terminate them at any time. Accordingly, we recommend you do your shopping soon.
Have you ever expanded a .22 or 6mm cartridge all the way up to .30-caliber? If so, you know this can be a difficult procedure that stresses the case necks and neck-shoulder junction. A significant neck-size expansion done in one big jump can increase run-out, cause doughnuts, or worse yet, even split the brass. Therefore you want to proceed in increments, increasing the neck diameter in stages. One smart way to do that is to use a Progressive Press. This article explains how…
The most successful short-range benchrest-for-score cartridge is the 30 BR. That cartridge, as well as 30 BR variants such as the 30 BRX, all start with the 6mmBR Norma parent cartridge, typically with Lapua 6mmBR brass. To get a nice 30 BR case you want to expand in stages, increasing the inside neck diameter incrementally from .243 to .308.
Darrell Jones of DJ’s Brass Service creates thousands of 30 BR cases each year. He has found a clever way to speed up the process — Darrell uses a Progressive Press. He runs his 6BR brass through four (4) separate Hornady neck-sizing dies with expander mandrels. First there is a .257 die, followed by .264 (6.5mm), .284 (7mm), and then .308. Then a fifth and final K&M die provides one last, slight expansion so the newly-fashioned 30 BR cases perfectly fit the arbor of Darrell’s neck-turning tool.
So to repeat, the case starts as .243 (6mm), then moves in up stages .257, .264, .284, and .308, with a final “finishing” step prior to neck-turning. You can see the expansion in this video, which starts with 6mmBR brass that was first hydro-formed to 6 BRX:
Watch 6mm Cases Expanded to 30-Caliber (6BRX to 30 BRX)
For this demo video, Darrell expands just one case at a time. However, he can also put multiple cases in the progressive — one per station. This takes a little more effort, Darrell says, but the results are still excellent. Darrell tells us: “I do put multiple cases in the progressive to save time. The results are the same — I just wanted to show a single-step process and how it reduces run-out by not stressing the shoulder with one big expansion from 6mm straight to 30 caliber. Doing the operation in multiple stages avoids binds and helps keep the shoulders concentric.”
This same multi-stage procedure can be use to expand other cartridge types. For example you could take .221 Fireball brass in stages up to .308 to create 300 Blackout brass.
Darrell uses caliber-specific, Hornady neck-sizing-only dies with elliptical expanders. Darrell tells us: “The Hornady elliptical expander has a reduced bearing surface that puts less strain on the brass when expanding the necks to the next size.” The fitting at the bottom of the die is the Lock-N-Load die bushing that allows fast die changes.
These particular cases used in the video were first hydro-formed to 6BRX then expanded to 30 BRX before neck turning. DJ’s Brass offers hydro-forming for many popular wildcat cartridges such as 6 PPC, 6mm Dasher, and .284 Shehane.
Today’s Saturday Video Showcase features informative videos about loading at the range. AccurateShooter.com contributor F-Class John shows efficient procedures for load development at the range, testing both powder charge and seating depth. And Ultimate Reloader’s Gavin Gear shows how to load in the field with a mechanical powder dispenser, small scale, and a high-tech hand press. We also include a video from a benchrest competitor in France loading his 6PPC, plus tips for loading at the range by Glen Zediker, author of the Handloading for Competition book.
Reloading at the Range with F-Class John
This excellent 25-minute video covers all aspects of loading at the range — case sizing, powder measuring/dispensing, priming, bullet seating and more. In the video, F-Class John also talks about transport of tools and how to develop loads at the range, as you test different powder charges and seating depths. Viewers have praised this video as one of F-Class John’s best ever. John employs a compact RCBS Summit press and an RCBS ChargeMaster. Highlights by time: 6:14 powder test with grain increments; 14:30 setting depth test; 16:18 test fire seating depth; 18:31 refine seating depth; 20:52 refined seating depth firing; 22:32 “take away” commentary.
Design and Function of Open Front RCBS Summit Press
Unlike other presses, the open front RCBS Summit moves the die up and down while the cartridge case remains stationary. The ambidextrous open-front design allows great access to your cases, and you can quickly change dies very quickly. The Summit has an all-steel linkage and cast iron frame. The Summit also offers compound leverage, a massive 2-inch diameter ram, full access through the front, a press adapter bushing, spent primer catcher, and wide 4.5-inch operating window for convenient access.
Ultimate Reloader Video of Loading at the Range
Sometimes the ONLY practical solution for load development is loading ammunition at the range. In this video Ultimate Reloader’s Gavin Gear demonstrates the loading process from start to finish, and covers what gear is required to “load where you shoot”. This applies to both loading at a covered range and loading in the field. In the video Gavin employs a bench-attached powder thrower and the impressive ($300) Buchanan Precision Machine (BPM) hand press.
Loading Between Matches — Precision Loading at a Pace
In this video, French benchrest competitor Carlos Pacheco loads ammo efficiently between relays at a Benchrest for Group match. He has a single-stage press clamped to a bench, and has a separate arbor press for bullet seating. 6PPC group-shooting competitors commonly tune their loads during the course of the competition, adjusting powder volumes to keep their rifles in optimal tune. Some competitors may also change bullet seating depth, but “tuning” is most commonly done with powder charge. Some benchrest-for-group competitors also believe that best accuracy is achieve with freshly-made ammo loaded before the brass necks take a set.
Loading at the Range — Then and Now
In benchrest shooting for Group, loading at the range has been de rigueur for decades. In the Score discipline, preloading is usually the custom. The main reason is that, in Score competition, only one Aggregate (warm-up match and five record targets) per day is usually shot. That would be less than 50 shots, assuming a few sighter shots. Also, the 30BR, the dominant Benchrest-for-Score cartridge, is very amenable to pre-loading.
By contrast, the Group discipline includes 21 targets (two warm-ups and twenty record targets) over a weekend, usually shot with 6PPC-chambered rifles. Many times, the 6PPC shooters may tweak their loads through the day given changing atmospheric conditions or simply trying to find the correct tune to “dot up”. This term, “Dot up”, means the shots are essentially going through the same hole, or closely so.
Loading at the range was a bit different when benchrest competition was in its infancy. The 1951 book, Modern Accuracy by Bob Wallack, is the best of the early benchrest books. Copies can be found, from time to time, on eBay or Alibris. It is a fascinating survey of benchrest as it existed more than six decades ago. In it, there is a photo of Wallack using the rear bumper of a car at the bench to clamp his reloading tools. Things have come a long way compared to the range loading set-ups of modern shooters. Here you can see Bob Wallack way back in 1950:
Good Article on Reloading at the Range by Glen Zediker
The February 2013 edition of Shooting Sports USA magazine has an interesting feature by Glen Zediker, who sadly passed away in October 2020. In this Transporting Success, Part I article, Zediker explains the advantages of loading at the range when you are developing new loads or tuning existing loads. Glen, the author of the popular Handloading for Competition book, discusses the gear you’ll need to bring and he explains his load development procedure. In discussing reloading at the range, Glen focuses on throwing powder and seating bullets, because he normally brings enough sized-and-primed brass to the range with him, so he doesn’t need to de-prime, re-size, and then re-prime his cases.
Zediker writes: “Testing at the range provides the opportunity to be thorough and flexible. You also have the opportunity to do more testing under more similar conditions and, therefore, get results that are more telling. Once you are there, you can stay there until you get the results you want. No more waiting until next time.”
Zediker starts with three-shot groups: “I usually load and fire three samples [with] a new combination. I’ll then increase propellant charge… based on the results of those three rounds, and try three more. I know that three rounds is hardly a test, but if it looks bad on that few, it’s not going to get any better.”
Glen reminds readers to record their data: “Probably the most important piece of equipment is your notebook! No kidding. Write it down. Write it all down.”
There’s More to the Story…
Editor’s Note: In Zediker’s discussion of loading at the range, he only talks about throwing powder and seating bullets. In fact, Glen opines that: “there is little or no need for sizing.” Well, maybe. Presumably, for each subsequent load series, Zediker uses fresh brass that he has previously sized and primed. Thus he doesn’t need to de-prime or resize anything.
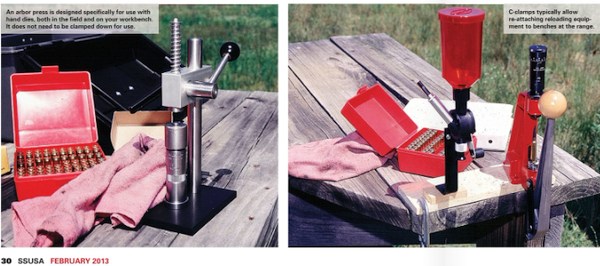
That’s one way to develop loads, but it may be more efficient to de-prime, re-size, and load the same cases. That way you don’t need to bring 50, 80, or even 100 primed-and-sized cases to the range. If you plan to reload your fired cases, you’ll need a system for de-priming (and re-priming) the brass, and either neck-sizing or full-length sizing (as you prefer). An arbor press can handle neck-sizing. But if you plan to do full-length sizing, you’ll need to bring a press that can handle case-sizing chores. Such a press need not be large or heavy. Many benchresters use the small but sturdy RCBS Partner Press, an “O-Design” that costs about $119.99 on Amazon. You may even get by with the more basic Lee Precision Compact Reloading Press, shown in Zediker’s article. This little Lee press, Lee product #90045, retails for under $50.00.
Wind Box Shelters Scales When Reloading at Outdoor Ranges
Beat the Breezes with a Wind Box for your Scale
Forum member Boyd Allen has come up with a smart solution for reloaders who use scales outdoors — a windproof scale enclosure, aka “Wind Box”. Boyd explains: “Many guys have good set-ups for loading at the range, with clamping mounts for powder measure and press. But they lack a good enclosure for a scale. This is vitally important with beam scales because they have a lot of surface area to catch the wind. With much wind at all, the beam can oscillate to the point that is not really very usable. While a low-profile electronic scale may be less wind-sensitive, breezes DO affect weight read-outs on digital scales. And of course you always have the issue of blowing powder particles.”
Boyd Allen has used his Wind Box successfully for many seasons. He explains: “The essence of the idea is to have a scale set up in a box with a clear cover that can be opened and closed. On one side the trickler handle/control emerges through a ‘just big enough’ hole. You raise the cover, add a sub-target-weight thrown charge to the pan, and then close the cover. With the cover secure, the set-up is protected from the wind, and you can now trickle up to your desired charge. It works very well. The scale in the photo is an old Ohaus that I picked up. You can adapt this Wind Box design to any beam scale, or portable electronic scale. Simply adjust the dimensions to fit your particular scale and trickler.”
Saturday Movies range loading story concept and video links by Boyd Allen
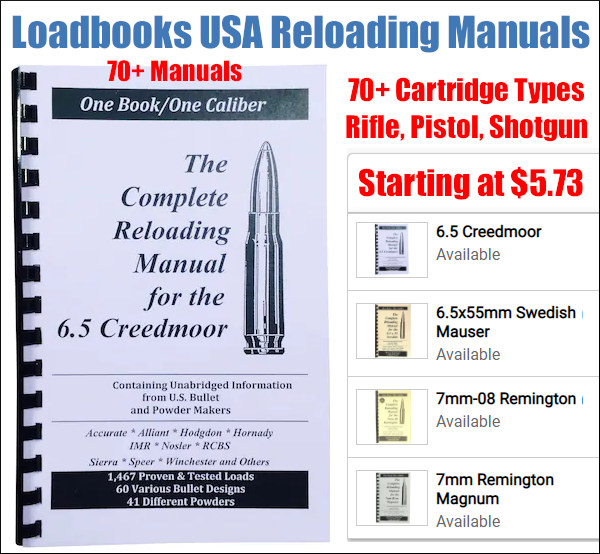
⏺️ » Over 70 loadbook varieties — great for pistol and hunting loads
Loadbooks pack a ton of valuable load data in a single handy volume. These booklets efficiently summarize data from multiple bullet and powder manufacturers. We have used these Loadbooks for our pistol loading as well as common rifle hunting loads. Right now many of these loadbooks are discounted up to 27% at MidwayUSA, with prices as low as $5.73 (The 6.5 Creedmoor manual is $8.99, the .45 ACP book is $9.79, and the .308 Win book is $11.99). Chose from over 70 cartridge types, including .380 ACP, 9mm Luger, .357 Magnum, .40 SW/10mm, .45 ACP, .204 Ruger, .223 Rem, 22-250, 6mm Remington, 6.5 Creedmoor, 6.5×55, 7mm-08, .270 Win, .284 Win, .308 Win, .30-06, 300 WinMag, .338 LM, 12ga shotshell and many more. NOTE: On MidwayUSA’s landing page, click “Select Title” then scroll down to choose your preferred cartridge type. You an order multiple loadbook titles by adding to the shopping cart.
Shown is the Redding Model 15-P Competition Piloted Inside Chamfering Tool with pilot rod that centers in the case flash hole. Also shown is a Forster 45° Rocket Tool.
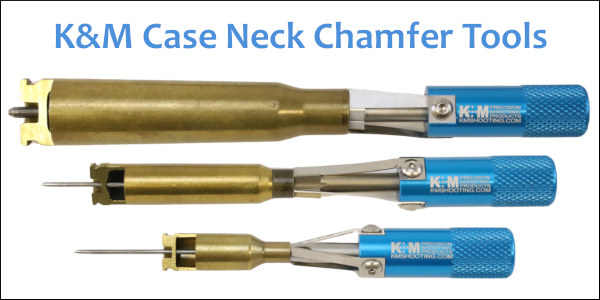
There are a wide variety of reloading tools designed to cut a slight chamfer in case necks and deburr the edge of the case mouth. You don’t need to spend a lot of money for an effective tool. A basic “rocket-style” 45° chamfering tool, such as the Forster, actually does a pretty good job taking the sharp edge off case mouths, particularly if you use a little scotch-pad (or steel wool) to smooth the edge of the cut. The Forster chamfer tool, shown below, is a nicely-made product, with sharper cutting blades than you’ll find on most other 45° chamferers. It costs $26.99 at Brownells.com.
Redding sells a handy piloted chamfering tool with a 15° inside cutting angle and removable accessory handle. This Redding Model 15-P chamferer works really well, so long as you have consistent case OALs. The pilot rod (which indexes in the flash hole) is adjustable for different cartridge types (from very short to very long). This ensures the concentricity of the inside neck chamfer to the case mouth. This quality tool works with cases from .22 to .45 Caliber, and retails for $41.49 at MidwayUSA.
Sinclair International offers a 28° carbide chamferer with many handy features (and sharp blades). The $29.99 Sinclair Carbide VLD Case Mouth Chamfering Tool will chamfer cases from .14 through .45 caliber. This tool features a removable 28° carbide cutter mounted in the green plastic Sinclair handle. NOTE: A hex-shaft cutter head power adapter can be purchased separately for $20.99 (Sinclair item 749002690). This can be chucked in a power screwdriver or used with dedicated power drives when doing large volumes of cases.
Many folks feel they can get smoother bullet seating by using a tool that cuts at a steeper angle. We like the 22° cutter sold by Lyman. It has a comfortable handle, and costs $17.89 on Amazon. The Lyman tool is an excellent value, though we’ve seen examples that needed sharpening even when new. Blade-sharpening is easily done, however.
K&M makes a depth-adjustable, inside-neck chamferer (“Controlled Depth Tapered Reaper”) with ultra-sharp cutting flutes. The latest version, which costs $64.40 at KMShooting.com, features a central pin that indexes via the flash hole to keep the cutter centered. In addition, the tool has an enhanced handle, improved depth-stop fingers, plus a new set-screw adjustment for precise cutter depth control. We caution, even with all the depth-control features, if you are not careful, it is easy to over-cut, slicing away too much brass and basically ruining your neck. We think that most reloaders will get better results using a more conventional chamfer tool, such as the Forster or Redding 15-P.
One last thing to note — tools like the K&M and the Sinclair chamferer are often described as VLD chamferers. That is really a misnomer, as bullets with long boat-tails actually seat easily with very minimal chamfering. In reality, these high-angle chamferers may be most valuable when preparing brass for flat-base bullets and bullets with pressure rings. Using a 22° or 28° chamferer can reduce the risk of cutting a jacket when using VLD bullets though — so long as you make a smooth cut.
SSG Greg Markowski of the USAMU at Camp Perry, Ohio.*
The U.S. Army Marksmanship Unit (USAMU) fields pistol teams as well as rifle and shotgun competition squads. Consequently the USAMU’s Reloading Shop loads tens of thousands of pistol rounds every year. In this article, the USAMU’s handgun experts talk about reloading for handguns — with smart tips on how to achieve superior accuracy with 100% reliability. This article, which offers important insights on COAL, primers, crimps and more.
This video shows .45 ACP centerfire pistol competitors at Camp Perry
Precision Pistol Reloading — Recommended Methods
Optimize the Taper Crimp
One often-overlooked aspect of handloading highly-accurate pistol ammunition is the amount of crimp and its effect on accuracy. Different amounts of taper crimp are used with various handloads to obtain best accuracy. The amount is based on bullet weight, powder burn rate and charge, plus other factors. It is not unusual for our Shop to vary a load’s crimp in degrees of 0.001″ and re-test for finest accuracy.
Use Consistent Brass
Brass is also important to pistol accuracy. While accurate ammunition can be loaded using brass of mixed parentage, that is not conducive to finest results, particularly at 50 yards. It is important for the serious competitor/handloader to use brass of the same headstamp and ideally one lot number, to maximize uniformity. Given the volumes of ammunition consumed by active pistol competitors, using inexpensive, mixed surplus brass for practice, particularly at the “short line” (25 yards), is understandable. However [at 50 yards], purchasing and segregating a lot of high-quality brass to be used strictly for slow-fire is a wise idea.
Importance of Uniform COAL
Uniformity of the Case Overall Length (COAL) as it comes from the factory is also important to achieving utmost accuracy. More uniform case lengths (best measured after sizing) contribute to greater consistency of crimp, neck tension, ignition/burn of powder charge, and so on. Cartridge case-length consistency varies from lot to lot, as well as by maker. Some manufacturers are more consistent in this dimension than others. [Editor’s note: It is easy to trim pistol brass to uniform length. Doing this will make your taper crimps much more consistent.]
Primers and Powders — Comparison Test for Accuracy
Pay attention to primer brands, powder types and charges. Evaluating accuracy with a Ransom or other machine rest at 50 yards can quickly reveal the effect of changes made to handload recipes.
Bullet Selection — FMJ vs. JHP
Bullets are another vital issue. First, there is the question of FMJ vs. JHP. A friend of this writer spent decades making and accuracy-testing rifle and pistol bullets during QC for a major bullet manufacturer. In his experience, making highly-accurate FMJ bullets is much more difficult than making highly-accurate JHPs, in large part due to the way the jackets are formed. Small die changes could affect accuracy of FMJ lots dramatically. The CMP now allows “safe, jacketed ammunition” in Excellence-in-Competition (EIC) Service Pistol matches, although wadcutter ammunition is prohibited. Thus, the option to use very accurate JHP designs simplifies the life of CMP Service Pistol shooters in pursuit of the prestigious Distinguished Pistol Shot badge.
This animation showing 1911 Pistol operation has over 31 million YouTube views:
Hopefully, these tips will be helpful to any pistol shooters interested in accurate handloads, not just “Bullseye” shooters. Small tweaks to one’s normal routine can pay big dividends in improved accuracy and make practice and competition more rewarding. Stay safe, and good shooting!
TOP IMAGE: SSG Greg Markowski, a shooter/instructor with the USAMU, fires his pistol during the 2018 Civilian Marksmanship Program’s National Pistol Matches at Camp Perry, Ohio. At that event, Markowski claimed the General Mellon Trophy, General Patton Trophy and the General Custer Trophy. U.S. Army photo by Maj. Michelle Lunato/released by Defense Visual Information Distribution Service.


 There’s More to the Story…


 Use Consistent Brass


