Many short-range Benchresters have thought about converting their 6 PPC to shoot a 30BR for score matches, or a Dasher for mid-range (or even 1000-yard) games. That way you have a rifle that does double duty, giving you the most bang for your buck. Though an action with a PPC bolt won’t normally work with 30BR/6BR/Dasher cases with their larger .308-class rim (0.4728″ diameter), there is a pretty easy solution that allows you to cycle these bigger cartridges with a 6PPC-style bolt (designed to fit .220 Russian rims).
“Rebating case rims … lets you shoot a 30BR in score matches using your PPC action. All you need is a new barrel. This saves buying another bolt, receiver, or rifle.” — Butch Lambert
Butch Lambert of ShadeTree Engineering provided this tip. Butch notes that many 6 PPC benchrest group shooters also enjoy shooting in score matches. But to be really competitive in the BR for score game, that means shooting a 30BR, which has a wider, .308-class rim (0.4728″ diameter). Likewise, if you want to compete in 600-yard registered BR events or in varmint matches, you probably want to run a bigger case, such as the 6BR, 6mm Dasher, or 6-6.5×47. Those cartridges also have the larger 0.4728″ rims.
Rebate Your 30 BR Rims
To convert a PPC-boltface action to shoot bigger cases you can spend a ton of money to buy a new bolt. That can cost hundreds of dollars. The simpler solution is to turn down the diameter of the larger cases on a lathe. Butch explains: “We’ve seen plenty of interest in rebating case rims. This lets you shoot a 30BR in score matches using your PPC action. All you need is a new barrel. This saves buying another bolt, receiver, or rifle if you have a PPC boltface. Anyone who has access to a lathe can do this job pretty easily. Yesterday I turned 150 case in about an hour.”
At right is the lathe form tool Butch uses to rebate the case rims.
Tech Report by Brian Williams
Reloading for a military surplus gun is different than loading for a modern precision rifle in my opinion. There are a few tasks that carry over from one to the other, but the main goal is slightly different. The target shot in the CMP games matches has a rather generous 10 ring, and with a little larger target your focus needs to change from a round with ultra accuracy to a round that is safe and functions well in your particular rifle.
Reloading for Vintage .30-06 Springfield Rifles
Bullet Selection — With the .30-06 for my Garands and Springfields I stick mostly with 168gr bullets plus some 155-grainers. These bullet weights have just worked for me in the past.
Cartridge Brass (Milsurp vs. Commercial) — I use both military and commercial brass, having success with each. I do prefer commercial brass as it is easier to prep for the first reload. Military brass usually has a primer crimp of some kind that needs to be removed, and I have found that trimming these cases can sometimes leave you scratching your head as the OAL on military cases varies considerably.
Powder Charge and Dispensing — I have always had good success with Hodgdon H4895 powder. My load has always been right around 47.0 grains, with both the 168gr and 155gr bullets. I also use the Auto-Trickler to drop all of my powder charges. This is a fantastic piece of equipment that not only gives super-consistent powder charges quickly, but it also makes one less thing that you have to worry about while on the firing line. With the Auto-Trickler, there is never a question about the powder charge in your ammo. As for primers, I have been shooting CCI 200 Large Rifle primers for many years and have never had an issue.
Case Care and Trimming — With most of the .30-06 brass that I use, I will only reload them 5 times maximum. I don’t push the brass too much, because the Garand’s semi-auto cycling can be tough on the cases. I also trim my cases for OAL each reload cycle. I use a Giraud power trimmer, so trimming is relatively quick and easy.
The chambers in some of the older rifles are not perfectly-machined like a modern high-end rifle. This can cause the brass to grow a little inconsistently, so I find trimming every load cycle helps to make sure that everything stays in a nice safe spec.
Case Annealing — A few years ago I started to anneal my .223 Rem service rifle brass. Now I have added that process for all my match ammunition. I anneal after every firing. It is a rather easy step as I can have my auto-feeding Annealeez machine running while doing something else, so annealing does not add a great deal of time or effort to the reloading process.
The .30-06 case was the father of the .308 Winchester, which was adopted as the 7.62×51 NATO cartridge.
VIDEO Showcase — Brian Williams Shoots M1903A3 Prone in May 2021
Bullet sorting station — quilted Maple with marble tile inlay, created by JVW2008.
We have a master woodworker in our Shooters’ Forum, Jerry from Colorado (aka JVW2008). In a Shooters’ Forum thread, Jerry showcases multiple examples of his handiwork — various wood projects for the reloading room. Beautifully made, these one-of-a-kind custom cabinets and tool stands deserve to be on display in a museum.
Jerry’s creations exhibit exquisite craftsmanship and some very clever design features. What is your favorite item among the Jerry’s wood wonders shown here? You can reveal your favorites in the comment section below.
Throne for a Sartorius Analytical Balance
Jerry built this “Throne” for his ultra-precise Sartorius Entris force restoration scale, which is linked to a V2 Auto-Trickler. This is a true state-of-the-art powder measuring system on a beautiful base unit.
Cabinet for Balance Beam Scale
Here is an oak balance beam scale cabinet and weighing surface. Note the mulitiple tiers, side wings, and other smart design features.
Custom Arbor Press Base
Below is a handsome, well-designed base for K&M Arbor Press and Wilson dies. Look at the fitted recesses for the hand dies — very nice!
Jumbo Walnut/Maple Loading Block
And here is a beautiful 100-cartridge reloading block, crafted from Walnut over Maple. It’s impressive to see 100 cartridges all lined up like that!
To see more impressive wood projects by our Shooters’ Forum members, visit the Wood Working Ideas Forum Thread. Along with Jerry’s reloading toom wonders, you’ll see cleaning cradles, shooting benches, transport boxes, and much more. Check out this amazing inlaid rifle case crafted by Forum member Nando-AS for his son.
As a cartridge case is reloaded multiple times, burnt powder residue and carbon builds up on the inside of the case. Unless the case interior is cleaned in some fashion, eventually you’ll see a slight reduction in case capacity. One of our Forum members from Australia wonders about the effects of reduced case capacity: “If the capacity of the case decreases as the crud builds up, then it effectively reduces the size of the cartridge (inside). Wouldn’t that change the pressure produced from that of an equivalent clean case?”
Interesting Test of Case Capacity Changes
Forum member Fred Bohl has actual test results that can help answer the above question. Fred proved that, over a 20-reload cycle, the case capacity of uncleaned cases did decline a small amount. However, surprisingly, this did not seem to affect the actual chronographed velocity of the load. Extreme Spread (ES) did increase, but Fred believes the higher ES was due to changes in case-neck tension, rather than due to the slight reduction in case capacity. Fred reports:
“Back when beginning to use ultrasonic case cleaning, part of the motivation was to get the inside clean based on the assumption that allowing burnt residue to build up inside cases would affect capacity, and, ultimately, performance. An experiment was done to test this hypothesis. The load used, 30.5 grains of RL15 behind 107gr SMKs in a 6mmBR, was selected for best group and lowest ES in prior load development. It turned out to be 92% of initial case capacity and neither “full” or compressed. (I would suspect that different powders, load weight, and total case capacity might produce very different results.)
We took 30 cases of identical initial capacity and tracked three lots of 10 each:
LOT 1: No Internal cleaning LOT 2: Cleaned with media in tumbler LOT 3: Cleaned with Ultrasound machine
Each case (in each lot) was shot and reloaded 20 times. The simplified results after 20 reloads of each lot were as follows:
Lot 1 (not cleaned) – 0.3 to 0.4 gr. loss of capacity, 5 to 8 fps greater ES.
Lot 2 (tumble cleaned) – 0.1 to 0.3 gr. loss of capacity, 4 to 6 fps greater ES.
Lot 3 (ultrasonic cleaned) – no loss of capacity, no detectable change in ES.
FINDINGS
There was no detectable correlation of velocity change to the lots. An oddity was that on very hot days Lot 1 velocities were, occasionally, slightly higher. From results of another ongoing test, I believe the above differences in ES are probably due more to variance in bullet grip tension than case capacity. The ultrasound cleaned cases (LOT 3) did maintain the lowest ES, but we are not 100% sure of the reasons why. More consistent bullet seating might be the reason.”
Editor’s NOTE: Fred’s results do suggest that carbon build-up inside the uncleaned cases might cause a slight increase in pressure that shows up on hot days. Fred has posted that: “A local shooter reported doing the 20 reload, no-clean test on a .308 that gave a loss of capacity of 2.0 grains, doubled ES and significant velocity changes. However, I don’t have any details on his load weight or powder.” Obviously a lot of carbon can build up with 20 reloads. Many shooters retire their brass before then.
Ultrasonic Cleaning and Neck Lube
Some time ago, Jason Baney did a lengthy test on ultrasonic cleaning. Jason found that with his ultrasonically-cleaned cases, the inside of the necks got so “squeaky clean” that he needed to use dry lube in the necks. Jason uses the $21.50 dry lube kit from Neconos.com. This applies ultra-fine Moly powder to the neck using small carbon steel balls.
Here’a useful article by Sierra Bullets Media Relations Manager Carroll Pilant. This story, which originally appeared in the Sierra Bullets Blog, covers some of the more common ammo problems that afflict hand-loaders. Some of those issues are: excessive OAL, high primers, and improperly-sized cases. Here Mr. Pilant explains how to avoid these common problems that lead to “headaches at the range.
I had some gentlemen at my house last fall getting rifle zeros for an upcoming elk hunt. One was using one of the .300 short mags and every 3rd or 4th round would not chamber. Examination of the case showed a bulge right at the body/shoulder junction. These were new cases he had loaded for this trip. The seating die had been screwed down until it just touched the shoulder and then backed up just slightly. Some of the cases were apparently slightly longer from the base to the datum line and the shoulder was hitting inside the seating die and putting the bulge on the shoulder. I got to thinking about all the gun malfunctions that I see each week at matches and the biggest percentage stem from improper handloading techniques.
One: Check Your Cases with a Chamber Gage
Since I shoot a lot of 3-gun matches, I see a lot of AR problems which result in the shooter banging the butt stock on the ground or nearest solid object while pulling on the charging handle at the same time. I like my rifles too well to treat them that way (I cringe every time I see someone doing that). When I ask them if they ran the ammo through a chamber gage, I usually get the answer, “No, but I need to get one” or “I didn’t have time to do it” or other excuses. The few minutes it takes to check your ammo can mean the difference between a nightmare and a smooth running firearm.
A Chamber Gauge Quickly Reveals Long or Short Cases
Size Your Cases Properly
Another problem is caused sizing the case itself. If you will lube the inside of the neck, the expander ball will come out a lot easier. If you hear a squeak as the expander ball comes out of a case neck, that expander ball is trying to pull the case neck/shoulder up (sometimes several thousandths). That is enough that if you don’t put a bulge on the shoulder when seating the bullet … it can still jam into the chamber like a big cork. If the rifle is set up correctly, the gun will not go into battery and won’t fire but the round is jammed into the chamber where it won’t extract and they are back to banging it on the ground again (with a loaded round stuck in the chamber). A chamber gage would have caught this also.
Oversizing cases also causes problems because the firing pin doesn’t have the length to reach the primer solid enough to ignite it 100% of the time. When you have one that is oversized, you usually have a bunch, since you usually do several cases at a time on that die setting. If the die isn’t readjusted, the problem will continue on the next batch of cases also. They will either not fire at all or you will have a lot of misfires. In a bolt action, a lot of time the extractor will hold the case against the face of the breech enough that it will fire. The case gets driven forward and the thinner part of the brass expands, holding to the chamber wall and the thicker part of the case doesn’t expand as much and stretches back to the bolt face. If it doesn’t separate that time, it will the next time. When it does separate, it leaves the front portion of the case in the chamber and pulls the case head off. Then when it tries to chamber the next round, you have a nasty jam. Quite often range brass is the culprit of this because you never know how many times it has been fired/sized and in what firearm. Back to beating it on the ground again till you figure out that you have to get the forward part of the case out.
Just a quick tip — To extract the partial case, an oversized brush on a cleaning rod [inserted] and then pulled backward will often remove the case. The bristles when pushed forward and then pulled back act like barbs inside the case. If you have a bunch of oversized case that have been fired, I would dispose of them to keep from having future problems. There are a few tricks you can use to salvage them if they haven’t been fired though. Once again, a case gage would have helped.
Two: Double Check Your Primers
Another thing I see fairly often is a high primer, backwards primer, or no primer at all. The high primers are bad because you can have either a slam fire or a misfire from the firing pin seating the primer but using up its energy doing so. So, as a precaution to make sure my rifle ammo will work 100% of the time, I check it in a case gage, then put it in an ammo box with the primer up and when the box is full, I run my finger across all the primers to make sure they are all seated to the correct depth and you can visually check to make sure none are in backwards or missing.
Three: Check Your Overall Cartridge Length
Trying to load the ammo as long as possible can cause problems also. Be sure to leave yourself enough clearance between the tip of the bullet and the front of the magazine where the rounds will feed up 100%. Several times over the years, I have heard of hunters getting their rifle ready for a hunt. When they would go to the range to sight in, they loaded each round single shot without putting any ammo in the magazine. On getting to elk or deer camp, they find out the ammo is to long to fit in the magazine. At least they have a single shot, it could be worse. I have had hunters that their buddies loaded the ammo for them and then met them in hunting camp only to find out the ammo wouldn’t chamber from either the bullet seated to long or the case sized improperly, then they just have a club.
Four: Confirm All Cases Contain Powder
No powder in the case doesn’t seem to happen as much in rifle cartridges as in handgun cartridges. This is probably due to more handgun ammo being loaded on progressive presses and usually in larger quantities. There are probably more rifle cartridges that don’t have powder in them than you realize though. Since the pistol case is so much smaller internal capacity, when you try to fire it without powder, it usually dislodges the bullet just enough to stick in the barrel. On a rifle, you have more internal capacity and usually a better grip on the bullet, since it is smaller diameter and longer bearing surface. Like on a .223, often a case without powder won’t dislodge the bullet out of the case and just gets ejected from the rifle, thinking it was a bad primer or some little quirk.
For rifle cases loaded on a single-stage press, I put them in a reloading block and always dump my powder in a certain order. Then I do a visual inspection and any case that the powder doesn’t look the same level as the rest, I pull it and the one I charged before and the one I charged after it. I inspect the one case to see if there is anything visual inside. Then I recharge all 3 cases. That way if a case had powder hang up and dump in the next case, you have corrected the problem.
On progressive presses, I try to use a powder that fills the case up to about the base of the bullet. That way you can usually see the powder as the shell rotates and if you might have dumped a partial or double charge, you will notice as you start to seat the bullet if not before. On a progressive, if I don’t load a cartridge in one smooth stroke (say a bullet tipped over sideways and I raised the ram slightly to reset it) Some presses actually back the charge back adding more powder if it has already dumped some so you have a full charge plus a partial charge. When I don’t complete the procedure with one stroke, I pull the case that just had powder dumped into it and check the powder charge or just dump the powder back into the measure and run the case through later.
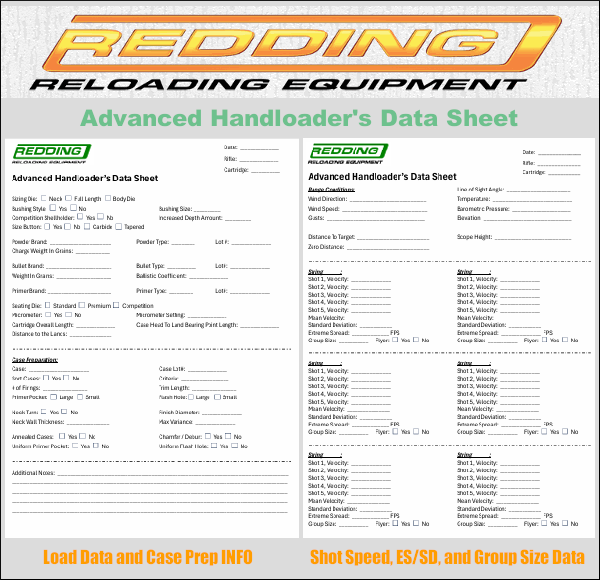
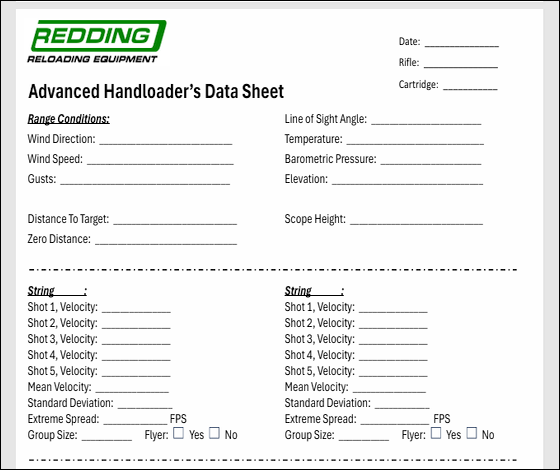
Redding Reloading offers handy Handloader’s Data Sheets in printable PDF format. This FREE 2-page form allows hand-loaders to document their tool settings, bushing size, powder charge, load specs (COAL etc.), and case prep status on Page 1. Then the second page allows you to enter your load testing information, complete with chronograph data, group size, zero range, and wind/temp conditions. The top of page 2 has fields for listing wind and weather conditions. Then below there are six (6) blocks for 5-shot strings, with places to record ES, SD, Average Velocity, and group size. With this single, handy form you can document all the vital information for your particular cartridges and loads. We suggest you print these out, 3-hole-punch ‘em, and then keep them in a three-ring binder.
We’ve seen various reloading log templates, but this Redding form (shown below) is better than most because it combines both reloading data AND range-test data in one place. You can see all key details of the reloading process (tool settings etc.) plus the end results — how the load actually performed over the chronograph and on paper. This form allows the user to capture a large amount of information for later use, while accurately track load development. CLICK HERE to DOWNLOAD.
FREE Ammunition Box Label Template Redding also provides a FREE printable template for your ammo boxes (see photo at top of article). This lets you put all vital load info on your ammo boxes. There are fields for: Date, Cartridge, Powder, Grains, Bullet, Weight, Primer, Case type. Designed for Avery 5260 (or similar) label sheets, this template allows you to print 30 labels at one time. You can purchase the Avery 5260 peel-off printable label sheets at any office supply store.
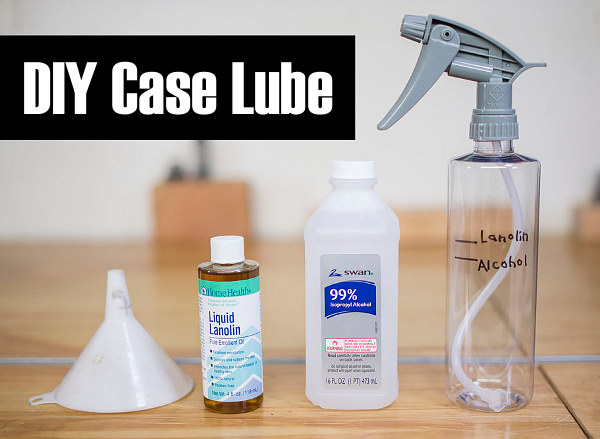
Tired of spending $15-$25 for a can of spray lube that doesn’t last that long? For about the same price as a single 10 oz. can you can make your own effective spray lube that should last for multiple seasons and lube thousands of cases quickly and easily.
In the YouTube video embedded below, our friend Gavin Gear of UltimateReloader.com shows how to make your own case lube using simple, inexpensive ingredients. As recommended by the 6.5 Guys, this Liquid Lanolin + Isopropyl Alchohol mix works well and is very cost-effective. You can make a pint of this home-brew Lanolin case lube that will lube thousands of cases — many more than a typical commercial aerosol spray can (that’s mostly compressed air).
Gavin describes the exact mixing process on his Ultimate Reloader website. Gavin says this lube mix is a good complement to the Hornady One-Shot (pistol) and Dillon DCL (rifle) lubes he has used for pistol and rifle reloading sessions. CLICK HERE to read more.
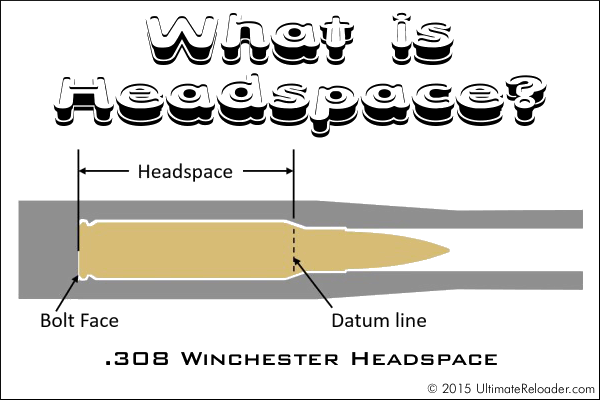
This illustration shows headspace measurement for the popular .308 Winchester cartridge, which headspaces on the shoulder. Image copyright 2015 Ultimate Reloader.
In this Brownells Tech Tip Video, Brownells gun tech Steve Ostrem explains what headspace is and why it’s one of the most critical measurements for nearly all firearms. Even if you’re an experienced rifle shooter, it’s worth watching this video to refresh your understanding of headspace measurements, and the correct use of “GO” and “NO-GO” gauges.
Headspace Definition
In firearms, headspace is the distance measured from the part of the chamber that stops forward motion of the cartridge (the datum reference) to the face of the bolt. Different cartridges have their datum lines in different positions in relation to the cartridge. For example, 5.56x45mm NATO ammunition headspaces off the shoulder of the cartridge, whereas .303 British headspaces off the forward rim of the cartridge. If the headspace is too short, ammunition that is in specification may not chamber correctly. If headspace is too large, the ammunition may not fit as intended or designed and the cartridge case may rupture, possibly damaging the firearm and injuring the shooter. (Source: Wikipedia)
Problems Caused by Too Much Headspace
Excessive headspace issues can include: light primer strikes, failure to fire, bulged/blown cases, case separations, split shoulders, or unseated primers after firing. Case ruptures caused by excessive headspace can lead to catastrophic failures causing serious injury. That is why headspace is such an important measurement.
Problems Cause by Too Little Headspace
Insufficent (or excessively tight) headspace can prevent the firearm from going into battery, resulting in failure to fire or deformation of the cartridge case. Various feeding and functioning problems can be caused by cases with too little headspace, even if a round can be chambered (with effort).
Headspace Gauges
Headspace is measured with a set of two headspace gauges: a “Go” gauge, and a “No-Go” gauge. Headspace gauges resemble the cartridges for the chambers they are designed to headspace, and are typically made of heat-treated tool steel. Both a “Go” and a “No-Go” gauge are required for a gunsmith to headspace a firearm properly. A third gauge, the “Field” gauge, is used (as the name implies) in the field to indicate the absolute maximum safe headspace. This gauge is used because, over time, the bolt and receiver will wear, the bolt and lugs compress, and the receiver may stretch, all causing the headspace to gradually increase from the “factory specs” measured by the “Go” and “No-Go” gauges. A bolt that closes on “No-Go” but not on “Field” is close to being unsafe to fire, and may malfunction on cartridges that are slightly out of spec. (Source: Wikipedia)
You need to understand Headspace Gauges and how to use them. There are “Go”, “No-Go”, and “Field” gauges. The “Field” is actually the longest. Brownells explains: “The GO gauge corresponds to the SAAMI minimum chamber length, while the FIELD gauge usually matches the maximum chamber depth, or slightly less. NO-GO gauges are an intermediate length between minimum and maximum, that, technically, is a voluntary dimension. A firearm that closes on a NO-GO gauge and does not close on a FIELD gauge may not give good accuracy and may have very short cartridge case life [.]”
When neck-turning cases, it’s a good idea to extend the cut slightly below the neck-shoulder junction. This helps keep neck tension more uniform after repeated firings, by preventing a build-up of brass where the neck meets the shoulder. One of our Forum members, Craig from Ireland, a self-declared “neck-turning novice”, was having some problems turning brass for his 20 Tactical cases. He was correctly attempting to continue the cut slightly past the neck-shoulder junction, but he was concerned that brass was being removed too far down the shoulder.
Craig writes: “Everywhere I have read about neck turning, [it says] you need to cut slightly into the neck/shoulder junction to stop doughnutting. I completely understand this but I cant seem to get my neck-turning tool set-up to just touch the neck/shoulder junction. It either just doesn’t touch [the shoulder] or cuts nearly the whole shoulder and that just looks very messy. No matter how I adjust the mandrel to set how far down the neck it cuts, it either doesn’t touch it or it cuts far too much. I think it may relate to the bevel on the cutter in my neck-turning tool…”
Looking at Craig’s pictures, we’d agree that he didn’t need to cut so far down into the shoulder. There is a simple solution for this situation. Craig is using a neck-turning tool with a rather shallow cutter bevel angle. This 20-degree angle is set up as “universal geometry” that will work with any shoulder angle. Unfortunately, as you work the cutter down the neck, a shallow angled-cutter tip such as this will remove brass fairly far down. You only want to extend the cut about 1/32 of an inch past the neck-shoulder junction. This is enough to eliminate brass build-up at the base of the neck that can cause doughnuts to form.
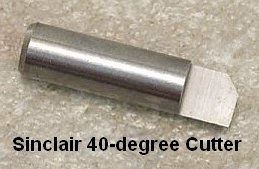
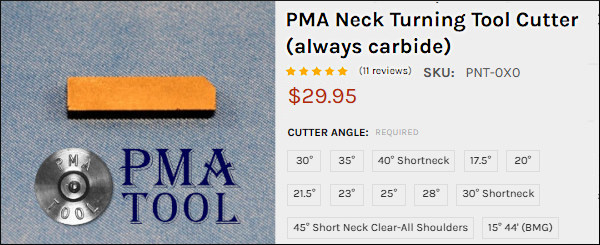
The answer here is simply to use a cutter tip with a wider angle — 30 to 40 degrees. The cutter for the K&M neck-turning tool (above) has a shorter bevel that better matches a 30° shoulder. There is also a 40° tip available. PMA Tool and 21st Century Shooting also offer carbide cutters with a variety of bevel angles to exactly match your case shoulder angle*. WalkerTexasRanger reports: “I went to a 40-degree cutter head just to address this same issue, and I have been much happier with the results. The 40-degree heads are available from Sinclair Int’l for $15 or so.” Forum Member CBonner concurs: “I had the same problem with my 7WSM… The 40-degree cutter was the answer.” Below is Sinclair’s 40° Cutter for its NT-series neck-turning tools. Item NT3140, this 40° Cutter sells for $14.99. For the same price, Sinclair also sells the conventional 30° Cutter, item NT3100.
Al Nyhus has another clever solution: “The best way I’ve found to get around this problem is to get an extra shell holder and face it off .020-.025 and then run the cases into the sizing die. This will push the shoulder back .020-.025. Then you neck turn down to the ‘new’ neck/shoulder junction and simply stop there. Fireforming the cases by seating the bullets hard into the lands will blow the shoulder forward and the extra neck length you turned by having the shoulder set back will now be blended perfectly into the shoulder. The results are a case that perfectly fits the chamber and zero donuts.”
A good case trimmer is an essential tool for precision hand-loading. To ensure consistent loads, you want your cases to be the exact same length. Today’s Saturday Showcase features five trimming tools, both powered and manually operated, that can trim your sized brass with great precision. In addition, some of these tools will also chamfer case necks inside and out. The powered case trimmers will save you considerable time (and effort) when working will large batches of brass.
Lead photo shows the Henderson Gen 2 trimmer from Panhandle Precision video review.
Henderson Gen 3 Power Trimmer — Ultimate Reloader Review
Gavin Gear of UltimateReloader.com has tested the impressive Henderson Gen 3 (V3) Trimmer. You’ll find a full write-up on Gavin’s website, and you can watch Gavin’s 18.7-minute video review above.
Gavin states: “The Henderson Gen 3 case trimmer is built on an adjustable tri-trim 3-way cutter with different pilots to accommodate different case necks. Three-way cutters trim to length and chamfer the inside and outside all at once. This trimmer has a 1700 RPM spindle and a custom DC motor made in the USA. The Henderson trimmer works much like a milling machine. You do not need much torque because of the way the taper works. The Henderson Gen 3 trimmer delivered outstanding cartridge length consistency after trimming. This trimmer is fast and easy to use and most importantly, returns consistent results.”
CLICK HERE for Henderson Gen 2 Trimmer video review, which shows how to how to set trim length and change cutter heads, using 6.5×47 Lapua, .260 Remington, and .300 Winchester Magnum cases.
Giraud Power Case Trimmer — Full Review by Erik Cortina
In this video, Erik Cortina of CortinaPrecision.com offers some very clever and useful tips that will help you get the most from your Giraud powered case trimmer. The Giraud trimmer is very precise. When set up correctly, it can trim brass with amazing consistency.
In the video, Erik trims 5 pieces of brass in 15 seconds (6:32 mark). He then measures all five with precision calipers (7:00-8:08). All lengths are exact within .0005 (half a thousandth). Erik notes that the Giraud trimmer indexes off the case shoulder. As long as you have fire-formed brass with consistent base-to-shoulder dimensions, you should get very consistent trim lengths.
Lyman Powered Case Trimmer Review
The Lyman Case Trim Xpress is an efficient, precise unit that allows easy adjustment of trim length with a click-adjustable collar. The trimmer comes with a set of cartridge-specific bushings that index off the case shoulder. One nice feature is a variable speed control. For the price, $146.20 on Amazon, this trimmer delivers excellent performance. To see more details, check out F-Class John’s video review of the Lyman Case Trim Xpress which shows set-up and operation.
Frankford Arsenal Universal Case Trimmer (for Power Drills)
This video features a handy tool that attaches to a portable drill. Used with various diameter collets, this can trim most popular sizes of shouldered brass. The universal collet system indexes on case shoulders for precise and consistent trimming (this does NOT work with straight-walled cartridges). The built-in depth micrometer allows for quick and precise micro-adjustments. There is a handy brass shaving ejection port. The system works well, particularly if you can stabilize your power drill in one position. This Frankford Arsenal trimmer, under $65.00 on Amazon, is an affordable alternative to the top-end powered case trimmers. It comes with a handy plastic case that holds the trimmer and collets.
L.E. Wilson Manual Case Trimmer
L.E. Wilson, makers of hand dies, case trimmers and other precision reloading tools, makes a popular and precise stainless steel case trimmer with micrometer adjustment. The above video explains the operation of the Wilson trimmer and shows how to trim cases and use the micrometer case length control positioned opposite the hand crank. We definitely like the micrometer control. This feature allows you to set the cartridge overall trim length with great precision. If you are trimming a variety of different cartridge types, the micrometer cut length control comes in very handy.
If you own a L.E. Wilson case trimmer, you should watch the official Accessories Video from L.E. Wilson. This video shows accessories for the L.E. Wilson trimmer. These include: Power Adapter for trimming (replaces hand crank), Titanium Case Trimmer Cutter (longer life), Inside Case Neck Reamer, Primer Pocket Reamer (removes military crimps), Uniform De-Burring Tool, Neck Chamfer Tool (30° and 45°), and handheld inside/outside deburring tool (and power adapter).
BONUS Video: How Important is Consistent Case Length?
This Primal Rights video explains why it is important to maintain precise case lengths if you want best accuracy and most consistent ES/SD. You’ll want to size your cases BEFORE trimming if your trimmer indexes off the case shoulders.


 Bullet Selection — With the .30-06 for my Garands and Springfields I stick mostly with 168gr bullets plus some 155-grainers. These bullet weights have just worked for me in the past.
  Powder Charge and Dispensing — I have always had good success with Hodgdon H4895 powder. My load has always been right around 47.0 grains, with both the 168gr and 155gr bullets. I also use the Auto-Trickler to drop all of my powder charges. This is a fantastic piece of equipment that not only gives super-consistent powder charges quickly, but it also makes one less thing that you have to worry about while on the firing line. With the Auto-Trickler, there is never a question about the powder charge in your ammo. As for primers, I have been shooting CCI 200 Large Rifle primers for many years and have never had an issue.


 Oversizing cases also causes problems because the firing pin doesn’t have the length to reach the primer solid enough to ignite it 100% of the time. When you have one that is oversized, you usually have a bunch, since you usually do several cases at a time on that die setting. If the die isn’t readjusted, the problem will continue on the next batch of cases also. They will either not fire at all or you will have a lot of misfires. In a bolt action, a lot of time the extractor will hold the case against the face of the breech enough that it will fire. The case gets driven forward and the thinner part of the brass expands, holding to the chamber wall and the thicker part of the case doesn’t expand as much and stretches back to the bolt face. If it doesn’t separate that time, it will the next time. When it does separate, it leaves the front portion of the case in the chamber and pulls the case head off. Then when it tries to chamber the next round, you have a nasty jam. Quite often range brass is the culprit of this because you never know how many times it has been fired/sized and in what firearm. Back to beating it on the ground again till you figure out that you have to get the forward part of the case out.


 Redding also provides a FREE

 Headspace Gauges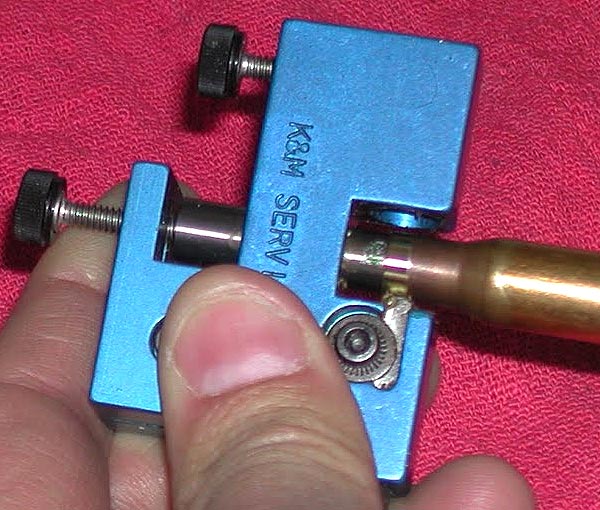
 When neck-turning cases, it’s a good idea to extend the cut slightly below the neck-shoulder junction. This helps keep neck tension more uniform after repeated firings, by preventing a build-up of brass where the neck meets the shoulder. One of our Forum members, Craig from Ireland, a self-declared “neck-turning novice”, was having some problems turning brass for his 20 Tactical cases. He was correctly attempting to continue the cut slightly past the neck-shoulder junction, but he was concerned that brass was being removed too far down the shoulder.