Creedmoor Sports is running a good sale right now, with significant discounts on TriggerTech triggers, Sierra bullets, Real Avid tools, Anschutz shooting coats, Reloading dies and more. You can save up to $100 on TriggerTech triggers with this Creedmoor Sports Midweek Markdown Sale and save over $60 on Sierra Bullets (.22 Cal 90gr 500ct). One tip — to find the best bargains, when the landing page opens, look for the “Sort By” control, then choose “Relevance”.
Here are some of the best deals this week. If you need a trigger for your AR or bolt-action rifle, this is a great opportunity. See more discounted products on the Creedmoor Sports Bargain Bunker Page.
Midweek Markdowns at Creedmoor Sports (Bargain Bunker)
As we wrap up the winter season there remains plenty of rain and snow in many areas of the country. With rain and snow comes increased moisture in the air, i.e. increased humidity. And that, in turn, can affect how your powders perform by altering their burn rates.
Most shooters realize that significant changes in temperature will alter how powders perform. That’s why you want to keep your loaded ammo out of the hot sun, and keep rounds out of a hot chamber until you’re ready to fire. But there are other factors to be considered — HUMIDITY for one. This article explains why and how humidity can affect powder burn rates and performance.
We’ve all heard the old adage: “Keep your powder dry”. Well, tests by Norma have demonstrated that even normal environmental differences in humidity can affect the way powders burn, at least over the long term. In the Norma Reloading Manual, Sven-Eric Johansson, head of ballistics at Nexplo/Bofors, presents a very important discussion of water vapor absorption by powder. Johansson demonstrates that the same powder will burn at different rates depending on water content.
Powders Leave the Factory with 0.5 to 1.0% Water Content
Johansson explains that, as manufactured, most powders contain 0.5 to 1% of water by weight. (The relative humidity is “equilibrated” at 40-50% during the manufacturing process to maintain this 0.5-1% moisture content). Importantly, Johansson notes that powder exposed to moist air for a long time will absorb water, causing it to burn at a slower rate. On the other hand, long-term storage in a very dry environment reduces powder moisture content, so the powder burns at a faster rate. In addition, Johansson found that single-base powders are MORE sensitive to relative humidity than are double-base powders (which contain nitroglycerine).
Tests Show Burn Rates Vary with Water Content
In his review of the Norma Manual, Fred Barker notes: “Johansson gives twelve (eye-opening) plots of the velocities and pressures obtained on firing several popular cartridges with dehydrated, normal and hydrated Norma powders (from #200 to MRP). He also gives results on loaded .30-06 and .38 Special cartridges stored for 663 to 683 days in relative humidities of 20% and 86%. So Johansson’s advice is to keep powders tightly capped in their factory containers, and to minimize their exposure to dry or humid air.”
Confirming Johansson’s findings that storage conditions can alter burn rates, Barker observes: “I have about 10 pounds of WWII 4831 powder that has been stored in dry (about 20% RH) Colorado air for more than 60 years. It now burns about like IMR 3031.”
What does this teach us? First, all powders start out with a small, but chemically important, amount of water content. Second, a powder’s water content can change over time, depending on where and how the powder is stored. Third, the water content of your powder DOES make a difference in how it burns, particularly for single-base powders. For example, over a period of time, a powder used (and then recapped) in the hot, dry Southwest will probably behave differently than the same powder used in the humid Southeast.
Reloaders are advised to keep these things in mind. If you want to maintain your powders’ “as manufactured” burn rate, it is wise to head Johannson’s recommendation to keep your powders tightly capped when you’re not actually dispensing charges and avoid exposing your powder to very dry or very humid conditions. The English-language Norma Reloading Manual (2d. Edition) is available from the Norma Brand Shop and ReloadingSolutions.com.
Real-World Example — “Dry” H4831sc Runs Hotter
Robert Whitley agrees that the burn rate of the powder varies with the humidity it absorbs. Robert writes: “I had an 8-lb. jug of H4831SC I kept in my detached garage (it can be humid there). 43.5-44.0 gr of this was superbly accurate with the 115 Bergers out of my 6mm Super X. I got tired of bringing it in and out of the garage to my house for reloading so I brought and kept the jug in my reloading room (a dehumidified room in my house) and after a few weeks I loaded up 43.5 gr, went to a match and it shot awful. I could not figure out what was going on until I put that load back over the chronograph and figured out it was going a good bit faster than before and the load was out of the “sweet spot” (42.5 – 43.0 gr was the max I could load and keep it accurate when it was stored in less humid air). I put the jug back in the garage for a few weeks and I now am back to loading 43.5 – 44.0 gr and it shoots great again. I have seen this with other powders too.”
If you have two jugs of the same powder, one kept in a room in your house and one somewhere else where it is drier or more humid, don’t expect the two jugs of the same lot of powder to chrono the same with the same charge weights unless and until they are both stored long enough in the same place to equalize again.
We’ve told fans of Hodgdon H4350 to give Alliant Reloder 16 (RL16) a try. In our tests, Reloder 16 has proven a very promising rival to H4350 for accuracy, low ES/SD, and temp stability.
Now you can get the advantages of Reloder 16 in a slower powder formulated for magnum cartridges — Reloder 26 (RL26). Alliant says RL26’s burn speed falls between that of Reloder® 22 and Reloder® 33. That means it’s slower than H4831 but faster than powders that would suit the .338 Lapua Magnum. Reloder 26 has a high bulk density that allows larger powder charges, and high velocities. RL26 also provides a consistent, controlled response to temperature changes.
We are hearing very good things about RL26 from friends and Forum members who are testing it with big calibers for Long Range applications. Accuracy is good and velocities are impressive. Alliant says RL26 “incorporates EI® technology to produce extremely high velocities in magnum cartridges”. In big magnums, shooters have reported gaining 100+ fps with RL26 compared to H1000 or Retumbo. And to our surprise some guys have even tried replacing H4350 with RL26 (in smaller cartridge types) and they have picked up meaningful velocities. We don’t think Alliant ever intended RL26 as a substitute for H4350, but if you’ve got the case capacity… it may be worth a try.
Alliant Reloder 26 Features
EI® technology delivers high velocities in magnum cartridges
Contains proprietary de-coppering additive
Controlled temperature stability
Excellent lot-to-lot consistency
Formulation contains no DNT or DBP
Made in Switzerland for Alliant Powder
Alliant’s Tech Expert Talks about Reloder 26
What are the characteristics of Reloder 26? That question was answered recently by Paul Furrier who works for ATK, the parent company of Alliant Powders. Posting in our Shooters’ Forum, Paul writes:
“Reloder 26 is produced in Switzerland by our extremely capable partner Nitrochemie. I have seen it stated that they [it is] made by Bofors, so that is incorrect. I have also noticed people are equating … Reloder 26 to Reloder 25. Reloder 26 is definitely slower burning than Reloder 25, so there shouldn’t be any confusion there either.”
Speed and More Speed with RL 26
Think of Reloder 26 as a high-velocity powder for big cartridges. Furrier explains: “Reloder 26 is produced with Nitrochemie’s latest generation EI® process technology. This is the same impregnation coating process used to produce Reloder 17, Reloder 33, and Reloder 50 for us, and it is fantastic. Reloder 26 [offers] great ballistic efficiency, high bulk density so you can get more of the slow powder into the case to harness the energy, and decent, predictable extreme temp response. Reloder 26 is not as flat at temps as the TZ or Australian materials, but it is very manageable, usually in the 0.5 fps/°F range (depending on the application). Just as important, the pressure increases at hot are very manageable. We are using quite a bit of this RL26 powder in our Federal factory ammo due to the fantastic ballistics and accuracy.” — Paul Furrier, ATK
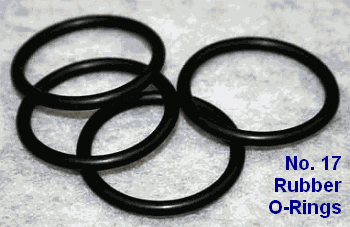
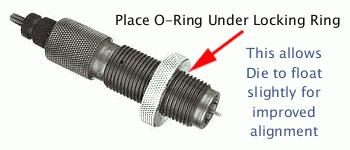
Here’s an inexpensive procedure that can help you load straighter ammo, with slightly better measured concentricity (i.e. less run-out) on the case necks and bullets. Simply use a Rubber O-Ring on the underside of the die locking ring. This allows the die to self-align itself (slightly) to the case that is being sized. Without the O-Ring, if the flat surface on the top of your press is not perfectly square with the thread axis, your die can end up slightly off-angle. This happens when the bottom of the locking ring butts up tight against the top of the press. The O-Ring allows the die to float slightly, and that may, in turn, reduce the amount of run-out induced during case sizing.
Top prone shooter GSArizona, who sadly passed in 2022, tried this trick and said it works: “Go to your local hardware store and get a #17 O-Ring (that’s the designation at Ace Hardware, don’t know if its universal). Slip the O-Ring on the die and re-adjust the lock ring so that the O-Ring is slightly compressed when the die is at the correct height. Size and measure a few more cases. You will probably see a slight improvement in neck concentricity as the die can now float a bit as the case enters and leaves it. This isn’t going to be a dramatic improvement, but it’s a positive one.”
We want to stress that adding O-Rings to sizing dies may help some reloaders, but we don’t offer this as a panacea. Try it — if using the O-Ring reduces measured runout that’s great. If it doesn’t, you’ve only spent a few pennies to experiment.
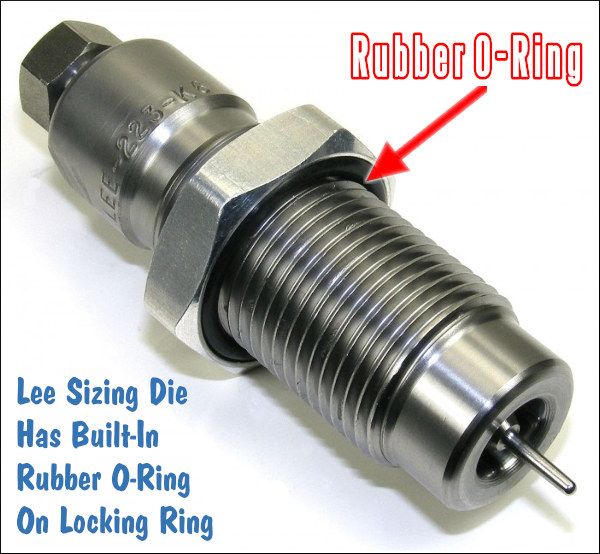
Lee Precision makes die lock rings with built-in O-Rings. Lee’s distinctive lock ring design allows the same kind of self-alignment, which is good. However, Lee lock rings don’t clamp in place on the die threads, so they can move when you insert or remove the dies — and that can throw off your die setting slightly. By using an O-Ring under a conventional die lock ring (that can be locked in place), you get the advantages of the Lee design, without the risk of the lock ring moving.
Here are some really smart tips for hand-loaders compiled by Sierra Bullets. These suggestions were submitted by Sierra’s Facebook fans — and some are very valuable indeed. Some of these tips will help you load more accurate ammo. Other selections will help you stay SAFE — which should always be your #1 priority. For example, we concur with the advice to “Check and Double Check. Everything. Every Time”. Also definitely keep “One powder on the bench at a time” — that could be a life-saver. You may want to print these “words of wisdom” and place them on a wall in your loading room.
Reloading Safety Tips — Sound Advice
ALWAYS START LOW: “Just because a load manual says X grains of X powder with X bullet is max, your rifle could reach max pressure a grain or two before what the book says. Start low and work up.” — Walter Coats
BE SAFE and CAREFUL: “Check and double check. Everything. Every time. Only one type of powder on the bench at a time.” — Glen Lundgren
DON’T RUSH: “Be patient, don’t be in a hurry, have fun and find your rhythm. Just tell your family you’re putting yourself in ‘time-out’. They will understand.” — Erik Dyal
POWDER RULE #1: “One powder on the bench at one time, it might save your life.” — James A. Kimery
STAY FOCUSED: “Relaxed but concentrated attention. Have fun enjoying a great hobby and pastime but stay focused.” — Jim Caldwell
POLICE LOADING AREA: “Keep your reloading bench area clean and put items away ASAP.” — Eric J. Ford
BE PATIENT: “Focus, Focus, Focus — be patient — it AIN’T a race.” — William Stanley
RECORD YOUR LOADS: “Write down on a small card what you’re loading – bullet weight, powder weight, type of powder, and primer. And put it in the powder hopper. I am unloading .45 FMJ because I forgot what type powder was in the hopper.” — Michael Conniff
HAVE a PROCEDURE for INTERRUPTIONS: “If, for any reason, you have to leave the bench while in the process of dropping powder charges, turn the next case to be charged upside down in the loading block so you know where you left off.” — Bill Tinsley
LABEL EVERYTHING: “OCD is a good habit to have with your loading bench. CLEARLY label everything!” — Andy Pynckel
HAVE a GOAL: “Never start reloading or developing a load without a specific goal in mind. Second keep meticulous records.” — Peter Eick
RESEARCH THE JOB: “Read all you can about it before you start!” — Keith Shively
KEEP TRACK of the Brass: “I put all my primed brass upside down (primer up) and as I charge the casing, I (of course) flip it primer down.” — Mark Ewing
Powder Valley Outdoors is one of the most respected suppliers of reloading components — powder, primers, brass, and bullets. And Hodgdon sells some of the most popular powder types for numerous disciplines — F-Class, PRS/NRL, Short-Range Benchrest, High Power, Mid-Range and Long-Range Benchrest, Silhouette, ELR, Varmint shooting, Long-range hunting and more.
If you are looking for popular Hodgdon powders, head over to Powder Valley today. You’ll find a large selection of top-tier Hodgdon powders. In stock now are: H4895, Varget, H4350, CFE223, H1000, H380, H50BMG, H322, Benchmark and 20 other powder types. For most of the powders both 1-lb containers and 8-lb jugs are in stock currently.
Here is a sample of the popular Hodgdon Powders in stock today, 2/25/2025. Along with the six (6) types shown, there are nearly two dozen other Hodgdon powders in stock at Powder Valley Outdoors.
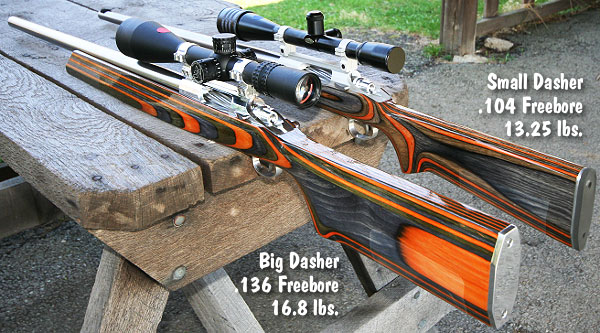
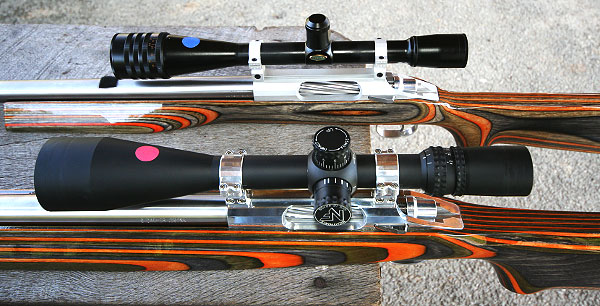
The 6mm Dasher wildcat cartridge is very popular among competitive benchrest shooters, varminters, and even PRS competitors. So this Sunday we thought we’d showcase a matched Duo of Dasher rifles belonging to a Forum member Chuck L. (aka “Ridgeway”). The 6mm Dasher began as a wildcat improved version of the 6mmBR Norma cartridge. The Dasher has been very successful in competition, and now factory Peterson 6mm Dasher brass is sold by Grafs.com. And Alpha Munitions also offers high-quality 6mm Dasher cartridge brass.
Chuck has a prize pair of 6mm Dashers for competitive benchrest and varmint matches in Pennsylvania. Both guns feature Kelbly Panda RBLP actions, Bartlein 8-twist barrels, and Shehane Laminated Tracker Stocks. However, the two rifles are not exact twins, as you can see. One, which we’ll call the Big Dasher, is built on a Shehane ST1000 Tracker stock. The other gun, the Small Dasher, sports Shehane’s “Baby Tracker” stock — a design used with great success by Richard Schatz. The Big Dasher, optimized for 1000-yard competition, has a slightly longer freebore — 0.136″ vs. 0.104″ for the Small Dasher.
Specifications for the Dasher Duo:
Small Dasher (13.5-pounder): Chambered for 6mm Dasher with approximately .104 freebore and a .264 NK. (No way of knowing exactly since its freebore was set in a separate operation by Kelbly.) Components are: Shehane Baby Tracker laminated stock, Kelbly Panda RPLB action, Bartlein 1:8″ LV barrel at 26 ¾”, Kelbly Rings, Weaver T36, Jewell trigger. The barrel was chambered by Kelblys and the stock was bedded, glued and balanced by a shooting buddy (Forum Member johara1). Chuck clear-coated the stock with auto urethane. Total weight is 13 lbs., 4 ounces.
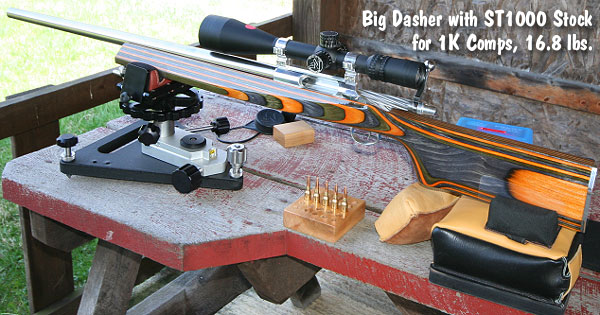
Big Dasher (1K Light Gun, 17-pounder): Chambered for 6mm Dasher with a .136 freebore and .264 neck (PTG Reamer). Components are: Shehane ST-1000 laminated stock, Kelbly Panda RPLB action, Bartlein 1:8″ HV 5R barrel at 28″, Shehane +20-MOA rings, Nightforce NXS 12-42x56mm, Jewell trigger. The barrel work, pillar installation, and bedding was done by Dave Bruno. The stock was clear-coated by Chuck with auto urethane. Chuck also made the rear butt plate and balanced the rifle. Total weight: 16 lbs., 13 ounces.
Chuck tells us: “I don’t get out shooting competition as much as I want due to time and family, but when I do compete, I shoot a Groundhog match at Southfork Rifle Club in Beaverdale, PA. Info on Southfork Club events can be found at Southforkrifleclub.com. The Southfork match is basically a 100-, 300- and 500-yard match with one sighter the entire match and 5 shots at each yardage for score. The Small Dasher, with the shorter ‘Baby Tracker’ stock, was set up for the Southfork Rifle Club’s ‘Light Unlimited’ class which has a 13.5-lb max weight.” (Editor: ‘unlimited’ is a misnomer for a weight-limited category.)
Chuck adds: “The Big Dasher with the heavy ST-1000 stock is set up for 1000-yard benchrest matches in Light Gun class. I shoot 1K matches with it at Reade Range in southwest Pennsylvania. One ironic thing is, it shoots the same load I’m shooting out of the lighter gun rather well. The only difference between the two chambers is the freebore is roughly thirty thousandths longer on the 1K gun (Large Dasher). I will also shoot this at Southfork in the ‘Heavy Unlimited’ class.”
Both Dashers Group in the Ones at 100 Yards
Chuck favors 107gr Sierra MK bullets in both Dashers. Other components are: Reloder 15 powder, Lapua cases, and CCI 450 primers. His main load for the Small Dasher is 33.0 grains of Reloder 15. This load shoots in the ones at 100 yards. For the Big Dasher Chuck reported: “I’m still working on a load, although the same 33.0 grain load shoots in the ones in the heavier gun as well. I’m still looking for more velocity and my ‘max’ node.”
Dasher Brass — Four Options
1. Buy Peterson 6mm Dasher Brass
In years past, you had to create your own Dasher brass, by fire-forming (with or without projectiles), or by hydro-forming. However, Peterson Cartridge now offers quality factory-made 6mm Dasher brass. This brass is available right now at Grafs.com.
If you do not want to waste time with fire-forming or hydro-forming, you can look for Peterson 6mm Dasher brass. This is excellent quality brass that has earned high praise from purchasers. The price — $62.99 for 50 cases at Graf’s (i.e. $1.26 per case) — is less than what you’d pay for Lapua 6mmBR brass, which is $149.99 for 100 cases or $1.50 per case. The advantage is that you save time, barrel life, and you won’t lose any cases to split necks. Peterson brass can be ordered from Grafs.com.
2. Buy Alpha Munitions 6mm Dasher Brass
Another great source for ready-to-run 6mm Dasher cartridge brass is Alpha Munitions. The made-in-USA Alpha 6mm Dasher brass is long-lasting and has been very popular with Benchrest and PRS/NRL competitors. Alpha 6mm Dasher brass costs $135.00 per hundred, or $1.35 per case. Unfortunately, as of 2/23/2025, this Alpha 6mm Dasher brass is out of stock, but it should be available later this spring.
One tip — as the capacity may vary slightly from Lapua 6mmBR brass fire-formed to 6mm Dasher, you should work up your load. Also, if you are chambering a new barrel you should get a chamber reamer that is optimized for the Alpha 6mm Dasher brass dimensions. User reviews of the Alpha 6mm Dasher brass have been highly positive: “Fantastic packaging and fantastic brass! It’s pricier than some other brands but there is a reason for that. It’s a quality product worth every penny.” — Chris Vaughn.
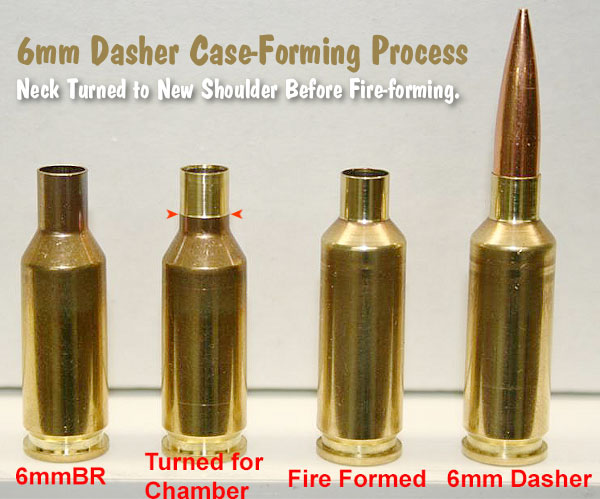
3. Fire-Form Dasher Brass with Bullets Hard in Lands
Chuck fireforms his Dasher brass for both rifles. Because he has a tighter-neck chamber, he neck-turns the brass first: “To fireform, I turn my cases down to fit the chamber and stop where the false shoulder makes snug contact with the chamber. Fire-forming rounds are loaded up with a 29-grain charge of H4895 or Varget and a 108gr Berger bullet seated hard into the lands about 0.020″ past initial contact with the rifling. It takes about three firings to make a nice clean Dasher case with a sharp shoulder.”
Chuck anneals his Dasher brass regularly to help maintain consistency: “I anneal about every 3-4 firings. I have many cases that have about 10+ firings on them and they are still shooting well. The primer pockets are a little looser, but still hold a primer.”
4. Have Darrell Jones Hydro-Form Your 6BR Brass to 6mm Dasher
DJ’s Brass can hydro-form a wide variety of cases for a modest fee
Fire-forming all your own 6mm Dasher brass takes time, costs money (in bullets and powder), and consumes precious barrel life. Well there IS a better solution — you can have your new brass hydro-formed by DJ’s Brass to your exact specifications for a $60.00 per hundred, which includes annealing.
DJ’s Brass Service now offers custom case hydro-forming to your exact specs. Darrell Jones offers this service for a variety of popular cartridges: 6 PPC, 30 PPC, 30 BR, 6 BRA (BR Ackley), 6mm Grinch, 6 BRDX, 6 BRX, .260 Ackley, .284 Shehane and of course the very popular 6mm Dasher. After hydro-forming your brass, Darrell can also neck-up or neck-down the cases to meet your needs. He can also turn the necks to your specs for an additional $0.60 per case.
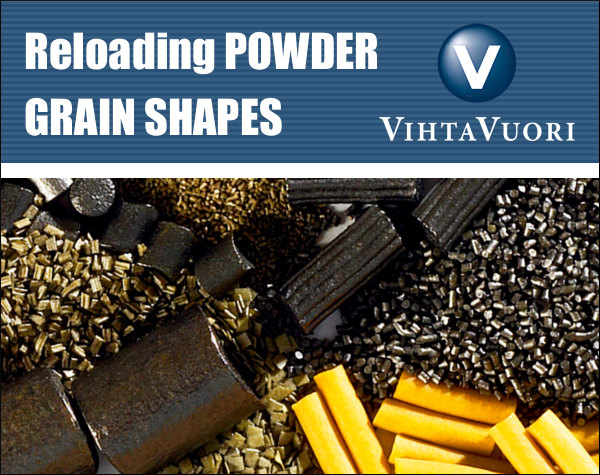
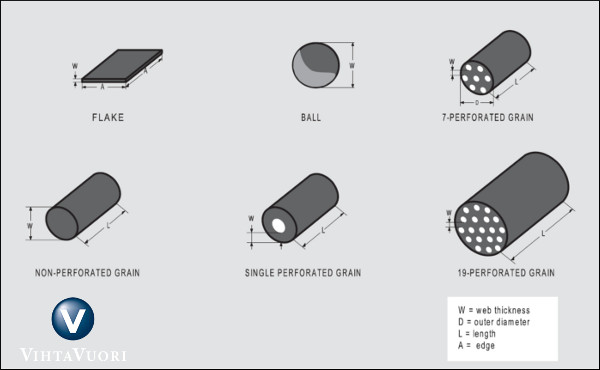
The shape of powder grains has a profound effect on the performance of the powder charge, as it concerns both pressure and velocity. There are multiple powder shapes including flake, ball, and extruded or “stick” (both solid and perforated).
So how does powder grain shape affect pressure and muzzle velocity?
In general, it can be said that powder that burns progressively achieves a desired muzzle velocity at lower maximum pressure than a powder that burns neutrally, not to mention a degressive powder. As grain size increases, the maximum pressure moves towards the muzzle, also increasing muzzle blast. Muzzle velocity and pressure can be adjusted by means of the amount of powder or loading density, i.e. the relationship between the powder mass and the volume available to it. As the loading density increases, maximum pressure grows.
All Vihtavuori reloading powders are of the cylindrical, single-perforated extruded stick type. The differences in burning rate between the powders depend on the size of the grain, the wall thickness of the cylinder, the surface coating and the composition. Cylindrical extruded powders can also have multi-perforated grains. The most common types are the 7- and 19-perforated varieties. A multi-perforated powder grain is naturally of a much larger size than one with a single perforation, and is typically used for large caliber ammunition.
Other types of powder grain shapes include sphere or ball, and flake. The ball grains are typically used in automatic firearms but also in rifles and handguns. The ball grain is less costly to produce, as it is not pressed into shape like cylindrical grains. Flake shaped grains are typically used in shotgun loadings.
Web thickness in gunpowder terminology means the minimum distance that the combustion zones can travel within the powder grain without encountering each other. In spherical powders, this distance is the diameter of the “ball”; in flake powder it is the thickness of the flake; and in multi-perforated extruded powders it is the minimum distance (i.e. wall thickness) between the perforations.
The burning rate of powder composed of grains without any perforations or surface treatment is related to the surface area of the grain available for burning at any given pressure level. The change in the surface area that is burning during combustion is described by a so-called form function. If the surface area increases, the form function does likewise and its behavior is termed progressive. If the form function decreases, its behavior is said to be degressive. If the flame area remains constant throughout the combustion process, we describe it as “neutral” behavior.
The cylindrical, perforated powders are progressive; the burning rate increases as the surface area increases, and the pressure builds up slower, increasing until it reaches its peak and then collapses. Flake and ball grains are degressive; the total powder surface area and pressure are at their peak at ignition, decreasing as the combustion progresses.
Progressive reloading presses offer shooters speed and efficiency in producing custom-tailored rifle and pistol ammunition. However, there is a wide choice of Progressive Presses and a bewildering array of options to consider. In this video, the 6.5 Guys and UltimateReloader.com’s Gavin Gear provide an overview of the leading Progressive Presses on the market along with key considerations for precision rifle shooters. If you are considering getting a Progressive for rifle ammo reloading, you should watch this informative, 25-minute video.
10 Tips for Reloading Rifle Ammo on a Progressive Press:
1. Make sure the brass is very clean. Don’t mix old range pick-up brass with newer brass.
2. Apply a thin, spray lube to all cases before the sizing/loading cycle.
3. Consider priming your brass separately (with a hand or bench tool) before the operation. Then inspect the primers before loading powder and bullets.
4. Always wear eye protection when loading with the Progressive, particularly if you are priming cases.
5. With masking tape, mark the powder measure/dropper with the powder type and cartridge charge weight. Check the charge mass multiple times (see below).
6. Cycle a few cases, sizing and adding powder but NOT seating bullets. Weigh the powder charges to ensure the powder measure is dispensing the correct charge. Sometimes this will change a couple tenths as it “settles down” after the first few charges.
7. Check the brass for shoulder bump and bullet seating depth carefully for the first few rounds, then check again periodically.
8. Try to maintain a steady pace and operate the handle the same way every time.
9. Visually inspect the powder charge in each case (before bullet seating), and use a lock-out die if your Progressive Press has enough stations.
10. Never, ever mix pistol and rifle powders! If you have previously loaded pistol ammo with your Progressive, make sure ALL the powder (every flake and kernel) is removed from all parts of the powder-dropping system before you add rifle powder.
Visit these sites for more Reloading and Precision Shooting Videos:
Do you have some ammo that got loaded incorrectly, perhaps with the wrong powder? Then you’ll want to disassemble the ammo for safety’s sake. You can use an impact puller to do this task, but if you have more than a dozen rounds or so, you may prefer to use a collet-style bullet puller. These work very quickly and positively, making quick work of big jobs. The efficiency of the collet-style puller is worth the investment if you frequently disassemble ammo. These devices retail for under $35.00 (collets sold separately). Normally, you’ll need a specific collet for each bullet diameter. But collets are not that costly, so this isn’t a big deal, particularly if you only load a few calibers, such as .223, 6mm, and .308.
Hornady and RCBS use different mechanisms to tighten the collet around the bullet. On the red lever Hornady Cam-Lock Bullet Puller, a lever-arm on the top of the bullet puller serves to tighten the collet around the bullet. Simply rotate the lever from the vertical to the horizontal position to grab the bullet. Lower the ram to remove the case. The bullet will drop out when you return the lever arm to the vertical position. This is demonstrated in the video below:
Hornady Cam-Lock Bullet Puller Demonstrated
Collet bullet-pullers resemble a loading die with a lever or handle on the top. They screw into a standard reloading press. Hornady and RCBS both make collet-style bullet pullers. They use the same basic principle — the device tightens a collet around the bullet, and then the bullet is separated from the case by lowering the press ram. NOTE: Collet pullers may leave small marks on your bullets, unlike impact (kinetic) pullers.*
Like the Hornady tool, the RCBS Bullet Puller employs a collet to grab the bullet. However, the RCBS tool tightens the collet in a different way. The head of the RCBS tool is threaded internally. By rotating the lever arm clockwise in a horizontal circle you squeeze the collet around the bullet. To remove the bullet, after lowering the press ram, simply spin the lever arm back in the opposite direction. The use of the RCBS tool is demonstrated in these two videos:
RCBS Collet Bullet Puller Demonstrated:
WARNING: When removing bullets from loaded cartridges, always make sure there are no obstructions or debris in your shell-holder or under the loaded round. NEVER engage a primer seating accessory on your press when working with loaded rounds. You can cause a round to discharge by contacting the primer! Also, we recommend you keep your head and torso away from the bullet puller tool at all times.
*By contrast, impact pullers rarely mark bullets, particularly if you put a little bit of foam or paper wadding in the closed end of your impact puller. When dismantling loaded rounds, powder kernels can get trapped in the wadding, so you should remove and replace the wadding before changing to cartridges loaded with a different powder type (assuming you intend to save the powder).


 Tests Show Burn Rates Vary with Water Content


 Fire-forming all your own 6mm Dasher brass takes time, costs money (in bullets and powder), and consumes precious barrel life. Well there IS a better solution — you can have your new brass hydro-formed by DJ’s Brass to your exact specifications for a $60.00 per hundred, which includes annealing.


 Like the Hornady tool, the


