On our main AccurateShooter.com site, you’ll find a good article by GS Arizona on the Basics of Neck Turning. If you’re new to the neck-turning game, or are just looking for good tips on improving your neck-turning procedures, you should read that article. Below we offer some highlights and photos from the article, but you’ll need to read the whole story to view all the illustrations and follow all the procedures step by step.
Why Should You Consider Neck Turning?
Let’s assume that your rifle doesn’t have a tight neck chamber that requires neck turning; if you have a tight neck chamber, of course, the answer to the question is “because you have to”. For the rest of us, and that includes the vast majority of Highpower shooters, neck turning isn’t a requirement, but it can be a useful way to bring your ammunition a small but meaningful step closer to that pot of gold at the end of the rainbow: perfection. I’m not talking about a theoretical improvement, but a real one, an improvement that lies in equalizing and optimizing the neck tension of your loaded rounds. Inconsistent neck tension is a real contributor to increased muzzle velocity variance which itself is a significant factor in increased elevation dispersion at long range. So there’s our basic reason for neck turning: to equalize and optimize neck tension in order to reduce elevation dispersion.
The Tools of the Trade
Here you see everything I use and a bit more. The press, a cordless screwdriver (always plugged in, turning is tough on the old battery), a couple of K&M neck turners (one set up for 6mm, the other for .30 caliber) an expander for each size, some Imperial lube, an old toothbrush or two to keep the cutter clean, a handle with a caseholder (for those emergencies when the screwdriver dies and there’s just one more case to go!), steel wool and a tubing micrometer finish the list of tools. Hey, I left the dial calipers out of the picture! They’re always handy, keep them around, but they are useless for measuring neck thickness, so don’t try. I usually use an Optivisor magnifier while I turn necks, very handy for a clear view of what’s happening on the neck.
Expanding the Neck
Put some lube on the inside of the case neck and run it into the expander. Really, this isn’t hard. I prefer to expand each case immediately before turning it as opposed to expanding all the cases and then turning them. Brass is somewhat springy and will tend to go back toward its original size; therefore, by expanding and turning immediately, you are more likely to have all cases fit the mandrel with the same degree of tightness and to get a more consistent depth of cut.
Cutter Adjustment for Cut Depth and Length
All the tools I’ve seen have pretty good adjustment instructions. The only thing they don’t tell you is that you should have five to ten spare cases to get it right initially. Anything of the right diameter will do while you learn, for instance, just use that cheap surplus .308 brass to do initial setup and save the precious .30-06 for when you know what you’re doing. Be patient and make your adjustments slowly; you’ll need to set the cutter for thickness as well as length of cut (just into the shoulder). The depth of cut (brass thickness) takes a bit of fiddling, the length of the cut is generally easy to set.
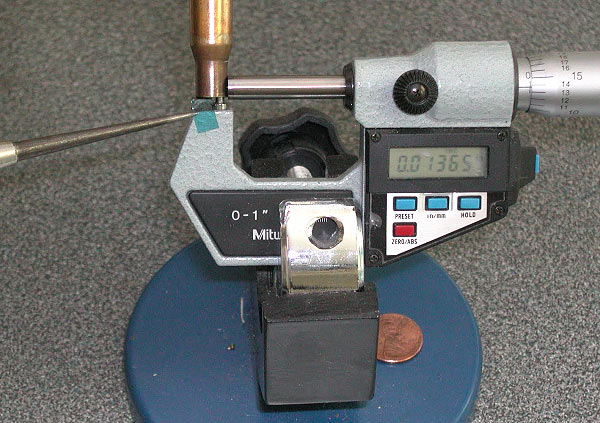
The Finished Product — A Perfectly Uniform Neck
If you read the whole article, and follow the procedures using quality tools, you should get very good results — with a little practice. To demonstrate, here’s an example of my finished, neck-turned brass. You’ll see there is a perfect, 0.0125″ thick neck. It’s very uniform around the circumference, usually I only see 1 or 2 ten-thousandths variance. Now, with the necks uniformed like this, we can select the bushing size that will give us our preferred neck tension and experiment with various levels of tension, secure in the knowledge that all of the cases will actually have the desired neck tension.
About the author — “GS Arizona” was the writing handle for German Salazar, a top-tier rifleman and gun writer. Sadly, German passed from a medical condition in 2022. German was instrumental in helping this website and our Forum get started, and we remember him as a very dear, valued friend.
German was a great individual, and a great asset to the sport. An attorney by trade, with an engineering background, German was one of the very best gun writers, who had high master shooting skills to match his writing abilities.
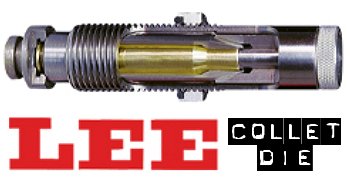
For those who prefer to neck-size their brass (rather than full-length-size), the LEE Collet Die is a popular, inexpensive option. It works by having collet tangs or “fingers” press the neck against a central mandrel. The benefit is that you get a very straight neck, which is sized consistently from top to bottom. Canadian shooter Jerry Teo explains: “LEE Collet Dies produce sized cases with very low runout (measured runout is under .001″ using a Sinclair concentricity gauge). You also don’t get the build-up of brass at the base of the neck, as can happen with bushing neck dies. The neck-shoulder junction stays nice and crisp.”
NOTE: For most handloading, we recommend FULL-LENGTH sizing of cases. You should always have a good Full-length sizing die for your brass. But there are some situations where neck-sizing may be useful. This article explains how to neck-size effectively with a LEE Collet Die.
Here’s a good video that explains how to use a Lee Collet Die to Neck-Size .243 Win brass:
TIP ONE — Adjusting Tension
LEE Collet dies don’t have a specific mechanical adjustment for neck tension. But you CAN easily modify the die to provide more or less tension. If you want to adjust the neck tension using a Lee Collet die, you can simply chuck the mandrel in a drill and reduce the diameter with some sand-paper (to increase neck tension) or you can order a mandrel the next caliber larger and turn it to whatever diameter you want (the larger the mandrel diameter, the less the neck tension). You can also order custom mandrels from Lee sized to any diameter you want.
Regarding neck tension, Boyd Allen makes an important point: “The only way to properly get more neck tension with collet dies is to either reduce the diameter of the mandrel, or order a smaller-diameter mandrel from Lee. I remind folks that adjusting the die position to have more toggle at the top of the ram stroke (not the factory recommended method), or leaning on the press handle with more force than recommended will NOT increase neck tension.”
TIP TWO — Polish and Tune for Easy Case Removal
Some users have complained that their Collet Dies grab the case-neck too firmly, making the case hard to remove. There are solutions to this problem. First inspect the collet fingers and smooth the inner surface up a bit with polishing compound or an extra-fine sanding pad. Second, you can open up the fingers a little bit. LEE recommends that if your Collet Die is sticking, take a steel punch and tap the fingers apart a little bit so that the natural “unloaded” position is wider. Lastly, you should lightly lubricate the outside of the collet fingers (see arrows) before you re-assemble the die. This will ensure they slide smoothly. Also, to prevent the collet fingers from closing too tight, never load up the die with your press without putting a case in place first. Without a case neck between the collet fingers and the mandrel, the collet can clamp itself too tight as you raise the ram.
TIP THREE — Always Have a Case Inside When Operating Collet Die
Our friend Boyd Allen tells us that you need to follow directions and NEVER operate the die without a case inside. Boyd explains: “This is because doing so will spring the quadrants of the collet inward so that they interfere with the insertion of a case, and the user will have to figure out how to undo the damage if the die is to operate properly. This advice would not be needed if everyone read the instructions before using the die…. but many times, they don’t. Another thing that I tell new users is to take the die apart so that they will have a better chance of understanding how it works.”
TIP FOUR — Size Twice and Spin Your Case 1/8th Turn
After reaching fully “down” on your press handle, withdraw the case about an inch and manually rotate it about 1/8th (NOT 1/4 or 1/2) turn while still in the shell-holder, then size again. This will place the die’s collet petals on the four “high spots” of the case neck and will result in a rounder, more evenly-sized neck with slightly more bullet tension. This takes only about one second more per case and is well worth the slight extra effort. (We thank reader Stonecreek for this smart tip).
Get CUSTOM Lee Collet Dies for Your Brass
Yes LEE does make custom collet neck-sizing dies! LEE Precision currently offers Custom Collet Neck-Sizing Dies, made from two of your fired cases. LEE offers custom standard-thread (7/8×14) collet dies for $100.00 (plus S/H) and custom large-thread (1¼x12) collet dies for $160.00 (plus S/H). This is a good option if you run wildcats or have unusual chamber dimensions. CLICK HERE to ORDER.
A while back, we featured a portable reloading bench built on a Black & Decker Workmate. That proved a VERY popular do-it-yourself project so we’re showing it again, in case you missed it the first time.
Texan Robert Lewis made himself a great portable reloading bench from plywood mounted to a Black & Decker Workmate. The bench, roughly 22″ x 19″ on top, folds up to fit easily in your car’s trunk or behind the seats in a pick-up truck cab. Four recessed bolts hold the wood top section to the collapsible B&D Workmate. The sides and back of the unit are attached to the base with small nails. There is a small shelf (also nailed in place) which can be used to clamp a powder measure or hold a scale. Shown in the photo is a Harrell’s Benchrest measure and Harrell’s single-stage “C” press.
Originally, the whole unit could be built for about $65.00 with pine, or $80.00 with oak (as shown). Robert explained: “The Workmate was $40. If someone bought a 2’x4′ sheet of 3/4″ oak plywood, I think it is around $30. Using pine plywood would be about half that. Fasteners were $3. Spar Urethane would be $5.” [Editor: We have seen major inflation — the Workmate is now $90+ and you’ll be spending more for the wood, so figure the whole project might be $150.00.]
Robert told us: “I used a couple ideas I found on the web. The Larry Willis website gave me the idea to use the Black and Decker Workmate as a base. I found the Workmate on sale for $40 and the top is made from oak plywood I had in my shop. I sealed the wood with three coats of Spar Urethane. The whole thing folds into a nice package for transportation to and from the range.”
NOTE: Since we first ran this story, the price of a Black & Decker Workmate WM225 has increased substantially. But good news — Amazon is currently selling WM225-A Workmates for $77.78, a decent price, particularly for Prime members who get FREE shipping. And for the same $77.78 price at Home Depot, you can get the Workmate WM225 with Local Store Pickup or home delivery (in most states).
Do you use bushings to size your case-necks? Are you assuming that your bushings are actually round on the inside, with a hole that’s centered-up properly? Well you may be in for an unpleasant surprise, based on what our friend Jim de Kort recently discovered. Jim was concerned about the run-out on his brass. His cases went into his bushing-equipped FL die pretty straight, but came out of the die with up to .004″ run-out. “What gives?”, Jim wondered. “Could the problem be the bushings themselves?”
To answer that question, Jim decided to examine his bushings. Using an Accuracy One Wheel-drive concentricity gauge, Jim checked out some of his neck bushings. What he discovered may surprise you…
Neck Bushing Flaws Revealed
Trust no one… — Jim de Kort
Jim writes: “I measured the concentricity of my 6BR rounds today. I noticed they went into the neck-bushing equipped full-length sizing die with less than .001″ deviation but came out with .003-.004″. The culprit, it appears, was the bushing itself. Without it the cases stayed within .0005″ to .001″ deviation, so something was happening with the bushing.
One bushing had .00025″ deviation on the outside, yet almost .003″ on the inside, so it is crooked. But even when using a bushing that is within .001″ I still get .003″ runout after sizing. I repeated the same procedure for my 6×47 and got the same results. When using the bushing, concentricity suffers a lot.”
Before we bash the bushing-makers, we must acknowledge that many different things can contribute to excessive run-out and/or mis-alignment of case-necks. We don’t have all the answers here, and Jim would be the first to say that some mysteries remain. Still, these are interesting results that give all precision hand-loaders something to think about.
Jim Borden of Borden Accuracy also offers this tip: “Check the trueness of the face of the die cap. That has more to do with trueness than the bushing. Also check perpendicularity of hole in bushing to top surface. When I was making dies, the cap was made by threading and facing the threaded tenon in same setup.”
Editor’s Comment: Many people have great results with neck-bushing dies, but Jim isn’t the only fellow who has seen some very odd results. I personally employ honed, non-bushing dies for many of my chamberings. These non-bushing dies (with the necks honed for .002-.003″ neck tension) produce extremely straight ammo, with run-out consistently under .0015″.
Reader Mike Etzel has come up with a simple, cost-effective way to apply moly or danzac coatings to your bullets. And you won’t need any expensive gear other than your regular vibratory tumbler and some small plastic containers.
Mike explains: “For a number of years I have been using a very convenient way of coating my projectiles with DANZAC in a tumbler. Instead of using a separate tumbler filled with DANZAC and stainless steel balls for coating applications, use small resealable plastic cake or pudding cups filled with stainless balls and DANZAC. Each cup will accommodate between 20 to 70 projectiles depending on caliber once the polishing balls and DANZAC are added. When I need to polish some cases, I insert the sealable plastic container(s) into the polishing material in the tumbler, add cases to the media, and in the process clean cases and coat the projectiles simultaneously in one tumbler. This does two operations in one session, saving on time and resources.”
While Mike uses DANZAC (Tungsten DiSulfide or WS2), you can use the same impact-tumbling-in-a-cup method to moly-coat your bullets, or to apply HBN (Hexagonal Boron Nitride).
TIPS for COATING your BULLETS, by “GS Arizona”
1. Start with Clean Bullets. This is simple enough, but some people overlook it and others overdo it. Get the bullets out of the box, wash them with warm water and dish soap and dry them. No need for harsh chemicals, after all, we’re only removing some surface dirt from shipping and maybe some left over lanolin from the forming process. Don’t handle them with bare hands once they’re clean, your skin oils will contaminate them.
2. Get Everything Hot — Real Hot. This is probably the single most important element in producing good-looking moly-coated bullets. I put the tumbler, the drum and the bullets out in the sun for at least 30 minutes before starting and then do all the tumbling in direct sunlight. On a summer day in Arizona, everything gets to the point that its uncomfortably hot to handle. If you are tumbling in the winter, you should heat the bullets in some form, a hair dryer can be useful, but they will cool off in the drum if you’re tumbling in cold temperatures. Your best bet is to plan ahead and do your coating in the summer. I coated about 3000 bullets in a couple of days recently to see me through our winter season (we’re a bit reversed from the rest of the country in terms of shooting season).
There is an excellent article about primers on the Shooting Times website. We strongly recommend you read Mysteries And Misconceptions Of The All-Important Primer, written by Allan Jones. Mr. Jones is a bona fide expert — he served as the manager of technical publications for CCI Ammunition and Speer Bullets and Jones authored three editions of the Speer Reloading Manual.
This authoritative Shooting Times article explains the fine points of primer design and construction. Jones also reveals some little-known facts about primers and he corrects common misconceptions. Here are some highlights from the article:
Size Matters
Useful Trivia — even though Small Rifle and Small Pistol primer pockets share the same depth specification, Large Rifle and Large Pistol primers do not. The standard pocket for a Large Pistol primer is somewhat shallower than its Large Rifle counterpart, specifically, 0.008 to 0.009 inch less.
Magnum Primers
There are two ways to make a Magnum primer — either use more of the standard chemical mix to provide a longer-burning flame or change the mix to one with more aggressive burn characteristics. Prior to 1989, CCI used the first option in Magnum Rifle primers. After that, we switched to a mix optimized for spherical propellants that produced a 24% increase in flame temperature and a 16% boost in gas volume.
Foiled Again
Most component primers have a little disk of paper between the anvil and the priming mix. It is called “foil paper” not because it’s made of foil but because it replaces the true metal foil used to seal early percussion caps. The reason this little disk exists is strictly a manufacturing convenience. Wet primer pellets are smaller than the inside diameter of the cup when inserted and must be compacted to achieve their proper diameter and height. Without the foil paper, the wet mix would stick to the compaction pins and jam up the assembly process.
Primer Functionality and Primer Types Compared
This video looks at a variety of primer types from multiple manufacturers, foreign and domestic. The video explains the basics of how primers function, and then explains the key characteristics of standard primers, magnum primers, and mil-spec primers (designed for semi-auto rifles).
UltimateReloader.com offers some of the most thorough firearms and reloading tool tests on the internet. And the Ultimate Reloader YouTube Channel now has over 1000 videos that showcase reloading tools, accurate firearms, precision optics, gunsmithing methods, and top-tier reloading components. For today’s Saturday at the Movies feature, we showcase six great videos recently created by Gavin Gear and his UltimateReloader team, including one with guest host F-Class John. These videos highlight a new Radar Chrono, superb Long-Range Target Camera, the remarkable AMP Annealer, and other interesting topics. Enjoy this our Saturday Video Showcase.
Bix’N Andy Trigger Showcase — Operation, Specs, Testing
Bix’N Andy makes some of the best triggers you can buy, with versions suited for benchrest, F-Class, ELR, PRS/NRL, as well as hunting and varminting. In this October 2024 video, Gavin looks at the features and functionality of a variety of Bix’N Andy triggers. You can purchase these quality triggers from BulletCentral.com at attractive prices starting at $199.00.
New Caldwell VelociRadar Chirp Radar Chronograph (with App)
In this video Gavin Gear tests Caldwell’s new VelociRadar chronograph. This is quite a bit bigger than the Garmin Xero C1 Pro or the new LabRadar LX compact, yet the VelociRadar is still much smaller than the original orange LabRadar. Notably, the VelociRadar uses a different mode of radar (Chirp Radar vs. Doppler) than other chronos. Caldwell states: “The Caldwell VelociRadar Chronograph [has] cutting-edge Chirp radar technology. While most chronographs stop at only providing muzzle velocity the VelociRadar tracks bullets downrange[.] Using these downrange velocity measurements, the VelociRadar calculates true muzzle velocity, the bullet’s ballistic coefficient, and downrange energy.” Here is one viewer’s comment on the Caldwell unit: “Pros: It is smaller than the original LabRadar, but bigger than the new Garmin. Price point is similar. The Caldwell looks more heavy-duty with reinforced corners, and more likely to survive a fall from the bench top. Control buttons are nice and large. Tripod looks better than Garmin. Cons: The display area looks large, but uses a small portion of that area. The data display should be larger.”
If you are considering purchasing a progressive reloading press — you’ve struck gold. Hosted by Gavin Gear of UltimateReloader.com, this remarkable 79-minute video covers a dozen presses from six leading manufacturers: Dillon, Frankford Arsenal, Hornady, Lee, Mark 7 (Lyman), and RCBS. Set aside plenty of time, because there is a wealth of information — the “mother lode” of progressive press coverage. Along with the big comparison video, Gavin has prepared a detailed, 17-page online article which covers all of the presses in the shootout. This Progressive Press comparison has generated 288,000 views on YouTube. Reviewer Gavin Gear demonstrates how each press works and provides data on costs, output rates, capabilities, and accessories so that potential buyers can make informed purchasing decisions.
6mmGT Rifle Complete Rifle Build, Start to Finish
In this video, Gavin builds an impressive 6mmGT (aka 6GT) field rifle start to finish. You can see him chamber the barrel, fit the bottom metal in the stock, and connect the Bix’N Andy trigger to a 416 Stainless Pristine brand Rem 700-footprint action. This is a multi-purpose rifle, build on the light side with a Carbon Six barrel. Gavin notes: “In this video I chamber a Carbon Six barrel and complete the package with a Bix ‘n Andy trigger, Hawkins Rings, and Riton Scope. Will this be the 6GT Lightweight hunting rifle I’ve been asking for?”
We like the 6GT cartridge, both for PRS/NRL competition and varmint work. The 6GT has the low recoil of a 6 Dasher, with good feeding and mag compatibility. With the 6GT, a competitor can push 105gr bullets at 3000+ FPS or run heavier bullets at 2800-2900+ FPS.
“The [6GT] is a more predictable and barrel-friendly cartridge than the 6mm Creedmoor. It can utilize the accurate and forgiving powders of the 6BR, has fantastic accuracy, and due to its shoulder angle and case length, it doesn’t suffer from feeding issues.” — PewPewTactical.com
LongShot Target Camera
Past 400 yards or so, it can be difficult to see bullet holes on paper, even with spotting scopes. That’s why we recommend a high-quality wireless target camera. The best long-range target cameras on the market are produced by Longshot Camera Systems. The Longshot Target Cam provides a live WiFi camera feed. This comes back to your shooting station and you can view the image with a laptop or mobile device. You don’t need internet coverage and no separate tall antennas are required. Simply place the camera unit next to your target and the receiver unit close to your rifle or bench. The Longshot system is completely self-contained. Longshot produces a variety of cameras starting at $199.00 for the LongShot Marksman. We recommend the $899.00 LR-3 unit which works out to two miles! In this video Gavin Gear of UltimateReloader tests the LR-3 at long range. PRODUCT INFO HERE.
Loading 7mm PRC on a Dillon 550C Progressive — F-Class John
This ULtimate Reloader video features F-Class John, a top-tier F-Class competitor who also has a very popular YouTube video channel. In this video John shows how to load the potent 7mm PRC cartridge with a Dillon 550C progressive press. The 7mm PRC is one of the newer short magnum-style cartridges popular with F-Open competitors. With the 7mm PRC you can drive a 180+ gr 7mm bullet at very impressive velocities with a 28″ or longer barrel.
Anschutz 54.18 .22 LR Rifle for Benchrest and Rimfire F-Class
With the high price of centerfire powders, bullets, and brass, everyone should have an accurate .22 LR rimfire rifle for marksmanship training and competition at 25 to 200 yards. In this video, Ultimate Reloader’s Gavin Gear tests the impressive Anschutz 54.18 BR50-U7 match rifle using a quality Sinclair Int’l front rest. Anschutz offers several versions of the 54.18 and BR-50. There are two barreled actions available: 20″ threaded and 25.9″ non-threaded. Gavin tested the 20″ threaded model with the U7 stock. In this video, Gavin tested the trigger with a sophisticated TriggerScan TS-11. The trigger was superbly repeatable at a measured 3.8 ounces. Gavin also did a bore examination, and tested various ammo. In this rifle, Lapua Midas+ ammo produced the smallest groups. FULL STORY HERE.
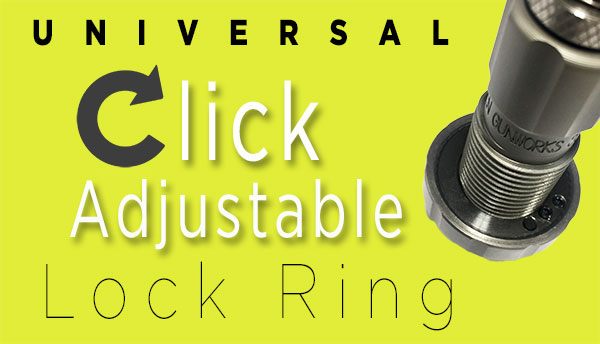
With the Whidden Click-Adjustable Sizer Dies, you can change shoulder bump by .001″ (one-thousandth) with a simple click. Fast. Easy. Precise.
As handloaders have become more aware of shoulder bump and proper adjustment of the sizer die in recent years, there has become a need for an easier way to adjust the sizer die properly. For most folks, with their conventional dies, it takes lengthy trial trial and error to get the shoulder setback correct. Anyone who has done this can attest that it can be a slow and annoying job.
Whidden Gunworks has solved the problem with the innovative Click Adjustable Sizer Die. Patent No: 10,393,488. This die and lock ring work together to give the user a clicking feel to the adjustment just like a high end rifle scope. Each click moves the shoulder bump exactly .001″ so you can easily find the exact shoulder bump that you desire.
The Click Adjustable option is available on Whidden Custom Sizer dies as well (7/8”-14 format dies only)! Included with the Click Adjustable Sizer Die is a Shoulder Bump Gauge. This gauge attaches to standard calipers and allows measurement from the case shoulder to the base. Using the Shoulder Bump Gauge with the Click Adjustable Sizer Die will make the proper sizer die setup easier than ever before.
Click-adjustable die sets are available with both bushing and non-bushing configurations. Along with these complete die sets, Whidden Gunworks offers a separate click-adjustable ring to use with existing dies. Priced at $58.99, the Whidden Click-Adjust Lock Ring represents a modest investment for a major gain in die ease-of-use and precision adjustability.
The Whidden Universal Click Adjustable Lock Ring you can instantly turn your sizer die into a Click Adjustable Die. This ring works with any 7/8 OD sizer of any brand with adjustable shoulder bump. Simple in design, the inner and outer ring can rotate independently of each other. Each click is metered in true 1 thousandths adjustment and has 0.100″ total available travel. These work great with nearly all sizing 7/8 OD sizing dies, and one verified purchaser noted: “Not only are they useful on reloading dies, but it’s the cat’s meow on the Giraud Power Trimmer Case Holders.”
Dillon Users Take Note: The Whidden Click Adjustable Sizing Die will not work with the Dillon 550 or 650 progressive reloading press systems. The Universal Click Adjustable Lock Ring is not compatible with the Dillon floating toolhead.
Sierra Bullets has published load data for the 6mm Creedmoor cartridge, a necked-down version of the popular 6.5 Creedmoor. Sierra has released very comprehensive 6mm Creedmoor load data, covering fifteen (15) different bullets from 55 to 110 grains. NOTE: Hornady-brand brass was used for Sierra’s 6mm Creedmoor load tests, not the newer, stronger Lapua 6.5 CM brass with small primer pockets. Hand-loaders using Lapua 6.5 Creedmoor brass necked to 6mm may have to adjust their loads.
Sierra writes: “As soon as the 6.5 Creedmoor was released in 2007, a 6mm version was being envisioned. After the 6mm Creedmoor demonstrated its worth at 1000 yards it began to catch the attention of Precision Rifle Series (PRS) competitors. The 6mm Creedmoor is a great fit for those looking for an AR platform-friendly cartridge. It delivers velocities very similar to the .243 Win and yet fits the AR10 magazine length[.] The 30-degree shoulder makes this a very efficient case and helps prolong case life as well. The 6mm Creedmoor works well with powders such as H4350, [RE-16], RE-17, and Ramshot Hunter for heavier long-range bullet weights. Slightly faster powders such as RE-15, Win 760, and Vihtavuori N540 work well with lighter weight bullets.”
Sierra Bullets Tested for 6mm Creedmoor Load Data
55gr BlitzKing (#1502)
60gr HP (#1500)
70gr HPBT (#1505)
70gr BlitzKing (#1507)
75gr HP (#1510)
In developing its 6mm Creedmoor load data, Sierra tested a very wide selection of propellants, two dozen overall. For the smaller bullets, fast-burning powders such as Benchmark, H4895, and CFE223 were tested. For the heavier 100+ grain bullets, Sierra tested a selection of medium-burn-rate powders including H4350, Reloder 16, Reloder 17, Varget, and Superformance. Sierra did a very thorough job. We know this information will be welcomed by 6mm Creedmoor shooters.
Don’t know what powder to try first? For the 107-110 grain bullets, if you want best accuracy and low ES/SD, our Forum members recommend Alliant Reloder 16 and Hodgdon H4350. If you are seeking max velocity with the 110-grainer, look at Hodgdon Superformance and Reloder 19.
Here are Sierra’s 6mm Creedmoor Load Data Charts for 90-95 grain bullets plus the 107gr MK and 110gr MK. There are five other tables for other bullet types.
BONUS: PRB 6mm Creedmoor and 6.5 Creedmoor Load Survey
The Precision Rifle Blog compiled Load Data from PRS Competitors, for both 6mm Creedmoor and 6.5 Creedmoor. This is a good place to start. PRB surveyed the match loads for “173 of the top-ranked precision rifle shooters in the country”. One cautionary note: These PRS guys may be loading fairly hot, so work up gradually, 0.3 grains at a time. CLICK HERE.
For years the 6mm PPC (aka 6PPC) cartridge has dominated short-range group benchrest shooting, winning championships and setting records. Traditionally 6PPC cases were formed from Lapua 220 Russian brass. Now there is an exciting alternative — Alpha Munitions 6mm PPC cartridge brass. With a suitable chamber this is ready to load and shoot with no special fire-forming required. (If you have a tight-necked chamber, neck-turning would be needed first.)
If you want to try the Alpha 6mm PPC brass, head over to Bruno Shooters Supply. Right now Bruno’s has a large quantity of Alpha 6mm PPC brass in stock and ready to ship. This brass comes in nice, protective plastic boxes with secure slots for each brass case. Order now at $159.95 for a 100ct box. NOTE: Discounts are offered for quantities of 500+.
On the Alpha Munitions website, you’ll find this information for Alpha 6mm PPC brass with Optimized Case Design OCD technology:
– 100 count boxes ship in custom Alpha Munitions plastic cases with perforated bi-layer foam for protection of cases and loaded ammunition
– Brass has a .060″ flash hole
– Do NOT small base size OCD brass
NOTE: If you shoot mid-range (600-yard) benchrest or F-Open matches, Alpha Munitions also produces 6mm BRA, 6mm Dasher, and 6mm GT brass. Unfortunately all three types are listed as currently out of stock on the Alpha Munitions website.


 On our main AccurateShooter.com site, you’ll find a good article by GS Arizona on the Basics of Neck Turning. If you’re new to the neck-turning game, or are just looking for good tips on improving your neck-turning procedures, you should read that article. Below we offer some highlights and photos from the article, but you’ll need to read the whole story to view all the illustrations and follow all the procedures step by step.
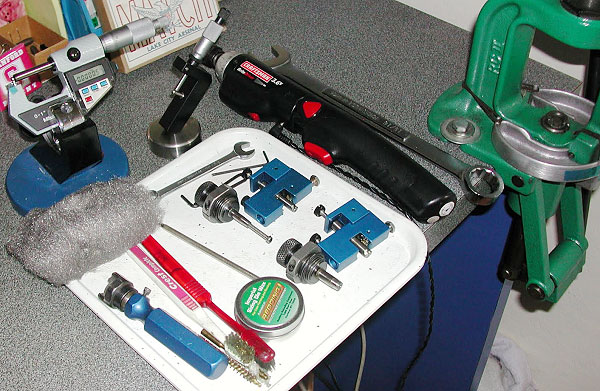

 TIP ONE — Adjusting Tension
 TIP TWO — Polish and Tune for Easy Case Removal
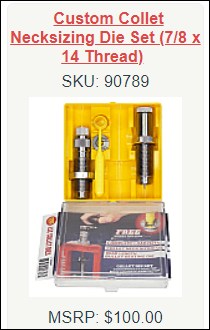
 A while back, we featured a portable reloading bench built on a Black & Decker Workmate. That proved a VERY popular do-it-yourself project so we’re showing it again, in case you missed it the first time.


 Reader Mike Etzel has come up with a simple, cost-effective way to apply moly or danzac coatings to your bullets. And you won’t need any expensive gear other than your regular vibratory tumbler and some small plastic containers.
 2. Get Everything Hot — Real Hot. This is probably the single most important element in producing good-looking moly-coated bullets. I put the tumbler, the drum and the bullets out in the sun for at least 30 minutes before starting and then do all the tumbling in direct sunlight. On a summer day in Arizona, everything gets to the point that its uncomfortably hot to handle. If you are tumbling in the winter, you should heat the bullets in some form, a hair dryer can be useful, but they will cool off in the drum if you’re tumbling in cold temperatures. Your best bet is to plan ahead and do your coating in the summer. I coated about 3000 bullets in a couple of days recently to see me through our winter season (we’re a bit reversed from the rest of the country in terms of shooting season).


 In this video, Gavin builds an impressive 6mmGT (aka 6GT) field rifle start to finish. You can see him chamber the barrel, fit the bottom metal in the stock, and connect the Bix’N Andy trigger to a 416 Stainless Pristine brand Rem 700-footprint action. This is a multi-purpose rifle, build on the light side with a Carbon Six barrel. Gavin notes: “In this video I chamber a Carbon Six barrel and complete the package with a Bix ‘n Andy trigger, Hawkins Rings, and Riton Scope. Will this be the 6GT Lightweight hunting rifle I’ve been asking for?”