IMR 8208 XBR powder is a great propellent that has shown superb consistency, delivering great accuracy and low ES/SD in our testing. We have used this powder with success in .308 Win and other cartridges. The burn rate is slightly slower than Vihtavuori N133 and a bit faster than Hodgdon H4895. IMR 8208 XBR is suitable for many cartridge types including .204 Ruger, 22 BR, .223 Rem, 6 PPC, 6BR (lighter bullets), and .308 Winchester. It works great for varmint hunting loads as well as benchrest competition.
If Powder Valley sells out, Natchez Shooting & Outdoors also has some IMR 8208 XBR one-pounders in stock. Current price is $51.69 (one-pound). Also Brownell’s has 8208 XBR one-pounders in stock for $55.99. NOTE: Neither Natchez nor Brownells have the 8-lb jugs of IMR 8208 XBR.
Stellar Accuracy and Exceptional Temperature Insensitivity
Field testing has shown that IMR XBR 8208 is extremely stable across a very wide temperature range. At SHOT Show 2010, we interviewed Chris Hodgdon, who gave us the “inside story” on this IMR powder. Chris shared lab test results showing how load pressure varied with ambient temperature. The data was stunning. Basically 8208 XBR showed almost constant pressures from below freezing to well over 100° F. This editor has personally never seen a powder test that revealed “flat-line” results like 8208 XBR, with recorded pressures remaining virtually unchanged over a huge temperature range. And IMR 8208 XBR has been used with great success in benchrest competition by Lou Murdica and others. When you combine its temp stability with such proven accuracy, IMR 8208 XBR is indeed a very exceptional powder.
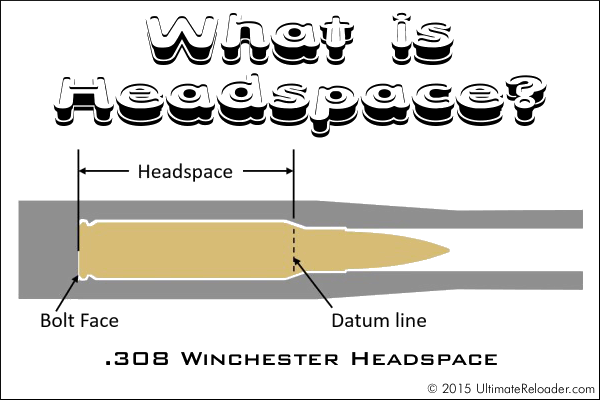
This illustration shows headspace measurement for the popular .308 Winchester cartridge, which headspaces on the shoulder. Image copyright 2015 Ultimate Reloader.
In this Brownells Tech Tip Video, Brownells gun tech Steve Ostrem explains what headspace is and why it’s one of the most critical measurements for nearly all firearms. Even if you’re an experienced rifle shooter, it’s worth watching this video to refresh your understanding of headspace measurements, and the correct use of “GO” and “NO-GO” gauges.
Headspace Definition
In firearms, headspace is the distance measured from the part of the chamber that stops forward motion of the cartridge (the datum reference) to the face of the bolt. Different cartridges have their datum lines in different positions in relation to the cartridge. For example, 5.56x45mm NATO ammunition headspaces off the shoulder of the cartridge, whereas .303 British headspaces off the forward rim of the cartridge. If the headspace is too short, ammunition that is in specification may not chamber correctly. If headspace is too large, the ammunition may not fit as intended or designed and the cartridge case may rupture, possibly damaging the firearm and injuring the shooter. (Source: Wikipedia)
Problems Caused by Too Much Headspace
Excessive headspace issues can include: light primer strikes, failure to fire, bulged/blown cases, case separations, split shoulders, or unseated primers after firing. Case ruptures caused by excessive headspace can lead to catastrophic failures causing serious injury. That is why headspace is such an important measurement.
Problems Cause by Too Little Headspace
Insufficent (or excessively tight) headspace can prevent the firearm from going into battery, resulting in failure to fire or deformation of the cartridge case. Various feeding and functioning problems can be caused by cases with too little headspace, even if a round can be chambered (with effort).
Headspace Gauges
Headspace is measured with a set of two headspace gauges: a “Go” gauge, and a “No-Go” gauge. Headspace gauges resemble the cartridges for the chambers they are designed to headspace, and are typically made of heat-treated tool steel. Both a “Go” and a “No-Go” gauge are required for a gunsmith to headspace a firearm properly. A third gauge, the “Field” gauge, is used (as the name implies) in the field to indicate the absolute maximum safe headspace. This gauge is used because, over time, the bolt and receiver will wear, the bolt and lugs compress, and the receiver may stretch, all causing the headspace to gradually increase from the “factory specs” measured by the “Go” and “No-Go” gauges. A bolt that closes on “No-Go” but not on “Field” is close to being unsafe to fire, and may malfunction on cartridges that are slightly out of spec. (Source: Wikipedia)
You need to understand Headspace Gauges and how to use them. There are “Go”, “No-Go”, and “Field” gauges. The “Field” is actually the longest. Brownells explains: “The GO gauge corresponds to the SAAMI minimum chamber length, while the FIELD gauge usually matches the maximum chamber depth, or slightly less. NO-GO gauges are an intermediate length between minimum and maximum, that, technically, is a voluntary dimension. A firearm that closes on a NO-GO gauge and does not close on a FIELD gauge may not give good accuracy and may have very short cartridge case life [.]”
Whidden Gunworks makes great sizing and seating dies. The Whidden full-length sizing die with neck bushing is very popular because it allows you to “tune” the neck tension by using different bushings, with larger or smaller inside diameters. In this video, John Whidden explains how to choose a the right bushing size for use with your neck-sizing and full-length sizing bushing dies.
For most applications, John suggest starting with the caliper-measured outside diameter of a loaded cartridge (with your choice of bullet), and then SUBTRACT about three thousandths. For example, if your loaded round mics at .333, then you would want to start with a 0.330 neck bushing. John notes, however, that you may want to experiment with bushings, going down a thousandth and up a thousandth. With thin In addition, as your brass ages and the necks harden, you may want to change your bushing size.
Quick Tip: Try Flipping Your Bushings
You may also want to experiment with “flipping” your neck bushings to alternate the side that first contacts the neck of the case. (One side of the bushing is usually marked with the size, while the other side is unmarked.) So try “number side up” as well as “number side down”.
Some folks believe that one side of the bushing may allow a smoother entry, and that this can enhance concentricity. Other people think they can get very slightly more or less neck tension depending on how the bushing is oriented. This is a subtle effect, but it costs nothing to experiment.
If one bushing orientation proves better you can mark the “up” side with nail polish so that you can always orient the bushing optimally. NOTE: We have confirmed that some bushings are actually made with a slight taper. In addition, bushings may get distorted slightly when the brand name and size is stamped. Therefore there IS a reason to try both orientations.
Lyman’s popular Case Trim Xpress is an affordable, variable-speed case trimmer with a razor-sharp CARBIDE CUTTER. The Case Trim Xpress can quickly and accurately trim brass at a rate of approximately 15 cases a minute. The unit has its own power source — a strong variable-speed motor. Using the 10 provided bushings, the unit indexes off the case shoulder — that’s simple, fast and reliable. Plus a precision trim adjustment wheel allows case lengths to be easily “dialed in” to 0.001″ increments. To trim your brass, simply push the case against the carbide cutter until the shoulder stops on the bushing (with precise case OAL set by the wheel). The Case Trim Xpress comes with 10 bushings that fit the most popular bottleneck rifle cartridges, so no pilots are needed. This is available now for $142.03 on Amazon.
Review by F-Class John
Case trimming can be one of the most boring and tedious steps in the reloading processes. This is largely because of outdated tools that either require manual turning, clunky pilot systems, or difficult adjustments. In order to overcome these obstacles, you might have to spend $500 for some premium systems. But Lyman’s bright orange Case Trim Xpress delivers premium trimming performance at an affordable price. Available for around $145, this trimmer offers an easily-adjustable cutting head plus a smart, shoulder-indexing bushing system to improve consistency and speed up the trimming process.
CLICK photo for full-screen view of Case Trim Xpress unit.
Video Shows How Carbide Cutter Head Adjusts Easily with Index Wheel
The Lyman Case Trim Xpress comes with the main trimming unit, power cord, and 10 bushings in a storage case. These 10 orange bushings let you trim more than 50 popular cartridge types (yes including the 6mmBR, 6.5 Creedmoor, and .308 Win of course). Set-up was simple and straight-forward. Install the bushing you need, turn the unit on and slowly push a piece of brass towards the cutting head. Once the brass is fully depressed, you can start adjusting the dial one click at a time until the case makes contact. Then you start making progressive adjustments and trim until you reach your desired length. The process is so simple that it’ll leave you wondering how you ever used anything else.
Vertical stringing is a common problem that all precision shooters will face sooner or later. In addition to ammo inconsistencies, many other factors can cause vertical stringing. Accordingly, it’s important that you analyze your gun handling and bench set-up systematically.
EDITOR: Folks, READ THIS ARTICLE! You WILL benefit. There are some VERY important insights here. You’ll learn ways to set up your gun better, and check for various technical issues. That can save you time at the range and save you money spent on expensive bullets and powder.
In this article, Hall of Fame benchrest Shooter Speedy Gonzalez explains how to eliminate mechanical and gun-handling problems that cause vertical spread in your groups. Speedy’s article addresses the many human and the hardware factors that can cause vertical.
Speedy Gonzalez, noted shooter, gunsmith and member of the Benchrest Hall of Fame, offers these pearls of wisdom to help you eliminate vertical in your shot strings. Remember that vertical can result from myriad gear issues and gun-handling mistakes. Try to isolate one item at a time as you work to improve your groups.
BAGS and REST–VERY IMPORTANT
• Front Rest Wobble — You will get vertical if the top section of the front rest is loose. Unfortunately, a lot of rests have movement even when you tighten them as much as you can. This can cause unexplained shots.
• Rifle Angle — If the gun is not level, but rather angles down at muzzle end, the rifle will recoil up at butt-end, causing vertical. You may need to try different rear bags to get the set-up right.
• Front Bag Tension–Vertical can happen if the front sand bag grips the fore-arm too tightly. If, when you pull the rifle back by hand, the fore-arm feels like it is stuck in the bag, then the front bag’s grip is too tight. Your rifle should move in evenly and smoothly in the sand bags, not jerk or chatter when you pull the gun back by hand.
• Sandbag Fill — A front sandbag that is too hard can induce vertical. Personally, I’ve have never had a rifle that will shoot consistently with a rock-hard front sandbag. It always causes vertical or other unexplained shots.
• Bag Ears — If the channel between the Rear Bag’s ears is not in line with the barrel, but is twisted left or right, this can affect recoil and vertical consistency. And take note — if the bag is off-axis quite a bit, you can also get horizontal stringing.
• Reliability — ALL your bench equipment must work flawlessly. If it doesn’t, get it fixed or get rid of it. We need all our attention on wind flags.
GUN HANDLING and BENCH TECHNIQUE
• Be Consistent — You can get vertical if your bench technique is not the same every shot. One common problem is putting your shoulder against the stock for one shot and not the next.
• Free Recoil — Free recoil shooters should be sure their rifle hits their shoulder squarely on recoil, not on the edge of their shoulder or the side of their arm.
• Head Position — Learn to keep your head down and follow-through after each shot. Stay relaxed and hold your position after breaking the shot.
• Eyes — Learn to shoot with both eyes open so you can see more of the conditions.
• Last Shot Laziness — If the 5th shot is a regular problem, you may be guilty of what I call “wishing the last shot in”. This is a very common mistake. We just aim, pull the trigger, and do not worry about the wind flags. Note that in the photo above, the 5th shot was the highest in the group–probably because of fatigue or lack of concentration.
• Last Shot Low — I hear a lot of discussion about low shots in a group and apparently this occurs a lot on the 5th shot. If your 5th shot that goes out most of the time, you can bet you are doing something at the bench.
• Seating — When possible, bring your own stool so that you can sit comfortably, at a consistent height, every time you shoot.
LOAD TUNING
• Find the Sweet Spot — A load that is too light or too heavy can cause vertical problems. When you’ve tuned the load right, you should see a reduction in vertical. Even 0.1 grain may make a difference, as will small changes in seating depth.
• Primers — If you’re getting vertical, and everything else looks fine, try another brand of primers. And remove the carbon from the primer pockets so the primers seat uniformly every time.
• Case Prep — When you chamfer the inside of your case necks make sure they are smooth enough that they don’t peel jacket material off when you seat the bullet. Bullets with J4 Jackets (like Bergers) and Lapua Scenar bullets seem more prone to jacket scratching or tearing than Sierra bullets.
• Shell Holders — Keep shell holders clean, in both your press and priming tool. I have seen so much dirt/crud in shell holders that the cases end up get sized crooked because the rim is not square to the die.
• Water in Cases — I see people walking around with case necks turned up in the loading block. A lot of the time there is condensation dropping from the roof of your loading area. If one drop of water gets in a case you are in trouble. How many times have you had a bad low shot when it has been raining and you have been walking around with your cases turned up in your block?
MECHANICAL and HARDWARE ISSUES
• Barrel Weight — A lot of rifles are muzzle-heavy. Some rifles have too heavy a barrel and this causes vertical, especially when shooting free recoil. Basically the gun wants to tip forward. The remedy is to trim or flute the barrel, or add weight in the rear (if you can stay within weight limits).
• Unbalanced Rifle — If the rifle is not balanced, it does not recoil straight, and it will jump in the bags. If the rifle is built properly this will not happen. Clay Spencer calls this “recoil balancing”, and he uses dual scales (front and rear) to ensure the rifle recoils properly.
• Firing Pin — A number of firing-pin issues can cause vertical. First, a firing pin spring that is either too weak or too strong will induce vertical problems. If you think this is the problem change springs and see what happens. Second, a firing pin that is not seated correctly in the bolt (in the cocked position) will cause poor ignition. Take the bolt out of rifle and look in the firing pin hole. If you cannot see the entire end of firing pin it has come out of the hole. Lastly, a firing pin dragging in bolt or shroud can cause vertical. Listen to the sound when you dry fire. If you don’t hear the same sound each shot, something is wrong.
• Trigger — A trigger sear with excessive spring load can cause problems. To diagnose, with an UNLOADED gun, hold the trigger in firing position and push down on sear with your thumb. If it is hard to push down, this will cause vertical problems.
• Stock Flex — Some stocks are very flexible. This can cause vertical. There are ways to stiffen stocks, but sometimes replacement is the best answer.
SCOPE ISSUES
• Lock Rings — This year alone I have seen nine lock rings on scopes that are not tight. Guess what that does to your group? Make sure yours are tight.
• Big Tubes Need Tension — We’ve observed that some 30mm scope rings are not getting tight enough, and scopes are slipping in the rings under recoil. This will cause point of aim movement.
• Windage Bases — If you’re using a conventional-style single dovetail with rear windage adjustment, make sure both sides of the windage screws are tight. This can induce both windage AND vertical issues since the rear ring is held down by the windage tension.
AWARENESS of CONDITIONS and READING WIND
• Basic Wind-Reading Rule–If you do not know how to read wind flags or are very inexperienced, try to shoot your group with the flags all going in one direction.
• Rate of Fire — The longer you wait between shots when a condition is changing, the more the condition change will affect your shots.
• Look Far and Wide — Learn to look at the whole field of flags, not just the row in front of you. Many times a change quite a ways out will cause shot to go out of your group well before that change shows up in front of your bench.
• Don’t Fear the Wind — When you realize that the wind is your friend you will become a much better benchrest shooter. By this I mean that wind skills can separate you from other shooters who have equally good equipment. To learn how to read the wind, you must practice in challenging winds, not only in good conditions.
• Watch Wind Direction AND Velocity — Pay attention to angle changes on flags. Even though you see the same windspeed indicators, angle changes make a big difference in your groups.
• Watch While You Wait — Between courses of fire, whenever possible, watch conditions on the range. That way you will be aware of any changes in conditions since your last group and you will be mentally prepared for the new condition.
SPECIAL ADVICE for HUNTING RIFLES
• Clean That Barrel — Most hunting rifle barrels do not get cleaned enough. If you keep barrel clean it will shoot better for you. You should clean your barrel well after every 10 to 12 shots. If you’re lazy, just use Wipe-Out.
• First Shot Inconsistency — Most hunting rifles will not put the first shot (after cleaning) with the subsequent shots. So, after cleaning, if you have a rifle that tosses that first shot high or wide, then shoot one fouling shot before going hunting or before you shoot for group.
• Barrel Heat — Thin-contour “sporter” barrels WILL change point of impact as they heat up. When testing loads for your hunting rifle, take your time and don’t let the barrel get hot on you.
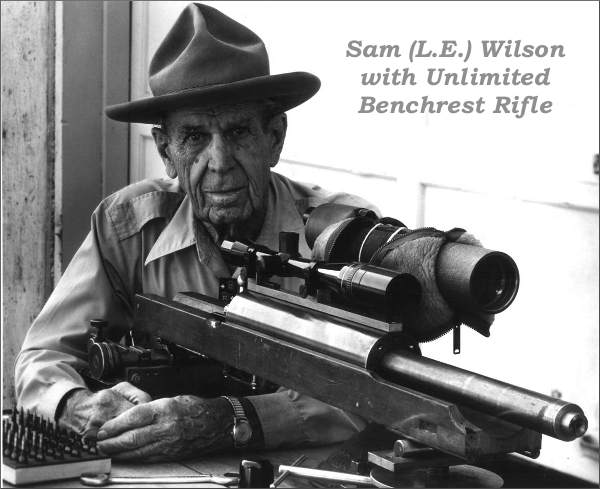
Sam (L.E.) Wilson actively competed in benchrest matches until he passed. He’s shown here with an Unlimited benchrest rifle of his own design.
If you’ve used hand dies with an arbor press, chances are you’ve seen the L.E. Wilson company name. You may not know that the founder of L.E. Wilson Inc. was an avid benchrest competitor who pioneered many of the precision reloading methods we used today. Known as “Sam” to his friends, L.E. Wilson was one of the great accuracy pioneers who collected many trophies for match victories during his long shooting career. His company continues to innovate — bringing out new products such as the Case Gage Depth Micrometer tool.
The photo above shows Sam (foreground) with all of his children at a shoot. Behind Sam are Jim, Jack and Mary, shooting in the Unlimited Class. What do they say — “the family that plays together stays together”? Note the long, externally-adjusted scopes being used. Learn more about Sam (L.E.) Wilson and his company on the L.E. Wilson website.
Unlimited Class was Sam’s favorite discipline, because in the “good old days” top competitors normally would craft both the rifle and the front/rear rests. This rewarded Sam’s ingenuity and machining/fabrication skills. In the “build-it-yourself” era, one couldn’t just order up an unlimited rail gun on the internet. How times have changed…
Shown is the Redding Model 15-P Competition Piloted Inside Chamfering Tool with pilot rod that centers in the case flash hole. Also shown is a Forster 45° Rocket Tool.
There are a wide variety of reloading tools designed to cut a slight chamfer in case necks and deburr the edge of the case mouth. You don’t need to spend a lot of money for an effective tool. A basic “rocket-style” 45° chamfering tool, such as the Forster, actually does a pretty good job taking the sharp edge off case mouths, particularly if you use a little scotch-pad (or steel wool) to smooth the edge of the cut. The Forster chamfer tool, shown below, is a nicely-made product, with sharper cutting blades than you’ll find on most other 45° chamferers. It costs $26.99 at Brownells.com.
Redding sells a handy piloted chamfering tool with a 15° inside cutting angle and removable accessory handle. This Redding Model 15-P chamferer works really well, so long as you have consistent case OALs. The pilot rod (which indexes in the flash hole) is adjustable for different cartridge types (from very short to very long). This ensures the concentricity of the inside neck chamfer to the case mouth. This quality tool works with cases from .22 to .45 Caliber, and retails for $37.19 at MidwayUSA.
Sinclair International offers a 28° carbide chamferer with many handy features (and sharp blades). The $28.99 Sinclair Carbide VLD Case Mouth Chamfering Tool will chamfer cases from .14 through .45 caliber. This tool features a removable 28° carbide cutter mounted in the green plastic Sinclair handle. NOTE: A hex-shaft cutter head power adapter can be purchased separately for $19.99 (Sinclair item 749002690). This can be chucked in a power screwdriver or used with dedicated power drives when doing large volumes of cases.
Many folks feel they can get smoother bullet seating by using a tool that cuts at a steeper angle. We like the 22° cutter sold by Lyman. It has a comfortable handle, and costs $17.49 on Amazon. The Lyman tool is an excellent value, though we’ve seen examples that needed sharpening even when new. Blade-sharpening is easily done, however.
K&M makes a depth-adjustable, inside-neck chamferer (“Controlled Depth Tapered Reaper”) with ultra-sharp cutting flutes. The latest version, which costs $62.95 at KMShooting.com, features a central pin that indexes via the flash hole to keep the cutter centered. In addition, the tool has a newly-designed handle, improved depth-stop fingers, plus a new set-screw adjustment for precise cutter depth control. We caution, even with all the depth-control features, if you are not careful, it is easy to over-cut, slicing away too much brass and basically ruining your neck. We think that most reloaders will get better results using a more conventional chamfer tool, such as the Forster or Redding 15-P.
One last thing to note — tools like the K&M and the Sinclair chamferer are often described as VLD chamferers. That is really a misnomer, as bullets with long boat-tails actually seat easily with very minimal chamfering. In reality, these high-angle chamferers may be most valuable when preparing brass for flat-base bullets and bullets with pressure rings. Using a 22° or 28° chamferer can reduce the risk of cutting a jacket when using VLD bullets though — so long as you make a smooth cut.
It’s summertime, so many folks will head to the hinterlands on prairie dog safaris. On a good P-Dog adventure, you may shoot hundreds of rounds over a long weekend. So you’ll need plenty of ammo. With these ammo volume requirements, you probably won’t have time to load to benchrest standards, and you may not have the budget for match-grade bullets. To save time you may throw (rather than weigh) your charges, or even load on a progressive press. This all raises the question of ammo accuracy — how good is “good enough”? A Sierra Bullets expert answers that question here — explaining how to efficiently load ammo for varmint work.
Ammunition Accuracy Requirements 101 — Varmint Ammo
This story based on article by Sierra Bullets Chief Ballistician Tommy Todd
I load and shoot ammunition for a living. In my duties here at Sierra I constantly test bullet accuracy for our production needs. Because of this, I shoot a variety of different calibers and cartridges on a daily basis and a large demand of this shooting is keeping the guns and loads tuned for optimum accuracy. I have a very narrow window of tolerances to maintain in order to provide our customers (you) with the most accurate bullets on the market.
I have learned many tricks and techniques over the years to tuning a load, prepping brass, and cleaning barrels to keep a gun shooting. I often utilize the things I have learned and take them to extreme levels when competing in a shooting event. I also often ignore most of these things (other than safety) and simplify the process if the shooting I will be doing does not warrant.
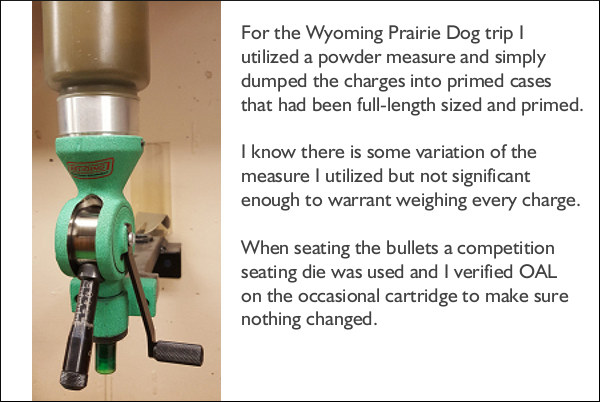
[One summer] I went on a prairie dog shoot in Wyoming with some good friends. The targets cooperated as did the weather with the exception of some challenging winds we experienced. We had a great time and make a lot of hits on those small rodents. When loading for the .223 Remington rifles and the TC Contender, I cut a few corners in the ammunition-loading process due to both time constraints and accuracy needed. When shooting at a prairie dog a miss is simply that, but when shooting at say the X-Ring at 1000-yard competition, a poorly-placed shot [harms your] placing in the match. Because of this, I can afford to miss an occasional shot at a varmint due to ammunition capability without worry but will not allow the same tolerances in my match ammo. For the Wyoming trip I utilized a powder measure and simply dumped the charges into primed cases that had been full-length sized and primed.
I had measured enough for length to know that while there was some variance all were under maximum length. I know there is some variation of the measure I utilized but not significant enough to warrant weighing every charge. When seating the bullets a competition seating die was used and I verified OAL on the occasional cartridge to make sure nothing changed.
This varmint ammo, with thrown charges, put TEN shots inside ONE inch at 200 yards. That’s half MOA. Good Enough? Absolutely!
The ammo produced shot under one inch at 200 yards in one of the guns I planned on taking on to Wyoming with me. [Editor: That was for TEN Shots — see above.] I knew I had loaded ammunition that was quite suitable for the task at hand which was evidenced by the number of hits I was able to make at fairly long range.
NOTE: The author, Tommy Todd, explains that, when loading ammo for F-Class matches, he uses more exacting methods. He weighs every charge and seats his bullets carefully with an arbor press. Todd adapts his methodology for his particular application. The lesson here is to load to the level of precision demanded by your discipline. READ Full Story HERE.
Need a top-notch Ballistics App for your iPhone, iPad, or iPod? Start with Ballistic: Advanced Edition (AE), the number 1 (i.e. most installed) App for iOS systems (iPhones and iPads). Ballistics AE (Advanced Edition) is the most popular iOS ballistics program for many good reasons. It offers a full feature set with Ballistic Solver, Ballistic Comparison (with up to 8 projectiles), Target Log (records group sizes), Advanced WindKit, and more. The Ballistic: Advanced Edition software is easy to use, with nice controls. Underneath it all is the proven JBM Ballistics calculator. And here’s the kicker — this excellent mobile App software is now FREE to download and install on iPhones and iPads!
This Video Explains How to Set Up and Use Ballistic: Advanced Edition
Full-featured and easy to use, Ballistics AE has been refined over many years, and it supplies rock-solid solutions derived from JBM Ballistics solver (created by James B. Millard). Unlike some other Apps, Ballistics AE is STABLE on iPhones (with various OS levels). What’s cool is that Ballistics AE is now available for FREE for both iPhones and iPads. This software is now provided by Federal Premium Ammunition, with in-App purchase functionality.
We’ve used the Ballistic: Advanced Edition program on an iPhone 5S, iPhone 6, and iPad, and it performed well. Here are some of the features we liked:
1. Mirrors output from online version of JBM Ballistics we often use for initial calculations.
2. Controls are simple to use and (mostly) intuitive.
3. Handy comparison feature lets you compare ballistics for different projectiles side by side.
4. Advanced Wind Kit allows you to account for complex wind situations.
5. Projectile and BC Databases are very comprehensive.
6. Software is regularly updated to match Apple OS changes.
This article is Copyright 2023 AccurateShooter.com. No republication is authorized. Any appearance of this story on another site obliges that site to pay liquidated damages and/or licensing fees.
A while back, Sinclair International’s Reloading Press Blog featured a “round-table” discussion of reloading techniques. Sinclair’s team of tech staffers were asked: “What do you feel is the one-most crucial step in precision reloading?”
Here are their responses (along with comments from our Editors):
Phil Hoham: “I feel that when working up a load do not go too high or too low in your powder charge. Stay away from ‘suggested loads’ you hear at the range, or on the internet. Always be sure to use a published reloading manual that presents not only minimums and maximums, but also pressure, velocity, and a proper range of powders used. Do not get distracted in the reloading process, and remain focused at all times during each step involved.”
AccurateShooter.com: Some loads presented on the Internet are OK as a starting point, but it is absolutely critical to understand that pressure maximums will vary considerably from one rifle to another (of the same chambering). For example, one 6mmBR rifle shooting 105gr bullets can max out with 30.0 grains of Varget powder, while another rifle, with the same chamber dimensions, but a different barrel, could tolerate (and perform better) with half a grain more powder. You need to adjust recommended loads to your particular rifle and barrel.
Pete Petros: “This could be a very broad topic, but if I were to pick one, it would be making sure to pay close attention, and weigh each and every powder charge to ensure that each load is exact and consistent. This is important not only for accuracy, but also for safety reasons.”
AccurateShooter.com: If you’re shooting beyond 200 yards, it is critical to weigh your loads with an accurate scale or automated system such as the AutoTrickler V3/V4. Loads that are uniform (within a few kernels) will exhibit lower Extreme Spread and Standard Deviation. And remember, even if you stick with the same powder, when you get a new powder lot, you may have to adjust your load quite a bit. For example, .308 Palma shooters have learned they may need to adjust Varget loads by up to a full grain from one lot of Varget to the next.
Ron Dague: “I feel that the most important step(s) in reloading for accuracy are in the initial case prep. Uniforming the primer pocket to the same depth to ensure consistency in primer seating is a crucial step. Additionally de-burring the flash holes, each in the same way to clean up and chamfer the inside is important. It ensures that the ignition from the primer is uniform and flows out in the same consistent pattern. Doing so will create uniform powder ignition and tighten up your velocity Extreme Spread.”
AccurateShooter.com: With some brands of brass, primer pocket uniforming and flash-hole deburring is useful. However, with the best Lapua, Norma, and RWS brass it may be unnecessary, or worse, counter-productive. So long as your Lapua brass flash-holes are not obstructed or smaller than spec, it may be best to leave them alone. This is particularly true with the small flash holes in 220 Russian, 6BR, and 6.5×47 cases. MOST of the flash-hole reaming tools on the market have cutting bits that vary in size because of manufacturing tolerances. We’ve found tools with an advertised diameter of .0625″ (1/16″) that actually cut an 0.068″ hole. In addition, we are wary of flash-hole deburring tools that cut an aggressive inside chamfer on the flash-holes. The reason is that it is very difficult to control the amount of chamfer precisely, even with tools that have a depth stop.
Rod Green: “I feel that bullet seating is the most important step. If you had focused on making sure all prior steps (case prep, powder charge, etc.) of the process have been carefully taken to ensure uniformity, bullet seating is the last step, and can mean all the difference in the world in terms of consistency. Making sure that the bullet is seated to the same depth each time, and time is taken to ensure that true aligned seating can make the load.”
Bob Blaine: “I agree with Rod. I strongly feel that consistent bullet seating depth is the most important step in creating the most accurate hand loads. I have seen the results in both my bench and long range rifles. Taking the time to ensure exactness in the seating process is by far, the number one most important step in my book.”
AccurateShooter.com: Agreed. When loading match ammo, after bullet seating, we check every loaded round for base of case to ogive length. If it varies by more than 3 thousandths, that round is segregated or we attempt to re-seat the bullet. We measure base of case to bullet ogive with a comparator mounted on one jaw of our calipers. You may have to pre-sort your bullets to hold the case-base to ogive measurement (of loaded rounds) within .003″.


 IMR 8208 XBR powder is a great propellent that has shown superb consistency, delivering great accuracy and low ES/SD in our testing. We have used this powder with success in .308 Win and other cartridges. The burn rate is slightly slower than Vihtavuori N133 and a bit faster than Hodgdon H4895. IMR 8208 XBR is suitable for many cartridge types including .204 Ruger, 22 BR, .223 Rem, 6 PPC, 6BR (lighter bullets), and .308 Winchester. It works great for varmint hunting loads as well as benchrest competition.

 Headspace Gauges
 Quick Tip: Try Flipping Your Bushings


 In this article, Hall of Fame benchrest Shooter Speedy Gonzalez explains how to eliminate mechanical and gun-handling problems that cause vertical spread in your groups. Speedy’s article addresses the many human and the hardware factors that can cause vertical.
  • Front Bag Tension–Vertical can happen if the front sand bag grips the fore-arm too tightly. If, when you pull the rifle back by hand, the fore-arm feels like it is stuck in the bag, then the front bag’s grip is too tight. Your rifle should move in evenly and smoothly in the sand bags, not jerk or chatter when you pull the gun back by hand.


 A while back, Sinclair International’s Reloading Press Blog featured a “round-table” discussion of reloading techniques. Sinclair’s team of tech staffers were asked: “What do you feel is the one-most crucial step in precision reloading?”


