Ever wondered what caused a particular bulge or marking on a case? And more importantly, does the issue make the case unsafe for further use? Sierra Bullets Ballistic Technician Duane Siercks offers some insight into various issues and their causes in two Case Diagnostic articles from the Sierra Blog.
Incipient Case-Head Separation
This is a Winchester .308 Win case that has a real issue. This case has a very obvious incipient case head separation in the process of becoming a complete failure.
This is most commonly caused by over-sizing the case causing there to be excess headspace on the case. After a few firings and subsequent re-sizing, this case is just about ready to come completely apart. Proper die adjustment is certainly a requirement here. Of course this case is not safe to reuse.
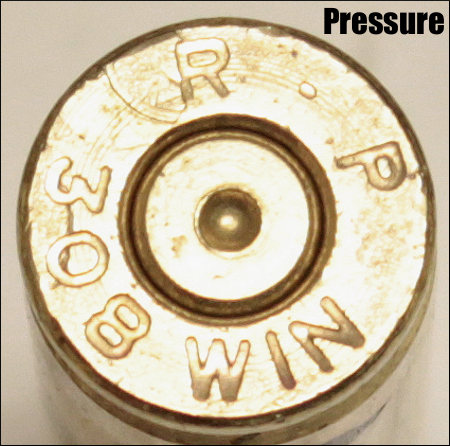
Excessive Pressure (Load Too Hot)
If you will notice in the picture of the case rim, there are two pressure signs to notice. First, look at the primer. It is basically flattened to about the max of what could be considered safe. If this was the only pressure sign noted, I would probably be fine with this load, but would constantly keep an eye on it especially if I was going to use this load in warmer temperatures. This load could easily cross into the “excess pressure” realm very quickly.
There is another sign of pressure that we cannot ignore. If you’ll notice, there is an ejector mark apparent that is located over the “R” of the R-P headstamp. This absolutely tells us that this load would not have been in the safe pressure range. If there were any of these rounds loaded, they should not be fired and should be dis-assembled. This case should not be reloaded.
Split Case-Neck
Here we have an R-P .22-250 case that has died the death. Everything looks fine with this case except the neck is split. This case must be tossed.
A split neck is a normal occurrence that you must watch for. It is caused by work-hardening of the brass. Brass cases get harder with age and use. Brand new cases that are stored for a period of time can become hard enough that they will split like this case within one to two firings. I have had new factory loads do the same thing. Then as we resize and fire these cases repeatedly, they tend to get harder and harder. Eventually they will split. The life of the case can be extended by careful annealing practices. This is an issue that would need to be addressed in an article by itself. Of course this case is no longer usable.
In the classes that I teach, I try to use examples like this to let the students see what they should be looking for. As always, if we can assist you, whether you are new to reloading or very experienced, contact us here at Sierra Bullets by phone at 1-800-223-8799 or by email at sierra@sierrabullets.com.
Dented Case Body
Here we have a Lake City 7.62×51 (.308 Win.) case with two heavy marks/dents in the case body.
This one may be a bit of a mystery. It appears as if this case may have been caught in the action of a semi-auto rifle when the firearm jammed or the case failed to clear during the cycling process. I probably would not reload this case just to prevent any feeding problems. This also appeared to be a factory loaded round and I don’t really see any pressure issues or damage to the case.
Multiple Problems — Lake City 5.56×45 unknown year.
This case has suffered multiple failures and cannot be re-used. First its has have a very rounded shoulder that is split. Upon first look it was obvious that this round had been a victim of excess pressure. The firearm (perhaps an AR?) was apparently not in full battery, or there was possibly a headspace issue also. While taking a closer look, the primer was very flat and the outside radius of the primer cup had been lost. High pressure! Then I also noticed that there was an ejector mark on the case rim. This is most certainly an incident of excessive pressure. This case is ruined and should be discarded.
It is very important to observe and inspect your cases before each reloading. After awhile it becomes second nature to notice the little things. Never get complacent as you become more familiar with the reloading process. If ever in doubt, call Sierra’s Techs at 1-800-223-8799.
The Shooting Sports USA website includes two excellent articles about the basics of metallic cartridge reloading. These two articles provide an excellent summary of the key procedures. If you are new to reloading, we recommend you read both articles:
Part II is particularly helpful because it explains the entire reloading process step-by-step, with 14 listed steps. The author notes: “In this, the second installment on metallic cartridge reloading, we’ll follow the sequence of steps involved in reloading a rifle cartridge and refining a metallic cartridge load. These steps are based on the use of a single-stage reloading press and a separate priming tool.”
Much important advice is provided as this article runs through the 14 Steps of Reloading. For example, when explaining Step 13, Bullet Seating, the article states:
“Proper seating depth is critical. Too much bullet protrusion and the cartridge may not work through the gun’s magazine, or it may fail to chamber. Too little and the bullet intrudes excessively into the powder chamber, decreasing volume and raising pressure. Neck tension is also important; any bullet that fails to seat with some resistance may be held only loosely by the neck and may be driven back into the case when the round is chambered, especially in semi-automatic arms.”
Important Guide to Detecting Over-Pressure Signs in Brass
As an example of the invaluable advice provided in these two articles, here’s a sample from Part II that explains how to determine if your load is over-pressure. We recommend that EVERY reader read this twice. There are more things to consider than a stiff bolt lift. You need to inspect cartridges very carefully:
When neck-turning cases, it’s a good idea to extend the cut slightly below the neck-shoulder junction. This helps keep neck tension more uniform after repeated firings, by preventing a build-up of brass where the neck meets the shoulder. One of our Forum members, Craig from Ireland, a self-declared “neck-turning novice”, was having some problems turning brass for his 20 Tactical cases. He was correctly attempting to continue the cut slightly past the neck-shoulder junction, but he was concerned that brass was being removed too far down the shoulder.
Craig writes: “Everywhere I have read about neck turning, [it says] you need to cut slightly into the neck/shoulder junction to stop doughnutting. I completely understand this but I cant seem to get my neck-turning tool set-up to just touch the neck/shoulder junction. It either just doesn’t touch [the shoulder] or cuts nearly the whole shoulder and that just looks very messy. No matter how I adjust the mandrel to set how far down the neck it cuts, it either doesn’t touch it or it cuts far too much. I think it may relate to the bevel on the cutter in my neck-turning tool…”
Looking at Craig’s pictures, we’d agree that he didn’t need to cut so far down into the shoulder. There is a simple solution for this situation. Craig is using a neck-turning tool with a rather shallow cutter bevel angle. This 20-degree angle is set up as “universal geometry” that will work with any shoulder angle. Unfortunately, as you work the cutter down the neck, a shallow angled-cutter tip such as this will remove brass fairly far down. You only want to extend the cut about 1/32 of an inch past the neck-shoulder junction. This is enough to eliminate brass build-up at the base of the neck that can cause doughnuts to form.
The answer here is simply to use a cutter tip with a wider angle — 30 to 40 degrees. The cutter for the K&M neck-turning tool (above) has a shorter bevel that better matches a 30° shoulder. There is also a 40° tip available. PMA Tool and 21st Century Shooting also offer carbide cutters with a variety of bevel angles to exactly match your case shoulder angle*. WalkerTexasRanger reports: “I went to a 40-degree cutter head just to address this same issue, and I have been much happier with the results. The 40-degree heads are available from Sinclair Int’l for $15 or so.” Forum Member CBonner concurs: “I had the same problem with my 7WSM… The 40-degree cutter was the answer.” Below is Sinclair’s 40° Cutter for its NT-series neck-turning tools. Item NT3140, this 40° Cutter sells for $14.99. For the same price, Sinclair also sells the conventional 30° Cutter, item NT3100.
Al Nyhus has another clever solution: “The best way I’ve found to get around this problem is to get an extra shell holder and face it off .020-.025 and then run the cases into the sizing die. This will push the shoulder back .020-.025. Then you neck turn down to the ‘new’ neck/shoulder junction and simply stop there. Fireforming the cases by seating the bullets hard into the lands will blow the shoulder forward and the extra neck length you turned by having the shoulder set back will now be blended perfectly into the shoulder. The results are a case that perfectly fits the chamber and zero donuts.”
After purchasing a new set of dies from Forster, Hornady, Redding, or Whidden Gunworks, you’ll want to disassemble the dies, inspect then, and then remove the internal grease and/or waxy coatings placed on the dies by the manufacturer. Below are two videos that show how to de-grease and clean dies as they come “out of the box” from the manufacturer. The videos also explain how to clean your dies after regular use. Cleaning your dies helps remove carbon, brass shavings, lube residues and other stuff that can get inside the dies.
In the first video, from Creedmoor Sports, Bill Gravatt (Creedmoor’s President) shows various methods for cleaning dies both when new and after they have accumulated carbon and lube after use. This video is definitely worth watching. In the second video, a Hornady technician shows the method for degreasing dies before first use. A convenient aerosol spray cleaner is used in the video. You can also use a liquid solvent with soft nylon brush, and cotton patches. NOTE: After cleaning you may want to apply a light grease to the external threads of your dies.
Creedmoor Sports Die Cleaning Video with Bill Gravatt
Hornady Video Showing Aerosol Cleaner
Clean Your Sizing Dies and Body Dies Regularly
These same techniques work for cleaning dies after they have been used for reloading. Many otherwise smart hand-loaders forget to clean the inside of their dies, allowing old case lube, gunk, carbon residue, and other contaminants to build up inside the die. You should clean your dies fairly often, particularly if you do not tumble or ultrasound your cases between loadings. It is most important to keep full-length sizing and body dies clean. These dies accumulate lube and carbon residue quickly.
Product Review by F-Class John
Case preparation is critical for precision reloading. One must trim cases, debur/chamfer case mouths, clean necks, spruce up primer pockets and do other important tasks. Complete case prep can involve many separate processes, each requiring its own tools. With each of those tools comes additional cost as well as the need for more storage and bench space. To make case prep easier, faster, and more convenient Lyman created the Case Prep Xpress (#ad). The Case Prep Xpress, introduced a few years back, combines up to five prep stages into one well-built, stable, versatile unit. Watch this video to see the machine in action:
The Case Prep Xpress features five (5) independently-turning spindles all with the common 8/32 thread. This allows you to attach multiple tools supplied with the unit PLUS many other screw-on prep tools. For our testing we started out using a variety of the 12 included tools and found they cover the majority of case prep tasks. Lyman supplies deburr and chamfer tools, pocket uniformers, reamers and cleaners, as well as an assortment of neck brushes.
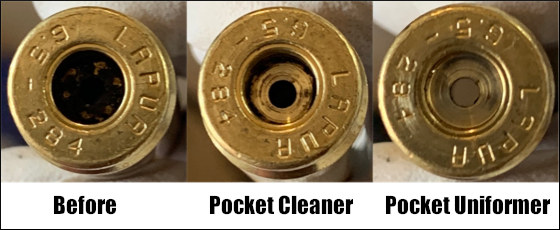
The deburr and chamfer tools worked really well, creating beautiful bevels all while leaving a nice flat edge across the top of the neck which is critical for accuracy and brass life. We found the primer pocket cleaning tool did a good job, but for truly clean pockets we recommend using the primer pocket uniforming tool, which very efficiently removes even hard residues.
The benefit of having interchangeable heads is that you can add your own accessories. We like to use a bore brush with bronze wool wrapped around it for use inside our necks. This worked perfectly once we screwed it in. In fact, we couldn’t think of any 8/32-threaded accessory that wouldn’t work well on this machine. Another great design feature is how all the accessories are oriented straight up. This allows for perfect visual alignment of your cases onto the tools which is critical — especially when performing cutting operations such as primer pocket uniforming.
Along with the five power stations there are six female-threaded storage spots on the sides where tools can be placed to ensure they don’t get lost. We like this feature since there will be more than five accessories you want to use and having them easily available is a great feature. You can keep 11 tools right on the machine (5 on top, 6 on the sides). That way you don’t have to dig through storage bins.
The Case Prep Xpress has a removable front bin to hold brass shavings, and there are two circular trays on either side of the bin. In front is a long tray that holds the provided brush. This makes it relatively easy to clean off brass shavings and other debris from case prep processes.
SUMMARY — Versatile Case Prep Xpress Is A Good Value
For the money, Lyman’s Case Prep Xpress is tough to beat. It performs multiple tasks well while being stable and easy-to-use. Yes there are some multi-spindle prep centers that offer variable or fast/slow RPM spindles while the Lyman’s spindles are all fixed RPM. (See, e.g. the RCBS Brass Boss). However those other systems don’t include all the convenient on-board storage of the Case Prep Xpress, and are typically more expensive. The Lyman Case Prep Xpress sells for about $170-$190 “street price”. It’s currently on sale for $179.99 on Amazon (#ad). This makes the Lyman Case Prep Xpress a fine value — it offers great versatility while saving space and saving money compared to buying five or more separate, powered tools.
As an Amazon affiliate, this site can earn revenues through sales commissions.
What can happen when the bottom-most primer in a primer feed tube goes off? A big bang, that’s what. Some or all of the primers in the vertical feeding tube can go off in a chain detonation. That’s exactly what happened to Dustin Ellermann, Top Shot Season 3 Champion. Scary experience, but thankfully Dustin was not injured. He writes: “Super thankful that I was wearing my Wiley X eye protection this weekend when I was reloading some .223 rounds. My press detonated nearly 100 small rifle primers. Shown here is the magazine feed tube. Not fun but it could have been much worse. Stay safe!”
When working with progressive reloading presses, you should definitely wear eye protection. Dustin’s chain detonation experience proves that — without a doubt. Remember you only have one set of eyes!
RCBS APS Strips — Alternative to Primer Tubes When you stack a column of primers in a single metal tube, you’re asking for trouble. As Dustin Ellermann learned, when one primer fires, the entire column can follow suit in a chain detonation. Thankfully, you do have options when it comes to primer feeding on a progressive press. RCBS developed an innovative, smart system with primers in horizontal plastic strips. Instead of being stored in a vertical tube, primers are placed in flat, plastic “APS” strips, with a ring of plastic separating each primer. Moving horizontally, primers are never stacked, so the chance of a chain detonation is reduced dramatically. The re-usable APS strips are color-coded for different primer types. You can buy CCI “pre-loaded” primer strips, or you can insert any brand of primers into strips using an RCBS strip-loader tool.
RCBS APS Strip Priming System This video shows how to use APS primer strips wiht a bench-mounted priming system.
AccurateShooter.com Editor Uses Strip Primers
This Editor owns an RCBS Pro-2000 progressive press. The RCBS strip-priming system was one key reason I selected the RCBS Pro-2000 over similar-priced progressives from Dillon and Hornady. I believe the strip primer system is safer, more positive, and easier to use. Before I purchased my RCBS progressive, I “road-tested” the competition. I loaded hundreds of rounds on each of four different progressives: Dillon 550B, Dillon 650, Hornady Lock-N-Load, and RCBS 2000. I was concerned about the primer feed tubes on the Dillons, and I found the RCBS rotary powder measure was much more precise (and easier to adjust) than the sliding bar system on the Dillon machines. The RCBS priming system was definitely more fool-proof than the system on the Hornady press (a first-generation L-N-L that had issues with primer feeding). After “test-driving” blue, red, and green brand progressives extensively, I settled on the RCBS Pro-2000. A decade later, I still think I made the right choice. I like the APS strips for big jobs, and I can also use them in the RCBS hand-priming tool (shown below). With the strips, it’s easy to prime 20 or 40 cases at a time, and then switch to another type of primer for comparison testing.
NOTE: Unfortunately, most of the RCBS APS system tools are no longer in production. But the tools and strips are still available on eBay and many reloading Forums, in some cases “new in box”. This Editor’s APS hand priming tool is still working great after 15 years.
The APS priming system also works with press-mounted priming tool, bench-mounted tool, and APS hand-tool. EdLongRange uses the press-mounted tool: “I also like the APS approach but use the press-mounted unit (saves your hands/wrists — and I haven’t had a need for a progressive press in over 20 years). Loading the primers in the strips is a bit of a PITA but very manageable. As with all tools there is a learning curve.” CLICK HERE for video showing strip-loading tool and press-mounted APS tool. The RCBS press-mounted tool is no longer in production by RCBS, but you can still find it in some stores or on eBay.
Here’s a simple task you can do that will give your seater die a more perfect fit to your match bullets. You can lap the inside of the seater stem so that it matches the exact profile of the bullet. This spreads out the seating force over a larger area of the bullet jacket. That allows smoother, more consistent seating, without putting dents, creases, or sharp rings in your bullets.
This process is demonstrated here by our friend Erik Cortina of Team Lapua-Brux-Borden. Erik, one of the nation’s top F-Class shooters and a skilled machinist, explains: “Here I’m lapping my new seater die stem with lapping compound. I chuck up a bullet in the lathe and lap the inside of the seating stem. I put lapping compound on the bullet and also in the stem. You can do the same with a hand drill and bore paste. You can see in the piture below how much contact area the stem has on the bullet after being lapped. This bullet is a Berger 7mm 180-grain Hybrid. ”
It can be helpful but it’s not necessary to make your seating stem an exact match to a bullet, particularly if you’re loading hunting or varmint rounds. But it is helpful to do some mild internal stem polishing. This should eliminate any ring (or dent) that forms on the bullet jacket during seating.
Sharp edges on a seating stem can cause a ring to be pressed into the bullet jacket — especially with compressed loads that resist downward bullet movement.
Q2: Is there any down-side to the process?
Not really. However, if you shoot many different bullet types for a particular cartridge, you may not want to conform the stem aggressively to one particular bullet design. Lightly lap the inside of the stem to remove burrs/sharp edges but leave it at that. A light lap will prevent a ring forming when seating bullets.
Many novice hand-loaders believe that neck bushing Inside Diameter (ID) size is the only important factor in neck tension. In fact, many different things will influence the grip on your bullet and its ability to release from the case neck. To learn more about neck tension and “case grip”, take the time to read this article carefully. We bet you’ll gain knowledge that will let you load more accurate ammo, with better ES/SD.
Editor: Guys, this is a VERY important article. You really should read it over carefully, twice. Variations in the force required to release a bullet can significantly affect accuracy and ES/SD. You really need to know how the grip on bullet can be altered by many different factors.
Neck Tension (i.e. Grip on Bullets) Is a Complex Phenomenon
While we certainly have considerable control over neck tension by using tighter or looser bushings (with smaller or bigger Inside Diameters), bushing size is only one factor at work. It’s important to understand the multiple factors that can increase or decrease the resistance to bullet release. Think in terms of overall brass-on-bullet “grip” instead of just bushing size (or the internal neck diameter in non-bushing full-length sizing dies).
Bullet grip is affected by many things, such as:
1. Neck-wall thickness.
2. Amount of bullet bearing surface (shank) in the neck.
3. Surface condition inside of neck (residual carbon can act as a lubricant; ultrasonic cleaning makes necks “grabby”).
4. Length of neck (e.g. 6mmBR neck vs. 6mm Dasher).
5. Whether or not the bullets have an anti-friction coating.
6. The springiness of the brass (which is related to degree of work-hardening; number of firings etc.)
7. The bullet jacket material.
8. The outside diameter of the bullet and whether it has a pressure ridge.
9. Time duration between bullet seating and firing (necks can stiffen with time).
10. How often the brass is annealed.
11. Amount (length) of neck sized (e.g. you can size only half the neck).
12. Interior diameter of bushing, or neck section of non-bushing die. – and there are others…
One needs to understand that bushing size isn’t the beginning and end of neck tension questions, because, even if bushing size is held constant, the amount of bullet “grip” can change dramatically as the condition of your brass changes. Bullet “grip” can also change if you alter your seating depth, and it can even change if you ultrasonically clean your cases.
6-time U.S. National Long-Range Champion John Whidden adds: “Our tests show us that the condition of the necks in regards to lubed or not, carbon inside or not, squeaky clean or not, etc., matter even more than the size of the bushing used. An ultrasonically cleaned or brand new dry case neck make for some quite high seating force.”
In our Shooters’ Forum a reader asked: “How much neck tension should I use?” This prompted a lengthy Forum discussion in which other Forum members recommended a specific number based on their experience, such as .001″, .002″, or .003″. These numbers, as commonly used, correspond to the difference between case-neck OD after sizing and the neck OD of a loaded round, with bullet in place. In other words, the numbers refer to the nominal amount of interference fit (after sizing).
While these commonly-used “tension numbers” (of .001″, .002″ etc.) can be useful as starting points, neck tension is actually a fairly complex subject. The actual amount of “grip” on the bullet is a function of many factors, of which neck-OD reduction during sizing is just one. Understanding these many factors will help you maintain consistent neck tension as your brass “evolves” over the course of multiple reloadings.
Seating Depth Changes Can Increase or Decrease Grip on Bullet
You can do this simple experiment. Seat a boat-tail bullet in your sized neck with .150″ of bearing surface (shank) in the neck. Now remove the bullet with an impact hammer. Next, take another identical bullet and seat it with .300″ of bearing surface in another sized case (same bushing size/same nominal tension). You’ll find the deeper-seated bullet is gripped much harder.
Neck-Wall Thickness is Important Too
I have also found that thinner necks, particularly the very thin necks used by many 6mm PPC benchrest shooters, require more sizing to give equivalent “grip”. Again, do your own experiment. Seat a bullet in a case turned to .008″ neckwall thickness and sized down .003″. Now compare that to a case with .014″ neckwall thickness and sized down .0015″. You may find that the bullet in the thin necks actually pulls out easier, though it supposedly has more “neck tension”, if one were to consider bushing size alone.
In practical terms, because thick necks are less elastic than very thin necks, when you turn necks you may need to run tighter bushings to maintain the same amount of actual grip on the bullets (as compared to no-turn brass). Consequently, I suspect the guys using .0015″ “tension” on no-turn brass may be a lot closer to the guys using .003″ “tension” on turned necks than either group may realize.
Toward a Better Definition of Neck Tension
As a convenient short-cut, we tend to describe neck tension by bushing size alone. When a guy says, “I run .002 neck tension”, that normally means he is using a die/bushing that sizes the necks .002″ smaller than a loaded round. Well we know something about his post-sizing neck OD, but do we really have a reliable idea about how much force is required to release his bullets? Maybe not… This use of the term “neck tension” when we are really only describing the amount of neck diameter reduction with a die/bushing is really kind of incomplete.
My point here is that it is overly simplistic to ask, “should I load with .001 tension or .003?” In reality, an .001″ reduction (after springback) on a thick neck might provide MORE “grip” on a deep-seated bullet than an .003″ reduction on a very thin-walled neck holding a bullet with minimal bearing surface in the neck. Bushing ID is something we can easily measure and verify. We use bushing size as a descriptor of neck tension because it is convenient and because the other important factors are hard to quantify. But those factors shouldn’t be ignored if you want to maintain consistent neck tension for optimal accuracy.
Consistency and accuracy — that’s really what this all about isn’t it? We want to find the best neck tension for accuracy, and then maintain that amount of grip-on-bullet over time. To do that you need to look not only at your bushing size, but also at how your brass has changed (work-hardened) with time, and whether other variables (such as the amount of carbon in the neck) have changed. Ultimately, optimal neck tension must be ascertained experimentally. You have to go out and test empirically to see what works, in YOUR rifle, with YOUR bullets and YOUR brass. And you may have to change the nominal tension setting (i.e. bushing size) as your brass work-hardens or IF YOU CHANGE SEATING DEPTHS.
Remember that bushing size alone does not tell us all we need to know about the neck’s true “holding power” on a bullet, or the energy required for bullet release. True bullet grip is a more complicated phenomenon, one that is affected by numerous factors, some of which are very hard to quantify.
Wouldn’t it be nice to have a print resource at your fingertips that has hundreds of true-size cartridge illustrations, plus technical descriptions of thousands of popular cartridge types? That could be a real time-saver. It’s no wonder this book is an Amazon category best-seller.
If you’re a serious shooter, the latest 7th Edition of the Ammo Encyclopedia belongs in your library. Released in late 2022, this 928-page book is probably the most comprehensive and up-to-date book in print covering current and obsolete cartridge and shotshell types. The Ammo Encyclopedia is a massive resource work with 100+ chapters, covering thousands of handgun, rifle, and shotgun cartridges from the past century and a half. This 928-page edition includes over 150 new cartridge profiles. An expanded Trademark Index lists contact information for all current ammunition manufacturers.
One of the best features is a full-color section with actual size drawings of over 320 current rimfire/centerfire cartridges and shotshells. You won’t find that many “life-size” cartridge drawings in one place even on the internet. Cartridge profiles and ballistic charts have been expanded to include many new factory cartridges. An updated Cartridge Index lists both the standard and alternate names for each cartridge in chronological order. The authors have even included air rifle pellets and historical images and charts. This 928-page softcover book is now $44.93 on Amazon.
Comments from guys who bought the book:
“This book contains a vast array of information on many modern and even obsolete ammunition. Definitely recommend for any modern reloader novice or experienced.” – Duggaboy460
“It’s a great reference book for individuals who reload their own ammunition. There is a lot more info in this Edition. Everyone who likes this information should have it in their library.” – Reloader
“I like the general and technical comments that are available for each and every cartridge. Information that predicts if a cartridge will stay in production for many more years or rapidly become obsolete.” – RSL1
Widener’s Reloading & Shooting Supply recently published a helpful introduction to reloading powders. Widener’s online Guide to Smokeless Powders shows the various types of powders, and explains how the differences in powder kernel/flake size and shape, and burn rate affect performance. We recommend you visit Widener’s website and read the Powder Guide in full.
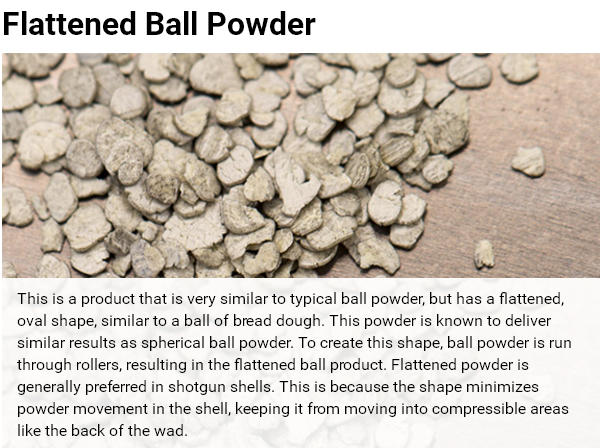
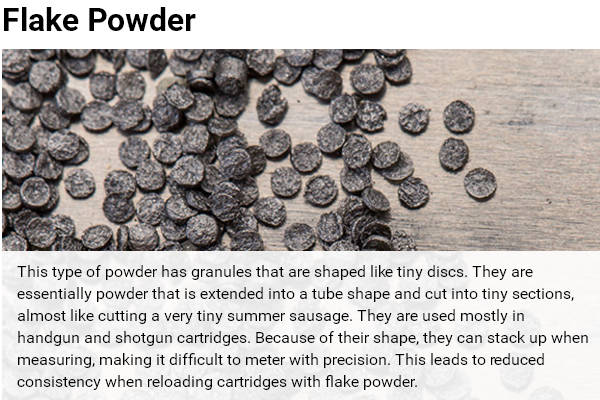
Take a close look at these illustrations which show the key differences between the four main powder types: extruded (stick) powder, ball (spherical) powder, flattened ball powder, and flake powder.
Burn Rate Basics
Widener’s Guide to Smokeless Powders also has a useful discussion of Burn Rate (a confusing topic for many hand-loaders). Wideners explains: “While a gun powder explosion in the cartridge seems instantaneous, if you slow it down you will actually find that each powder has a different ‘burn rate’, or speed at which it ignites.” This video shows powders with two very different burn rates. Watch closely.
Different burn rates suit different cartridge types notes Widener’s: “In general a fast-burning powder is used for light bullets and low-speed pistols and shotguns. Medium-rate powders are used for magnum pistols, while high-velocity, large bore rifle cartridges will need slow powders[.]
It should be noted that burn rate does not have a standardized unit of measurement. In fact, burn rate is really only discussed in comparison to other powders; there is no universal yardstick. Specifics will change by cartridge and bullet types[.]”


 When neck-turning cases, it’s a good idea to extend the cut slightly below the neck-shoulder junction. This helps keep neck tension more uniform after repeated firings, by preventing a build-up of brass where the neck meets the shoulder. One of our Forum members, Craig from Ireland, a self-declared “neck-turning novice”, was having some problems turning brass for his 20 Tactical cases. He was correctly attempting to continue the cut slightly past the neck-shoulder junction, but he was concerned that brass was being removed too far down the shoulder.


 When you stack a column of primers in a single metal tube, you’re asking for trouble. As Dustin Ellermann learned, when one primer fires, the entire column can follow suit in a chain detonation. Thankfully, you do have options when it comes to primer feeding on a progressive press. RCBS developed an innovative, smart system with primers in horizontal plastic strips. Instead of being stored in a vertical tube, primers are placed in flat, plastic “APS” strips, with a ring of plastic separating each primer. Moving horizontally, primers are never stacked, so the chance of a chain detonation is reduced dramatically. The re-usable APS strips are color-coded for different primer types. You can buy CCI “pre-loaded” primer strips, or you can insert any brand of primers into strips using an RCBS strip-loader tool.


 In our
  Neck-Wall Thickness is Important Too