For today’s Sunday GunDay story, we feature highlights from two in-depth reports on rifles built around the relatively new 6GT cartridge (also known as the “6mm GT”). Developed by George Gardner (G.A. Precision) and Tom Jacobs (Vapor Trail), the 6GT was designed to feed well from magazines, be more efficient than the 6mm Creedmoor, and offer outstanding accuracy. It is just enough bigger than the 6mmBR or 6 Dasher so it feeds better. But it retains many of the qualities of the 6mmBR (high efficiency and outstanding accuracy). Burning significantly less powder than the 6mm Creedmoor, the 6GT is a bit less expensive to shoot, and should, theoretically at least, deliver better barrel life.
“The [6GT] is a more predictable and barrel-friendly cartridge than the 6mm Creedmoor. It can utilize the accurate and forgiving powders of the 6BR, has fantastic accuracy, and due to its shoulder angle and case length, it doesn’t suffer from feeding issues.” — PewPewTactical.com
We should say that the 6 Dasher has been used very successfully in PRS/NRL competition, with some aftermarket magazine accessories. For this reason, if you already shoot a 6 Dasher, moving to a 6GT may not be worth the cost of new dies and new brass. A.J. Deysel, writing for LoadDevelopment.com, writes:
“The longer case of the 6mm GT means it feeds as reliably from a magazine as a 6mm Creedmoor, and offers slightly higher powder capacity and in turn velocities than the 6mmBR variants, whilst still being able to use the same accurate and forgiving propellants.
You will also find many competitive and average Joes shooting 6mmBR and 6mm Dashers with a Primal Rights or some other mag conversion kit, having very few if any mag-feed issues at all, so that pretty much also nullifies the need to move away from those [chamberings] if you already own one of those or the reloading equipment for it.” — LoadDevelopment.com
Part I: The 6GT Cartridge for Precision Rifle Competition
Report by Vu Pham
I was ready to build a 6 Dasher when I saw a lot of buzz… about a new caliber George Gardner (Owner of G.A. Precision) and Tom Jacobs (Owner of Vapor Trail Bullets) designed, the 6GT. After some research and talking to George, I ditched the 6mm Dasher build and had GA Precision build me a 6GT on a GAP Templar action I already had in the safe. The reasons to try the 6GT in a new PRS-style rig were as follows:
1. Push a 110-115 grain class bullet at 2880-2930 FPS safely in the Sacramento heat.
2. Achieve a load that is reliable and predictable. The caliber must be easy-to-tune and predictable from barrel to barrel. I don’t want to spend weeks developing a new load each time I spin on a fresh barrel.
3. Be able to run the same mag in all my guns without having to tweak or use mag kits. The round must feed from AICS and AW magazines without major tweaking or hiccups.
4. Get good barrel life. The barrel needs to go 2200-2500 rounds with match-grade reliability and accuracy.
5. Have a competitive cartridge with the least possible recoil without sacrificing too much performance down range, compared to bigger options like the 6mm Creedmoor.
6GT feeding from un-modified magazines has been flawless in all the rifles we tested. The 6GT feeds so well, I sometimes have to do a press check to ensure there is a round in the chamber.
On paper the 6GT seemed like the perfect cartridge for PRS- and NRL-style competition. It has the low recoil of a 6 Dasher, with good feeding and mag compatibility. With the 6GT, a competitor can push 105gr bullets at 3000+ FPS or run heavier bullets at 2800-2900+ FPS.
Knowing that I would initially have to make my own 6GT brass and do quite a bit of load development, I enlisted the help of Dan Bertocchini with CS Tactical. Dan has a lot more experience with wildcats and is the man when it comes to this type of data gathering. He has been running a 6 Dasher for a few years so I was curious how he would compare the 6GT to his 6 Dasher.
Quick Summary: “I am really digging the 6GT and the capabilities it offers. It can launch 103gr Vapor Trails at 3000+ FPS or lob heavy 115gr DTACs in the low-to-mid 2900s comfortably. I think we will see this cartridge go mainstream in PRS/NRL-style competition in 2020.” — Vu Pham
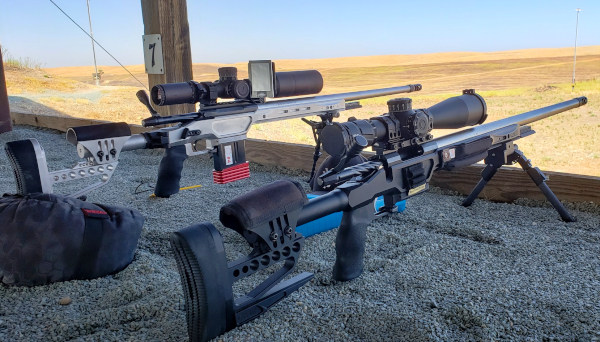
The new 6GT Cartridge Was Tested in Three (3) Tactical Rifles:
Rifle 1: Vu’s 6GT 1.0
Builder: GA Precision
Action: Left Hand GAP Templar (large firing pin)
Barrel: Bartlein 7.7 Twist finished at 26″ with a 419 Hellfire Brake
Stock: KMW Sentinel
Optic: Vortex Razor Gen II 4.5-27x56mm EBR-7C MRAD
Bi-Pod: Harris
Trigger: Timney Calvin Elite
Magazines: AICS and AW
Support Bag: Wiebad Fortune Cookie
Rifle 2: Vu’s 6GT 2.0
Builder: Rubicon Precision
Action: Impact Precision 737
Barrel: Bartlein 7.0 Twist finished at 27″ with a 419 Hellfire Brake
Stock: XLR Industries Envy Chassis
Optic: Vortex Razor Gen II 4.5-27x56mm EBR-7C MRAD
Bi-Pod: Harris with Henderson Arca adapter
Trigger: Trigger Tech Diamond
Magazines: AICS and AW
Support Bag: Wiebad Fortune Cookie
Rifle 3: Dan’s 6GT
Builder: CS Tactical
Chambered by: Rubicon Precision
Action: Lone Peak Arms Fusion
Barrel: Proof 7.0 Twist finished at 28″ with a Muzzle Brake and More Brake
Stock: XLR Industries Envy Chassis
Optic: Minox ZP5 5-25x56mm MR4
Bi-Pod: Arca Cyke Pod (PRS)
Trigger: Trigger Tech Diamond
Magazines: MDT
Support Bag: Armageddon Gear OG Game Changer, Waxed Canvas
Alpha Munitions Pre-Production 6GT Brass George Gardner was kind enough to send us 50 pieces of Pre-Production Alpha 6GT brass for preliminary testing. Like the cases I formed from 6.5×47 Lapua brass, the Alpha 6GT brass will use a small rifle primer. Purchased direct from Alpha Munitions, 6GT brass is now $1.30 per case, which is comparable with Lapua 6mm Creedmoor brass, currently $120.99/100 at Grafs.com.
The major difference between 6.5×47 Lapua-formed brass and Alpha 6GT brass is the case capacity. Alpha 6GT brass has 1.5 to 1.7 grains more case capacity. When a piece of 6.5×47 Lapua brass is formed into a 6GT, the walls of the case now become the shoulder and part of the neck. In a normal piece of brass, the shoulder and neck are typically thinner because of the thickness of the brass tapering from the body to neck.
While the cartridge design was optimized for Hodgdon Varget, the extra case capacity of the Alpha 6GT brass opens the door to Hodgdon H4350 (my favorite powder) and Alliant Reloder 16.
Test Results with Alpha Munitions 6GT Brass
Initial test results were as expected from a premium brass-maker. Dan and I both got excellent Standard Deviations and Extreme Spreads over my MagnetoSpeed V3 and his LabRadar. This string below was with 112gr Barnes Match Burners and 33.8 grains of Varget. Can’t complain about a 3 FPS Extreme Spread!
Yes, H4350 Works with the Alpha Munitions Brass
Personally, I prefer running Alpha 6GT brass with H4350 rather than Varget pushing a heavier bullet. H4350 burns slower and cleaner which should equate to better barrel life. The Lapua-formed 6GT cases just do not have the capacity to reach the cartridge’s full capability with the slower burning powders.
Is the 6GT cartridge accurate? Definitely. Here is a 5-shot group at 600 yards shot by Dan. This was Alpha 6GT brass, with Hodgdon H4350 pushing Barnes 112gr Match Burner bullets.
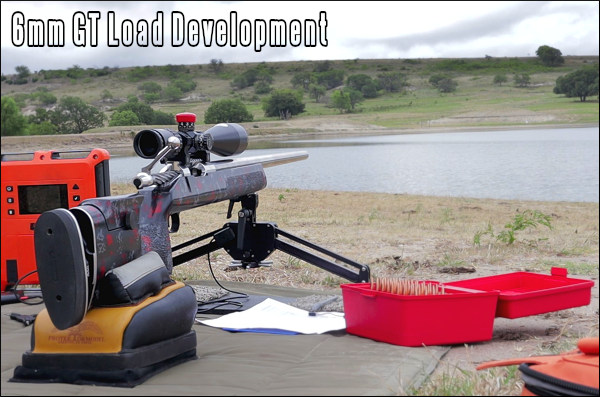
PART II — 6GT Load Development with Multiple Powders
This text is taken from a full report by Mike McCasland on his 6GT (aka “6mm GT”) bolt action rifle. This rig was designed for general use, not just for PRS/NRL matches. In his 6GT rifle, Mike tested multiple powders including Varget, H4350, Reloder 16, Reloder 15, Shooters World Precision, and Vihtavuori N140. For more details, CLICK HERE for full report.
About the 6mm GT Cartridge
BRASS — The first thing you’ll find is cartridge brass choices for the 6 GT are rather limited currently. At present, the only commercial options are Hornady and Alpha Munitions. For the die-hard Lapua fans, you can technically make 6mm GT brass from 6.5×47 Lapua, however that process is very labor-intensive.
I have used both Hornady and Alpha brass in this rifle and haven’t noticed much difference between the two. I will say that my batch of Alpha brass was slightly softer than Alpha brass I’ve used in other calibers; you could feel a difference when neck turning cases. I’m unsure if that’s a batch issue, or something specific to their 6mm GT brass as a whole. As far as performance, there was little discernable difference. Oddly enough, the Hornady brass seemed to have slightly less case capacity than the Alpha; with most other cartridges it’s the other way around.
POWDERS — The 6mm GT was designed with Hodgdon Varget in mind, and that popular powder works exceedingly well in this platform. That said, the 6mm GT can work with a wide variety of powders, some yielding better performance than Varget.
I’ve tried a multitude of powders during my initial 6mm GT load development: Varget, Shooters World Precision, RL16, VV N140, H4350, and RL-15 to name a few. In my barrel, Hodgdon H4350 seems to deliver the best velocity/accuracy combination. SD and ES also seemed to be the lowest with H4350.
Load Development for the 6mm GT — Many Powders Tested
BULLETS — The most common 0.120″ freebore chamber allows for the majority of high-BC 6mm projectiles found in both F-Class and PRS. I had good luck with the pointed 107gr Sierra Match Kings (SMK), as well as the 110gr Hornady A-Tips in my rifle. For those looking to run the heavier 112-115 grain 6mm offerings, I believe GAP designed a 0.160″ freebore reamer that gets those bullets out of the neck/shoulder junction. Shown below is the 0.120″ freebore JGS reamer print:
SUMMARY — Good Cartridge with Much Potential
Generally speaking, I think the 6mm GT is a good little round. Some may not subscribe to this theory, but I believe some cartridges are inherently easier to tune than others. I’m not sure the 6mm GT is as easy-to-tune as a 6mmBR, 6 Dasher, or 6 BRA, but I don’t think it lags that far behind.
With relatively little trouble, I was able to find loads with both Varget and H4350 that would consistently shoot very well — 0.2 to 0.3 MOA. Moreover, I found the 6GT cartridge lives up to the velocity claims made by G.A. Precision. I was easily able to push the 110gr A-Tips to 2950 FPS, and the 107gr SMKs to low 3000 FPS range without any pressure signs, or unnecessary wear and tear on the brass.
As a fun test, I ran my 6mm GT rifle in a local 1000-yard F-Class match with the 110gr A-Tips, just to see just how well they would perform. Although wind conditions of the day and some E-Target issues prevented my 6mm GT rig from getting the better of the larger 7mm and .30-Cal rifles, the 6mm GT proved itself an accurate little round at distance. Here is a 1000-yard ShotMarker target:
After putting several hundred rounds through my 6mm GT rifle, I anticipate building another 6GT on a repeater action to give PRS a try. I think if you are looking for a dual-purpose rifle that can run tactical matches (with 100% feeding reliability), and can also be used for mid-range, F-Open Class competition, the 6mm GT would be a very good option.
About the author, Mike McCasland:
Mike McCasland is an avid shooter who competes regularly in F-Class matches. Based in Texas, Mike is the creator of the Texas Precision YouTube Channel. There you’ll find many videos covering reloading, gun projects, and marksmanship. Mike has done some notable product reviews including a comparison test of Micrometer Competition Seating Dies. To access Mike’s YouTube Channel, CLICK HERE.
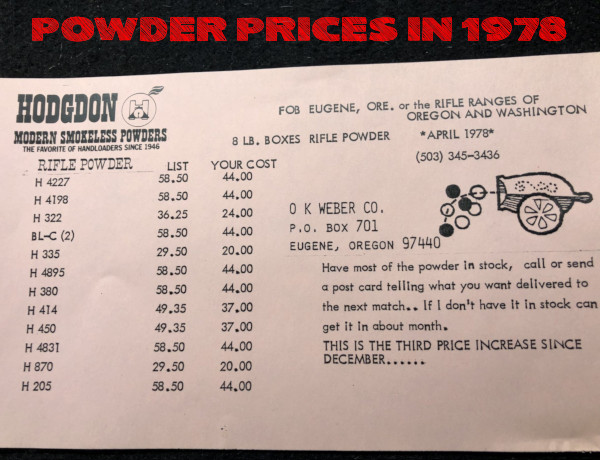
Have inflation (and supply chain shortages) affected the price of powder? You bet. Probably WAY more than you could imagine. Forum member “Two Time HM LR” posted this interesting photo (above) showing Hodgdon powder prices from 1978, as sold by O.K. Weber in Oregon.
Eight Pounders under $45.00 in 1978
Now the prices — $20 to $44 — may not get your attention at first. But take note that these numbers are for EIGHT pound containers. Yep eight-pounders were all under $45! For example, H4895 was $44 for 8 pounds back in 1978, 45 years ago. And H335 was $20 for eight pounds — that’s just $2.50 per pound!
These days a single pound of a desirable powder such as H4831 might cost $60+ at some stores IF you can find it at all. On Hodgdon’s web site, H4831 powder is priced at $54.99 per pound in August 2023. Using that current $54.99/lb figure, H4831 is now TEN times higher than it was in 1978, when H4831 cost $44 for 8 pounds, i.e. $5.50 per pound.
Here are some comments from our Forum Members:
“Heck those prices are just about the same as current ones, just a little smaller container now.” — Joe
“I’ve got some H4831 in a can marked ‘WWII Surplus Powder’ with a price tag of $2.75. We’ll never see that again either.” Rick in Oregon
“1978 prices and 2022 income would be nice. Unfortunately that doesn’t work. If you compare prices and income, powder cost about the same. You also have to discount the temporary gouging that we are seeing.” — Tmwinds
“So I used to buy gas for 10 cents per gallon and they’d pump it, check the oil, and clean the windshield.” — Pirate Ammo
One comment suggests that the powder price hike actually tracks general U.S. currency inflation over the last four decades. So perhaps powder price increases are not as bad as they seem, when compared to how all prices have risen since 1978:
“Using H4895 as a comparison basis at $58.50 (list price) in 1978 calculates it to $275 in todays money. Looking at Powder Valley prices it looks like around [$340 in August 2023] for the same item in todays money [a 24% increase in real dollars]. Availability is another issue though and if someone is really needing powder they may well have to pay above suggested retail.” — Drover
L.E. Wilson Case Gage Depth Micrometer Tool Hands-On Tool Review by F-Class John
Are you looking for a better way to measure shoulder bump when sizing brass? When it comes to measuring your shoulder bump there has traditionally been just one way to do it and that’s with a set of calipers and some type of tool attached to a calipers jaw which contacts the case shoulder. While this method has worked well for decades there’s always been some inherent lack of consistency and repeatability. While a minor issue, the inability to get the exact number in completely dependent on the user’s pressure applied and the angle at which the jaws push on the brass.
Enter the L.E. Wilson Case Gage Depth Micrometer with its simple but effective use of Wilson case gauges to ensure a perfect measure of shoulder bump every time. The unit comes with the micrometer top as well as a check gauge which allows you to easily calibrate the micrometer whenever needed. On top of the micrometer unit, you’ll also need to purchase the appropriate case gauges for each of your cartridge types and then you’re ready to go. No other measuring instruments are needed (yep, no calipers are required).
Using the Wilson Depth Micrometer (perhaps a better name is Shoulder Bump Micrometer) is a straightforward process. Simply take your fired brass and insert it into the case gauge and place the micrometer top onto the primer side of the gauge. While holding the micrometer top firmly against the case gauge in one hand, slowly turn the micrometer until you feel it stop. You can back off and turn it again to verify the stop point and once you have it, look at the measurement on the micrometer. Now insert a sized piece of brass and repeat the procedure. Take note of the new number and subtract it from the fired brass number and you now have an exact amount of shoulder bump. Continue to adjust your sizing die until you have the correct amount of shoulder bump and you’re ready to size all your brass.
Watch Video to See how Shoulder-Bump Measuring Micrometer Tool Works
Guys, in this case a VIDEO is worth more than a thousand words. It may not be obvious from the photos how this system works. In fact, it is fast and easy. Drop brass into cartridge-specific case gauge, then put the Micrometer unit on top, and dial to touch. The video shows how this works.
SUMMARY — Tool is Fast, Precise, Repeatable, and Easy to Use — We Like It
The beauty of this tool is the simplicity with which it works. It uses a very accurate micrometer to simply measure how much further your brass is sitting forward inside the case gauge. After a couple uses, you’ll find that this tool is fast, accurate and incredibly repeatable. That gives you confidence that your brass is being sized properly. Ultimately, I found that using the micrometer top really became a joy as I set up a new set of dies and as I sized my brass, I could easily check the consistency as brass came off my press. If you’re looking to improve your sizing game, give the L.E. Wilson Case Gage Depth Micrometer a try. MSRP is $130.00.
Even with high-quality brass from Lapua, Peterson, Norma, Alpha and RWS, occasionally you may find one or two cases per box which have a small flake or obstruction in the flash-hole. This will appear like a thin crescent on one side of the flash hole (see photo). You should inspect ALL new brass before loading to identify any pieces with a partially-obstructed flash hole. It’s a good idea to remove any flake or thin crescent left as an artifact of the flash-hole forming process. Because the flash-hole itself is normally centered and of the correct diameter, it is not necessary to ream the flash-hole to a larger diameter. All you really need to do is remove the small obstruction(s). This can be done quickly with inexpensive tools.
Use a Small Pin Vise to Remove Flash-Hole Obstructions
Folks have asked if there is a tool that can remove obstructions from a Lapua small, BR-sized flash hole without opening the hole size. The Lapua PPC/BR flash hole is spec’d at 1.5mm, which works out to 0.059055″. Most of the PPC/BR flash-hole uniforming tools on the market use a 1/16″ bit which is nominally 0.0625″, but these often run oversize — up to 0.066″.
If you want to just clear out any obstructions in the flash hole, without increasing the flash hole diameter, you can use an inexpensive “pin vise” with an appropriate drill bit. For $0.99 ($0.50 on sale), eHobbyTools.com sells a 1.5mm drill bit, item 79186, that matches the Lapua flash hole exactly. Other vendors offer a #53 pin vise drill bit that measures .0595″ or .060″ (depending or source). An 0.0595″ bit is close enough. You can find pin vises and these small-diameter drill bits at hobby stores.
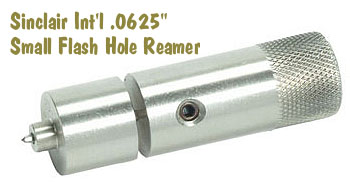
For quite some time, Sinclair Int’l has sold a similar device for small (PPC and BR-size) flash holes. Like the 07-3081 unit for large flash holes, the 073000 Reamer for small flash holes works from the outside, so it can index off the primer pocket. It reams to .0625″, and also costs $29.99. The standard dimension for Lapua 220 Russian and 6mmBR flash holes is 1.5mm or .0590″. This tool will permit standard-size decapping rods with .0625″ tips to work without binding. However, note that both Forster and Redding normally supply .057″ decapping pins with their PPC and BR dies. So, it is NOT necessary to ream your Lapua BR/PPC flashholes, unless you prefer to do so for uniformity. It IS, however, a good idea to check BR/PPC flash holes for burrs before loading the first time.
NOTE: If you purchase either the 073081 or 073000 Sinclair Flash Hole Reamer tools, we recommend you mic the cutter tip before you process a bunch of cases. Sometimes a tip comes through that is oversize. This will ream the flash holes larger than you may intend.
Here’s something all shooters need — a smartphone App that calculates bullet-hole group sizes from your own photos. The Ballistic-X App is simple to use. Take a photo of your target, set some values (such as bullet diameter and distance to target), then use the touchscreen to place circles around each hole. The App will calculate group size (in MOA or Mils), distance to point of aim, and provide all the info in an overlay. Then click “save” to record your group for posterity!
This App works well, is relatively easy to set-up, and costs just $7.99. It is available for both Android devices and iOS (Apple) devices. There are other ways to measure group sizes from target images, such as the excellent On-Target program, which we have used for years. However On-Target requires a software installation on a Windows platform desktop or laptop. Ballistic-X is a simple, easy-to-install App with versions for both Android and iOS (Apple) Mobile devices.
The Ballistic-X App has a relatively easy-to-use interface. Of course you can choose either MOA or Milrad group values, and Inch or Metric dimensions. There are various labeling options that provide useful info for Load Development. There is even an ATZ (Adjustment To Zero) feature for adjusting your turrets.
How to Use Ballistic-X App
1. Select Photo Source — Choose Camera to take new photo or get image from Photo Library.
2. Set Reference Values — Select Bullet Diameter and enter Distance to Target.
3. Establish Scale on Image — Mark two points on target photo to set scale. For example, if the target has a 1″-square grid lines, mark two points on grid for 1″ distance.
4. Mark Point Of Aim — Put the central X on the aim point.
5. Designate Shot Locations — Place the green circles around each shot.
6. Finalize Data Display — Position Overlay, select size/color options, and export file.
Android Options — Range Buddy FREE App
Along with Ballistic-X, there is another Mobile App, Range Buddy, that also measures shot groups. Range Buddy is currently offered for Android devices only. It is FREE, but has adverts. Range Buddy isn’t bad, but users complained about the program crashing, and there are compatibility issues with newer phones. We recommend you pay $7.99 and stick with Ballistic-X.
Sierra Bullets has published load data for the 6mm Creedmoor cartridge, a necked-down version of the popular 6.5 Creedmoor. Sierra has released very comprehensive 6mm Creedmoor load data, covering fifteen (15) different bullets from 55 to 110 grains. NOTE: Hornady-brand brass was used for Sierra’s 6mm Creedmoor load tests, not the newer, stronger Lapua 6.5 CM brass with small primer pockets. Hand-loaders using Lapua 6.5 Creedmoor brass necked to 6mm may have to adjust their loads.
Sierra writes: “As soon as the 6.5 Creedmoor was released in 2007, a 6mm version was being envisioned. After the 6mm Creedmoor demonstrated its worth at 1000 yards it began to catch the attention of Precision Rifle Series (PRS) competitors. The 6mm Creedmoor is a great fit for those looking for an AR platform-friendly cartridge. It delivers velocities very similar to the .243 Win and yet fits the AR10 magazine length[.] The 30-degree shoulder makes this a very efficient case and helps prolong case life as well. The 6mm Creedmoor works well with powders such as H4350, [RE-16], RE-17, and Ramshot Hunter for heavier long-range bullet weights. Slightly faster powders such as RE-15, Win 760, and Vihtavuori N540 work well with lighter weight bullets.”
Sierra Bullets Tested for 6mm Creedmoor Load Data
55gr BlitzKing (#1502)
60gr HP (#1500)
70gr HPBT (#1505)
70gr BlitzKing (#1507)
75gr HP (#1510)
In developing its 6mm Creedmoor load data, Sierra tested a very wide selection of propellants, two dozen overall. For the smaller bullets, fast-burning powders such as Benchmark, H4895, and CFE223 were tested. For the heavier 100+ grain bullets, Sierra tested a selection of medium-burn-rate powders including H4350, Reloder 16, Reloder 17, Varget, and Superformance. Sierra did a very thorough job. We know this information will be welcomed by 6mm Creedmoor shooters.
Don’t know what powder to try first? For the 107-110 grain bullets, if you want best accuracy and low ES/SD, our Forum members recommend Alliant Reloder 16 and Hodgdon H4350. If you are seeking max velocity with the 110-grainer, look at Hodgdon Superformance and Reloder 19.
Here are Sierra’s 6mm Creedmoor Load Data Charts for 90-95 grain bullets plus the 107gr MK and 110gr MK. There are five other tables for other bullet types.
BONUS: PRB 6mm Creedmoor and 6.5 Creedmoor Load Survey
The Precision Rifle Blog compiled Load Data from PRS Competitors, for both 6mm Creedmoor and 6.5 Creedmoor. This is a good place to start. PRB surveyed the match loads for “173 of the top-ranked precision rifle shooters in the country”. One cautionary note: These PRS guys may be loading fairly hot, so work up gradually, 0.3 grains at a time. CLICK HERE.
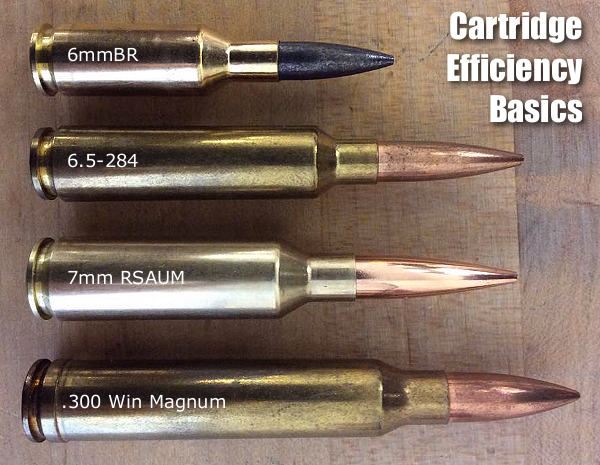
Efficient cartridges make excellent use of their available powder and case/bore capacity. They yield good ballistic performance with relatively little recoil and throat erosion.
Cartridge Efficiency: A Primer (pun intended!)by USAMU Staff
The U.S. Army Marksmanship Unit (USAMU) published a series of reloading articles on its Facebook Page. In this article, the USAMU discusses cartridge case efficiency and its benefits. While this is oriented primarily toward NRA High Power Rifle and Long Range (1000-yard) competition, these factors also apply to medium/big game hunters. Assuming one’s rifle and ammunition are accurate, key considerations include ballistic performance (i.e., resistance to wind effects, plus trajectory), recoil, and throat erosion/barrel life.
Efficient cartridges make excellent use of their available powder and case/bore capacity. They yield good ballistic performance with relatively little recoil and throat erosion. A classic example in the author’s experience involved a featherweight 7x57mm hunting/silhouette rifle. When loaded to modern-rifle pressures, just 43-44 grains of powder pushed a 139gr bullet at 2900 fps from its 22” barrel. Recoil in this light rifle was mild; it was very easy to shoot well, and its performance was superb.
An acquaintance chose a “do everything” 7mm Remington Magnum for use on medium game at short ranges. A larger, heavier rifle, it used ~65 grains of powder to achieve ~3200 fps with similar bullets — from its 26″ barrel. Recoil was higher, and he was sensitive to it, which hampered his shooting ability.
Similarly efficient calibers include the 6mm BR [Norma], and others. Today’s highly-efficient calibers, such as 6mm BR and a host of newer developments might use 28-30 grains of powder to launch a 105-107gr match bullet at speeds approaching the .243 Winchester. The .243 Win needs 40-45 grain charges at the same velocity.
Champion-level Long Range shooters need every ballistic edge feasible. They compete at a level where 1″ more or less drift in a wind change could make the difference between winning and losing. Shooters recognized this early on — the then-new .300 H&H Magnum quickly supplanted the .30-06 at the Wimbledon winner’s circle in the early days.
The .300 Winchester Magnum became popular, but its 190-220gr bullets had their work cut out for them once the 6.5-284 and its streamlined 140-142gr bullets arrived on the scene. The 6.5-284 gives superb accuracy and wind performance with about half the recoil of the big .30 magnums – albeit it is a known barrel-burner.
Currently, the 7mm Remington Short Action Ultra-Magnum (aka 7mm RSAUM), is giving stellar accuracy with cutting-edge, ~180 grain bullets, powder charges in the mid-50 grain range and velocities about 2800+ fps in long barrels. Beyond pure efficiency, the RSAUM’s modern, “short and fat” design helps ensure fine accuracy relative to older, longer cartridge designs of similar performance.
Recent design advances are yielding bullets with here-to-fore unheard-of ballistic efficiency; depending on the cartridge, they can make or break ones decision. Ballistic coefficients (“BC” — a numerical expression of a bullet’s ballistic efficiency) are soaring to new heights, and there are many exciting new avenues to explore.
The ideal choice [involves a] balancing act between bullet BCs, case capacity, velocity, barrel life, and recoil. But, as with new-car decisions, choosing can be half the fun!
Factors to Consider When Evaluating Cartridges
For competitive shooters… pristine accuracy and ballistic performance in the wind are critical. Flat trajectory benefits the hunter who may shoot at long, unknown distances (nowadays, range-finders help). However, this is of much less importance to competitors firing at known distances.
Recoil is an issue, particularly when one fires long strings during competition, and/or multiple strings in a day. Its effects are cumulative; cartridges with medium/heavy recoil can lead to shooter fatigue, disturbance of the shooting position and lower scores.
For hunters, who may only fire a few shots a year, recoil that does not induce flinching during sight-in, practice and hunting is a deciding factor. Depending on their game and ranges, etc., they may accept more recoil than the high-volume High Power or Long Range competitor.
Likewise, throat erosion/barrel life is important to competitive shooters, who fire thousands of rounds in practice and matches, vs. the medium/big game hunter. A cartridge that performs well ballistically with great accuracy, has long barrel life and low recoil is the competitive shooter’s ideal. For the hunter, other factors may weigh more heavily.
Cartridge Efficiency and Energy — Another Perspective
Former Lapua staffer Kevin Thomas explains that efficiency can be evaluated in terms of energy:
“Cartridge efficiency is pretty straight forward — energy in vs. energy out. Most modern single-based propellants run around 178-215 ft/lbs of energy per grain. These figures give the energy potential that you’re loading into the rifle. The resulting kinetic energy transferred to the bullet will give you the efficiency of the round. Most cases operate at around 20-25% efficiency. This is just another way to evaluate the potential of a given cartridge. There’s a big difference between this and simply looking at max velocities produced by various cartridges.”
A good case trimmer is an essential tool for precision hand-loading. To ensure consistent loads, you want your cases to be the exact same length. Today’s Saturday Showcase features five trimming tools, both powered and manually operated, that can trim your sized brass with great precision. In addition, some of these tools will also chamfer case necks inside and out. The powered case trimmers will save you considerable time (and effort) when working will large batches of brass.
Lead photo shows the Henderson Gen 2 trimmer from Panhandle Precision video review.
Henderson Gen 3 Power Trimmer — Ultimate Reloader Review
Gavin Gear of UltimateReloader.com has tested the impressive Henderson Gen 3 (V3) Trimmer. You’ll find a full write-up on Gavin’s website, and you can watch Gavin’s 18.7-minute video review above.
Gavin states: “The Henderson Gen 3 case trimmer is built on an adjustable tri-trim 3-way cutter with different pilots to accommodate different case necks. Three-way cutters trim to length and chamfer the inside and outside all at once. This trimmer has a 1700 RPM spindle and a custom DC motor made in the USA. The Henderson trimmer works much like a milling machine. You do not need much torque because of the way the taper works. The Henderson Gen 3 trimmer delivered outstanding cartridge length consistency after trimming. This trimmer is fast and easy to use and most importantly, returns consistent results.”
CLICK HERE for Henderson Gen 2 Trimmer video review, which shows how to how to set trim length and change cutter heads, using 6.5×47 Lapua, .260 Remington, and .300 Winchester Magnum cases.
Giraud Power Case Trimmer — Full Review by Erik Cortina
In this video, Erik Cortina of CortinaPrecision.com offers some very clever and useful tips that will help you get the most from your Giraud powered case trimmer. The Giraud trimmer is very precise. When set up correctly, it can trim brass with amazing consistency.
In the video, Erik trims 5 pieces of brass in 15 seconds (6:32 mark). He then measures all five with precision calipers (7:00-8:08). All lengths are exact within .0005 (half a thousandth). Erik notes that the Giraud trimmer indexes off the case shoulder. As long as you have fire-formed brass with consistent base-to-shoulder dimensions, you should get very consistent trim lengths.
Lyman Powered Case Trimmer Review
The Lyman Case Trim Xpress is an efficient, precise unit that allows easy adjustment of trim length with a click-adjustable collar. The trimmer comes with a set of cartridge-specific bushings that index off the case shoulder. One nice feature is a variable speed control. For the price, $146.20 on Amazon, this trimmer delivers excellent performance. To see more details, check out F-Class John’s video review of the Lyman Case Trim Xpress which shows set-up and operation.
Frankford Arsenal Universal Case Trimmer (for Power Drills)
This video features a handy tool that attaches to a portable drill. Used with various diameter collets, this can trim most popular sizes of shouldered brass. The universal collet system indexes on case shoulders for precise and consistent trimming (this does NOT work with straight-walled cartridges). The built-in depth micrometer allows for quick and precise micro-adjustments. There is a handy brass shaving ejection port. The system works well, particularly if you can stabilize your power drill in one position. This Frankford Arsenal trimmer, under $65.00 on Amazon, is an affordable alternative to the top-end powered case trimmers. It comes with a handy plastic case that holds the trimmer and collets.
L.E. Wilson Manual Case Trimmer
L.E. Wilson, makers of hand dies, case trimmers and other precision reloading tools, has videos whoe Wilson stainless steel case trimmer with micrometer adjustment (photo below). The first video explains the operation of the Wilson trimmer and shows how to initially assemble the tool, attach the handle, and set the cut length.
This second video shows how to set up the stainless Wilson trimmer with micrometer cut-length control. The micrometer feature allows you to set the cartridge overall trim length with great precision. If you are trimming a variety of different cartridge types, the micrometer cut length control comes in very handy.
BONUS Video: How Important is Consistent Case Length?
This Primal Rights video explains why it is important to maintain precise case lengths if you want best accuracy and most consistent ES/SD. You’ll want to size your cases BEFORE trimming if your trimmer indexes off the case shoulders.
Here’s a handy new item, particularly if you load large quantities of bulk ammo for a variety of firearms. Lyman’s new Ammo Checkers check the diameters of reloaded rounds and factory ammo, so you can quickly confirm that your ammo fits a standard chamber. Just drop your loaded rounds in the Ammo Checker, and if the round fits into the gauge, it will fit in the gun’s chamber.
Lyman Ammo Checkers are multi-caliber — each orange block checks six or eight different cartridge types, with each caliber/cartridge name engraved on the gauge. Ammo Checkers are machined to SAAMI minimum chamber dimensions from solid blocks of 6061 T6 aluminum. Ammo Checkers are available in three versions covering most common handgun and rifle calibers:
Handgun Ammo Checker (#7833000) $35.99 at Brownells
Fits: 380 Auto, 9mm Luger, 38 Super, 40 S&W, 45 ACP, 38/357, 44 Spl/Mag, and 45 Colt
Why Use a Case Gauge?
We find that case gauges like the Lyman Ammo Checker are particularly useful for handgun reloaders using progressive presses. The chambers of many popular semi-auto pistols are partly unsupported. This allows the case to swell in the bottom quarter. The case may not be sized adequately by your sizing die, which can lead to misfeeds or malfunctions.
Additionally, if you have loaded a large quantity of ammo for a semi-auto rifle such as an AR15, it’s not a bad idea to check your cartridges before you load them into your magazines. All you need is one mis-sized round to cause a stoppage. That will ruin your day if you are competing in a Service Rifle match or 3-Gun event.
At the request of our readers, we provide select “Deals of the Week”. Every Sunday afternoon or Monday morning we offer our Best Bargain selections. Here are some of the best deals on firearms, hardware, reloading components, optics, and shooting accessories. Be aware that sale prices are subject to change, and once clearance inventory is sold, it’s gone for good. You snooze you lose.
NOTE: All listed products are for sale to persons 18 years of age or older. No products are intended for use by minors.
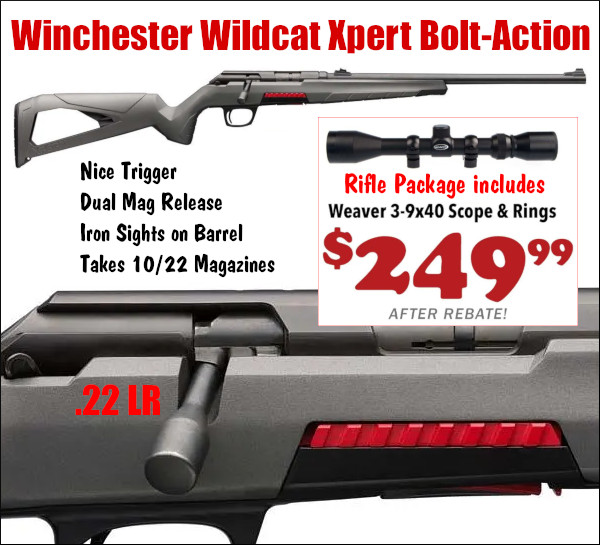
⏺ With free scope and factory rebate, it’s like getting rifle for $150!
Everyone should have a handy rimfire rifle. This Winchester Wildcat Xpert bolt-action .22 LR rifle is a great trainer for a young family member. And it’s also a fun plinker for shooters of any age. Right now, with the $25 Winchester Factory Rebate, this Wildcat Xpert is just $249.99 complete with a Weaver 3-9x40mm scope and rings ($274.99 before rebate). That’s a steal on a good rifle with a nice trigger and button-rifled barrel. If you prefer a semi-auto, you can get the self-loading Winchester Wildcat for $194.99 after rebate. This has the same stock, but different action, and it does NOT come with a scope.
2. Precision Reloading — Powder Sale on Many Brands
⏺ Large selection of popular powders in stock with discounted prices
Need powder for reloading your rifle or pistol ammo? There’s a good sale right now at Precision Reloading with popular powders up to 15% OFF. Chose among Hodgdon, Alliant, Vihtavuori, IMR, Accurate, and Winchester powders. Some hard-to-find rifle powders, such as H4831SC, Reloder 16, and VV N540 are IN STOCK now at good prices. Pistol powders are on sale too, such as Hodgdon Titegroup at just $24.41 per pound! But you need to order right away. This sale ends at 11:59 pm on August 8, 2023.
3. KYGUNCO — Savage 64 Precision Rimfire Rifle, $249.99
⏺ Great deal on good starter rifle for NRL22
Want to get started in NRL22, America’s fastest-growing type of rifle competition? Here’s a bargain-priced .22 LR rifle in a modern chassis. The Savage 64 Precision FDE features a semi-automatic action in a chassis with M-LOK slots and an ergonomic pistol grip. The heavy barrel has a threaded muzzle for easy attachment of brake, tuner, or suppressor. This is a good starting rifle for NRL22 — the semi-auto action allows fast follow-up shots. Get this rifle on sale now for $249.99.
4. Midsouth — Frankford Tumbler Lite + Depriming Tool, $119.99
⏺ Depriming Tool and Tumbler Work Great, save $45 with COMBO
The Frankford Arsenal Depriming Tool and Tumbler Lite are both excellent products. With the hand depriming tool you can knock out primers while watching TV. Spent primers are collected in the removable clear catch tube — so no mess on your press or loading bench. The Tumbler Lite is great for tumbling with liquid media to get your cases bright and shiny. Right now you can save $45 by getting the $119.99 Combo Pack from Midsouth.
5. EuroOptic — Leupold Spotting Scope and LRF Sale
⏺ Save $100 on quality Leupold Spotting Scopes and Rangefinders
Right now Leupold is offering $100.00 “instant savings” on SX-4 HD Spotting Scopes and RX-Fulldraw 5 Laser Rangefinders. You save immediately when you order — no rebate forms to fill out. This $100 savings is offered at multiple vendors including EuroOptic, Brownells, Sportsman’s Warehouse, and MidwayUSA. We recommend EuroOptic as it offers free shipping with orders over $250.00 plus excellent customer service.
6. Precision Reloading — Rifle and Pistol Primers on Sale
⏺ Quality primers for ARs and rifles at attractive price
Top-quality primers are still pricey and in very high demand. Thankfully, Precision Reloading has a large supply of Federal, CCI, and Remington primers in stock at competitive prices. And yes the popular CCI 450 and CCI BR-4 primers are in stock. AR shooters should check out the Winchester #41 small rifle primers which work great in ARs and bolt guns. These #41 primers are just $79.99/1000 while supplies last.
7. Midsouth — Starline Pistol Brass in Stock
⏺ Excellent pistol brass for popular cartridge types, good value
Starline offers some of the best pistol brass you can buy — all made here in the USA. Right now Midsouth has a big inventory of Starline brass IN STOCK at attractive prices. If you need hard-to-find brass, such as .357 Sig or .45 ACP +P, Starline has that. And prices are attractive. For example, Starline’s regular 9mm Luger brass is just $21.99 per 100 cases at Midsouth.
8. Amazon — Midland-EX37VP Radio Kit (Set of 2), $49.99
⏺ Quality Walkie-Talkies with good range and special Emergency functions
Having a good 2-way communication system is vital when hunting or wilderness hiking. And a pair of walkie-talkies really helps during shooting practices when a buddy goes downrange to set targets. A very good 2-Way radio system is the Midland-EX37VP E+Ready Emergency Two-Way Radio Kit. These walkie-talkies have a 26 mile range and feature 22 FRS (Family Radio Service) channels, along with channel scan. With this kit you get vital E+Ready Emergency functionality, plus NOAA weather alerts.
9. Amazon — KRATE AR500 Steel Targets, $16.99 and Up
⏺ Tough AR500 steel gongs, excellent user reviews, lifetime warranty
KRATE offers quality, durable AR500 steel targets, starting at just $16.99 for a 4″ Gong. KRATE AR500 targets have a lifetime warranty, and have earned good user reviews. These Tactical AR500 Steel Gongs are 3/8″ thick and come in various sizes set up for hanging chains (sold separately). And get this, right now if you spend at least $25, your Gongs ship for FREE! Along with Gong targets, KRATE also sells AR500 steel silhouette targets through Amazon.
10. Amazon — Large Digital Display Timer, $13.95
⏺ Use in Matches — Count-Down or Count-UP, handy big buttons
If you shoot in a discipline with time limits, or you time your firing strings during practice, having a reliable and easy-to-read timer is critical. One of our favorite timers is this very affordable Digital Display Timer with both count-up and count-down functions. It boasts an easy-to-read display and LARGE buttons making it perfect for F-Class, Palma, and other matches. This timer comes with both a built-in stand AND a strong magnet so you can position the timer conveniently.


 George Gardner was kind enough to send us 50 pieces of Pre-Production Alpha 6GT brass for preliminary testing. Like the cases I formed from 6.5×47 Lapua brass, the Alpha 6GT brass will use a small rifle primer. Purchased direct from Alpha Munitions, 6GT brass is now $1.30 per case, which is comparable with Lapua 6mm Creedmoor brass, currently $120.99/100 at Grafs.com.

 BRASS — The first thing you’ll find is cartridge brass choices for the 6 GT are rather limited currently. At present, the only commercial options are Hornady and Alpha Munitions. For the die-hard Lapua fans, you can technically make 6mm GT brass from 6.5×47 Lapua, however that process is very labor-intensive.

 SUMMARY — Good Cartridge with Much Potential