Here is a simple technique that can potentially help you load straighter ammo, with less run-out (as measured on the bullet). This procedure costs nothing and adds only a few seconds to the time needed to load a cartridge. Next time you’re loading ammo with a threaded (screw-in) seating die, try seating the bullet in two stages. Run the cartridge up in the seating die just enough to seat the bullet half way. Then lower the cartridge and rotate it 180° in the shell-holder. Now raise the cartridge up into the die again and finish seating the bullet.
Steve, aka “Short Range”, one of our Forum members, recently inquired about run-out apparently caused by his bullet-seating process. Steve’s 30BR cases were coming out of his neck-sizer with good concentricity, but the run-out nearly doubled after he seated the bullets. At the suggestion of other Forum members, Steve tried the process of rotating his cartridge while seating his bullet. Steve then measured run-out on his loaded rounds. To his surprise there was a noticeable reduction in run-out on the cases which had been rotated during seating. Steve explains: “For the rounds that I loaded yesterday, I seated the bullet half-way, and turned the round 180 degrees, and finished seating the bullet. That reduced the bullet runout by almost half on most rounds compared to the measurements from the first test.”
Steve recorded run-out measurements on his 30 BR brass using both the conventional (one-pass) seating procedure, as well as the two-stage (with 180° rotation) method. Steve’s measurements are collected in the two charts above. As you can see, the run-out was less for the rounds which were rotated during seating. Note, the change is pretty small (less than .001″ on average), but every little bit helps in the accuracy game. If you use a threaded (screw-in) seating die, you might try this two-stage bullet-seating method. Rotating your case in the middle of the seating process won’t cost you a penny, and it just might produce straighter ammo (nothing is guaranteed). If you do NOT see any improvement on the target, you can always go back to seating your bullets in one pass. READ Forum Thread..
Peterson Cartridge Company (“Peterson”) has released a lengthy, authoritative guide to the 22 Creedmoor cartridge, a popular wildcat based on the 6.5 Creedmoor or 6mm Creedmoor necked down to .224 caliber. We think the .22 Creedmoor would be a great long-range varmint cartridge, similar to the .22-250 Rem, but with a more modern, efficient cartridge design. In addition, some PRS/NRL competitors may turn to the .22 Creedmoor because it has less recoil and is flatter-shooting than the 6mm Creedmoor. In addition, .224-caliber match bullets are typically less expensive than heavier 6mm and 6.5mm projectiles. Less recoil, and less cost — what’s not to like?*
Along with load data, this article has specific sections dedicated to: Primers, Rifling Twist Rates, and Reloading Supplies. If you are considering building a .22 Creedmoor, we recommend you download the full Peterson .22 Creedmoor article, which is available in PDF format.
Peterson states, “Since its inception in 2007… the 6.5 Creedmoor has seen some pretty meteoric growth in popularity. That growth continues as of this writing, as the cartridge has now gone mainstream with hunters and shooters alike. As the popularity of the 6.5 Creedmoor has increased, so has the number of wildcat cartridges based off of it. Some of those popular wildcat cartridges are the 6mm Creedmoor, the .25 Creedmoor, and now the .22 Creedmoor. This data sheet will cover the .22 Creedmoor.
To help our customers, and anyone else who shoots .22 Creedmoor, we decided to create this Data Sheet and distribute it. [In this LOAD DATA Document] you will find four (4) common bullets, and four (4) common rifle powders used when handloading the .22 Creedmoor cartridge. We then took the different bullet and powder combinations and loaded them up to the SAAMI Maximum Average Pressure (MAP) for the 6.5 Creedmoor and 6mm Creedmoor cartridges, which is 62,000 PSI. [O]ur goal was to provide a wide spectrum of bullet weights and the powders used with them.
All of the following data was gathered by our ballistician in our indoor ballistics lab located in our factory in Pennsylvania. Although we were able to gather pressure and velocity data in our lab, we have NOT tested these loads for accuracy. Again, these loads are just designed to give shooters information regarding what velocity, a given bullet and powder charge combination, will produce the SAAMI Maximum Average Pressure (MAP) of 62,000 psi.”
Sample 22 Creedmoor LOAD DATA
IMPORTANT — Pressures can vary significantly with different Cartridge Overall Lengths (COAL). In addition, ANY change to ANY load components — primers, bullets, brass, powder — can affect pressure. Always load conservatively. In addition, because of variances in bore dimensions, some barrels may show higher pressures than others. Again, always start with conservative loads, well below MAX pressures.
*Actually there IS a potential downside — reduced barrel life. We expect that a .22 Creedmoor running hot varmint loads would experience shorter useful barrel life compared to a 6.5 Creedmoor. This is based on what we’ve observed with .22-250 and .22-250 Ackley barrels compared to our 6.5 CM barrels.
Shiny brass — it may not shoot more accurately, but it does make you feel better about your hand-loaded ammo. While it’s not necessary to get brass “bright and shiny” after every firing, it is a good idea to clean powder residue, grime, and grit off your brass before you run cases into sizing dies. There are many ways to clean cartridge cases. A quick wipe with solvent on a patch may suffice for recently-shot cases. Older brass with baked-on carbon may require lengthy tumbling. Ultrasonic cleaning is another popular option that gets your brass clean inside and out.
Sinclair International has a series of helpful videos on brass cleaning. These short “how-to” videos, hosted by Bill Gravatt, former head honcho at Sinclair Int’l and Creedmoor Sports, cover the various processes you can use — tumbling, ultrasonic cleaning, chemical cleaning, and cleaning by hand.
Video ONE — Cleaning Brass in Vibratory or Rotary Tumbler
TIP: Brass that has recently been shot will clean more easily than brass that has been sitting many days or weeks. If your tumbling media is fresh the job should be done in an hour or less. It’s your choice whether to tumble with primers removed or with primers still in the cases. If you choose to tumble with primers out, we suggest you deprime with a depriming die, rather that put dirty brass into your sizing die. Some people like to add a teaspoon of liquid polish to the media. This does work, cutting tumble time, and making your brass more shiny. However, if you add liquid polish, do that BEFORE you add the brass and let the tumbler run for a 15 minutes to get the polish completely mixed into the media. Otherwise you can else up with gooey gunk inside your cases — a very bad thing.
Video TWO — Ultrasonic Case Cleaning
TIP: There are many different types of solutions you can use. Soapy water suffices for some folks, particularly if you add a little Lemi-Shine. The Hornady and Lyman solutions work well, and can be used multiple times, provided you strain the solution to remove dirt and grit after cleaning sessions. Many ultrasonic cleaning machines have timers. Experiment with dwell time to see how long you need to immerse your brass. A very small amount of Ballistol in the solution will help lubricate your necks on the inside. This can make bullet seating go more smoothly, with more consistent neck tension.
Video THREE — Chemical Cleaners (Soaking without Ultrasound)
TIP: After using chemical cleaners, such as the Iosso solution, you need to water-rinse your brass thoroughly. A kitchen strainer helps with this (see video at 0:20). Also, don’t forget your brass in the chemical solution — follow the manufacturers recommendations and don’t exceed the recommended dwell time. Chemical cleaners work surprisingly well to remove grease and grime, and the solution can be re-used multiple times. However, if you want your cases to look bright and shiny (like new brass), you will probably have to tumble. [Editor: A very effective new chemical cleaner is the Brass Monkey product from the makers of Wipe-Out and Carb-Out. Add a teaspoon to a gallon of water then soak your brass for 20-30 minutes. It really works — the cases clean up dramatically].
Video FOUR — Manual Cleaning (By Hand)
TIP: Keep some oversize patches in your range kit. At the end of your shooting sessions, wipe off your fired brass with a patch dampened with a mild, non-corrosive solvent (once again Ballistol works well). Before the carbon sets up on your brass it is very easy to remove. For tougher jobs, you can use 0000 Steel Wool (as Bill recommends in the video). You may find that timely hand-cleaning lets you avoid tumbling altogether — or you may choose to tumble (or ultra-sound) your brass only after a half-dozen or so firings.
At the request of our readers, we provide select “Deals of the Week”. Every Sunday afternoon or Monday morning we offer our Best Bargain selections. Here are some of the best deals on firearms, hardware, reloading components, optics, and shooting accessories. Be aware that sale prices are subject to change, and once clearance inventory is sold, it’s gone for good. You snooze you lose.
NOTE: All listed products are for sale to persons 18 years of age or older. No products are intended for use by minors.
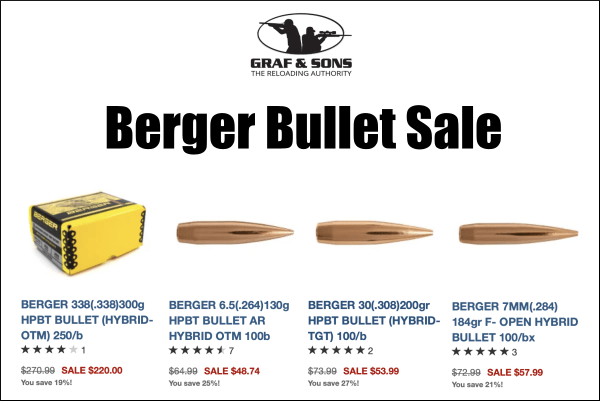
Graf & Sons — Major Berger Bullet Sale
⏺️ » Great savings on ultra-high quality Berger Bullets
When it comes to competition, Berger Bullets are among the very best with countless wins in PRS, High Power, F-Class, and other disciplines. Berger also makes great varmint and hunting bullets. Now you can stock up on these winning bullets for the matches you’re planning this year. Save now with this major Graf’s sale instead of paying more later.
Amazon — RCBS Rebel Master Reloading Kit, $470.95
⏺️ » Complete kit with press, powder measure, scale, tools and more
For folks getting started with hand-loading, a great basic package is the RCBS Rebel Master Reloading Kit which is on sale for only $470.95. This RCBS Package features pretty much all you need to load rifle and pistol ammo: Rebel single-stage Press, Uniflow-III Powder Measure, 1500gr digital scale, hand priming tool, powder funnel, powder trickler, hex key set, accessory handle with case neck brushes, primer pocket brushes, deburring tool, loading block, and case lube. You even get a Speer Reloading Manual.
As an Amazon affiliate, this site can earn revenues through sales commissions.
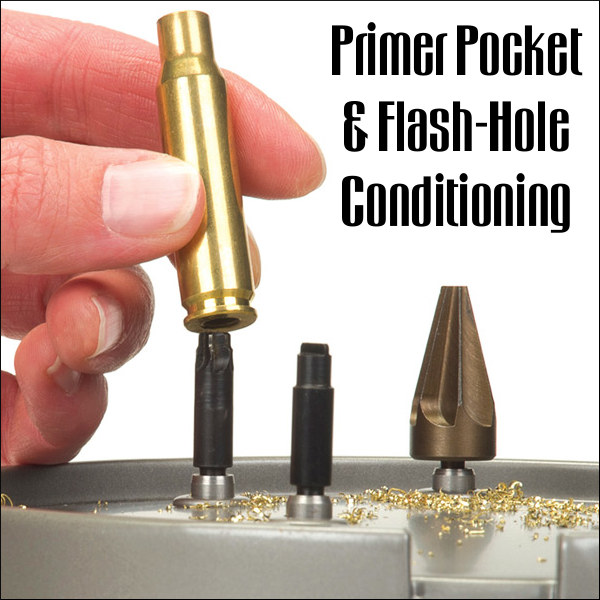
In the past the U.S. Army Marksmanship Unit published a series of reloading “how-to” articles on its USAMU Facebook page. One “Handloading Hump Day” article covered two basic case prep chores — uniforming primer pockets and deburring flash-holes. Visit the USAMU Facebook page for other tips.
Primer Pocket & Flash-Hole Conditioning
This week, we’ll address a question that frequently arises: “Do you uniform primer pockets and deburr flash-holes?” As we tailor our handloading methods to the specific needs of each instance, the answer, not surprisingly, is “Sometimes!” However, don’t flip that dial just yet, as what determines our approach may be helpful in deciding how to address one’s own techniques. Moreover, we have a buried “Easter Egg” morsel that may bring a chuckle, as well as useful safety information!
Generally, the USAMU Handloading Shop does not uniform primer pockets (PP) or deburr flash holes (FH) of our rifle brass. We’re certainly not against it… Rather, this reflects the very high volume of ammunition we load, the fact that very few cases are ever re-loaded for a second firing, and the types of brass we use. However, as a need is perceived, we DO deburr flash holes. Of interest, we have fired many very small, 1000-yard test groups and aggregates using weight-selected, domestic brass that had not had PPs uniformed or FHs deburred.
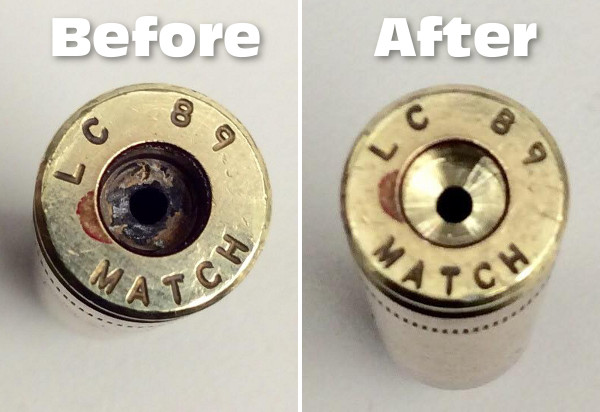
Before and After — On the left is a fired, deprimed 7.62×51 case with primer residue intact. On the right the primer pocket has been uniformed to SAAMI specs. Note the shiny finish at the bottom of the pocket — evidence of the the removal of metal when uniforming the primer pocket.
As to the type cases we use, many thousands of our long-range 5.56mm cases come to us from the arsenal with the primer of our choice pre-installed and staked-in, per usual practice. Obviously, we cannot uniform either FHs or PPs on this live, primed brass. However, after careful sorting, inspection and preparation, we do obtain match-winning results with it.
Shooters who reload their brass several times may decide to uniform PPs and deburr FHs, especially on their “300-yard and beyond” brass. Here, they will use the cases many times, while the uniforming is performed only once. Also, most handloaders only process moderate amounts of brass, compared to our multi-thousand round lots.
Having high quality Long Range (LR) brass helps. Many of the better brass manufacturers [make] their flash holes so that no burrs are created. Still, it does pay to inspect even THESE manufacturer’s products, as occasional slips are inevitable. Very rarely, some of the best makers will have a significant burr in, say, 1 per 1000 or 2000 cases, and it’s worth catching those.
Exceptions can always be found. Recently, we began processing a large lot of match brass from a premier manufacturer. We were startled to find that every case had a significant burr in the FH — something we’d never before seen from this maker. We then broke out the FH deburring tools and went to work.
Some observers have noted that it can be difficult to truly verify the contribution to accuracy of these procedures — particularly when firing from the shoulder, in conditions. Members of this staff, as individual rifle competitors, do often perform these operations on their privately-owned LR rifle brass. One could ascribe this to the old High Power Rifle maxim that “if you think it helps, then it helps.”
However, a World Champion and Olympic Gold/Silver medalist here commented on his own handloading (for International competition, which demands VERY fine accuracy). He noted that he did seem to see a decline in accuracy whenever he did not uniform FHs, deburr FHs and clean primer pockets before each reloading. (One might be tempted to counter that only a truly World Class shooter could reliably detect the difference.) However, with the wisdom of decades experience, our Champion also remarked that “It could have been that I just wasn’t shooting as well that day.”
For those who do opt for these procedures, note that various tool models may have adjustable depth-stops; pay attention to the instructions. Some FH-deburring tools (which enter the case mouth, not the primer pocket) are dependent upon uniform case length for best results.
Above is a flash-hole deburring tool on an RCBS powered case-prep unit. These case prep machines can save a lot of pain and misery, helping one perform various functions quickly and efficiently.
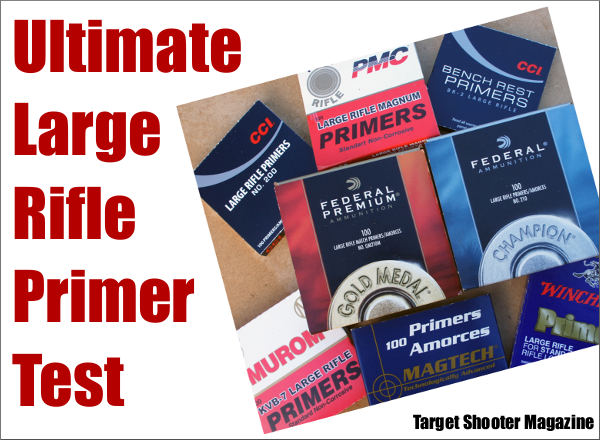
Mother of All LR Primer Tests
If you shoot a .308 Win, or any cartridge that uses a Large Rifle (LR) primer, you should read an important article by Laurie Holland in Target Shooter Magazine. Holland, a talented shooter from the UK (and Accurate Shooter Forum member), tested no less than sixteen (16) different large primer types using a custom F-TR target rifle shot from the bench. Laurie loaded .308 Win ammo* with 16 LR primer varieties and then tested for average velocity, ES/SD, and group size. This may be the most comprehensive and thorough LR primer test ever done. Here are the primer types tested:
1. CBC Magtech 9½
2. CCI 200 LR
3. CCI BR2 Match
4. CCI 250 Magnum
5. Federal 210
6. Federal 210M Match
7. Federal 215M Magnum Match
8. Fiocchi Large Rifle
9. Kynoch Large Rifle
10. Murom KVB-7 (PMC LR)
11. Norma Superflash LR
12. PMC LR Magnum
13. Remington 9½ LR
14. Remington 9½ M Magnum
15. Sellier & Bellot LR
16. Winchester WLR
Test Rig: Osprey Rifles-built F-TR rifle with Savage PTA action, 32″ Bartlein 1:12″-twist ‘Heavy Palma’ barrel, and Dolphin Gun Company modular stock with an F-Open/Benchrest fore-end.
Some of Laurie’s results may surprise you. For example, would you guess that Sellier & Bellot primers had the lowest ES, by a significant margin? And get this, among ALL the primers tested, Rem 9½M Magnum primers produced the lowest velocity, while Rem 9½ LR (non-magnum) primers yielded the highest velocity. (The total velocity spread for all primers was 35 fps). That’s counter-intuitive and it’s odd that Rems were at opposite ends of the speed spectrum among ALL primers tested.
“The rationale for doing side-by-side tests is to see what effect primer choice has on ballistics, i.e. average velocities and MV consistency. There are a great many views on the subject, a few based on tests (including primer flame photography) but most apparently hearsay.” — Laurie Holland
Every serious hand-loader should definitely read the full test results to understand Laurie’s methodology and get all the details. This is an important test, with significant findings. But if you can’t spare the time right now, here are some highlights below:
Primer with Lowest Velocity: Remington 9½ M Magnum (2780 fps)
Primer with Highest Velocity: Remington 9½ LR (2815 fps)
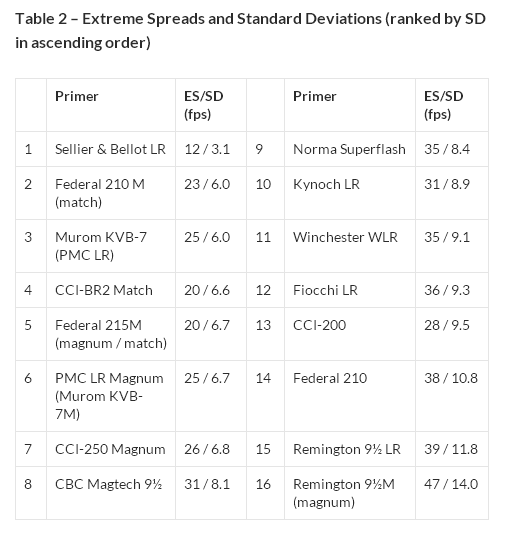
Primer with Lowest ES/SD: Sellier & Bellot LR (12/3.1 fps)
Primer with Highest ES/SD: Remington 9½ M Magnum (47/14.0 fps)
Primer with Smallest Group Size: Remington 9½ LR (0.43″ average, three 5-shot groups)
Primer with Biggest Group Size: CBC Magtech 9½ (0.7″ average, three 5-shot groups)
Editor’s Comment: Laurie shot three, 5-shot groups at 100 yards with each primer type. The average group size for the top six primers varied by only 0.10″ (0.43″ to 0.53″), so one can’t conclude that one type is much better than another. Total group size variance (from best to worst) was 0.27″.
“The biggest surprise to me … came from an elderly (at least 10 years) lot of Czech Sellier & Bellot standard caps with an ES of 12 and SD of 3.1 fps, way below those of the nearest competitor. By contrast to the Fiocchis, they were an almost slack fit in the cases and this may have contributed to their consistent performance.” — Laurie Holland
NOTE: Values in chart are based on 15-Shot strings. The ES/SD numbers will therefore be higher than is typical with five-shot strings.
All ES/SD Values from 15-Shot Strings
Testing 16 primer types was a huge task — we commend Laurie for his hard work and thoroughness. This extensive test is an important contribution to the “knowledge base” of precision shooting. Laurie’s findings will doubtless influence many hand-loaders who hope to produce more consistent ammunition, or achieve better accuracy. Credit should also be given to Target Shooter Magazine for publishing the results. Well done gentlemen…
*Reloading method for Test Ammo: “Test batches consisted of 16 or 17 rounds for each primer, charges thrown by an RCBS ChargeMaster and checked on lab-quality electronic scales, adjusted if necessary to within ± 0.04gn, so any charge weight variation would be under 0.1 grain which equates here to 5 fps.”
For many years, the U.S. Army Marksmanship Unit (USAMU) regularly published reloading “how-to” articles on the USAMU Facebook page. In this article, the USAMU’s reloading gurus address a question frequently asked by prospective handloaders: “Should I buy a single-stage press, or a progressive?” The USAMU says the best answer is Solomon-esque in both its wisdom and simplicity: “Get BOTH!” However, there is definitely more to the issue, as the USAMU explains below.
Progressive Press Safety Considerations
by USAMU Staff
Many are the beginning handloaders who have asked a friend about their “setting up” a progressive press for them. The idea is that the newbie could then just feed in components and crank out buckets of practice ammo without needing to really learn much about handloading. Tempting though this might be, that’s simply not how it works. Such an approach might be ok if there were never a malfunction with either press or operator, but that’s unrealistic. Our hypothetical newbie would then lack the knowledge to problem-solve most situations.
Worse yet, several different handloading operations would be occurring at different stations on the progressive press at the same time. It takes an experienced operator to keep track of, and truly understand the significance of, all those potential mini-problems. Loading without this experience is a recipe for potential disaster – such as a double powder charge (especially with pistol cartridges) dropped while the loader was attending to some other function, etc. Progressives are an animal unto themselves, and while they offer many benefits, they do take some getting used to – even by experienced handloaders!
ILLUSTRATIVE HORROR STORY
Here, enter a 40-year veteran handloader who decided to jump onto the progressive bandwagon late in his career, having used only single-stage presses all his life. A High Master NRA High Power Rifle competitor, he had no background in competitive pistol shooting, where historically most progressive presses are found.
Experienced Action Pistol shooters have typically encountered multiple episodes in which shooters “skipped” a powder charge for some reason, leading to a squib round and a bullet possibly lodged in the bore. Thus, at matches, it’s reflexive for them to yell “STOP!” in unison if they see a shooter get a “click” vs. a “bang”, and rack the slide to keep firing. This writer has personally seen several pistols saved in just such scenarios over the years.
Click No Bang — What NOT to Do
Our High Master set up a popular progressive press and began turning out .223 Rem 100-yard practice ammo with abandon. He was using a moly-coated 52gr match bullet and an economical, fast-burning surplus powder that gave great accuracy. Once on the range, he began practicing strings of rapid-fire. All was well, until he heard “Click!” rather than “Boom”.
Lacking the above experience or onlookers to halt him, he reflexively operated the charging handle on his expensive, custom NM AR15 Service Rifle, and the next trigger squeeze reportedly registered on seismographs over at least a three-state radius. He sat, uninjured but bewildered, until the hail of expensive bits and pieces quit raining down around him.
When the smoke cleared, he immediately cursed the horrid, evil, demonically-possessed progressive press for this, his first-ever reloading mishap. His $1400 NM upper was ruined, but thankfully, his $800 pre-ban lower… and he had escaped injury.
This tale is told not to discourage the use of progressive presses, but to emphasize the need to EASILY and IMMEDIATELY KNOW what is happening with the press at each station, every time the handle is cranked. Not to do so is, as they say, “bad ju-ju.”
It illustrates why we at the USAMU Handloading Shop agree in recommending that new handloaders should begin with a single-stage press. Once one thoroughly learns the steps in each phase of handloading by repeated experience, then one will be qualified to move on to a progressive press.
The single-stage press will REMAIN virtually indispensable for one’s entire handloading career, even after having purchased a progressive press (or two). There are endless small projects that are best handled on a single-stage press, and a poll of USAMU’s Handloading staff reveals that not one would willingly be without his single-stage press, despite owning at least one progressive.
When you make a reloading mistake, you may need to “pull down” assembled ammo. The embedded UltimateReloader.com video demonstrates how to use the Hornady Cam-Lock bullet pulling system.
When Reloading Goes Bad — The Danger of Over-Charging
Our friend Gavin Gear of UltimateReloader.com was recently reloading some 9mm pistol ammo with his Hornady progressive press. As part of his reloading procedure, he visually checks the cases — and he noticed that the charges seemed high. Sure enough, his most recently-produced rounds were about two grains over spec. He diagnosed the issue: “I was using a powder measure without a baffle. What happened was, over the course of the loading session, things settled in, and the charge level increased.”
Not knowing just when his powder measure started delivering too much powder, Gavin decided, for safety’s sake, to pull down all the ammo he had just reloaded. Yes that’s time-consuming, but it’s better than the alternative — having a dangerous Kaboom while shooting. With fast-burning pistol powders, a two-grain over-charge could cause a blown case, damaged firearm, and/or serious injury.
Watch Cam-Lock Bullet Puller Used to Remove Bullets from Loaded Ammo:
Use of Bullet Puller starts 4:00 minutes into video.
Gavin says it is vitally important to perform safety checks during the reloading process: “You’ve got to do it — check every single round to make sure there IS powder, and that there’s not too MUCH powder. Double, Triple, Quadruple check your components… and your powder charges. You can’t be too careful.”
To pull down a loaded round, first place the cartridge in the shellholder on your press ram. Then raise the round up into the bullet puller device installed where a die would go. The Hornady Cam-lock bullet puller works by clamping the bullet in a collet when you flip down the red-coated lever. Then, with the case held by the rim in the shell-holder, the bullet exits the cartridge as the press ram is lowered. It takes time, but it’s pretty fool-proof once you get the hang of it. This entire process is illustrated in Gavin’s video, starting near the four-minute mark.
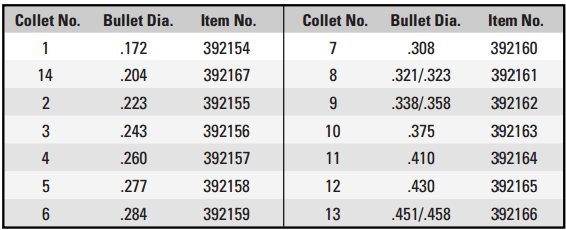
The Hornady Cam Lock Bullet Puller has four (4) key components: 1. Cam-Lock die body; 2. Cam-Lock lever; 3. Stem; and 4. Collet (Caliber-specific).
NOTE: In order to use this tool, you’ll need the appropriate collet for each diameter range of bullets you intend to pull. For example use collet #3 for 6mm, collect #6 for 7mm, and collet #7 for .308 Caliber.
RCBS Lock-Out Die
A good safety option for users with progressive presses is the RCBS Lock-Out Die. This has a charge detection rod that dips into each case after powder has dropped. You adjust the die to the proper charge height for your desired load. If the actual dispensed charge is too high or too low, the Lock-Out Die senses the problem and stops the press from advancing to the next case (it does this by preventing the ram/shellplate from fully elevating). We’ve used the Lock-out die with success for both pistol and rifle cartridges. It’s sensitive to about one-half grain with pistol powders.
This Lock-Out Die works with Hornady and Dillon progressives as well as with RCBS progressives. It does take up one die station on the press.
This image is from multi-time Nat’l Long Range Champion Nancy Tompkins, author of Prone and Long Range Rifle Shooting. Nancy loves to photograph the Aurora Borealis.
As a Christmas present for our readers, today we showcase eight very informative videos from AccurateShooter Forum member F-Class John. A talented F-Class competitor with a smart, technically-focused mind, John has created a series of videos about reloading and precision loading tools, along with rifle and shooting accessories. Many of John’s product reviews are the most thorough and detailed you’ll find in video format. You’ll find over 840 informative videos on F-Class John’s popular YouTube Channel.
This is a great summary of multiple quality front rests. This is a must-watch video for all F-Open and Benchrest shooters! If you are shopping for a front rest, definitely watch this comprehensive 42-minute video from start to finish. This is probably the most informative video about premium shooting rests available on YouTube. Top F-Class shooter and video-maker F-Class John covers a wide selection of front rests, with some observations about coaxial bipods as well. John covers the impressive new SEB NEO-X, the easy-to-transport SEB Mini-X, the excellent Rodzilla Rest, the innovative 21st Century Hybrid Rest, the sleek Italian Lenzi Rest. At the end of the video John reviews the very affordable Caldwell Fire Control Rest ($269.99 at MidwayUSA), explaining how it can be a decent choice for shooters on a limited budget.
How to Use a Barrel Tuner to Improve Accuracy and Repeatability
In this video, John works with a barrel tuner created by Erik Cortina, a member of Team Lapua/Brux/Borden. A tuner can be useful in modulating barrel vibrations and that can translate to smaller groups on target. Sometimes the positive effects are quite noticeable. Tuners have been popular with short-range benchresters for many years and now they are becoming more common on top F-Class and Long Range rifles.
John says: “I’ve been using Erik’s E.C. Tuner for a while now and I really like what it’s done to help as my final step in load development. Just remember, a tuner is a tool, not a magician. You still need good load development practices, good brass prep, and solid skills but the tuner does help make great loads even better.”
F-Class Rear Bag Setup: Fill Techniques for Ultimate Consistency
In this helpful video, F-Class John shows his process for filling high-quality Dima rear bags (both medium models). John explains how to select fill (based on weight and density preferences). He shows the different funnel systems that work very effectively. If you’re planning to invest in a quality rear bag for competition, this video will be useful, both in choosing appropriate fills and getting the fills into the bag efficiently.
21st Century Hydro Press and Arbor Press — Product Review
Many of the world’s top benchrest, long-range, and F-Class shooters prefer to seat their bullets using arbor-type presses with inline dies. This allows smooth, repeatable bullet-seating with very low run-out. One of the very best arbor-type seating presses ever created is the 21st Century Hydro Press. This offers plenty of leverage driving a precision ram. The Hydro Press also features a hydraulic line to drive a precision seating force gauge. Along with the Hydro Press, John tests 21st Century’s standard arbor press.
Accuracy One Concentricity Gauge — Product review
Every person who makes precision hand-loads should have a quality concentricity gauge to measure run-out of case-necks and loaded rounds. Here John tests one of the best such tools on the market, the Accuracy One Concentricity Gauge. This measures the internal and external neck runout of cartridge cases as well as seated bullet runout. It can also measure the runout of the ogive, bearing surface, and boat-tail of individual bullets and can even measure primer pocket runout. John notes: “I think most precision shooters should have one of these to make sure their ammo is within their specs they’re happy with.”
Henderson vs. Giraud Rifle Power Brass Trimmer Review
After adding the impressive Henderson Gen 3 Powered Trimmer to his inventory of tools. F-Class John became is a Henderson fan. He likes the speed, precision, and repeatability of the $439.00 Henderson machine, which trims-to-length and chamfers the case mouth all in one pass. Unlike some other trimming tools, the Henderson indexes off the overall case length NOT the shoulder. The $575.00 Giraud trimmer is a very different design which indexes off the case shoulder, but it is also very precise. When set up correctly, it can trim brass with amazing consistency. As long as you have fire-formed brass with consistent base-to-shoulder dimensions, you should get very consistent trim lengths.
SuperTrickler vs. AutoTrickler V4 Powder Measure Comparison
This video compares the elite SuperTrickler and AutoTrickler V4. The AutoTrickler system paired with a quality Force Restoration scale, is the “Rolls Royce” of electronic powder dispensing systems, offering unrivaled charge-weight accuracy, great repeatability, and ultra-fast dispensing speeds. If you have the budget — $490 for the V4 plus $720+ for A&D FX-120i scale — the AutoTrickler V4 is a superb system that lets you load extremely accurate, consistent ammo. This detailed F-Class John video compares the AutoTrickler with and all-in-one SuperTrickler scale/dispenser which also performs great. The SuperTrickler ST101 is $775.00 for ST101 Gen2 top unit only or the full unit is $1400.00 complete with FZ-120i scale.
Teslong Rigid 26″ Borescope with 4.5″ Monitor — Product Review
There are a variety of affordable Teslong digital borescopes for inspecting your barrels and diagnosing issues. All Teslongs deliver impressively sharp images/video. Some units plug into a laptop or tablet, while others work via a dongle to communicate wirelessly. Here John tests a 26″ rigid model borescope that comes complete with its own 4.5″ viewing screen. Priced at $149.99 on Amazon, this system is completely self-contained — you don’t need a laptop or smartphone. You don’t have to worry about connections and there are no Apps to install or configure. John says: “Teslong now offers a 26″ rigid rod model with a 4.5″ monitor. This allows you to use the unit without the need for any mobile device or computer.”
Top to bottom: Remington firing pin assembly with ISS, Tubb SpeedLock alloy-composite system without ISS (current versions have dual, opposite-wound springs), and Remington short action firing pin assembly without ISS.
The U.S. Army Marksmanship Unit regularly publishes technical articles on the USAMU Facebook page. One informative USAMU article covered mechanical issues and related ignition irregularities that can cause vertical fliers even with good ammunition in an otherwise excellent rifle. We highly recommend you read this article, which offers some important tech tips.
Vertical Dispersion: Mechanical/Ignition Issues?
Poor or inconsistent ignition has long been known to be one of the “usual suspects” when one encounters vertical fliers that just shouldn’t be there. By having a sense of some of the basic principles involved, and a few basic areas to check, the shooter may avoid colsiderable frustration, not to mention time, expensive loading components and barrel wear.
Is your well-built rifle of high-quality components plagued with vertical fliers across more than 1-3 handload combinations? Consider the bedding, crown and scope/sight mounts. Are they correct? If so, then you might check for ignition issues before boldly undertaking an extensive, expensive, and quite possibly fruitless quest for the “magic handload”.
SEEING IS BELIEVING: While the author had been aware for many years that poor ignition should be considered and ruled out when dealing with vertical fliers in an otherwise-excellent rifle, actually seeing the problem and its almost instantaneous cure really drove the lesson home.
He was working with a “dot” rifle – a .22 LR match rifle that really stacked bullets into little piles at 50 yards and beyond. With one lot of ELEY Tenex, it produced consistent “bughole” groups at 50, but with another, selected lot of Tenex, similar groups were regularly ruined by single, vertical fliers that did not appear in other rifles. Rather than spending days burning up expensive, select ammunition looking for “magic lots”, he contacted a well-respected rimfire gunsmith and explained the situation.
Without so much as batting an eye, the highly-experienced ‘smith tore into the rifle’s action, and quickly found the cause(s) of the problem. He discovered a demonstrably weak firing pin spring, plus a chip out of the face of the firing pin where it contacted the cartridge rim.
After replacing and tuning the offending parts, the rifle immediately began shooting tiny, bughole groups with the previously “unacceptable” lot of Tenex. Centerfire rifles can also benefit from ensuring positive, consistent ignition. A wise riflesmith is literally worth his weight in gold!
So, what are some issues we as shooters can inspect in our rifles to help determine if ignition woes could be part of our problem? At the club level, ask yourself if that “experienced” Remington, Winchester 70, or even Springfield-based match bolt gun you’re using is still running its’ original 40-80 year-old factory striker spring? If so, a new replacement is cheap insurance against current or future problems. (And BTW, it might be best to stick to the normal, factory-spec spring weight. A super-powerful spring can cause vertical, just as a weak one one can.) Along with that, a routine check for proper firing-pin protrusion is a quick preventive measure that can rule out potential issues.
Other areas to consider are the centering and consistency of the firing pin’s operation in the bolt. Admittedly, with the increasing use of precision-machined custom actions, this is becoming less an issue every day. Below is the firing pin assembly from a custom BAT action:
However, particularly with factory actions, a very quick and easy check is to remove the bolt, let the firing pin go forward, and look at the firing pin tip through the firing pin hole. Is the tip off-center in the hole, and possibly striking it as it moves forward? Is the hole out-of-round or burred from being struck repeatedly? If so, a trip to the riflesmith is likely in order.
Similarly, machining issues in the bolt/firing pin system can lead to rough and erratic firing pin movement, in which the firing pin drags against an internal surface of the bolt. In high-quality rifles these issues are relatively rare, but not unheard-of, and it takes mere minutes to rule them out. It may be worthwhile to remove the cocking piece/firing pin/spring assembly and look for any unusual gouges, dings, peening, burrs or signs of abnormal wear.
This task is especially easy with Winchester 70s, Springfields, and the similar Mauser 98s, involving little more than the push of a button and unscrewing the cocking piece assembly. This is just one of the many reasons these tried-and-true actions have earned such a loyal following in the field, among hunters who must maintain their rifles away from a shop.
Particularly with older rifles, watch for and remove excess grease (or even Cosmoline!) from both the firing pin assembly and inside the bolt. This can help improve firing pin speed and consistency. Other bolt-action designs may need a take-down tool or other measures.
As part of this inspection, AFTER ENSURING THE RIFLE IS UNLOADED, slowly cock the rifle, dry-fire, and repeat several times. Listen carefully near the action for inconsistency in the sounds it generates. Does the striker falling make the same sound each time? Do you hear or feel grinding upon operation? If so, where?
Be sure to check the operation of the cocking piece (bolt shroud), firing pin within the bolt shroud, the cocking piece cam and the rear of the bolt body where the cocking piece cam operates. As with our examination for abnormal wear marks discussed above, look for marks indicating roughness or a possible need for light polishing. Then, clean and lightly grease the bearing surfaces while you’re at it.
Remington 700 bolt shroud and cocking cam
These are relatively easy checks that shooters can undertake to perform a preliminary inspection on their own. Other mechanical issues can also cause ignition issues, chiefly centered around the action of the trigger, sear and sear spring. If these are suspected, a trip to an experienced, qualified riflesmith for diagnosis is recommended. We hope you find this information helpful! Join us again next week, and in the meantime, enjoy the shooting sports safely!


 Shiny brass — it may not shoot more accurately, but it does make you feel better about your hand-loaded ammo. While it’s not necessary to get brass “bright and shiny” after every firing, it is a good idea to clean powder residue, grime, and grit off your brass before you run cases into sizing dies. There are many ways to clean cartridge cases. A quick wipe with solvent on a patch may suffice for recently-shot cases. Older brass with baked-on carbon may require lengthy tumbling. Ultrasonic cleaning is another popular option that gets your brass clean inside and out.


 RCBS Lock-Out Die


 Is your well-built rifle of high-quality components plagued with vertical fliers across more than 1-3 handload combinations? Consider the bedding, crown and scope/sight mounts. Are they correct? If so, then you might check for ignition issues before boldly undertaking an extensive, expensive, and quite possibly fruitless quest for the “magic handload”.


