The Tactical Rifle Shooters Facebook Group recently showcased tools used to measure case headspace before and after “bumping” the shoulder. After a case is fired, hand-loaders who full-length size their cases will typically bump the shoulders back anywhere from .001″ to .0035″, depending on the rifle and application. With our 6mmBR and Dasher cases we like about .0015″ bump.
You want the amount of case sizing and bump to be the same for all your brass. To ensure uniformity, it makes sense to measure your cases before and after the FL sizing process. When we have time, we check every case. Other folks will simply check the first 3-4 cases coming out of the FL sizing die to ensure the FL die setting is correct and delivering desired headspace/bump.
1. Whidden Gunworks Shoulder Bump Gauge
There are a variety of tools that can be used to measure shoulder bump. Our favorite is a special cartridge-specific bushing made by Whidden Gunworks. The Whidden Shoulder Bump Gauge enables you to adjust your sizing die to the desired measurement. The bump gauge is attached to your calipers with a set screw and determines the measurement from the base to the shoulder of the case. The photo below, from Tactical Rifle Shooters, shows the Whidden Bump Gauge for the .375 CheyTac cartridge.
2. Dave Manson Vertical Comparator with Dial Read-Out
Dave Manson states: “This tool was designed to make life easier for the advanced shooter and re-loader by allowing precise measurement of ammunition, case, and chamber headspace. With this information, the re-loader will be able to fine-tune clearances and fits between his ammunition and chamber, with resultant improvements in accuracy and case life.” The functions of the Manson Comparator are:
1. Measure headspace of factory or reloaded ammunition
2. Quantify chamber headspace by measuring headspace of a fired case
3. Ensure minimal shoulder set-back when setting up re-loading dies
4. Compare base-to-ogive length to ensure consistent bullet-to-rifling relationship.
In addition to the Dial Indicator and Stand, the $130.00 Vertical Comparator is supplied with multiple Datum Blocks of precise length and inside diameter (.3300″/.3750″/.4000″/.4375″). MORE INFO HERE — Catalog page 20.
3. Hornady L-N-L Headspace Comparator System
Hornady’s Lock-N-Load Headspace Comparator system is easy-to-use and handy. You can get a kit with Red bushing-holder body and 5 bushings for $43.43 at Midsouth. Hornady explains: “The Lock-N-Load® Headspace Comparator… gauge measures variations in brass before and after firing or re-sizing. It allows for headspace comparison between fire-formed brass and re-sized brass.” IMPORTANT: Hornady states: “To determine the proper bushing diameter for your cartridge, simply add the neck diameter and the shoulder diameter and divide that number by two. Use the bushing closest to that number.” Hornady offers five: .330″, .350″, .375″, .400″, and .420″.
One tip — We have found the Hornady gauges may vary a little from unit to unit even with the same nominal size. If you have more than one gauge for the same cartridge, test each on your brass — you may then note a slight difference in your bump measurements. There is also an Anvil Base Kit that mounts to the opposite blade on the caliper. This provides a more stable surface for the base of your case.
4. L.E. Wilson Case Gage Depth Micrometer
If you are looking for precise “bump” measurements without having to mess with calipers and clamp-on gauge blocks, you may want to consider the L.E. Wilson Case Gage Depth Micrometer. This takes very precise, repeatable measurements, but you need to know your starting point. The manufacturer explains: “Every reloader should know exactly how much your Full Length Sizing Die is pushing back the shoulder. With the NEW Case Gage Depth Micrometer you can do just that! It has never been easier to measure you cases headspace before and after sizing. The Depth Mic allows you to slip the micrometer perfectly over the top of the Gage with your case inserted into the Gage and take a measurement. Micrometer has graduations of .001″. The Case Gage Depth Micrometer is set to a zero of .100″ on the scale at our factory. Because of differences in ‘feel’ and temperature, we include a the Gage Block for you to test Zero and to adjust if necessary.”
5. Pistol Brass Case DIY Bump Gauge
Last is a “field expedient” set-up if you do not have any of the comparator tools shown above. A sized .45 ACP case (or other suitable pistol case) can be used to measure shoulder bump. The mouth of the pistol case sits on the shoulder of your rifle cartridge brass.
Make sure the .45 ACP case is trimmed square and that it is round. We recommend you first run it through an expander, then size it, trim it and chamfer. Next, take the .45 ACP case and slip it over the neck of a fired, unsized rifle case with the primer removed. Align the two cases between the jaws of your calipers and note the length from rim to rim (See left photo below).
OK, now you have the length for a fired rifle case BEFORE sizing. Next, take a full-length sized rifle case (without primer) and do the same thing, placing the .45 ACP case over the neck of the FL-sized case (Right Photo). The difference between the two numbers is the amount of “bump” or set-back you are applying to the shoulder. Here the difference is .0015″. The amount of bump you need varies with your chamber and your load, but .0015-.002″ is a good initial setting.
We’re pleased to confirm that Vihtavuori remains 100% committed to producing powders for handloaders around the globe. In fact, Vihtavuori is INCREASING production dramatically, with output nearly double what it was 3-4 years ago. That is a great news for all handloaders, hunters, and competitive shooters.
On June 28, 2022, Vihtavuori published this message on its Facebook Page:
We would like to address a rumor in the market. Some [misinformed] sources have suggested that we are planning to withdraw from the consumer reloading market. This rumor is false. We have no intentions whatsoever to quit selling reloading powders or turn our backs on the reloading community. On the contrary, this year we will be producing almost double the amount of reloading powder compared to 3-4 years back. That is a massive increase in capacity.
… The demand for powder has increased enormously on a global scale in the last two years. However, we know that in many areas where the powder demand has doubled, the actual consumption has not increased as much. This means that some shooters are buying powder more than they actually need, probably partly because they believe rumors like the one we’re addressing here. But no need to worry — we are not going anywhere! We are working very hard on meeting the demand on the market and will continue to do so in the future as well — hopefully, for the next 100 years to come!
Vihtavuori Reloading Data Update
Vihtavuori has been busy producing new reloading data. Earlier this summer Vihtavuori released a major update with new load data for .223 Remington and 7.62×39, plus many new loads for .308 Win with new bullets from Berger, Barnes, Nosler, Hornady and more. CLICK HERE for new Reloading Data.
All updated load data is now available on the Vihtavuori website and in the FREE Vihtavuori Reload App. NOTE: In the Vihtavuori Reload App, new reloading data is highlighted in orange.
Download the FREE Vihtavuori Reload App (and get updates) via Google Play Store or Apple App Store:
Hodgdon Powder Company (Hodgdon) offers a series of professionally-produced, “how-to” instructional videos through its online Reloading Data Center. These 3.5-minute videos present rifle, pistol, and shotshell reloading basics in an easy-to-understand, step-by-step format. These mobile-friendly, informative videos can also be viewed on a smart phone or tablet.
To watch the reloading videos go to the Reloading Data Center at hodgdon.com. With your cursor placed to the right/left of the displayed video, click to switch between pistol, rifle, and shotgun videos. Or, for your convenience, we have embedded the Rifle and Pistol videos here. Just click to watch!
Click to Watch Hodgdon Rifle Reloading Video:
Click to Watch Hodgdon Pistol Reloading Video:
In addition to these videos, Hodgdon’s Reloading Data Center (RDC) provides a wealth of information on Hodgdon®, IMR®, and Winchester® propellants. Along with reliable load data, you’ll find explanations of reloading basics, safety procedures, plus answers to frequently asked questions (FAQ).
Hey guys, you’ll probably want to download this Powder Burn Rate Chart issued by Hodgdon/IMR. This table includes the latest IMR powders including the Enduron series (IMR 4166, 4451, 4955, 7977), shown in green below. Please note, the chart is not limited to Hodgdon and IMR propellants. This table also includes popular powders from Accurate, Alliant, Norma, Ramshot (Western), Vihtavuori, and Winchester. There are a total of 163 powders listed in the chart.
This chart provides useful information for all hand-loaders. When doing load development, and testing one powder versus another, it’s generally wise to choose propellants that share the same relative burn rate, as least for starters. While this chart contains “Nov. 2019″ in the title, this is the most recent chart available from Hodgdon/IMR. It is the chart currently linked on the Hodgdon.com Reference Data Center.
NOTE: Hodgdon powders are shown in blue, IMR standard powders are shown in yellow, IMR Enduron powders are shown in green, and Winchester powder are shown in red. DOWNLOAD Chart HERE.
Burn Rate Chart from LoadData.com with 197 Powders
The LoadData.com website has released its own burn rate chart, which is even more comprehensive than the official Hodgdon/IMR chart. We recommend starting with the Hodgdon/IMR listings, but if you can’t find a particular powder on the Hodgdon/IMR chart above, then consult the alternative from LoadData.com which lists 197 powders.
We also caution that, with any powder, start conservatively, at the low end of official load recommendations. Be aware that, even within the same burn range a ball powder can behave differently than an extruded powder. And some powders are much more temperature sensitive than others. Among the available powders on the market, some of best in terms of temp stability are the Alliant TS (temp stable) series, and the popular Hodgdon powders, such as H4350, made by ADI in Australia.
If you load pistol ammo you should have a case gauge (aka “gage”) for each cartridge type you reload. Caliber-specific, precision-machined cylindrical gauges perform many important functions. They will instantly reveal if your rounds are too long or have excessive headspace. They will also show if your case is bulged or otherwise too fat to chamber easily. You can use the gauge with sized brass as well as loaded rounds.
Case gauges are a “must-have” for anyone loading handgun ammunition, particularly if you crank out large quantities of pistol ammo with a progressive press. An oversize round can cause a misfeed, jam, or other problem. That can ruin your day if you are in the middle of a shooting match. If you are relying on your handgun for self-defense, the last thing you want is a malfunction of any kind. This Editor personally runs every pistol round through a gauge before it goes into the ammo box.
UltimateReloader.com Video Shows How to Use Pistol Case Gauges:
Our friend Gavin Gear of UltimateReloader.com has prepared an excellent video that explains the benefits of pistol case gauges and shows how to use them. Gavin uses the quality gages produced by L.E. Wilson. These are available for the most popular handgun cartridges, both autoloader cartridges, and rimmed revolver cartridges. Gavin demonstrates gage use with .40 SW and .44 magnum cases.
Gavin states: “Using a case gage is very simple, and I would recommend that you add one of these gages to your reloader’s tool chest for each of the pistol cartridge types you reload. It may just save you a lot of time and hassle. Peace of mind is hard to put a price on!”
Creedmoor Sports is a leading vendor of products for competitive shooters and serious hand-loaders. Along with great gear, Creedmoor Sports provides informative content for its customers. The Creedmoor InfoZone provides Reloading Tips, Gear Reviews, Shooting News, and basic gunsmithing information.
Bill Gravatt, President of Creedmoor Sports, is an expert on reloading processes and gear. He developed many of the popular tools marketed by Sinclair Int’l, and he brings that expertise to Creedmoor Sports. Bill hosts a series of “how-to” videos produced for the Creedmoor InfoZone.
In this video, Bill Gravatt demonstrates several methods to clean your cases. Bill tells us: “Powder residue should be removed before you insert your cases into your reloading dies. There are several ways to clean your cases. Many shooters use a combination of various methods…”
1. Manual Cleaning — You can use 0000 Steel wool for the outside of the case and a Case Neck brush for the inside. A paper towel can remove any remaining residue. This is a handy way to clean if you load at the range.
2. Vibratory Tumbling — This traditional method works well, particularly for pistol brass. Experiment with both Corn Cob and Walnut media. You can get a brighter shine by putting a small amount of liquid brass polish in the media.
3. Wet Tumbling with Stainless Media — This process can get your brass clean inside and out. Do check to ensure no pins are stuck in the flash-holes. Watch for peening of case mouths that can occur over time.
4. Ultrasonic Cleaning — Ultrasonic cleaning works great for small parts as well as brass. The ultrasonic process removes all carbon and traces of lube, which can leave the inside of case necks too dry. To smooth bullet seating, try putting a tablespoon of Ballistol in the cleaning solution.
Cleaning Reloading Dies
Cleaning your reloading dies is something that many hand-loaders neglect. In this 60-second Tech Tip, Bill Gravatt provides some smart advice on cleaning your dies. Bill notes: “After heavy use, case lube and carbon can build up in your reloading dies. It’s important to keep them clean. Also, with new dies, give them a good cleaning before first use, because they ship with a corrosion inhibitor.”
1. Step 1 — Prior to cleaning, disassemble the die and spray it with a good degreaser. Do this with brand new dies too.
2. Step 2 – Take a patch and run it in the die to remove old lube and gunk. Don’t forget the decapping assembly and other internal parts.
3. Step 3 — After cleaning the die, but before reassembly, spray the die with a good corrosion inhibitor, such as Corrosion-X or Starrett M1.
Fred Zeglin has released a Kindle eBook edition of his popular book Wildcat Cartridges — Reloader’s Handbook of Wildcat Cartridge Design. Gunsmith/author Zeglin explains: “The print edition of Wildcat Cartridges has gone out of print. We have plans to produce a second edition, but that is currently on the back burner. Demand of this book has remained strong so the decision to offer the first edition in a e-book format was made.” The Kindle eBook edition retails for $9.99 on Amazon.com. You can preview a FREE SAMPLE. CLICK HERE then click on “Look Inside” above the cover photo.
This is more than just a history of cartridges. Dimensional drawings and loading data accompany many of the cartridge descriptions. More recent and popular designs are included as well as the “classic” older wildcats. There are chapters about important cartridge designers like P.O. Ackley, Jerry Gebby, Rocky Gibbs, and Charles Newton. (The hardback edition of the book contains 288 pages of stories, illustrations, instructions, and data.)
Gunwriter Wayne Van Zwoll says Zeglin’s book is a valuable resource: “Fred has illustrated his book well, with neat line drawings and photos you probably won’t find anywhere else. It’s a rare technical treatise that draws you in with illustration, or that keeps you with an easy flow of chat that, were it lifted from print, might pop up at any gun counter or handloading bench. Fred Zeglin has done well with this book, giving wildcatters – indeed, all rifle enthusiasts – an overview of a culture often mentioned but little explored on the page.”
Writing about the 2005 Print Edition of Wildcat Cartridges, Big Bore Journal declared: “This is a fantastic book on American wildcats, US loads and much more. A must have for wildcatters and gunsmiths.”
About the Author
An award-winning writer, Fred Zeglin operates Z-Hat Custom, and Hawk Cartridges. Fred has taught classes for the NRA Gunsmithing Schools in Colorado and Oklahoma. He served as production manager for McGowen Precision Barrels for a time, and was a tech advisor for 4D Reamer Rentals. To learn more about Z-Hat and Fred’s Wildcat Cartridges eBook, contact:
Z-Hat Custom Inc.
Fred Zeglin
432 E. Idaho St., Suite C420
Kalispell, MT 59901
In years past the U.S. Army Marksmanship Unit Facebook page regularly released reloading “how-to” articles each week. One “Handloading Hump Day” post covered bore-cleaning, specifically the use of pull-through style bore-snakes. Visit the USAMU Facebook page for other helpful tips.
Barrel Cleaning with Bore-Snakes
Today, we’ll shift from handloading to rifle bore cleaning and maintenance, with information courtesy of the USAMU’s Custom Firearms Shop. We recently had some inquiries about bore cleaning, and this seems a good opportunity to share. After all, even the best handloads won’t yield their full potential in a poorly-cleaned and maintained rifle.
NOTE: Hoppes claims a trademark on the term “BoreSnake” (one word, no hyphen). For this article, the USAMU has used the term in hyphenated form, two words. We believe the USAMU is referring to a Hoppes Brand Boresnake, not a different bore cleaning rope.
BORE-SNAKES: MIRACLE REPLACEMENT FOR THE CLEANING ROD?
The experiences of our both firearms test specialist and this writer have given no evidence that proper use of a clean bore-snake will damage a match barrel. Of course, one does not pull the bore-snake at an angle to the crown when removing it — pull it straight out, parallel to the bore’s direction, to prevent crown wear over time.
Bore-snakes are very useful for some applications (primarily a hasty, interim wipe-down). In [my] experience they cannot replace a thorough cleaning with a proper rod and brushes. While the experiment cited here involves rimfire, it may help illustrate. Several years ago, the writer used his new, personal Anschutz to investigate the bore-snake issue. It had been fired ~350 rds with match ammo and had had 3 typical rod/brush cleanings.
Next, starting with a clean bore, the writer fired 300 more rounds without cleaning in order to build up a “worst-case” fouling condition. Afterwards, the writer examined the bore with a Hawkeye bore scope. There was a uniform, grey film down the entire barrel, with some small, intermittent lead build-up at and just forward of the throat.
Some bore-cleaning rope products feature separate, detachable bronze brush and bore mop segments. This allows more usage options (e.g. mop only), and makes it easier to clean the brush elements:
A new bore-snake was then wet with solvent and pulled through the bore. The Hawkeye revealed that the grey fouling was gone, and much of the visible fouling at the throat was reduced. However, nine more passes with the bore-snake, checking after each with the Hawkeye, revealed no further improvement in cleaning. The writer then cleaned with two wet patches, observed, then one stroke of a new, wet bronze brush, and one wet patch to clean out residue.
The Hawkeye showed a significant reduction in fouling at the throat; it was virtually gone. A second pass with a wet bronze brush and a wet patch removed the remaining fouling. Scrubbing the bore further, checking to see how much fouling was removed, revealed no significant improvement. The reason for this test was to learn what’s needed to get (and keep) this Anschutz clean with minimal cleaning rod use — and thus, minimal risk of bore damage/wear. Leaving fouling in the bore promotes corrosion over time.
Obviously, this applies to a nice, smooth rimfire match barrel, using good, well lubed ammo. It doesn’t apply directly to the use of copper-jacketed bullets, which leave a stubborn fouling all their own. However, it does suggest that while the bore-snake can be helpful and a useful field-expedient, to truly clean a rifle barrel one will still need a good quality rod, bronze brush and solvents. [Editor: Add a good-fitting cleaning rod bore guide.]
SO, WHAT ABOUT BORE SNAKES FOR BARREL BREAK-IN?
The goal of barrel break-in is to fire each shot through a clean barrel, preventing copper buildup and allowing the bullets their best chance at burnishing sharp edges. Thus, it seems this purpose would be best served by one’s usual rods, brushes and rod guides.
We are often asked “Can I get more velocity by switching primer types?” The answer is “maybe”. The important thing to know is that changing primer types can alter your load’s performance in many ways — velocity average, velocity variance (ES/SD), accuracy, and pressure. Because there are so many variables involved you can’t really predict whether one primer type is going to be better or worse than another. This will depend on your cartridge, your powder, your barrel, and even the mechanics of your firing pin system.
BE SAFE: Be cautious when changing primer types. Glen Zediker recommended decreasing your load ONE FULL GRAIN when changing to a different primer type, one that you haven’t used before.
Interestingly, however, a shooter on another forum did a test with his .308 Win semi-auto. Using Hodgdon Varget powder and Sierra 155gr Palma MatchKing (item 2156) bullets, he found that Wolf Large Rifle primers gave slightly higher velocities than did CCI-BR2s. Interestingly, the amount of extra speed (provided by the Wolfs) increased as charge weight went up, though the middle value had the largest speed variance. The shooter observed: “The Wolf primers seemed to be obviously hotter and they had about the same or possibly better ES average.” See table:
Varget .308 load
45.5 grains
46.0 grains
46.5 grains
CCI BR2 Primers
2751 fps
2761 fps
2783 fps
Wolf LR Primers
2757 fps
2780 fps
2798 fps
Speed Delta
6 fps
19 fps
15 fps
You can’t extrapolate too much from the table above. This describes just one gun, one powder, and one bullet. Your Mileage May Vary (YMMV) as they say. However, this illustration does show that by substituting one component you may see significant changes. Provided it can be repeated in multiple chrono runs, an increase of 19 fps (with the 46.0 grain powder load) is meaningful. An extra 20 fps or so may yield a more optimal accuracy node or “sweet spot” that produces better groups. (Though faster is certainly NOT always better for accuracy — you have to test to find out.)
WARNING: When switching primers, you should exercise caution. More speed may be attractive, but you have to consider that the “speedier” primer choice may also produce more pressure. Therefore, you must carefully monitor pressure signs whenever changing ANY component in a load. In his books, the late Glen Zediker recommended decreasing your load ONE FULL GRAIN when changing to a different primer type, one that you haven’t used before.
In the past the U.S. Army Marksmanship Unit published a series of reloading “how-to” articles on its USAMU Facebook page. One “Handloading Hump Day” article covered two basic case prep chores — uniforming primer pockets and deburring flash-holes. Visit the USAMU Facebook page for other tips.
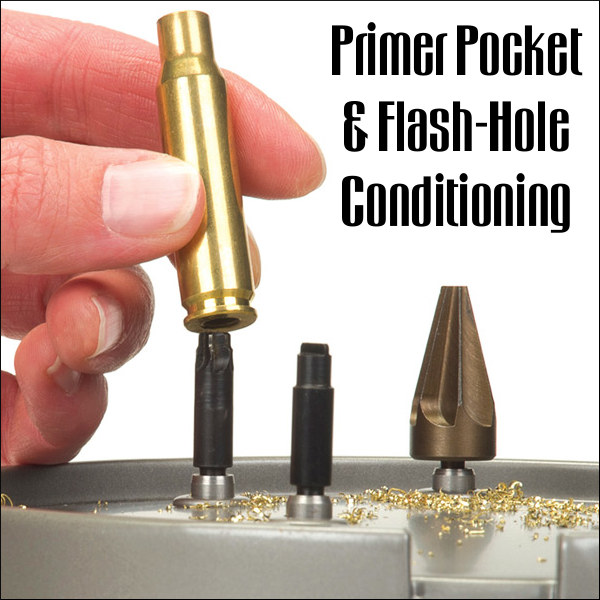
Primer Pocket & Flash-Hole Conditioning
This week, we’ll address a question that frequently arises: “Do you uniform primer pockets and deburr flash-holes?” As we tailor our handloading methods to the specific needs of each instance, the answer, not surprisingly, is “Sometimes!” However, don’t flip that dial just yet, as what determines our approach may be helpful in deciding how to address one’s own techniques. Moreover, we have a buried “Easter Egg” morsel that may bring a chuckle, as well as useful safety information!
Generally, the USAMU Handloading Shop does not uniform primer pockets (PP) or deburr flash holes (FH) of our rifle brass. We’re certainly not against it… Rather, this reflects the very high volume of ammunition we load, the fact that very few cases are ever re-loaded for a second firing, and the types of brass we use. However, as a need is perceived, we DO deburr flash holes. Of interest, we have fired many very small, 1000-yard test groups and aggregates using weight-selected, domestic brass that had not had PPs uniformed or FHs deburred.
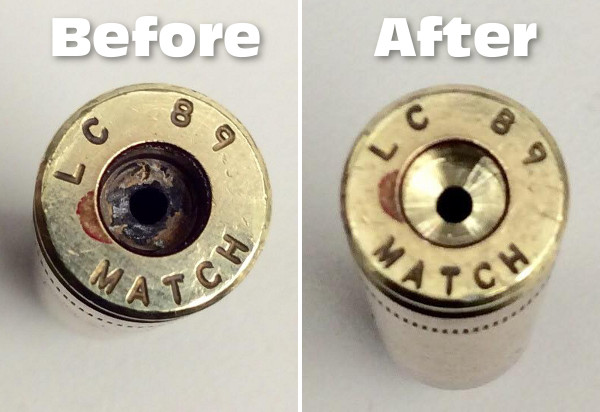
Before and After — On the left is a fired, deprimed 7.62×51 case with primer residue intact. On the right the primer pocket has been uniformed to SAAMI specs. Note the shiny finish at the bottom of the pocket — evidence of the the removal of metal when uniforming the primer pocket.
As to the type cases we use, many thousands of our long-range 5.56mm cases come to us from the arsenal with the primer of our choice pre-installed and staked-in, per usual practice. Obviously, we cannot uniform either FHs or PPs on this live, primed brass. However, after careful sorting, inspection and preparation, we do obtain match-winning results with it.
Shooters who reload their brass several times may decide to uniform PPs and deburr FHs, especially on their “300-yard and beyond” brass. Here, they will use the cases many times, while the uniforming is performed only once. Also, most handloaders only process moderate amounts of brass, compared to our multi-thousand round lots.
Having high quality Long Range (LR) brass helps. Many of the better brass manufacturers [make] their flash holes so that no burrs are created. Still, it does pay to inspect even THESE manufacturer’s products, as occasional slips are inevitable. Very rarely, some of the best makers will have a significant burr in, say, 1 per 1000 or 2000 cases, and it’s worth catching those.
Exceptions can always be found. Recently, we began processing a large lot of match brass from a premier manufacturer. We were startled to find that every case had a significant burr in the FH — something we’d never before seen from this maker. We then broke out the FH deburring tools and went to work.
Some observers have noted that it can be difficult to truly verify the contribution to accuracy of these procedures — particularly when firing from the shoulder, in conditions. Members of this staff, as individual rifle competitors, do often perform these operations on their privately-owned LR rifle brass. One could ascribe this to the old High Power Rifle maxim that “if you think it helps, then it helps.”
However, a World Champion and Olympic Gold/Silver medalist here commented on his own handloading (for International competition, which demands VERY fine accuracy). He noted that he did seem to see a decline in accuracy whenever he did not uniform FHs, deburr FHs and clean primer pockets before each reloading. (One might be tempted to counter that only a truly World Class shooter could reliably detect the difference.) However, with the wisdom of decades experience, our Champion also remarked that “It could have been that I just wasn’t shooting as well that day.”
For those who do opt for these procedures, note that various tool models may have adjustable depth-stops; pay attention to the instructions. Some FH-deburring tools (which enter the case mouth, not the primer pocket) are dependent upon uniform case length for best results.
Above is a flash-hole deburring tool on an RCBS powered case-prep unit. These case prep machines can save a lot of pain and misery, helping one perform various functions quickly and efficiently.












 Bore-snakes are very useful for some applications (primarily a hasty, interim wipe-down). In [my] experience they cannot replace a thorough cleaning with a proper rod and brushes. While the experiment cited here involves rimfire, it may help illustrate. Several years ago, the writer used his new, personal Anschutz to investigate the bore-snake issue. It had been fired ~350 rds with match ammo and had had 3 typical rod/brush cleanings.