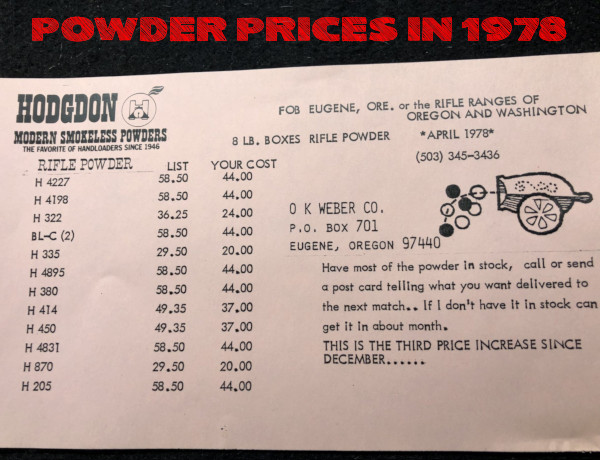
Have inflation (and supply chain shortages) affected the price of powder? You bet. Probably WAY more than you could imagine. Forum member “Two Time HM LR” posted this interesting photo (above) showing Hodgdon powder prices from 1978, as sold by O.K. Weber in Oregon.
Now the prices — $20 to $44 — may not get your attention at first. But take note that these numbers are for EIGHT pound jugs. Yep eight-pounders were all under $45! For example, H4895 was $44 for 8 pounds back in 1978, 44 years ago. And H335 was $20 for eight pounds — that’s just $2.50 per pound!
These days a single pound of a desirable powder such as H4831 might cost $65 at some stores IF you can find it at all. On Hodgdon’s web site, H4831 powder is priced at $60.99 per pound in October 2022. Using that current $60.99/lb figure, H4831 is now ELEVEN times higher than it was in 1978, when H4831 cost $44 for 8 pounds, i.e. $5.50 per pound.
Here are some comments from our Forum Members:
“Heck those prices are just about the same as current ones, just a little smaller container now.” — Joe
“I’ve got some H4831 in a can marked ‘WWII Surplus Powder’ with a price tag of $2.75. We’ll never see that again either.” Rick in Oregon
“1978 prices and 2022 income would be nice. Unfortunately that doesn’t work. If you compare prices and income, powder cost about the same. You also have to discount the temporary gouging that we are seeing.” — Tmwinds
“So I used to buy gas for 10 cents per gallon and they’d pump it, check the oil, and clean the windshield.” — Pirate Ammo
One comment suggests that the powder price hike actually tracks general U.S. currency inflation over the last four decades. So perhaps powder price increases are not as bad as they seem, when compared to how all prices have risen since 1978:
“Using H4895 as a comparison basis at $58.50 (list price) in 1978 calculates it to $246 in todays money. Looking at Powder Valley prices it looks like around $256 for the same item in todays money, so it really hasn’t gone up. Availability is another issue though and if someone is really needing powder they may well have to pay above suggested retail.” — Drover
The U.S. Army Marksmanship Unit (USAMU) has published a series of reloading “how-to” article on the USAMU Facebook page. In this article, the USAMU’s reloading gurus address a question frequently asked by prospective handloaders: “Should I buy a single-stage press, or a progressive?” The USAMU says the best answer is Solomon-esque in both its wisdom and simplicity: “Get BOTH!” However, there is definitely more to the issue, as the USAMU explains below.
Bottom line, the USAMU recommends that novice handloaders start with a single-stage press. That press will always be useful for many tasks, even if a multi-station progressive is later acquired.
Progressive Press Safety Considerationsby USAMU Staff
Many are the beginning handloaders who have asked a friend about their “setting up” a progressive press for them. The idea is that the newbie could then just feed in components and crank out buckets of practice ammo without needing to really learn much about handloading. Tempting though this might be, that’s simply not how it works. Such an approach might be ok if there were never a malfunction with either press or operator, but that’s unrealistic. Our hypothetical newbie would then lack the knowledge to problem-solve most situations.
Worse yet, several different handloading operations would be occurring at different stations on the progressive press at the same time. It takes an experienced operator to keep track of, and truly understand the significance of, all those potential mini-problems. Loading without this experience is a recipe for potential disaster — such as a double powder charge (especially with pistol cartridges) dropped while the loader was attending to some other function, etc. Progressives are an animal unto themselves, and while they offer many benefits, they do take some getting used to – even by experienced handloaders!
ILLUSTRATIVE HORROR STORY
Here, enter a 40-year veteran handloader who decided to jump onto the progressive bandwagon late in his career, having used only single-stage presses all his life. A High Master NRA High Power Rifle competitor, he had no background in competitive pistol shooting, where historically most progressive presses are found.
Experienced Action Pistol shooters have typically encountered multiple episodes in which shooters “skipped” a powder charge for some reason, leading to a squib round and a bullet possibly lodged in the bore. Thus, at matches, it’s reflexive for them to yell “STOP!” in unison if they see a shooter get a “click” vs. a “bang”, and rack the slide to keep firing. This writer has personally seen several pistols saved in just such scenarios over the years.
Better Safe Than Sorry — the RCBS Lock-Out Die
RCBS Makes a “Lock-Out Die” that senses the powder charge. This will halt the Progressive press if you have a double charge, or an undercharge. Your Editor has the Lock-Out Die on his RCBS Pro 2000. It has “saved his bacon” a half-dozen times over the years. It can be used on Dillon and Hornady progressives as well as RCBS machines.
Click No Bang — What NOT to Do
Our High Master set up a popular progressive press and began turning out .223 Rem 100-yard practice ammo with abandon. He was using a moly-coated 52gr match bullet and an economical, fast-burning surplus powder that gave great accuracy. Once on the range, he began practicing strings of rapid-fire. All was well, until he heard “Click!” rather than “Boom”.
Lacking the above experience or onlookers to halt him, he reflexively operated the charging handle on his expensive, custom NM AR15 Service Rifle, and the next trigger squeeze reportedly registered on seismographs over at least a three-state radius. He sat, uninjured but bewildered, until the hail of expensive bits and pieces quit raining down around him.
When the smoke cleared, he immediately cursed the horrid, evil, demonically-possessed progressive press for this, his first-ever reloading mishap. His $1400 NM upper was ruined, but thankfully, his $800 pre-ban lower… and he had escaped injury.
This tale is told not to discourage the use of progressive presses, but to emphasize the need to EASILY and IMMEDIATELY KNOW what is happening with the press at each station, every time the handle is cranked. Not to do so is, as they say, “bad ju-ju.”
It illustrates why we at the USAMU Handloading Shop agree in recommending that new handloaders should begin with a single-stage press. Once one thoroughly learns the steps in each phase of handloading by repeated experience, then one will be qualified to move on to a progressive press.
The single-stage press will REMAIN virtually indispensable for one’s entire handloading career, even after having purchased a progressive press (or two). There are endless small projects that are best handled on a single-stage press, and a poll of USAMU’s Handloading staff reveals that not one would willingly be without his single-stage press, despite owning at least one progressive.
I have seen it time and time again, shooters on the line wrestling with their rifle trying to get the bolt closed while the wind is switching. They were too focused trying to get their bolt to close and getting their rifle settled back on the bags that they missed the wind switch. Bang… Eight! The straw that broke the camel’s back for me was at the 2017 Canadian Nationals. I was paired up with a young girl and she would try really hard to close the bolt on her rifle. The majority of the time she would get it to close, but often times she could not even get the round to chamber. She was focused on her rifle the entire time rather than on the conditions. When we completed our strings, she had five rounds that did not chamber our of 15! That is way too many!. I told her she needed to think about Full-length sizing with 0.002″ shoulder bump, or Controlled Full-length Sizing like I call it. I told her not to worry about losing accuracy. I told her that I full-length size all my rounds and asked if she noticed how smooth my bolt was and noticed my score. She said yes, they were both great!
Controlled Full-length Sizing Does NOT Harm Accuracy
I have found that Controlled Full-length Sizing does NOT hurt accuracy or shorten brass life. I find that I can focus much more on the conditions when I don’t have to think about chambering a round nor extracting it. It has become second nature. After firing, I keep my head welded to the stock, I open the bolt by placing my thumb on top of stock and rotating hand upwards. I reach in and retrieve spent case, place it back in ammo box, and pick up another loaded round and put in chamber. I verify conditions and when ready, I push the bolt in and close it with my index and middle finger.
With Controlled Full-length Sizing you “bump” the shoulder around .002″ for bolt guns.* Image courtesy Sinclair International which carries a variety of Full-length dies.
Whidden Full-Length Sizing Dies by AccurateShooter.com Editor
For proper Full-length sizing, you want a quality die that’s a very good match to your chamber. For our project rifles we usually turn to Whidden Gunworks which offers both bushing and non-bushing FL dies. And if you want the hot new option, check out Whidden’s patent-pending, click-adjustable FL-sizing die. This gives instant, precise control over shoulder bump. It works great.
*With gas guns, such as the AR10, you may want to increase shoulder bump to .003″ or more. With some benchrest cartridges, .0015″ bump may prove optimal. But .002″ is a good starting point.
The U.S. Army Marksmanship Unit (USAMU) has published a series of reloading articles on its Facebook Page. In this article, the second in a 3-part series, the USAMU covers the process of loading competition pistol ammunition. The authors focus on two key elements — the taper crimp and the quality/uniformity of the original brass. If you shoot pistol competitively, or just want to maximize the accuracy of your handguns, read this article. The taper crimp tips are very important.
Loading Accurate Competition Pistol Ammunition — Part 2 of 3
Today, we resume our series on factors affecting accuracy in pistol handloads. Readers who missed Part One can visit our USAMU Facebook Page. Scroll down to March 28, 2018 to find that first installment which is worth reading.
One often-overlooked aspect of handloading highly-accurate pistol ammunition is the amount of taper crimp used, and its effect on accuracy. (NOTE: this article pertains to loading for semi-autos – revolver crimp techniques involve some quite different issues.) Briefly, different amounts of taper crimp are used with various handloads to obtain best accuracy. The amount is based on bullet weight, powder burn rate and charge, plus other factors such as case neck tension. During machine-rest testing of experimental Service Pistol ammunition, many variables are examined. Among these, our Shop often varies a load’s crimp in degrees of 0.001″ when re-testing for finest accuracy.
How to Measure Taper Crimp on Pistol Cartridges
One question that often arises is, “How do I measure the taper crimp I’m putting on my cartridges?” Using the narrow part of one’s dial caliper jaws, carefully measure the case diameter at the exact edge of the case mouth on a loaded cartridge. It’s important to take several measurements to ensure consistency. Also, be sure to measure at several places around the case mouth, as case wall thickness can vary. After measuring 2-3 cartridges with a given crimp setting, one can be confident of the true dimension and that it can be repeated later, if needed.
However, for good results, one must use brass from one maker due to variances in case wall thickness. For example, the same degree of crimp that imparts a measurement of 0.471″ with Brand X brass may result in 0.469″ with Brand Y. Thus, for best accuracy, using brass from the same manufacturer is important — particularly for 50-yard Slow Fire. In a perfect world, it is better still to use brass from one lot number if possible. With the popularity of progressive presses using interchangeable tool heads, keeping separate tool heads adjusted for each load helps maximize uniformity between ammunition lots.
Brass Uniformity and Accuracy
Brass is important to pistol accuracy. While accurate ammunition can be loaded using brass of mixed parentage, that is not conducive to finest results, particularly at 50 yards. It is important for the serious competitor to pay attention to his brass – even if only for the 50-yard “Slow Fire” portions of “Bullseye” matches and practice. By segregating brass as described above, and additionally keeping track of the number of times a given batch of cases has been fired, one can ensure case neck tension and case length are at their most uniform.
Given the large volumes of ammunition consumed by active pistol competitors, using inexpensive, mixed surplus brass for practice, particularly at the “short line” (25 yards), is understandable. In NRA Outdoor Pistol (“Bullseye”), the 10-ring is relatively generous — especially for a well-trained shooter with an accurate pistol and load. However, for the “long line” (50 yards), purchasing and segregating a lot of high-quality brass to be used strictly for slow-fire is a wise idea. To keep track of your brass on the line, use a unique headstamp marking with 1 or 2 colors of marking pen ink.
Uniform Cartridge Overall Length is Important
Cartridge case Overall Length (OAL) uniformity as it comes from the factory is important to achieving utmost accuracy. More uniform case lengths (best measured after sizing) contribute to greater consistency of crimp, neck tension, ignition/burn of powder charge, headspace (rimless cartridges), etc. Cartridge case-length consistency varies noticeably by maker and, with lesser manufacturers, also from lot to lot. Some manufacturers are more consistent in their dimensions than others, and also in the hardness/ductility of their brass. Similarly, pay attention to primer brands, powder lot numbers, etc.
Consider Using a Lock-Out Die with Progressive Presses
When reloading pistol ammo with a Progressive press, we strongly recommend the use of a lock-out die, or other system that can detect double charges or low charges. If your progressive is manually advanced, the possibility of a double charge is very real — and that can have disastrous consequences.
On UltimateReloader.com website you’ll find an excellent two-part series on the function and set-up of the RCBS Lock-Out Die. This die prevents loading if a high or low powder charge is detected. The video below shows setup of the RCBS Lock-Out Die on the Dillon XL-650 progressive press.
The Shooting Sports USA website includes two excellent articles about the basics of metallic cartridge reloading. These two articles provide an excellent summary of the key procedures. If you are new to reloading, we recommend you read both articles:
Part II is particularly helpful because it explains the entire reloading process step-by-step, with 14 listed steps. The author notes: “In this, the second installment on metallic cartridge reloading, we’ll follow the sequence of steps involved in reloading a rifle cartridge and refining a metallic cartridge load. These steps are based on the use of a single-stage reloading press and a separate priming tool.”
Much important advice is provided as this article runs through the 14 Steps of Reloading. For example, when explaining Step 13, Bullet Seating, the article states:
“Proper seating depth is critical. Too much bullet protrusion and the cartridge may not work through the gun’s magazine, or it may fail to chamber. Too little and the bullet intrudes excessively into the powder chamber, decreasing volume and raising pressure. Neck tension is also important; any bullet that fails to seat with some resistance may be held only loosely by the neck and may be driven back into the case when the round is chambered, especially in semi-automatic arms.”
Important Guide to Detecting Over-Pressure Signs in Brass
As an example of the invaluable advice provided in these two articles, here’s a sample from Part II that explains how to determine if your load is over-pressure. We recommend that EVERY reader read this twice. There are more things to consider than a stiff bolt lift. You need to inspect cartridges very carefully:
Every serious hand-loader benefits from a precise, repeatable, and efficient powder dispensing system. There are many electronic powder dispensers on the market, starting at about $230 for a Frankford Arsenal Intellidropper and $240 for a Lyman Gen6. At the high end, the ultimate powder weighing/dispensing system would be an Auto-Trickler V4 mated to an top-tier electronic Force Restoration scale. Such a system can run $1200 or more, depending on scale cost.
In today’s Saturday video showcase we feature eight videos about electronic powder dispensers, as well as Auto-Trickler systems (both V3 and V4). If you are in the market for a new powder scale/dispenser system, we recommend you watch these videos. You may be surprised by some of the findings, and you will certainly learn more about these machines — their pros and cons. That knowledge can help you decide what electronic powder dispenser best deserves your hard-earned dollars.
Five Powder Dispenser Comparison Test (All Units Purchased)
If you are in the market for a sub-$500 electronic powder dispenser, definitely watch this review. This Backfire comparison test is notable because the tester spent his own money to purchase all five powder dispensers being reviewed. That means Backfire could tell the full truth, both good and bad, about the machines. In fact, Backfire bought TWO ChargeMaster Lites because one failed (See 14:12 time-mark). The reviewer liked the RCBS ChargeMaster Supreme, but his top choice overall was the Hornady Auto Charge Pro. He favored the overall design, and really liked the way the dispensing speeds could be easily set faster or slower. Here are highlights from the video review:
00:08 Speed Test
03:09 Accuracy Test
07:57 Frankford Arsenal Intellidropper
09:08 Lyman Gen 6
10:44 RCBS Chargemaster Supreme
12:03 Hornady Auto Charge Pro
14:12 RCBS Chargemaster Lite
14:41 Conclusions
AutoTrickler V3 vs. Hornady Auto Charge Pro
In the Backfire comparison video above, the Hornady Auto Charge Pro powder dispenser earned top marks among sub-$500 units. Here the Auto Charge takes on some tougher competition — an ultra-precise Force Restoration scale fitted with an Auto-Trickler V3, a system that cost upwards of $1150.00 U.S. Dollars. The Australian duo running the comparison found the Auto-Trickler system was more accurate and consistent. Notably, with a dispense speed of just 14 seconds. the Auto-Trickler V3 system was significantly faster than the Hornady machine. The Auto-Tricker V3 has been superseded by the new Auto-Trickler V4 which retails for $490.00 USD. Add $625 or more for a good Force Restoration scale such as the A&D FX-120i.
RCBS New ChargeMaster Supreme and Other ChargeMasters
In this well-made video, Gavin Gear of UltimateReloader.com does a detailed review of the new-generation RCBS ChargeMaster Supreme. He puts it through his paces, verifying its accuracy and repeatability. He shows how the unit can be programmed. At the 17:20 time-mark, Gavin employs an A&D FX-120i Force Restoration scale to check the ChargeMaster Supreme’s charge-weighing precision. The results were good.
Frankford Arsenal Intellidropper vs. RCBS ChargeMaster Link
The Frankford Arsenal Intellidropper, now just $230 on sale at Midsouth, was very innovative when first released, offering remote Bluetooth access and a wide range of programmable features. The downloadable App stores your load data and has preloaded bullet and powder databases. This video compares the Intellidropper with another Bluetooth-enabled modern powder dispenser, the RCBS Chargemaster Link. A free RCBS App allows you to control settings remotely.
Hornady Auto Charge Pro Review by Ultimate Reloader
As the $350 Hornady Auto Charge Pro dispenser was top-rated in the Backfire comparison at the start of this article, we thought we’d include a detailed review from Gavin Gear of UltimateReloader.com. If you are thinking of buying a Hornady Auto Charge Pro, definitely watch this video, as it is the most thorough Auto Charge Pro review on the web and Gavin is by far the most articulate tester. SEE FULL TEST.
AutoTrickler V4 and Force Restoration Scale
The AutoTrickler V4, paired with a quality Force Restoration scale, is the “Rolls Royce” of electronic powder dispensing systems, offering unrivaled charge-weight accuracy, great repeatability, and ultra-fast dispensing speeds. If you have the budget — $490 for the V4 plus $625+ for scale — the AutoTrickler V4 is a superb system that lets you load extremely accurate, consistent ammo. This detailed F-Class John video shows how to set up the system properly and control the dispensing and trickling functions.
RCBS MatchMaster vs. AutoTrickler V3 with A&D FX-120i Scale
This video is interesting because it compares the most advanced and expensive mass-market electronic dispenser, the $899 RCBS MatchMaster, with an AutoTrickler V3 mated to an ultra-precise Force Restoration scale. The AutoTrickler V3 + scale system offers wicked fast dispensing while delivering near-single-kernel precision and great repeatability. The MatchMaster has some interesting features, including dual dispensing tubes and a special slower, “Match Mode” dispensing function which provides enhanced precision.
BONUS Video: RCBS ChargeMaster Dispenser vs. Four Scales
This video answers the question “How does a common powder dispenser’s weighing accuracy compare to stand-alone scales?” Here the tester compares the weighing precision of an early-model RCBS ChargeMaster with four dedicated scales: A&D FX-120i (Force Restoration), Hornady G2-1500, Hornady GS-1500 (Gen 1), and a WAOAW milligram scale. These scales range significantly in price, with the FX-120i Force Restoration the most expensive by far. The features/prices of the four scales are listed at 4:41 time-mark. Accuracy/repeatability comparison testing with test weights starts at 10:12 time-mark.
Product Review by F-Class John
Case preparation is critical for precision reloading. One must trim cases, debur/chamfer case mouths, clean necks, spruce up primer pockets and do other important tasks. Complete case prep can involve many separate processes, each requiring its own tools. With each of those tools comes additional cost as well as the need for more storage and bench space. To make case prep easier, faster, and more convenient Lyman created the Case Prep Xpress. The Case Prep Xpress, introduced a few years back, combines up to five prep stages into one well-built, stable, versatile unit. Watch this video to see the machine in action:
The Case Prep Xpress features five (5) independently-turning spindles all with the common 8/32 thread. This allows you to attach multiple tools supplied with the unit PLUS many other screw-on prep tools. For our testing we started out using a variety of the 12 included tools and found they cover the majority of case prep tasks. Lyman supplies deburr and chamfer tools, pocket uniformers, reamers and cleaners, as well as an assortment of neck brushes.
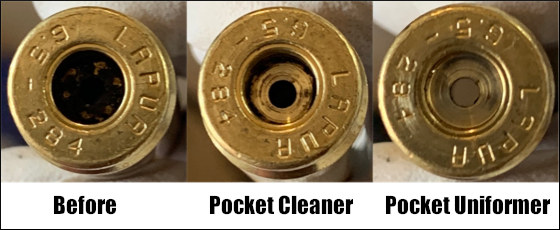
The deburr and chamfer tools worked really well, creating beautiful bevels all while leaving a nice flat edge across the top of the neck which is critical for accuracy and brass life. We found the primer pocket cleaning tool did a good job, but for truly clean pockets we recommend using the primer pocket uniforming tool, which very efficiently removes even hard residues.
The benefit of having interchangeable heads is that you can add your own accessories. We like to use a bore brush with bronze wool wrapped around it for use inside our necks. This worked perfectly once we screwed it in. In fact, we couldn’t think of any 8/32-threaded accessory that wouldn’t work well on this machine. Another great design feature is how all the accessories are oriented straight up. This allows for perfect visual alignment of your cases onto the tools which is critical — especially when performing cutting operations such as primer pocket uniforming.
Along with the five power stations there are six female-threaded storage spots on the sides where tools can be placed to ensure they don’t get lost. We like this feature since there will be more than five accessories you want to use and having them easily available is a great feature. You can keep 11 tools right on the machine (5 on top, 6 on the sides). That way you don’t have to dig through storage bins.
The Case Prep Xpress has a removable front bin to hold brass shavings, and there are two circular trays on either side of the bin. In front is a long tray that holds the provided brush. This makes it relatively easy to clean off brass shavings and other debris from case prep processes.
SUMMARY — Versatile Case Prep Xpress Is A Good Value
For the money, Lyman’s Case Prep Xpress is tough to beat. It performs multiple tasks well while being stable and easy-to-use. Yes there are some multi-spindle prep centers that offer variable or fast/slow RPM spindles while the Lyman’s spindles are all fixed RPM. (See, e.g. the RCBS Brass Boss). However those other systems don’t include all the convenient on-board storage of the Case Prep Xpress, and are more expensive. The Lyman Case Prep Xpress sells for $150-$170 “street price”. It’s currently on sale for $146.99 on Amazon. This makes the Lyman Case Prep Xpress a fine value — it offers great versatility while saving space and saving money compared to buying five or more separate, powered tools.
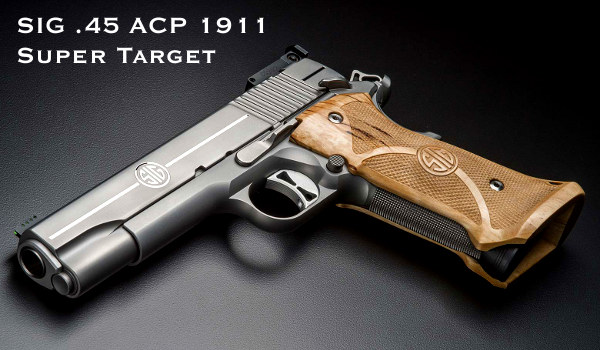
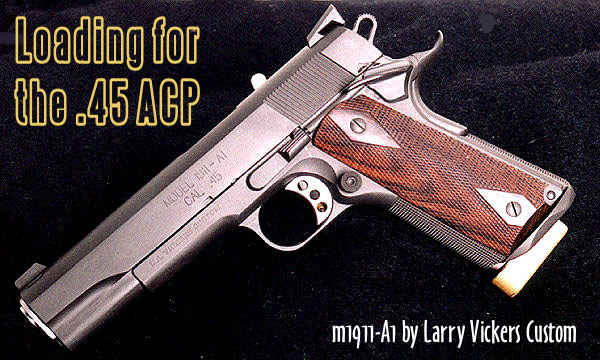
There’s an interesting thread in our Shooters Forum right now — all about good choices for a .45 ACP handgun. If you’re considering getting your first .45 ACP pistol, you should read that thread. If you already own one or more .45 ACP handguns, this article offers some good tips on handloading options.
Good Powder Choices for the .45 ACP
We know that many of our readers own .45 ACP handguns and load for this extremely accurate “classic” cartridge. When selecting a powder for the .45 ACP, there are many good options. All the major powder manufacturers make propellants with appropriate density and burn rate characteristics for the .45 ACP. Popular choices include: AA #5 (Accurate Powder); Bullseye (Alliant); Clays, HP-38, and Titegroup (Hodgdon); VV N310 and N320 (Vihtavuori); and WW 231 and WST (Winchester). We’ve tried all those powders in a variety of .45 ACP handguns. When we consider all the factors that make for a good pistol powder, we think Vihtavuori N320 is one of the best available propellants for the .45 ACP.
Vihtavuori N320 is very accurate, it meters well, and it burns clean, with minimal smoke and flash. If you haven’t tried VV N320 yet, you should.
Pros and Cons of Different Powders for the .45 ACP
This Editor has personally tried out eight or more different powders for the .45 ACP. Bullseye works but it is very dirty (both smoke out the barrel and sooty powder fouling on case). Though it otherwise burns clean, Titegroup leaves a singular (and nasty) high-temp flame streak on your brass that is hard to remove. AA #5 is a good choice for progressive press newbies as you use more powder so a double charge will (usually) be obvious. I like AA #5 but N320 was more accurate. Clays burns clean but some powder measures struggle with flake powders like this. WW 231 offered excellent accuracy and metered well, but it kicked out sparks with little pieces of debris that would hit me in the face. Who wants that?
I personally tried all the powders listed above with lead, plated, and jacketed bullets. After testing for accuracy, consistency, and ease of metering, I selected VV N320 as the best overall performer.
Vihtavuori N320
No powder tested was more accurate (WW 231 was equally accurate).
Meters very well in all kinds of powder measures.
Produces very little smoke from muzzle.
Does not put nasty burn streak on brass like Tite-Group does.
Low Flash — you don’t get particles and sparks flying out like WW 231.
Cases come out from gun very clean — so you can tumble less often.
Forum member and gunsmith Michael Ezell agrees that N320 is a good choice for the .45 ACP. Mike has also found that WW 231, while accurate, produces sparks and a large flash. Mike writes: “I first started using N320 after my first night shoot, while shooting IDPA/IPSC matches. It was astonishing how much of a fireball the WW 231 created. I was literally blinded by the flash while trying to shoot a match. As you can imagine, that didn’t work out very well. I went from WW 231 to N320 and never looked back…and the flash from it was a fraction of what a kid’s sparkler would give off. I have nothing but good things to say about [N320] after using both. Night shoots are a real eye-opener! When it comes to a personal protection… there is, statistically, a very high chance that if you ever have to use a gun to protect yourself or your family, it’ll be in the darkness[.] Being blinded by muzzle flash (and deafened by the noise) are things that should be considered, IMO.”
This Editor owns a full-size, all-stainless S&W 1911. After trying numerous powders, I found VV N320 delivered the best combination of accuracy, easy metering, consistency, clean burning qualities, and low muzzle flash. My gun has proven exceptionally accurate using N320 with bullets from 180 grains to 230 grains — it will shoot as accurately as some expensive customs I’ve tried. At right is 5-round group I shot offhand at 10 yards with my 5″ S&W 1911.
NOTE: The bullet hole edges are sharp because I was using semi-wad-cutters, and the target paper is thick. Rounds were loaded with Vihtavuori N320 and 200-grain SWCs from Precision Bullets in Texas. We shoot Precision’s coated bullets in many of our pistols. These projectiles are accurate and they seem to reduce fouling in our pistol barrels. You can learn about them in this video:
Tech Tip by Doc Beech, Applied Ballistics Support Team
I am going to hit on some key points when it comes to bullet pointing. How much pointing and trimming needed is going to depend on the bullet itself. Specifically how bad the bullets are to begin with. Starting out with better-quality projectiles such as Bergers is going to mean two things. First that you don’t need to do as much correction to the meplat, but also that the improvement is going to be less. NOTE: We recommend you DO NOT POINT hunting bullets. Pointing can affect terminal performance in a bad way.
NOTE the change in the bullet tip shape and hollowpoint size after pointing:
Don’t Over-Point Your Bullets
What is important here is that you never want to over-point. It is far better to be safe, and under-point, rather than over-point and crush the tips even the slightest bit. To quote Bryan Litz exactly: “Best practice is to leave a tiny air gap in the tip so you’re sure not to compress the metal together which will result in crushing. Most of the gain in pointing is taking the bullet tip down to this point. Going a little further doesn’t show on target”. So in essence you are only bringing the tip down a small amount… and you want to make sure you leave an air gap at the tip.
Also keep in mind, bullet pointing is one of those procedures with variable returns. If you only shoot at 100-200 yards, bullet pointing will likely not benefit you. To see the benefits, which can run from 2 to 10% (possibly more with poorly designed bullets), you need be shooting at long range. Bryan says: “Typically, with pointing, you’ll see 3-4% increase in BC on average. If the nose is long and pointy (VLD shape) with a large meplat, that’s where pointing has the biggest effect; up to 8% or 10%. If the meplat is tight on a short tangent nose, the increase can be as small as 1 or 2%.” For example, If you point a Berger .308-caliber 185gr Juggernaut expect to only get a 2% increase in BC.
Should You Trim after Pointing?
Sometimes you can see tiny imperfections after pointing, but to say you “need” to trim after pointing is to say that the small imperfections make a difference. Bryan Litz advises: “If your goal is to make bullets that fly uniformly at the highest levels, it may not be necessary to trim them.” In fact Bryan states: “I’ve never trimmed a bullet tip, before or after pointing”. So in the end it is up to you to decide.
Pointing is Easy with the Right Tools
The process of pointing in itself is very simple. It takes about as much effort to point bullets as it does to seat bullets. We are simply making the air gap on the tip of the bullet ever-so smaller. Don’t rush the job — go slow. Use smooth and steady pressure on the press when pointing bullets. You don’t want to trap air in the die and damage the bullet tip. You can use most any press, with a caliber-specific sleeve and correct die insert. The Whidden pointing die has a micrometer top so making adjustments is very easy.
Bryan Litz actually helped design the Whidden Bullet Pointing Die System, so you can order the Pointing Die and Inserts directly from Applied Ballistics. Just make sure that you pick up the correct caliber sleeve(s) and appropriate insert(s). As sold by Applied Ballistics, the Whidden Bullet Pointing Die System comes with the die, one tipping insert, and one caliber-specific sleeve. To see which insert(s) you need for your bullet type(s), click this link:
Readers who have just recently discovered the Daily Bulletin may not realize that AccurateShooter.com has hundreds of reference articles in our archives. These authoritative articles are divided into multiple categories, so you can easily view stories by topic (such as competition, tactical, rimfire, optics, shooting skills etc.). One of the most popular categories is our Technical Articles Collection. On a handy index page (with thumbnails for every story), you’ll find over 120 articles covering technical and gunsmithing topics. These articles can help you with major projects (such as stock painting), and they can also help you build more accurate ammo. Here are six popular selections from our Technical Articles archive.
Stress-Free Pillar Bedding. Richard Franklin explains how to do a top-quality bedding job, start to finish.
Gun Safe Buyers Guide. Our comprehensive Safe Buyers Guide examines the key features to consider in a safe — Wall Thickness, Volume, Shelving, Fire Rating, Lighting, Weight and more. We also explain the Pros/Cons of Dial vs. Digital (Keypad) locking systems.
Savage Action Tuning. Top F-TR shooter Stan Pate explains how to enhance the performance of your Savage rifle by optimizing the torque settings of the action screws.
Complete Precision Case Prep. Jake Gottfredson covers the complete case prep process, including brass weight sorting, case trimming, primer pocket uniforming, neck-sizing, and, case-neck turning.
Stock Painting Instructions. Step-by-step guide for stock painting by expert Mike Ricklefs. Mike shows both simple coverage and fancy effects.
Ultrasonic Case Cleaning. This article reviews the recommended process for cleaning cartridge brass with ultrasonic cleaning machine. We cover the right liquid solutions, processing times, and case drying options.









 Good Powder Choices for the .45 ACP
 This Editor owns a full-size, all-stainless S&W 1911. After trying numerous powders, I found VV N320 delivered the best combination of accuracy, easy metering, consistency, clean burning qualities, and low muzzle flash. My gun has proven exceptionally accurate using N320 with bullets from 180 grains to 230 grains — it will shoot as accurately as some expensive customs I’ve tried. At right is 5-round group I shot offhand at 10 yards with my 5″ S&W 1911.


