We are often asked “Can I get more velocity by switching primer types?” The answer is “maybe”. The important thing to know is that changing primer types can alter your load’s performance in many ways — velocity average, velocity variance (ES/SD), accuracy, and pressure. Because there are so many variables involved you can’t really predict whether one primer type is going to be better or worse than another. This will depend on your cartridge, your powder, your barrel, and even the mechanics of your firing pin system.
BE SAFE: Glen Zediker recommends decreasing your load ONE FULL GRAIN when changing to a different primer type, one that you haven’t used before.
Interestingly, however, a shooter on another forum did a test with his .308 Win semi-auto. Using Hodgdon Varget powder and Sierra 155gr Palma MatchKing (item 2156) bullets, he found that Wolf Large Rifle primers gave slightly higher velocities than did CCI-BR2s. Interestingly, the amount of extra speed (provided by the Wolfs) increased as charge weight went up, though the middle value had the largest speed variance. The shooter observed: “The Wolf primers seemed to be obviously hotter and they had about the same or possibly better ES average.” See table:
Varget .308 load
45.5 grains
46.0 grains
46.5 grains
CCI BR2 Primers
2751 fps
2761 fps
2783 fps
Wolf LR Primers
2757 fps
2780 fps
2798 fps
Speed Delta
6 fps
19 fps
15 fps
You can’t extrapolate too much from the table above. This describes just one gun, one powder, and one bullet. Your Mileage May Vary (YMMV) as they say. However, this illustration does show that by substituting one component you may see significant changes. Provided it can be repeated in multiple chrono runs, an increase of 19 fps (with the 46.0 grain powder load) is meaningful. An extra 20 fps or so may yield a more optimal accuracy node or “sweet spot” that produces better groups. (Though faster is certainly NOT always better for accuracy — you have to test to find out.)
WARNING: When switching primers, you should exercise caution. More speed may be attractive, but you have to consider that the “speedier” primer choice may also produce more pressure. Therefore, you must carefully monitor pressure signs whenever changing ANY component in a load. Glen Zediker recommends decreasing your load ONE FULL GRAIN when changing to a different primer type, one that you haven’t used before.
Brownells is a well-known retailer of guns, gun parts, tools, accessories, ammo, and pretty much everything gun related. What you may not know is that Brownells has a very active video production department that releases new “how-to” and product information videos every week. These videos offer helpful advice on gun cleaning/maintenance, reloading, as well as selecting/assembling components for various kinds of rifles. And every week Brownells serves up a new products video. There now over 1000 videos on the Brownells YouTube Channel, this really is a remarkable resource.
Here are six of our favorite recent videos from Brownells. AR owners will find some good advice on spare parts, new reloaders can learn how to use the OAL tool, and all gun owners should watch the video on ammunition storage.
Introduction to PRS Competition
In this video, Tom Beckstrand, former Special Forces Sniper Team Leader and Guns & Ammo magazine staffer, looks at the Precision Rifle Series (PRS). Tom covers the types of stages in a typical PRS match using unconventional, real-world shooting rests. He also discusses the equipment you’ll need including bag supports, bipods, tripods, and optics. As most ranges aren’t set up for PRS, Tom offers tips on how to train at your local range.
How to Use Hornady OAL Tool and Hornady Bullet Comparator
Gun Tech Steve Ostrem explains how to properly use Hornady’s Overall Length Gauge to determine length-to-land precisely. The OAL Gauge uses a “Modified Case” that theads onto the tool and holds a bullet. Push on the back of the gauge until you feel the bullet just touch the rifling. (We do this gently at first, tapping the rod a couple time to ensure the bullet is aligned correctly). Once you’ve got the length, then use the tool with a comparator on your calipers to get the lenght-to-lands. NOTE: We recommend taking the measurement 3-4 times in a row to get a reliable number. With a little practice your should be able to get repeatable measurements within .0015″.
New Bog Pod Tripod and Caldwell Electronic Muffs
Brownells staffer Paul Levy showcases the impressive new DeathGrip Tripod from Bog Gear. The DeathGrip’s adjustable jaws clamp firmly to the rifle’s forearm. This is a useful device for both PRS shooters and hunters. The head assembly has 25-deg front/rear tilt and 360-deg swivel. And the jaws’ non-slip, rubberized padding won’t scratch that stock. The legs snap open to three pre-set hard stops, and there’s plenty of length extension. Easily switch between rubber feet and steel spikes without removing a single part from the trippod. This video also features Caldwell’s E-Max™ Pro noise-cancelling electronic muffs. These affordable 23 dB NRR units boast dual microphones and digital volume controls, and two sizes are offered — Youth and Adult.
How to Store Ammunition Safely and Securely
Notably, this is the single most popular Brownells video this year, with 494,000 views since March 2020. Here’s the deal — ammunition WILL keep for a long time if you store it properaly. DO store ammunition in a cool, dry place that doesn’t have wide temperature swings. Temperature cycling will also degrade primers and powder. Put it in airtight ammo cans to keep out the moisture. Tupperware containers will work too. Brownells also recommends putting moisture-absorbing silica packs in your ammo containers. DON’T just keep ammo in factory cardboard factory boxes stacked in the basement, attic, or garage — especially not on the floor! The ammunition boxes will absorb moisture which will degrade primers and powder and corrode the brass cases. Yes, sealed military ammo will usually handle this kind of storage for quite a while, but it’s still not wise.
Must-Have Spare Parts for AR-Platform Rifles
This is one of Brownells most popular recent videos, with 154,000 views in just four months. Two gun technicians answer the question: “What spare parts should I keep on hand for my AR-15?” On the list are: Gas Rings, Buffer Spring, Extractor Spring and Pin. NOTE: You may want to try the one-piece spiral gas ring rather than the standard rings which require alignment. The cotter pin and cam pin can also easily get lost when the Bolt Carrier Group is disassembled for cleaning. On the lower receiver you’ll want spare springs and detents for the pivot/takedown pins. If you’re using lighter-power springs, keep standard-power spares on hand. If your rifle stops working, swap in the factory-spec springs to find out if the problem is the gun or your ammo. Also, if you have upgraded your trigger, always keep the original trigger as a backup.
Cleaning Advice for .22 LR Rimfire Rifles
Gun Techs Steve Ostrem and Caleb Savant debunk some myths about cleaning .22 LR barrels. One myth is that cleaning will harm the accuracy of a .22 LR barrel. Caleb thinks this myth is the result of people cleaning a barrel from the muzzle and damaging the muzzle crown, which CAN diminish accuracy. If it’s done right, cleaning won’t damage the bore. However, you certainly do NOT have to clean your 22 LR’s bore every time you go to the range. But DO clean the action every time you shoot the rifle, especially on a semi-auto. What about shooting a lot of lead bullets? Won’t that lead up the bore? The guys give us the straight skinny on lead fouling, too. When you see your .22 LR rifle’s groups opening up, you may want to consider cleaning.
Above is a 26-year-old hand-loaded .300 Winchester Magnum case that failed to fire. After the misfire, the shooter used an inertial (impact) bullet puller to pull the bullet. In the process the case-neck sheared off.
Here’s a cautionary tale from the Tactical Rifle Shooters Facebook group. This real-world example explains why you should be cautious of old ammunition. Here serious internal corrosion was discovered.
Old Ammunition — Why You Should Be Careful
Commentary byTactical Rifle Shooters
The subject often comes up as to whether it is safe to shoot old ammunition. Historically my answer has always been yes, since over the years I have shot military surplus ammo dating back to World War II (1939-1945) and never had a problem. With over 40 years in competitive shooting, I’ve also had boxes of factory ammo that were 30+ years old and all worked flawlessly.
But I had an interesting experience this week shooting some .300 Winchester Magnum (WinMag) that I had loaded for competition with Reloder 22 back in 1993. I was breaking in a new barrel so just shooting any old ammo that I had. Of the 20 rounds, 15 shot perfectly, three had a fraction of a second hang-fire, and two didn’t shoot at all.
SMART TIP: If you have old ammunition, pull one bullet to see what’s going on inside.
So I pulled the bullets using a hammer-type impact (inertial) bullet puller. What I found was verdigris-like corrosion inside the necks, with one neck completely separating. One reason for this could be that dissimilar metals (copper and brass) can set up a reaction resulting in corrosion. Like I said, this is the first time I’ve seen this, but will definitely be more aware when shooting old hand-loads in the future.
Above is one of the 26-year-old reloaded .300 WinMag cartridges which had failed to fire. To check the internal condition, the bullet was removed using an impact (inertial) bullet puller. Note the verdigris-like corrosion and crack in neck.
Here’s a close-up of the same .300 Winchester Magnum hand-load from 1993 showing serious corrosion inside the neck. (This was a fail-to-fire.) The powder was Alliant Reloder 22. If you have old ammo, it wouldn’t hurt to pull one bullet to see what’s going on inside.
Our friend Gavin Gear of UltimateReloader.com often gets to test the latest and greatest reloading tools before they hit the market. He does a good job showing the features of new products with informative videos. Today we present three interesting products that Gavin has reviewed. First off is the impressive new RCBS Rebel reloading press. Next is the versatile three-head Case Prep Trio machine from Hornady. Third, Gavin reviews new Die Lock Rings and Breech Lock Die Bushings from Lee Precision.
RCBS Rebel Single-Stage Reloading Press
Most hand-loaders have used an RCBS Rock Chucker press at one time or another. Recently RCBS unveiled its new Rebel single-stage press. Like the Rock Chucker, the Rebel has a Cast Iron frame, but with a bigger base and taller arch (for a larger opening). The most important change is that this new Rebel press ejects primers out the bottom of the ram. This a big deal — just put a bin under the press to collect spent primers. However — take note — the Rebel has no on-press priming. You need to prime your cases separately. That’s not really a major issue, as we know the majority of our readers prime separately using hand or bench priming tools.
In this video Gavin loads ammo on the new the Rebel single-stage press and explains its notable features, including the primer ejection through the ram.
Note, RCBS is currently running a Buy Green Get Green Rebate Program. The Rebel Press qualifies for a $50.00 Rebate. And right now, MidwayUSA has the Rebel Press on sale for $186.99. So your net cost, after RCBS Rebate, is just $136.99. That’s a great deal on an excellent press.
Hornady Lock-N-Load Case Prep Trio
Hornady’s compact Case Prep Trio machine (item 050160) packs a lot of functionality in a small package. This triple-threat tool has a small footprint, yet it can perform three tasks as well as much more expensive, tower-style case prep units.
Gavin Gear does a nice job explaining the features of the Case Prep trio. Watch this video to see how it can help you perform chamfering, deburring, and pimer pocket uniforming tasks more efficiently.
With three active stations, you can chamfer, deburr and clean primer pockets without having to change tools. The Case Prep Trio ships with inside chamfer, outside chamfer, and deburr tools. You can also use the machine with other optional 8/32 threaded accessories such as primer pocket reamers and case neck brushes. We’ve used this machine and it works well. The only negative is that you will get metal shavings on your bench (unlike some of the larger case prep centers). We’ve seen some guys put a small pan under the power head — then you can just dump the shavings out of the pan.
New Lee Die Lock Rings and Spline Drive Breech Lock Bushings
New basic lock ring in left hand. Older non-splined ring in right hand.
In this recent video Gavin Gear reviews three types of die accessories from LEE. These work for virtually all standard dies, not just LEE-brand reloading dies. The new LEE basic silver-finish die lock rings now feature splines for enhanced grip and compatibility with LEE’s new die lock ring wrench (photo right). They still boast a rubber 0-Ring that helps “float” the die for improved cartridge concentricity.
LEE’s new Ultimate Die Lock Rings have two major improvements — a colorful anodized finish, and a split-ring design with a tensioning screw, that allows these rings to be clamped securely to your dies. Available as a set, this package includes three ultimate die lock rings, and a plastic die lock ring wrench.
Gavin also reviews Lee’s new Spline Drive Breech Lock Bushings for use with presses fitted with LEE’s Breech Lock system. These new Breech Lock bushings allow rapid change-out of dies without modifying the setting. The colorful new bushings feature splines on top that work with the new Lee Lock ring wrench shown above. In addition, the Breech Lock Bushings have a clamp to preserve die depth setting.
Summer’s here, so many folks will head to the hinterlands on prairie dog safaris. On a good P-Dog adventure, you may shoot hundreds of rounds over a long weekend. So you’ll need plenty of ammo. With these ammo volume requirements, you probably won’t have time to load to benchrest standards, and you may not have the budget for match-grade bullets. To save time you may throw (rather than weigh) your charges, or even load on a progressive press. This all raises the question of ammo accuracy — how good is “good enough”? A Sierra Bullets expert answers that question here — explaining how to efficiently load ammo for varmint work.
Ammunition Accuracy Requirements 101 — Varmint Ammo
This story based on article by Sierra Bullets Chief Ballistician Tommy Todd
I load and shoot ammunition for a living. In my duties here at Sierra I constantly test bullet accuracy for our production needs. Because of this, I shoot a variety of different calibers and cartridges on a daily basis and a large demand of this shooting is keeping the guns and loads tuned for optimum accuracy. I have a very narrow window of tolerances to maintain in order to provide our customers (you) with the most accurate bullets on the market.
I have learned many tricks and techniques over the years to tuning a load, prepping brass, and cleaning barrels to keep a gun shooting. I often utilize the things I have learned and take them to extreme levels when competing in a shooting event. I also often ignore most of these things (other than safety) and simplify the process if the shooting I will be doing does not warrant.
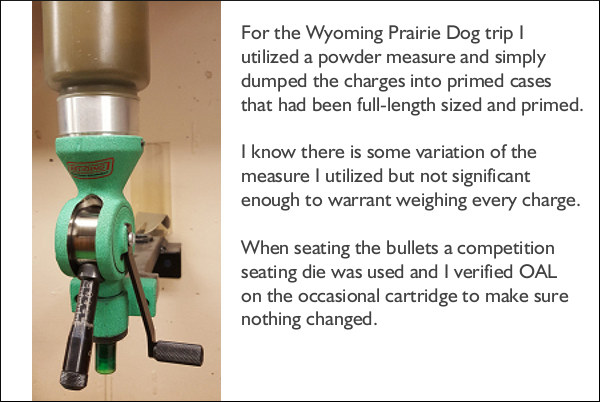
Recently I went on a prairie dog shoot in Wyoming with some good friends. The targets cooperated as did the weather with the exception of some challenging winds we experienced. We had a great time and make a lot of hits on those small rodents. When loading for the .223 Remington rifles and the TC Contender, I cut a few corners in the ammunition-loading process due to both time constraints and accuracy needed. When shooting at a prairie dog a miss is simply that, but when shooting at say the X-Ring at 1000-yard competition, a poorly-placed shot [harms your] placing in the match. Because of this, I can afford to miss an occasional shot at a varmint due to ammunition capability without worry but will not allow the same tolerances in my match ammo. For the Wyoming trip I utilized a powder measure and simply dumped the charges into primed cases that had been full-length sized and primed.
I had measured enough for length to know that while there was some variance all were under maximum length. I know there is some variation of the measure I utilized but not significant enough to warrant weighing every charge. When seating the bullets a competition seating die was used and I verified OAL on the occasional cartridge to make sure nothing changed.
This varmint ammo, with thrown charges, put TEN shots inside ONE inch at 200 yards. That’s half MOA. Good Enough? Absolutely!
The ammo produced shot under one inch at 200 yards in one of the guns I planned on taking on to Wyoming with me. [Editor: That was for TEN Shots — see above.] I knew I had loaded ammunition that was quite suitable for the task at hand which was evidenced by the number of hits I was able to make at fairly long range.
NOTE: The author, Tommy Todd, explains that, when loading ammo for F-Class matches, he uses more exacting methods. He weighs every charge and seats his bullets carefully with an arbor press. Todd adapts his methodology for his particular application. The lesson here is to load to the level of precision demanded by your discipline. READ Full Story HERE.
Talented F-Class shooter Peter Johns has been on a tear the last couple years. He won the F-TR Division at the 2020 Berger SW Nationals (SWN), after finishing second in 2019. His SWN win came on the heels of stellar performances in 2019. He won both the mid-range AND long-range Texas State championships last year. Along the way Peter set a new 600-yard NRA National F-TR Record (200-18X), and tied the 600-yard F-TR Aggregate Record with 600-47X. This Sunday GunDay story features Peter and his trophy-grabbing .308 Win F-TR rifle.
How to Campaign a Winning .308 Winchester F-TR Rifle
Report by Peter Johns
I started contemplating F-Class shooting after talking with Darrell Buell at SHOT Show a decade ago. My first F-Class match was with a Savage VLP with a 26″ Shilen 7mm SAUM barrel and a Harris bipod. After that initial match in Texas I knew I had a lot to learn. I decided that F-TR was the place to start. This story follows my development as an F-TR shooter and showcases the rifle that delivered multiple F-TR match wins in 2019 and 2020.
Watch Peter Johns Shoot his .308 Win F-TR Rig
Equipment Showcase — Key Components of Peter’s F-TR Rifle
Omar Alonzo (Alonzo Custom Rifles, (713) 283-4384, Gunbuilder284@gmail.com) does all my gunsmithing. I believe this is one of the major reasons I have been doing so well in the last couple years. He does a phenomenal job with rifle bedding. He also fixed the timing on my action. The first barrel he chambered has really helped me win matches and set records.
In this Video, Peter talks about his key rifle components and gear:
McMillan Kestros BR Stock — I switched to a Kestros BR stock when they first came out. I painted the stock myself. I am very grateful to Kelly McMillan for letting me be one of the first to try them. The Kestros BR tracks better than any stock I have tried. NOTE — the Kestros was so light that I had to add a steel bar under the forearm to get closer to the F-TR weight limit with a 30″ HV barrel. [Editor: That has the advantage of lowering the center of gravity and the bar can slide fore/aft to adjust center of balance]. I use a SEB Bigfoot rear bag with slick ears and 3/4″ spacing. When I got the Kestros I thought the rear bag spacing was too wide but it worked so well I didn’t change.
Kelbly (Stolle) Panda Action and Krieger Barrel — My rig has a Kelbly Panda F-class action with a Bix’N Andy trigger. At the Berger SWN, I used a Krieger 1:10″-twist 30″ HV 4-groove barrel. It is superbly accurate. I have been bouncing between Krieger and Bartlein for barrels for the last few years. The best barrel I have had is a 30″ Krieger 4-groove HV, however the Bartleins have been very good as well.
Duplin Bipod with Articulating Feet — I really liked the Pohlabel articulating feet that are available for the SEB JoyPod so I asked Dan Pohlabel for permission to copy his feet. I bought some aluminum and made the best copy I could. Since SWN, Duplin has coming out with a new bipod with articulating feet which are considerably better than the feet I made. I use a board and a piece of stall mat with carpet glued on it for the bipod to sit on.
Vortex Golden Eagle Scope — I use the 15-60x52mm Vortex Golden Eagle on all my F-Class rifles. I see the mirage better with the Golden Eagle than any other scope and it tracks perfectly. I also use a Vortex Razor spotting scope with long eye relief lens on the line to help watch mirage and flags. I also use the Razor spotting scope to call wind for Team Texas.
Cleaning Procedure — Less is More — No Cleaning During SWN Long Range Event
Peter has learned that he can go for long round counts without cleaning: “I have found that my .308 Win rigs, for the most part, shoot really well dirty. I can usually get 300 or more rounds before cleaning. I cleaned my barrel at the 2020 SWN after the mid-range event and fouled it before the long-range. I did not clean my barrel again until I got home from the match.”
Peter does clean thoroughly when he gets home: “After a big match I clean my rifles with Boretech Eliminator and a bronze brush followed by Iosso until the majority of carbon is removed from the barrel, as verified with a Lyman borescope. After a thorough cleaning, I find that I need to shoot a bunch of foulers. I will usually go to my practice range and shoot a 20-shot practice match and I will see the accuracy tighten up in the back half.”
600-yard practice target on left. On right is 600-yard record match target shot at 2019 TX State Championships (on ShotMarker targets). This 200-18X is a NRA National Record for F-TR division.
Peter’s Match Load and Reloading Methodology
Loading for .308 Win F-TR — Do What Matters
My loading technique has evolved almost full circle from where I started. I went from the basics to doing every step a person could conceive. Then I decided to start testing all the different steps to see what didn’t matter or made things worse. I am now back to almost no steps in my reloading process. I don’t clean brass anymore. I just wipe the case off, lube, size, prime, and load. I anneal when I feel the necks getting inconsistent when seating the bullets. I pre-load all my ammo for matches. I tried seating them at the match but I didn’t find it to matter on the score card and it takes my focus away from conditions.
Peter’s 2020 SWN-winning .308 Win load consists of Berger 200.20X bullets, Lapua Palma brass, Federal 205M primers, and Varget powder. Peter revealed: “The Berger 200-grainers are running in the mid-2600 fps range. I have tried them much faster but found the best consistency at this speed.”
Peter measures powder to the kernel and also weighs/sorts other components. He runs Berger 200.20X bullets slightly off the lands in a 0.170 freebore chamber. Notably he tests a variety of powders, ascertaining each barrel’s particular preference: “In the last few years I have tried N140, N150, H4895, and Varget. I think they are all good powders for F-TR and the 200.20X bullet. This year I was using Varget. At the 2018 SWN I placed 4th with H4895, in 2019 SWN I got 2nd with N140. I find what powder my particular barrel likes best. I also test CCI BR4 and Fed 205M to see which my rifle likes best. This year I was using Fed 205M. I have been using Lapua Palma brass and it seems to last forever.” Peter full-length sizes with a Redding bushing FL die. He seats his Berger bullets with a Wilson inline seater.
Q & A with Peter Johns, F-TR Ace
Q: What was your biggest challenge at the 2020 Berger SW Nationals?
Peter: I think the biggest challenge was staying focused on conditions. I think the hardest thing for me to do is to stop shooting when the wind conditions are out of my ability to call accurately. I focused hard on this aspect of my game this year and it has paid off. This match is super well run and staff does an excellent job which allows the shooters to maintain their focus.
Q: What gear/hardware items give you an edge over the competition?
Peter: The Kestros BR stock (below) is not used by many F-TR shooters and I think it gives me a huge advantage over the competition. This stock fits me perfectly and tracks in such a manner that I can shoot fast and accurately when conditions are right.
Q: What is your advice for newcomers in F-Class and Long Range competition?
Peter: Go to a top gunsmith building F-Class rifles and do what he says. Competition is the best way to get better. So shoot as many matches as you can. Find top shooter rivals and strive to beat them.
Q: Do you have any specific Gun Handling Tips for F-TR shooters?
Peter: I shoot better with a really light grip and cheek pressure. I can shoot well with a heavier grip and cheek pressure but when the tension of a big match is going my pressure will vary and cause poor accuracy. The most consistent I can shoot is with light gun handling. I also focus on trying to watch the bullet hit through the scope to ensure good follow through and this prevents me from jerking the trigger. There are a bunch of ways to hold a rifle that have proven to be successful. I think a shooter needs to test and find what works best for them.
Q: What do you like most about F-Class and Long Range competition?
A. I really like technical things. F-Class is right in my wheel house for technical stuff. Also, the people in the shooting world are top notch. I enjoy talking with other shooters.
Q: Do you prefer individual events or team matches?
Peter: I prefer the team matches by far because it is a social event with collaboration and there is a lot more pressure. I put a lot of effort into learning the wind for the team matches which in the long run helps me with individual matches. [Editor: Below Peter is calling wind for Team Texas at the 2018 F-Class Nationals in Raton, New Mexico.]
Peter Johns calls wind for Team Texas at 2018 F-Class Nationals in Raton.
Overcoming Serious Injury in U.S. Navy to Become a Top-Level Marksman
Peter Johns is a U.S. Navy veteran, rank Chief (E7). In 2006, during his duty aboard the U.S.S. Nimitz, Peter sustained very serious and extensive burns in a massive electrical fire. Showing great strength of character, Peter went through a tough, 4-year program of surgeries and rehab. The photo below shows Peter doing therapy during his recovery process.
Peter tells us: “As many of you know I was badly burned on board the U.S.S. Nimitz in 2006. That has limited me in my ability to compete in physical activities that I used to enjoy but F-Class has filled the gap for my competitive nature. I medically retired from the Navy as a Chief (E7) in 2010 after four years of surgeries and physical therapy. I was very surprised to find how accepting and nice people have been in the shooting community. I think the shooting community is comprised of the best people in the world.”
Lapua has kicked off its 2020 Sizzling Summer Savings Rebate Program. From July 15 through August 31, 2020 you can get 10% Cash Back on qualifying Lapua Scenar bullets and rifle cartridge cases. With this Summer Rebate you can get up to $200 back on your Lapua bullet and brass purchases.
This is quality stuff. Lapua brass is used by top shooters in all disciplines, and Lapua Scenar bullets show outstanding accuracy and consistency. We’ve had superb results with Scenar bullets in multiple rifles and even set a local range record with the 6mm 105s.
– Lapua Scenar bullets have a proven record on the range and the battlefield. They’re a popular tangent ogive, HPBT design that is extremely accurate with excellent base-to-ogive and weight uniformity.
– Lapua cartridge cases set the standard for quality, uniformity, and long life. Strong primer pockets, superior annealing processes, and dimensional uniformity deliver superior accuracy and longevity. There is a reason winning shooters use Lapua.
To get your rebate, complete the online form at Capstonepg.com/LapuaRebate or fill out an order form from your favorite retailer. You will need the original online order receipt or the retailer cash register receipt showing the retailer name and date of qualifying product purchase.
About Lapua — Renowned for Quality
Lapua is world-renowned for producing the finest bullets and cartridge cases. Starting with the highest-quality raw materials and state-of-the-art manufacturing techniques, Lapua components are highly sought-after by competitive shooters, Mil/LE operators and outdoor enthusiasts alike. Lapua is a part of the Capstone Precision Group, exclusive U.S. distributor for Berger, Lapua, Vihtavuori and SK-Rimfire products. For more information, visit .
Sierra Bullets asked a few hand-loaders to reveal their favorite reloading tool or accessory: “What is your favorite ‘don’t know how you ever lived without it’ piece of reloading equipment?” Some of the answers are listed below. We were interested to see some high-tech, micro-processor items mentioned, such as the AMP Annealer, and the AutoTrickler powder dispenser. Old standbys, such as the rugged RCBS Rockchucker and Dillon 650, also made the favorites list. You can nominate your own favorite reloading hardware in the comments section of the Sierra Bullets Blog.
Sierra Bullets Ballistic Technician Philip Mahin answered: “A comparator gauge to measure from the base of a case to the ogive of the bullet. This bypasses the tip of the bullet, so I can repeat the same seating depth the next time I visit a specific combination.”
Bill, Editor of Rifleshooter.com, answered: “I have so many favorite reloading tools, it’s hard to pick one. But if I had to, it would be my Forster Co-Ax press. I like the ease [with which] you can change dies and that it doesn’t require traditional shell holders. It’s a great tool to have!”
Sierra Bullets Ballistic Technician Duane Siercks answered: “I don’t know that you would actually call this equipment, but the item that comes to mind would be my reloading room/shoot house. I had always had to squeeze everything into a corner or even an unheated shed. After we bought our current house, I built a garage and placed it so that I had a window looking down a 250-yard range. I built a dedicated room with heat and A/C. It contains my reloading bench and a shooting bench. The shooting bench lets me slide open the window and shoot down the range. It is very handy to not have to load everything up to go to the range. It also makes load development a lot simpler and efficient. I don’t know how I ever got along without it.
I also wonder what I did before I acquired the Lyman 1200 DPS Powder Dispenser. This has made the process so much simpler and much easier. I also have a Lee Precison Universal Decapping Die that I would gladly spend the money on again. This may be a small thing, but it certainly is handy. The Lee would accommodate some very large cases that some of the others were too small for.”
Jon Addis answered: “Putting an A&D FX-120i scale with AutoTrickler and Auto-Throw on the bench has changed the way I reload. It’s kernel accurate in about 15 seconds. Saves time and reduces a variable. And of course, the system is made better by the Area 419 Billet Adjustable base for the trickler and Billet Powder Cup.”
This video shows the AutoTrickler V2 and Auto-Throw Combo:
Sierra Bullets Chief Ballistician Tommy Todd answered: “A brass annealing machine and a RCBS Chargemaster complimented with a Sartorious scale.”
Sierra Bullets Ballistician Gary Prisendorf answered: “RCBS Rock Chucker Press, it’s built like a tank, and it will last me a lifetime.”
Sierra Bullets Production Manager Chris Hatfield also answered: “RCBS Rock Chucker single-stage reloading press.”
Jeremy Kisner answered: “My Giraud trimmer has taken [three operations] and combined them into one easy task. I can now size my brass and then sit down and trim, chamfer, and debur to a 0.001″ tolerance in one motion.”
Dan Blake answered: “My Annealing Made Perfect (AMP) annealer. With consistent neck tension being one of the largest contributions to small Extreme Spread on muzzle velocities, I believe this induction annealer is truly the best on the market.”
This manufacturer-produced video shows how the AMP annealing machine operates:
Trevor Aldinger answered: “Area 419 Master Funnel Kit. In the past I’ve used plastic funnels and even other metal ones. This system fits case necks and flows much better than any others I’ve used, and there is no static since it’s metal. We spend a lot of time and money to get precise charges, I don’t want to lose or miss a kernel because of a cheap funnel.”
Tyler Riley answered: “My RCBS bench primer (priming tool). It has a lot more leverage than a hand primer and still has a good feel to how tight primer pockets are. Makes it much easier on my hands to prime large runs, especially new brass with tight pockets.”
Craig Arnzen answered: “My Annealeez [annealing machine] is one of the best tools in my reloading room. Neck tension is SO important, and annealing every firing really helps with that. This is an inexpensive tool that can anneal a lot of cases at once, and help me produce more consistent ammo.”
Josh Temmen answered: “Time is critical for me so my RCBS Chargemasters are indispensable (pun intended.) They cut down on time at my reloading bench while maintaining the weight tolerances required for long range shooting.”
Josh Bartlett answered: “I have my Dillon 650 set up with Whidden floating tool heads to do decapping and sizing on my match ammo. The case feeder and progressive function of the press save me a TON of time when doing lots of several hundred rounds.”
Ryan Brandt answered: “… A quality set of calipers. My reloading room is full of very nice equipment but little does more to satisfy my perfectionism than a good check with the calipers.”
Our friend Gavin Gear has just released an excellent video showing how to make a threaded Modified Case for use with the Hornady Lock-N-Load Overall Length Gauge. You can watch Gavin make a Modified Case start to finish in the video below:
Video Shows How to Drill and Tap Modified Case
Gavin has some clever tricks. First he uses a sizing die to hold the cartridge case during the threading process. Second he uses two drill bits in sequence — a smaller bit to ream out the primer pocket, and then a larger “M” bit to increase the hole diameter before threading the brass. Finally he leaves the threading tap IN the brass, locks the tailstock, and then “gently pulls on the quill” to remove the brass from the die held in his lathe (See 5:46 timemark).
Get the Correct 5/16″-36 RH Tap
Unfortunately, Hornady has selected an uncommon thread type for OAL Gauges. You probably won’t be able to buy the correct 5/16″ – 36 RH HSS Tap at your local hardware store. However you CAN order this special tap from Amazon for $9.99.
Modified Case Q & A — TECH TIPS
Why do I need a Modified Case?
Every serious reloader should have a Modified Case for each cartridge type they shoot. The reason is that this allows you to get very precise measurements of the length-to-lands in your chamber. When used with the Hornady OAL Gauge, with some practice, you should be able to get repeatable length-to-lands measurements within about 0.015″. We generally do 4-5 measurements with the OAL Gauge and usually 3 or 4 will be “on the money”. NOTE: We recommend a gentle, easy pressure on the plastic pusher rod. Don’t push too hard or you will jam the bullet hard into the lands, which produces inconsistent results.
Can’t I Just Buy a Modified Case?
Hornady makes a variety of Modified Cases sold on Amazon and through retailers such as Midsouth. While Hornady makes modified cases for many standard cartridges, if you shoot a wildcat such as the 6mm Dasher or .284 Shehane, you’ll need to create a custom modified case. And even if you shoot a standard cartridge such as the .308 Win, you can get more consistent measurements with a custom Modified Case.
If you do decide to make your own modified case, you’ll want to start with a case that’s been fired in your rifle. That way you get the best fit to YOUR chamber. Also, you won’t need to expand the neck to provide bullet clearance. Then you need to drill out the primer pocket and tap the base of the case to match the threads on the Hornady OAL Gauge tool. Make at least two modified cases, as you’ll probably misplace one at some point.
Erik Cortina Makes a Modified Case
If you want to learn more about making Modified Cases, top F-Class shooter Erik Cortina has also created a helpful video showing the process he uses to make modified cases. In Erik’s video, he shows how he taps a case to work with the Hornady Lock-N-Load Overall Length Gauge (formerly the Stoney Point Tool). Erik also explains how to get the best results when using the Modified Case to measure length to lands.
MORE INFORMATION: Want to learn more? We published a much longer story in which Erik explains in greater detail how to made the Modified Case. That article illustrates the 5/16″ – 36 RH HSS Tap required and shows how to set up the lathe to drill and tap your case. If you are serious about making your own Modified Cases, you should Read the Full Article.
Bullet sorting station — quilted Maple with marble tile inlay, created by JVW2008.
We have a master woodworker in our Shooters’ Forum, Jerry from Colorado (aka JVW2008). In a Shooters’ Forum thread, Jerry showcases multiple examples of his handiwork — various wood projects for the reloading room. Beautifully made, these one-of-a-kind custom cabinets and tool stands deserve to be on display in a museum.
Jerry’s creations exhibit exquisite craftsmanship and some very clever design features. What is your favorite item among the Jerry’s wood wonders shown here? You can reveal your favorites in the comment section below.
Throne for a Sartorius Analytical Balance
Jerry built this “Throne” for his ultra-precise Sartorius Entris force restoration scale, which is linked to a V2 Auto-Trickler. This is a true state-of-the-art powder measuring system on a beautiful base unit.
Cabinet for Balance Beam Scale
Here is an oak balance beam scale cabinet and weighing surface. Note the mulitiple tiers, side wings, and other smart design features.
Custom Arbor Press Base
Below is a handsome, well-designed base for K&M Arbor Press and Wilson dies. Look at the fitted recesses for the hand dies — very nice!
Jumbo Walnut/Maple Loading Block
And here is a beautiful 100-cartridge reloading block, crafted from Walnut over Maple. It’s impressive to see 100 cartridges all lined up like that!
To see more impressive wood projects by our Shooters’ Forum members, visit the Wood Working Ideas Forum Thread. Along with Jerry’s reloading toom wonders, you’ll see cleaning cradles, shooting benches, transport boxes, and much more. Check out this amazing inlaid rifle case crafted by Forum member Nando-AS for his son.


 In this recent video Gavin Gear reviews three types of die accessories from LEE. These work for virtually all standard dies, not just LEE-brand reloading dies. The new LEE basic silver-finish die lock rings now feature splines for enhanced grip and compatibility with LEE’s new die lock ring wrench (photo right). They still boast a rubber 0-Ring that helps “float” the die for improved cartridge concentricity.


 Sierra Bullets Ballistician Gary Prisendorf answered: “


