We’ve all encountered those boastful guys at the range — you know, the ones who say their factory rifle will shoot “dime-sized groups all day long.” Well maybe they were actually telling the truth — it all depends on the size of the ten-cent piece. With the huge dime shown above, we think we could shoot “dime-sized groups all day long” — even with a pistol. After seeing this, one reader commented: “That’s great. So this means my groups are only around Quarter-sized!”
Credit Forum member DKhunt14 who started a thread with this humorous image in our Shooters’ Forum. Other Forum members gave examples of similar accuracy claims they’ve heard:
I ran into a local tactical guru a few years ago that topped any story I’ve ever heard yet. He claimed he could shoot a quarter-inch group every time at 300 yards — like no problem whatsoever. — IMMike
I had a guy tell me he dropped a doe at 420 yards with a M1 carbine, open sights. Never took a step. I’ll bet he also shot those dime-sized groups!– DJ Porter
Seems like we could substitute 1000-yard prairie dog (other small varmint) hits for dime-sized groups. They both happen “all day long”. — Dsandfort
Many folks come into my shop… and feel compelled to regale me with their life history with firearms. Head-shooting squirrels at 100 yards with a .22 short and iron sights, deer dropped at 500 yards with a .35 Rem, ground hogs taken with one shot across vast distances, etc. — and it would appear that every former SEAL, Marine or SF sniper lives in the general area. My Dad used to tell me that sometimes you just have to smile and nod a lot. Not always, but a lot.
I’m not a huge fan of Bass Pro Shop, but I DO appreciate Bass Pro’s motto: “Welcome hunters, fishermen and other liars.” Human nature can be so entertaining. — JLT
GET Your Own Giant DIME
By the way, if you want your own jumbo dime, Amazon.com offers 3″-diameter Roosevelt dimes for about eight bucks. These would be good for range accuracy challenges. You could tell a buddy you can “put five shots on a dime at 200 yards”. Then whip out this slightly oversize 3-incher and see his face.
These could also serve as “gag prizes” at club shooting matches — giveaways for folks who want to say they shot a group at 200 or 300 yards that could be “covered with a dime” … a 3″ dime that is!
Today is National Hunting and Fishing Day. To help the avid hunters among our readers, here are Twenty Tips that can help ensure a safe and successful hunt. These tips have been compiled from our AccurateShooter Hunting Forum, with help from Hunting Editor Colton Reid (who has already been out hunting this month). Some items are preparatory — such as working with maps, sighting in the rifle, and improving physical fitness. We also talk about equipment — having the right gear, from proper boots to a GPS for multi-day hunts.
Of course there are entire volumes written on hunting, but these 20 Tips can benefit all hunters. Follow these suggestions and you should have a safer hunting experience with greater likelihood of success. If you liked these pointers, you’ll find two dozen more helpful hints on the NSSF Website.
Preparations Before The Hunt
1. Map Your Hunt and Notify Others — Before your hunt, make a plan and notify friends and family members about WHERE you are going and your intended return date and time. Print out a Google Satellite map and locate landmarks and trailheads. Mark where you plan to park your vehicle and give a copy of this map to friend and/or family members. A hunter may injure himself by falling off a rock, or tumbling in a creek-bed. After that kind of injury the hunter may be confused or unable to walk. If you get stranded in the wilderness, you want trusted persons to know where you are. So, before you leave on a trip, provide a map to a friend or family member. Show them where you will leave your vehicle, and where you expect to be every day of your hunting adventure.
2. Licenses and Permits — Make sure you have a valid hunting licenses and all the necessary tags. Begin this process with ample time before your intended hunt(s). The NSSF adds: “If you are crossing state or national borders, find out about any special considerations you must take care of. Border crossings can mean knowing about firearm transport laws or Chronic Wasting Disease-related regulations.”
3. Work on Your Fitness — On a multi-day hunt you may be trekking many miles. You need to be in good shape. If you are out of shape you may be putting yourself in a precarious situation, particularly if you underestimate the terrain difficulty. As the NSSF says: “Not being able to handle the conditions lessens your chances of success, can turn a great experience into an agonizing one and can endanger your health.”
4. Do Your Homework — Study the area you will be hunting. Talk to other hunters. Look at satellite photos. Get a real sense of the walking and terrain challenges. For a multi-day hunt, MAKE a PLAN. The NSSF states: “Eliminate surprises. Learn as much about where you will be staying, the area you will be hunting, what the weather might be like and what you need to bring[.]”
5. Rifle and Ammo — Make sure your rifle is sighted-in and your ammo is tested. Sight-in your rifle with the ammo you plan to use on your hunt. CLICK HERE for 4-Shot Sight-in Method. After sighting-in from the bench, confirm your zero by shooting from typical hunting positions (kneeling and with forearm supported on a rock or post).
6. Shooting Positions — Practice the shooting positions you will use in the field. Practice sitting, kneeling, and prone positions. You should also practice with shooting sticks, using your day pack as a rest, and with a bipod. Try to have a rock-steady rest before taking your shot.
7. Back-Up Irons — If possible, select a rifle with back-up iron sights. While modern scopes are very durable, they can and do fail (glass can crack). If you’ve invested a lot of time and money in your hunt, back-up iron sights can keep you in the game even if your riflescope fails.
8. Communications and GPS — Bring a GPS if you are in a wilderness area far from civilization. It’s a good idea to bring a cell phone, but you may not have coverage if you’re quite a distance from populated areas. A smart-phone also doubles as a digital camera to record your trophies. For navigation and safety, consider getting Garmin inReach Explorer+. This high-tech handheld unit features interactive SOS, connecting you to the GEOS 24/7 search-and-rescue monitoring center. They also allow you to send and receive text messages, no matter where you are, via advanced inReach satellite technology. Yes you can communicate even if you are miles from the nearest cell tower.
9. Select Good Gear — Make sure you have GOOD BOOTS that are comfortable — you’ll spend a lot of time on your feet. You may want a pack with harness for your rifle so you have both hands free. On a multi-day trip, make sure you can carry enough water, and that you will stay warm enough at night. Good practices for backpacking apply to multi-day hunts.
10. Make a Checklist — Create a complete checklist of the gear and supplies you need. That includes arms, ammunition, rangefinder, binoculars, proper clothing (including spare clothes), hunting accessories, sleeping gear (on multi-day hunts), toiletries, medications. Don’t forget a good first aid kit — lots of bad things can happen during any wilderness trip. You can cut a hand, break an ankle or worse.
During The Hunt
11. Have a Plan — know where you plan to go and when. Try to be where you want in the early morning and early evening hours when deer are likely most active.
12. Take Your Time — If you spot a deer and get too excited and don’t take your time you may spook him. Go slow and glass. If possible, wait for the animals to bed down and relax. Then work out the best way to approach your prey. Remember, “You get so few opportunities, don’t screw it up!”
13. Glass More, Walk Less — Let your eyes do the walking — get good binoculars and use them. With their heightened senses of smell and hearing, deer/elk are able to spot you way better than you can spot them. If you are walking around a lot, chances are you are getting spotted by your prey.
14. Riflescopes Are Not Binoculars — Never use a riflescope as a substitute for binoculars. The temptation to do so is real, but when one does this, one is by definition pointing the muzzle of the gun at unknown targets. We like binoculars with built-in rangefinders. When glassing at long range, try supporting your binoculars on your pack.
15. Be Sure of Your Target before Shooting — Every year during whitetail season, farmers everywhere are forced to spray-paint their cattle or risk having them “harvested” by hunters who don’t bother confirming the species in their sights. Hunters with “buck fever” can make mistakes. When in doubt, don’t shoot.
16. Know When to Unload — When finished hunting, unload your firearm before returning to camp. You should also unload your gun before attempting to climb a steep bank or travel across slippery ground.
17. Hearing Protection — While pursuing and stalking your prey you’ll want full sensory use of your ears. But when you’re finally ready to take the shot, slip in hearing protection. A shot from a large-caliber hunting rifle can exceed 170 decibels. Unprotected exposure to noise from a SINGLE 170+ dB shot can cause permanent hearing damage. (Source: ASHA.org). If you make a follow-up shot, you double that noise hazard. Therefore a hunter with a non-suppressed rifle should have hearing protection available.
You can keep a pair of quick-insert plugs on a cord around your neck. Or, get the Howard Leight Quiet Band QB2HYG. This is a plastic ring with earbuds, you can keep around your neck.
“Once a hunter is successful, the REAL work begins.” — Colton Reid
18. Harvesting the Animal — When dressing your animal, be careful with the meat. You’ll want very sharp knives. Some hunters prefer knives with replaceable, razor-sharp blades. Don’t rush the task. Make sure you don’t get moisture or dirt on meat. The three spoilers of meat are heat, moisture, and dirt.
19. Pace Yourself When Packing Out — If you DO succeed, and bring down a big buck, will you be able to dress the animal and carry out the meat? Always be prepared to hike out with extra weight. If you are successful, make sure not to waste the meat you worked so hard for. Choose a pack that can help you carry a heavy load. Remember, this is not an insignificant challenge — you may be carrying 60 to 100 extra pounds in addition to your other gear. Again, take your time. Rest as needed. Don’t hurt yourself.
20. Remember to Enjoy the Experience — Our Hunting Editor, Colton Reid, offers this sage advice to all hunters, but particularly to novices: “Have fun, and appreciate your hunt, whether you bag a buck or not. It is a privilege to experience the wilderness and to get away from the city. Enjoy it while you’re out there. And keep your spirits up. You may get tired, but remember that ‘comes with the territory’. At the end of the day, yes you may be exhausted. And you may want to quit and go home. But stay positive, stay focused. Be patient, the experience is worth it.”
CLICK HERE for Hunter Training/Mentoring Programs State-by-State.
Prepare For Your Hunt — Get Fit and Practice Positions
As part of the NRA’s Tips & Tactics video series, Kristy Titus explains how to prepare for a hunt. Titus, co-host of the Team Elk TV show has hunted around the globe. She grew up in the outdoors, running pack mules in Oregon with her father. In this video, Kristy discusses fitness training and demonstrates field positions that can be employed during a hunt.
Kristy explains: “Hunting can lead you into some steep, rough country. It’s really important that you train both your body and your mind to handle the elements and the rigors of hunting So, if you plan on going on a mountain hunt, get out and train your body. Train with your firearm. Get off the bench and have some fun with this. Do some positional shooting or, if you want to add a stress dynamic… have someone put you under a time parameter.”
Visit WhereToHunt.org
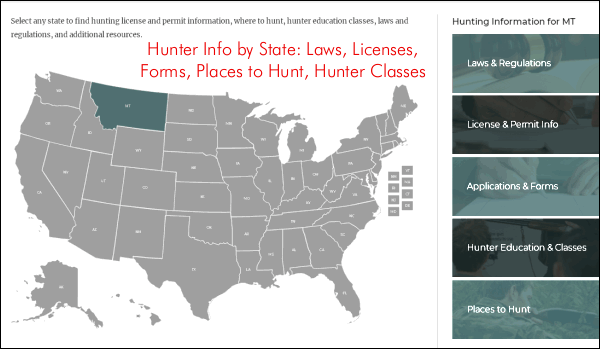
There’s a great online resource for hunters that will help you find game locations in your state and ensure you have all the proper permits and game tags. WheretoHunt.org features an interactive map of the country. For all 50 states, the NSSF has compiled information about hunting license and permits, where to hunt, hunter education classes, laws and regulations and more. For each state you’ll also find a link for required applications and license forms.
Today, September 26, 2020, is National Hunting and Fishing Day (NHFD). On this day we recommend you take new shooters afield and introduce them to shooting or hunting. The NFHD website has helpful resources for hunters.
Getting the right introduction to hunting ensures a quality experience and the start to a lifetime of enjoyment. Many hunters receive their first introduction to hunting from family or friends as a tradition passed down from generation to generation.
For all hunters, whether they have mentors to guide them or not, the most important first step into the woods begins with a state-certified hunter education course.
Game Resources — To learn more about different game species, click these NSSF links:
FREE Printable Deer Hunting Target
To help you prepare for a fall hunt, here is a free, printable Deer Practice target. Hone your skills on a trio of bucks with a red bullseye centered on the animals. You can print the targets in black and white, but they look best in color. Right-click the image below to download a FREE printable PDF file.
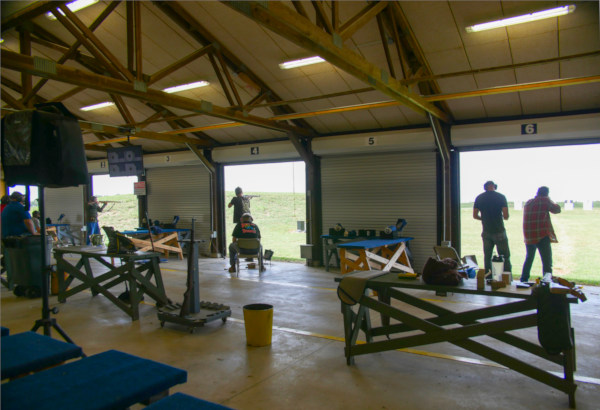
This is heartening — folks are shooting at Camp Perry again. Some normalcy has returned to the world (despite the ongoing pandemic). Though the CMP National Matches were cancelled in summer 2020, shooting returned, on a smaller scale, in the fall. The CMP hosted a Garand-Springfield-Modern and Vintage Military (GSMM) Rifle Match on Camp Perry’s Petrarca Range on September 14th.
Competitors on the line greeted each other with warm smiles and swapped stories of missed competition over the last few months – some traveling from as far as Virginia with the hopes of enjoying Camp Perry after the cancellation of the National Matches (typically an annual tradition for marksmen). Others admitted the Petrarca Match was their first time in competition since last year’s National Matches. So, for those in attendance, this event did represent a positive return to normalcy during this challenging year.
The GSMM Match was subject to strict health and safety guidelines. Participants practiced social distancing and wore masks when not firing. The CMP team also employed sanitation procedures for the facility.
The morning started off soggy as rain moved through the range area along the shores of Lake Erie, clearing off before the first relay to leave a gray backdrop. The weather quickly improved through early afternoon as the sun appeared and warmed the air, making for a pleasant return to the firing line for later relays.
Winning overall in the Garand competition was Jeffrey Cramer, 66, with a 266-3X Aggregate. Jace Diezman, 59, led the Springfield category with 266-2X, as SFC Charles Novak, 55, won the Vintage Military class, with a score of 254-1X. Joe Rondon, 53, won Modern Military with a score of 281-5X over the day.
Modern Kongsberg Electronic Targets for Rapid Scoring
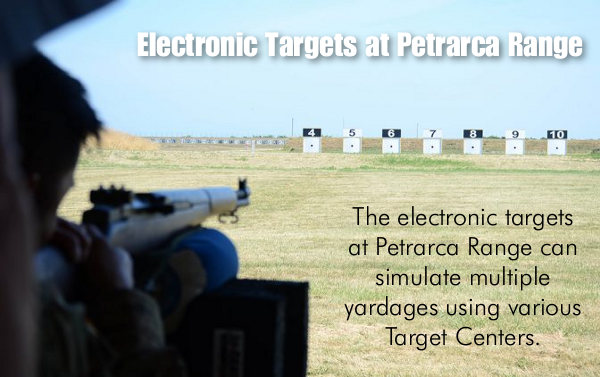
Petrarca Range is home to CMP Targets, powered by the Kongsberg Target Systems (KTS) of Norway. The lineup of electronic targets utilized on the range allows competitors to watch their shots on monitors located at each firing point eliminating the need for pit duty and dead range time.
Next Saturday, September 26, 2020, is National Hunting & Fishing Day. The annual celebration takes place on the the 4th Saturday of September every year. National, regional, state and local organizations will run thousands of “open house” hunting- and fishing-related events around the country. Events will include Fishing Derbys, Hunting Expos, Wing-shooting tournaments, and much more.
Hunting Safety Checklist
A good hunt begins with preparation. And during the hunt, safety is a key priority. To help hunters, the National Shooting Sports Foundation (NSSF) has created a Safety Checklist for hunters. This Hunting Safety Checklist, produced as part of the NSSF’s “Hunt S.A.F.E.” campaign, helps hunters follow good, safe practices in the field and at home.
Hunting Season has started in many parts of the country… or will very soon. Before you head out to the hunting fields, you may want to practice your shooting on specialty paper targets designed expressly for hunters. Here is a selection of game targets which can help you achieve success this hunting season.
Realistic Game Targets with Marked Vital Zones
Serious hunters may prefer to practice with photo-realistic game targets with animal profiles that look like the real thing. Champion offers realistic “X-Ray” game animal targetss. These X-Ray targets display the bone structure and heart/lung position of game animals. These are popular with hunters, as are Champion’s Critter Targets Set with 5 different realistic animals in a 10-pack. CLICK HERE to view X-Ray Animal Targets and Critter Targets.
Unfortunately this large ELK X-Ray target has been discontinued, but you may still find it in some stores. CLICK HERE to view large version.
Birchwood Casey offers a Realistic Deer Target that shows the vital Hit Zone. The target comes with four (4) replaceable Shoot-N-See overlays. A target twin-pack with the overlays is $11.56 at Amazon.com.
FREE Printable Game Targets from the NRA
To help you prepare for your fall hunts, NRABlog.com has created a set of color practice hunting targets. You can hone your skills on a trio of bucks, three gobblers, or three wild hogs. Each target features three red bullseyes, centered on the animals. You can print the targets in black and white, but they look best in color. Click on each image below to download a FREE printable PDF file.
Right-Click Each Image to Download Printable PDF File:
Hunting season is right around the corner. We know many readers have acquired a new hunting rifles, or perhaps are using new ammo or a new optic. If you’ve got new gear, you’ll want to sight-in and zero your hunting rig properly. Here’s how…
Here’s a simple procedure that lets you get a solid zero in just four shots. Of course you probably want to fire a few more rounds to confirm your zero before you head off to your hunting grounds, but this will let you get on-target with a minimum amount of time and ammo expended. (This assumes your scope is securely mounted, and the bases are not drastically out of alignment.)
QUICK-TIP: The Key to this procedure is Dialing to Shot One Point of Impact (POI). Re-aim at center of target after SHOT ONE. Then with the rifle motionless, use the turrets to put the middle of the cross-hair (reticle) on the first shot location. Be sure NOT to move your rifle while clicking.
1. First, remove the bolt and boresight the rifle. Adjust the position of the rifle so that, looking through the bore, you can see the center of the target with your eyes. Secure the rifle in the rests to maintain its position as boresighted. Then, without moving the rifle, center the reticle. That should get you on paper. With the rifle solidly secured in front and rear rests or sandbags, aim at the center of a target placed at your zeroing distance (50 or 100 yards). Confirm there are no obstructions in the barrel! Then load and fire SHOT ONE. Then, return the gun to the exact position it was when you pulled the trigger, with the cross-hair centered on the target as before.
2. Locate, in the scope, where your first bullet landed on the target. Now, while you grip the rifle firmly so it doesn’t move, have a friend adjust the turrets on your scope. While you look through the scope, have your friend turn the windage and elevation turrets until the cross-hairs, as viewed through the scope, bisect the first bullet hole on the target. Use the turrets to move the center of the reticle to the actual position of shot number one. IMPORTANT: Dial the crosshairs to the hole — don’t move the rifle.
3. After you’ve adjusted the turrets, now re-aim the rifle so the cross-hairs are, once again, positioned on the target center. Keep the rifle firmly supported by your rest or sandbag. Take the SECOND SHOT. You should find that the bullet now strikes in the center of the target.
4. Take a THIRD SHOT with the cross-hairs aligned in the center of the target to confirm your zero. Make minor modifications to the windage and elevation as necessary.
5. Finally, shoot the rifle from a field rest (shooting sticks, bipod, or rucksack) as you would use when actually hunting. Confirm, with SHOT FOUR, that your zero is unchanged. You may need to make slight adjustments. Some rifles, particularly those with flexy fore-arms, exhibit a different POI (point of impact) when fired from a bipod or ruck vs. a sandbag rest.
This Video Shows the Process Described Above:
Fouling Shots and Cold Bore Condition
If you recently cleaned your rifle, you may want to fire two or three fouling shots before you start this procedure. But keep in mind that you want to duplicate the typical cold bore conditions that you’ll experience during the hunt. If you set your zero after three fouling shots, then make sure the bore is in a similar condition when you actually go out hunting.
Reactive targets — whether balloons, steel gongs, or clay birds — always add fun to a range session. But precision shooters may want something more challenging (i.e. smaller) than a clay bird when shooting inside 300 yards. For a change of pace, try shooting at inexpensive pool cue chalks. Less than 1″ square, these will test your marksmanship skills. (If you need a bigger target, that also makes a nice puff of “smoke”, try charcoal briquettes).
Pool Cue Chalks — Cheap, Fun, Dramatic
If you’re looking for a small target that makes a nice big cloud of color when hit, try billiard chalks — those little blue cubes you use to dust the end of pool cues. Measuring about 7/8″ per side, billiard chalks make very challenging targets at 100 and 200 yards. When you hit them, if you nail the circular “dimple” in the middle, they disintegrate impressively, tossing blue “smoke” in all directions. Billiard chalks are inexpensive. You can buy a dozen chalks online for about $3.00 — just 25 cents each. And the prices drop with more quantity. One gross of chalks (that’s 144 pieces) costs just $24.95 at ozonebilliards.com. That’s 17 cents each.
To see actual hits on chalk at 100 and 200 yards, watch the video below. (WARNING: Soundtrack is loud and advertisement may play before movie. Flash plug-in required for playback, so you may see a note that a Flash file is loading.) The movie-maker cautions that: “You’ll notice (in the video) that some of the hits are ‘wiffs’ instead of ‘poofs’. If you look at the picture above, you’ll see the 1/2 inch dimple in the cube face. If you don’t put the bullet in that dimple, it’ll ‘wiff’ on you.” Note — this video may not be available on some mobile devices or computers with Flash disabled.
Watch Billiard Chalks Explode with Blue Smoke When Hit:
NOTE: This movie requires Flash to run.
Forum members who have tried Billiard Chalks say they are definitely fun to shoot. Member Blake says: “[These are] satisfying and cheap reactive targets — I have a 72ct box of [chalks] in every color. They work great if you hit them in the center with anything more powerful than a 22 LR, and they don’t leave much mess to clean up.” Blake offers attachment tips: “I use double-stick tape on the back to hold them onto target rails. Just make sure you stick them to steel so that they have something nice & hard to crush against when you hit them. Put them on thin plywood and they’ll just punch right through!”
Many of our readers are thinking of trying out PRS-type competition. Tactical matches are becoming more popular every season. Along with F-Class, tactical/practical disciplines are the fastest-growing forms of competitive rifle shooting. Rich Emmons, one of the founders of the Precision Rifle Series (PRS), has written an insightful article about getting started in the tactical game. This will help PRS novices pick the right equipment and understand the game. Here are highlights from Emmon’s “PRS — Intro to Competition” article, originally published on the PRS website. You may also want to read the current PRS FAQ Page.
Precision Rifle Series — Intro to Competition
by Rich Emmons, PRS President
Tactical Shooting with a precision rifle is not like other disciplines, there is no set course of fire or format. That is what makes it so fun!
First, you have to ask yourself what do you want to accomplish. When I was introduced to long range shooting, immediately a light turned on for me, once I saw how easy it was to hit 300–600 yard targets. What I quickly learned from my first competition and the many that followed was there is so much to learn and shooting in competition put everything you thought you knew to the test. So back to the question: “What do YOU want to accomplish?”. The reality is you may not know yet, you just think it is cool to have a bad ass rifle and scope that can make almost any shot. Now if you’ve got that rifle and scope, it’s time to take it to the next level.
Watch PRS 2016 Championship
Getting Started — What to Expect
If you’re reading this, you have probably already have been bitten by the long range shooting bug. It can seem quite intimidating to just jump in with a new bunch of shooters you don’t know and shooting lingo you don’t quite understand yet. But here is the key — show up and shoot! I guarantee you if you show up to a match as a new shooter, other experienced shooters will guide you along and give you help on anything you need.
AUDIO: Click Button to hear Rich Emmons Talk about the Precision Rifle Series.
Now, a couple things you should just expect. You’re not as good as you think you are. Don’t expect to come into your first match and beat all the veterans. That just doesn’t happen unless you have had some really good coaching or other shooting competition experience to get you ready for this type of competition. If possible, find a local rifle club that has monthly long range matches, or any type of match will help prepare you for a larger PRS event. Getting involved with a rifle club and starting out shooting monthly matches is definitely the way to jump into competition shooting.
The Gear You Need
The first question that many ask is: “What kind of rifle/caliber/scope do I need?” The easiest answer to this is, the best you can afford. It’s no secret the gear is expensive. It took me several years of buying sub-par gear and eventually trading up to figure this out. Now, a guy can get a real sense of pride of doing it on the cheap, or with a factory rifle. I’ve seen many old Savage 10FPs take down custom rigs that cost 10 times as much. And if that’s all you can afford, then eventually you will learn the limitations of yourself or your gear. As for choice of cartridge/caliber, the respected Precision Rifle Blog has analyzed five years worth of match results from the best tactical shooters in the nation. CLICK HERE to read a PRB article that reveals what cartridge types the “top guns” use.
Craig Arnzen of Area 419 has created a useful article reviewing the gear PRS shooters need, including support bags, hearing protection, and other key accessories such as muzzle brakes. This helpful article also covers factory ammunition options.
Making Good Ammo
Producing quality reloads is something you have to master. It’s not hard at all, you just have to pay attention to detail, and eventually you are going to do something stupid like mis-priming your brass, or skip a row of brass when dumping your powder. Everybody has their own horror story of some reloading failure that cost them a stage or even a match. So load to perfection, work with your rifle to find what load it likes the best, then start your practice.
Practice Makes Perfect
You want to become ONE with your rifle, learning everything you can about its functionality. Getting comfortable with the operation of your rifle is key. Learn the feel of your trigger, dry-firing until you wear the paint off your bolt handle. Learn how the rifle works best — pay attention to little things like the sound and feel of the bolt feeding a round from the mag (or when it doesn’t). Learn how to remove a jammed round quickly, learn how to reload a magazine quickly. Learn to scan across a field and find targets in a quick manner, seeing the targets with your eye and coming into the scope on target. These are some of the basic practices that separate the new shooters from the seasoned ones.
In our Shooters’ Forum, there was an discussion about a range that was threatened with closure because rifle over-shoots were hitting a farm building over two miles from the firing line. One reader was skeptical of this, asking “how’s that possible — were these guys aiming at the stars?” Actually, you may be surprised. It doesn’t take much up-angle on a rifle to have a bullet land miles down-range. That’s why it’s so important that hunters and target shooters always orient their barrels in a safe direction (and angle). Shooters may not realize how much a small tilt of the barrel (above horizontal) can alter a bullet’s trajectory.
How many degrees of muzzle elevation do you think it would take to hit a barn at 3000 yards? Ten Degrees? Twenty Degrees? Actually the answer is much less — for a typical hunting cartridge, five to seven degrees of up-angle on the rifle is enough to create a trajectory that will have your bullet impacting at 3000 yards — that’s 1.7 miles away!
Five degrees isn’t much at all. Look at the diagram above. The angle actually displayed for the up-tilted rifle is a true 5.07 degrees (above horizontal). Using JBM Ballistics, we calculated 5.07° as the angle that would produce a 3000-yard impact with a 185gr .30-caliber bullet launched at 2850 fps MV. That would be a moderate “book load” for a .300 Win Mag deer rifle.
Here’s how we derived the angle value. Using Litz-derived BCs for a 185gr Berger Hunting VLD launched at 2850 fps, the drop at 3000 yards is 304.1 MOA (Minutes of Angle), assuming a 100-yard zero. This was calculated using a G7 BC with the JBM Ballistics Program. There are 60 MOA for each 1 degree of Angle. Thus, 304.1 MOA equals 5.068 degrees. So, that means that if you tilt up your muzzle just slightly over five degrees, your 185gr bullet (2850 fps MV) will impact 3000 yards down-range.
Figuring Trajectories with Different Bullets and MVs
If the bullet travels slower, or if you shoot a bullet with a lower BC, the angle elevation required for a 3000-yard impact goes up, but the principle is the same. Let’s say you have a 168gr HPBT MatchKing launched at 2750 fps MV from a .308 Winchester. (That’s a typical tactical load.) With a 100-yard zero, the total drop is 440.1 MOA, or 7.335 degrees. That’s more up-tilt than our example above, but seven degrees is still not that much, when you consider how a rifle might be handled during a negligent discharge.
Think about a hunter getting into position for a shot. If careless, he could easily touch off the trigger with a muzzle up-angle of 10 degrees or more. Even when shooting from the bench, there is the possibility of discharging a rifle before the gun is leveled, sending the shot over the berm and, potentially, thousands of yards down-range.
Hopefully this article has shown folks that a very small amount of barrel elevation can make a huge difference in your bullet’s trajectory, and where it eventually lands. Nobody wants to put holes in a distant neighbor’s house, or worse yet, have the shot cause injury. Let’s go back to our original example of a 185gr bullet with a MV of 2850 fps. According to JBM, this projectile will still be traveling 687 fps at 3000 yards, with 193.7 ft/lbs of retained energy at that distance. That’s more than enough energy to be deadly.








 In our Shooters’ Forum, there was an discussion about a range that was threatened with closure because rifle over-shoots were hitting a farm building over two miles from the firing line. One reader was skeptical of this, asking “how’s that possible — were these guys aiming at the stars?” Actually, you may be surprised. It doesn’t take much up-angle on a rifle to have a bullet land miles down-range. That’s why it’s so important that hunters and target shooters always orient their barrels in a safe direction (and angle). Shooters may not realize how much a small tilt of the barrel (above horizontal) can alter a bullet’s trajectory.


