by Tony Chow
In recent years, the use of electronic trainer systems has revolutionized training in all disciplines of position shooting. By capturing (and illustrating) key performance variables like the steadiness of a shooter’s hold, accuracy of aiming, and the timeliness of trigger release, these devices can offer tremendous insights into the strengths and weakness of a shooter’s position and technique, making high-level marksmanship training less voodoo and more of a science.
Until now, electronic trainers all suffered from one critical limitation: the inability to be used outdoors in live fire training. Now, however, SCATT has introduced the next-generation MX-02 electronic trainer, a product that can finally support outdoor live firing in broad daylight, as well as dry firing indoors. In addition, the MX-02 is the first electronic trainer to support centerfire rifles. It goes without saying that, when we at AccurateShooter.com were offered an MX-02 test unit to review, we jumped at the opportunity.
How the SCATT MX-02 Works
The SCATT sensor mounted on the end of the barrel has a digital camera that “sees” the black bullseye in the target, even in broad daylight outdoors. Using the bullseye as a reference, the SCATT software tracks the movement of the muzzle relative to the center of the target. The unit can plot these movements as a continuous trace, which appears on a monitor as a squiggly, colored line. Data points from the trace are also available in a tabular spreadsheet format. This allows the shooter to “crunch the numbers”, revealing strengths and weaknesses in his gun-handling and aiming technique.
In our testing, we confirmed that, like SCATT’s earlier indoor-only WS-01, the MX-02 offers excellent support for indoor dry-fire training, which will continue to be the primary means through which position shooters sharpen their fundamental skills. Since the new SCATT uses the same familiar Windows software for data capture and analysis as its predecessors, shooters and coaches upgrading to MX-02 will have no learning curve to overcome, and newcomers to the SCATT platform can tap into the wealth of institutional knowledge accumulated over the years by the shooting community on how to interpret shot data.
It’s in the support for outdoor live firing, however, that SCATT MX-02 distinguishes itself from its predecessors and the competition. Shot trace data captured by MX-02 during live firing turned out to be every bit as valuable (and revealing) as we had hoped. The ability to correlate SCATT tracing with real shots on target gave us a better understanding of the shooting process, and helped the reviewer, already a high-level smallbore prone shooter, uncover a significant problem in his shooting. SCATT MX-02’s outdoor capability is therefore an invaluable feature, particularly for experienced shooters aspiring to world-class performance.
In summary, SCATT MX-02 is an outstanding product that delivers on its promises. We heartily recommend it, both for first-time users of electronic training aids, and also for those shooters who may wish to upgrade their current electronic training system. The MSRP for SCATT MX-02 is $1,799, $500 more than its predecessor, the SCATT WS-01, which is still available. In my view, the $500 premium for the MX-02 is justified by the MX-02’s enhanced capabilities, making it a better long-term investment.
Our complete, 3600-word MX-02 review of the SCATT MX-02 can be accessed through the link below. This full review contains many more photos plus detailed field test results. For the time being, the review only covers our experience with the product in smallbore shooting. An upcoming addendum to the review will include test results from centerfire shooting. Those attending SHOT Show in Las Vegas next week can examine SCATT MX-02 in person. SCATT will have the MX-02 on display at Booth 111.
Experienced rifle marksmanship instructors and shooters who would like to receive advanced training and be certified as “Master Instructors” to teach CMP-sanctioned Clinics are invited to apply to attend a CMP Master Instructor Training Workshop. Workshops are periodically held at CMP North (Camp Perry, OH) and CMP South (Anniston, AL) and in conjunction with the Eastern CMP Games and Creedmoor Cup Matches at Camp Butner, NC. CMP-sanctioned rifle clinics teach basic and intermediate rifle marksmanship skills to novice shooters. If you are interested in becoming a Master Instructor, you can apply to attend a two-day Master Instructor Training Workshop.
February 8-9, Camp Perry, OH
March 15-16, Anniston, AL
May 2-3, Camp Butner, NC
July 15, Camp Perry, OH
October 10-11, Phoenix, AZ
WHO CAN ATTEND
Attendance at a Master Instructor Training Workshop is usually limited to 30 students per class. This is to ensure that all attendees have sufficient practical opportunities to work with workshop leaders and to practice what is taught. GSM Master Instructor students should possess these qualifications:
Association with a shooting club or shooting range where the Master Instructor will have opportunities to teach Sanctioned Rifle Clinics.
Experience teaching rifle marksmanship as a coach or instructor.
Experience competing in John C. Garand, Springfield or Rimfire Sporter matches at national and club levels.
Experience as a competitive service rifle shooter (desired, not required).
Desire to teach marksmanship to new shooters and to help them get a good start.
HOW TO REGISTER
To register for the CMP GSM Master Instructor Training Workshop, complete the APPLICATION FORM. Please submit the completed form on-line, fax it to 419-635-2573, or mail it to: CMP, Attn: Shannon Hand, P. O. Box 576, Port Clinton, OH 43452. There is a $135.00 registration fee, which includes notebook of material, CD, sling, 10 M1 Clips, 20 dummy rounds, and a CMP Rifle Scorebook.
Massachusetts smallbore shooter Dan Holmes, well-known match shooter and gun writer Hap Rocketto, and Erik Hoskins have developed a great dedicated website for competitive small-bore and air rifle shooters. Over the past few years, Pronematch.com has delivered quality content, including match reports, shooting tips, rule changes/updates, tech reports, and a calendar of events.
Pronematch.com also has a “human interest” feature, called the “Shooter Spotlights”. Holmes and his staff have interviewed dozens of shooters. Each marksman answers a few questions about his/her background in shooting, shooting techniques, match strategies, and personal items (such as “What is your favorite pre-match meal?).
The “Shooter Spotlights” let you “tap into” the wisdom of some of the county’s best shooters. Many of those interviewed offer some great tips, or they share fascinating anecdotes about the shooting sports.
We recommend you visit Pronematch.com, if nothing else to peruse the profiles, check the upcoming matches and read the popular “Hap’s Corner” stories. Hap is a talented writer who has provided plenty of content to ProneMatch.com. As just one example, Hap has written a fascinating Short History of Camp Perry and The National Championships.
A varmint shooter’s target is not conveniently placed at a fixed, known distance as it is for a benchrester. The varminter must repeatedly make corrections for bullet drop as he moves from closer targets to more distant targets and back again. Click HERE to read an interesting Varmint Forum discussion regarding the best method to adjust for elevation. Some shooters advocate using the scope’s elevation adjustments. Other varminters prefer to hold-over, perhaps with the assistance of vertical markers on their reticles. Still others combine both methods–holding off to a given yardage, then cranking elevation after that.
Majority View–Click Your Scope
“I zero at 100 yards — I mean really zero as in check the ballistics at 200 and 300 and adjust zero accordingly — and then set the scope zero. For each of my groundhog guns I have a click chart taped into the inside of the lid of the ammo box. Then use the knobs. That’s why they’re there. With a good scope they’re a whole lot more accurate than hold-over, with or without hash marks. This all assumes you have a good range finder and use it properly. If not, and you’re holding over you’re really just spraying and praying. Try twisting them knobs and you’ll most likely find that a 500- or 600- or 700-yard groundhog is a whole lot easier than some people think.” – Gunamonth
“I have my elevation knob calibrated in 100-yard increments out to 550. Range-find the critter, move elevation knob up…dead critter. The problem with hold-over is that it is so imprecise. It’s not repeatable because you are holding over for elevation and for wind also. Every time you change targets 50 yards, it seems as if you are starting over. As soon as I got completely away from the hold over method (I used to zero for 200), my hit ratios went way up.” — K. Candler
“When I first started p-dog shooting, I attempted to use the hold-over method with a 200-yard zero with my 6mm Rem. Any dog much past 325-350 yards was fairly safe. I started using a comeups table for all three of my p-dog rifles (.223 Rems and 6mm Rem). 450-yard hits with the .223s are fairly routine and a 650-yard dog better beware of the 6mm nowadays. An added benefit (one I didn’t think of beforehand) with the comeups table (elevation only), is that when the wind is blowing, it takes half of the variables out of the equation. I can concentrate on wind, and not have to worry about elevation. It makes things much more simple.” — Mike (Linefinder).
“I dial for elevation and hold for wind. Also use a mil-dot reticle to make the windage holds easier. For windage corrections, I watch for the bullet strike measure the distance it was “off” with the mil-dot reticle, then hold that much more the other way. Very fast once you get used to it.” — PepeLP
Minority View–Hold-Over is Better
“I try to not touch my knobs once I’m zeroed at 200 meters. Most of my varmint scopes have duplex reticles and I use the bottom post to put me on at 300 meters versus turning knobs. The reason I try to leave my knobs alone is that I have gone one complete revolution up or down [too far] many times and have missed the varmint. This has happened more than once and that is why I try not to change my knobs if at all possible.” — Chino69
“I have been using the hold over method and it works for me most of the time but the 450 yards and over shots get kinda hard. I moved to a 300 yard zero this year and it’s working well. I do want to get into the click-up method though; it seems to be more fool-proof.” — 500YardHog
Compromise View–Use Both Methods
“I use both [methods] as well — hold over out to 250, and click up past that.” — Jack (Wolf)
“I use the target knobs and crank-in elevation. I also use a rangefinder and know how far away they are before I crank in the clicks. I have a scope with drop dots from Premier Recticle and like it. No cranking [knobs] out to 600.” –Vmthtr
In his Guns & Ammo Blog, Top Shot (Season 1) Champion Iain Harrison explains how to get started in 3-Gun Competition. Iain begins with some very practical advice: “Don’t worry too much about the gear. Spending a ton of money to get into the game, only to discover a few months later that you want to head in another direction, is a surefire way to alienate your significant other…. Go shoot what you have, even if it’s not ideal; you’ll learn much more about what works and what doesn’t by shooting in a match than you ever will by reading blogs like this.”
It’s obvious that you’ll need three firearms — pistol, carbine/rifle, and shotgun. But Harrison explains you don’t have to go out an get the most expensive (or complex) weaponry. For the rifle/carbine segment, Harrison says: “A vanilla AR15 with a low-power variable scope is a good place to start. Pretty much any flat top AR15 [will do].” For a scattergun, yes it would be nice to have an exotic Benelli M1 Super 90, but a low cost semi-auto from Remington, Winchester, or Mossberg will be competitive. And many guys start off with their “old reliable” Rem model 870 pump shotgun. Harrison explains: “Add an extended mag tube to the Remington 1100 lurking in the back of the safe and you have the shotgun component covered, though if you’d rather run your trusty pump gun… that’s cool too.”
Choice of Pistol and Caliber
The best handgun brand and caliber is really a matter of personal choice. You want a “dead-nuts” reliable pistol, for which you can get affordable accessories (holster, mag pouches, high-cap magazines). Glocks, 1911s, HKs, Sigs, S&W M&Ps are all popular. As for caliber choice, Harrison notes: “Most guys run 9 mm handguns as the capacity advantage over a .40 or .45 is significant, but whatever you choose, your holster is as important as the piece it contains. Bump a loaded pistol out of your holster in the middle of a stage and you’ll be going home early.”
Video Shows Highlights from 3-Gun Nation 2011 Championship
In his Guns & Ammo Blog post, Harrison also give advice about 3-Gun optics and he lists particular firearms models that are favored by competitors. Learn more about these topics by visiting the 3-Gun Nation website. When it comes to gun shopping, Harrison does advise to “buy new” — that’s because active 3-gunners fire so many rounds in practice and competition that they really can wear out their firearms. Click Here to read Harrison’s full Getting Started in 3-Gun Blog article. While visiting GunsandAmmo.com, check out Harrison’s amusing Top Five Reasons to Try 3-Gun. Here’s Reason Number One: “It’s sexy. So sexy in fact, it’s the only shooting sport with its own TV show!”
Kirsten Joy Weiss is one of America’s top smallbore shooters. Her many titles include the 2012 NRA National Women’s Smallbore 3P Championship. Using her Anschütz target rifle and Lapua ammunition, she has competed at top-level national and international events. To help demonstrate the fun of shooting, Kirsten has started her own YouTube Channel, Facebook Page, and her own website, www.KirstenJoyWeiss.com. There you’ll find shooting tips, gear reviews, and videos. Each week Kirsten does a new trick shot video. Here are three of our favorites.
Here Kirsten Drills the Center of Two Apples with One Shot:
In this Video, Kirsten Shoots from Pilates Position with Rifle Held Upside-Down (Wow!):
For this Trick Shot, Kirsten Shoots the Lead Tip off a Pencil without Breaking the Wood:
Kirsten Joy Weiss Competition Highlights
Kirsten is from Pennsylvania. A 3-time All-American in smallbore, Kirsten led the Univ. of Nebraska Cornhuskers to a 4th-place finish at the NCAA Championships. Weiss was an NRA Second-Team All-American and was named to the CRCA All-Collegiate Team twice. In 2012, Kirsten was the top USA athlete-shooter at the Munich World Cup. She won the 2012 NRA Three-Position Women’s Smallbore Championship and also won the Standing Position, while finishing as the National Overall Woman Champion.
In response to questions from a fellow F-Class shooter, G. Salazar offered some expert advice in an article entitled: Basics: A Few Wind Reading Tips. Here are highlights from that essay. You can read the entire article on Salazar’s Rifleman’s Journal Website. Salazar cautions that: “I certainly am not attempting to make this short item into a comprehensive lesson in wind reading, but there may be a nugget or two in here for the newer shooter. There is, however, no substitute for range time and coaching.”
Preliminary Matters — Holding Off vs. Knob-Turning
Let’s begin by eliminating one topic altogether — I realize that the predominant method of wind correction in F-Class is holding-off with the crosshairs of your scope rather than adjusting the windage knob. I am a firm believer in aiming at the center and turning the knob as needed, but we’ll leave that for another time and focus on seeing what the wind is doing.
The Wave — Wind Cycles and Shot Timing
I find that most shooters begin to shoot immediately when the time commences rather than waiting for an appropriate moment in the cycle, this often leads to lost points early on. If you’ve been scoring prior to shooting, hopefully you’ve observing the flags and your shooter’s shot placement. It’s a very useful way of gaining some insight into the day’s wind patterns before shooting.
My technique is based on the understanding of wind as a cyclical wave motion. That statement alone should give you plenty to think about[.] Imagine for a moment, a surfer. He waits for a gentle swell, gets moving on it and rides it through it’s growth and ultimately its crescendo and hopefully avoids being swallowed in its crash. Wind typically behaves in the same fashion as that wave and a smart shooter behaves as does the surfer — get on early in the wave, ride through the major change and get off at the right moment. Knowing when to stop shooting is every bit as important as shooting quickly through the predictable portion of the wave; getting back on to the next wave is a matter of delicate judgment and timing.
When you are on that rising (or falling) wave, the idea is to shoot very quickly to minimize the amount of change between shots and to make a small adjustment on each shot. Too many shooters waste time trying to analyze the exact amount of the change, by which time it has changed even more! Get on with it, click or hold over a set amount and fire the next shot quickly. This is the foundation of how I shoot and it is very effective as long as you know when to start, when to stop and you have a good man working the target – a slow marker is the death of this method.
Watch Shots from Other Shooters
We all watch the wind flags, of course, and the trees if your range is so blessed (ours are fairly barren), and many other small wind indicators. Watching the shots of your fellow shooter can also be a very useful tool and should be observed whenever possible. When a good shooter next to you comes up with a poor shot, it should signal you to stop and reassess conditions as they may not be what they appear.
While scoring for another shooter, take a moment to scan the line of targets. You’ll be surprised at how most of the shot markers move in unison to one side and then the other. The sad truth is that most shooters are behind the changes in the wind and they will get carried to either side of the bull as the wind changes. You’ll see this in the targets as they come up, and once learned, you’ll find that the line of targets is as useful as another row of flags.
Are you thinking, “Snow’s on the ground, winter’s here, I won’t be competing until spring.” Well think again — there are opportunities to compete indoors during these cold months.
The 2014 NRA National Indoor Rifle & Pistol Championships start January 1, 2014. There will be indoor matches around the country with a variety of disciplines including Air Pistol, Rimfire Pistol, Air Rifle, and Rimfire Rifles. There is even a BB gun class for Juniors. The Indoor Championships involve multiple sectional tournaments, held in a variety of states from January through mid-April. This is like a super-duper postal match. Your results are sent to the NRA where they’re compared to other shooters. Winners are determined in late May. It’s a fun way to compete with many other shooters and it’s easy to get involved. There will be nearly 300 sectionals in 2014, so you’ll probably find an event close to home. Here are dates for 2013:
For more information contact these NRA staffers: Dian Bullock, (703) 267-1482 (Rifle); Ann Boyd, (703) 267-1452 (Pistol); Tori Croft, (703) 267-1473 (Collegiate).
The 50m Free Pistol is one of the events in the NRA National Indoor Championship. It takes skill — the pistol is shot one-handed, with iron sights, and the Ten-Ring is only 50mm (about 1.97″) in diameter. A competitive world-class score is 560 or better out of 600 possible points. Learn more about this challenging discipline in this USA Shooting video:
Today is Thanksgiving. After partaking in the traditional Turkey Day feast, we know many of our readers will find time during the holiday to head to the range. A Thanksgiving Day shoot is a fun excursion, and a great way for young and old family members to share time together. For all you T-Day marksmen, we offer a special turkey target. This was created by our friend and Forum member Pascal (aka “DesertFrog”).
We’ve packaged the turkey target along with five (5) other varmint/animal-themed targets for your shooting pleasure. These are all offered in .pdf (Adobe Acrobat) format for easy printing.
Program Promotes Family Hunting Opportunities
Speaking of turkeys and families going shooting together, we’d like to give a plug for the “Families Afield” program. A joint effort of the Nat’l Shooting Sports Foundation (NSSF), U.S. Sportsmen’s Alliance (USSA), and National Wild Turkey Federation (NWTF), the “Families Afield” program works to expand the opportunities for young hunters with adult mentors. The goal of the program is to increase the number of young people getting involved in hunting. For every 100 adult hunters today, only 69 youth hunters are coming up to take their place. “Families Afield” works to reverse that trend. Several states that were restrictive to youth hunting have signed into law “Families Afield” legislation. These new laws make it possible for young hunters and their families to enjoy hunting traditions together. CLICK HERE to learn more.
Some folks say you haven’t really mastered marksmanship unless you can hit a target when standing tall ‘on your own hind legs’. Of all the shooting positions, standing can be the most challenging because you have no horizontally-solid resting point for your forward arm/elbow. Here 10-time National High Power Champ Carl Bernosky explains how to make the standing shot.
Carl Bernosky is one of the greatest marksmen in history. The reigning 2012 National High Power Champion, Carl has won ten (10) National High Power Championships in his storied shooting career. In this article, Carl provides step-by-step strategies to help High Power shooters improve their standing scores. When Carl talks about standing techniques, shooters should listen. Among his peers, Carl is regard as one of the best, if not the best standing shooter in the game today. Carl rarely puts pen to paper, but he was kind enough to share his techniques with AccurateShooter.com’s readers.
If you are position shooter, or aspire to be one some day, read this article word for word, and then read it again. We guarantee you’ll learn some techniques (and strategies) that can improve your shooting and boost your scores. This stuff is gold folks, read and learn…
How to Shoot Standing by Carl Bernosky
Shooting consistently good standing stages is a matter of getting rounds down range, with thoughtfully-executed goals. But first, your hold will determine the success you will have.
1. Your hold has to be 10 Ring to shoot 10s. This means that there should be a reasonable amount of time (enough to get a shot off) that your sights are within your best hold. No attention should be paid to the sights when they are not in the middle — that’s wasted energy. My best hold is within 5 seconds after I first look though my sights. I’m ready to shoot the shot at that time. If the gun doesn’t stop, I don’t shoot. I start over.
2. The shot has to be executed with the gun sitting still within your hold. If the gun is moving, it’s most likely moving out, and you’ve missed the best part of your hold.
3. Recognizing that the gun is sitting still and within your hold will initiate you firing the shot. Lots of dry fire or live fire training will help you acquire awareness of the gun sitting still. It’s not subconscious to me, but it’s close.
4. Don’t disturb the gun when you shoot the shot. That being said, I don’t believe in using ball or dummy rounds with the object of being surprised when the shot goes off. I consciously shoot every shot. Sometimes there is a mistake and I over-hold. But the more I train the less of these I get. If I get a dud round my gun will dip.* I don’t believe you can learn to ignore recoil. You must be consistent in your reaction to it.
5. Know your hold and shoot within it. The best part of my hold is about 4 inches. When I get things rolling, I recognize a still gun within my hold and execute the shot. I train to do this every shot. Close 10s are acceptable. Mid-ring 10s are not. If my hold was 8 inches I would train the same way. Shoot the shot when it is still within the hold, and accept the occasional 9. But don’t accept the shots out of the hold.
6. Practice makes perfect. The number of rounds you put down range matter. I shudder to think the amount of rounds I’ve fired standing in my life, and it still takes a month of shooting standing before Perry to be in my comfort zone. That month before Perry I shoot about 2000 rounds standing, 22 shots at a time. It peaks me at just about the right time.
This summarizes what I believe it takes to shoot good standing stages. I hope it provides some insight, understanding, and a roadmap to your own success shooting standing.
— Good Shooting, Carl
* This is very noticeable to me when shooting pistol. I can shoot bullet holes at 25 yards, but if I’ve miscounted the rounds I’ve fired out of my magazine, my pistol will dip noticeably. So do the pistols of the best pistol shooters I’ve watched and shot with. One might call this a “jerk”, I call it “controlled aggressive execution”, executed consistently.


 Pronematch.com also has a “human interest” feature, called the “Shooter Spotlights”. Holmes and his staff have interviewed dozens of shooters. Each marksman answers a few questions about his/her background in shooting, shooting techniques, match strategies, and personal items (such as “What is your favorite pre-match meal?).
 A varmint shooter’s target is not conveniently placed at a fixed, known distance as it is for a benchrester. The varminter must repeatedly make corrections for bullet drop as he moves from closer targets to more distant targets and back again.
  Minority View–Hold-Over is Better
 In his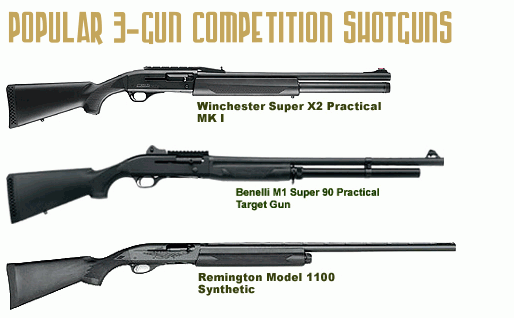

 Kirsten Joy Weiss Competition Highlights
 In response to questions from a fellow F-Class shooter, G. Salazar offered some expert advice in an article entitled:
  My technique is based on the understanding of wind as a cyclical wave motion. That statement alone should give you plenty to think about[.] Imagine for a moment, a surfer. He waits for a gentle swell, gets moving on it and rides it through it’s growth and ultimately its crescendo and hopefully avoids being swallowed in its crash. Wind typically behaves in the same fashion as that wave and a smart shooter behaves as does the surfer — get on early in the wave, ride through the major change and get off at the right moment. Knowing when to stop shooting is every bit as important as shooting quickly through the predictable portion of the wave; getting back on to the next wave is a matter of delicate judgment and timing.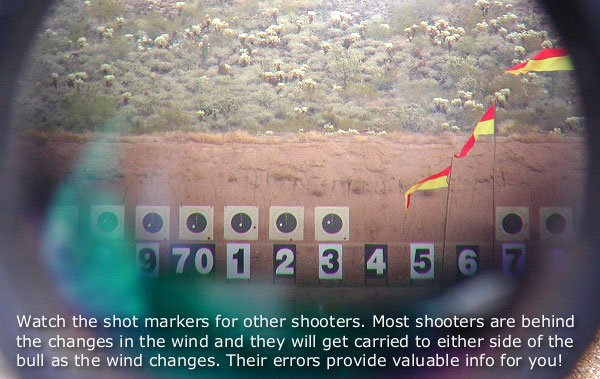



 How to Shoot Standing
 5. Know your hold and shoot within it. The best part of my hold is about 4 inches. When I get things rolling, I recognize a still gun within my hold and execute the shot. I train to do this every shot. Close 10s are acceptable. Mid-ring 10s are not. If my hold was 8 inches I would train the same way. Shoot the shot when it is still within the hold, and accept the occasional 9. But don’t accept the shots out of the hold.


