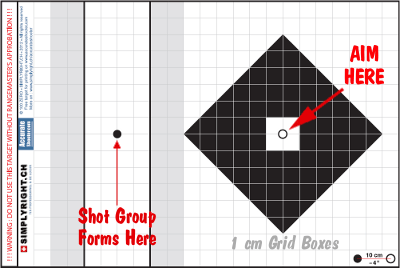
Forum member Florian from Switzerland (SimplyRight.ch) has created an interesting new grid target for precision practice work.
The concept behind the target is to allow a marksman to shoot a string of shots (with the same hold) without obliterating his aiming point. Florian’s Swiss Offset Target does this by separating the point of aim from point of impact (POI). On this target, POI is 10 cm (approx. 4″) over to the left.
We’ve found that Florian’s Offset Target is also very good for precise long-range shooting. At 600 yards and beyond, the big black diamond (12 cm or 4.72″ from point to point) provides a nice big aiming center. You can align your vertical and horizontal crosshairs to intersect the points of the diamonds (with intersection of crosshairs in white center of black diamond). That gives you a very precise sight picture. Then you can see your bullet holes appear “in the white” to the left side of the target. At long range it’s much easier to see holes “in the white”. And the grid lines let you gauge group size from afar.
More Uses for the Swiss Offset Grid Target
We’ve also found that this target lets you do a “quick and easy” Box Test with your scope. The target is designed as a precise grid. Starting at the lower left corner, you can click up X clicks, then right Y clicks, then down X clicks, then back left Y clicks, to see how your scope tracks. Also, since Florian’s target is set up with 1 CM grid boxes, this target is ideal for testing the true click values for metric-based scopes. Thanks to Florian for developing this Swiss Offset Grid Target. You may find new uses for it that we haven’t thought about yet!
How to use the Swiss Offset Target:
1. Print the target as a PDF file. Check if the size is correct by measuring the space between the two little circles’ centers. This should be 10cm (4″). (One square = 1cm).
2. Place the target horizontally at 100 meters for metric scope or 100 yards for inches and MOA scope. (We suggest using a small contractor’s level to ensure the target is mounted straight)
3. With your already-zeroed rifle, put in the amount of clicks needed to shoot 4 inches left at 100 yards (or 10cm on the left at 100 meters). Write down the amount of clicks it takes to move the point of impact the correct amount.
4. Aim at the circle inside the black diamond and shoot. (Your group should cover the small black circle at left (between the two gray columns).
5. Adjust your scope if needed.
6. Confirm your accuracy and click values by clicking back right and shooting (one time) at the virgin circle in the middle of the diamond.
Nancy Tompkins has been working on a new Second Edition of her popular book: Prone and Long-Range Rifle Shooting. Nancy just announced that the final proof has been submitted to the printer (at last), and the book should be available in six weeks, i.e. early February, 2013. Nancy posted today: “Mid gave me roses last night after I sent the proof for book to the printer. Yay! After thousands of hours of work… I AM DONE! In six weeks it will be a book.”
The enhanced Second Edition will feature updates to the current chapters, more photos, plus an entirely new chapter on F-Class Shooting. The Second Edition will be issued with a hardback cover, for increased durability. Price isn’t set yet, but Nancy hopes to keep the price “under $40.00″. The book will be available from Sinclair Int’l and direct from Nancy via her website, RifleShootingbyNancy.com.
Author Profile:Nancy Tompkins has been shooting competitively for over 33 years. She has won the National Long Range Championship four times. Nancy was the first woman in history to win the National High Power Championship (a feat accomplished by only two ladies, the other being Nancy’s daughter Sherri Jo Gallagher). Nancy has also been the Wimbledon Cup winner, and a 5-time Leech Cup winner. She has won both team and individual medals in the World Palma Championships, and has been on 6 Palma Teams (as both a shooter and a coach).
FMG Publications has partnered with renowned firearms instructor Clint Smith in a timely video covering the precepts of safe gun-handling. Commonly known as the “Four Gun Safety Rules,” these simple steps act as a safeguard, helping to prevent tragedy.
“I was heartbroken to read about the father who accidentally shot his son in Mercer, PA, earlier this week,” said FMG Publications Director Randy Molde. “If he would have observed just one of the four gun safety rules, his son would still be alive. It’s a sobering reminder that we can never take gun safety for granted. Hopefully our viewers will share this video and, more importantly, remind friends and family of the four gun safety rules.”
Clint Smith, Director of the Thunder Ranch training facility in Oregon, is widely recognized as one of the top shooting instructors in the nation.
by Steven Blair, 2012 California State Long Range F-Open Champion
Assess the Terrain and How the Wind Will Interact with It
Before you begin a match, take a few minutes to look around the range at the terrain, any obstructions, range topography (berms and backstop), and trees, buildings or structures that could affect wind flow over the range. Imagine what might happen if the wind was from the left or right, headwind or tailwind. Depending upon the direction, significant effects may be seen on range. A head or tail wind may ripple across the berms, causing elevation changes, both high and low. A tall side berm, like the east side berm at Ben Avery, may cause turbulence when the wind comes from that direction. Blocking features might shield most of the wind but a break along the range can funnel strong gusts through the gap with no other indications. Take a few notes about the effects of different wind directions and refer to them if the prevailing direction changes. (Tip courtesy Tony Robertson.)
Use a Spotting Scope, Even When Shooting a Scoped Rifle
A good spotting scope can “see” mirage much more clearly than even an expensive rifle scope. Take your spotting scope to the line and position it as sling shooters do, close enough to use without much movement. Focus the scope approximately 1/3 of the way down range or where the most significant wind effects are likely to occur. Take a quick look while waiting for pit service, glance at the flags and compare to your scope sight picture. I often see ambiguous indications at the target through the rifle scope, but see a clear indication of wind direction and speed through the spotting scope at the shorter distance. When shooting the Arizona Palma Championship at Ben Avery last weekend, I was scoring while the wind was coming from the east. Shooters up and down the line were out to the left, losing points. Mirage at the target looked moderate and the flags weren’t indicating strong wind. As I focused the spotting scope back, the mirage suddenly looked like it was flowing twice as fast around 500 yards than it was closer or farther. It wasn’t until I realized that the access road cut through the berm there that I understood what was happening. (Tip courtesy Gary Eliseo.)
Don’t Over-React to Something That May Be an Anomaly
On ranges with sizable berms, a headwind or tailwind can cause significant elevation problems. It is generally not possible to see or predict when this will occur. When the conditions exist that cause elevation changes and other competitors are experiencing the same problem, the best strategy is to ignore it. Certainly, avoid shooting when the head or tail wind is gusting, the same as you would in a crosswind. But, if you react to random, range-induced elevation changes, the only likely result is to make it worse. Whether the problem is caused by range or ammunition, maintain your waterline hold until you have evidence that something has fundamentally changed.
My .284 Shehane will usually require a click or two down during a string as the barrel warms. That is normal and manageable. But, if your shots are just bouncing up and down in the 10 ring, leave it alone. The same is also true of an occasional gust pushing a shot into the 9 ring. If the conditions have not changed and one shot just went out, it may be the result of a random occurrence that was not predictable. (Tip courtesy “School of Hard Knocks”.)
Adjust Spotting Scope Focus and Magnification as Needed to View Mirage vs. Target Details
In F-Class we only need to see mirage, spotters, and scoring disks. That does not take a lot of magnification. My scope is a Nikon 25-75x82mm ED. It is a superb scope for the money and makes it trivial to see minor variations in mirage. It is good to have the high magnification available, and it can always be reduced if necessary. I use different power settings for different situations.
Setting Magnification Levels
During a match, in very good viewing conditions, I set my spotting scope at 75X, full power. The mirage is more subtle in the morning and greater magnification is needed.
During a match with heavy mirage I set my spotting scope at about 40X. I have no problem seeing mirage, even at this magnification.
When practicing at 300 yards or closer I set my spotting scope at max power (75X) so I can see the little 6mm holes from my 6BR rifle. I usually need to focus back and forth between shots to see both bullet holes and mirage.
Steven Blair, 2012 California State Long Range F-Open Champion, has been shooting since childhood and competing for over 30 years. Before retiring, Steve spent 16 years in Engineering and IT with General Atomics. He has held Engineering and Marketing positions with several firearms companies and worked on projects from pistols to 155mm howitzers.
SCATT Company, based in Russia, produces an advanced marksmanship training aid that is now being used by many of the world’s top prone and position shooters. The SCATT system uses a gun-mounted infrared (IR) sensor that precisely tracks the movement of the rifle during the aiming process. This tracking data can then be displayed on a computer screen or special electronic targets. In development since 1991, the SCATT system was first employed by the Russian Federation shooting team. However, the SCATT technology was released commercially and is now being used by many other national teams including: USA, China, France, Germany, Japan, and Switzerland.
SCATT Training Systems employ an electronic optical sensor fixed to a gun’s barrel, frame, or the compressed air cylinder of an air gun. The shooter then aims at the electronic target. A trace of the point of aim can then be followed on a ‘real-time’ display screen. When the shooter pulls the gun’s trigger, the point of impact is then displayed on the screen. (This is dry-fire only — no projectiles are loaded). All results of training sessions can be recorded for later analysis. Russian research has shown that SCATT training is both effective and efficient. Using SCATT, beginning marksmen can acquire competitive skills two to three times more quickly than with conventional practice methods alone.
SCATT Shows How an Olympian Holds
The video below shows the aiming patterns of Olympic bronze medalist Miss Snježana Pejčić, a 10m Air Rifle shooter. The SCATT system records the air rifle’s muzzle motions as green traces while Snježana dials in her aim. Her final shot positions (and scores) are recorded when the large circle appears.
SCATT Company has dealers worldwide for its training systems, electronic targets, and shooting accessories. To order SCATT systems in the USA, contact:
Center Shot Sports
www.CenterShot.com
4300 Rogers Ave., Suite 20,
Box 213
Fort Smith, AR 72903
Phone: 479-262-2584
E-mail: info [at] centershot.com
In our Shooters Forum, one newcomer wanted some advice on selecting a reticle for F-Class optics. He wondered about the advantage of Forward Focal Plane (FFP) vs. conventional scopes and also wondered if one type of reticle was better for “holding off” than others.
In responding to this question, Forum regular Monte Milanuk provided an excellent summary of aiming methods used in F-Class. For anyone shooting score targets, Monte’s post is worth reading:
Aiming Methods for F-Class Shooting — by Monte Milanuk
F-Class is a known-distance event, with targets of known dimensions that have markings (rings) of known sizes. Any ‘holding off’ can be done using the target face itself. Most ‘benefits’ of forward focal plain (FFP) optics are null and void here — they work great on two-way ranges where ‘minute of man’ is the defining criteria — but how many FFP scopes do you know of in the 30-40X magnification range? Very, very few, because what people who buy high-magnification scopes want is something that allows them to hold finer on the target, and see more detail of the target, not something where the reticle covers the same amount of real estate and appears ‘coarser’ in view against the target, while getting almost too fine to see at lower powers.
Whether a person clicks or holds off is largely personal preference. Some people might decline to adjust their scope as long as they can hold off somewhere on the target. Some of that may stem from the unfortunate effect of scopes being mechanical objects which sometimes don’t work entirely as advertised (i.e. one or two clicks being more or less than anticipated). Me personally, if I get outside 1-1.5 MOA from center, I usually correct accordingly. I also shoot on a range where wind corrections are often in revolutions, not clicks or minutes, between shots.
Some shooters do a modified form of ‘chase the spotter’ — i.e. Take a swag at the wind, dial it on, aim center and shoot. Spotter comes up mid-ring 10 at 4 o’clock… so for the next shot aim mid-ring 10 at 10 o’clock and shoot. This should come up a center X (in theory). Adjust process as necessary to take into account for varying wind speeds and direction.
Others use a plot sheet that is a scaled representation of the target face, complete with a grid overlaid on it that matches the increments of their optics — usually in MOA. Take your Swag at the wind, dial it on, hold center and shoot. Shot comes up a 10 o’clock ‘8’… plot the shot on the sheet, look at the grid and take your corrections from that and dial the scope accordingly. This process should put you in the center (or pretty close), assuming that you didn’t completely ignore the wind in the mean time. Once in the center, hold off and shoot and plot, and if you see a ‘group’ forming (say low right in the 10 ring) either continue to hold high and left or apply the needed corrections to bring your group into the x-ring.
Just holding is generally faster, and allows the shooter to shoot fast and (hopefully) stay ahead of the wind. Plotting is more methodical and may save your bacon if the wind completely changes on you… plotting provides a good reference for dialing back the other way while staying in the middle of the target. — YMMV, Monte
Thanksgiving is coming up soon. After partaking in the traditional Turkey Day feast, we know many of our readers will find time during the holiday to head to the range. A Thanksgiving Day shoot is a fun excursion, and a great way for young and old family members to share time together. For all you T-Day marksmen, we offer a special turkey target. This was created by our friend and Forum member Pascal (aka “DesertFrog”).
We’ve packaged the turkey target along with five (5) other varmint/animal-themed targets for your shooting pleasure. These are all offered in .pdf (Adobe Acrobat) format for easy printing.
Program Promotes Family Hunting Opportunities
Speaking of turkeys and families going shooting together, we’d like to give a plug for the “Families Afield” program. A joint effort of the Nat’l Shooting Sports Foundation (NSSF), U.S. Sportsmen’s Alliance (USSA), and National Wild Turkey Federation (NWTF), the “Families Afield” program works to expand the opportunities for young hunters with adult mentors. The goal of the program is to increase the number of young people getting involved in hunting. For every 100 adult hunters today, only 69 youth hunters are coming up to take their place. “Families Afield” works to reverse that trend. Several states that were restrictive to youth hunting have signed into law “Families Afield” legislation. These new laws make it possible for young hunters and their families to enjoy hunting traditions together. CLICK HERE to learn more.
The National Shooting Sports Foundation (NSSF) has produced a GUN SAFETY Video that presents 10 fundamental rules of safe gun use. The video covers basic safe gun handling procedures, and it also explains how to transport guns safely, and how to secure them properly at home.
We know this stuff is familiar to most of our readers, but we recommend you watch the video as a refresher. Segments show how to safely unload different types of handguns and shotguns. That’s helpful for a rifle guy who may not have much familiarity with other types of arms. The video also explains how you can keep a handgun safe from kids and guests in the home, while still having quick access in an emergency. This video won’t win an Oscar, but it provides good, logical safety advice. If you help run a shooting club, you may want to embed the video into your club’s webpage.
Forum member Mark Dalzell (aka “MDSlammer”) is an avid long-range shooter and talented movie-maker. Some months ago, he produced a great video about shooting his Savage 110 BA at 1200 yards. That video was a hit with readers, and now Mark has come up with a new video, with the range pushed out to 2300 yards (that’s 1.3 miles!). Mark and his compatriots Dale Jorgensen and Gio Valdez headed out to their “secret spot” in the high desert, near Jean, Nevada, armed with a pair of 7mm RSAUMs and Mark’s .338 Lapua Magnum Savage 110 BA. Given the degree of difficulty, it’s not surprising that Mark’s gang had more misses than hits this time out, but they did produce an entertaining video that shows the challenges of shooting at Extreme Long Range.
Watch HD Video — Extreme Long-Range Shooting at 2300 Yards
Shooting 2300 Yards with the 7mm RSAUM and .338 Lapua Magnum
Target Cam Spotter: Wally Krusee
Film By Mark Dalzell – Sin City Productions / All Rights Reserved, Copyright 2012
Mark was shooting a Savage 110 BA .338 Lapua Magnum, the same gun he used for his previous 1200-yard high desert shooting safari. The elevation required to get on target at 2300 yards was mind-boggling. Elevation for Mark’s .338 LM was 96.5 MOA (on top of a +40MOA rail). Mark’s buddy Dale was running a full 30.5 MILs of elevation with his 7mm RSAUM with milrad optic.
Mark set up a wireless remote camera near the target, so you can see where the shots impacted. A second camera was behind the trigger-pullers, giving a “shooters’-eye view”. The target was a full-sized steel silhouette with an orange square painted in the middle.
Mark reports: “I was out this past Monday with a couple of buddies. We tried our luck shooting at 2300 yards. I had one hit out of 30. Very poor marksmanship. But I did learn a few things about shooting at this distance for the next time. I have nothing but admiration for those shooters who are consistent at this distance. [It was] pretty amazing.”
Equipment List and Load Specifications
Mark Dalzell
Dale Jorgensen
Gio Valdez
Savage BA110 .338 Lapua Magnum Murphy +40MOA Titanium Rail Harris bipod Nightforce 5.5-22x50mm NXS Speed Turret
7mm RSAUM Krieger 30″, 1:8.75″ twist Barrel with Ross Brake McRees Folder Chassis Harris Bipod Bushnell HDMR Scope
7mm RSAUM Krieger 28″, 1:9″ twist 5R Barrel with Ross Brake McRees Folder Chassis GG&G Bipod Bushnell H2DMR Scope
This 2010 story is reprinted at readers’ request.
In the past few years, tubeguns have really taken over in high power circles. At many matches you’ll see more tubeguns than conventional prone rifles, and a high percentage of those tubeguns will have been built using an Eliseo (Competition Machine) CSS chassis kit.
Step-By-Step Guide to Stock Set-Up
If you are a new tubegun shooter, or if you are planning a tubegun build this winter, German Salazar has prepared a comprehensive set-up guide for Eliseo tubeguns. Eliseo’s CSS chassis system affords a myriad of adjustments. Initially, one can be overwhelmed by all the variables: Length of Pull, Length to Sights, Length to Handstop, Cheekpad Height, Buttstock Offset, Buttstock Cant Angle, Handstop Angle, and Forearm Rotation.
In his Guide to Configuring the Eliseo Tubegun, Salazar shows how to adjust the Tubegun so that a shooter’s prone position is stable, repeatable, and comfortable. Salazar covers each adjustment, step by step. If you follow his instructions, starting with setting Length of Pull, you should find that your hold becomes more stable, the gun moves less from shot to shot, and your eye position relative to the sights is improved.
German explains the set-up process: “Adjusting the stock is a process that you must work at and it builds on itself. As you get one adjustment right, the others begin to fall into place. Our hope is that you take from this article a system for adjusting the stock, not an exact set of dimensions; and that you understand that it will take continuous work over a period of time to really refine the adjustments. Your goal is not to obtain a ‘perfect set of dimensions’ but rather a perfect feel that accomplishes the three objectives of stability, durability and comfort and the knowledge of how to change the adjustments to achieve those objectives under varying conditions such as sloped firing lines or other terrain features.”
Read More at RiflemansJournal.com German Salazar runs the excellentRifleman’s Journal website, where you will find dozens of informative articles like this story.


 Forum member Florian from Switzerland (SimplyRight.ch) has created an interesting new grid target for precision practice work.
 Nancy Tompkins has been working on a new Second Edition of her popular book: Prone and Long-Range Rifle Shooting. Nancy just announced that the final proof has been submitted to the printer (at last), and the book should be available in six weeks, i.e. early February, 2013. Nancy posted today: “Mid gave me roses last night after I sent the proof for book to the printer. Yay! After thousands of hours of work… I AM DONE! In six weeks it will be a book.”
 FMG Publications has partnered with renowned firearms instructor Clint Smith in a timely video covering the precepts of safe gun-handling. Commonly known as the “Four Gun Safety Rules,” these simple steps act as a safeguard, helping to prevent tragedy.


 Setting Magnification Levels
 SCATT Company has
  F-Class is a known-distance event, with targets of known dimensions that have markings (rings) of known sizes. Any ‘holding off’ can be done using the target face itself. Most ‘benefits’ of forward focal plain (FFP) optics are null and void here — they work great on two-way ranges where ‘minute of man’ is the defining criteria — but how many FFP scopes do you know of in the 30-40X magnification range? Very, very few, because what people who buy high-magnification scopes want is something that allows them to hold finer on the target, and see more detail of the target, not something where the reticle covers the same amount of real estate and appears ‘coarser’ in view against the target, while getting almost too fine to see at lower powers.
 Others use a

 The
The 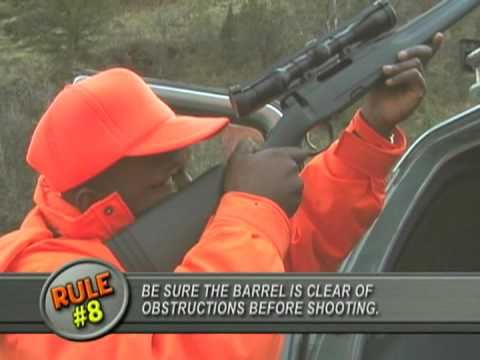

 Mark was shooting a Savage 110 BA .338 Lapua Magnum, the same gun he used for his previous 1200-yard high desert shooting safari. The elevation required to get on target at 2300 yards was mind-boggling. Elevation for Mark’s .338 LM was 96.5 MOA (on top of a +40MOA rail). Mark’s buddy Dale was running a full 30.5 MILs of elevation with his 7mm RSAUM with milrad optic.


 In his


