We know that many of our readers will be heading to Indiana soon to attend the F-Class National Championships at Camp Atterbury July 22-30. If you’ll be flying to Indiana this month, or venturing to another destination by air, you need to be careful when transporting firearms through airports both in the USA and in other countries. It is important that you comply with all Homeland Security, TSA, and Airline policies when transporting guns and ammunition. Following the rules will help ensure you (and your gear) make it to your destination without hassles, delays or (God forbid), confiscations.
Guidelines for Air Travel in 2021
To help our readers comply with rules and regulations for air travel, we offer these guidelines, courtesy “Ron D.”, a member of our Shooters’ Forum. Before he retired, Ron D. served as a Police Officer assigned to Chicago’s O’Hare airport. Here Ron offers some very important advice for shooters traveling with firearms and expensive optics.
First, Ron explains that airport thieves can spot bags containing firearms no matter how they are packaged: “Don’t think you’re safe if your guns are placed in cases designed for golf clubs or trade show items. Baggage is X-Rayed now and cases are tagged with a special bar code if they contain firearms. It doesn’t take long for bad guys to figure out the bar coding for firearms.”
Use Carry-On for Scopes and Expensive Items
Ron advises travelers to avoid placing very expensive items in checked baggage: “When traveling by air, carry on your rangefinder, spotting scope, rifle scope, medications, camera, etc. You would be surprised at the amount of people that carry-on jeans and shirts, but put expensive items in checked baggage. Better to loose three pairs of jeans than some expensive glass.”
Mark Bags to Avoid Confusion
Ron notes that carry-on bags are often lost because so many carry-on cases look the same. Ron reports: “People do accidentally remove the wrong bag repeatedly. I frequently heard the comment, ‘But it looks just like my bag.’ When de-planing, keep an eye on what comes out of the overhead that your bag is in. It’s easy to get distracted by someone that has been sitting next to you the whole flight. I tie two streamers of red surveyors’ tape on my carry-on bag.” You can also use paint or decals to make your carry-on bag more distinctive.
The 2021 NRA F-Class Nat’l Championships at Camp Atterbury, Indiana begin soon. The Mid-Range F-Class Nationals run July 22-26, 2021, while the Long Range F-Class Nationals take place July 27-30, 2021.
General Advice for Air Travelers
Ron cautions: “Keep your hands on your items before boarding. One of the most often heard comments from theft victims was, ‘I just put my computer down for a minute while I was on the phone.’ Also, get to the baggage claim area quickly. If your family/friends can meet you there, so can the opportunists. Things do get lost in the claim area. Don’t be a Victim. Forewarned is forearmed.”
Choosing a Rifle Transport Case
Ron advises: “Buy the best [rifle case] that you can afford. Don’t cry when your $3,000+ Benchrest rifle has a cracked stock or broken scope. Think about what it would be like to travel across the country (e.g. to Montana or the Cactus Classic) and arrive with a damaged rifle. Remember the Samsonite commercial. (For you younger shooters, it shows a monkey throwing the suitcase around in his cage at the zoo.) Baggage handling is NOT a fine art. There is no guarantee that your rifle case will be on top of all the other baggage. Then there is shifting of baggage in the belly of the plane. Ponder that for a while. Rifle and pistol cases must be locked. It doesn’t take a Rocket Scientist to figure out that a simple pry tool will open most case locks. There is not much that you can do to disguise a rifle case. It is what it is, and opportunists know this. Among thieves, it doesn’t take long for the word to get around about a NEW type of case.”
Plano Two-Gun Tactical Case
The Plano AW2 two-gun case offers the functionality and durability of an SKB-type hard case for HALF the money. This is now just $116.67, while the equivalent SKB is around $300.00.
This Plano AW2 two-gun case is Amazon’s #1 Best Seller in wheeled, heavy-duty firearms cases. This is offered in three sizes: 36″, 42″, and 52″. We like the biggest 52″ version, as it is long enough inside to fit most scoped match rifles. Alternatively, if you have a really long F-Class, ELR, or Palma rig, you can detach the barreled action from the stock, and run the two sections in the shorter 42″ case. This case is strong enough for airline travel, meeting FAA requirements for checked baggage. This Plano case offers a good balance between strength and weight, all for a reasonable cost — $116.67 on Amazon.
For those headed to the Nationals, we are sharing some smart tips from a past F-Class Champion who is both a great shooter AND a ballistics wizard. In 2015, Bryan Litz won the F-TR Mid-Range AND Long-Range National Championships hosted at Ben Avery. And at the 2014 Berger SW Nationals (SWN), Bryan took top honors among all sling shooters. If you only know Bryan Litz from his Applied Ballistics Books and DVDs, you may not realize that this guy is a also great marksman along with being an actual rocket scientist!
Given his impressive track record in both F-Class and Palma (Fullbore) out to 1000 yards, we asked Bryan if he had any advice for other long-range competitors.
First Bryan provided three tips concerning Ballistics, his special area of expertise. Next Bryan offered three more general tips about long-range competition — how to analyze your shooting, how to choose your ‘wind strategy’, and how to avoid the most costly mistakes, i.e. how to avoid the “train-wrecks”.
Bryan Litz won the 2015 F-TR Mid-Range and Long-Range Championships with this sleek rig:
Litz Ballistics Tips
Ballistics TIP ONE. If you’re having trouble getting your ballistic software to match actual drops, you need to look at a number of possible reasons. Here are some common issues that can cause problems.
Click Values Are Not Exact. Scopes and iron sights don’t always produce accurate adjustments. In other words, if your ballistics program predicts 30 MOA of drop, and you dial 30 MOA but hit low, it might be that your sight actually only moved 28 MOA (for example). To see if your sight is adjusting accurately, shoot a tall target at 100 yards and measure group separation when dialing your sight.
Barometric vs. Station Pressure. This is a commonly misunderstood input to ballistics programs. You can avoid this pitfall by remembering the following: station pressure is the actual measured pressure at your location, and you don’t need to tell the program your altitude when using station pressure. Barometric pressure is corrected for sea level. If you’re using barometric pressure, you also have to input your altitude.
Muzzle Velocity. Chronographs are not always as accurate as shooters think they are — your true MV may be off by 10-20 fps (or more). If your drop is different than predicted at long range, it might be because your muzzle velocity input is wrong.
Mixing Up BC (G1 vs. G7). Knowledgeable long range shooters know that the G7 standard is a more representative standard for modern LR bullets. However, using G7 BCs isn’t just a matter of clicking the ‘G7′ option in the program. The numeric value of the BC is different for G1 and G7. For example, the G1 BC of the Berger 155.5 grain Fullbore bullet is .464 but the G7 BC is .237. If you were to enter .464 but click on G7, the results would be way off.
Ballistics TIP TWO. A properly installed level is absolutely essential for long range shooting. Without a good level reference, your long range wind zero will be off due to minor canting of the rifle from side to side. You can verify that your level is installed correctly on a 100-yard ‘tall target’. Draw a plumb line straight up the target and verify that your groups track straight up this line as you go up in elevation.
Ballistics TIP THREE. If your long range ballistic predictions aren’t tracking, always come back and verify your 100-yard zero. Sometimes a simple zero shift can be misconstrued as errors in long range ballistics predictions.
Litz Competition Shooting Tips
Competition TIP ONE. Improving your scores in long range competition is a constant process of self-assessment. After each match, carefully analyze how you lost points and make a plan to improve. Beginning shooters will lose a lot of points to fundamental things like sight alignment and trigger control. Veteran shooters will lose far fewer points to a smaller list of mistakes. At every step along the way, always ask yourself why you’re losing points and address the issues. Sometimes the weak links that you need to work on aren’t your favorite thing to do, and success will take work in these areas as well.
Competition TIP TWO. Select your wind shooting strategy carefully. For beginners and veterans, most points are typically lost to wind. Successful shooters put a lot of thought into their approach to wind shooting. Sometimes it’s best to shoot fast and minimize the changes you’ll have to navigate. Other times it’s best to wait out a condition which may take several minutes. Develop a comfortable rest position so you have an easier time waiting when you should be waiting.
Competition TIP THREE. Actively avoid major train wrecks. Sounds obvious but it happens a lot. Select equipment that is reliable, get comfortable with it and have back-ups for important things. Don’t load on the verge of max pressure, don’t go to an important match with a barrel that’s near shot out, physically check tightness of all important screws prior to shooting each string. Observe what train wrecks you and others experience, and put measures in place to avoid them.
Today we feature a modern switch-barrel PRS chassis rifle set up for quick changes between 6mm Creedmoor and 6.5 Creedmoor barrels. The owner, Forum member Jeff Cosgrove (aka “Punkur67″) uses the 6 CM barrel for competition, favoring the reduced recoil over its 6.5 mm big brother. He does use the 6.5 CM barrel for practice (given its better barrel life). The 6.5 CM barrel also gives him the chance to shoot a variety of factory 6.5 Creedmoor ammo.
- Terminus Zeus action with Quick Change (QC) barrel option.
– 6mm Creedmoor Pre-Fit Bartlein Heavy Varmint 400MODBB barrel for matches
– 6.5 Creedmoor Pre-Fit Benchmark Heavy Palma barrel for training
– MPA BA Competition chassis with full weight kit
– Zero Compromise Optic ZCO 5-27x56mm FFP scope
– TriggerTech Diamond trigger
This rifle represents an evolution for Jeff. Each step along the way in his PRS journey, he has learned more about what he wants and needs in a competition rifle. And what you see here, from the $3760 ZC527 scope to his high-tech reloading equipment, represents pursuit of excellence. Jeff even created a modern, spacious man cave/reloading center in his new house (photos below).
Quick-Change Barrel System with Terminus Zeus QC Action
This rifle has two pre-fit barrels that work with the Terminus Zeus QC Action for fast and easy barrel swaps. To remove a barrel, you simply release two tension screws on the front of the action and then unscrew the barrel. To swap in a different pre-fit barrel, reverse the process and then tension the screws. The Terminus Zeus is 3-lug receiver with 60° bolt and integral recoil lug. Both the receiver and bolt are DLC-treated. Jeff reports this action is extremely smooth and has met all of his expectations. Some other Zeus features are threaded trigger pins for quick/easy trigger installation, and a roller-tipped cocking piece.
PRS Discipline Offers Fun, New Challenge for Long-Time Shooter
My name is Jeff Cosgrove, I live in Winchester, California and do commercial heating and air conditioning. I have shot for 20+ years but I found my interest in shooting was dwindling over time. I got somewhat bored with shooting paper at 100 yards or plinking cans out in the desert. About 18 months ago I decided I wanted to shoot long range. I picked up a used MPA in .300 Winchester Magnum and started shooting long range with a new buddy. That day I fell in love with guns all over again with more intensity than ever.
How I Got Started in PRS
With that new .300 WM I soon found my reloads were not up to my expectations (high ES/SD), so I purchased all new reloading hardware. One of my purchases was a used Benchsource Annealer. The guy I bought that from asked if I had ever tried PRS and he invited me to check out a match. So I went to a local PRS event as a spectator. I looked at many rigs on the firing line and took notes. By the end of the day I knew this was something I really wanted to do. I then acquired a used chassis rifle that I thought would work well for PRS. I went to a PRS match the following month but shot poorly.
After working with that first PRS rifle, a 6.5 CM with Stiller Tac30 action, MDT chassis, and Proof Carbon-wrapped barrel, I quickly learned that gun did not handle and balance the way I hoped.* It was too light in the front, the ergos were poor, and scope eye relief was not optimal. So I decided to build my own GEN 2 PRS rifle. This is the story of how I put together my new switch-barrel rig that I now use in competition.
PRS Rifle and Gear Selection — Learning What Works
Barrel availability was limited given the current shortages. Luckily I was able to obtain a 6mm Creedmoor pre-fit Bartlein Heavy Varmint 400MODBB from Southern Precision Rifles. The 6mm Creedmoor is notorious for being a barrel burner cartridge so I went with the special 400MODBB metal. Bartlein says that barrel life expectancy is 1.5 to 2 times longer than the standard 416 grade steel. I also purchased a 6.5 Creedmoor pre-fit Benchmark Heavy Palma barrel for training (Source: Straight Jacket Armory). With the Terminus Zeus quick change system I am able to swap from my match barrel to my trainer barrel in just a couple minutes. I loosen two set screws, unthread the barrel, thread the new barrel on, and torque the set screws to 10 inch-pounds. This also affords me caliber options in case I’m in a pinch for ammo. If I have some 6.5 CM loaded up and don’t have time to load 6mm Creedmoor for a match, then I’m covered.
For the trigger, I went with a TriggerTech Diamond Pro curve model. I have Timney, Jewell, and TriggerTech triggers in other rifles. I like them all but I liked the feel of the TT Diamond the best so that is what I used on this build. I set my triggers around 18-20 oz. — I am not a fan of ultra-light trigger pulls.
MPA BA Competition Chassis with Added Weight
I went with an MPA BA Comp chassis with full internal and external weight kit. I also have Gray Ops external weight on the handguard. I had the same chassis on my .300 WinMag and felt very comfortable with it. I took a PR1 class and found that, with a different gun, I had to force a comfortable hand position for proper trigger pull. After that class I grabbed my MPA and my hand fell in to the perfect position. I did not need to hunt or index my hand with the MPA. The built ARCA rail (RAT) lowered the rifles center of gravity more than my old setup with the ARCA rail bolted to the bottom of the handguard. With the current configuration, the rifle weighs in at 24 lbs. and balances three inches in front of the magwell. I now have the flexibility to add, subtract, or move approximately 6 lbs. of weight.
The Attraction of PRS/NRL Practical Competitions
I really enjoy PRS-style shooting because there seems to be a new challenge every time you compete — no matter what. With PRS I am shooting many different positions and ranges with the pressure of a stopwatch. This keeps things interesting for me. I have taken a few training classes to help establish good, clean fundamentals.
Jeff says it is hard to practice for the many unconventional shooting positions at PRS matches.
My biggest challenges so far have been: 1) building stable shooting positions that I have not practiced enough; 2) proper equipment selection; and 3) time management. Regarding the shooting positions — PRS/NRL is not like F-Class where you can always practice from one position. And it’s hard to practice for unusual set-ups (barriers and positions) you’ve not encountered before. Concerning equipment — you need some experience in the game to determine what really works best for you.
Innovative Zero Compromise Optic — Optimized for the Tactical Game
The scope is a Zero Compromise ZC527 (5-27x56mm FFP) with MPCT2 reticle. Zero Compromise Optic is a relatively new manufacturer, but their scopes are top-flight. The First Focal Plane ZCO has excellent glass that is extremely bright and clear. With a big 36mm main tube, the ZC527 offers 35 Mils Elevation and 21 Mils Windage adjustment. The field of view is 21 feet at 100 yards — one of the widest in the industry. The ZC527 also offers illuminated reticle and locking turrets. When I was at my first PRS match I looked through several different scopes. When I got behind a ZCO scope I knew this was what I wanted — the ZCO scope was super clear, super sharp, with very positive controls.
I put a protective wrap on the scope because with some of our PRS stages it is easy to scratch or dent the scope tube. You don’t want to bang up an expensive scope — the ZC527 retails for $3760.
Reloading for 6mm Creedmoor and 6.5 Creedmoor
When starting out with a new cartridge I like to search places like AccurateShooter.com and UltimateReloder.com for popular recipes used by knowledgeable shooters. I am all about paving your own way on certain things but with the consistency, higher cost, and limited supply of components these days I try to stick with the most common loads. I also want to limit barrel wear and get through load development quickly. I don’t want to chase loads for 300 rounds to ultimately land in the same place that so many other people have already found.
I start my new barrels with virgin brass and load three rounds at each charge weight in 0.2 grain increments. I put the most popular charge weight (for my chosen bullet) in the middle of my load range and load above and below to find a good node while paying close attention for pressure signs along the way. I use the 6.5 Guys spreadsheet (see below) to help analyze my results. With those results I like to re-test a narrower range with 5-10 rounds each charge weight in 0.2 grain increments. I again use the 6.5 Guys spreadsheet to make a final charge weight selection and then I move on to seating depth. I will load different depths to tighten the groups up.
Load Development Using 6.5 Guys Custom Spreadsheet
To hold and analyze my load development data I use the spreadsheet from 65Guys.com. It helps a ton with making a decision on your final load. This Excel spreadsheet works great and makes it simple to analyze your data. You can even copy and paste your chronograph data if your chrono logs on to a SD card.
In this 6.5 Guys video Steve provides an overview and tutorial for using the Excel load development analysis model that he has developed. The Excel Load Development Analysis Spreadsheet version 2.0 is FREE. Download from the 6.5 Guys Website.
In this video Steve explains some key statistical concepts for performing load data analysis. He also provides tips and guidance for determining the optimal load for your rifle as you analyze the load data you’ve collected.
New House, New Man Cave/Reloading Room
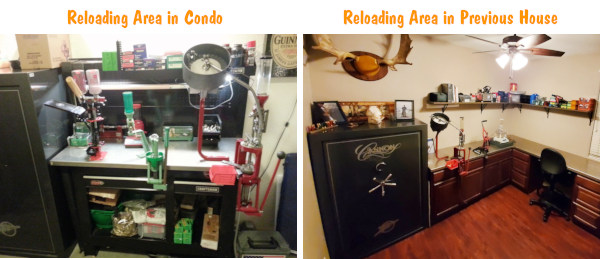
Jeff recently moved with his family into a great new house. One bonus of this move was that he upgraded from a cramped reloading area to a dedicated “Man Cave” that has ample space for his gun safes, multiple presses, and all his reloading components. Large upper and lower cabinets plus a dedicated “gun closet” provide plenty of storage. Read all about this move in this AccurateShooter Forum Thread.
Here is Jeff’s first reloading area years ago: “My first reloading setup was smashed in my two-bedroom condo so I had a very small bench that was very cluttered. I had to deal with the limited space I had but I made it work. Then in our first house I had a larger bench/cabinet, but it was still not ideal.”
Here is the new Man Cave in the new house — very open, spacious, with plenty of storage.
This animated GIF shows the new Man Cave move-in process start to finish:
As a cartridge case is reloaded multiple times, burnt powder residue and carbon builds up on the inside of the case. Unless the case interior is cleaned in some fashion, eventually you’ll see a slight reduction in case capacity. One of our Forum members from Australia wonders about the effects of reduced case capacity: “If the capacity of the case decreases as the crud builds up, then it effectively reduces the size of the cartridge (inside). Wouldn’t that change the pressure produced from that of an equivalent clean case?”
Interesting Test of Case Capacity Changes
Forum member Fred Bohl has actual test results that can help answer the above question. Fred proved that, over a 20-reload cycle, the case capacity of uncleaned cases did decline a small amount. However, surprisingly, this did not seem to affect the actual chronographed velocity of the load. Extreme Spread (ES) did increase, but Fred believes the higher ES was due to changes in case-neck tension, rather than due to the slight reduction in case capacity. Fred reports:
“Back when beginning to use ultrasonic case cleaning, part of the motivation was to get the inside clean based on the assumption that allowing burnt residue to build up inside cases would affect capacity, and, ultimately, performance. An experiment was done to test this hypothesis. The load used, 30.5 grains of RL15 behind 107gr SMKs in a 6mmBR, was selected for best group and lowest ES in prior load development. It turned out to be 92% of initial case capacity and neither “full” or compressed. (I would suspect that different powders, load weight, and total case capacity might produce very different results.)
We took 30 cases of identical initial capacity and tracked three lots of 10 each:
LOT 1: No Internal cleaning LOT 2: Cleaned with media in tumbler LOT 3: Cleaned with Ultrasound machine
Each case (in each lot) was shot and reloaded 20 times. The simplified results after 20 reloads of each lot were as follows:
Lot 1 (not cleaned) – 0.3 to 0.4 gr. loss of capacity, 5 to 8 fps greater ES.
Lot 2 (tumble cleaned) – 0.1 to 0.3 gr. loss of capacity, 4 to 6 fps greater ES.
Lot 3 (ultrasonic cleaned) – no loss of capacity, no detectable change in ES.
FINDINGS There was no detectable correlation of velocity change to the lots. An oddity was that on very hot days Lot 1 velocities were, occasionally, slightly higher. From results of another ongoing test, I believe the above differences in ES are probably due more to variance in bullet grip tension than case capacity. The ultrasound cleaned cases (LOT 3) did maintain the lowest ES, but we are not 100% sure of the reasons why. More consistent bullet seating might be the reason.”
Editor’s NOTE: Fred’s results do suggest that carbon build-up inside the uncleaned cases might cause a slight increase in pressure that shows up on hot days. Fred has posted that: “A local shooter reported doing the 20 reload, no-clean test on a .308 that gave a loss of capacity of 2.0 grains, doubled ES and significant velocity changes. However, I don’t have any details on his load weight or powder.” Obviously a lot of carbon can build up with 20 reloads. Many shooters retire their brass before then.
Ultrasonic Cleaning and Neck Lube
Some time ago, Jason Baney did a lengthy test on ultrasonic cleaning. Jason found that with his ultrasonically-cleaned cases, the inside of the necks got so “squeaky clean” that he needed to use dry lube in the necks. Jason uses the $21.50 dry lube kit from Neconos.com. This applies ultra-fine Moly powder to the neck interior using small carbon steel balls.
About Jerry Miculek… The Man, The Myth, The Legend
The video above begins: “My name is Jerry Miculek. Guns are what I do.” Jerry Miculek is a true legend in the firearms community. Acknowledged as the best wheelgun speed-shooter in history, Jerry is also an accomplished rifle and shotgun shooter with many class victories in 3-Gun competition. He also has been a prolific YouTube Video creator. For this Saturday at the Movies story, we are featuring five notable Jerry Miculek videos. You will find over 200 more informative and entertaining videos on the Jerry Miculek Pro Shooter YouTube channel
Here Jerry shoots two, double-barrel .45 ACP 1911 pistols (AF2011) at the same time, one in each hand. Jerry was the first-ever person to accomplished this 4-barrel feat with twin handguns. Employing the dual double-barreled pistols, Jerry send 20 rounds downrange in under 1.5 seconds. This amazing sequence is captured with hi-speed cameras for vivid slow-motion playback. There are some spectacular close-ups as the bullets leave the muzzles. Worth watching!
2. Take-Down and Full Cleaning of AR-15
If you want to keep your black rifle running smoothly and reliably, you must clean it regularly and follow the correct maintenance procedures. In this video, Jerry Miculek takes down and cleans an AR-platform rifle belonging to his daughter Lena. This is a good video because Lena’s rifle was “run hard and packed up dirty” so you can see where carbon and grease build up. This 35-minute video is very thorough. Jerry is one of the nation’s top action carbine shooters, so listen carefully to his advice on cleaning and lubrication.
3. Jerry Reviews Magnetospeed T1000 Target Impact Indicator
MagnetoSpeed makes more than barrel-mounted chronographs. The T1000 is a target hit indicator that illuminates a super-bright red light when you hit a steel target. The T1000 was designed to be mounted to the back side of AR500 steel targets. In this video Jerry tests the MagnetoSpeed T1000 indicator light system. We like the T1000, especially for longer ranges where impacts on plates may not be easily visible. And you never have to paint your steel targets again to show impacts!
4. Shooting 240 Yards with 85-Year-Old K-22 Rimfire Revolver
Jerry Miculek is probably the greatest (certainly speediest) revolver shooter in history. He has set multiple world records with Smith & Wesson wheelguns. Here he tests a true classic — an 85-year-old S&W model K-22 revolver chambered for the .22 LR rimfire cartridge. Jerry uses this handsome classic blued revolver to hit targets at 240 yards!
5. 80,000 Philippine M1 Garands in One Place
Last year Jerry Miculek recently the CMP where he looked at the vast inventory of military rifles, including 80,000+ M1 Garands recently received from the Philippines. CMP tech staff showed Jerry some rare Garands that had never been issued. If you’re interested in classic military arms, you should definitely watch Jerry’s video. Gina Johnson, CMP’s general manager, told Guns.com that: “We have roughly 86,000 rifles from the Philippines and roughly 13,000 rifles from Turkey in our possession”.
Along with the 80,000+ Philippines Garands, the CMP received 13,000 from Turkey. The arrival of these 99,000 M1 Garands is great news for rifle collectors. Garands have been in short supply in recent years. Garands were getting harder to acquire from the CMP. In fact, over the past two years, many common Garand varients have been “sold out” on the CMP site.
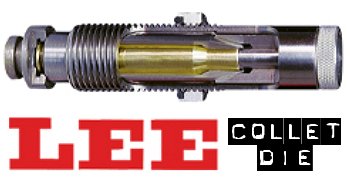
Editor’s NOTE: We generally recommend full-length sizing your cases. But there may be some situations where you may want to body-size your brass in one operation, and then neck-size the case as a final operation for reduced run-out. Or, perhaps you have a non-bushing FL sizing die and you want to modify the neck sizing. This article explains how to use a Lee Collet Die to size case-necks.
For those who prefer to neck-size their brass (rather than full-length-size), the LEE Collet Die is a popular, inexpensive option. It works by having collet tangs or “fingers” press the neck against a central mandrel. A collet squeezes the case neck against a precision mandrel for a perfect fit with minimum run-out. The benefit is that you get a very straight neck, which is sized consistently from top to bottom. Canadian shooter Jerry Teo explains: “LEE Collet Dies produce sized cases with very low runout (measured runout is under .001″ using a Sinclair concentricity gauge). You also don’t get the build-up of brass at the base of the neck, as can happen with bushing neck dies. The neck-shoulder junction stays nice and crisp.”
Here’s a good video that explains how to use a Lee Collet Die to Neck-Size .243 Win brass:
UPDATE to LEE Collet Dies — Neck Protrusion Change
The Lee Precision website notes a small design change: “If you’re a long-time user of Lee Collet Neck Sizing Die you may notice we have modified the Collet so a small portion of the neck protrudes through the end of the Collet-sizing portion. This often-requested modification was implemented in 2019. This change allows the portion of the neck that protrudes above the Collet to remain in its fire-formed condition. This provides a natural flare to the case neck allowing easy and concentric seating of bullets. This is especially important when seating cast bullets or low-drag coated bullets.”
TIP ONE — Adjusting Tension
LEE Collet dies don’t have a specific mechanical adjustment for neck tension. But you CAN easily modify the die to provide more or less tension. If you want to adjust the neck tension using a Lee Collet die, you can simply chuck the mandrel in a drill and reduce the diameter with some sand-paper (to increase neck tension) or you can order a mandrel the next caliber larger and turn it to whatever diameter you want (the larger the mandrel diameter, the less the neck tension). You can also order custom mandrels from Lee sized to any diameter you want.
Regarding neck tension, Boyd Allen makes an important point: “The only way to properly get more neck tension with collet dies is to either reduce the diameter of the mandrel, or order a smaller-diameter mandrel from Lee. I remind folks that adjusting the die position to have more toggle at the top of the ram stroke (not the factory recommended method), or leaning on the press handle with more force than recommended will NOT increase neck tension.”
No Custom Lee Collet Dies For Now
In years past, Lee also offered Custom Collet Dies, made from two fired cases. Hopefully these will be available in the future. However, earlier this year, Lee announced it had suspended sale of most custom dies including Collet Dies: “March 17, 2021: Due to unprecedented order volume, we have suspended custom services for Collet Necksizing Dies, Full-Length Sizing Die Sets, Quick Trim Dies, Case Length Gauges, Factory Crimp Dies, and Bullet Molds until we are able to meet the required volume of our standard products.”
TIP TWO — Polish and Tune for Easy Case Removal
Some users have complained that their Collet Dies grab the case-neck too firmly, making the case hard to remove. There are solutions to this problem. First inspect the collet fingers and smooth the inner surface up a bit with polishing compound or an extra-fine sanding pad. Second, you can open up the fingers a little bit. LEE recommends that if your Collet Die is sticking, take a steel punch and tap the fingers apart a little bit so that the natural “unloaded” position is wider. Lastly, you should lightly lubricate the outside of the collet fingers (see arrows) before you re-assemble the die. This will ensure they slide smoothly. Also, to prevent the collet fingers from closing too tight, never load up the die with your press without putting a case in place first. Without a case neck between the collet fingers and the mandrel, the collet can clamp itself too tight as you raise the ram.
TIP THREE — Always Have a Case Inside When Operating Collet Die
Our friend Boyd Allen tells us that you need to follow directions and NEVER operate the die without a case inside. Boyd explains: “This is because doing so will spring the quadrents of the collet inward so that they interfere with the insertion of a case, and the user will have to figure out how to undo the damage if the die is to operate properly. This advice would not be needed if everyone read the instructions before using the die…. but many times, they don’t. Another thing that I tell new users is to take the die apart so that they will have a better chance of understanding how it works.”
TIP FOUR — Size Twice and Spin Your Case 1/8th Turn
After reaching fully “down” on your press handle, withdraw the case about an inch and manually rotate it about 1/8th (NOT 1/4 or 1/2) turn while still in the shell-holder, then size again. This will place the die’s collet petals on the four “high spots” of the case neck and will result in a rounder, more evenly-sized neck with slightly more bullet tension. This takes only about one second more per case and is well worth the slight extra effort. (We thank reader Stonecreek for this smart tip).
PMA Tool offers lightweight yet sturdy cleaning cradles that are handy, affordable, and easy to transport. PMA’s single-gun cradle, priced at $85.95, is ideal for benchrest rigs. It measures about 17″ in length and weighs about one pound. PMA now also offers a double cradle for $119.95 and a triple cleaning cradle for $225.95. All these cradle type secure your rifle(s) in a muzzle-down position that allows easy cleaning and prevents solvents from running back into the action. The front “saddle” and all contact surfaces are covered by thick silicone rubber padding which grips the rifle securely yet protects the stock and components from scratches. Various front saddle widths are offered: 2.5″, 3″, 4″, 5″ and 6″.
These cradles are most commonly sold with a 3″-wide front saddle for Benchrest and F-Open style stocks, or a 2.5″-wide front saddle for rifles with narrower fore-ends such as those found on Hunter Class and varmint stocks. In addition, you can get 4″-wide, 5″-wide, and even 6″-wide saddles for the big, long range benchrest rifles.
Double Rifle Cradle is a Smart, Versatile Design
PMA’s double rifle cleaning cradle was was designed from the ground up to work perfectly for two rifles side-by-side. Using the same tie bar and protective saddles found on the single cradel, PMA widened the base and created new uprights to support the saddles, making the cradle as narrow and light as possible, while retaining all the protective and non-slip features from our single unit.
This PMA Tool double cradle unit is available with twin 3″ front saddles, double 2.5″ front saddles or combination 3″ / 2.5″ front saddle configurations to accommodate different classes of benchrest rifles.
If you purchased Winchester or Browning 9mm Luger (9x19mm Parabellum) ammunition this year, you should check your lot numbers. Olin Winchester is recalling numerous lots of 9mm Luger 115 grain Full Metal Jacket and 115 grain Jacketed Hollow Point pistol ammunition. The problem is the ammo may yield “squib” loads that could leave a bullet in the barrel. With a subsequent shot, this could be very dangerous. The affected 9mm ammo products have symbols: Q4172, RED9, USA9JHP, USA9MMVP, USA9W, WW9B.
NOTE: The ammunition Lot Number is stamped on the cartons as shown below:
NOTE: Winchester states “If ammunition of the above Symbols was purchased BEFORE March 25, 2021, it is NOT subject to the recall.” This recall notice applies only to the above 9mm Luger 115 FMJ and JHP Symbols with the above Lot Numbers.
Safety Issue Leading to Recall: Winchester has determined the above lots of 9mm Luger 115 FMJ/JHP ammunition may contain propellant that does not properly ignite and burn when the cartridge is fired. Ammunition containing propellant that does not properly ignite and burn may result in a bullet remaining in the barrel (i.e. a bullet-in-bore obstruction). Firing a subsequent bullet into the bore obstruction could cause firearm damage, rendering the firearm inoperable and subjecting the shooter and bystanders to a risk of serious personal injury.
How to Check Your Ammo: To determine if your ammunition is subject to this recall, review the Symbol and Lot Number. If it is any of the above Symbols and Lot Numbers, immediately discontinue use and contact Winchester toll-free at 844-653-8358 for free UPS pick-up of the recalled ammunition. Upon receipt of your recalled ammunition, Winchester will ship replacement ammunition directly to you or issue you a reimbursement check.
If you have any questions concerning this 9mm Luger 115 FMJ / JHP pistol ammunition recall please call toll-free 844-653-8358, write to Winchester (600 Powder Mill Road, East Alton, IL 62024 Attn: 9mm Luger Recall), or visit our website at Winchester.com.
BROWNING 9mm Luger Ammo Recall NOTICE
Along with the Winchester ammo recalled, Browning Ammunition is recalling the following lots of Browning 9mm Luger 115 grain Full Metal Jacket pistol ammunition: Symbol B191800092 with Lot Numbers SC13LD20, or SD10LD20.
The reason for the Browning Recall is the same as for the Winchester 9mm Luger ammunition — possible “squib” loads that could leave a bullet in the barrel of the gun.
DO NOT USE BROWNING 9mm Luger 115 FMJ SYMBOL B191800092 THAT HAS LOT NUMBER SC13LD20 or SD10LD20. The ammunition Lot Number is stamped on the 50-round carton as indicated here:
Browning Ammunition has determined the above lots of 9mm Luger 115 FMJ ammunition may contain propellant that does not properly ignite and burn when the cartridge is fired. Ammunition containing propellant that does not properly ignite and burn may result in a bullet remaining in the barrel (i.e., a bullet-in-bore obstruction). Firing a subsequent bullet into the bore obstruction could cause firearm damage, rendering the firearm inoperable and subjecting the shooter and bystanders to a risk of serious personal injury.
This notice applies only to Symbol B191800092 with Lot Number SC13LD20 or SD10LD20. Other Symbols or Lot Numbers are not subject to this recall. Note: If ammunition was purchased before March 25, 2021, it is NOT subject to the recall.
If you have any questions concerning this 9mm Luger 115 FMJ pistol ammunition recall please call toll-free 844-653-8358, write to Browning Ammunition (600 Powder Mill Road, East Alton, IL 62024 Attn: 9mm Luger Recall), or visit our website at Browningammo.com.
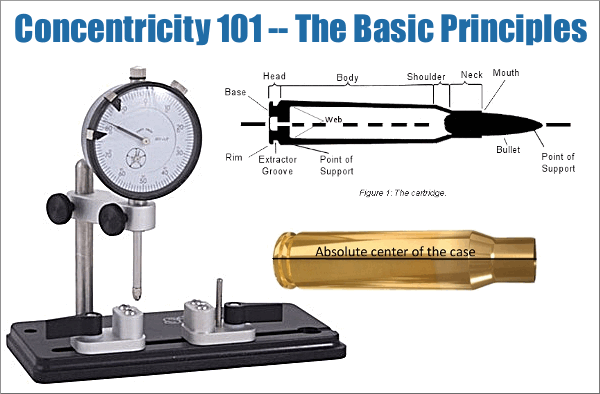
Sinclair Internationalhas released an interesting article about Case Concentricity* and bullet “run-out”. This instructional article by Bob Kohl explains the reasons brass can exhibit poor concentricity, and why high bullet run-out can be detrimental to accuracy.
Concentricity, Bullet Alignment, and Accuracyby Bob Kohl
The purpose of loading your own ammo is to minimize all the variables that can affect accuracy and can be controlled with proper and conscientious handloading. Concentricity and bullet run-out are important when you’re loading for accuracy. Ideally, it’s important to strive to make each round the same as the one before it and the one after it. It’s a simple issue of uniformity.
The reason shooters work with tools and gauges to measure and control concentricity is simple: to make sure the bullet starts down the bore consistently in line with the bore. If the case isn’t properly concentric and the bullet isn’t properly aligned down the center of the bore, the bullet will enter the rifling inconsistently. While the bore might force the bullet to align itself with the bore (but normally it doesn’t), the bullet may be damaged or overstressed in the process – if it even it corrects itself in transit. These are issues we strive to remedy by handloading, to maintain the best standard possible for accurate ammunition.
The term “concentricity” is derived from “concentric circle”. In simple terms it’s the issue of having the outside of the cartridge in a concentric circle around the center. That goes from case head and center of the flash hole, to the tip of the bullet.
Factors Affecting Concentricity
The point of using this term is to identify a series of issues that affect accurate ammunition. Ideally this would work best with a straight-walled case; but since most rifle cartridge cases are tapered, it equates to the smallest cross section that can be measured point by point to verify the concentric circle around the center. For the examples below, I’m working with .308 Winchester ammo.
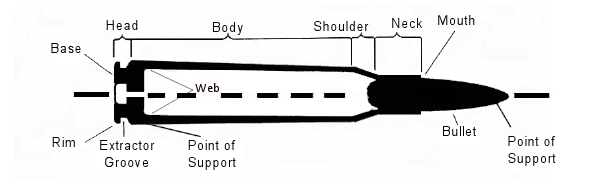
Figure 1: The cartridge.
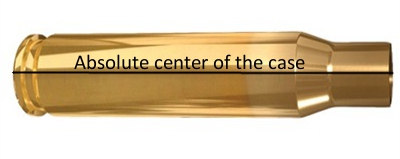
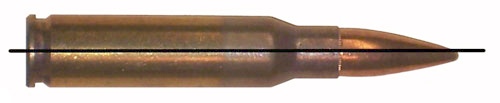
Figure 2: Centerline axis of the case, extending from flash hole to case mouth.
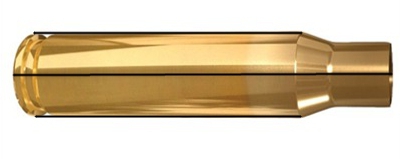
The case walls have to be in perfect alignment with the center, or axis, of that case, even if it’s measured at a thousandth of an inch per segment (in a tapered case).
Figure 3: Case body in alignment with its axis, or centerline, even in a tapered case.
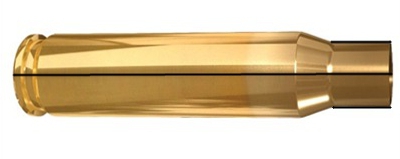
The case neck must also be in alignment with its axis. By not doing so you can have erratic bullet entry into the bore. The case neck wall itself should be as uniform as possible in alignment and in thickness (see the M80 7.62x51mm NATO cartridge in Figure 5) and brass can change its alignment and shape. It’s why we expand the case neck or while some folks ream the inside of the neck and then turn the outside for consistent thickness, which affects the tension on the bullet when seated.
Figure 4: Neck in alignment with center of the case axis.
Figure 5: Variations in case neck wall thickness, especially on some military brass, can cause an offset of the bullet in its alignment. This is an M80 ball round. Note the distinct difference of the neck walls.
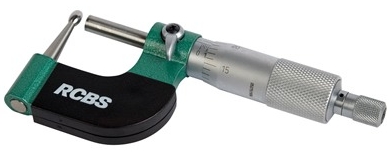
Having a ball micrometer on hand helps, especially with military brass like 7.62x51mm in a semi-auto rifle, where there are limits as to how thin you want the neck walls to be. In the case of 7.62 ball brass you want to keep the wall to .0145″.
Figure 6: A ball micrometer like this RCBS tool (#100-010-268) can measure case neck thickness.
Turning the outside of the neck wall is important with .308 military cases regardless of whether you expand or ream the neck walls. There are several outside neck turning tools from Forster, Hornady, Sinclair, and others. I’ve been using classic Forster case trimming (#100-203-301) and neck turning (#749-012-890) tools for 40 years.
Bullet Run-Out
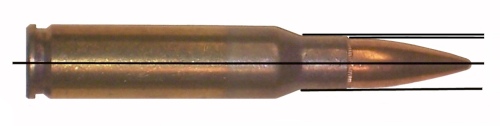
The cartridge, after being loaded, still needs to be in alignment with the center of the case axis. Figure 7 shows a bad example of this, a round of M80 ball. A tilted bullet is measured for what’s known as bullet “run-out”.
Figure 7: An M80 round with the bullet tilted and not aligned with the axis. This will be a flyer!
Run-out can be affected by several things: (1) improperly indexing your case while sizing, which includes not using the proper shell holder, especially while using a normal expander ball on the sizing die (it also can stretch the brass). (2) The head of a turret press can flex; and (3) improper or sloppy bullet seating. This is also relevant when it comes to using a progressive press when trying to load accuracy ammo.
Mid Tompkins came up with a simple solution for better bullet seating years ago. Seat your bullet half way into the case, back off the seater die and rotate the case 180 degrees before you finish seating the bullet. It cuts down on run-out problems, especially with military brass. You also want to gently ream the inside of the neck mouth to keep from having any brass mar the surface of the bullet jacket and make proper seating easier. A tilted bullet often means a flyer.
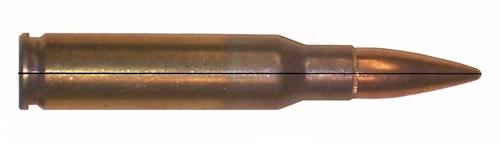
Figure 8: Proper alignment from the center of the case head to the tip of the bullet.
(NOTE: This links to a Web Archive of the original Sinclair Int’l article.)
*Actually some folks would say that if we are talking about things being off-center or out-of-round, we are actually talking about “eccentricity”. But the tools we use are called “Concentricity Gauges” and Concentricity is the term most commonly used when discussing this subject.
Story Tip from EdLongrange. We welcome reader submissions.
Dual-Lock Technology: Cannon offers an innovative combined digital/mechanical lock system. This dual-access lock provides the rapid access of an electronic lock backed up by the assurance of a manual (rotary dial) combination lock.
Electronic (Keypad) Lock vs. Manual (Rotary) Lock
Smart gun owners know they need a good, solid gun safe. But when choosing a gun safe, what kind of lock should you select — electronic or mechanical? Both types have their advantages and disadvantages. This article will help you make the right choice for your needs and also get the most reliable performance from either type.
Gunsafes can be fitted with either an electronic keypad-style lock, or a conventional dial lock. In our Gunsafe Buyer’s Guide, we explain the important features of both dial and electronic lock systems. Many safe-makers will tell you that consumers prefer electronic locks for convenience. On the other hand, most of the locksmiths we’ve polled believe that the “old-fashioned” dial locks, such as the Sargent & Greenleaf model 6730, will be more reliable in the long run.
Here is the opinion of RFB from Michigan. He is a professional locksmith with over two decades of experience servicing locks and safes of all brands and types:
What a Professional Locksmith Says:
For the convenience of quick opening, the electronic locks can’t be beat. However, for endurance and years of trouble-free use, the electronics can’t compare with the dial lock.
I’ve earned my living, the past 22 years, servicing locks of all types. This includes opening safes that can’t otherwise be opened. I do warranty work for several safe manufacturers (including Liberty). What I’ve learned in all those years is that manual dial locks have very few problems. The most common is a loose dial ring which can shift either left or right, which will result in the index point being in the wrong place for proper tumbler alignment. This is simple to fix.
Electronic locks, however, can have all kinds of issues, and none (except bad key-pad) are easy to fix, and when one goes bad, it must be drilled into to open it. IMO, it’s not a matter of ‘if’ an electronic lock will ultimately fail, but a matter of ‘when’ it will fail. Over the past 10 years or so, since electronics have become more and more prevalent, I’ve had to drill open bad electronic locks vs. bad manual dial locks on a ratio of about 20-1.
My professional opinion is to get the manual dial lock, unless you’ve got a good friend who is a locksmith/safecracker.
How Secure is Your Lock?
RFB tells us that both dial and electronic locks offer good security, provided it’s a good quality lock made by LaGard, Sargent & Greenleaf, Amsec, or Kaba/Ilco. However, RFB warns that “Some of the ‘cheaper’ locks (both manual and electronic) however, are very simple to bypass.
An electronic lock that’s glued or ‘stuck’ to the door with double-sided tape, and has its ‘brain’ on the outside of the lock in the same housing as the keypad, and merely sends power to an inner solenoid via a pair of wires through the door, is a thief’s best friend. The good ones have the brain inside the safe, inaccessible from the outside.
No amateur can ‘manipulate’ either a good manual or electronic lock. Both give you a theoretical one million possible combinations. I say ‘theoretical’ because there are many combinations that cannot, or should not, be used. You wouldn’t set your combo on a dial lock to 01-01-01 etc., nor would you set an electronic to 1-1-1-1-1-1, or 1-2-3-4-5-6.”
Tips for Dial Locks
RFB notes that “The speed, and ease of use, of a manual dial lock can be improved upon, simply by having your combo reset using certain guidelines. Avoid high numbers above 50. Having a 1st number in the 40s, 2nd number anywhere from 0-25, and 3rd number between 25 and 35 will cut dialing time in half, without compromising security. (For mechanical reasons I won’t get into here, the 3rd number of a good manual dial lock cannot — or should not — be set to any number between 95 & 20).”
Tips for Electronic Locks
Electronic locks can have the combination changed by the user much more easily than dial locks. That should be a good thing. However, RFB explains: “That can be a double-edged sword. More than a few times I’ve had to drill open a safe with an electronic lock that has had the combo changed incorrectly by the user, resulting in an unknown number that nobody can determine. Also, don’t forget that electronic locks have a ‘wrong-number lock-out’. I would NOT rely on the normal quickness of an electronic 6-number combo in an emergency situation. If for any reason (panic etc.) you punch in the wrong number several times, the lock will shut down for a 5-minute ‘penalty’.
Replace Electronic Lock Batteries Every Year
To get the most life out of any electronic (keypad Lock), you should change the battery at least once a year, whether it needs it or not. Low voltage won’t necessarily shut down the lock, but using it in a low voltage situation is bad for the electronics, and eventually will cause lock failure. So, If you do nothing else to maintain your digital-lock safe, replace the battery every year. And get a fresh battery (with a release date) from the store — don’t just pull a battery out of a storage bin, even if it’s never been used. Old batteries can degrade, even when in storage.


 First, Ron explains that airport thieves can spot bags containing firearms no matter how they are packaged: “Don’t think you’re safe if your guns are placed in cases designed for golf clubs or trade show items. Baggage is X-Rayed now and cases are tagged with a special bar code if they contain firearms. It doesn’t take long for bad guys to figure out the bar coding for firearms.”


 The
The 




 TIP ONE — Adjusting Tension
 TIP TWO — Polish and Tune for Easy Case Removal




 Gunsafes can be fitted with either an electronic keypad-style lock, or a conventional dial lock. In our
  Tips for Dial Locks
 Replace Electronic Lock Batteries Every Year


